
CPL3DMX - Lighting Controller Monacor - Free user manual and instructions
Find the device manual for free CPL3DMX Monacor in PDF.
User questions about CPL3DMX Monacor
0 question about this device. Answer the ones you know or ask your own.
Ask a new question about this device
Download the instructions for your Lighting Controller in PDF format for free! Find your manual CPL3DMX - Monacor and take your electronic device back in hand. On this page are published all the documents necessary for the use of your device. CPL3DMX by Monacor.
USER MANUAL CPL3DMX Monacor
DMX Interface and Controller for 12 V or 24 V LEDs

WWW.IMGSTAGELINE.COM
CPL-3DMX
DMX Interface and Controller for 12 V or 24 V LEDs
These instructions are intended for users with basic knowledge in DMX control. Please read these instructions carefully prior to operating the unit and keep them for later reference.
All operating elements and connections described can be found on page 2.
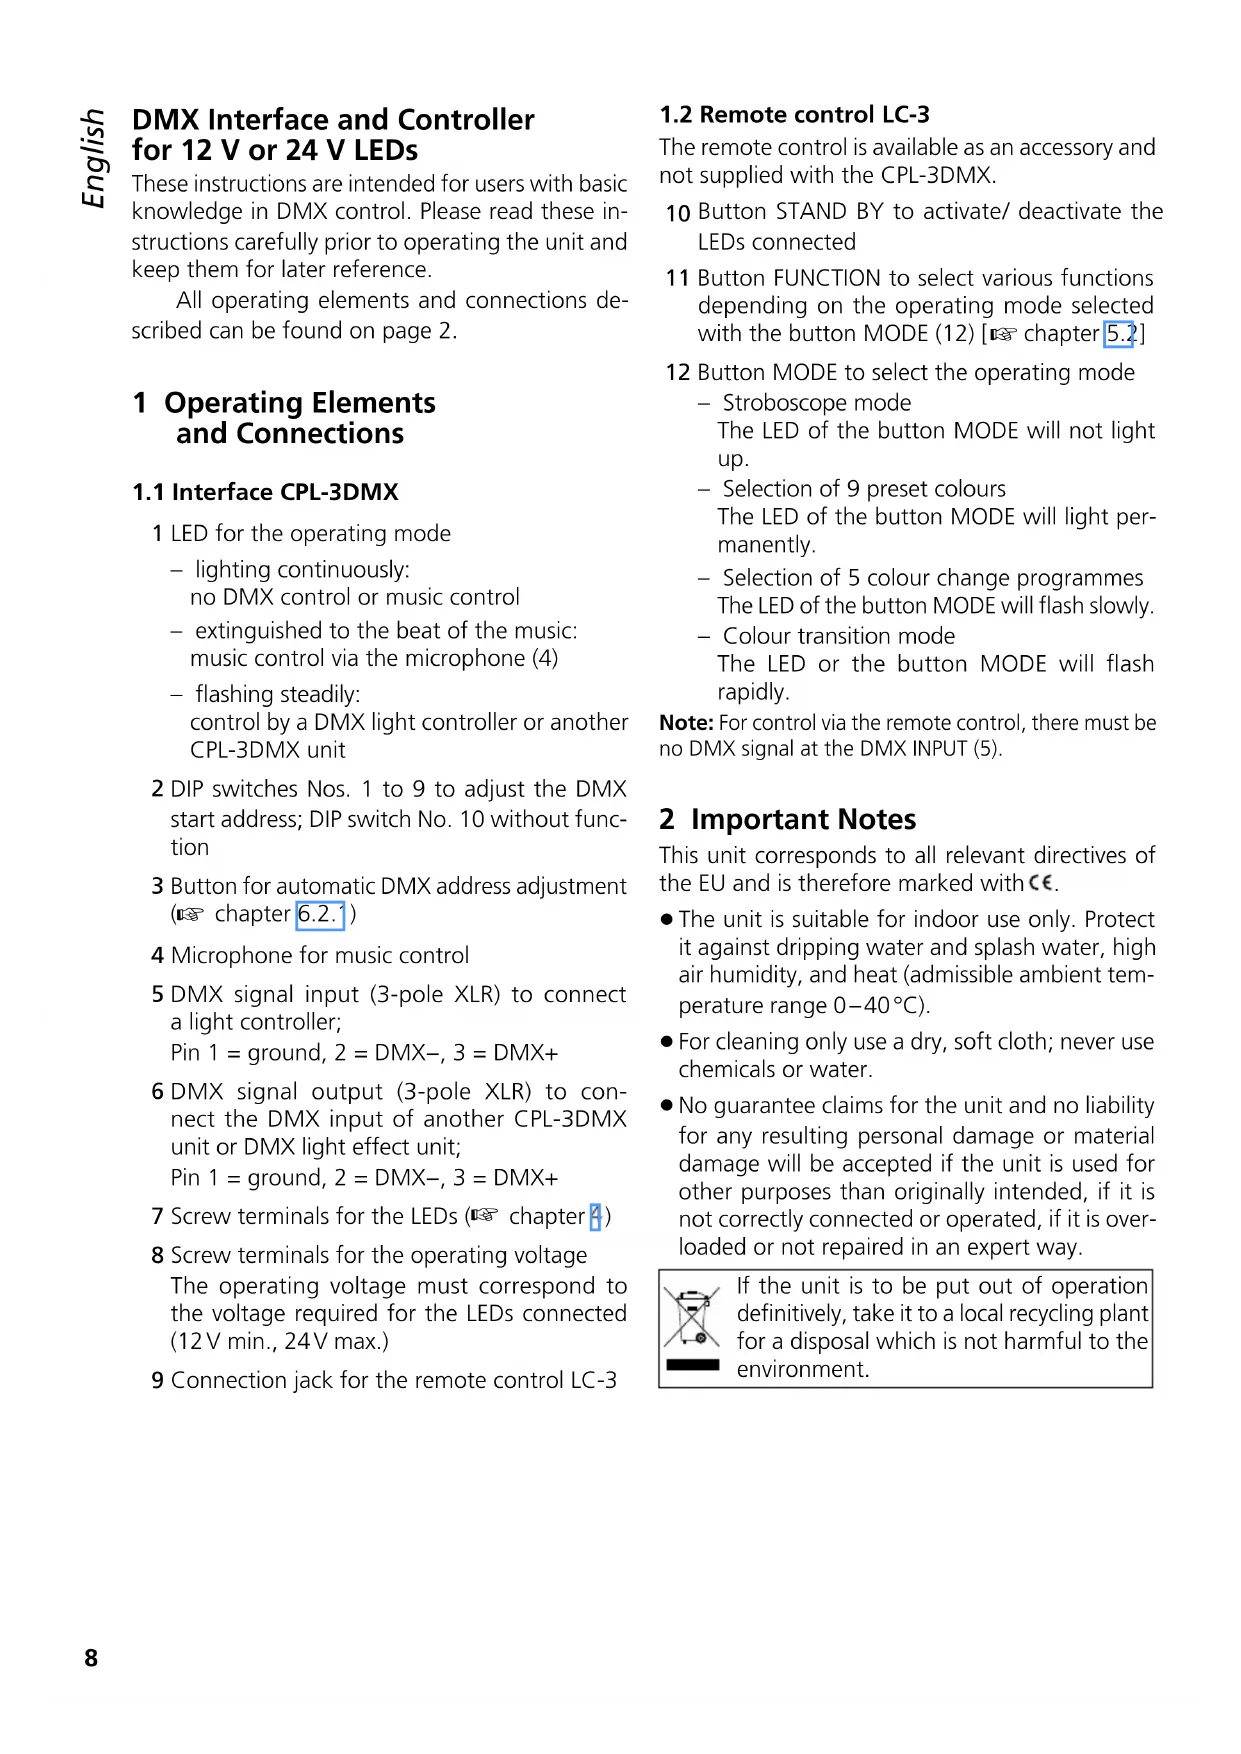
1 Operating Elements and Connections
1.1 Interface CPL-3DMX
1 LED for the operating mode
- lighting continuously: no DMX control or music control
extinguished to the beat of the music: music control via the microphone (4) - flashing steadily: control by a DMX light controller or another CPL-3DMX unit
2 DIP switches Nos. 1 to 9 to adjust the DMX start address; DIP switch No. 10 without function
3 Button for automatic DMX address adjustment (6.2.)
4 Microphone for music control
5 DMX signal input (3-pole XLR) to connect a light controller; Pin 1 = ground, 2 = DMX-, 3 = DMX+
6 DMX signal output (3-pole XLR) to connect the DMX input of another CPL-3DMX unit or DMX light effect unit; Pin 1 = ground, 2 = DMX-, 3 = DMX+
7 Screw terminals for the LEDs ( chapter 4)
8 Screw terminals for the operating voltage The operating voltage must correspond to the voltage required for the LEDs connected (12V min., 24V max.)
9 Connection jack for the remote control LC-3
1.2 Remote control LC-3
The remote control is available as an accessory and not supplied with the CPL-3DMX.
10 Button STAND BY to activate/ deactivate the LEDs connected
11 Button FUNCTION to select various functions depending on the operating mode selected with the button MODE (12) [5.2]
12 Button MODE to select the operating mode
- Stroboscope mode
The LED of the button MODE will not light up.
Selection of 9 preset colours The LED of the button MODE will light permanently. - Selection of 5 colour change programmes The LED of the button MODE will flash slowly.
Colour transition mode The LED or the button MODE will flash rapidly.
Note: For control via the remote control, there must be no DMX signal at the DMX INPUT (5).
2 Important Notes
This unit corresponds to all relevant directives of the EU and is therefore marked with
- The unit is suitable for indoor use only. Protect it against dripping water and splash water, high air humidity, and heat (admissible ambient temperature range 0 - 40^ ).
- For cleaning only use a dry, soft cloth; never use chemicals or water.
- No guarantee claims for the unit and no liability for any resulting personal damage or material damage will be accepted if the unit is used for other purposes than originally intended, if it is not correctly connected or operated, if it is overloaded or not repaired in an expert way.
If the unit is to be put out of operation definitively, take it to a local recycling plant for a disposal which is not harmful to the environment.
3 Applications
The unit CPL-3DMX is used to control LEDs or LED chains requiring an operating voltage between 12V= and 24V= . The consumption of the LEDs connected must not exceed 1.5 A per channel (R, G, B). The following items from the product range of IMG STAGE LINE can be operated with the CPL-3DMX, e. g.
Chains with RGB LEDs
(emission of red, green and blue by one LED respectively, allowing any combination colour)
LEDS-.../RGB
Chains with red (RT), green (GN) or blue (BL) LEDs (no combination colours possible, merely different brightness between red, green and blue chains)
LEDS-.../RT
LEDS-.../GN
LEDS-.../BL
Chains with white (WS) and warm white (WWS) LEDs (different brightness between three chains possible)
LEDS-.../WS
LEDS-. /WWS
The LEDs can be controlled solely via the CPL-3DMX (gradual transition of different colours, also music-controlled change of colour via integrated microphone). When connecting the remote control LC-3 available as an accessory, various lighting colours, stroboscopic effects and colour change programmes can be selected.
The CPL-3DMX is also suitable as a DMX interface for controlling the LEDs from a DMX controller. For this purpose, the CPL-3DMX is provided with 4 DMX control channels.
4 Mounting and Connection
1) Mount the CPL-3DMX to a suitable place, if required.
2) Connect the LEDs to the screw terminals (7). To prevent damage to the CPL-3DMX, the load by the LEDs for each channel (R, G, B) must not exceed 1.5 A.
B = negative pole for the blue LEDs
G = negative pole for the green LEDs
R = negative pole for the red LEDs
+ = common positive pole
3) For power supply, a regulated power supply unit is required. Adjust the power supply unit to the voltage required for the LEDs connected (12V = ., 24V = .) . The power supply unit
must be able to deliver the current required for operating the LEDs plus a supply current of 110mA for the CPL-3DMX. Connect the power supply unit to the terminals POWER (8).
The DMX connection is described in chapter 6. and the connection of the remote control LC-3 in chapter 5.2.
5 Operation without DMX Controller
For operation without DMX controller, the position of the DIP switches (2) is of no significance. Once the CPL-3DMX receives its operating voltage, the red LED (1) will light up. The LEDs connected will continuously change their lighting colour (only for RGB LEDs).
With music of sufficiently high volume, the lighting colour will change to the beat of the music and the red LED (1) will shortly be extinguished with each change of colour. Adjust the volume of the music system in such a way to provide optimum music control via the microphone (4). If required, reduce the distance between the speaker and the CPL-3DMX or position the CPL-3DMX in such a way that the microphone will point to the speaker.
5.1 Interconnecting several CPL-3DMX units
Several CPL-3DMX units can be interconnected. Thus, it will be possible to operate more LEDs than with a single CPL-3DMX unit. The master unit will be able to synchronize all slave units so that all LEDs will show the same colour and will change their lighting colours at the same moment.
1) Connect the DMX OUTPUT (6) of the master unit via a 3-pole XLR cable (e.g. series MEC-... or CDMXN-... from the product range of IMG STAGE LINE) to the DMX INPUT (5) of the first slave unit.
2) Connect the DMX OUTPUT of the first slave unit to the DMX INPUT of the second slave unit, etc. until all units have been connected in a chain.
There must be no DMX signal at the DMX INPUT of the master unit so that the red LED (1) will light continuously or will be extinguished to the beat of the music. Thus, the unit is switched to the master mode. Once the control signals from the master unit are applied to the slave units, their red LED (1) will flash steadily. The slave units are automatically switched to the slave mode and can be synchronized by the master unit.
5.2 Remote control LC-3
When operating the unit with the remote control LC-3 available as an accessory, additional functions will be available.
1) Connect the remote control to the jack REMOTE CONTROL ONLY (9).
2) There must be no DMX signal at the DMX INPUT (5).
3) Via the DMX OUTPUT (6), further CPL-3DMX units can be connected (13 chapter 5.1) in order to control them together with the master unit via the remote control.
4) The button STAND BY (10) allows to activate / deactivate the LEDs. With the LEDs deactivated, the LED next to the button STAND BY will light up as an indication.
5) Select the operating mode with the button MODE (12):
Stroboscope mode
The LED of the button MODE will not light up.
When the button FUNCTION (11) is kept pressed, one of the three stroboscope functions can be activated:
- music-controlled white flash salvos
- music-controlled individual flashes, change of colour
- music-controlled flash salvos, change of colour
When the button FUNCTION is kept pressed again, the next stroboscope function respectively will be activated.
Selection of lighting colour
The LED of the button MODE will light permanently.
The button FUNCTION allows to select one of nine preset colours. A music control will not be possible in this mode.
Music-controlled colour change programmes
The LED of the button MODE will flash slowly.
The button FUNCTION allows to select five different colour change programmes. Without any music signal, the unit will switch over to gradual colour transition. The different programmes will only be distinguishable when several CPL-3DMX units are used.
Colour transition mode
The LED of the button MODE will flash rapidly.
With the button FUNCTION, set the transition speed for the colours to slow, medium or fast. A music control will not be possible in this mode.
6 Operation via a Light Controller
For operation via a light controller with DMX512 protocol (e.g. DMX-1440 or DMX-510USB from IMG STAGE LINE), the CPL-3DMX is equipped with four DMX control channels. The functions of the channels and the DMX values can be found in chapter 7.1 on page 1.
DMX stands for Digital Multiplex and means digital control of multiple DMX units via a common control line.
6.1 DMX connection
For DMX signal transmission, special cables are recommended (e. g. cables of the CDMXN series from IMG STAGE LINE). For cable lengths exceeding 150m and when controlling more than 32 units via a single DMX output, it is generally recommended to insert a DMX level matching amplifier (e. g. SR-103DMX).
1) Connect the DMX input (5) to the DMX output of the light controller.
2) Connect the DMX output (6) to the DMX input of the following CPL-3DMX unit or the following light effect unit. Connect its output again to the input of the following unit, etc. until all light effect units have been connected in a chain.
3) To prevent interference in signal transmission, in case of long cables or a multitude of units connected in series, terminate the DMX output of the last DMX unit in the chain with a 120 resistor (>0.3W) : Connect a corresponding terminating plug (e.g. DLT-123 to the DMX output.
6.2 Adjusting the start address
For operating the CPL-3DMX with a light controller, adjust the DMX start address for the first DMX channel. If e.g. address 17 on the controller is provided for controlling the proportion of red, adjust the start address 17 on the CPL-3DMX. The DMX channels 2 - 4 will then automatically be assigned to the three following addresses (in this example 18 - 20). As the next possible start address for the following DMX-controlled unit, address 21 could be used in this example.
After adjusting the start address, the CPL-3DMX can be operated via the DMX controller. Once DMX signals are received, the red indicating LED (1) will flash steadily.
6.2.1 Automatic address adjustment
This method is recommended when several CPL-3DMX units are used and the first unit is to receive start address 1:
1) On all CPL-3DMX units, set all DIP switches (2) to the lower position (OFF)
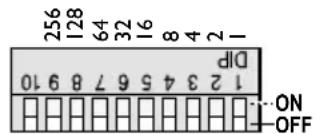
Fig. 4 Automatic adjustment: all switches set to OFF
2) Interconnect all CPL-3DMX units via the DMX INPUT (5) and the DMX OUTPUT (6) (chapter 6.) and switch them on.
3) On the first CPL-3DMX unit (directly connected to the light controller), keep the button AUTO DMX ADDRESS (3) pressed for five seconds until the LEDs connected are extinguished.
After a while, the LEDs will light up again. The start address of the first CPL-3DMX unit is now set to 1. The start addresses of the following CPL-3DMX units are respectively set to the next DMX address that is free:
2^nd unit to address 5
3^rd unit to address 9
4^th unit to address 13
5^th unit to address 17, etc.
6.2.2 Manual address adjustment
The start address is adjusted as a binary number with the DIP switches Nos. 1 - 9 (2). It will result by adding the place values of the switches set to "ON". (Switch No. 10 is without function.)
Examples of the start addresses 1, 6 and 104:
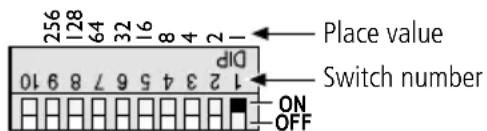
Fig. 5 Start address 1: switch No. 1 set to ON

Fig. 6 Start address 6: switches Nos. 3 and 2 set to ON
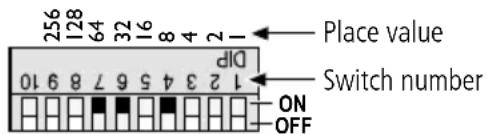
Fig. 7 Start address 104: switches Nos. 7, 6 and 4 set to ON
The easiest way is to start from the highest possible place value and to add the smaller values until the start address will result.
6.3 Control with the LED-4C
The unit LED-4C from IMG STAGE LINE is an easy-to-use controller which also allows to control the CPL-3DMX. The LED-4C is equipped with 4 channels so that all units connected to it can only be controlled synchronously.
Set the start address of the CPL-3DMX to 1 or to a multiple of 4 + 1 (5, 9, 13, ..., 61 max.), chapter 6.2. Detailed information for operation can be found in the manual of LED-4C.
7 Specifications
Current rating: .3 × 1.5 A max.
Power supply: 12-24V depending on the LEDs connected
No-load current: 110 mA
Ambient temperature: . . .0-40°C
Dimensions: 193 × 40 × 72 mm
Weight: .460g
7.1 DMX channels
| DMX value Function | |
| Channel 1: proportion of red | |
| 0 - 255 brightness of red | |
| Channel 2: proportion of green | |
| 0 - 255 brightness of green | |
| Channel 3: proportion of blue | |
| 0 - 255 brightness of blue | |
| Channel4: simmer/musiccontrol/stroboscope | |
| 0 - 7 light off | |
| 8 - 190 | dimmer: dark → bright |
| 191 - 200 music-controlled change of colour via integrated microphone | |
| 201 - 247 | stroboscope: slow → fast |
| 248 - 255 maximum brightness | |
Subject to technical modification.
Dimensions: 193 × 40 × 72 mm
Poids: .460g