
GXV3350 - Phone GRANDSTREAM - Free user manual and instructions
Find the device manual for free GXV3350 GRANDSTREAM in PDF.
| Product type | Android IP Video Phone |
| Brand | Grandstream |
| Model | GXV3350 |
| Operating system | Android 7.0 |
| Screen | 5-inch capacitive touchscreen, 1280×720 resolution |
| Camera | Tiltable, HD 720p video support |
| Microphones | Two built-in microphones |
| SIP lines | 16 |
| Network ports | 2 Gigabit Ethernet ports with PoE/PoE+ |
| Wireless connectivity | Built-in Wi-Fi, Bluetooth |
| HDMI output | Yes |
| Power supply | 12V DC power adapter (included) or PoE |
| Package contents | Main unit, handset, stand, telephone cord, Ethernet cable, 12V adapter, installation guide |
| Possible extensions | Up to 4 GBX20 modules (sold separately) |
| Key features | HD video calls, video conferencing, Android app access, call management, 16 SIP accounts |
| Maintenance | Clean with a soft, dry cloth. Do not use abrasive products. |
| Safety | Use only the supplied adapter. Do not power off during an update. Configuration required for emergency calls. |
| Repairability | Spare parts available on request from the manufacturer. |
Frequently Asked Questions - GXV3350 GRANDSTREAM
User questions about GXV3350 GRANDSTREAM
0 question about this device. Answer the ones you know or ask your own.
Ask a new question about this device
Download the instructions for your Phone in PDF format for free! Find your manual GXV3350 - GRANDSTREAM and take your electronic device back in hand. On this page are published all the documents necessary for the use of your device. GXV3350 by GRANDSTREAM.
USER MANUAL GXV3350 GRANDSTREAM
Grandstream Networks, Inc.
126 Brookline Ave, 3rd Floor
Boston, MA 02215, USA
Tel: +1 (617) 566-9300
*Android is a Registered Trademark of Google LLC.

HDMI, the HDMI Logo, and High-Definition
Multimedia Interface are trademarks or registered
trademarks of HDMI Licensing LLC in the United
States and other countries.


In the UK and EU member status, c
peration of 5150-5350
M

GXV3350
High-End Smart Video Phone for Android™
Quick Installation Guide
For Warranty and RMA information, please visit www.grandstream.com
EU Agent:
Picus Advisors Ltd
Taivalmaki 9F1-02200 Espoo, FINLAND https://www.picus.fi
Content
English. 1
简体中文. 8
Espanol. 15
Francais 22
Deutsch 29
Italiano. 36
Pycckn. 43
Portugues. 50
Polski 57
The GXV3350 is not pre-configured to support or carry emergency calls to any type of hospital, law enforcement agency, medical care unit ("Emergency Service(s)") or any other kind of Emergency Service. You must make additional arrangements to access Emergency Services. It is your responsibility to purchase SIP-compliant Internet telephone service, properly configure the GXV3350 to use that service, and periodically test your configuration to confirm that it works as you expect. If you do not do so, it is your responsibility to purchase traditional wireless or landline telephone services to access Emergency Services.
GRANDSTREAM DOES NOT PROVIDE CONNECTIONS TO EMERGENCY SERVICES VIA THE GXV3350. NEITHER GRANDSTREAM NOR ITS OFFICERS, EMPLOYEES OR AFFILIATES MAY BE HELD LIABLE FOR ANY CLAIM, DAMAGE, OR LOSS. YOU HEREBY WAIVE ANY AND ALL SUCH CLAIMS OR CAUSES OF ACTION ARISING FROM OR RELATING TO YOUR INABILITY TO USE THE GXV3350 TO CONTACT EMERGENCY SERVICES, AND YOUR FAILURE TO MAKE ADDITIONAL ARRANGEMENTS TO ACCESS EMERGENCY SERVICES IN ACCORDANCE WITH THE IMMEDIATELY PRECEDING PARAGRAPH.
PRECAUTIONS:
WARNING: Please DO NOT power cycle the GXV3350 during system boot up or firmware upgrade. You may corrupt firmware images and cause the unit to malfunction.
WARNING: Use only the power adapter included in the GXV3350 package. Using an alternative non-qualified power adapter may possibly damage the unit.
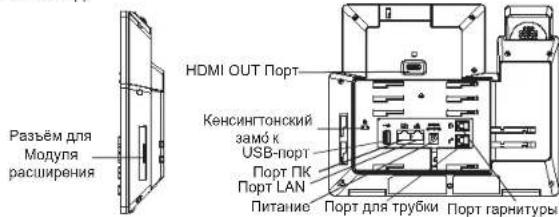
OVERVIEW:
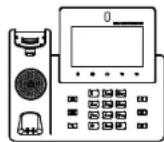
The GXV3350 IP Video Phone for Android combines a 16-line IP video phone with a multi-platform video collaboration solution and the functionality of an Android tablet to offer an all-in-one communications solution. This IP video phone delivers a powerful experience through its 5 inch 1280x720 capacitive touch screen, titable camera, HDMI output, dual microphones and support for 720p HD video. The GXV3350 adds dual Gigabit ports with PoE/PoE+, integrated Wi-Fi and Bluetooth support. It also runs Android 7.0 and offers instant access to hundreds of thousands of Android apps. By combining a state-of-the-art IP video phone, an advanced video collaboration solution, and the functionality of an Android tablet, the GXV3350 offers businesses throughout the world a powerful desktop communication and productivity solution..
PACKAGE CONTENTS:

1x GXV3350 Main Case 1x Handset

1x Phone stand

1x Quick Installation Guide 1x GPL License

1x Phone Cord

1x Ethernet Cable

1x 12V Power Adapter
PHONE SETUP:
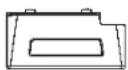
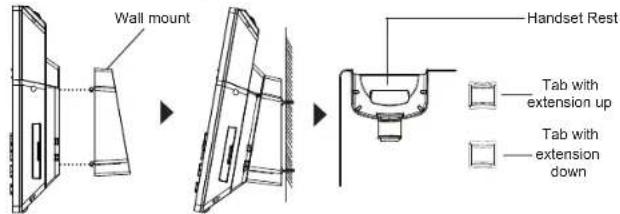
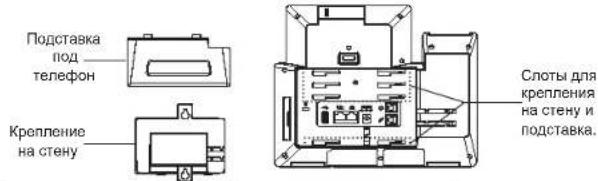
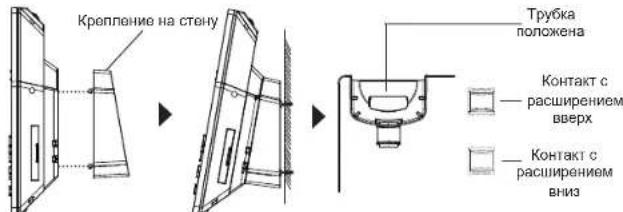
Installing the Phone (Wall Mount *Sold seperately):
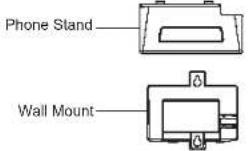
- Attach the wall mount spacers to the slot for wall mount spacers on the back of the phone.
- Attach the phone to the wall via the wall mount hole.
- Pull out the tab from the handset cradle (see figure below).
- Rotate the tab and plug it back into the slot with the extension up to hold the handset while the phone is mounted on the wall.
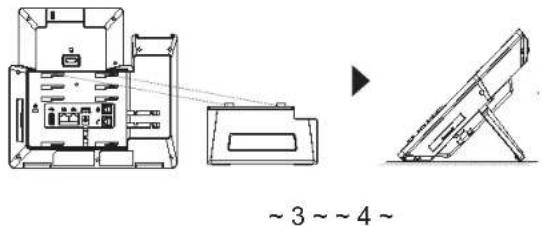
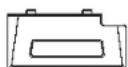
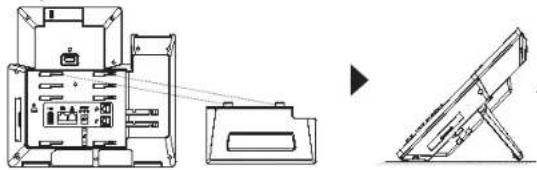
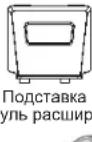
Using the Phone Stand:
For installing the phone on the table with the phone stand, attach the phone stand to the bottom of the phone where there is a slot for the phone stand, (upper half, bottom part).
CONNECTING THE PHONE:
- Connect the handset and main phone case with the phone cord.
- Connect the LAN port of the phone to the RJ-45 socket of a hub/switch or a router (LAN side of the router) using the Ethernet cable.
- Connect the 12V DC output plug to the power jack on the phone; plug the power adapter into an electrical outlet. If PoE switch is used in step 2, this step could be skipped.
- The LCD will display booting up or firmware upgrading information. Before continuing, please wait for the main screen display to show up.
- Using the web configuration interface or from the menu of the touch screen, you can further configure network connection using static IP, DHCP... etc.

Tips for using the GXV3350 Keys:
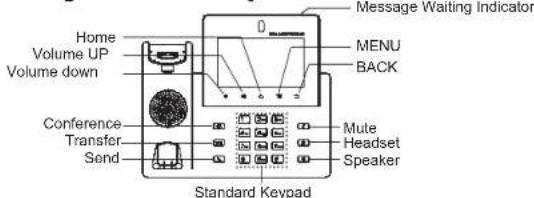
- Tap on VOLUME DOWN / UP keys to adjust volume on the phone.
- Tap on HOME key to return to the default idle screen. Or press and hold on the HOME key for 2 seconds to take a screenshot.
- Press MENU key to access phone's display settings, edit widgets and thread manager. Or press and hold on the MENU key for 2 seconds to enter managing application interface directly.
- Press BACK key to go back to the previous menu.
PHONE CONFIGURATION:
Configuring the GXV3350 using Touch Screen:
- Make sure the phone is properly powered up and in idle screen.
- Select Settings Advanced Account settings. Tap on one of the Account to configure Account name, SIP Server, SIP User ID, SIP Auth ID, SIP Auth Password to register account on the GXV3350. After successfully registered, the dial screen will be shown.
- Follow the Menu options to configure other settings on the phone. For example, to configure static IP on the GXV3350, set up static IP address via LCD Menu Settings Network Ethernet Settings.
- Please contact your ITSP (Internet Telephony Service Provider) for additional settings that may be necessary to configure the phone.
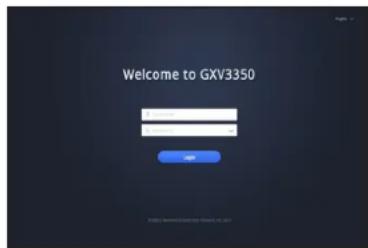
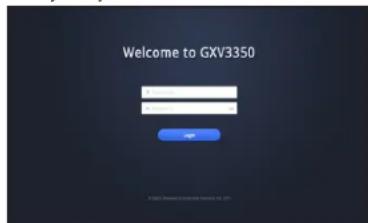
Configuring the GXV3350 using Web Browser:
- Ensure your phone is properly powered up and connected to the Internet.
- Tap on Settings Status Network status, to obtain the IP address of your phone.
- Type the phone's IP address in your PC's browser.
- Enter username and password to login. (The default administrator username is "admin" and the default random password can be found at the sticker on the GXV3350).
- In the web GUI Account, select Account 1/2/3/.../16 page to configure Account name, SIP Server, SIP User ID, Authenticate ID and Authenticate Password to register the account on the GXV3350.
5 6
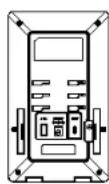
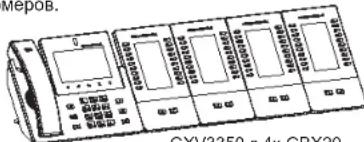
CONNECTING GBX20 EXTENSION MODULE TO GXV3550 (GBX20 is sold seperately):
The GXV3350 uses GBX20 as the extension module. The extension module is an ideal solution for the busy enterprise environment looking to add the ability to receive and dispatch calls efficiently. Each GBX20 extension module has 20 programmable buttons, Left and Right buttons, supporting 40 Multiple Purpose Keys to be configured. GXV3350 supports up to 4 extension modules, adding 160 fully programmable phone extensions to the phone.

GXV3350 with 1x GBX20
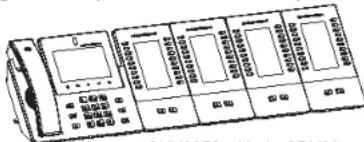
GXV3350 with 4x GBX20
Notes:
- The GBX20 is an additional accessory for the GXV3350. Therefore, the GBX20 (including extension module accessories for installation) is not included in the GXV3350 package.
In case two or more GBX20 extension modules are connected to the GXV3350, the second GBX20 needs to be powered on by a 12V/1A PSU.
GBX20 PACKAGE CONTENTS:
1xGBX20
Extension Board

1x GBX20 Extension Board Stand

1x 12V/1A Power Adapter


1x Extension Board Connector Plate
1x Screw


1x TypeA-MicroB USB Cable
1x Quick Installation Guide
Installing the GBX20 to GXV3350:
- On the back of the GBX20 and the GXV3350 there are slots for connector plate. Attach the connector plate between the slots for the GBX20, Apply the screw provided and securely tighten the connector plate to the GBX20 (see figure in next page).
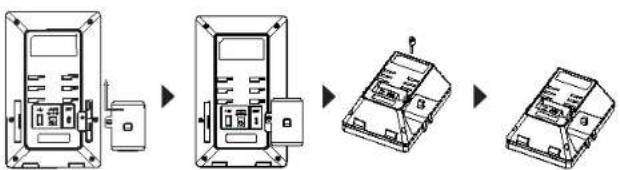
2. Attach the other side of the connector plate to the GXV3350's EXT slots like shown in the figure below:

3. Connect the GBX20 to the GXV3350 via the USB port using the USB cable provided with the GBX20.
4. Install the phone stands on the GXV3350 and the GBX20.
5. Power up the GXV3350. The GBX20 will show the booting up screen with version information and connecting status.
6. After successfully booting up, the extension board will stay in idle. Press Right and Left keys at the same time to check the version information and status.
Configuring the GXV3350 Extension module:
- Login the GXV3350 web GUI and configure multiple purpose keys for extension board 1/2/3/4 under web GUI Applications Programmable Keys GBX20 Settings page.
- On the GXV3350 extension board (i.e., GBX20), press LEFT or RIGHT button to browse all the MPK Programmable Keys' status in different pages.
- For more configuration information, please refer to the GXV3350's user manual.
Refer to online documents and FAQ for more detailed information: http://www.grandstream.com/our-products
This product is covered by one or more of the U.S. patents (and any foreign patent counterparts thereof) identified at www.cmspatents.com.
ZH
CONNECTING GBX20 EXTENSION MODULE TO GXV3550 (GBX20 is sold seperately):

AnschluSt fur Headsets
http://www.grandstream.com/our-products
IT
http://www.grandsstream.com/our-products
GXV3350 He npedHa3NaeH dIy NODepKKn BbINOJIHeHn CPOUHbIX 3BOHKOB B MeDINHCKne yUpeJKeHn, npaBOOxP-aHHTeNbHbIe OprAhbl, UypeJKeHn 3dpaBOoXpAHeHn ("3KCTpeHHbIe cnyk6bl) n B KaKne-Imbo DpyRte 3KCTpeHHbIe cnyk6bl. Iyra DoCTyna K 3KCTpeHHbIM Cnyx6am Heo6xOdIMO npEepnHbTb DOONHtEJIbHbI Mepbl. PInOp6peTeHne SIP-COBMeCtHMoYcLyrN INTEpHET TeJeFOHn, HADNeJekaUaJy KOHfUgpaUaJG GXV3350 dnnCNoB3ObaHN DaHHoY cNyTu n nepnoDUnueckar npOBepKa KOHfUgpaUuC ceJIbO NOdTBePckDeHn npABINbHOCTn paBoTb IAIBIO Tc863AAHOCTbIO 3aka3UHa. Ecnn 3TO He cdeNaHo, To dNAnDOctyna K 3KCTpeHHbIM cnyk6am Heo6xOdIMO NOdklIOuHTbc K ycLyram 6ecnpoBodHOu INI npOBoHDn TEefoHHo CBzN.
GRANDSTREAM HE IPEOCTABJRET NOKIOUCHNE K 3KCTPEHHbIM CNYKbAM YEPE3 GXV3350. KPOME TOGO, HN KOMPAHnI GRANDSTREAM, HN EE PYKOBOINTEJI, COTPYDNIK N AΦFNIIPOBAHHbIE JNlCA HE HECYT OTBETCTBEHHOCHTB CNYAEE KAKNX-JIbO IPETEH3N, YUEPBA JIN6O NOTEPB, N Bbl TEM CAMbIM OTKA3bIBAETECB OTKAKNXJIbOTPEBOAHNIINIOCHOBAHNI DnI NCKA, RBJLOHUNCXCR PE3yIbTATOM INI KACAOUXXCBAWE HECNOC6HOCTN NCIOJIb3OBATb GXV3350, YTObI CB83ATbC C ABAPINHBIMC NYK6AMN BALIM OTKA3OM CDEJATb IDONOHNTBbHEI PPINOTOBNEHn, YTObI IOJYuHTb JOCTyn K ABAPINHBIM CNYK6AMB COOTBETCTBNIC PPEDbUYsIM NAPARPAOM.
PNEBAPNTIbHbIE YCIOBnA:
PNEyPExDEHHe: He cNeJyET BbKIOHaTb/BKnIOaTb GXV3350 BoBpeM 3aRpykN CnCTeMbI NII O6HOBeHnE MmKpONpOpaMMHOro 06eCneHnE. Bo3MOxHO NOBpeDeHnBCTpoEHhBIX PpOpaMM, TTo npINBeTe K nONOMKe yCTpoHCTBa
PNEpyPExkHEHNE: Cneyet HcnoIb3oBaTb TOnIbKa aanTepe nTuHaHn, BxOaIuB K ComnNeKT noCTaIK GxV3350. McnoIb3oBaHnE pyrToR He oTBHeIoero Tpe6oBaHnM aanTepe MoKet npBeCTn K nobpeXKeHIO yctpoNCTBA.
OBsH N OB3OP:
IP BIneo TeNEoHGXV3350 Ha 6a3e Android covetaet B ce6e IP BIneoTeNEoHc 16 NINHmM C MyIbTn PnAToFOpMeHHbIM peSeHHeM dNnBIneoKOHpepeHUN n FyHKUMOHaJIbHOCTb PAnHWeTHORO KOMNtOpeHa HC OND, INPdNarra KOMNKeCHoe peSeHMe I DnCBrN.3TOB BICOKOpONBOJNTeHbNl IP-BIneoTeNEoH o6OpYDoBaN 5-DOIOMBiEMKOCThbM CEHCOPHbM kpaHOM cPapHeHMe 1280x720 ToeK, KamepoC nImHeMeBbM NIOJOKeHHeM, HDMblBIXoDM, DByMa MmPKoPoHAMn nNoDepkKoi BIneo BIncoKoi YETKocTN 720p.MoDeBg GXV3350 IMeET DaRrABHTbX npTa C NoDpeKko PoE/POE+, nBCtpoHBeMoyn Wi-Fi nBluTooth. OHa TaKke paBoTaET noD ynpabLeHMe Android 7.0 n ppeNaeraeMrHOBeHN bIOCTyN K COTHM TbcRA npINOxoHeH M Android. CoTaeB Cce6CopeMeHNb IP-BIneoTeNEoH, nepeOboe peSeHHe Nn BInEOcBnN n FyHKUHOHaJIbHOCTb Android PAnHWeTA, MoDeBg GXV3350 ppeNaeraeNPpePnTnM NO BcEMy MmPy MoUHoe HAcTohBoHpeSeHHe Nn CBzNn NNOBbHexH NPOIBOIDNTbHOCTN.
KOMNJIeKT NOCTABKN:
1x kopnyc GXV3350

1x TeneoHnHa Tpy6ka
X I ndctabka nod teneopho

1x kpaTKeo pykoBOCTBO noIbOBATeH / 1x GPL nIeHn

1x TelefoHHbIuHyp

1x ka6ebb Ethernet
1x anaTepuTAnHua 12 B
YCTAHOBKA TEJIeFOHA:
YctaHOBKa TeJeΦoHa (KpenneHne Ha CTeHy \*npOdaTcR OTdEJIbHO):
1.Плкрени troponддк стэнгог К сотас стэнгог крелени на заднachtу тетфona.
2.Пикpenite TeNeepOH K cTeHe NocpeCTBOM OTBepCTNcTeHHORO KpennneHn.
3. BbTaunTe KOHTaKT N3 HHe3a Tpy6Kn (CM. pncyHOK Hnke).
4. NopebHNTA KOHTAKI Y BCTABTE ERO oBPAHO T he3DIO PACUIMPEHnEM BBePDX, KORA TePeHOF PnIPKpenN K CTHe (CM.PNCYHK NIXE)
YctaHObKa TepeoHa (POnCTaBka) :
Ду установ К телфога на CTON Ha NOCTABKE,пнсоедиHTe NOCTABKу KДMuTu TeteФОWA BTHEOДЯ NOCTABKN.(BepxHЯ NOOBHa,HNKHЯ YaCtBJ).
NOKNIQUEHNE TENEFOHA:
- CoeHnHTe Hhypom TeJeFOHHyTo Tpy6ky KOpnyc.
2.Cnmoiubko6eIa Ethernet noKIOHHTne nopt LAN teneoHa HtE3do RJ-45 y3a/bkIOHOTaeNIM MapuTyM3aTOpA (co ctoPOhB LAN MapuTyM3aToPA). - NpKJNQHtE BnIky BbIXOda 5 B NOCTOHHHORo TOKA KTHe3dy NITAHINr TEnefoHa; BCTaBte aadantep NITAHIN B nETKPNueckm BbIXOq.EcN Ha 3ane Da nCnONbEyTC nepeKnHOatEnPoE,OT stn AOT MOKHO npOnyctNb.
4.HaKK-3Kpahe 6yuyt oTo6paKeHb CBepeHnO 3arpy3Ke Hnn 06HOBneHHM KMQponpRAMMOHO EocceHnI. TpeD TeK kNPOoJXHTb, NODOxNTe BbBOIO rnaBHO 3KpaHa - INONb3y INTEPpeHc HAcTPOKn CTeH Nm MeHIO Ha CeHCOPHom 3KpaHe, MOXHO BInOJIHHaTb DOnIINHTeJIbHHe HAcTPOKn CTeH, INONb3y CTaTHecKNI IP, DHCPN T. d.
Pndka3Kn no nCnoJb3OBAHnIO KhoNOK GXV3350:

1.KoCHITeB KIbAII WbABITb TPGMOKCTb/TPNbABUTTgPOMKTbIbIaHCTPOIKI rPOMKOCTnTepeOHa.
2. HaNKMITE Ha KHONKY DOMOJI IaIbIaBOPaHa NDoMaIHHN EApKAn. HINJHAKMITE YIeDpXBAIBAE KHOKNY DOMOJI B TceHHe 2cEYHd, YTOb6I cIeNaTb CkPmHUIOT.
3. Hachmiete Khoinky MEHIO IIN BDOA B Hactpoikn kapaa TepnoHa, peAdkTPOBAHNB INDKEKETOB N DNICNTePORA pTOKOK. NIM HAcMITE N EDPKBIAIte KHOINK MEHIO B TcEHue A 2CekHy, YTObI peNeHTI HENOpCECTBHeHO K npabABHHIO INHTpeBcOOM pRINOKeHH.
4. Haxmnte KnaBnuy HA3AД ДЯ B03Bpata K nppebIyUeMy MeHIO.
HACTPOINKA TEJIeFOHA:
HactpoKa GXV3350 c nOMOBcHo ceHCOPHOro 3KpaHa:
1.Y6eDnTeCb,HToTeIeΦoHHeaKTNBEH.
2. BbIbePHTe HAcTpoiKN PacWnpeHHBe HAcTpoiKN HAcTpoiKn yHcTHoH 3aNNiN. HAcKMTte HaOHy n3yHcTHbIX 3aNNceIN dNra HAcTpoiKn NMeHN yHuTHoH 3aNNiC, SIP-cepBepa, SIP NDeHTnФnKaTopa NOlb3oBaTeN, INdeHTnФnKaTopa IN PanoJyAteHTnФnKaUIN, YTO6bl 3apeRtncpObaTb yHuTHyo 3aNNcb HaGXV3350. Iocne ycneuHoi perncptuaMn 3kpan Habopa 6yDet.
3. NepexoJnte no oniM MeHIO nO KoHpypaunDpyrNx Hactpoek TenePOnA.HanmpmE, nO KONFpyaun CtATMeCkoro IP DnGXV3530, 3aJaTe cTaTHeckn IP-aDpec nepeIaN no npTN MeHIO XKJ HactpoIK Cetb HactpoIKk Ethernet coedneHHN.
4.ДоПОПИТЕЛБИЕ HASTPOYK,KOTOPBIE MOYT 6bTb Heo6xOdMblI DnI KOHФураци TetefoHa,MOKHO noTyNTb,OBpaTHBwCb K npOBAHepy no O6cNJIYKBAMHIO HHTpeHET-TeNEΦOHIM
Hactpoika GXV3350 c nomoosbu Be6-6o63peBaTeIa:
- PpOBePbTe, NOKIOUeH N TeNEoH K NITaHIO I K INHTepHety.
2.HaXMMTe Ha HactpoKn 06 yCTpoiCTBe CoCToHne cETn, dIpy nOlyueHnIP-adpeca Baawero TenefoHa. - BBeDTe IP-apec B 06o3peBaTeJIb PIK.
4.Ди BXOda BBeDte Mm NOIb3OBaTeN n napOnb.(MnONb3OBaTeN aDMnHcTpaTOpA no YMOnaHNO -admin",cnyaHbN npoBn no yMOYAMHNO MOXHO HAHTn HAKNeKe HGXV3350).
5.BBe6ΓI→YyETHa3aNcB, BbIepeTcCTpaHcy Account 1/2/3/..16 nI HactpoKIMnIeHMeYyTeOH3aNcIc, SIP-cepBaepa, SIP IeHTnIFkAtopa NOIb3OBeTaJI, NIEHTmIFkAtopa I NaPOnI ayTeHTmIFkaUIn, YTObI 3apERNTpRopBaTbYyTeHYo 3aNcIb Ha GXV3350.
IIOKNIQUEHNE MOyJIa PACUHPEHnGXV3350 (GBX20 \*npojaetc ordienbHo):
TING XV3350 B KauCTBe MOyIpaacUHpeHn HcNOnbEyETCR GBX20. MoIyIb paucIHpeHn GXV3350 - 30 NoIeAnbIepeHne IINHpactpyKtpyb b KOToPOI OcyIeCTBNIETCR 6ONbIOe KOJIuNcCTBO B13OBoB N CyUIeCTByEOTnePb6HOCT b EoOeKfMTHOB OcBcYKbAHane BxOaDJIbN I NcKOaIIuX 3BOHOK. KaKdJIb MOyJIb IMeET 20 FmNcHECKNIOprpAMMHyEBybIX KNaBIII, C NOMUBI KNaBIII "BnPaBO" I "BHeBO" MOxHO PepeNlCtBbATs CnCOK IN TAKIM Oba3OMa 3ApnporpaMMPoBaT do 40 o6bEkTO.TeneOHGX V3350 NOdepXkBaNTdo 4 MOynJ paucIHpeHn, cTO B CMME DaET BoMOxHoHct 3a nporpaMMpoBaT 160 DobaboHbIX TeneOHHbIX HOMePOB

GXV3350c1xGBX20
GXV3350c4xGBX20
Примочанe:
- GBX20 YBNIETcA DonONHITeNBHbIM akceccyapom DnGXV3350. CnEOBaTeBHO, BXG (BKNUOa PNHPADNHEKCHOTn DnY cTAHOBM MOUDy pauchinepHe) HE BXOINT B KOMNIJEKT NOCTABKN GXV3350.
B cnyuae,ecnK GXV/3350 nokKnOueHbI Dba nn6 bonee moyn paacwnpeHH GBX20,BtopoM odyJbGBX20doJxhen 6bItb nokKnUoyen K mctouhky mTaHn 12B/1A.
GBX20 Komnlekt noctabkn:
1x Monynb
DCHUMDEHIM
GBX20

1x 12B/1A aanTep
NTAHN

1x CoeHnHTelbHaN aIPTNaHc
(GBX20 *Sold seperately):
http://www.grandstream.com/our-products

For certification information, please refer to User Manuals: http://www.grandstream.com
Common part:
This equipment complies with radiation exposure limits set forth for an uncontrolled environment. This transmitter must not be co-located or operating in conjunction with any other antenna or transmitter. This equipment should be installed and operated with minimum distance 20cm between the radiator& your body.
The earpiece is easy to absorb small object, please take care to avoid scratching
U.S. FCC Part 15 Regulatory Information
This device complies with part 15 of the FCC Rules. Operation is subject to the following two conditions: (1) this device may not cause harmful interference, and (2) this device must accept any interference received, including interference that may cause undesired operation.
Any Changes or modifications not expressly approved by the party responsible for compliance could void the user's authority to operate the equipment.
Note: This equipment has been tested and found to comply with the limits for a Class B digital device, pursuant to part 15 of the FCC Rules. These limits are designed to provide reasonable protection against harmful interference in a residential installation. This equipment generates, uses and can radiate radio frequency energy and, if not installed and used in accordance with the instructions, may cause harmful interference to radio communications. However, there is no guarantee that interference will not occur in a particular installation. If this equipment does cause harmful interference to radio or television reception, which can be determined by turning the equipment off and on, the user is encouraged to try to correct the interference by one or more of the following measures:
—Reorient or relocate the receiving antenna.
—Increase the separation between the equipment and receiver.
-Connect the equipment into an outlet on a circuit different from that to which the receiver is connected.
—Consult the dealer or an experienced radio/TV technician for help.
U.S. FCC Part 68 Regulatory Information
This equipment complies with Part 68 of the FCC rules. Located on the equipment is a label that contains, among other information, the ACTA registration number and ringer equivalence number (REN.) If requested, this information must be provided to the telephone company.
The REN is used to determine the quantity of devices which may be connected to the telephone line. Excessive REN's on the telephone line may result in the devices not ringing in response to an incoming call. In most, but not all areas, the sum of the REN's should not exceed five (5.0). To be certain of the number of devices that may be connected to the line, as determined by the total REN's contact the telephone company
to determine the maximum REN for the calling area.
This equipment cannot be used on the telephone company-provided coin service. Connection to Party Line Service is subject to State Tariffs.
If this equipment causes harm to the telephone network, the telephone company will notify you in advance that temporary discontinuance of service may be required. If advance notice isn't practical, the telephone company will notify the customer as soon as possible. Also, you will be advised of your right the file a complaint with the FCC if you believe it is necessary.
The telephone company may make changes in its facilities, equipment, operations, or procedures that could affect the operation of the equipment. If this happens, the telephone company will provide advance notice in order for you to make the necessary modifications in order to maintain uninterrupted service.
If the trouble is causing harm to the telephone network, the telephone company may request you to remove the equipment from the network until the problem is resolved. This equipment uses the following USOC jacks: RJ45C.
It is recommended that the customer install an AC surge arrester in the AC outlet to which this device is connected. This is to avoid damaging the equipment caused by local lightening strikes and other electrical surges.
If trouble is experienced with this equipment, please contact (Agent in the US):
Company Name: Grandstream Networks,
Address: 126 Brookline Ave, 3rd Floor Boston, MA 02215, USA
Tel: 1-617-5669300
Fax:1-617-2491987
Canada Regulatory Information
Radio equipment
Operation of 5150-5250 MHz is restricted to indoor use only.
This device contains licence-exempt transmitter(s)/receiver(s) that comply with Innovation, Science and Economic Development Canada's licence-exempt RSS(s). Operation is subject to the following two conditions:
(1) This device may not cause interference.
(2) This device must accept any interference, including interference that may cause undesired operation of the device.
This product meets the applicable Innovation, Science and Economic Development Canada technical specifications.
This product meets the applicable Innovation, Science and Economic Development Canada technical specifications.
The Ringer Equivalence Number (REN) indicates the maximum number of devices allowed to be connected to a telephone interface. The termination of an interface may consist of any combination of devices subject only to the requirement that the sum of the RENs of all the devices not exceed five.
EU Regulatory Information
Operation of 5150-5350 MHz is restricted to indoor use only.
Support Frequency Bands and Power:
BT 2402-2480 MHz < 10 dBm;
BLE 2402-2480 MHz < 3 dBm;
WLAN 2412-2472 MHz < 20 dBm;
WLAN5150-5250MHz<23
WLAN 5250-5350 MHz < 18 dBm;
WLAN5470-5725MHz<18dBm;
The simplified EU declaration of conformity referred to in Article 10(9) shall be provided as follows:
Hereby, [Grandstream Networks, Inc.] declares that the radio equipment type [GXV/3350] is in compliance with Directive 2014/53/EU.
The full text of the EU declaration of conformity is available at the following internet address: www.grandstream.com
UK Regulatory Information
Operation of 5150-5350 MHz is restricted to indoor use only.
Support Frequency Bands and Power:
BT 2402-2480 MHz < 10 dBm;
BLE 2402-2480 MHz < 3 dB
WLAN 2412-2472 MHz < 20 dBm;
WLAN 5150-5250 MHz < 23 dBm;
WLAN5250-5350MHz<18dBm;
WLAN5470-5725MHz<18dBm;
The simplified UK declaration of conformity referred to in Regulation 8&14 shall be provided as follows:
Hereby, [Grandstream Networks, Inc.] declares that the radio equipment type [GXV3350] is in compliance with Directive RER 2017 (S.1.2017/1206).
The full text of the UK declaration of conformity is available at the following internet address: www.grandsstream.com