IAN 367455 - Mosquito net Livarno Lux - Free user manual and instructions
Find the device manual for free IAN 367455 Livarno Lux in PDF.

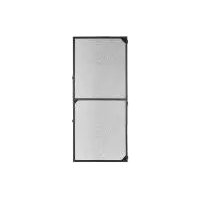
| Product Type | Telescopic Mosquito Net for Door |
| Brand | Livarno Lux |
| Model | IAN 367455 |
| Intended Use | Mounting on interior door frame, protection against insects |
| Rail Dimensions | 2 side guide rails: 950 mm; 1 top rail with pleated fabric: 2080 mm |
| Adjustment | Width and height adjustable by cutting rails to door dimensions |
| Material | Fiberglass fabric, plastic, metal |
| Estimated Weight | Approximately 2 kg |
| Power Supply | None (manual operation) |
| Fixation | Self-adhesive option (clip pads) or screw-mount (screws included) |
| Delivery Contents | Rails, pleated fabric, pull cords, corner connectors, end caps, sliders, brushes, screws, Allen key, self-adhesive clip pads |
| Warranty | 3 years from date of purchase |
| Maintenance | Clean with damp cloth and mild detergent; vacuum dust from fabric |
| Safety | Do not expose fabric or plastic parts to flame or heat source; handle saw with caution |
| Storage | In a clean, dry, temperate place |
| Disposal | Sort materials according to local recycling guidelines |
| After-Sales Service | Phone: +49-180-3000 841, email: service@bosh-tec.com |
| Required Tools | Saw, file, Allen key (included), tape measure |
Frequently Asked Questions - IAN 367455 Livarno Lux
User questions about IAN 367455 Livarno Lux
0 question about this device. Answer the ones you know or ask your own.
Ask a new question about this device
Download the instructions for your Mosquito net in PDF format for free! Find your manual IAN 367455 - Livarno Lux and take your electronic device back in hand. On this page are published all the documents necessary for the use of your device. IAN 367455 by Livarno Lux.
USER MANUAL IAN 367455 Livarno Lux
MOUSTQUAIREPORTEPLISSE
Notedemorange
(X)
DVEROVA PLISE SIE PROTI HMYZU
Naxed mertl
INSECT PROTECTION SUDING DOOR
infolium inductio
B
Fmng, unld the page wif rurccions and thn lorid ayrroaf with all the compaents of the nort
FENNDGOT
Surplusliabilities-42-180-3950.841
www.bcbh-lsc.com
IAN367455_2010
5KRAADANA OSEONA DRZWIOWA PRZECIW INSEKTOM
instrkda m-taz.
NSEKTOM

CEATCH
10
C)F100%
NUT montageonclding
F.
6
1
3
E5 Instruetionso de coroje
520
( x - 2x) t - xy^2 = ( x - 2x) f^ t
1
10
Str#38
28p4
P
1
Rgio 50
5d. 54
5
IAN 367
Montage in Textform 23
Einleitung
- Fabricant / service
bash-tec GmbH
Hoorwaldstr. 42
DE-57299Burbach
GERMANY
Scope of delivery / accessories
Part description / scope of delivery in image form. 04
Installation
Installation instructions in images. 05
Installation instructions in text form 31
Introduction
Intended use 31
Safety instructions 31
Cleaning 32
Storage 32
Disposal 32
Liability 32
Warranty 32
Introduction/ General safety instructions
| Legend of the pictograms used | |||
| i | Fold out the folded page Second option available | Y | |
| Read instructions! Do not expose fibreglass fabric or any plastic parts to open flames or any other source of heat. | |||
| Observe warning and safety instructions! Products and packages should be disposed of in an environmentally friendly manner. | |||
| Rotate object 180 Recycling code for cardboard disposal | |||
| Two people needed | |||
Telescopic insect screen for door
Introduction

Congratulations on the purchase of your new product. You have chosen a high quality product. Familiarise yourself with the product before
using it for the first time. Please read the following operating instructions and the safety instructions carefully. Use the product only as described and for the specified applications. Keep this manual in a safe place. Hand over all documents when passing on the product to third parties.
- Intended use
The insect screen product may only be used for its intended, non-commercial use (installation on the existing door frame). Misuse may cause hazards. Additional loads on this product due to attached objects or operation beyond the mechanical limitations may result in damage to the product and are therefore not permitted. The manufacturer shall not assume any liability for the damages resulting herefrom.
- Part description/ scope of supply
[1] 4x screw 3.5x32
[2] 2x small corner cap A
[3] 2x small corner cap B
[4] 1x large corner cap A
[5] 1x large corner cap B
[6] 2x corner connector A
[7] 2x corner connector B
[8] 1x slider A
[9] 1x slider B
[10] 2x guide rails 950 mm
[11] 12x clip adhesive pads
[12] 1x guide rail 2080 mm, pleated fabric, pull cord.
[13] 1x guide rail 2080 mm
[14] 1x brush 14x8 mm
[15] 1x brush 4.8 × 8 ~mm
[16] 1x Allen key

Safety instructions

Please read the instructions carefully before assembly! Keep the instructions and hand them over when passing on the product!
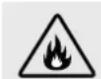
Do not expose fibreglass fabric or any other plastic parts to open flames or any other source of heat.

CAUTION! RISK OF INJURY!
Use the saw carefully.
Assembly
CAUTION! Risk of damage to the product! When installing, place a blanket or something similar underneath to prevent scratches.
Fig. 1:
Measure the width Z of the pleat [12].
Fig. 2:
- First measure the inside dimensions of the door (X = width, Y = height).
- Open the door to do this (see Fig. 1)
- Enter the dimensions in the fields provided.
Fig. 3:
- Shorten the guide rails [10] to the measured width X NOTE: Use a sawing template if available.
- Deburr the edges with a file
Fig. 4:
(a) Calculate the dimension Z minus the dimension Y .
(b) Calculate the result (a) minus 30~mm
(c) Calculate the result (b) divided by 2. The result corresponds to dimension D.
Fig. 5:
- Pull the pull lines integrated into component [12] to the outside along with the attached components.
- Measure the dimension D on the left and right of each of the components [12] and [13]. CAUTION! Measure at exactly a 90^ angle!
Fig. 6:
- Remove the brush [14] from the guide bar [13].
(a) Saw off the dimensions measured in Fig. 5 to the left
Assembly
and right of component [12] and the guide rail [13].
(b) Remove the guide rail [13] from component [12]. CAUTION! The guide rail [13] is not installed until Fig. 13.
Fig. 7:
- Shorten the brush [14] to the length Y + 30 mm .
Fig. 8:
- Insert the brush [14] into component [12] at the bottom into the holder provided for it (see magnifying glass).
Fig. 9:
Cross the pull lines from component [12] so that 1x corner connector B [7] and 1x slider B [9] are on the left and 1x corner connector A [6] and 1x slider A [8] are on the right.
Fig. 10:
- Push the crossed pull cords into component [12] so that they are between the pleated fabric and the lower metal rail (see magnifying glass).
Fig. 11:
Fix the slider B [9] on the left and the slider A [8] on the right side in the lower metal rail (see magnifying glass).
Fig. 12:
- Guide the pull lines from the component [12] downwards from the edges at a 90^ angle.
- Place a guide rail [10] on the left and right of the component [12] with the open side facing component [12]
- At the upper end of the guide rails [10], place the loose corner connector A [6] on the left and the loose corner connector B [7] on the right so that they point at right angles towards the component [12].
Fig. 13:
(a) Fix the loose corner connector A [6] on the left and the loose corner connector B [7] on the right to the upper end of the guide rails [10] so that they point at right angles towards the component [12] (see magnifying glass).
(b) At the other end of the guide rails, fix the corner connectors A [6] on the left-hand guide rail and the corner connector B [7] on the right-hand guide rail [10] (see magnifying glass).
- Tighten the corner connectors with the Allen key [16].
Fig. 14:
- Connect all the guide rails [12], [13], 2x [10] in a rectangle with each other so that the open sides are facing inwards and the guide rails [10] are opposite each other.
Fig. 15:
- Knot the longer pull cord on both sides. It should be possible to untie the knot.
Fig. 16:
- Cut the band that holds the pleated fabric together on component [12].
Fig. 17:
- Close the pleated door.
- Untie the knots of the pull lines again.
- Tighten the lower corner connectors with the Allen key [16]. Meanwhile, keep the pull lines taut.
Fig. 18:
(a) Knot the longer pull lines with a double knot so that they remain taut.
(b) Cut the pull lines so that at least 5cm protrude.
(c) Stow the knots inside the recess of the corner con
nectors.
Fig. 19: Opt. 1-Opt. 2 Fig. 22
- Turn the pleated door 180^ so that the back is visible.
(a) Clip the clip adhesive pads [11] 12x at even intervals with three clip adhesive pads [11] each at the bottom and top and three clip adhesive pads [11] to the left and right of the pleated door in the frame (see magnifying glass). Keep a minimum distance of 250~mm from the corners of the frame with the clip adhesive pads [11] (see Fig.19).
(b) Detach the protection from all adhesive surfaces of the clip adhesive pads [11].
Figs. 20 & 21: Opt. 1
- With the help of a second person, press the opened pleated door with the opened pleated fabric on the door stop side against the door frame. CAUTION! The pleated door requires 12 hours until the adhesive is fully dried.
Figs. 22 & 23: Opt. 2
- Screw the opened pleated door to the door frame with 4x screws [1] in the corners with the opened pleated fabric on the door stop side.
Fig. 24:
- Opt. 1: Press 1 × large corner cap A [4] at the top left and at the top right 1 × large corner cap B [5] onto the corner connectors.
- Opt. 2: Press 1 × small corner cap B [3] at the top left and at the top right 1 × small corner cap A [2] onto the corner connectors.
- Press 1x small corner cap A [2] at the bottom left and at the bottom right 1x small corner cap B [3] onto the corner connectors.
- Cleaning
Use only a damp cloth with mild detergent for cleaning. You can remove dust from the fibreglass fabric with a vacuum cleaner (brush attachment) or hand broom.
Storage
Store the product dry and clean in a temperature-controlled room when not in use.
- Disposal instruction
Don't forget about environmental protection. There is a public take-back system for the disposal of packaging materials and old appliances. You can get information about collection points and current regulations from your city or municipal administration.
- Liability
In the case of non-observation of the instructions and information given in this manual, in the case of improper use or use outside the intended purpose, the manufacturer rejects the warranty for damage to the product. Liability for consequential damage to elements of any kind or persons is excluded.
Warranty
The product has been carefully produced according to strict quality guidelines and conscientiously tested before delivery. In the event of defects in this product, you have legal rights against the seller of the product. These legal rights are not limited by our warranty set forth below.
This product comes with a 3 year warranty from the date of purchase. The warranty period begins on the date of purchase. Please keep the original receipt in a safe place. This document is required as proof of purchase.
If a material or manufacturing defect occurs within three years from the date of purchase of this product, we will replace the product, free of charge for you, with a product of our choice. This warranty is void if the product is damaged, improperly used or maintained.
The warranty covers material or manufacturing defects. This warranty does not cover product parts that are subject to normal wear and tear (e.g. weathering) and can therefore be considered wear parts or for damage to the fabric that has been torn by heavy use (stretching or sharp objects).
Manufacturer / Service
bash-tec GmbH
Hoorwaldstr. 42
DE-57299 Burbach
GERMANY
Service Hotline: +49-180-3000 841
service@bash-tec.com
IAN 367455_2010
For all inquiries, please have the receipt and item number (e.g. IAN 12345) available as proof of purchase.
Note: The pictures in this manual are exemplary and may differ from the product.