WA87jr SE - Microphone Warm Audio - Free user manual and instructions
Find the device manual for free WA87jr SE Warm Audio in PDF.
| Product type | Large diaphragm cardioid condenser microphone |
| Brand | Warm Audio |
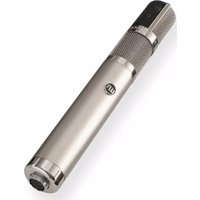
| Model | WA87jr SE (Studio Essential) |
| Polar pattern | Cardioid (fixed) |
| Capsule | K87 type with single backplate, large diaphragm, gold-sputtered |
| Circuit | Transformerless FET, fully discrete |
| Power supply | 48V phantom power |
| Connector | 3-pin XLR balanced with gold-plated contacts |
| Self-noise | 9 dBA |
| Dynamic range | 116 dBA |
| Maximum SPL | 125 dB |
| Frequency response | 20 Hz – 20 kHz |
| Output impedance | 100 ohms |
| Sensitivity | -37 dBV (14 mV/Pa) |
| Included accessories | Rigid mount, leather carrying case |
| Warranty | 5 years (subject to registration within 14 days) |
| Care and cleaning | Keep away from water and moisture; do not attempt to repair yourself |
| Safety | Use only recommended power supply; do not expose to liquids; ensure adequate ventilation |
| Spare parts and repairability | Contact Warm Audio support for repairs; warranty covers material and manufacturing defects |
Frequently Asked Questions - WA87jr SE Warm Audio
User questions about WA87jr SE Warm Audio
0 question about this device. Answer the ones you know or ask your own.
Ask a new question about this device
Download the instructions for your Microphone in PDF format for free! Find your manual WA87jr SE - Warm Audio and take your electronic device back in hand. On this page are published all the documents necessary for the use of your device. WA87jr SE by Warm Audio.
USER MANUAL WA87jr SE Warm Audio
WA-87ir & WA-87ir SE
LARGE-DIAPHRAGM FET CONDENSER MICROPHONE
WA-87JR MANUAL
- ENGLISH - FRANCAIS - ESPANOL - DEUTSCH - ITALIANO
- PORTUGUESE • NEDERLANDS • SIMPLIFIED CHINESE • JAPANESE • KOREAN
WA-87JR SE MANUAL START
LIMITED WARRANTY STATEMENTS EU SAFETYWARNINGS

THANK YOU!
Thank you for purchasing the Warm Audio WA-87jr transformerless large-diaphragm condenser microphone. We feel this product offers the best in terms of sound, function, and vibe from the classic era of analog recording. We don't cut corners when it comes to what goes into our products, and the WA-87jr is no exception.
The WA-87jr features a true reproduction of the vintage K87-style capsule used in the original, all-time studio vocal '87 microphones. Designed with the same hole pattern and frequency response as vintage capsules, the WA-87jr adds a modern, transformerless circuit to deliver legendary tone in a highly affordable package. With onboard -10 dB pad, 70 Hz high-pass filter and 3 selectable polar patterns, the WA-87jr delivers timeless tone, elite recording flexibility, and unprecedented value.
Bryce Young
President
Warm Audio
Austin, Texas USA
CLAIM YOUR 5-YEAR WARRANTY - REGISTER YOUR WA-87jr
Before we begin, please take the time to visit www.warmaudio.com to register your product. To ensure you receive proper and uninterrupted warranty support for your product, please register your unit within 14 days from purchase.
GETTING STARTED - FEATURES
A LEGENDARY HISTORY
The WA-87jr is a contemporary version of the classic '87-style mic, lauded for its pristine top end and professional vocal polish, with a modern circuit design. WA-87jr uses a true reproduction of the large, dual-diaphragm K87-style capsule found in the award-winning WA-87 R2 professional microphone used throughout pro studios worldwide. With switchable controls for polar pattern, high-pass filter, and a 10dB pad, the WA-87jr gives you the flexibility and features you need for professional recording.
1. Pattern Select Switch
This switch selects the polar pattern for the WA-87jr capsule. The three polar pattern options are: Omnidirectional, Cardioid, and Figure-8.
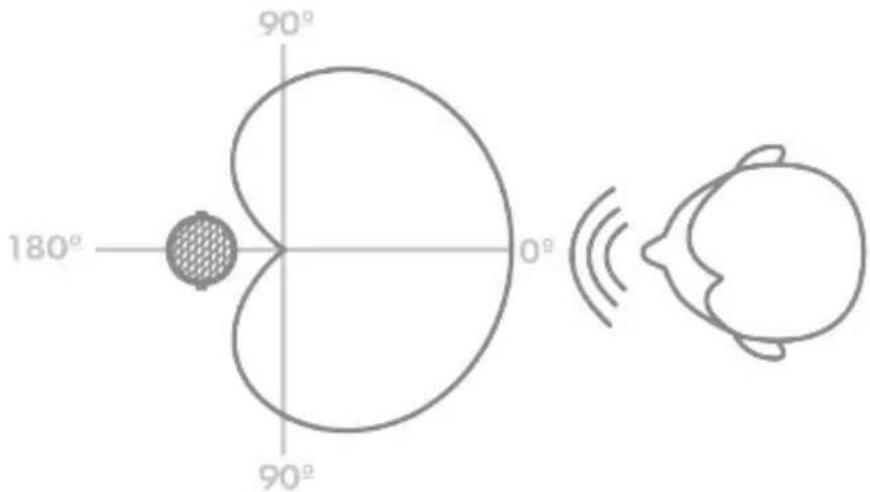
A. Cardioid: The cardioid pattern captures sound primarily from the front, with good rejection of side and rear noise. The pattern can be visualized like an open fan, and is great for capturing sources that require focus and an up-front sound - like lead vocals!
B. Omnidirectional: The "omni" pattern captures sound evenly from all directions with no rejection. This pattern can be visualized like a sphere, and is great for capturing the entire sound of the room that the source is in, including all reverb and reflections from surfaces.
C. Figure-8: The figure-8 pattern captures sound from the front, and separately, the back, rejecting sound from the sides. This pattern can be visualized like two cardioid patterns in a mirror image, flipped vertically. The figure-8 pattern is ideal when the goal is to capture focused tone on one or both sides of the mic with stronger side-rejection than cardioid.
2. XLR Output
The WA-87jr's output is a balanced, gold-contact 3-pin XLR which accepts a standard XLR to XLR shielded microphone cable.
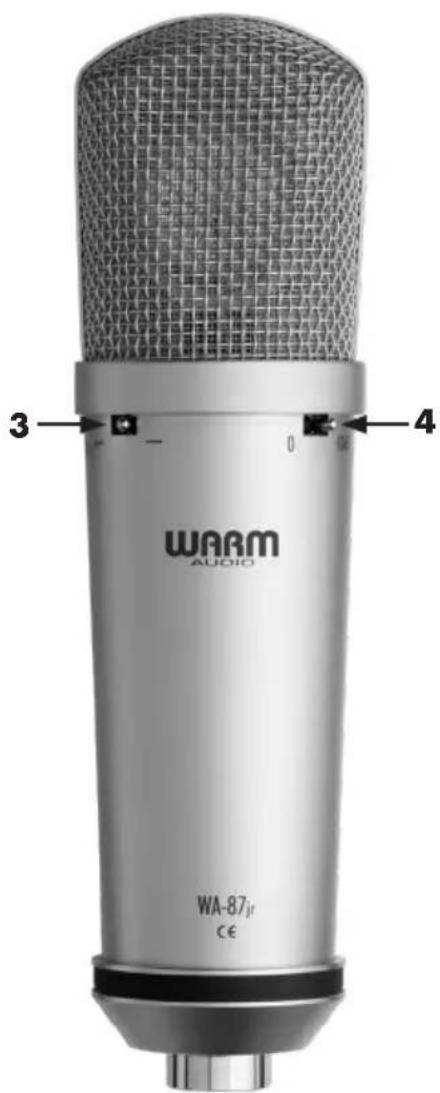
3. High-Pass Filter Control
This switch on the WA-87jr engages a 70 Hz high pass filter that eliminates bass frequencies under 70 Hz from hitting your mix. Engaging this control should produce audible reduction in rumble, mud, and boomy bass. This is great to use when available preamps lack this feature, especially on sources like vocals and acoustic guitar.
4. -10dB Pad Switch
This switch on the WA-87ir engages a -10 dB pad that allows for louder signals to hit the mic without distorting the signal, increasing the max SPL to 135 dB. Engaging this control should make it easier to handle louder sources like horns or close drum kit mic placement.

PLugging IN, GETTING TONE
Here's a quick visual and checklist to follow to get started getting great tones with the WA-87jr.
- Plug the female end (no pins) of an XLR cable into the mic, plugging the male end (3 pins) into a preamp (recommended) or into your audio interface. Make sure 48v phantom power is turned on!
TIP: Add a discrete analog preamp before your interface to add even more headroom and tonal possibilities. Most interfaces will accept a preamp "in front" of the included inputs. Even if your interface only has XLR inputs, it's likely that you will be able to bypass the mic level signal for line level in the provided software to get the most out of your analog hardware.
There are features on the WA-87jr that when used properly, can make the latter mixing and editing process a lot easier!
VOLUME & GAIN STAGING
- Place the mic appropriately for the source. Make several practice (scratch) recordings and listen back to see if the tone captured aligns with your plans for the final recording.
- Adjust the volume of the preamp and any other gear you have in the signal chain in order to get the right balance of headroom (both loud and clear) to warm tone. Engage the -10 dB pad on the WA-87jr to remove unwanted distortion from extra loud sources/close mic placements.
SOLVES FOR: Distortion coming from too close or too loud sound sources.
FREQUENCY & DIRECTIONALTY WITH THE WA-47jr
- The WA-87jr adds a selectable 70Hz high pass filter right on the mic to help filter out unwanted bass and rumble. Especially in mixes with more than a few tracks, added bass frequencies can make the whole track sound muddy. When recording sources like lead vocals or acoustic guitar for songs with dense track counts, frequencies under 70 Hz will heavily compete with drums, bass, and other instruments for space and aren't needed.
SOLVES FOR: Muddy sounding mixes when blending each recording with multiple tracks.
-
The polar pattern switch on the WA-87jr helps change the "focus" on the mic's capsule. As a dual-sided capsule mic, the WA-87jr can "listen" in the front and back.
-
With the cardioid pattern being front-only (front = side with polar pattern switch), the audio from the back and far sides will be rejected. By removing all the room reflections and natural reverb, the resulting tone will be focused and up front. This is the ideal setting for any tracks that need focus, like vocals.
- If you wanted to do the opposite and capture the way a drum set or acoustic guitar sounds in a room, set the WA-87jr to Omnidirectional mode to hear not only the source but how the source reflects in the room.
WA-87jr - QUICKSTART GUIDE - CONTINUED
- For a dual-focused tone, using Figure-8 with the WA-87jr offers strong rejection on the sides and focused capture on the front or back. This works well for capturing two sources, isolated, on the same track.
TIP: Try using two WA-87irs, one in cardioid pointed towards the source, and one turned 90 degrees from the source in figure-8. This creates a unique mid-side soundscape where there is one track with focus and another capturing reflections only. There are creative ways to blend these tracks together to create or remove space in the mix.
SPECIFICATIONS
PRODUCT DESCRIPTION & EXTERNAL SPECS
- Contemporary Version Of The 87-Style All-Time Studio Vocal Mic
Large-Diaphragm FET Transformerless Condenser Microphone - Polar Patterns: Cardioid, Figure-8, & Omnidirectional
- 10 dB Pad | 70 Hz High-Pass Filter
- Includes: Shockmount, Hard Mount, Leather Storage Pouch
COMPONENTS & INTERNAL SPECS
Gold-Sputtered, Large-Diaphragm, Dual-Backplate, K87-Style Capsule
Fully Discrete Signal Path
PERFORMANCE SPECS
- Self-Noise: 9dBA | Dynamic Range: 116dBA
Maximum SPL: 125/135dB (Without/With Pad)
Frequency Range: 20Hz 20KHz
Output Impedance: 100 Ohms
Sensitivity: 10mV / Pa Or-40dB
MERCI!
4. Selector Pad -10 dB
iSwchuW87JRKcHJtJtRtoe 10000000000000000000000000000000000000000000000000000000000000000000000000
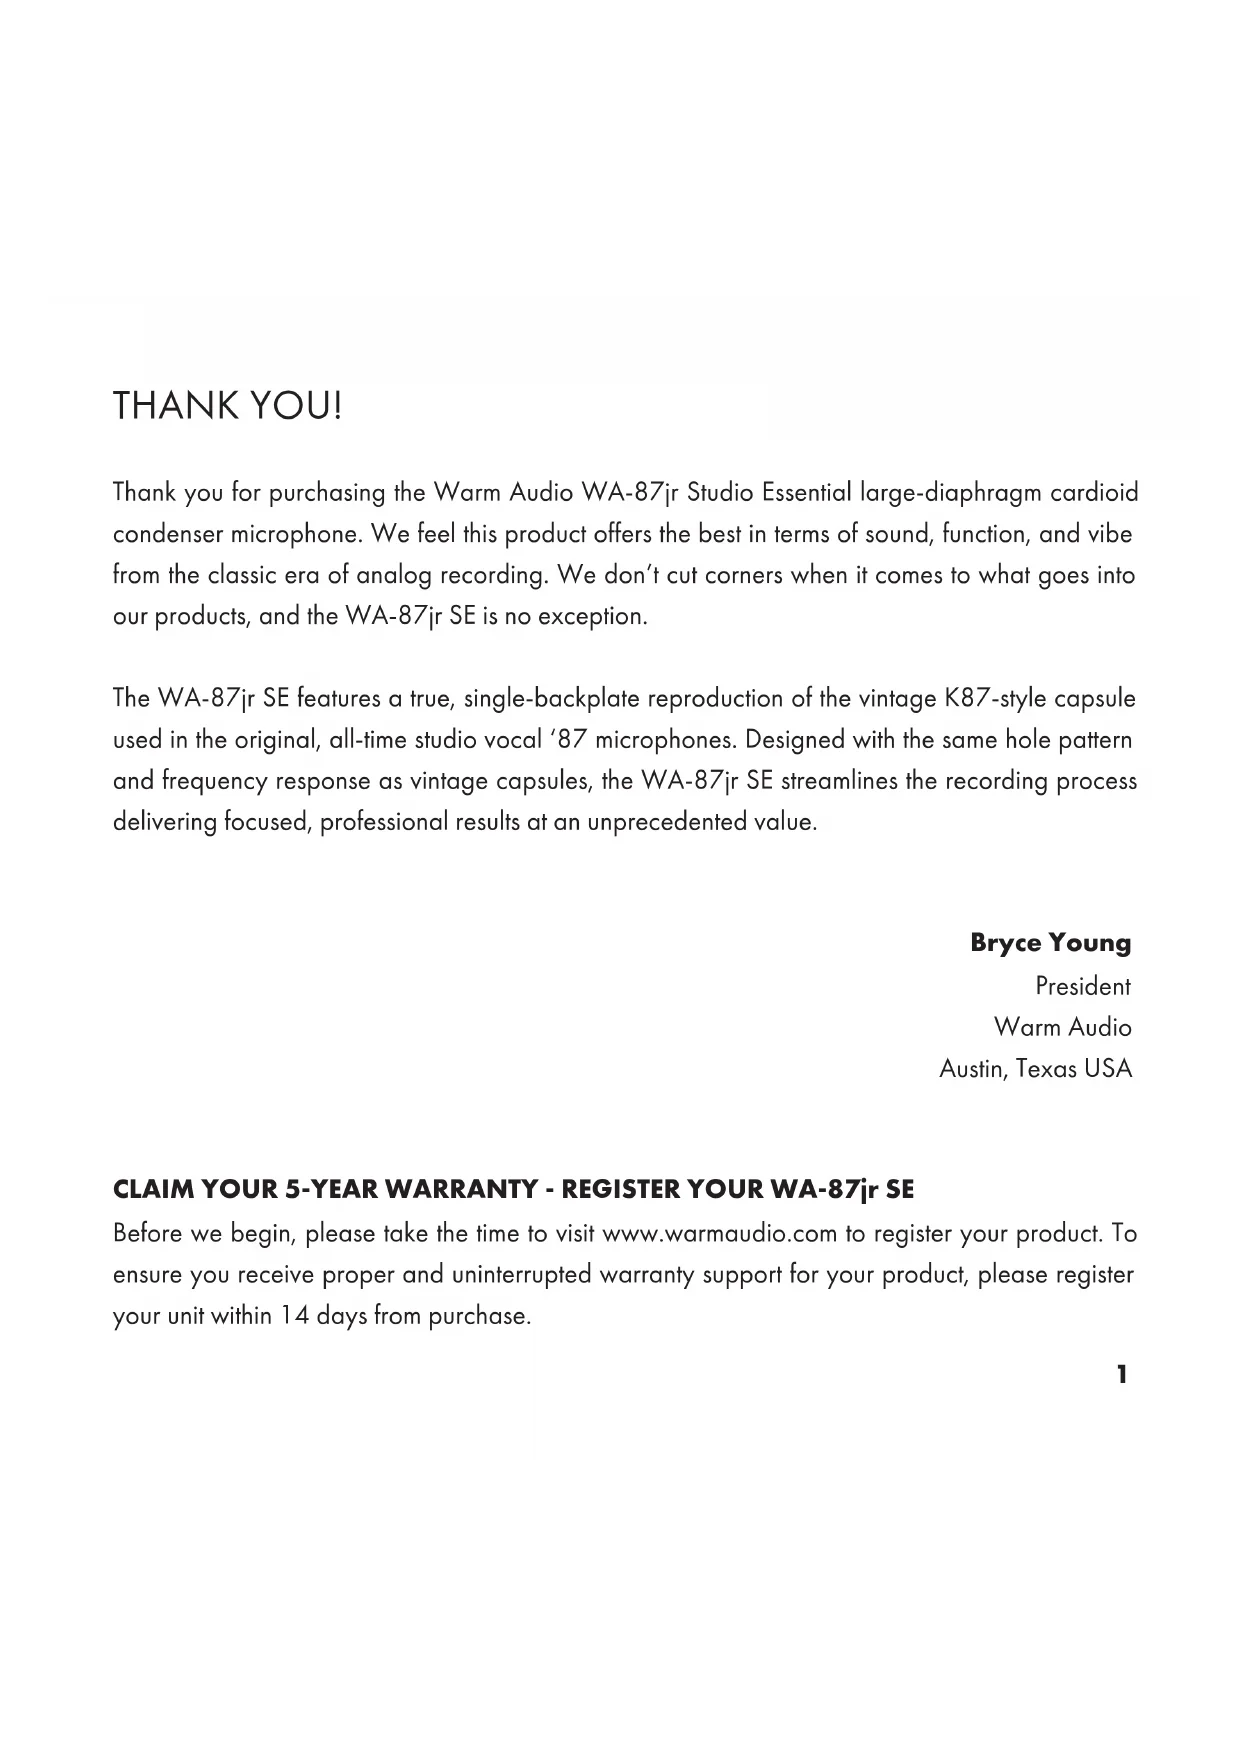
Thank you for purchasing the Warm Audio WA-87jr Studio Essential large-diaphragm cardioid condenser microphone. We feel this product offers the best in terms of sound, function, and vibe from the classic era of analog recording. We don't cut corners when it comes to what goes into our products, and the WA-87jr SE is no exception.
The WA-87jr SE features a true, single-backplate reproduction of the vintage K87-style capsule used in the original, all-time studio vocal '87 microphones. Designed with the same hole pattern and frequency response as vintage capsules, the WA-87jr SE streamlines the recording process delivering focused, professional results at an unprecedented value.
Bryce Young
President
Warm Audio
Austin, Texas USA
CLAIM YOUR 5-YEAR WARRANTY - REGISTER YOUR WA-87jr SE
Before we begin, please take the time to visit www.warmaudio.com to register your product. To ensure you receive proper and uninterrupted warranty support for your product, please register your unit within 14 days from purchase.
GETTING STARTED - FEATURES
A LEGENDARY HISTORY
The WA-87jr Studio Essential is a streamlined version of the classic '87-style mic, lauded for its pristine top end and professional vocal polish, with a modern circuit design and cardioid polar pattern. WA-87jr SE uses a single-backplate version of the K87-style capsule found in the award-winning WA-87 R2 professional microphone used throughout professional studios worldwide.
1. Cardioid Polar Pattern
The cardioid polar pattern captures sound from the front of the mic and rejects audio from the sides and back. Placing the mic in front of the source and adjusting the mic's distance to the source will determine how loud the sound will be coming into the recording or streaming equipment.

Included Accessories
The WA-87jr SE includes a custom hardmount and leather carrying case.
WA-87JR STUDIO ESSENTIAL - QUICKSTART GUIDE
PLUGGING IN, GETTING TONE
Here's what you need to know to get started getting great tones with the WA-87jr SE.
- Plug the female end (no pins) of an XLR cable into the mic, plugging the male end (3 pins) into a preamp (recommended) or into your audio interface. Make sure 48v phantom power is turned on!
TIP: Add a dedicated mic preamp before your interface to add even more headroom and tonal possibilities. Most interfaces will accept a preamp "in front" of the included inputs. Even if your interface only has XLR inputs, it's likely that you will be able to bypass the mic level signal for line level in the provided software to get the most out of your hardware.
SETTING UP FOR RECORDING, PODCASTING & STREAMING
When set up properly, the WA-87jr SE can even make recording, editing, mixing, and streaming a lot easier!
VOLUME & GAIN STAGING
- Place the mic appropriately for the source. Make several practice (scratch) recordings and listen back to see if the tone captured aligns with your plans for the final recording.
WA-87JR STUDIO ESSENTIAL - QUICKSTART GUIDE
VOLUME & GAIN STAGING CONT.
- Adjust the volume of the preamp and any other gear you have in the signal chain in order to get the right balance of headroom (both loud and clear) to warm tone.
TIPS FOR PODCASTING & STREAMING
- When streaming, make sure you are monitoring your audio in headphones for proper isolation. Monitoring a condenser mic with speakers in front of the mic can cause nasty feedback that you and your followers won't want to hear!
- For best results, record scratch tracks (as mentioned above) before your stream or podcast recording to hear how you will sound. Rooms with flat, hard surfaces (think hardwood floors and drywall) create echo. Adding curtains, rugs, or professional acoustic paneling can help reduce echo and reflections. Having a proper boom arm and speaking close to the mic capsule can help reduce unwanted room noise. Always check your gain, meaning the sensitivity of the mic to make sure you are not distorting on the output - the volume you hear in the headphones.
TIP: Grab a friend and run a private stream. Have them give feedback on volume and tone adjustments from your mic placement and your interface or equipment settings.
SPECIFICATIONS
PRODUCT DESCRIPTION & EXTERNAL SPECS
- Streamlined Version Of The 87-Style All-Time Studio Vocal Mic
Large-Diaphragm Cardioid Condenser Microphone - Includes: Hard Mount, Leather Storage Pouch
COMPONENTS & INTERNAL SPECS
- Gold-Sputtered, Large-Diaphragm, Single-Backplate, K87-Style Capsule
Fully Discrete Signal Path
PERFORMANCE SPECS
- Self-Noise: 9dBA | Dynamic Range: 116dBA
Maximum SPL: 125dB
Frequency Range: 20Hz 20kHz
Output Impedance: 100 Ohms
Sensitivity: -37dBV or 14mV/Pa
MERCI!
- 87 SsTaiIiJiJiJiJiJiJiJiJiJiJiJiJiJiJiJiJiJiJiJiJiJiJiJiJiJiJiJiJiJiJiJiJi
- 大達図ドai어フROMKaiDiOoiDkQDNK 1
- 亻:hth 雨云,
Warm Audio warranties this product to be free from defect in materials and workmanship for five years from the date of purchase, for the original purchaser to whom this equipment is registered. This warranty is non-transferrable.
Exemption Note: vacuum tubes are warranted for one year from the purchase date.
This warranty is void in the event of damage incurred from unauthorized service to this unit, or from electrical or mechanical modification to this unit. This warranty does not cover damage resulting from abuse, accidental damage, misuse, improper electrical conditions such as mis-wiring, incorrect voltage or frequency, unstable power, disconnection from earth ground (for products requiring a 3 pin, grounded power cable), or from exposure to hostile environmental conditions such as moisture, humidity, smoke, fire, sand or other debris, and extreme temperatures.
Warm Audio will, at its sole discretion, repair or replace this product in a timely manner. This limited warranty extends only to products determined to be defective and does not cover incidental costs such as equipment rental, loss of revenue, etc. Please visit us at www.warmaudio.com for more information on your warranty, or to request warranty service.
This warranty applies to products sold globally by authorized Warm Audio retailers. Depending on the state in which you live, you may have rights in addition to those covered in this statement. Please refer to your state laws or see your local Warm Audio retailer for more information. For warranty information in countries outside the United States, please refer to your local Warm Audio distributor.
NON-WARRANTY SERVICE
If you have a defective unit that is outside of our warranty period or conditions; we are still here for you and can get your unit working again for a modest service fee. Please visit us at www.warmaudio.com to contact us about setting up a repair or for more information.
With proper care, your Warm Audio gear should last a lifetime and provide a lifetime of enjoyment. We believe the best advertisement we can have is a properly working unit being put to great use. Let's work together to make it happen.
GARANTIE LIMITEE DE 5 ANS
SERVICE BUITEN GARANTIE
It is the best way to use this technique to prepare a suitable set of suitable equipment. It is important to be able to use the equipment properly and carefully. It is important to be able to use the equipment properly and carefully.
Best of the Sures
SAFETY WARNING FOR PRODUCTS

Please pay attention to the following safety instructions to ensure safe use of your electronic product:
- Power Supply: Use only the recommended power supply and the correct cables to avoid overheating or short circuits.
- Water Protection: Keep the product away from water and other liquids. Do not use it in damp environments.
- Ventilation: Ensure that the device is adequately ventilated. Do not block ventilation openings to prevent overheating.
- Repairs: Do not attempt to repair the product yourself. Contact an authorized service partner to avoid damage or injury.
- Children: Keep the product out of reach of children. It contains small parts and can be dangerous if misused.
- Visible Damage: Regularly check the product for visible damage. Do not use it if it is damaged.
Please read the user manual carefully and follow all safety instructions. Your safety is our top priority!