BU5501 - CD Player Denon DJ - Free user manual and instructions
Find the device manual for free BU5501 Denon DJ in PDF.
User questions about BU5501 Denon DJ
0 question about this device. Answer the ones you know or ask your own.
Ask a new question about this device
Download the instructions for your CD Player in PDF format for free! Find your manual BU5501 - Denon DJ and take your electronic device back in hand. On this page are published all the documents necessary for the use of your device. BU5501 by Denon DJ.
USER MANUAL BU5501 Denon DJ
CD DRIVE & MOUNTING KIT
CD ローナフ&マウnton��キット
BU5501
Owner's Manual
Bedienungsanleitung
The lightning flash with arrowhead symbol, within an equatorial triangle, is intended to alert the user to the presence of uninsulated "dangerous voltage" within the product's enclosure that may be of sufficient magnitude to constitute a risk of electric shock to persons.

The exclamation point within an equilateral triangle is intended to alert the user to the presence of important operating and maintenance (servicing) instructions in the literature accompanying the appliance.
IMPORTANT TO SAFETY
WARNING:
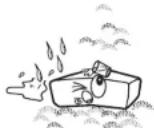
To reduce the risk of fire and electric shock, this apparatus should not be exposed to rain or moisture and objects filled with liquids, such as vases, should not be placed on this apparatus.
European models
Marking sign is located on bottom of the unit.
U.S.A., Canada models
This device complies with Part 15 of the FCC Rules. Operation is subject to the following two conditions: (1) This device may not cause harmful interference, and (2) this device must accept any Interference received, including interference that may cause undesired operation.
THIS PRODUCT COMPLIES WITH DHHS 100% RATING. THIS PRODUCT HAS NOT BEEN APPROVED FOR APPLICABLE AT DATE OF MANUFACTURE.
IMPORTANT SAFETY INSTRUCTIONS
READ BEFORE OPERATING EQUIPMENT
This product was designed and manufactured to meet strict quality and safety standards. There are, however, some installation and operation precautions which you should be particularly aware of.
-
Read these instructions.
-
Keep these instructions.
-
Heed all warnings.
-
Follow all instructions.
-
Do not use this apparatus near water.
-
Clean only with dry cloth
-
Do not block any ventilation openings. Install in accordance with the manufacture's instructions.
-
De not install near any heat sources such as radiators, host registers, stoves, or other apparatus (including amplifiers) that produce heat.
-
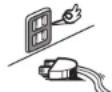
Do not destroy the safety purpose of the polarized or grounding type plug. A polarized plug has two blades with one wider than the other. A grounding type plug has two blades and a third grounding rhop. The wide blade or the third rhop are provided for your safety. If the provided plug does not fit into your outlet, consult an electrician for replacement of the obsolete outlet.
-
Protect the power cord from being walked on or pinched particularly at plugs, convenience receptacles, and the point where they exit from the apparatus.
-
Only use attachments/accessories specified by the manufacturer
12 Use only with the cart, stand, tripod, bracket, or table specified by the manufacturer, or sold with the apparatus. When a cart is used, use caution when moving the cart; apparatus combination to avoid injury from tip over.
-
Unplug this apparatus during lightning storms or when unused for long periods of time.
-
Faler for all surviving to qualified service personnel. Servicing is required when the apparatus has been damaged in any way, such as power-supply cord or plug is damaged, liquid has been spilled or objects have fallen into the apparatus, the apparatus has been exposed to rain or moisture, does not operate normally, or has been dropped.
Additional Safety Information
- Marked terminals are HAZAFOCUS LIVE and that the external wiring connected to those terminal requires installation by an instructed person or the use of ready-made leads or cores.
□ NOTE ON USE / HINWEISE ZUM GEBRAUCH / OBSERVATIONS RELATIVES A L'UTILISATION / NOTE SULL'USO / NOTAS SOBRE EL USO / ALVORENS TE GEBRUIKEN / OBSERVERA ANGÄENDE ANVÄNDNINGEN

- Avoid high temperatures.
Allow for sufficient heat dispersion when restated in a rack.
Vermodeh Sio hno Iamoratun.
Beachten Sse, dass eine zuschücksende Befristung gewährt ist wird, wenn das Geset auf ein Regal gestellt wird.
Eviter des tempres et voies.
Tenir compte d'une dispersion de caleur sur la fiestaude lors del'initiation sur une etage.
Eytatae di asporto lunita e temperature selyate.
Assuratisti chvi si ia un aagouta disporsia del calore, quince instilata lunti in a mobile per compositi auditi.
q
Formato: su superficie dispossession cel color cuiico est inisidiato e la consola.
Vermild hoge temperaturen.
Zong et ci all instiels en un auloricook vor, de do door agen.
Ile selip genproducesveeante goed kan worden agevocn. - Uncivik hoga temperature
Se till alle det firsts mijigert till god vamweseding vid monitoring i ettack.
- Handle the power core carefully.
Hold the plug when unplugging the cord.
Genen Sile vorsichtn mit dem Natzkabel um
Haltten Sie das Kabel am Stecker, wenn Sie den Stecker herauszehen.
* Maniqueur le cordon d'almentat on avec précaution.
Lanciase loss u depanementu or
Maeepn
Tenete Terns la spine quand oocolgeate il cavo da lce.
- Manaje e condon de energia on canulado.
Sostenge el enrcule cuando descnnece el cordon de enrgie.
Huaagat
Iouh het snoer de stekerke vaut winnere deze moet wunder an of lagesppeld.
Hbtae oikksin sersant
Hali keshel nir den sapples fio shhctog.
- Keep the unit free from moisture, water, and dust.
- Halten Sie das Cerit von Feuchigkeit, Wasser und Staub fern.
- Protégé' apparénte contre l'humidité, l'eu et la pousseis.
- Tenots l'unté tortana dallumisita, dallacque c dali pièverie.
- Mantenga el equipo llore de numeced,ague y palso.
- Leat goon vontighed, water of stof in hot apparatus binnendingen.
- Utsattinte acparaten fortkt, vatten oon demm.
*For apparatus uses with ventilation holes
- Ds not schulc the vxtution tals
- Dacken Sien aep Liiftpargnreirb pch 1
- No one sboutse his tous dianation
- Non regulatory framework
No other issues or conflicts of interest - De vontieipogeniogen moer, net wondn bealokceerd
Ting tnti veitioeipsoing
Do not et foreign objects into the unit
- Lasser sie keine fremden Gegenstände in das Gericht cormen.
- Ne pas lasser des opels étrangers dans l'apparéit.
Non inscrtio corpia francialnte depellun
No de e obelos extrinncs del equo: -
Let genemoe boverwer in it apceret valan. - for titt fainmert mert intin in anrson
-
30 anrnnnne nene rannnne dargnrrnng

Do not let insecticides, benzene, and thinner corne in contact with the soil.
- Lassen Sie das Ergebnis nicht mit Insekziden, Benzin oder Veredlungsamitteln in Berhargung zusammen.
- Ne pas meille en contact des insecticides, ou benzene et un diluent avec (apparit).
Assicularei che lunita non enti in contato con insettioli, benolo e soventi.
No permits el contado de inestigndos, genia y duyentes con el equipo.
Voorkom fot insecticides, benzonc of vefferturner met di tese: a contact kernel.
- Se till att nsteinsche mod a cyaebru censen oit thinner kromm i kontakt mad acperatoren holo.

- Never disassemble or modify the unit in any way.
Versuchen Sie nimals das Gefält auszinsander zu erhönen oder zu verträgen. - N je jamais démonter ou modifier l'apparéil d'une manière ou d'une autre.
Non opreite nmeiie 100 in aev mode - Nunca desarme o modifiee el equipo de ninguna manera.
- Dix tostel meigt nog qodomortend o angepast worden. Ta inte, sa r asparaten och fersk i tve gyn om den.
CAUTION:
- The ventilation should not be impeded by covering the ventilation openings with items such as newspapers, tablecloths, curtains, etc.
No naked flame sources, such as lighted candles, should be placed on the unit - Observe and follow local regulations regarding battery disposal.
- Do not expose the unit to dripping or spashing fluids.
- Do not place objects filed with liquids, such as vases, on the unit.
ACHTUNG:
To completely disconnect this product from the mains, disconnect the plug from the wall socket outlet.
The mains plug is used to completely interrupt the power supply to the unit and must be within easy access by the user.
VORSICHT:
- DECLARATION OF CONFORMITY
We declare under our sole responsibility that this product, to which this declaration relates, is in conformity with the following standards:
EN60005, EN55013, EN55020, EN61000-3-2 and EN61000-3-3.
Following the provisions of 73/23/EEC, 2004/108/EC and 93/88/EEC Directive.
A NOTE ABOUT RECYCLING:
This product's packaging materials are recyclable and can be reused. Please dispose of any materials in accordance with the local recycling regulations.
When discarding the unit, comply with local rules or regulations.
Batteries should never be thrown away or incinerated but disposed of in accordance with the local regulations concerning battery disposal.
This product and the supplied accessories, excluding the batteries, constitute the applicable product according to the WEEE directive.
HINWEIS ZUM RECYCLING:
1. Handle the power supply cord carefully
Do not damage or deform the power supply cord. If it is damaged or deformed, it may cause electric shock or malfunction when used. When removing from wall outlet, be sure to remove by holding the plug attachment and not by pulling the cord.
2. Do not open the rear cover
In order to prevent electric shock, do not open the top cover. If problems occur, contact your DENON DEALER.
3. Do not place anything inside
Do not place metal objects or spill liquid inside the system. Electric shock or malfunction may result.
NOTE:
This CD player uses the semiconductor laser. To allow you to enjoy music at a stable operation, it is recommended to use this in a room of 5^ (41°F)–35°C (95°F).

Use compact discs that include the 102 k.
CD's with special shapes (heart-shaped CD's, octagonal CD's, etc.) cannot be played on this set.
Attempting to do so may damage the set. Do not use such CD's.
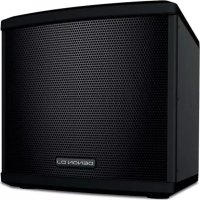
We greatly appreciate your purchase of this product. The BU5501 CD Drive & Mounting Kit is designed specifically for mounting to the DN-HS5500 Professional Media & Controller.
Accessories
Check that the following parts supplied with the product.
| ① Owner's Manual | 1 |
| ② CD Drive & Mounting Kit | 1 |
| ③ Screws (M3 x 6 mm, Black) | 2 |
| ④ Hex. Head Screws (M3 x 6 mm) | 4 |
| ⑤ Plate | 1 |
| ⑥ Front panel | 1 |
| ⑦ Hex. wrench | 1 |
| ⑧ Service Station List | 1 |
| ⑨ Service Station List (For Japan only) | 1 |
NOTE
Be sure to download the firmware from the website shown below and update the product's firmware version. www.denoncj.com The functions describe in these handling instructions will not operate unless the firmware is updated.
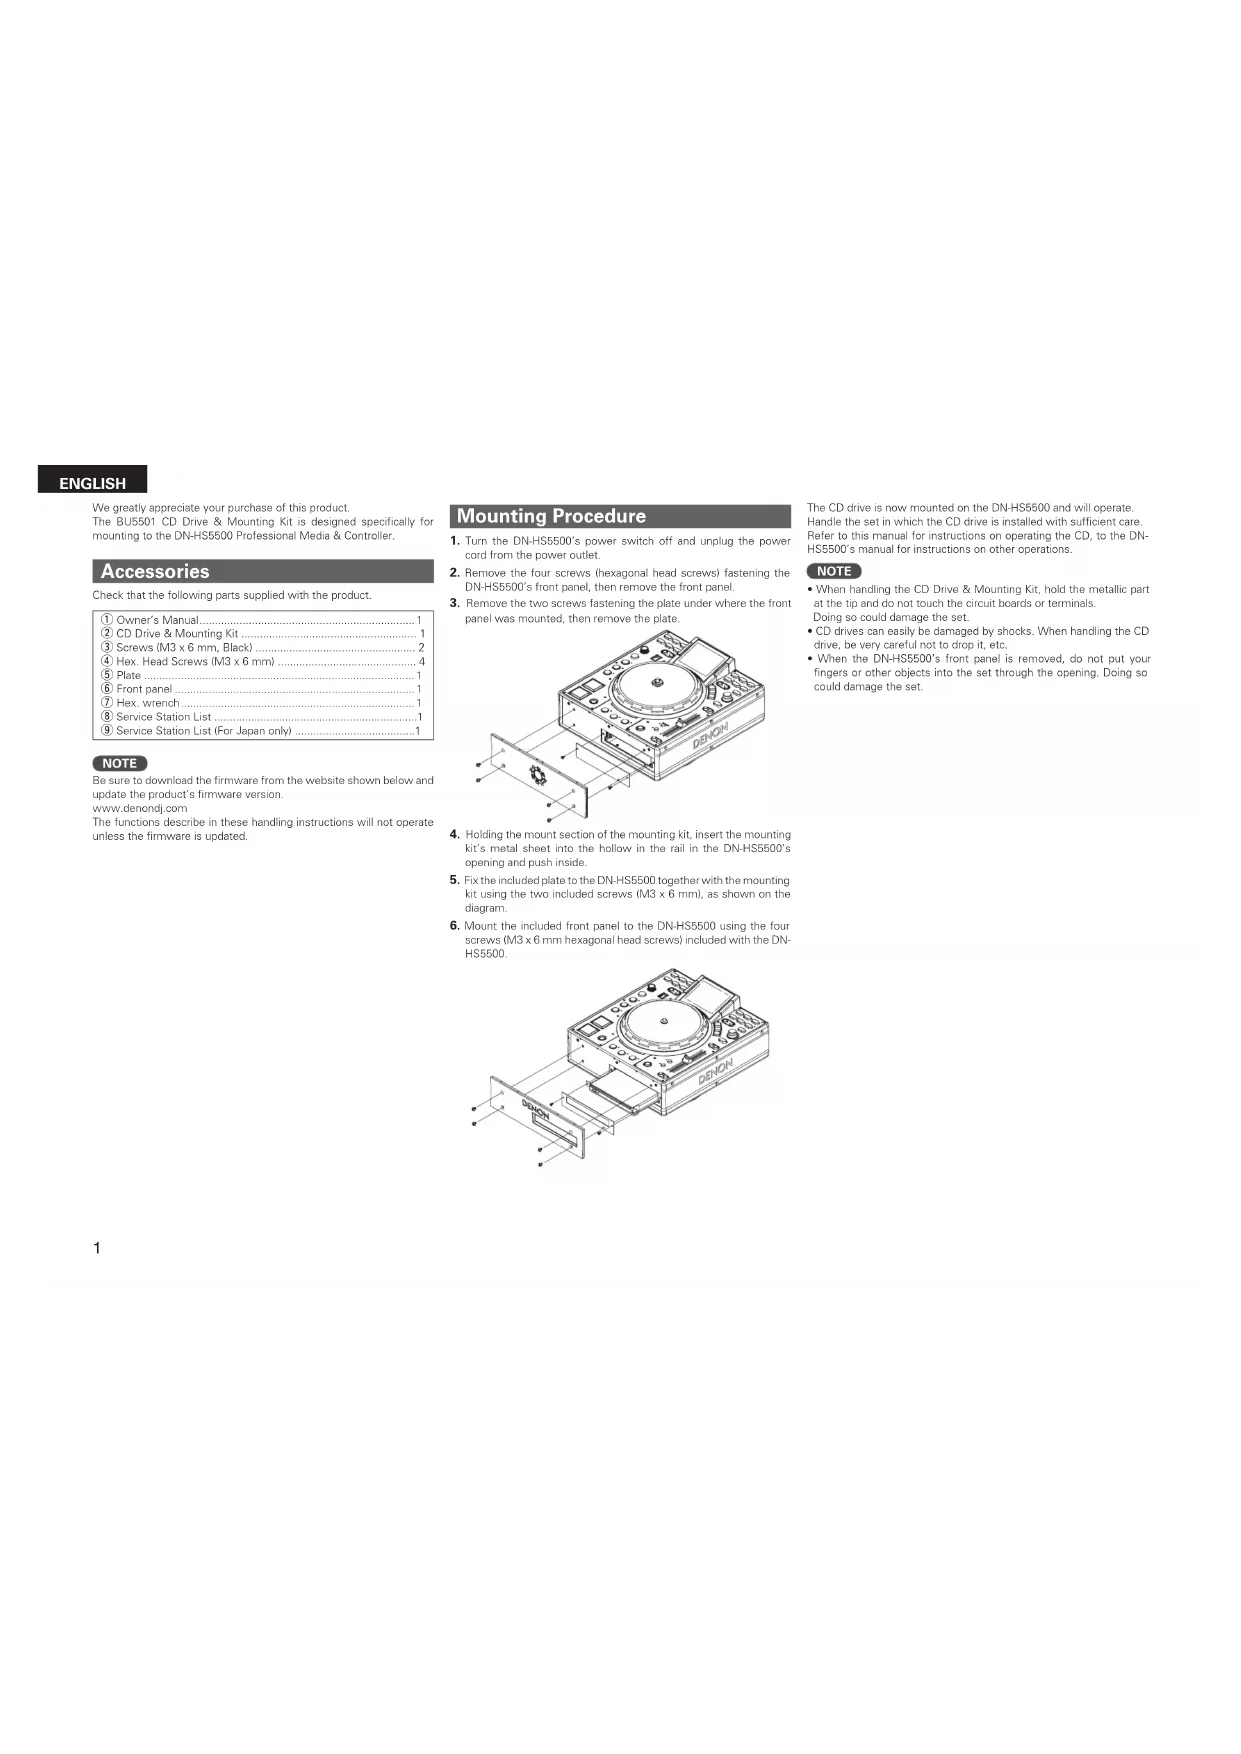
Mounting Procedure
- Turn the DN-HS5500's power switch off and unplug the power cord from the power outlet.
- Remove the four screws (hexagonal head screw) fastening the DN-HS5500's front panel, then remove the front panel.
- Remove the two screws fastening the plate under where the front panel was mounted, then remove the plate.

- Holding the mount section of the mounting kit, insert the mounting kit's metal sheet into the hollow in the rail in the DN-HS500's opening and push inside.
- Fix the included plate to the DN-HS5500 together with the mounting kit using the two included screws (IM3 x 6 mm), as shown on the diagram.
- Mount the included front panel to the DN-HS5500 using the four screws (M3 x 6 mm hexagonal head screw) included with the DN-HS5500.
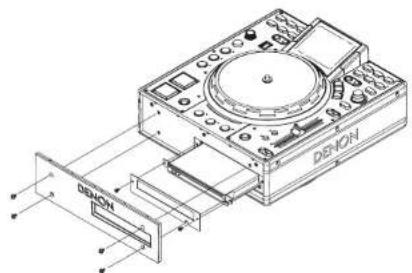
The CD drive is now mounted on the DN-HS5500 and will operate. Handle the set in which the CD drive is installed with sufficient care. Refer to this manual for instructions on operating the CD, to the DN-HS5500's manual for instructions on other operations.
NOTE
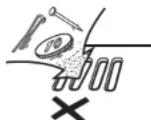
- When handling the CD Drive & Mounting Kit, hold the metallic part at the tip and do not touch the circuit boards or terminals. Doing so could damage the set.
- CD drives can easily be damaged by shocks. When handling the CD drive, be very careful not to drop it, etc.
- When the DN-HSs500's front panel is removed, do not put your fingers or other objects into the set through the opening. Doing so could damage the set.
ENGLISH
Operation when CD is selected
MIRROR MIX button
When the selected device is "CD" and the mirror mix mode is turned off, the disc loaded in the CD drive is ejected when the Mirror Mix button is pressed.
If the CD is playing, ejection is locked.
For cases other than the above, see page 6.7 of the main unit's manual.
EJECT button
When the button is pressed, the disc loaded in the CD drive is ejected.
If the CD is playing, ejection is locked.
For other buttons, see page 6.7 of the main unit's manual.
Display when CD is selected
If CD is selected and no disc is loaded, the display is as shown below.
Full display mode Dual display mode
For a description of the screen, see page 8, 9 of the main unit's manual.
Device selection
For operating instructions, see page 13 of the main unit's manual.
When the included CD drive is connected and the power is started up, "HDD" switches to "CD" on the device selection screen.
Use of the CD drive is enabled when "CD" is selected.
USB1 USB2 USB3 USB4
NOTE
- When CD is selected on one of the decks, CD cannot be selected on the other deck.
The CD drive cannot be used if it is connected after the power is turned on.
Playing CDs
Use this procedure to play CDs on the DN-HS5500.
CD-DA discs can be played.
MP3 files recorded on CD-R and other such discs cannot be played.
Loading the disc
- When the CD is inserted into the disc loading slot, the standby mode is set at the first track on the disc. The CUE button lights when the standby mode is set.
- With the auto cue function, the standby mode is set at the point where the sound starts.
The setting can be changed at "Auto Cue" in the presettings (see page 34 of the main unit's manual).
□ Selecting the track
- Turn the PARAMETERS knob.
- When the PARAMETERS knob is pressed in while turning it, the tracks switch in units of 10.
SINGLE PLAY LOCK:
This function disables track selection during playback, preventing tracks from being selected or playback
stoppedaccidentally.
To cancel, press the CONT./SINGLE,-Relay button.
See "Top Panel CONT/SINGLE -Relay button" on page 7 of the main unit's manual.
ENGLISH
Making memos
Creating memos for CDs
- A total of up to 5000 memos can be stored, one memo per track. If for example a disc contains 22 tracks, 22 memos can be stored
NOTE
The track memo function's memory system handles 1000 memos as one package. 11000 memos as 5 packages! With this memory system, the memory is erased in units of packages, so if one memo is deleted, the memory number remains and the memory space does not increase. For this reason, the number of memos that can actually be stored decreases.
If 5000 memos have been stored, the "Memo Full" message is displayed. When this happens, it is necessary to delete 1 package of memory 11000 memos, starting from the oldest memos
The "MEMO" indicator flashes when a disc for which there is memo data is loaded. The indicator lights when a track for which there is memo data is selected.
The following data is stored:
a) CUE point
bl A1/B1 and A2/B2 points
Playing speed, pitch on/off and cue adjust on/off settings
di BPM data (CUE, A1 and A2)
- The A1, A2, B1 and B2 points can be on different tracks within the same disc.
If the CD memo data memory is full when you try to set a memo... If the memory is full, the "Memo Full" and "Delete 1000?" messages appear.
In this case, you must delete the 1000 oldest memos from the memory to free up space.
To free up space, press the PARAMETERS button when "Delete 1000" is displayed.
When the PARAMETERS button is pressed while the message asking you to confirm that you want to delete the memos ("Delete OK?") is displayed, 1000 memos are deleted.
For operating instructions, refer to page 25 of the main unit's manual.
Utilities
Some names have been changed
| New Old | |
| Preset Data Import/Export | |
| Preset Import File Import | |
| Preset Export File Export |
For operating instructions, refer to page 31 of the main unit's manual.
"Memo Data" has been added.
Memo Data
Use this procedure to store CD memo data onto devices and import it from devices, as well as to delete the internal CD memo data.
Memo Data mode
1 While the top menu in the utilities mode is displayed, turn the PARAMETERS knob and select "MEMO Data".
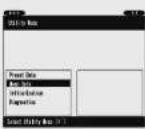
Press the PARAMETERS button to set. The "Memo Data" items are displayed.
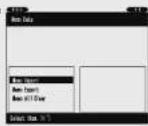
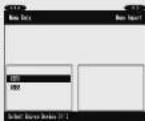
Memo Import
1 While the top menu in the memo mode is displayed, turn the PARAMETERS knob and select "MEMO Import".
The set is set to the Memo Import mode.
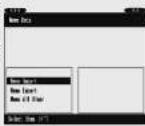
2 Select the device from which the memo data is to be imported.
A message for confirming that you want to overwrite the internal data appears.
3 Select the setting item.
When "OK" is selected:
Importing is executed. When it is completed, the set returns to as it was in step 2
When "Cancel" is selected:
The set returns to as it was in step 2
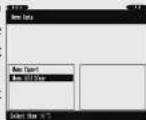
Memo Export
1 While the top menu in the memo mode is displayed, turn the PARAMETERS knob and select "MEMO Export".
The set is set to the Memo Export mode.
2 Select the device to which the memo data is to be exported.
If there is no memo data on the external USB memory device:
Exporting is executed. If there is already memo data on the external USB memory device:
A message for confirming that you want to overwrite the data
appears.
To stop 3.
3 Select the setting item.
When "OK" is selected:
Exporting is executed. A progress bar is displayed so you can watch the progress. When exporting is completed, the set returns to as it was in step 2.
When "Cancel" is selected: The set returns to as it was in
Memo All Clear
1 While the top menu in the memo mode is displayed, turn the PARAMETERS knob and select "MEMO All Clear".
A message for confirming that you want to clear the data appears. To step 2.
2 Select the setting item.
When "OK" is selected:
Clearing of all the memo data is executed. A progress bar is displayed so you can watch the progress. When clearing a
completed, the set returns to as it was in step 1.
When "Cancel" is selected:
The set returns to as it was in step 1.
DEUTSCH
2 Valj foremal for installing.
När "OK" har valts:
Professional Business Company, D&M Holdings Inc.
Printed in Japan 5411 10085 102P