SM50 - Speaker Denon DJ - Free user manual and instructions
Find the device manual for free SM50 Denon DJ in PDF.

User questions about SM50 Denon DJ
0 question about this device. Answer the ones you know or ask your own.
Ask a new question about this device
Download the instructions for your Speaker in PDF format for free! Find your manual SM50 - Denon DJ and take your electronic device back in hand. On this page are published all the documents necessary for the use of your device. SM50 by Denon DJ.
USER MANUAL SM50 Denon DJ
User Guide (English)
Box Contents
SM50 Studio Monitor (1) User Guide
IEC Power Cable (1) Safety & Warranty Manual
Isolation Pad (1)
Support
For complete system requirements, compatibility information, and product registration, visit the Denon DJ website: denondj.com.
For additional product support, visit denondj.com/support.
Specifications
| Frequency response | 50 Hz - 20 kHz (±3 dB) |
| Crossover frequency | 2.6 kHz |
| Low-frequency amplifier power 50 | W with 20-gauge wiring to this transducer |
| High-frequency amplifier power 40 | W with 20-gauge wiring to this transducer |
| LF cutoff flat, 80 Hz, 100 Hz | |
| MF boost In/Out of 2 dB centered at | 2 kHz |
| HF trim | +2 dB, 0 dB, -2 dB above 3 kHz |
| Acoustic space | 0 dB, -2 dB, and -4 dB |
| Maximum signal-to-noise (dynamic range) | >97 dB (typical A-weighted) |
| Polarity Positive signal at + input produces outward LF cone displacement | |
| Input impedance | 20 kΩ balanced, 10 kΩ unbalanced |
| Input sensitivity | 100 mV pink noise input produces 92 dBA output SPL at 1 meter with volume control at maximum |
| Power | factory-programmed for either 115V ~50/60 Hz or 230V ~50/60 Hz |
| Protection | RF interference, output current limiting; over-temperature; transient on/off protection to prevent speaker "pops"; subsonic filter; external mains fuse |
| Cabinet | Front and rear baffle 1" MDF with 0.75" MDF wrap. Black lacquer paint on enclosure with soft touch black paint on curved front plate. |
| Size (width x height x depth) | 8" x 12.5" x 10.1"191 mm x 318 mm x 257 mm |
| Weight (monitor + power cable) | 17.2 lbs./unit7.8 kg/unit |
Above specifications subject to change without notice.
Connection Diagrams
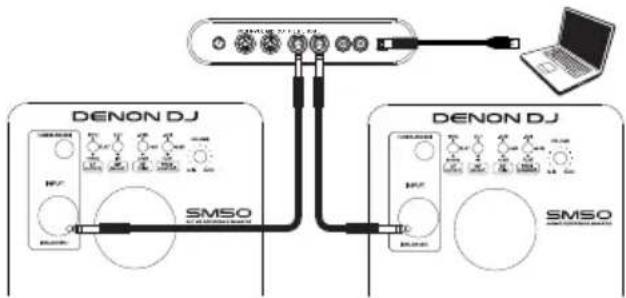
Denon DJ SM50 monitors feature balanced XLR and 1/4" connectors, as well as unbalanced RCA-type analog inputs. Connect the outputs of your audio interface, mixer, or other line-level device to these inputs.
Note: The XLR/TRS and RCA inputs are summed (i.e., mixed together) before arriving at the SM50 amplifier, so it is possible to have two sound sources connected to a speaker at the same time. However, we recommend that not playing audio through both connectors simultaneously, which may overload the inputs and result in clipping (distortion) at the inputs.
Tip: If your mixer, interface, or other audio source features both XLR/TRS and RCA-type outputs, use the XLR or TRS connectors instead of the RCA connectors whenever possible. XLR and TRS cables incorporate a "balanced" design that carries a signal over three conductors ("hot," "cold," and "ground") instead of two conductors as found in RCA cables ("hot," and "ground"). This results in lower noise, higher rejection of radio-frequency (RF) interference, and better overall fidelity. If XLR/TRS jacks are unavailable, use RCA-style cables but try to keep the cables as short as possible.
Scenario 1
Audio Interface (Balanced TRS to Balanced TRS)
flowchart
graph TD
    A["Denon DJ"] -->|SMSO| B["User Interface"]
    C["Denon DJ"] -->|SMSO| D["User Interface"]
    B --> E["Laptop"]
    D --> E
    style A fill:#f9f,stroke:#333
    style C fill:#f9f,stroke:#333
    style B fill:#ccf,stroke:#333
    style D fill:#ccf,stroke:#333
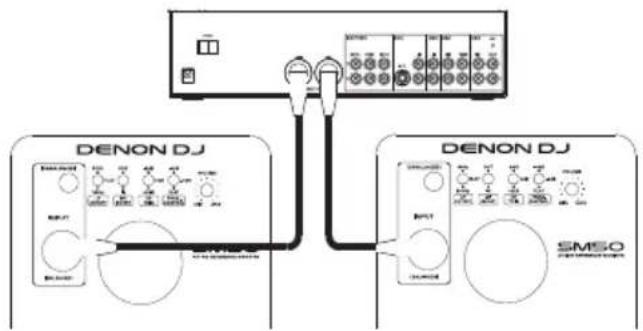
Scenario 2
Mixer (Balanced XLR to Balanced XLR)
flowchart
graph TD
    A["Power Supply"] --> B["Switch"]
    B --> C["External Switch"]
    C --> D["DENON DJ Device 1"]
    C --> E["DENON DJ Device 2"]
    D --> F["Control Unit"]
    E --> G["Control Unit"]
    F --> H["Display"]
    G --> I["Display"]
    H --> J["Signal"]
    I --> K["Signal"]
    J --> L["Output"]
    K --> M["Output"]
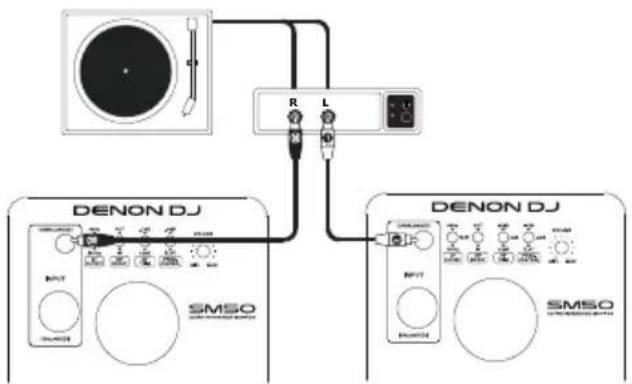
Scenario 3
Preamplifier (Unbalanced RCA to Unbalanced RCA)
flowchart
graph TD
    A["Denon DJ"] -->|R L| B["Radio"]
    A -->|R L| C["L Signal"]
    D["DENON DJ"] -->|R L| E["Radio"]
    D -->|R L| F["L Signal"]
    G["SMSO"] --> H["Radio"]
    G --> I["L Signal"]
    J["SMSO"] --> K["Radio"]
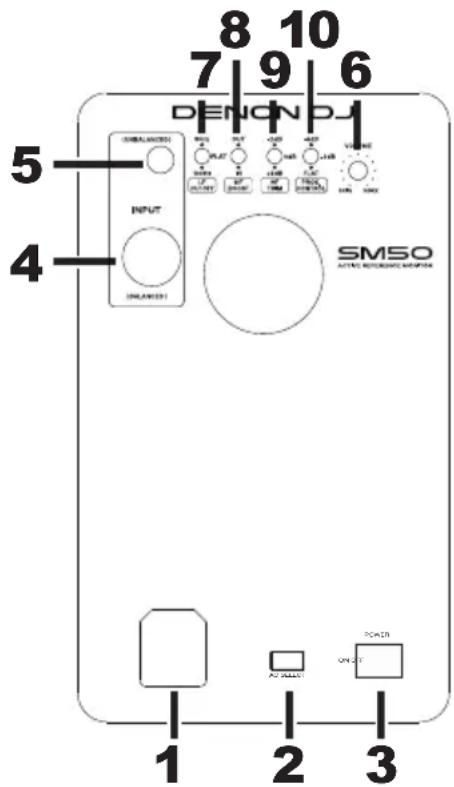
Features
- Power Connector: This socket accepts a standard IEC-type power cable.
- Input Voltage Selector*: This recessed switch adjusts the input voltage from 100-120V or 220-240V and allows your SM50 monitor to be used worldwide. Make sure this switch is set correctly for your country to prevent damage to the speaker.
- Power Switch: This switch powers your SM50 monitors on and off.
Note: This product does not have a standby/low-power mode.
-
XLR+1/4" Input (+4 dBu)**: This input jack accepts line-level signals from a balanced XLR or 1/4" TRS connector. Connect your audio interface, monitor controller, mixer, or other line-level audio source to this jack.
-
RCA Input (-10 dBV)**: This connector accepts line-level signals from audio sources with unbalanced RCA-style outputs.
-
Volume Knob: This knob adjusts the gain level of all three of the rear panel inputs (XLR, 1/4" and RCA). The gain is at minimum when the knob is turned fully counter-clockwise; the gain is set to its maximum level when the knob is turned fully clockwise; additionally, the gain is set to unity when at the 12:00 position. Adjust this knob to a position where you are working with a comfortable range of travel on the output volume knob of your connected audio interface, monitor controller, or mixing console.
-
LF Cutoff Switch: This switch sets the low-frequency cutoff point of your monitor. See the About the Rear-Panel EQ Contour Switches section to learn more about this switch.
-
MF Boost Switch: This switch allows you to contour the mid-range response of your monitor to your specific studio. See the About the Rear-Panel EQ Contour Switches section to learn more about this switch.
-
HF Trim Switch: This switch allows you to adjust the high-frequency response of the monitor to your specific studio. See the About the Rear-Panel EQ Contour Switches section to learn more about this switch.
-
Proximity Control Switch: This switch allows you to set a "shelf" EQ to tailor low-frequency response to your specific studio. See the About the Rear-Panel EQ Contour Switches section to learn more about this switch
* Power outlets in North America, Japan, and many parts of South America usually supply between 100V and 120V, whereas outlets in Europe and most of Africa and Asia provide between 220V and 240V. If you are not sure about your region, be sure to check your power outlet's rating and set the Input Voltage selector before connecting and switching on your SM50 monitors.
** The XLR/TRS and RCA inputs are summed (i.e., mixed together) before arriving at the SM50 amplifier. We recommend not playing audio through both connectors simultaneously, which may overload the inputs and result in clipping (distortion) at the inputs.
Declaration for Always-On Products for Regulation (EC) No. 1275/2008:
To provide audio signal at the noise floor level, this studio monitor speaker product should be in the “always on” status for terminal users to use. The requirement of a power management function as provided under point 2(d) of Annex II would be “inappropriate for the intended use” of the equipment. This product is an exception to the design requirements as provided under Annex II, thus an “off,” “standby” and/or “another condition” mode and a power management function is not appropriate for its intended use. When not using this product, we suggest switching it off.
text_image
8 10 7 9 6 DENNDJ 5 INPUT SMSO AUTO REFERENCE SOURCE 4 1 2 3Setup
The configuration and placement of your SM50 monitors on speaker stands or your desktop workstation may affect the performance of the speakers. Use the following tips to achieve the best performance out of your SM50 monitors.
Tip: If possible, place your SM50 monitors on speaker stands instead of your desk top. Desks tend to resonate sympathetically at low frequencies and may adversely affect the bass response of your monitors. If speaker stands are not possible due to space restrictions and you notice a buildup in bass, try placing the monitors on isolation pads (included) to acoustically de-couple the monitors from the desk.
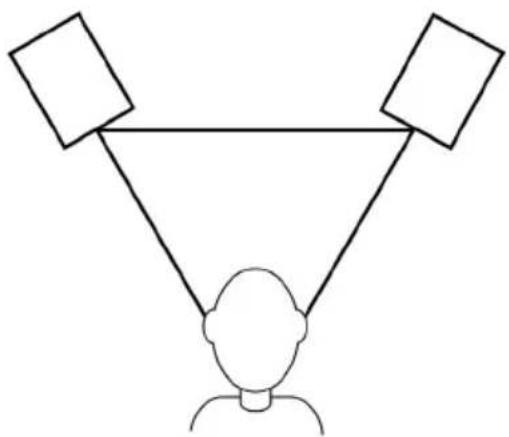
Speaker Placement
Place the SM50 monitors so that the two speakers and the engineer form an equilateral triangle when viewed from above. Angle the speakers slightly inward so that the drivers face the engineer.
In general, it is recommended that SM50 monitors be placed at least one foot away from the nearest wall, ceiling, or any other large, flat surface (the reason for this is covered in detail in the following chapter of this guide). If practical considerations such as limited studio space make this impossible, SM50 monitors include separate equalizer controls to compensate for placement near walls and corners, as well as to compensate for the general acoustic response of your monitoring environment.
flowchart
graph TD
    A["Top-Left Square"] --> B["Top-Right Square"]
    B --> C["Bottom-Left Human Figure"]
    C --> D["Bottom-Right Human Figure"]
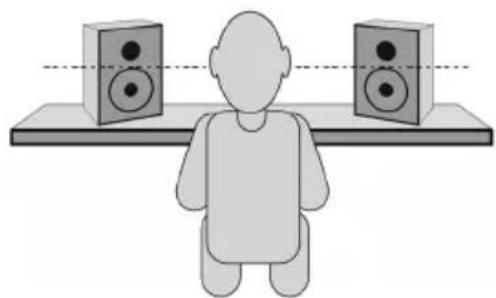
Speaker Height
Position the speakers so that they are parallel to the ground and that your ears are between the midpoint of the woofer and the tweeter.
natural_image
Illustration of a person sitting on a bench facing two speakers (no text or symbols present)Speaker Orientation
If possible, place the SM50 monitors in their upright position and avoid laying the speakers on their sides. The SM50 woofer and tweeter are vertically aligned and will provide the best performance when the speakers are placed upright. Placing them on their sides may create strong reflections from nearby surfaces resulting in spectrally unbalanced sound.
If your SM50 monitors must be oriented horizontally due to space or line-of-sight considerations, place the speakers so that their tweeter is on the "inside" to improve imaging.

natural_image
Simple line drawing of two blocks with eyes and a cross mark on a base (no text or symbols)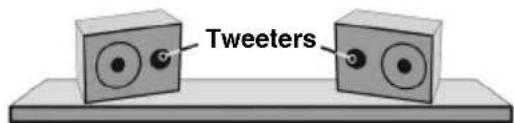
text_image
TweetersAbout the Rear-Panel EQ Contour Switches
These switches allow you to tailor the EQ curve of your SM50 monitors to complement the frequency response of your studio. Since studio monitors (including the SM50) are designed to have a flat frequency response, you may be wondering why these speakers include additional EQ controls. They are included for three reasons:
- Size, shape, and acoustical treatment of your specific studio: SM50 monitors are tested and tuned in an anechoic chamber to be as linear (flat) as possible. This means that leaving the switches set to their default settings will closely resemble monitoring in an "ideal" environment similar to those found in high-end recording studios. In these studios, acousticians carefully determine the size and shape of the control room, placement of the studio monitors and large furniture, construction materials of the walls and ceiling, as well as all acoustical treatments that must be applied to various parts of the room. All this ensures that studio monitors will sound as flat and accurate as possible at the "mixing position."
In the real world, however, many project studios are set up in preexisting rooms where the size/shape of the room cannot be easily modified to improve acoustics. This means that the design of the room itself may have adverse effects on the frequency response of the monitors (i.e., sound reflections from flat surfaces in the room may cause the monitors to not sound linear). For that reason, the SM50 features "corrective" EQ controls to compensate for adverse effects that may be caused by your room.
-
Placement of the SM50 monitors within your studio: The proximity of your SM50 monitors to the walls (and floors/ceilings) may adversely affect the frequency response of what you hear at the mixing position. This is because all speakers radiate low-frequency sounds in all directions—not just toward the mixing position. If there are large, flat surfaces (such as walls or ceilings) within one foot of the speaker, these surfaces act as low frequency "sound reflectors" that return bass energy projected from the rear of the speaker back into the studio. This can result in bass that sounds "tubby" and exaggerated.
-
Using a subwoofer: If you plan to use a subwoofer with your SM50 monitors, you will need to filter out low-frequency sounds so that only the subwoofer plays low-frequency sounds (the SM50 monitors will only play mid-range and high-frequency sounds, in this scenario). This needs to be done so that the subwoofer and SM50 monitors do not both play the same low-frequency sounds, causing a greatly exaggerated bass response within your studio.
The SM50 addresses all three of these issues with the following controls:
Proximity Control Switch
As stated earlier in this section, your SM50 should ideally be placed at least one foot away from the nearest wall, ceiling, or other large, flat surface. In the real world, this may be impractical due to space limitations within your studio. For that reason, SM50 monitors feature a Proximity Control Switch. This switch compensates for placement near walls by "shelving" (reducing) frequencies below 200 Hz. This switch should be set as follows:
- 0 dB: This default setting should be used if the monitors are placed at least one foot away from the nearest wall.
- -2 dB: This setting reduces frequencies below 200 Hz by 2 dB. Use this setting if the speakers must be placed closer than one foot from the nearest wall.
- -4 dB: This setting reduces frequencies below 200 Hz by 4 dB. Use this setting if the speakers must be placed within one foot of the corner of a room (i.e., the intersection of two walls).
Tip: Be sure to leave at least 3" of space between the rear of the speaker and a wall to allow the rear-firing port to "breathe" properly. Placing the speaker any closer than 3" may adversely affect low-frequency response.
HF Trim Switch
This control allows you to boost or attenuate (reduce) your SM50 monitors' high-frequency response above 3 kHz. This switch can be set in the following ways:
- 0 dB: This default setting leaves high-frequency signals unaffected (high-frequency sounds are neither boosted nor attenuated).
• +2 dB: This setting boosts signals above 3 kHz by 2 dB.
-2 dB: This setting attenuates signals above 3 kHz by 2 dB.
To configure the HF Trim switch, begin by mixing a few songs with this knob set to the default 0 dB position. If your mixes sound good in the studio and on other speakers (car stereos, "multimedia" computer speakers, etc.), leave this switch in the default position.
If your mixes sound good in the studio but they sound "dull" and lack high-frequency "sparkle" on other playback systems, set the switch to -2 dB.
Alternatively, if your mixes sound good in the studio but sound too "crispy" or "brittle" and contain too much high-frequency content, set this switch to +2 dB.
Setting this switch to either +2 dB or -2 dB allows the SM50 monitors to compensate for a mixing environment that is either too "live" (i.e., too much high-frequency reflection from the walls and other surfaces) or too "dead" (i.e., not enough high frequency sound is being reflected around the room).
MF Boost Switch
This control engages a mid-range boost from 1 kHz – 3 kHz with a 2 dB peak at 2 kHz. The switch can be set in the following ways:
- Out: This default setting allows incoming signals to bypass the midrange boost circuitry (the midrange of a signal is not affected).
- In: This setting engages the midrange boost circuitry and creates a 2dB peak at 2 kHz with a 1 kHz bandwidth (i.e., signals between 1.5 kHz – 2.5 kHz are boosted).
To configure the switch, leave the switch set to the Out position and mix a few songs. If you notice your mixes sound good in the studio but the midrange tends to be too prominent (e.g., the vocals/guitars are too loud) on other speakers, set the knob to In. This will make the midrange of your SM50 monitors slightly more pronounced in the studio and will result in more balanced mixes since you will be less inclined to "push" the midrange of your mixes.
LF Cutoff Switch
This control allows you to engage a high-pass filter that removes low-frequency sounds from the monitors. This switch can be set in the following ways:
- Flat: This default setting allows your monitors to play their entire frequency spectrum with no low-frequency filtering.
- 80 Hz: This setting engages a second-order (12 dB/octave) filter that rolls off frequencies below 80 Hz.
- 100 Hz: This setting engages a second-order (12 dB/octave) filter that rolls off frequencies below 100 Hz.
If you are using your SM50 monitors with a subwoofer that does not have a built-in crossover, set this switch as close as possible to the low-pass cutoff frequency of your subwoofer. The low-pass cutoff of the subwoofer should be listed in the "technical specifications" section of the subwoofer's User Guide.
If your subwoofer has an internal crossover that sends high-frequency signals out to your main monitors through a pair of outputs, leave the LF Cutoff Switch on your SM50 monitor set to Flat.
Tip: Many subwoofers feature a low-pass cutoff frequency of 80 Hz. If you are not sure about your subwoofer, use this setting as a starting point.
Tip: The Low Cutoff switch can also be engaged if you wish to hear what your mixes would sound like on speakers with smaller woofers (such as those found in most televisions).
flowchart
graph TD
    A["Person at the bottom"] --> B["Square Node 1"]
    A --> C["Square Node 2"]
    A --> D["Square Node 3"]
natural_image
Illustration of a person sitting at a desk facing two speakers (no text or symbols present)natural_image
Simple line drawing of two rectangular blocks with circular eyes on a flat base, crossed by two black X marks (no text or symbols)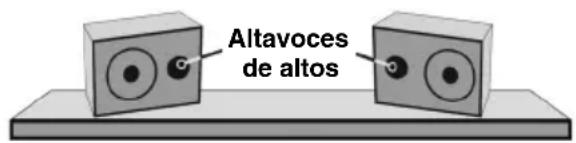
text_image
Altavoces de altosnatural_image
Simple line drawing of a person with two triangular targets above head, no text or symbols presentnatural_image
Simple line drawing of a person sitting at a desk facing two speakers (no text or symbols)natural_image
Simple line drawing of two switches on a board with no text or symbols
text_image
Tweetersflowchart
graph TD
    A["Central Device"] --> B["DENON DJ"]
    A --> C["DENON DJ"]
    B --> D["User Interface"]
    C --> E["User Interface"]
    D --> F["User Interface"]
    E --> G["User Interface"]
    F --> H["User Interface"]
    G --> I["User Interface"]
    H --> J["User Interface"]
    I --> K["User Interface"]
    J --> L["User Interface"]
    K --> M["User Interface"]
    L --> N["User Interface"]
    M --> O["User Interface"]
    N --> P["User Interface"]
    O --> Q["User Interface"]
    P --> R["User Interface"]
    Q --> S["User Interface"]
    R --> T["User Interface"]
    S --> U["User Interface"]
    T --> V["User Interface"]
    U --> W["User Interface"]
    V --> X["User Interface"]
    W --> Y["User Interface"]
    X --> Z["User Interface"]
Scenario 3
flowchart
graph TD
    A["Person at the bottom"] --> B["Square Node 1"]
    A --> C["Square Node 2"]
    A --> D["Square Node 3"]
natural_image
Illustration of a person sitting at a desk facing two speakers (no text or symbols present)natural_image
Simple line drawing of two rectangular blocks with circular eyes on a flat base, crossed by two black X marks (no text or symbols)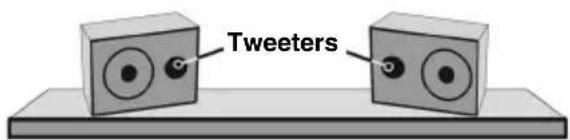
text_image
Tweetersflowchart
graph TD
    A["User Interface"] --> B["User Interface"]
    B --> C["Laptop"]
    D["DENON DJ"] --> E["User Interface"]
    E --> F["User Interface"]
    G["DENON DJ"] --> H["User Interface"]
    H --> I["User Interface"]
Setup-Szenario 2
Mischpult
(XLR symmetrisch
text_image
5 4 8 10 7 9 6 D E N O N D J SMSO 1 2 3natural_image
Simple line drawing of a person at the bottom with two empty square boxes above, no text or symbols present.natural_image
Silhouette of a person sitting on a platform facing two speakers (no text or symbols)natural_image
Two gray rectangular blocks with circular eyes on a flat base, crossed by two black X marks (no text or symbols)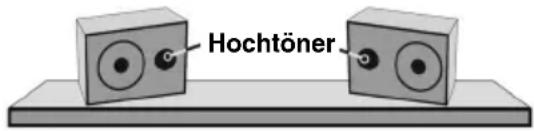
text_image
HochtönerTechnical Specifications
Denon is a trademark of D&M Holdings Inc., registered in the U.S. and other countries.
All other product or company names are trademarks or registered trademarks of their respective owners.