AquaAir Eco 250 - Water pump OASE - Free user manual and instructions
Find the device manual for free AquaAir Eco 250 OASE in PDF.

User questions about AquaAir Eco 250 OASE
0 question about this device. Answer the ones you know or ask your own.
Ask a new question about this device
Download the instructions for your Water pump in PDF format for free! Find your manual AquaAir Eco 250 - OASE and take your electronic device back in hand. On this page are published all the documents necessary for the use of your device. AquaAir Eco 250 by OASE.
USER MANUAL AquaAir Eco 250 OASE
natural_image
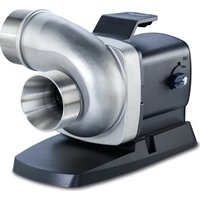
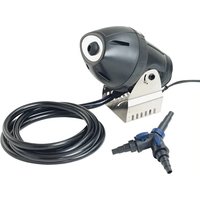
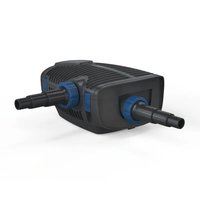
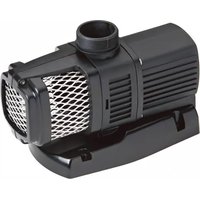
Black plastic air purifier device with mesh vent and mounting bracket (no text or symbols visible)AquaAir Eco 250
DE Inbetriebnahme
EN Commissioning
FR Mise en service
text_image
Labeled diagram of an electric motor or generator with numbered parts for identification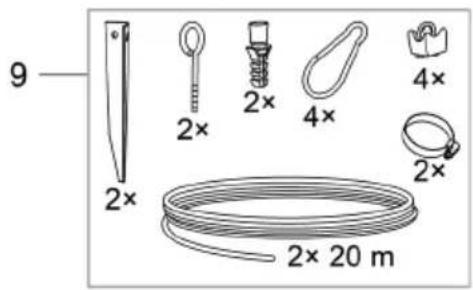
text_image
9 2× 2× 2× 4× 4× 2× 2× 2× 20 mAAR0010
□ B
text_image
Diagram of a gasifier or air vent system with labeled components and directional arrows indicating flow or movement.AAR0011
□ c
text_image
0° 22.5° 45° 67.5° 90°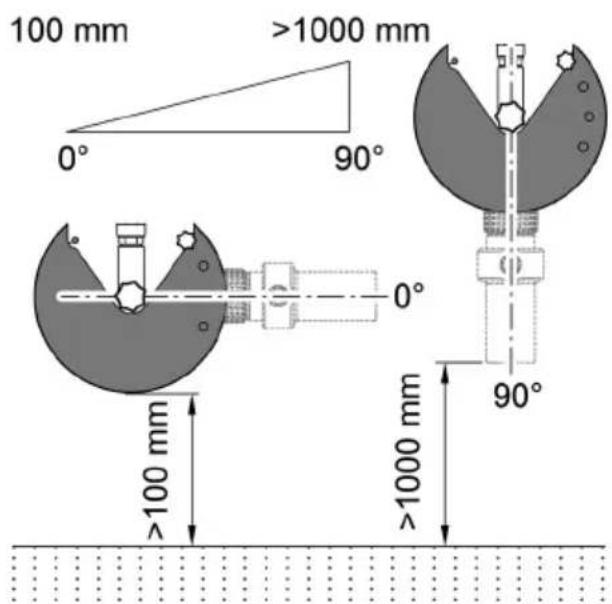
text_image
100 mm >1000 mm 0° 90° 0° >1000 mm 90° 100 mmAAR0003

D
flowchart
graph TD
    A["InScenio FM-Master\nHome / Cloud\nGarden Controller\nHome / Cloud\nOASE\nControl OUT"] --> B["<Device 1>"]
    B --> C["OASE\nControl IN OUT"]
    C --> D["..."]
    D --> E["<Device 2>"]
    E --> F["OASE\nControl IN OUT"]
    F --> G["..."]
    G --> H["<Device n>\nn ≤ 10\nOASE\nControl IN OUT"]
    H --> I["R"]
    style A fill:#f9f,stroke:#333
    style B fill:#ccf,stroke:#333
    style C fill:#cfc,stroke:#333
    style D fill:#fcc,stroke:#333
    style E fill:#cff,stroke:#333
    style F fill:#ffc,stroke:#333
    style G fill:#cfc,stroke:#333
    style H fill:#fcc,stroke:#333
    style I fill:#ffc,stroke:#333

E
text_image
1. 2. max. 2.0 Nm (max. 18 lb-in) ×PLX0004

F
text_image
≥ 2 mAAR0004
□ G
text_image
90° 90° 135° 135°AAR0005
□ H
text_image
Technical diagram illustrating a water safety system with labeled components and angular measurements for installation or monitoring.AAR0006
Environmental Function Control (EFC)....10

Environmental Function Control (EFC)
Original operating manual. This operating manual belongs with the unit and must always be handed over together with the unit.
EN
WARNING
▶ Disconnect all electrical units in the water from the power supply before reaching into the water. Otherwise there is a risk of injuries or death by electrocution.
This unit can be used by children aged 8 and above and by persons with reduced physical, sensory or mental capabilities or lack of experience and knowledge if they are supervised or have been instructed on how to use the unit in a safe way and they understand the hazards involved. Do not allow children to play with the unit. Only allow children to carry out cleaning and user maintenance under supervision.
Contents
Safety information....13
Electrical connection 13
Safe operation....13
Intended use....13
Product description....14
Overview 14
Installation and connection....14
Assembling the unit 14
Adjusting the injector nozzle....14
Connecting the control system 15
Installing the unit 15
Fastening the unit on the side of the pond 15
Fastening the unit to the bottom of the pond 16
Commissioning/start-up....16
Switching ON/OFF 16
Environmental Function Control (EFC)....16

A more detailed operating manual is available for download as a PDF online: www.oase.com/manual
The following additional topics are addressed in the operating manual:
• Product features, symbols on the unit
- Cleaning and maintenance, storage/winter-proofing, malfunction repair
- Technical data, wear parts, spare parts, disposal
Safety information
Electrical connection
- Special regulations apply to electrical installation in outdoor areas. Only allow a qualified electrician to perform the electrical installation.
- The qualified electrician has the required professional training, knowledge and skills to perform electrical installations in outdoor areas. The qualified electrician can detect potential risks and adheres to regional and national standards, regulations and directives.
- For your own safety, please consult a qualified electrician.
- Only connect the unit if the electrical data of the unit and the power supply match.
- Only plug the unit into a correctly installed outlet. Ensure that the unit is fused for a rated fault current of max. 30 mA by means of a fault current protection device.
- Extension cables and power distributors (e.g. outlet strips) must be suitable for outdoor use (splash-proof).
- Protect open plugs and sockets from moisture.
Safe operation
- Do not use the unit, if electrical lines or the housing are damaged.
- A damaged connection cable cannot be replaced. Dispose of the unit.
- Do not carry or pull the unit by its power cable.
- Never make technical modifications to the unit.
- Only carry out work on the unit that is described in this manual.
- Only use original spare parts and accessories.
- Route lines so that they are protected from damage and nobody can trip over them.
- Should problems occur, please contact the authorized customer service or OASE.
Intended use
Only use the product described in this manual as follows:
- For aerating bodies of water.
• In compliance with the technical specifications.
The following restrictions apply to the unit:
- Do not use in accessible water basins.
- Never use the unit with fluids other than water.
- Do not use in conjunction with chemicals, foodstuff, easily flammable or explosive substances.
- Never run the unit without water.
- Do not use for commercial or industrial purposes.
Product description
Overview
□A
| 1 | Float | |
| 2 | Drum with integrated pump | |
| 3 | Power connection cable | |
| 4 | OASE Control OUT | Control system connection |
| 5 | OASE Control IN | The AquaAir Eco 250 is controlled via the OASE control network. For this purpose you can connect the AquaAir Eco 250 either to the OASE Garden Controller or to the OASE InScenio FM-Master Home/Cloud. For information on OASE Control visit www.oase.com. |
| 6 | Injector nozzle with Venturi principle | |
| 7 | Hose for air intake | |
| 8 | Knurled screw, when the knurled screw is loosened the drum can be turned to adjust the injector nozzle | |
| 9 | Fastening material contained in the scope of delivery | |
Installation and connection
Assembling the unit
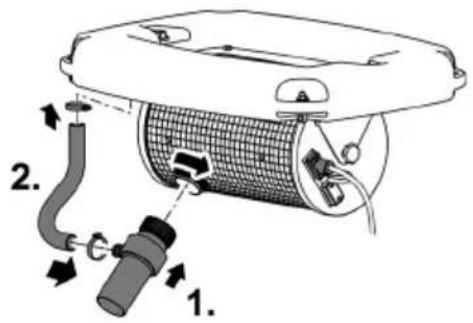
□ B
- Screw the injector nozzle onto the pump outlet.
- Attach the hose ends to the connection sockets on the injector nozzle and on the float.
- Fasten the hose with the hose clips.
Adjusting the injector nozzle
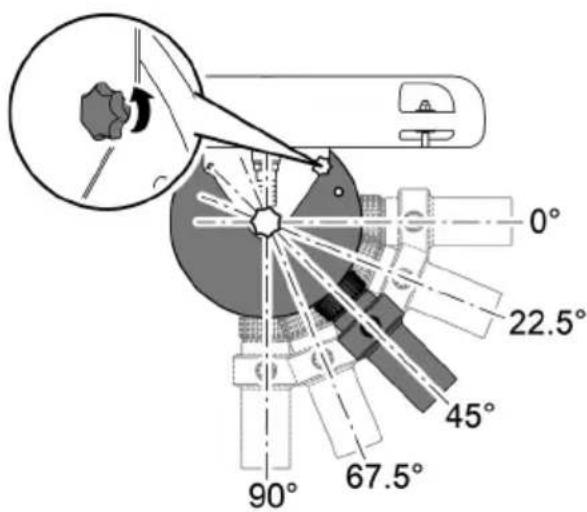
□ C
- Undo the knurled screw for locking the drum.
- Turn the drum until the injector nozzle is in the desired position.
- Tighten the knurled screw.
To optimize the effect of the injector nozzle, note the specified minimum distances from the bottom of the pond.
- When the injector nozzle is directed downwards towards to the bottom of the pond, it generates deep aeration, thereby biologically activating the pond sludge.
- When the injector nozzle is directed at a flatter angle, it generates a stronger water flow.
Connecting the control system
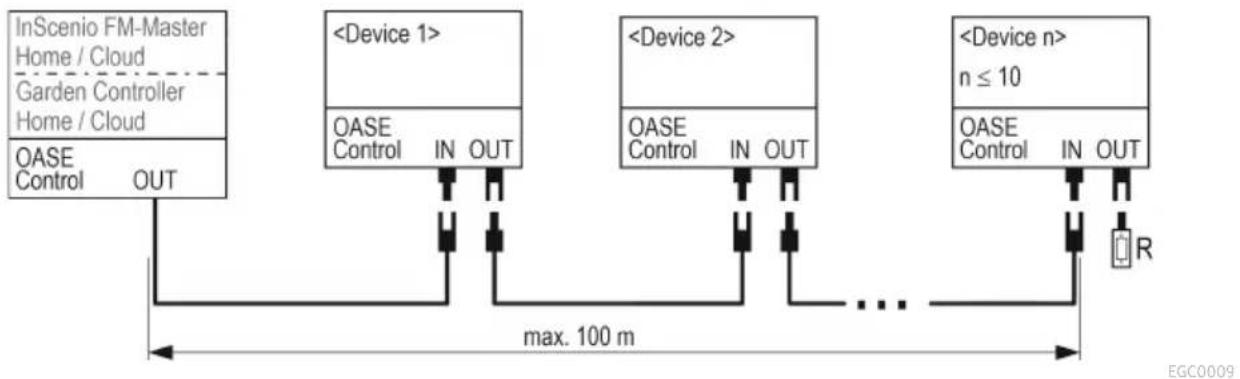
□D
Connect the AquaAir Eco 250 to the OASE Garden Controller or the OASE InScenio FM-Master Home/Cloud and control the AquaAir Eco 250 using OASE Control.
- For information on OASE Control visit www.oase.com.
i Integrate the AquaAir Eco 250 in the OASE Control network either as the only or as the final station.
- The line length in the OASE Control network is limited. If the network cable is looped through (IN/OUT) on the AquaAir Eco 250 the network cable can reach a length of 197 ft due to the 98 ft network connection cable.
Connecting and disconnecting the OASE Control plug connection
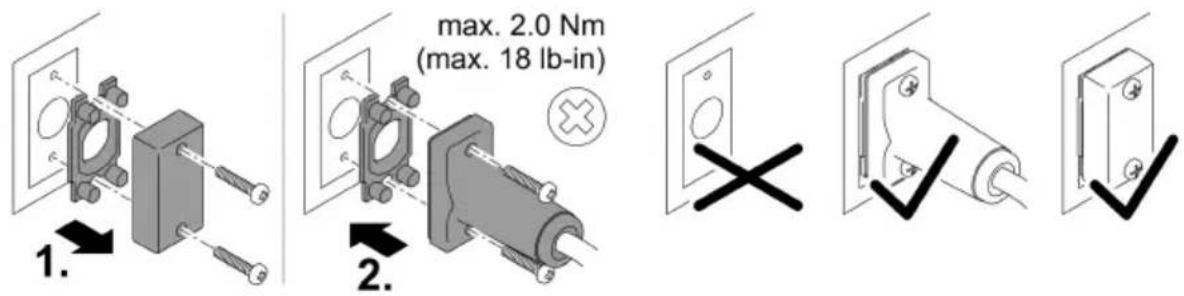
□ E
NOTE
The unit will be destroyed if water penetrates the plug connector.
- Connect the plug connector or place the protective cap on the plug connector.
- Ensure that the rubber seal is clean and fits precisely. If the rubber seal is damaged, replace it.
- Secure the plug connector or protective cap with the two screws.
Installing the unit
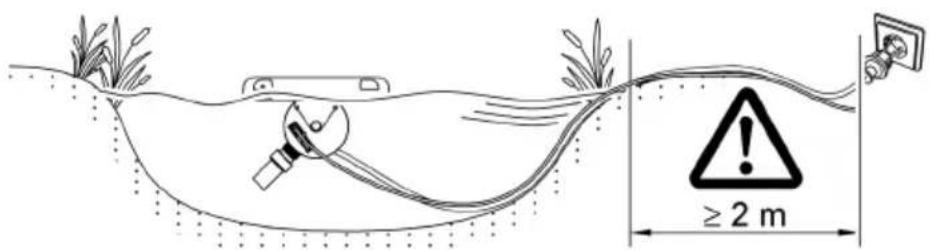
□ F
WARNING
Severe injuries or death from operation of the unit in a swimming pond. Faulty electric components will apply dangerous electric voltage to the water.
▶ Never operate the unit in a swimming pond.
Ensure that the connection to the power supply is at least 6.5 ft from the edge of the pond.
Fastening the unit on the side of the pond
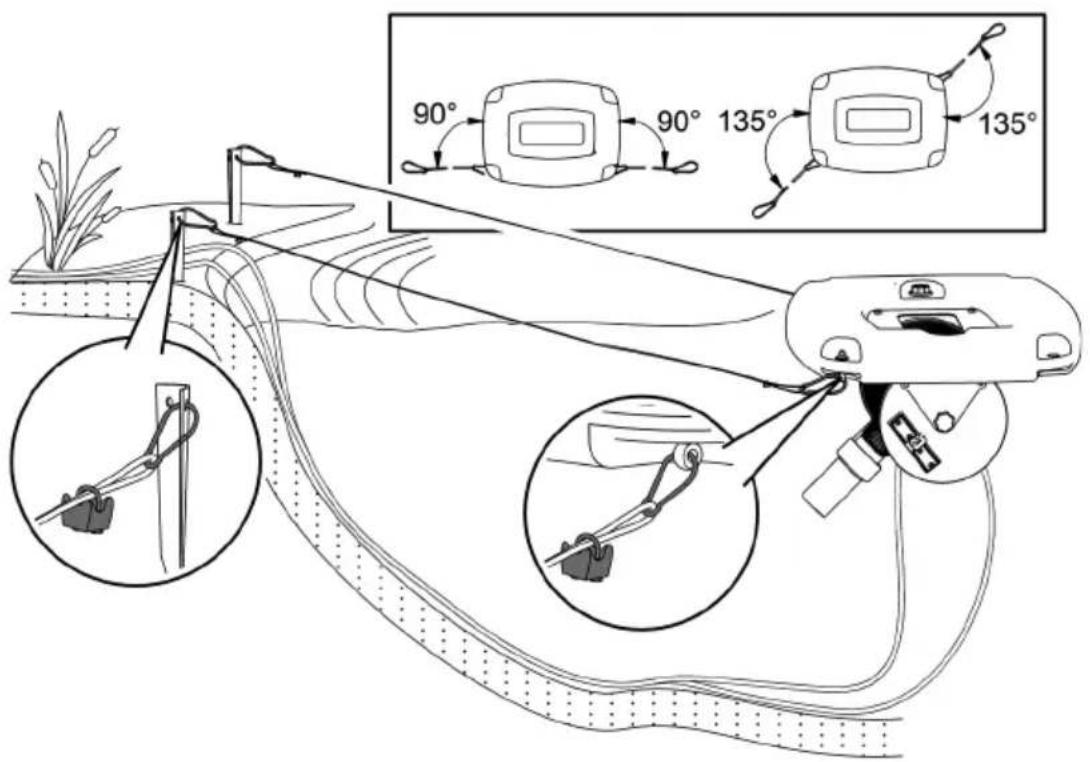
□G
- Shorten two wire cables to the desired length.
- Form loops at each of the cable ends and fasten these with cable clamps.
- Anchor the aerator using the two wire cables, the safety hook and the two pegs driven in at the side of the pond.
- Adhere to the specified anchoring angles so that the aerator cannot move.
- Relieve strain from the power cable and protect the power plug from wetness.
Fastening the unit to the bottom of the pond
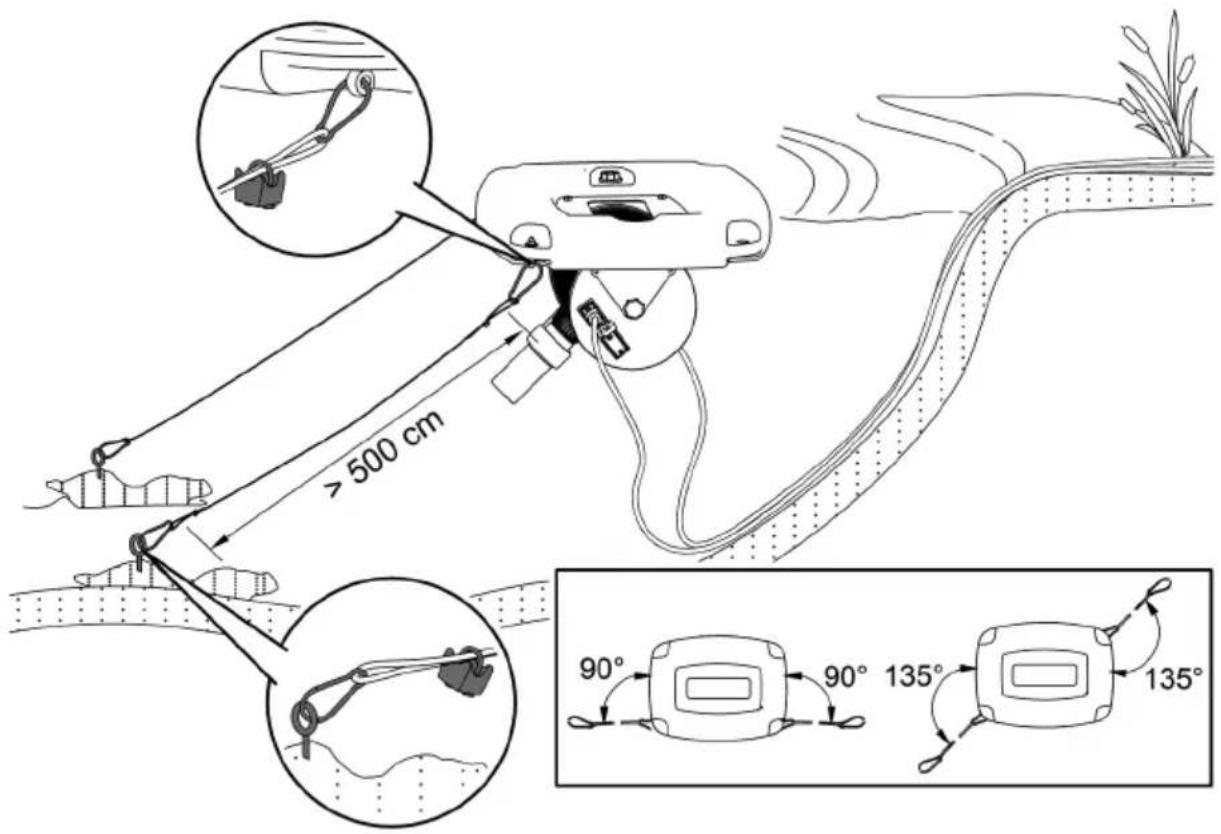
□H
- Shorten two wire cables to the desired length (minimum 16.5 ft).
- Form loops at each of the cable ends and fasten these with cable clamps.
- For anchoring to the bottom of the pond, screw the two threaded hooks into, for instance, two sufficiently heavy stones using dowels.
- Attach the cables to the threaded hooks using the safety hooks and lower the stones to the bottom of the pond.
— Adhere to the specified anchoring angles so that the aerator cannot move. - Anchor the aerator using the two wire cables and the safety hook.
- Relieve strain from the power cable and protect the power plug from wetness.
Commissioning/start-up
NOTE
The unit will be destroyed if it is operated with a dimmer. It contains sensitive electrical components.
▶ Do not connect the unit to a dimmable power supply.
NOTE
Never allow the pump to run dry. Otherwise the pump will be destroyed.
▶ Only operate pump while it is submerged.
Switching ON/OFF
- Switching on: Plug the power plug into the outlet.
– The unit switches on immediately. - Switching off: Pull the power plug from the outlet.
Environmental Function Control (EFC)
When started up, the pump automatically performs a pre-programmed self-test (Environmental Function Control (EFC)). The pump detects if it is running dry / blocked or submerged. The pump switches off automatically after approx. 90 seconds if it runs dry/is blocked. In the event of a malfunction, disconnect the power supply and "flood the pump" or remove the obstacle. Afterwards, the unit can be restarted.
Environmental Function Control (EFC) 22

Environmental Function Control (EFC)
Environmental Function Control (EFC) 28

Environmental Function Control (EFC)
Environmental Function Control (EFC)....34

Environmental Function Control (EFC)
Environmental Function Control (EFC)....40

Environmental Function Control (EFC)
Environmental Function Control (EFC).... 46

Environmental Function Control (EFC)
Environmental Function Control (EFC)....52

Du finder en videregående brugsanvisning som PDF på internettet til download: www.oase.com/manual
Environmental Function Control (EFC)
Environmental Function Control (EFC).... 58

Den komplette bruksanvisningen finner du på Internett som PDF for nedlasting www.oase.com/manual
Du finner disse ekstra emnene i bruksanvisningen:
Environmental Function Control (EFC)
Environmental Function Control (EFC)....64

Environmental Function Control (EFC)
Environmental Function Control (EFC)....70

Environmental Function Control (EFC)
Environmental Function Control (EFC)....76

Environmental Function Control (EFC)
Environmental Function Control (EFC) 82

Environmental Function Control (EFC)
Environmental Function Control (EFC) 88

Environmental Function Control (EFC)
Environmental Function Control (EFC)....94

Podrobný návod na použitie nájdete na internete v PDF formáte na stiahnutie www.oase.com/manual
Environmental Function Control (EFC)
Environmental Function Control (EFC)....100

Environmental Function Control (EFC)
Environmental Function Control (EFC)....106

Daljnje upute za uporabu pronaći ćete na internetu u PDF obliku za preuzimanje www.oase.com/manual
Environmental Function Control (EFC)
Prilikom puštanja u rad pumpa automatski obavlja unaprijed programirano samostalno testiranje ispravnosti (Environmental Function Control (EFC)). Pumpa prepoznaje radi li pritom na suho, je li blokirana ili uronjena. U slučaju rada na suho ili blokiranja, pumpa se automatski isključuje nakon otprilike 90 sekundi. U slučaju smetnje, prekinite dovod električne energije i „potopite pumpu“ odn. uklonite prepreku. Nakon toga uređaj možete ponovo uključiti.
Environmental Function Control (EFC)....112

Environmental Function Control (EFC)
Environmental Function Control (EFC)....118

Environmental Function Control (EFC)
Environmental Function Control (EFC) 124

Environmental Function Control (EFC)
Environmental Function Control (EFC)....131

Environmental Function Control (EFC)
Environmental Function Control (EFC) 137

更多PDF 使用说明书可在网上下载:
www.oase.com/manual
其他主题可在使用说明中找到: