
BC4M48M4D8JS - Washing machine CANDY - Free user manual and instructions
Find the device manual for free BC4M48M4D8JS CANDY in PDF.
| Product Type | Washing Machine |
| Brand | Candy |
| Model | BC4M48M4D8JS |
| Maximum Wash Capacity | 9 kg |
| Maximum Spin Speed | 1400 rpm |
| Wash Temperatures | Cold, 20°C, 30°C, 40°C, 60°C, 90°C |
| Number of Programs | 15 programs (Cotton, Eco 40-60, Jeans, Wool/Hand Wash, Synthetic & Mix Colors, Rinse, Drain & Spin, Delicate 59', Sport Plus 39', Hygiene Plus 59', Quick 14'/30'/44', Mix & Colors 59', Perfect Cotton 59', Special 49', Remote Control Wi-Fi) |
| Options | Prewash, Intensive rinse, Hygiene +, Easy ironing, Delayed start, Soiling level (3 levels), Quick cycles (14'/30'/44'), Steam level (on some models), Single wash, Night wash, Drum cleaning |
| Connectivity | Built-in Wi-Fi (hOn app) |
| Child lock | Yes (button lock B+C) |
| Door lock | Yes (automatic during cycle) |
| Leak protection system | Aquastop (depending on model) / Aquaprotect (supply hose with containment sheath) |
| Power supply | 220-240 V / 50 Hz |
| Installation type | Freestanding (adjustable feet) |
| Water connection | Cold water inlet, drain hose (height min 50 cm, max 85 cm) |
| Regular maintenance | Clean pump filter (5-6 times/year), clean detergent drawer, clean drum |
| Control panel | Touch with rotary selector, LED display |
| Energy class | Not specified in the manual |
Frequently Asked Questions - BC4M48M4D8JS CANDY
User questions about BC4M48M4D8JS CANDY
0 question about this device. Answer the ones you know or ask your own.
Ask a new question about this device
Download the instructions for your Washing machine in PDF format for free! Find your manual BC4M48M4D8JS - CANDY and take your electronic device back in hand. On this page are published all the documents necessary for the use of your device. BC4M48M4D8JS by CANDY.
USER MANUAL BC4M48M4D8JS CANDY
BUILT-IN WASHING MACHINE
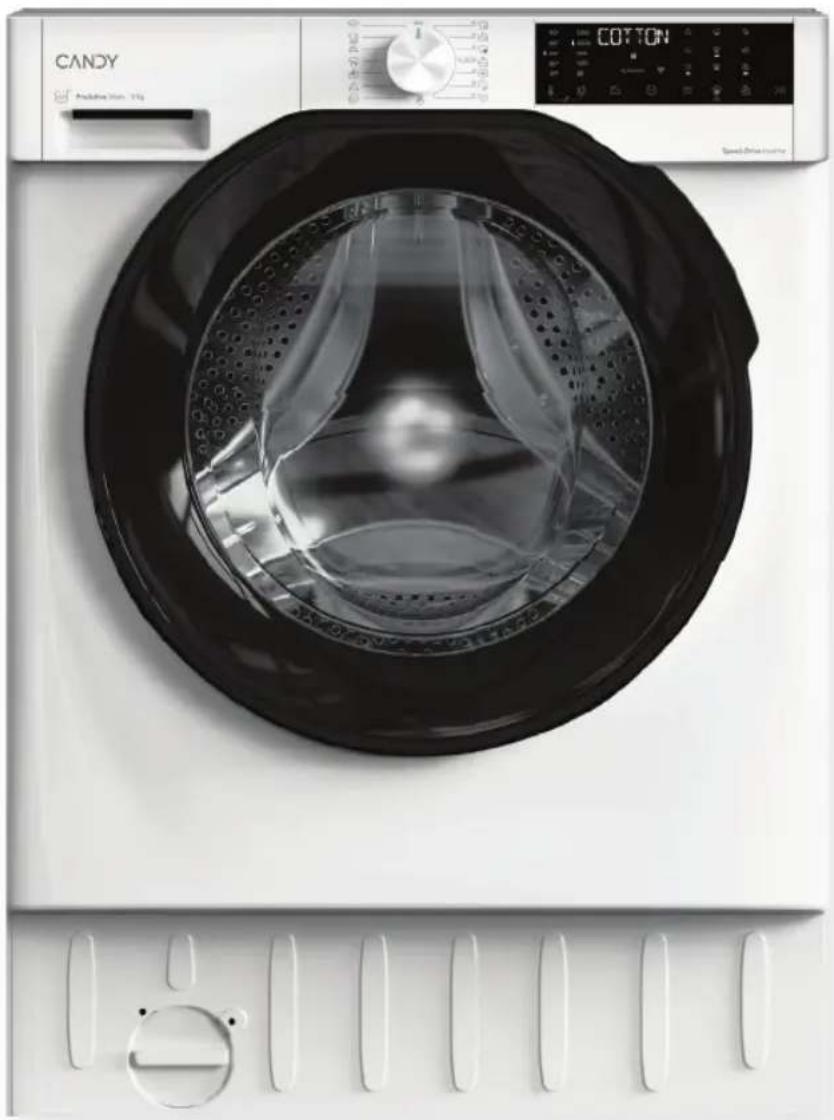
natural_image
Front view of a white CANDY washing machine with black glass lid and digital display (no visible text or symbols on the device itself)Prima accensione - Erstinbetriebnahme - First starting - Primer uso - Premier démarrage - Eerste start - Primeira utilização - Първо стартиране - Prvo uključenje Első beindítás - Prvi zagon - Prvo pokretanje - První start - Pierwsze uruchomienie Prima punere in funcțiune - Prve spustenie - Перше увімкнення - Прώτη εκκίνηση

LANGUAGE
IT 3
DE 11
EN 19
ES 27
FR 35
NL 43
PT 51
BG 59
HR 67
HU 75
SL 83
SR 91
CS 99
PL 107
RO 115
SK 123
UKR 131
EL 139
natural_image
Illustration of a hand using a tool to adjust a circular component, with no visible text or symbols.natural_image
Illustration of a medical or laboratory procedure with a device and tubing, no visible text or symbols
2. Bedienfeld
B
Nur 2,4-GHz-Band
E

F
EN Built-in washing machine
THANK YOU FOR PURCHASING A CANDY PRODUCT

Before using the appliance, carefully read the safety instructions.
Before using the machine, it is absolutely necessary to remove the screws and transport lock spacers.
For detailed instructions on the removal procedure, see the Installation Instructions.
Download and read the complete User Manual online for more details.
1. Installation
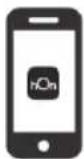
Download the hOn App


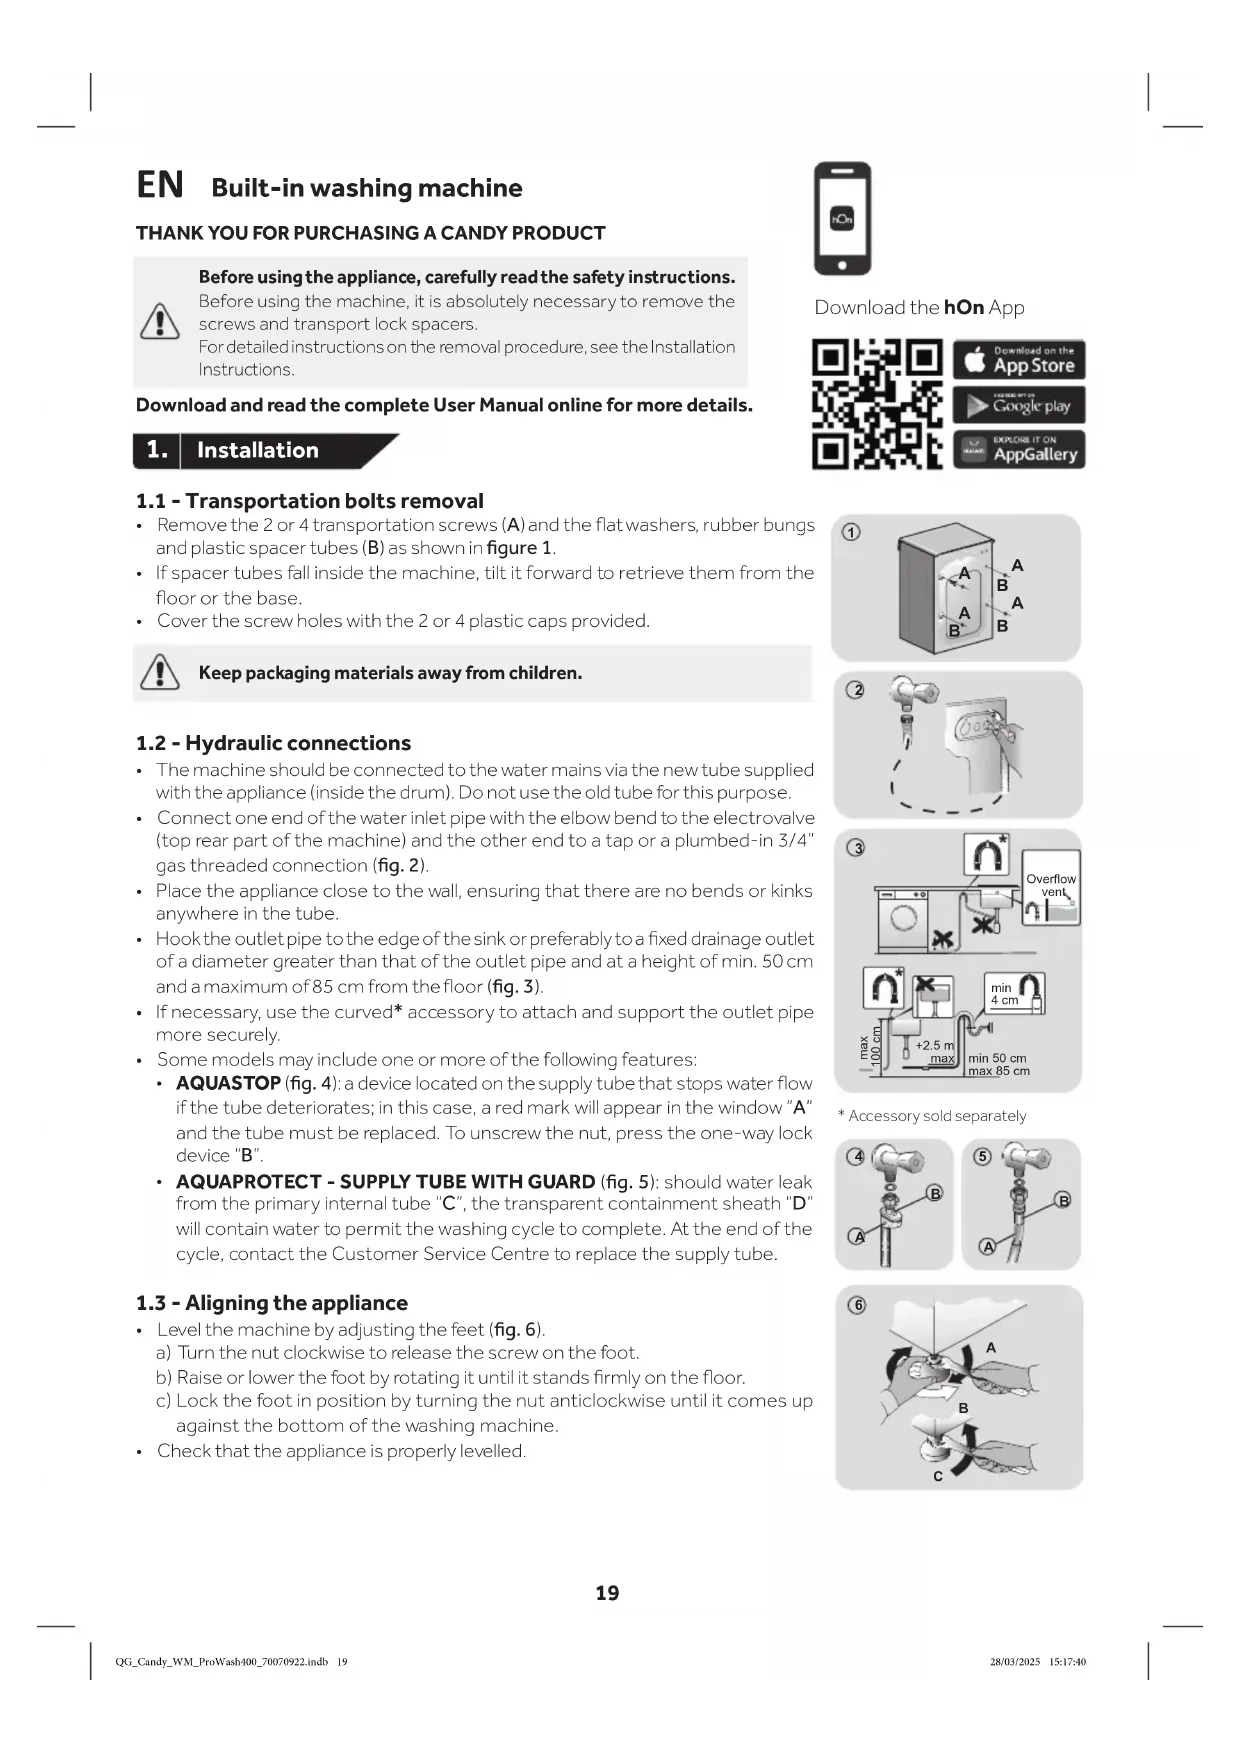
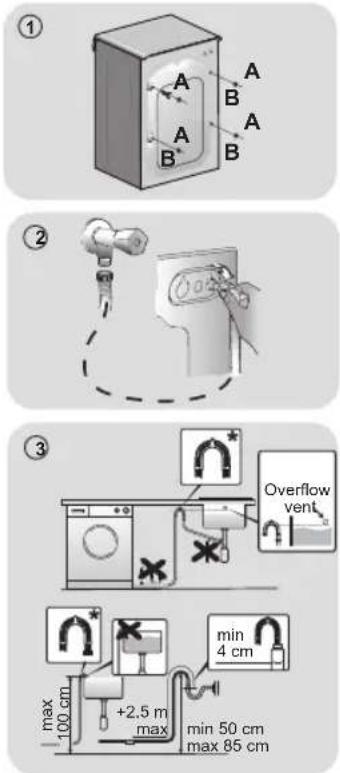
1.1 - Transportation bolts removal
- Remove the 2 or 4 transportation screws (A) and the flat washers, rubber bungs and plastic spacer tubes (B) as shown in figure 1.
- If spacer tubes fall inside the machine, tilt it forward to retrieve them from the floor or the base.
• Cover the screw holes with the 2 or 4 plastic caps provided.

Keep packaging materials away from children.
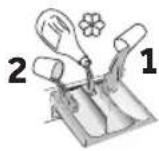
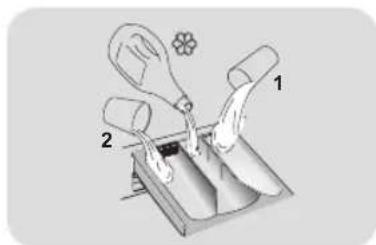
1.2 - Hydraulic connections
- The machine should be connected to the water mains via the new tube supplied with the appliance (inside the drum). Do not use the old tube for this purpose.
- Connect one end of the water inlet pipe with the elbow bend to the electrovalve (top rear part of the machine) and the other end to a tap or a plumbed-in 3/4" gas threaded connection (fig. 2).
- Place the appliance close to the wall, ensuring that there are no bends or kinks anywhere in the tube.
- Hook the outlet pipe to the edge of the sink or preferably to a fixed drainage outlet of a diameter greater than that of the outlet pipe and at a height of min. 50 cm and a maximum of 85 cm from the floor (fig. 3).
- If necessary, use the curved* accessory to attach and support the outlet pipe more securely.
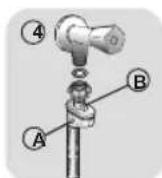
• Some models may include one or more of the following features:
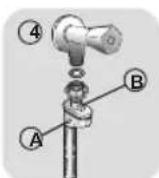
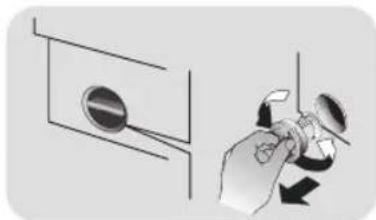
- AQUASTOP (fig. 4): a device located on the supply tube that stops water flow if the tube deteriorates; in this case, a red mark will appear in the window "A" and the tube must be replaced. To unscrew the nut, press the one-way lock device "B".
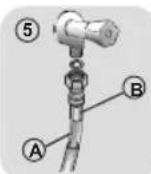
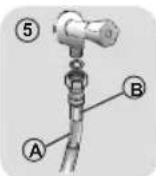
- AQUAPROTECT - SUPPLY TUBE WITH GUARD (fig. 5): should water leak from the primary internal tube "C", the transparent containment sheath "D" will contain water to permit the washing cycle to complete. At the end of the cycle, contact the Customer Service Centre to replace the supply tube.
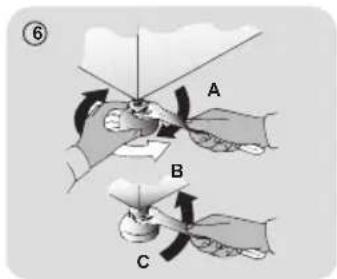
1.3 - Aligning the appliance
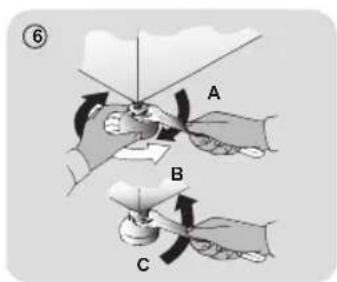
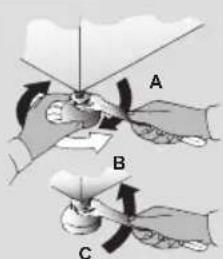
• Level the machine by adjusting the feet (fig. 6).
a) Turn the nut clockwise to release the screw on the foot.
b) Raise or lower the foot by rotating it until it stands firmly on the floor.
c) Lock the foot in position by turning the nut anticlockwise until it comes up against the bottom of the washing machine.
- Check that the appliance is properly levelled.
* Accessory sold separately
6
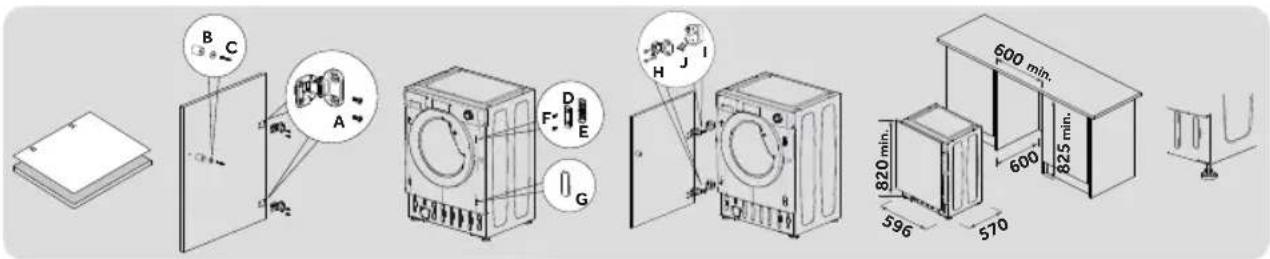
1.4 - Mounting the furniture door
- Position the template on the back of the door and mark the holes for the hinges and magnet (left or right side). Drill the holes and secure the hinges with the screws (A) provided.
- Fix the magnet (B) in place using screw (C) then mount the plate (D) with the plastic support (E) under it and fix them in position with screw (F).
- Snap mount cap (G) in the lower position.
- Mount the furniture door to the front of the washer using the hinges. Fix the spacers (I) in place with the 2 screws (J) and then fix the hinges with 2 screws (H).
- Adjust the washer height (820-840 mm) using the 4 adjustable feet and secure them with the nuts.
- Slide the washer into place, adjusting the furniture plinth to the new height.

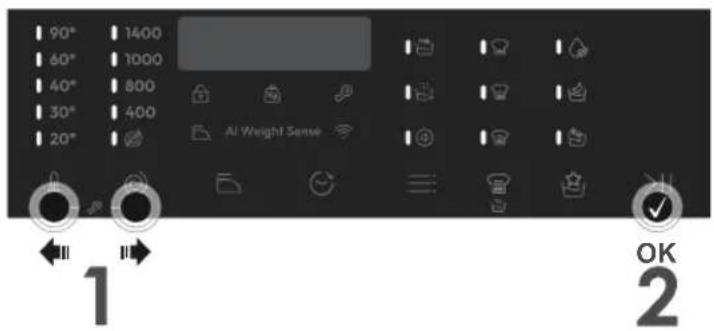
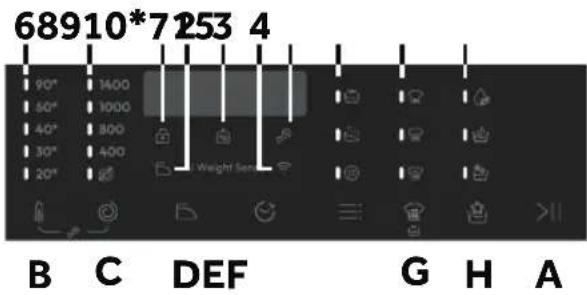
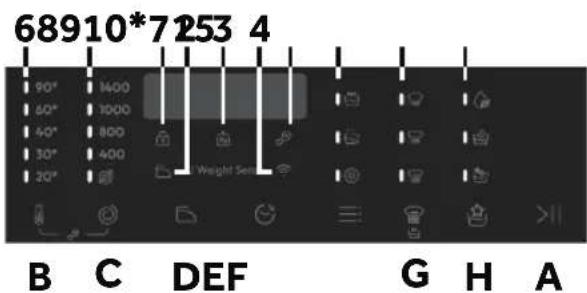
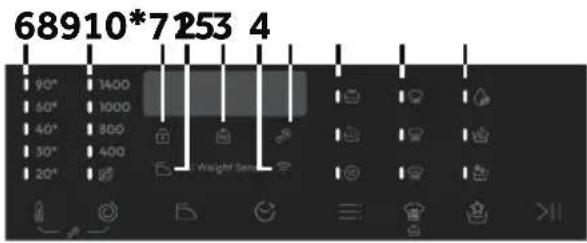
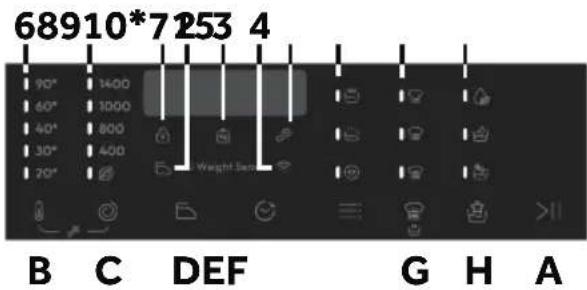
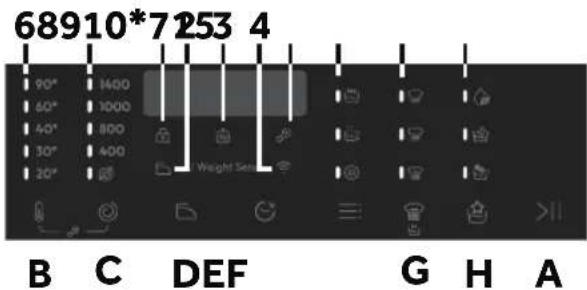
2. Control panel

* Only available in certain models
Buttons
A Start/Pause
B Temperature selection
C Spin selection
D Easy iron
E Delay start
F Options
G Stain level/Rapid/Steam level**
H Special programmes (only available on certain models)
B+C Child lock
** Steam level (only available on certain models)
Indicator lights
1 Door locked indicator
2 Easy iron indicator
3 "AI Weight Sense" indicator***
4 Wi-Fi indicator
5 Child lock indicator
6 Wash temperature indicators
7 Spin speed indicators
8 Options indicators
9 Stain level indicators
10 Special programmes indicators
*** Weight detector indicator
2.1 - Buttons
>|| Start/Pause button (A)
Close the door BEFORE selecting the button START/PAUSE. To start the selected cycle with the preset parameters, press START/PAUSE. When the programme is running, the display will show the time to elapse.

Temperature selection button (B)
This button allows you to change the temperature of the wash cycles. It is not possible to raise the temperature over the maximum allowed for the programme, in order to protect the fabrics. If you want carry out a cold wash all the indicators must be off.

Spin selection button (C)
By pressing this button, it is possible to reduce the maximum speed, and if you wish, the spin cycle can be cancelled.

Easy iron (D) - Available on some programmes only
This function allows you to minimize creases as much as possible, eliminating the intermediate spins or reducing the intensity of the last one.

Delay start button (E)
This button allows you to pre-programme the wash cycle to delay the start of the cycle for up to 24 hours.

Options button (F)
This button allows you to choose between different options (depending on the selected programme):
| Prewash (F) - This option allows you to make a prewash and it is particularly useful for heavily soiled loads (can be used only on some programmes). When activated, the indicator icon (E) lights up | |
| Extra rinse (F) - This option allows you to add one rinse at the end of the washing cycle and is useful for people with delicate and sensitive skin. When activated, the indicator icon (F) lights up | |
| Hygiene + (F) - This option allows deep cleaning of your clothes by maintaining the same temperature for the whole wash. |


Stain level/ Rapid / Steam level button\* (G)
This button allows you to choose between different options (depending on the selected programme):
| Stain level (G) - This option allows you to choose between3 levels of wash intensity modifying the length of the programme, depending on how much the fabrics are soiled (can only be used on some programmes as shown in the table of programmes). | |
| Rapid (G) - The button becomes active when you select the RAPID (14'/30'/44') programme on the knob and allows you to select one of three durations indicated, depending on the type of fabric. |
Steam level\*(G)
After selecting the EASY IRON PLUS programme, you can use this button to choose between three steam treatments of different intensities, designed for dry or wet garments and depending on the type of fabric.
* Only available on certain models

Special programmes (H) - Only available on certain models
This button allows you to choose between different options (depending on the selected programme):
| [4426] | Single item (H) - This option (which can be set in several programs) optimizes the water and energy consumption of the selected program, maintaining the washing performance unchanged. |
 | Night wash (H) - This option reduces the intermediate spin speed to 400 rpm, where applicable, increase the water level during rinsing and keep the laundry immersed in water after the final rinse, in order to spread the fiber perfectly. |
 | Drum clean (H) - Developed to clean the washing machine drum. Use only powder detergent. Do not start the programme with laundry in the washing machine. It is suggested that this is carried out after every 50 washing cycles. The option can only be selected for the DRAIN & SPIN programme. |

Child lock (B+C)
- Pressing simultaneously the buttons "TEMPERATURE SELECTION" and "SPIN SELECTION" for about 3 seconds, the machine allows you to lock the keys. In this way, you can avoid making accidental or unwanted changes if a button on the display is pressed accidentally during a cycle.
- The key lock can be simply cancelled by pressing the two buttons simultaneously again or turning off the appliance.
2.2 - Indicator lights

Door lock indicator (1)
For safety reasons the door is locked partially during the washing cycle. It is only possible to open the door at the end of the program or after the program was cancelled correctly. In case of high water level, high water temperature and during spinning it is not possible to open the door.

Easy iron indicator light (2)
The indicator light shows the selection of the relevant option.

"AI Weight Sense" indicator light (3): (active only on certain programmes).
Through every wash phase "AI Weight Sense" allows to monitor information on the wash load in the drum and in the first minutes of the wash it:
- adjusts the amount of water required;
• determines the length of the wash cycle; - controls rinsing according to the type of fabric selected to be washed it;
- adjusts the rhythm of drum rotation for the type of fabric being washed;
- recognises the presence of too much soap suds, and if necessary, adjust the amount of rinse water.
- adjusts the spin speed according to the load, thus avoiding any imbalance.

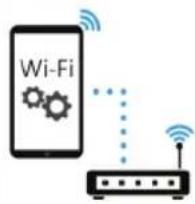
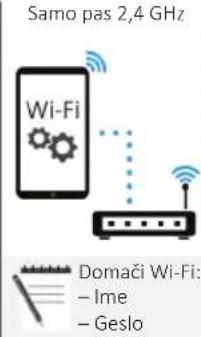
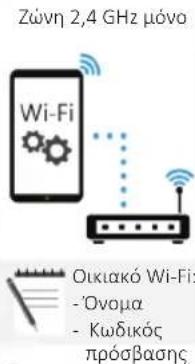
Wi-Fi indicator light (4): On models equipped with Wi-Fi, it indicates the status of the connection.

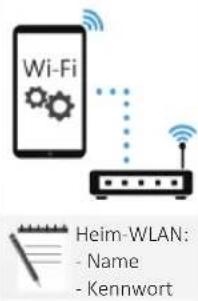
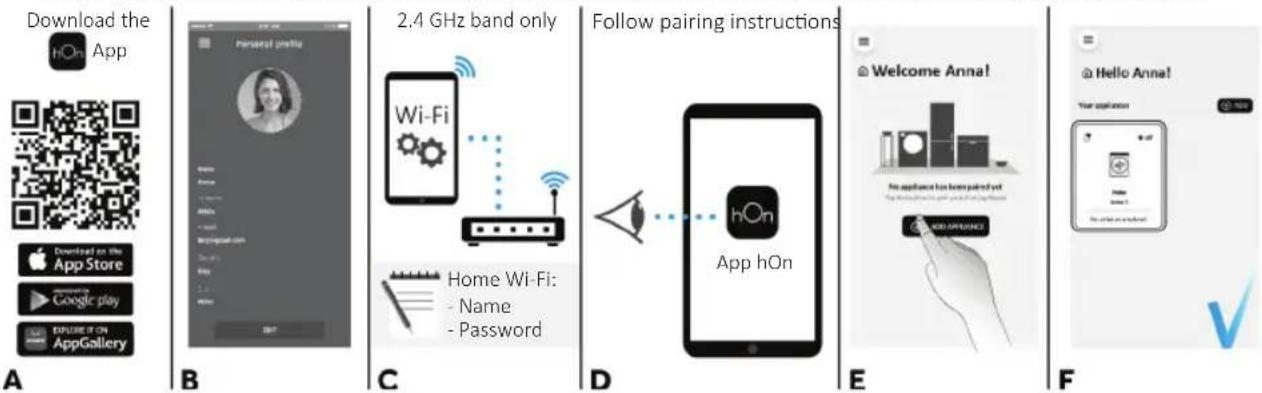
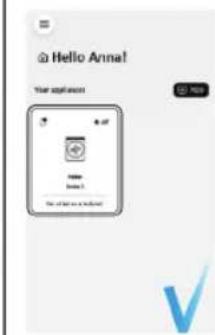
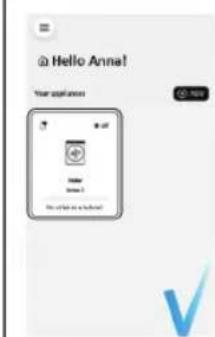
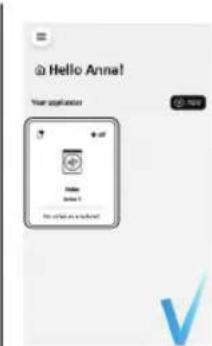
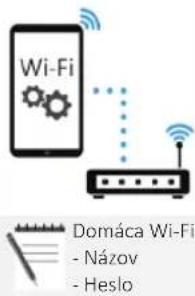
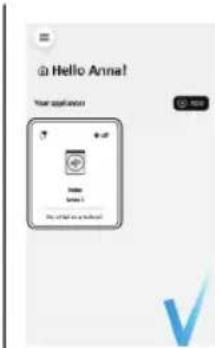
APPLIANCE PAIRING (ON APP)
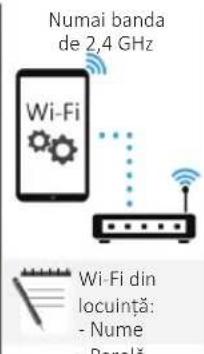
NOTE: The frequency of the home Wi-Fi network has to be set on the 2.4 GHz band. (5 GHz band not allowed).
- Download the hOn App on your device by framing the following QR code or by the link:
go.haier-europe.com/download-app
• Create the user profile (or log-in) and pairing the appliance following the instructions on the device display.
TO ENABLE REMOTE CONTROL
- Close the door and turn the knob to the REMOTE CONTROL (Wi-Fi) position
You can now manage your product from the app.
TO DISABLE REMOTE CONTROL
- Turn the knob to any position other than REMOTE CONTROL (Wi-Fi), without going through the OFF. If there is a cycle underway, it will continue. From the app it is possible to view the status of the product but not to control it.

Key lock indicator light (5): The indicator light show that the keys are locked.

Wash temperature indicator lights (6)
The indicator lights show the washing temperature of the selected programme that can be changed (where allowed) by the relevant button. If you want carry out a cold wash all the indicators must be off.

Spin speed indicator lights (7)
The indicator lights show the spin speed of the selected programme, you can reduce or omit by the relevant button.


Options indicator lights (8)
The indicator lights show the options that can be selected by the relevant button.


Stain level indicator lights (9)
- Once the programme has been selected, the indicator light will automatically show the stain level set for that programme.
- Selecting a different stain level the relevant indicator will light up.


Special programmes indicator lights (10) - Only available on certain models
The indicator lights show the options that can be selected by the relevant button.
3. Programmes
Yes
(●) Yes by pressing the button
○ Optionals
/ No
Detergent compartment for:
1 Prewash
② Detergent
Softener or care product
| PROGRAMME | (MAX.) (depending on model) | °C | DETERGENT | EASY IRON | DELAY START | PREWASH | EXTRA RINSE | HYGIENE + | STAIN LEVEL | ||||||
| 6kg | 7kg | 8kg | 9kg | (MAX.) | 2 | 1 | |||||||||
 | COTTONS 6 | 78 | 990° | ● | ● | (●) | / | ○ | ○ | ○ | |||||
 | ECO 40-60 | 67 | 89 | 60° | ● | ● | / | ○ | / | ○ | // | ||||
 | JEANS | 33 | 33 | 40° | ● | ● | / | ○ | / | ○ | // | ||||
 | WOOL/HAND WASH | 11 | 22 | 30° | ● | ● | ○ | ○ | ○ | //// | |||||
 | SYNTHETIC AND COLOURED | 3 | 3.5 | 4 | 4.5 | 60° | ● | ● | (●) | ○ | ○ | ○ | ○ | ○ | |
 | RINSE | ---- | - | ● | / | ○ | ///// | ||||||||
 | DRAIN & SPIN | ---- | - | / | ○ | ///// | |||||||||
 | DELICATE 59' | 2 | 2.5 | 2.5 | 2.5 | 40° | ● | ● | ○ | ○ | ///// | ||||
 | SPORT PLUS 39' | 22 | 2.5 | 2.5 | 30° | ● | ● | / | ○ | / | ○ | // | |||
 | HYGIENE PLUS 59' | 22 | 22 | 60° | ● | ● | / | ○ | ///// | ||||||
| [RX6C] | RAPID 14' | 11 | 1.5 | 1.5 | 40° | ● | ● | / | ○ | / | ○ | / | ○ | ||
| 2 | 2.5 | 2.5 | 2.5 | 40° | ● | ● | / | ○ | / | ○ | / | ○ | |||
| 3 | 3.5 | 3.5 | 3.5 | 40° | ● | ● | / | ○ | / | ○ | / | ○ | |||
 | 44' | ||||||||||||||
 | MIXED & COLOURED 59' | 67 | 89 | 40° | ● | ● | / | ○ | / | ○ | // | ||||
 | PERFECT COTTON 59' | 3 | 3.5 | 4 | 4.5 | 40° | ● | ● | / | ○ | / | ○ | // | ||
 | SPECIAL 49' | 67 | 89 | 40° | ● | ● | / | ○ | / | ○ | // | ||||
 | REMOTE CONTROL (Wi-Fi) Position that you have to select when you want to enable remote control through the App (via Wi-Fi). | ||||||||||||||
3.1 - Programmes description
| [YKWS] | COTTONS | This programme is suitable for washing coloured cotton garments at 40°C or for ensuring the highest degree of cleanliness for cotton resistant laundry washing at 60°C or 90°C. The final spin is at maximum speed that ensures excellent water removal. |
 | ECO 40-60 | The ECO 40-60 programme is able to clean normally soiled cotton laundry declared to be washable at 40C or 60C, together in the same cycle. This programme is used to assess the compliance with the EU Ecodesign legislation (environmentally friendly products design). |
 | JEANS | This programme has been designed to have the highest quality cleaning of fabrics such as denim: ideal for removing dirt without affecting the elasticity of the fibers. |
 | WOOL/HAND WASH | This programme performs a wash cycle dedicated to the wool fabrics that can be washed in a washing machine, the articles to be washed by hand or laundry items made from silk or specified as "Wash as Silk" on the fabric label. |
 | SYNTHETIC AND COLOURED | This programme allows you to wash different type's fabrics and different colours all together. The rotation movement of the drum and the water levels are optimized, both during the washing the rinsing phase. The accurate spin action, ensures a reduced formation of creases in the fabrics. |
 | RINSE | This program performs 3 rinses with an intermediate spin (which can be reduced or excluded by using the appropriate button). It is used for rinsing any type of fabric, for example after a wash carried out by hand. |
 | DRAIN & SPIN | The program completes the drain and a maximum spin. It is possible to delete or reduce the spin through the SPIN SELECTION button. |
 | DELICATE 59' | Developed to wash and treat delicate garments and precious fabrics. This programme washes at a low temperature for 59 minutes. Recommended for small loads. |
 | SPORT PLUS 39' | Created to remove dirt from technical garments used in the gym and for sports. The programme washes for 39 minutes at a low temperature. Recommended for small loads of synthetic garments. |
 | HYGIENE PLUS 59' | This programme offers the best possible combination of high temperature, time and cleaning action to guarantee maximum sanitising power against bacteria in only 59 minutes. Recommended for cotton laundry, it washes at a temperature of 60°C and is best used with small loads. |
 | RAPID 14'-30'-44' | Saving without compromising! This new programme may be used to obtain excellent results while saving water, energy, detergent and time. This option washes at a medium temperature suitable for any kind of fabric. Recommended for small loads and lightly soiled items. |
 | MIXED & COLOURED 59' * | This programme offers you the freedom to wash all kinds of fabrics and non-fading colours together, with a full load, obtaining excellent results in only 59 minutes. With washing at medium temperature, this programme is recommended for laundry that is not particularly dirty.* Preset temperature of 20°C (modifiable by the relevant button). The washing cycle is also suitable for washing cotton fabrics. |
 | PERFECT COTTON 59' | This programme guarantees excellent results for cotton laundry. This option was designed to cut washing time at medium temperatures for medium-soiled cotton laundry. Fill the machine only halfway for best results. |
 | SPECIAL 49' | This programme's innovative technology cuts the amount of time we spend doing laundry ensuring anyway high washing performance at medium temperatures in only 49 minutes. |
4. Daily use
- Connect the machine to a power supply and water connection (see installation chapter on user manual).
-
Prepare the laundry: Sort out clothes according to fabric (cotton, synthetics, wool or silk etc.) and how dirty they are. Check the labels on your garment. Separate white clothes from colored ones. Empty pockets from objects like keys, coins, etc. and remove harder decorative objects.
-
Put in the laundry piece by piece avoiding overloads (check the different maximum loadability according to program). Close the door carefully. Make sure that no pieces of laundry are pinched.
- Select the detergent and softener (when needed) and pour it into the correct compartments of the dispenser.
Open dispenser drawer, the following components can be seen:
- Compartment 1 is for prewash detergent.
- The compartment is for fabric conditioners, scenting agents and special additives such as starch, blueing, etc.
- Compartment 2 is for washing detergent.
Some detergents are not designed for use in the dispenser drawer but are supplied with their own dispenser that is placed in the drum directly.
To use the right amount of detergent, softener or any other additives, carefully follow the manufacturer's instructions every time.
- Select a program by turning the knob, choosing the one that fits the most according to the loaded garments. The display will show the program name, the main options and the duration estimation.
- Add or remove options and change the parameters according to your specific needs.
- Press Start/Pause button to start the program.
- When the cycle is finished, "END" is shown on the display, Switch off the appliance by turning the selector to "OFF". Remove your laundry as soon as possible in order to prevent wrinkles, bad odors and bacteria to proliferate.
5. Care and maintenance
5.1 - General machine cleaning
- Unplug the machine during cleaning and maintenance.
- Use a soft cloth with soap liquid to clean the machine case and rubber components.
- Do not use organic chemicals or corrosive solvents.
5.2 - Pump filter cleaning
We recommend checking and cleaning the filter 5 or 6 times a year.
• Turn off and unplug the machine.
• Prepare a flat container to catch leach water.
- Unscrew and remove counter-clockwise the pump filter and clean it carefully.
- Put the filter back in the machine and close it carefully.
natural_image
Illustration of a hand holding a magnifying glass over a circular component, with an arrow indicating rotation (no text or symbols present)5.3 - Drawer cleaning
Take always care there are no detergent residues. Clean the drawer regularly:
- Remove the drawer gently but firmly.
- Clean the drawer under running water and put it back into its compartment.
5.4 - Cleaning the drum
- Remove accidentally washed items, especially metal parts such as pins, coins, etc. from the drum and the groove of the door gasket (rubber ring) because they cause rust stains and damage.
• Use a non-chloride cleaner for removing rust stains. Observe the warning hints of the cleaning agent manufacturer. - Do not use any hard objects or steel wool for cleaning.
• After the procedure, open the door, use a towel to clean the stains and foam around the gasket, and keep the inside and outside of the gasket clean.
2. Panel de control
natural_image
Illustration of a hand adjusting a circular component next to a wall-mounted device (no text or symbols visible)MERCI D'AVOIR ACHETÉ UN PRODUIT CANDY

ACTIVATION DU CONTRÔLE À DISTANCE
natural_image
Illustration showing a hand adjusting a circular component next to a wall, with no visible text or symbols.natural_image
Diagram showing a mechanical device with a dashed outline and a separate view of a component (no text or symbols)

1.4 - De meubeldeur monteren
2. Bedieningspaneel


3 Indicator "AI Weight Sense"***
4 Wifi-indicator
5 Kinderslotindicator
6 Indicators wastemperatuur
7 Indicators centrifugeersnelheid
8 Indicators opties
9 Indicators vlekkenniveau
10 Indicators speciale programma's
*** Indicator gewichtdetector
2.1 - Toetsen
> || Toets Start/Pauze (A)
APPARAATKOPPELING (IN DE APP)
BEDIENING OP AFSTAND INSCHAKELEN
natural_image
Illustration of a hand using a tool to adjust a circular component, with no visible text or symbols.5.3 - Lade schoonmaken
natural_image
Diagram showing a mechanical assembly with a tool and a dashed outline, no text or symbols present
APPLIANCE PAIRING (NA APP)
natural_image
Illustration of a hand using a tool to adjust a circular component, with no visible text or symbols.natural_image
Diagram showing a mechanical assembly with a tool and a dashed outline, no text or symbols present
natural_image
Illustration of a hand using a tool to adjust or install a circular component, with no visible text or symbols.natural_image
Illustration of a robotic arm interacting with a device, showing no text or symbols
Gumb Odabir temperature (B)
- Okretanjem regulatora odaberite program koji najviše odgovara umetnutoj odjeći. Na zaslonu će se prikazati naziv programa, glavne opcije i procjena trajanja.
- Dodajte ili uklonite opcije i promijenite parametre u skladu sa svojim potrebama.
- Pritisnite gumb Pokreni/Pauza da biste pokrenuli program.
- Po završetku ciklusa na zaslonu se prikazuje "ZAVRŠETAK". Isključite uređaj okretanjem izbornika u položaj "OFF" (ISKLJUČENO). Uklonite rublje štoje prije moguće kako biste spriječili stvaranje nabora, širenje neugodnih mirisa i razvoj bakterija.
natural_image
Illustration of a hand holding a rotary knob next to a circular vent (no text or symbols)natural_image
Illustration of a hand holding a device next to a box, with no visible text or symbols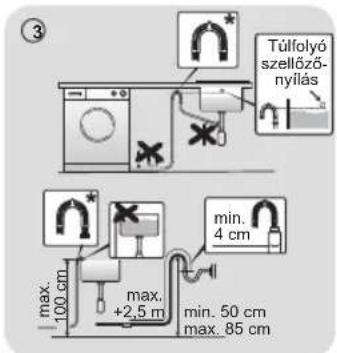

2. Vezérlőpult

B
Csak 2,4 GHz-es sáv
E
F
natural_image
Illustration of a hand holding a tool near a circular component, with no visible text or symbols.natural_image
Illustration of a hand holding a small object with a dashed outline, no text or symbols present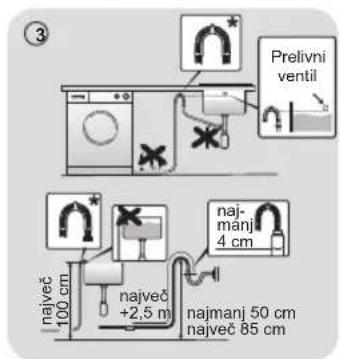
2. Nadzorna plošča

* Na voljo le pri nekaterih modelih
Gumbi
>11 Gumb Start/Pavza (A)
Gumb Izbira temperature (B)
B
C

E

F
OMOGOČANJE DALJINSKEGA UPRAVLJANJA
natural_image
Illustration of a hand holding a magnifying glass over a circular component, next to a wall-mounted fixture (no text or symbols)natural_image
Illustration of a hand holding a device next to a device with a dashed outline (no text or symbols)
* Dodatna oprema se prodaje odvojeno

1.4 - Montiranje vrata za nameštaj
- Postavite šablon na zadnju stranu vrata i označite rupe za šarke i magnet (levu ili desnu stranu). Izbušite rupe i pričvrstite šarke priloženim vijcima (A).
- Pričvrstite magnet (B) na mesto pomoću vijka (C), a zatim montirajte ploču (D) pomoću plastičnog nosača (E) ispod nje i pričvrstite ih u položaj pomoću vijka (F).
• Postavite kapicu (G) u donji položaj. - Montirajte vrata za nameštaj s prednje strane mašine pomoću šarki. Pričvrstite odstojnike (I) na njihovo mesto pomoću 2 zavrtnja (J), a zatim pričvrstite šarke pomoću 2 zavrtnja (H).
- Podesite visinu podloške (820–840 mm) pomoću 4 podesive nožice i pričvrstite ih maticama.
• Gurnite podlošku na mesto, podešavajući postolje nameštaja na novu visinu.
2. Kontrolna tabla

* Dostupno samo u određenim modelima
Dugmad
A Start/Pauza
B Izbor temperature
C Izbor centrifuge
D Lako peglanje
E Odloženi start
F Opcije
G Nivo zaprljanosti/Brzi programi/Nivo pare**
H Specijalni programi (dostupni samo na određenim modelima)
B+C Blokada kontrola
** Nivo pare (dostupno samo na određenim modelima)
Svetlosni indikatori
1 Indikator zaključanih vrata
2 Indikator Lako peglanje
3 Indikator "AI Weight Sense"***
4 Indikator Wi-Fi mreže
5 Indikator blokade kontrola
6 Indikatori temperature pranja
7 Indikatori brzine centrifuge
8 Indikatori opcija
9 Indikatori nivoa zaprljanosti
10 Indikatori specijalnih programa
*** Indikator za detektor težine
2.1 - Dugmad
>11 Dugme Start/Pauza (A)
Zatvorite vrata PRE pritiskanja dugmeta START/PAUZA. Da biste izabrali ciklus sa podešenim parametrima, pritisnite dugme START/PAUZA. Kada je program u toku, na ekranu će biti prikazano preostalo vreme.

Dugme Izbor temperature (B)
Ovo dugme vam omogućava da promenite temperaturu ciklusa pranja. Temperatura se ne može povećavati preko maksimuma predviđenog za taj program da biste se očuvale tkanine. Ukoliko želite da se veš pere u hladnoj vodi, svi svetlosni indikatori moraju biti isključeni.

Dugme Izbor centrifuge (C)
Pritiskanjem ovog dugmeta moguće je smanjiti maksimalnu brzinu, te ukoliko želite, ciklus centrifuge se može otkazati.

Lako peglanje (D) - Dostupno samo u nekim programima
E
F
AKTIVIRANJE BEŽIČNOG UPRAVLJANJA
- Zatvorite vrata i okrenite okruglo dugme u položaj BEŽIČNO UPRAVLJANJE (Wi-Fi) 📞. Sada možete da upravljate proizvodom iz aplikacije.
DEAKTIVIRANJE BEŽIČNOG UPRAVLJANJA
- Okrenite okruglo dugme u bilo koji položaj osim BEŽIČNO UPRAVLJANJE (Wi-Fi), bez prolaska kroz "OFF" (ISKLJUČENO). Ako je neki ciklus bio u toku, nastaviće se. Iz aplikacije je moguće videti status proizvoda, ali ne i kontrolisati ga.

Svetlosni indikator za zaključavanje komandi (5): Svetlosni indikator prikazuje da su tasteri zaključani.

Svetlosni indikatori temperature pranja (6)
- Izaberite program okretanjem dugmeta, birajući onaj koji najviše odgovara ubačenoj odeći. Na ekranu će se prikazati naziv programa, glavne opcije i procena trajanja.
- Dodajte ili uklonite opcije i promenite parametre u skladu sa vašim specifičnim potrebama.
- Pritisnite dugme Start/Pauza da biste pokrenuli program.
- Kada se ciklus završi, na displeju se prikazuje "KRAJ", Isključite uređaj okretanjem birača u položaj "OFF" (ISKLJUČENO). Uklonite veš što je pre moguće kako biste sprečili gužvanje, širenje neprijatnih mirisa i bakterija.
natural_image
Illustration of a hand using a tool to adjust or install a circular component, with no visible text or symbols.
CS Vestavná pračka
DĚKUJEME VÁM, ŽE JSTE SI KOUPILI VÝROBEK ZNAČKY CANDY

natural_image
Illustration of a robotic arm interacting with a mechanical device (no text or symbols visible)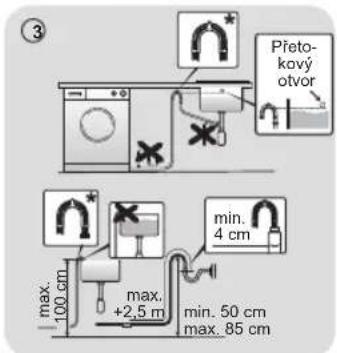

2. Ovládací panel

natural_image
Illustration of a hand using a tool to adjust or install a circular component, with no visible text or symbols.
natural_image
Diagram showing a mechanical assembly with a tool and a dashed outline, no text or symbols present

2. Panel sterowania

natural_image
Diagram showing a robotic arm interacting with a device, enclosed in a dashed circle (no text or symbols present)

1.4 - Montarea uşii mobilei
2. Panoul de control

Butoane
B
E
F
PENTRU ACTIVAREA TELECOMENZII
natural_image
Illustration of a hand using a tool to adjust a circular component, with no visible text or symbols.natural_image
Diagram showing a mechanical assembly with a tool and a dashed outline, no visible text or symbols

2. Ovládací panel
B
Len pásmo 2,4 GHz
E

F
POVOLTE DIALKOVÉ OVLÁDANIE
natural_image
Illustration of a hand holding a small device with a circular button, next to a wall-mounted panel (no text or symbols)5.3 - Čistenie zásuvky
natural_image
Diagram showing a robotic arm interacting with a device, enclosed in a dashed circle (no text or symbols present)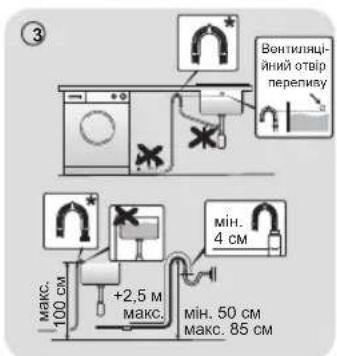

natural_image
Illustration of a hand holding a rotary knob next to a circular dial (no text or symbols)natural_image
Illustration of a hand holding a small object above a panel, enclosed in a dashed circle (no text or symbols)

2. Πίνακας ελέγχου
B
E
F