Patio Heater - Heating Create - Free user manual and instructions
Find the device manual for free Patio Heater Create in PDF.
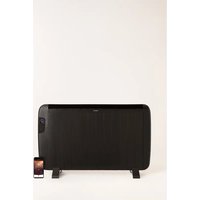
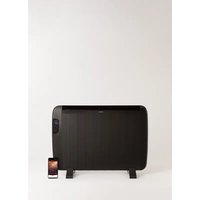
| Product Type | Outdoor Heater (Halogen) |
| Brand | Create |
| Model | Patio Heater |
| Category | Outdoor Heating |
| Maximum Power | 2100 W |
| Heat Settings | 3 levels: 900 W, 1200 W, 2100 W |
| Power Supply | Mains, 220-240 V, 50 Hz |
| Rated Current | 13 A |
| Heating Element Type | Halogen Tube |
| Safety Protection | Tilt Switch (automatic shut-off in case of tipping) |
| Minimum Distance from Objects | 1 m |
| Minimum Distance from Ceiling | 30 cm |
| Minimum Head Height | 1.8 m from the ground |
| Recommended Use | Outdoors or large well-ventilated indoor spaces |
| Assembly | Requires assembly (base, tubes, heating head) |
| Cleaning | Damp cloth, no solvents or immersion |
| Spare Parts | Halogen tube (replacement by a professional) |
| Protection Rating | Splash-proof (do not use in rain) |
| Weight | Approximately 8 kg (estimate) |
Frequently Asked Questions - Patio Heater Create
User questions about Patio Heater Create
0 question about this device. Answer the ones you know or ask your own.
Ask a new question about this device
Download the instructions for your Heating in PDF format for free! Find your manual Patio Heater - Create and take your electronic device back in hand. On this page are published all the documents necessary for the use of your device. Patio Heater by Create.
USER MANUAL Patio Heater Create
natural_image
Line drawing of a standard outdoor lamp with vertical panel and base (no text or symbols)PATIO HEATER
ESTUFA DE EXTERIOR
USER MANUAL
CREATE CREATE CREATE ATE CREATE CREATE CRE CREATE CREATE CREATE ATE CREATE CREATE CRE CREATE CREATE CREATE ATE CREATE CREATE CRE CREATE CREATE CREATE ATE CREATE CREATE CRE CREATE CREATE CREATE ATE CREATE CREATE CRE CREATE CREATE CREATE ATE CREATE CREATE CRE CREATE CREATE CREATE ATE CREATE CREATE CRE CREATE CREATE CREATE ATE CREATE CREATE CRE CREATE CREATE CREATE ATE CREATE CREATE CRE CREATE CREATE CREATE ATE CREATE CREATE CRE CREATE CREATE CREATE ATE CREATE CREATE CRE CREATE CREATE CRE CREATE CREATE CRE CREATE CREATE CRE
CREATE CREATE CREATE ATE CREATE CREATE CRE CREATE CREATE CREATE ATE CREATE CREATE CRE CREATE CREATE CREATE ATE CREATE CREATE CRE CREATE CREATE CREATE ATE CREATE CREATE CRE CREATE CREATE CREATE ATE CREATE CREATE CRE CREATE CREATE CREATE ATE CREATE CREATE CRE CREATE CREATE CREATE ATE CREATE CREATE CRE CREATE CREATE CREATE ATE CREATE CREATE CRE CREATE CREATE CREATE ATE CREATE CREATE CRE CREATE CREATE CREATE ATE CREATE CREATE CRE CREATE CREATE CREATE ATE CREATE CREATE CRE CREATE CREATE CRE CREATE CREATE CRE CREATE CREATE CRE
INDEX
ENGLISH
SECURITY INSTRUCTIONS 6
ASSEMBLY PROCESS 8
CARE AND MAINTENANCE 10
FUNCTIONING 10
PORTUGUÊS
INSTRUÇÕES DE SEGURANÇA 16
PROCESSO DE MONTAGEM 18
Thank you very much for choosing our heater. Before using the appliance, please read these instructions carefully to use it correctly.
The included safety precautions reduce the risk of electric shock, injury and even death if strictly followed. Please keep this manual in a safe place for future reference, along with the completed product warranty card, original product packaging and proof of purchase. If possible, pass these instructions on to the next owner of the appliance. Follow basic safety precautions and accident prevention rules at all times when using an appliance. We decline all liability arising from non-compliance with these instructions by customers.
SECURITY INSTRUCTIONS
When using any appliance, basic safety measures must be respected at all times:
- Unpack the halogen heater making sure all items are present and no components remain in the box and the heater head is free of any packing material.
- Follow the steps to mount your halogen heater.
- Do not connect halogen heater to electrical supply until all assembly is complete.
- Do not connect the halogen heater to the power supply if any of the components or the power cord are damaged in any way.
• In case of doubt, contact your supplier.
- This appliance can be used by children aged from 8 years and above and persons with reduced physical, sensory or mental capabilities or lack of experience and knowledge if they have been given supervision or instruction concerning use of the appliance in a safe way and understand the hazards involved. Children must not play with the appliance. Cleaning and user maintenance should not be performed by children without supervision.
WARNING: This heater is not equipped with a device to control the room temperature. Do not use this heater in small rooms when occupied by persons who are unable to leave the room on their own, unless constant supervision is provided.
• Children under 3 years of age should be kept away unless continuously supervised.
- Children aged 3 years and under 8 years should only turn the appliance on/off when it has been placed or installed in its intended normal operating position and they have been given supervision or instruction concerning use of the appliance in a safe way and understand the dangers involved. Children aged 3 and under 8 years old must not plug in, adjust and clean the appliance or carry out user maintenance.
CAUTION: Some parts of this product can become very hot and cause burns. Special attention should be paid where children and vulnerable people are present.
- Use the halogen heater only on a firm, solid horizontal area where all feet of the base are in contact with the ground. (In case the heater tips or falls over, the automatic cut-off switch will be activated).
- Place the heater outside or in a large open area and away from any obstructions such as branches or where the heater is close to any object that may be affected by heat, such as furniture, curtains or other flammable objects (minimum distance of 1 meter).
- Do not use this heater in the vicinity of a bath, shower or swimming pool.
- Do not use in unventilated areas.
-
Do not use where gas, gasoline, paint or other flammable products are stored.
-
Do not insert any object, obstruct or cover the heater head grill.
- Do not place it immediately above or below a power outlet.
- Do not move when connected to an electrical supply and always wait for the patio heater to cool down before storing it.
- Do not touch the heater head when it is in use.
- Do not leave it turned on and unattended, especially when children or animals are nearby.
- The indication of the different positions of the switches must be visible from a distance of 1 meter.
- The marking relative to the cover must be visible after the heater has been installed. It should not be placed on the back of space heaters.
- The unit should be placed with a distance of 100 cm from the wall and 30 cm from the ceiling.
- The unit must be installed correctly according to the instructions. Make sure your head is at least 1.8m above the ground.
- The unit must be placed securely on a flat, horizontal surface.
- Unit is at high temperature during operation. It stays warm for a period after being turned off. A potential danger would occur when touching it during this period.
- Do not place the unit near curtains or other flammable objects. Otherwise, there will be a fire hazard.
- Do not cover the unit with anything during operation or shortly after it has been turned off.
- Do not wrap the power cord around the unit.
- The unit must be handled with care and avoid vibration or shock.
- The unit must be safely grounded during operation.
- If the unit is damaged, it must be repaired by professional electricians.
- When the power cord is damaged, it must be replaced by qualified agents or other professional persons to avoid danger.
- The unit must not be placed under a socket.
- When mounting the heater, keep away from any wood or flammable material.
- The unit must be supervised by adults if used by a child.
- Do not install the unit next to a swimming pool, in a bath or shower area.
- The unit is for home use only. It is not safe to use on a construction site, greenhouse, barn, or where there is flammable dust.
- The drive head is at a high temperature during operation. Unplug the unit and wait until it cools down before cleaning.
- Do not use this unit in places where there is causticity or volatile air, i.e. dust, steam, gas, etc.
- Do not use this unit as a clothes dryer or towel dryer.
- Do not use this unit as a sauna heater.
- Do not use this unit as a space heater.
- Do not use this unit in animal propagation and breeding places.
- Do not immerse this unit in water to clean it.
- The unit should be plugged in where it is easily visible and accessible.
- There may be two dark spots on the surface of the heating elements during the first few minutes after power on. This is normal and will not affect the performance of the unit.
- A tilt switch is installed inside the unit for safety reasons.
- The wheels are for moving the heater only, once it is in the correct position the wheels must be removed for safety reasons.
- Do not use this heater with a programmer, timer, or any other device that turns it on automatically, as there is a risk of fire if the heater is covered or positioned incorrectly.
- This appliance is not intended for use by persons (including children) with reduced physical, sensory or mental capabilities, or lack of experience and knowledge, unless they have been given supervision or instruction concerning use of the appliance by a person responsible for their safety.
• Children must be supervised to ensure that they do not play with the appliance.
ASSEMBLY PROCESS
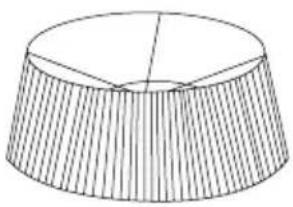
Warning: First remove all the protection film around the big decorative cover.
natural_image
Simple line drawing of a frustum with vertical ribs (no text or symbols)- Fix the lower tube to the base by screwing it.

natural_image
Simple line drawing of a vertical pole with a curved arrow indicating rotational motion (no text or symbols)-
Connect the central tube with the lower tube by screwing them.
-
Connect the upper tube with the central tube by screwing them together (as in step 2).

natural_image
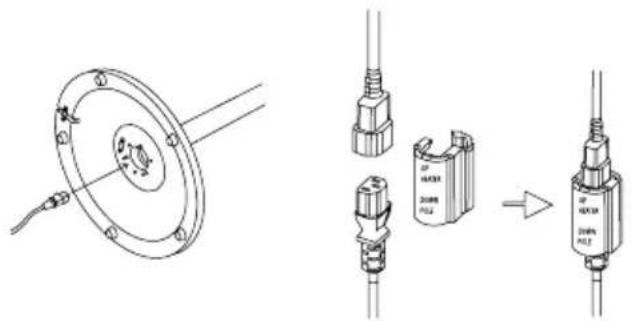
Diagram showing two mechanical components with a curved arrow indicating rotation (no text or symbols)- Route the power cord through the base, bottom post, middle post, and top post. Connect the plug of the power cord to the socket on the heater head.
text_image
Technical diagram showing a mechanical component with labeled parts and a schematic transformation arrow indicating assembly or modification.- Push heater head onto upper tube, align threads and tighten screw.
natural_image
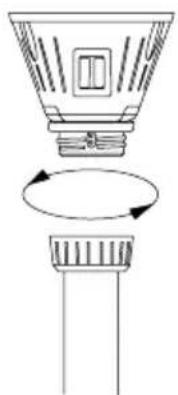
Diagram showing a funnel-shaped object with a rotating arrow indicating rotation (no text or symbols)- Fix the power cord on the base with 4*12 screws.
natural_image
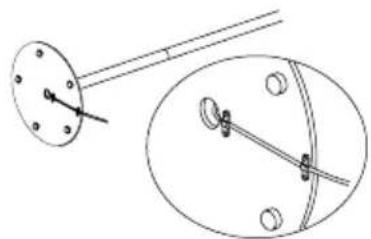
Technical line drawing of a mechanical assembly with two views (top and side), no text or symbols present.- Set the heater on the ground. Drill three holes in the ground, fix the heater with three wedge bolts in the ground by tightening the bolts with a wrench.

natural_image
Simple line drawing of a cylindrical object with a stem and two small square markers on its sides (no text or symbols)FUNCTIONING
- Plug the power cord into a 13 amp source located in a safe, dry area.
WARNING: The heater must be installed correctly before it is used.
- The switch on the heater head is used to control the three heat settings: (I) for 900 W (II) for 1200 W (I&II) for 2100 W.
- Position 0 means the heater is off.
- Although the patio heater is waterproof, do not use it when it rains.
- Always unplug the power cord from the electrical supply when the patio heater is not in use.
CARE AND MAINTENANCE
- Once disconnected from the electrical outlet, clean the outside of the heater with a damp cloth. Never use corrosive cleaners or solvents, or immerse the unit in water.
- Any maintenance or repair work involving replacement of the halogen tube must be carried out by a qualified electrician or a recommended service center.
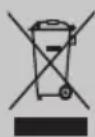
In compliance with the directives: 2012/19/EU and 2015/863/EU on the restriction of the use of hazardous substances in electrical and electronic equipment, as well as their waste disposal. The crossed bin symbol shown on the packaging indicates that the product at the end of its useful life will be collected as separate waste. Therefore, any product that has reached the end of its useful life should be delivered to waste disposal centers specialized in the separate collection of waste electrical and electronic equipment, or returned to the retailer when purchasing similar new equipment, in one for a base. Proper separate collection for subsequent commissioning of equipment sent for recycling, treatment and disposal in an environmentally compatible manner helps prevent possible negative effects on the environment and health and optimizes recycling and reuse of waste. the components that make up the device. The abusive disposal of the product by the user implies the application of administrative sanctions in accordance with the laws.
natural_image
Simple line drawing of a frustum with vertical divisions (no text or symbols)natural_image
Simple line drawing of a pole with a rotating arrow indicating rotation (no text or symbols)natural_image
Diagram showing two mechanical components with a curved arrow indicating rotation (no text or symbols)text_image
Technical diagram showing a mechanical component with labeled parts and an arrow indicating transformation or assembly.natural_image
Diagram showing a funnel-shaped object with internal structure and rotation arrows (no text or symbols)natural_image
Technical line drawing of a mechanical assembly with two views (top and side), no text or symbols present.natural_image
Simple line drawing of a circular base with a vertical rod and two small blocks attached at the base (no text or symbols)FUNCIONAMIENTO
natural_image
Simple line drawing of a frustum with vertical slats (no text or symbols)natural_image
Simple line drawing of a vertical pole with a rotating arrow indicating rotation (no text or symbols)- Conecte o tubo central com o tubo inferior aparafusando-os.
- Conecte o tubo superior com o tubo central aparafusando-os (como no passo 2).