
FHSM 755 4G DC ON E - Cooker FRANKE - Free user manual and instructions
Find the device manual for free FHSM 755 4G DC ON E FRANKE in PDF.
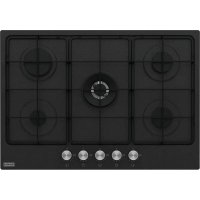



| Product type | Built-in gas hob |
| Brand | Franke |
| Model | FHSM 755 4G DC ON E |
| Category | Cooktop |
| Number of burners | 5 |
| Burner types | 1 Double crown (DC), 2 Rapid (R), 1 Semi-rapid (SR), 1 Auxiliary (AUX) |
| Table dimensions (W x D x H) | 730 x 510 x 40 mm |
| Cutout dimensions (W x D) | 560 x 480 mm |
| Net weight | Approximately 11 kg |
| Electrical supply | 220-240 V ~ 50/60 Hz, 0.6 W |
| Compatible gas type | Natural gas G20 (20 mbar) and LPG G30/G31 (28-30/37 mbar) |
| Gas category | II 2H3+ |
| Total installed power | 10.8 kW (gas) |
| Safety | Thermoelectric safety valve (automatic gas shut-off in case of flame extinction) |
| Ignition | Integrated electronic ignition by rotary knobs |
| Surface material | Stainless steel or enamel (according to version) |
| Care and cleaning | Clean after each use with a soft cloth; do not use steam cleaner or steel wool |
| Repairability | Spare parts available through customer service; maintenance by a qualified professional |
| General information | Household use only; do not use to heat a room |
Frequently Asked Questions - FHSM 755 4G DC ON E FRANKE
User questions about FHSM 755 4G DC ON E FRANKE
0 question about this device. Answer the ones you know or ask your own.
Ask a new question about this device
Download the instructions for your Cooker in PDF format for free! Find your manual FHSM 755 4G DC ON E - FRANKE and take your electronic device back in hand. On this page are published all the documents necessary for the use of your device. FHSM 755 4G DC ON E by FRANKE.
USER MANUAL FHSM 755 4G DC ON E FRANKE
EN User manual Gas Hob
In this manual and on your appliance we have provided many important safety messages. Always read and obey all safety messages. Franke reserves the right to make modifications to the product without prior notice. All information correct at time of issuance.
This appliance can be used by children aged from 8 years and above and persons with reduced physical, sensory or mental capabilities or lack of experience and knowledge if they have been given supervision or instruction concerning use of the appliance in a safe way and understand the hazards involved. Children shall not play with the appliance. Cleaning and user maintenance shall not be made by children without supervision.

Risk of injury!
This device is not a toy. - Keep children and pets away from the device and the packaging material e.g. plastic film and polystyrene; it can be dangerous, dispose of it in a proper way.
Do not leave children near the device unattended. Do not let children play with the device.

Risk of burns!
During use the appliance becomes hot. Care should be taken to avoid touching the hob.
WARNING: Accessible parts may become hot during use. Young children should be kept away. Children less than 8 years of age shall be kept away unless continuously supervised.
Ensure the gas type and supply is compatible with appliance specifications. The hob was developed exclusively for nonprofessional, domestic use in the household only. The type of gas for which the appliance is arranged is specified on the dataplate on the bottom of the tray. Prior to installation, ensure that the local distribution conditions (nature of the gas and gas pressure) and the adjustment of the appliance are compatible. This appliance is not connected to a combustion products evacuation device.
It shall be installed and connected in accordance with current installation regulations. Particular attention shall be given to the relevant requirements regarding ventilation.
The adjustment conditions for this appliance are stated on the label (or data plate). Pay particular attention to the applicable regulations on ventilation. After use, switch off the hob by its controls. Make sure the burners are cold before closing the lid, if the appliance has one.

Risk of electric shock to entering liquid!
The device contains electrical components.
Make sure that no liquid enters the interior of the device. Do not use pressurised steam to clean the device. In the event of the burner flames accidentally extinguished, turn off the burner control and do not attempt to reignite the burner for at least 1 min. The device shall not be operated for more than 15 seconds if after 15 seconds the burner has not lit, stop operating the device and open the compartment door.
and/or wait at least 1 minute before attempting a further ignition of the burner.
Ensure that the device is installed in a way that allows to disconnect it from the power supply, with a contact opening distance (3 mm) that ensures complete disconnection in category III overvoltage conditions. Ensure that the appliance is connected to an earthing system in compliance with the current regulations.

CAUTION: The use
of a gas cooking appliance results in the production of heat, moisture and products of combustion in the room in which it is installed.
Ensure that the kitchen is well ventilated especially when the appliance is in use: keep natural ventilation holes open or install a mechanical ventilation device (mechanical extractor hood). Do not operate the appliance with an external time switch or a separate remote control system.
CAUTION: The cooking process has to be supervised. A short term cooking process has to be supervised continuously.
Do not use steam cleaners or direct jets of water. Never use scouring pads, steel wool, muriatic acid or other products which could scratch or mark the surface. - Never use sharp objects, as they could damage the seals between the trim and worktop. Ensure the gas outlet zones are perfectly clean. These instructions are only valid if the country symbol appears on the appliance. If the symbol does not appear on the appliance, it is necessary to refer to the
technical instructions which will provide the necessary instructions concerning modification of the appliance to the conditions of use of the country.
Risk of fire!
Do not store items on the cooking surfaces.
WARNING: Unattended or automatic cooking on a hob with fat or oil can be dangerous and may result in fire. Hot oil ignites readily.
TECHNICAL DATA
FHSM 604 4G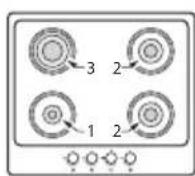
FHMA/FHSM 604 3G DC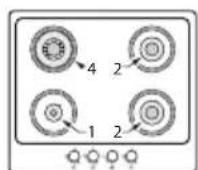
HMA 755 4G DCL FHSM/FHM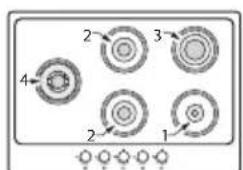
4G 755 DC FHMA/FHSM 905 4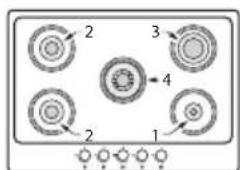
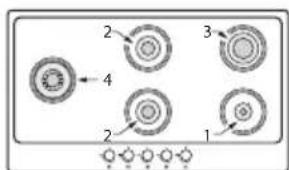
| Position Burner Rated | Capacity-G20 | InjectorsG20-20 mbar | RatedCapacity-G30 | RatedCapacity-G31 | Injectors G30/G31 28-30/37 mbar | RatedPower(Kw) | ReducedPower (Kw) | |
| 4 DC 0,315 1,35 | 240 240 0,91 3,3*218 *218 *0,85 | *3 | 2,10 | |||||
| 3 | R | 0,286 | 1,15 | 218 | 218 | 0,85 | 3 | 1,30 |
| 2 | SR | 0,166 | 0,97 | 127 | 127 | 0,65 | 1,75 | 0,70 |
| 1 AUX | 0,095 | 0,72 | 73 | 73 | 0,50 | 1 | 0,65 | |
| Pressure(mbar) | min | 17 | 20 | 25 | ||||
| nom | 20 | 28-30 | 37 | |||||
| max | 25 | 35 | 45 | |||||
| Type of Gas | G20 natural gas | LPGG30 ButaneG31 Propane | Cat. II2H3+ | |||||
*ALL FHMA MODELS
| MODELS'S CONFIGURATION | ||||||||||||
| MOD. nr | AUX | nr SR | nr R | nr DC | N burners | Heat Source | Total Rated Capacity G20 (m3/h) | Total Rated Capacity G30/G31 (g/h) | Air Necessary for combustion (m3/h) | Tot Installed Gas Rated Power (kW) | Tot Installed LPG Rated Power (kW) | Weight (net - gross) (kg) |
| FHSM 604 4G | 1 | 2 | 1 | 4 | GAS | 0,713 | 545 | 15 | 7,5 | 7,5 | 8-9,4 (C) 7,1-8,5 (E) | |
| FHSM 604 3G DC | 1 | 2 | 1 | 4 | GAS | 0,742 | 567 | 15,6 | 7,8 | 7,8 | 8-9,4 (C) 7,1-8,5 (E) | |
| FHSM 755 4G DC | 1 | 2 | 1 | 1 | 5 | GAS | 1,028 | 785 | 21,6 | 10,8 | 10,8 | 10,5-12(C) 8,9-10,4 (E) |
| FHSM 905 4G DCL | 1 | 2 | 1 | 1 | 5 | GAS | 1,028 | 785 | 21,6 | 10,8 | 10,8 | 14-15,7 (C) 12,5-14,2(E) |
| FHMA 604 3G DC | 1 | 2 | 1 | 4 | GAS | 0,742 | 545 | 15,6 | 7,8 | 7,5 | 8,8-10,2 (C) | |
| FHMA 755 4G DC | 1 | 2 | 1 | 1 | 5 | GAS | 1,028 | 764 | 21,6 | 10,8 | 10,5 | 11,5-13 (C) |
| FHMA 755 4G DCL | 1 | 2 | 1 | 1 | 5 | GAS | 1,028 | 764 | 21,6 | 10,8 | 10,5 | 11,5-13 (C) |
| FHMA 905 4G DCL | 1 | 2 | 1 | 1 | 5 | GAS | 1,028 | 764 | 21,6 | 10,8 | 10,5 | 14,5-16,2 (C) |
| DC = Double Crown SR-Semi-Rapid R = Rapid AUX=Auxiliary C = Cast Iron Grid E = Enameded Grid Power supply = 220-240 V; Frequency = 50-60 Hz; Power/current = 0,6 Watt | ||||||||||||
INSTALLATION

Installation and electrical/gas connection must only be carried out by specialized and licensed personnel.
The manufacturer declines any liability for injury to persons or damage to things due to failure to comply with these provisions. The gas connection must comply with the regulations in force in the country at the time of installation.
Ensure that the device is connected directly to the mains socket. Ensure that no adapters, no multi-sockets and no extension cables are used to connect the device.
Cabinet requirements
This handbook refers to a class 3 built-in gas hob and type Y for electric part. The gas pipe must not come into contact with the sides of any oven under the hob. For fitted units, the components (plastic materials and veneered wood) must be assembled with heat-resistant adhesives (min. 100°C): Unsuitable materials and adhesives can result in warping and detachment.
The ventilation of rooms must be in compliance with local regulations. The kitchen element must allow sufficient room for the electrical connections of the appliance.
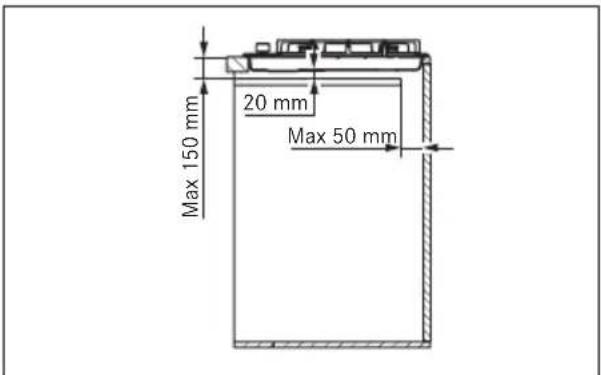
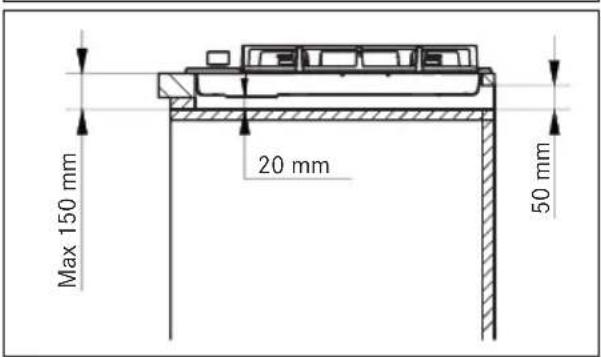
Important: These devices are "Y" type with respect to the degree of protection against the dangers of fire. The minimum distance from the edge of the appliance is 150 mm for the side wall, 50 mm for the rear and 700 mm for any cabinets above it. The appliance is recommended to be built into 40 mm thick worktops. In case the dimensions are different, eventual modifications have to be managed by the technician.
Note: if a hood is installed above the hob, for the distance to be respected refer to the assembly instructions of the hood.
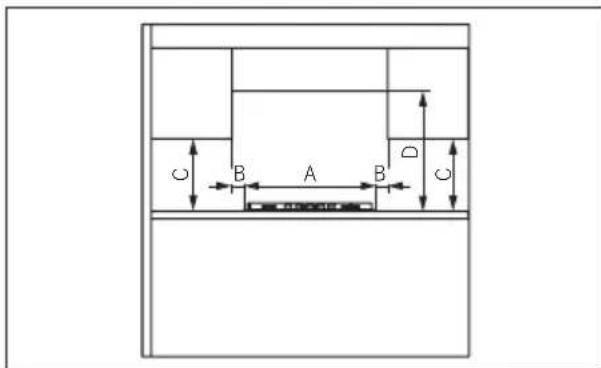
MINIMUM DIMENSIONS (MM)
A = 590 / 730 / 880, B = 50, C = 400, D = 700
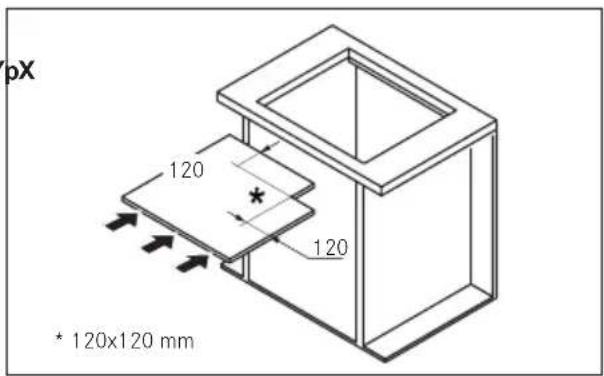
If the appliance is not installed above an oven: arrange a separator baffle.
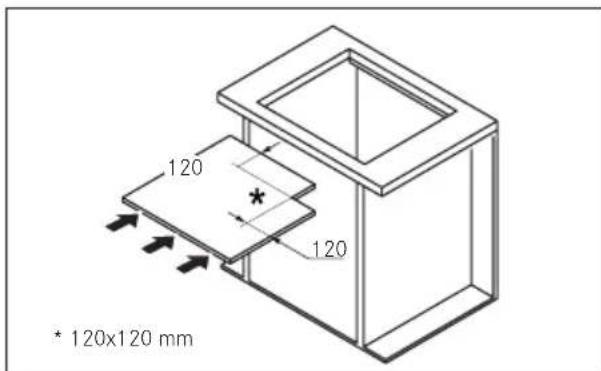
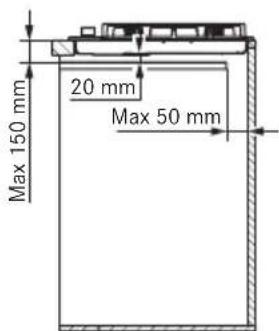
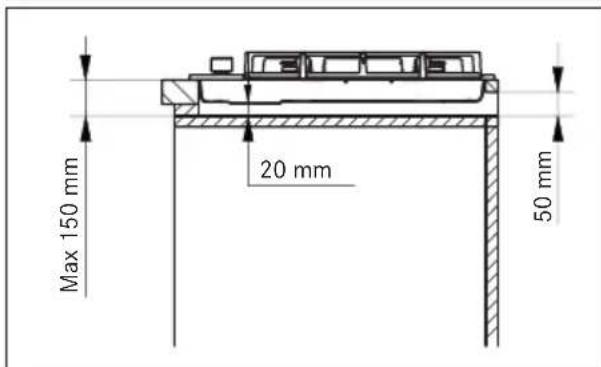
Installation procedure
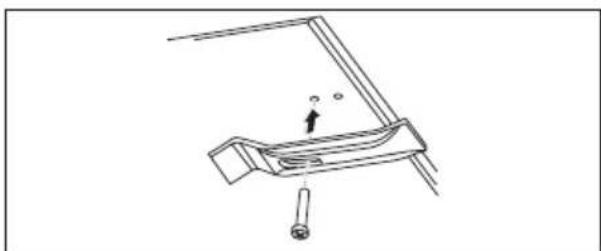
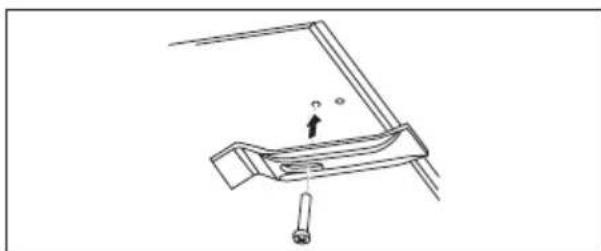
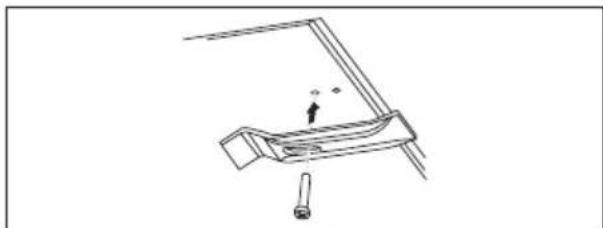
The appliance is fixed to the unit by means of the brackets and accessories provided.
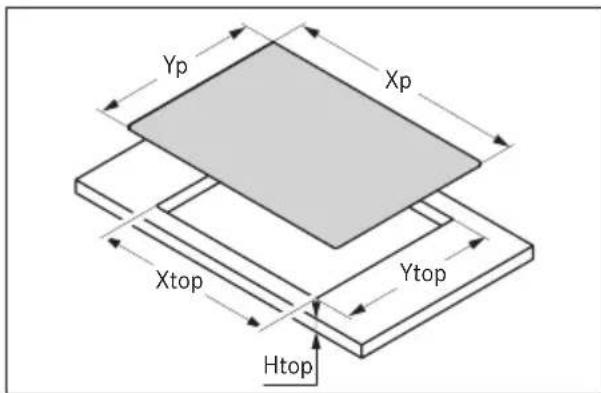
Make sure that there is free access to the fixing elements in front and in the rear after the installation of the appliance. Prepare the hole in the worktop according to the dimensions indicated. Be sure to comply with the dimensions indicated.
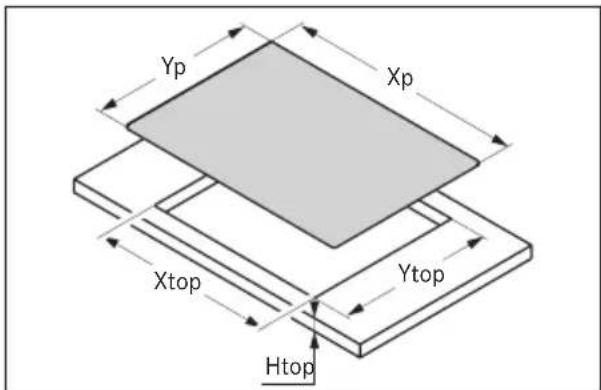
| Model Xp Yp X | |||||
| top | Y top | H top | |||
| FHSM 604 3G DC | 590 | 510 | 560 | 480 | 40 |
| FHSM 604 4G | mm | mm | mm | mm | mm |
| FHMA 604 3G DC | |||||
| FHSM 755 4G DC | 730 | 510 | 560 | 480 | 40 |
| FHMA 755 4G DC/DCL | mm | mm | mm | mm | mm |
| FHSM 905 4G DCL | 880 | 510 | 840 | 480 | 40 |
| FHMA 905 4G DCL | mm | mm | mm | mm | mm |
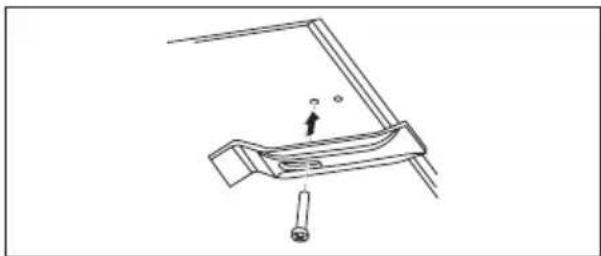
Apply the sealing strip around the hole and position the hob. Fix the appliance with the screws and brackets. Remove any excess sealing strip.
Connection to gas supply
Connect the appliance to the gas supply in compliance with the current regulations, only after making sure it is arranged for the type of gas to be used. Otherwise, carry out the operations described in the paragraph "Replacing injectors". For liquid gas use pressure regulators complying with the current regulations.
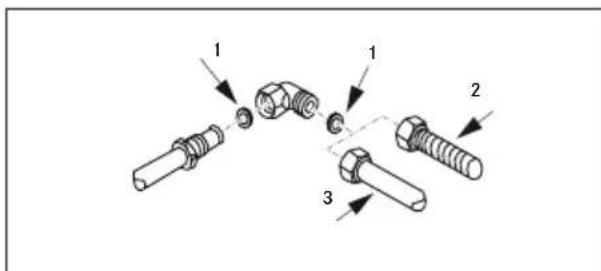
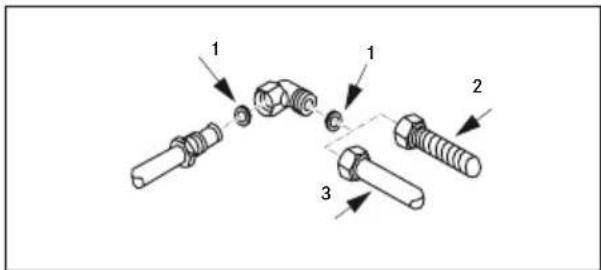
Connection to the gas supply can be made in two ways:
A. Connect the gas hob using a 12 mm diameter rigid copper pipe (3). To ensure a good seal, use the elastomer gasket supplied as an accessory (1). B. Connect the hob using a continuous-surface flexible steel tube (2). Also in this case, to ensure a good seal use the gasket supplied as an accessory (1). The maximum length of the hose is 2 linear metres.
Important: if a stainless steel hose is used, it must be installed so as not to touch any mobile part of the furniture. It must pass through an area where there are no obstructions and where it is possible to inspect it on all its length.
After connection to the gas supply light up the burners and turn the knobs from max position to minimum position to check flame stability. After carrying out the connection use soapy water to check for any leaks.
For United Kingdom, Northern Ireland and Republic of Ireland.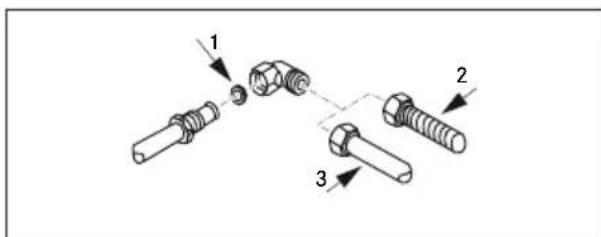
Electrical connection
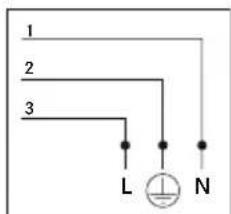
The FRANKE cooking hob comes with a 3-core power cable with free terminals.
Ensure the following:
- The characteristics of your household electrical power supply (voltage, maximum output and current) are compatible with those of your FRANKE hob.
- The plug and the socket can be easily reached and are positioned so that no live part is accessible when inserting or removing the plug.
- A 3 × 0.75 mm2 H05RR-F type cable for completely gas hobs is used when replacing the power cable.
- The terminals of two appliances are not connected to the same plug.
- The polarities of the free terminals (Blue = Neutral = (1) / Yellow and Green = Earth = (2) / Brown = Live = (3)) are respected.
Adjustment to different types of gas
WARNING: This operation must be performed by a qualified technician.
Minimum flame adjustment
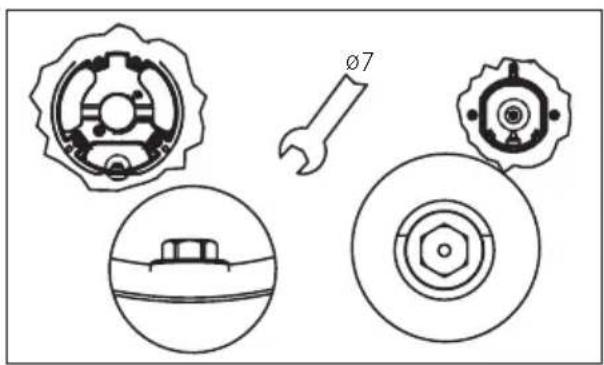
Remove the knob. Insert the screwdriver between the gasket and the cover until it reaches the adjustment screw. Adjust the minimum flame by turning the screw clockwise to decrease the flame and anticlockwise to increase it. The screwdriver for adjustment is supplied with the accessories.
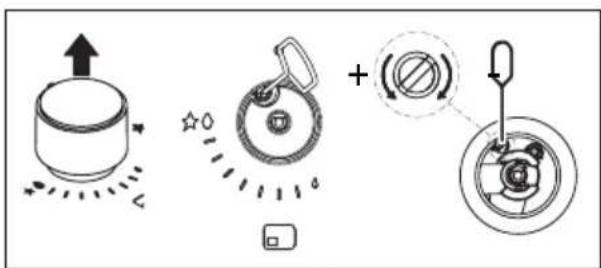
Replacing injectors
Not supplied injectors must be requested to the customer service.
Important: All the appliances are factory-set for natural gas (G20). If a different type of gas is to be used, change the injectors as follows:
- Remove the grids, burner caps and flame-spreaders;
- Unscrew the injectors and replace them with those provided and suitable for the gas supply, making sure the marking matches that given in the table;
- Refit the flame-spreaders, burner caps and grids.
These burners do not require air adjustment.
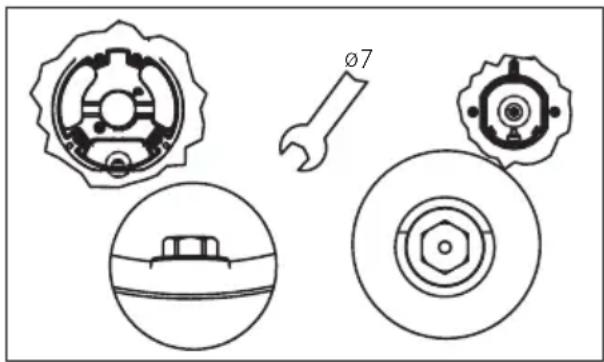
Accessing the hob
To access the tray containing the functional parts, proceed as follows:
- Remove the grids, burner caps and flame-spreaders;
- Remove the knobs, sliding them off their pins;
- Remove the screws that fix the burners to the hob;
- Lift the hob.
Important: When converting the appliance to a different type of gas, place the corresponding sticker (supplied as an accessory) in the special space on the data plate. For operation with LPG (G30 or G31), the minimum flame adjustment screw must be fully screwed down.
These appliances are supplied in cat. II 2H3+.
INTENDED USE
CAUTION: This appliance is for cooking purposes only. It must not be used for other purposes, for example room heating.
Do not pull the appliance or the power cable to unplug it. Close the general gas supply cock when the hob is not in use.

Risk of burns!
Do not touch the pot grids during use. Do not touch the appliance with wet parts of the body.
Lighting the burners
The hob is lit with the control knobs. To light the burners, proceed as follows:
- Press and turn the required knob to the lighting and maximum delivery position.
- Keep the knob pressed down for 3-4 seconds to allow the sparks to ignite the gas coming out of the burner and to allow the thermocouple to heat up.
Then release the knob and, turning it anticlockwise, adjust the flame as required. If the flame does not stay lit, repeat the operation from step 1.
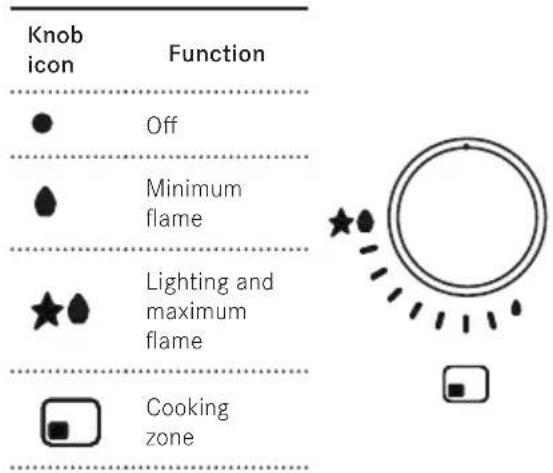
The hob is an item for daily use: signs of usage such as scratches or visible material abrasion from pots or cookware are normal. Intensive use leads to more distinctive signs of usage. In such cases, the appliance continues to function perfectly and a complaint is not justified. Safety is always guaranteed.
Do not use the appliance as a support top. To avoid damaging the appliance: In the case of thermal failure, switch the solid plate off and allow it to cool down completely. Do not put any dishes on it. Do not cool with cold water under any circumstances. Do not climb onto the appliance. The appliance is manufactured in compliance with the relevant effective safety standards and safety requirements of the Gas Directive.
Automatic Safety Valve
These hobs have a safety device that automatically closes the gas flow if the flame accidentally goes out due to draughts, pot spilling, or a temporary interruption of the gas supply. This device is activated approx. 30 seconds after the flame goes out.
Burner use
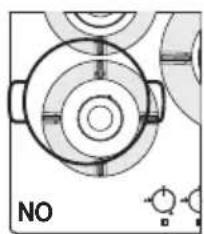
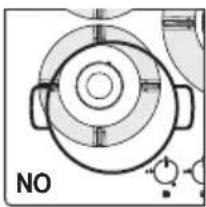
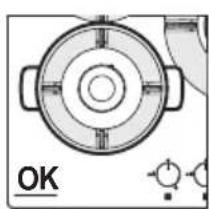
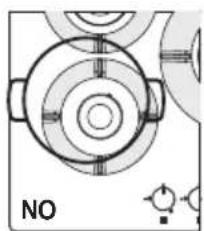
For lower gas consumption and better efficiency, use pots of widths suitable for the burners, making sure the flame does not go beyond the edges (comply with the following table):
| Burner | Pan bottom min-max. (recommended) |
| Double Crown 160 -240 mm | |
| Rapid 140 - 220 mm | |
| Semi-Rapid 140 - 200 mm | |
| Auxiliary 60 - 140 mm | |
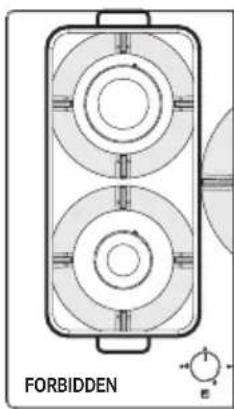
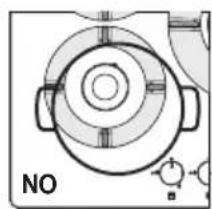
The use of larger pots than those specified can cause excessive overheating of the knobs and top and, in case of prolonged use, yellowing of the cover (if in stainless steel). FRANKE declines any liability for damage due to such use (Fig. 1).
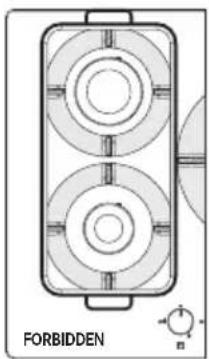
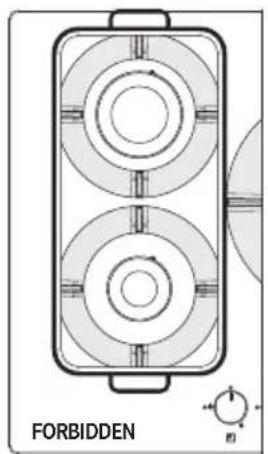
Do not put the same pan on two burners (Fig. 1). Do not use two burners working at the same time with a single container, like a saucepan or a fish pan (Fig. 1). Improper use of the grids can damage the hob: do not position the grids upside down or slide them across the hob. In case of use of cast iron griddles, griddle stones, terracotta pots and pans, use them for no more than 20 minutes and, in case of prolonged cooking, adjust the burner to the minimum. Heat diffusers such as metal mesh, or any other types, are not recommended.
CAUTION: The use of particular pans or pots may cause a light temporary deformation of the steel cooking surface. This is normal and does not affect the operation of the appliance.
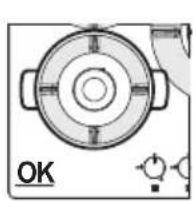
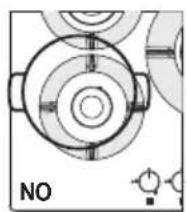
Fig. 1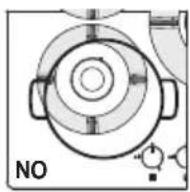
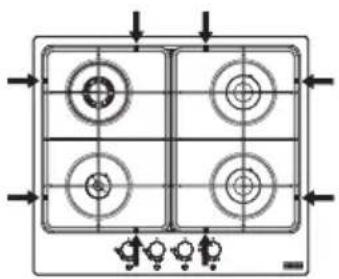
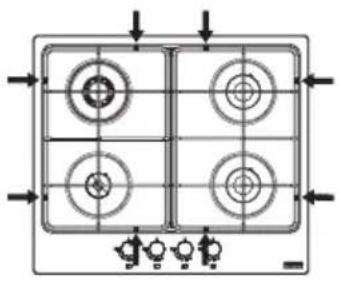
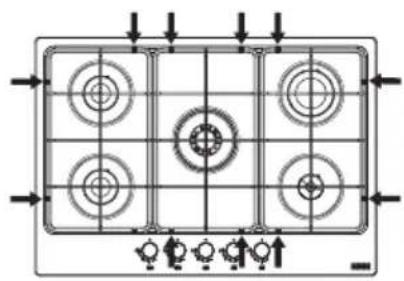
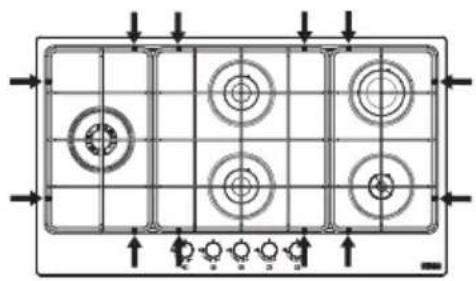
Correct position of the grids
Be sure to place the grids with the rubber feet in the right position as indicated by the arrows in the pictures below:
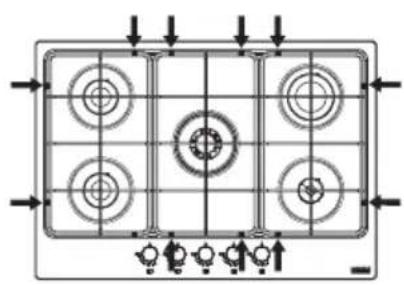
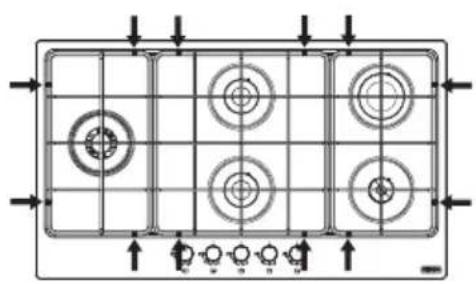
CLEANING AND CARE

Risk of burns!
Do not clean the appliance and its accessories until they are cold. Do not use flammable liquids near the appliance.
Before performing any cleaning and care: Turn the appliance off.
Foods that accidentally fall or settle on the surface, on the functional or aesthetic elements of the hob must not be eaten.
Cleaning the appliance
Clean the hob after every use in order to prevent food residues from burning on. To clean food residues, use a soft cloth or sponge with water. We recommend using protective cleaning agents. - Immediately remove any foods with high sugar content that spill onto the hob. To prevent limescale stains from forming, always thoroughly dry the appliance after going over it with a damp cloth. Clean the grids, burner caps and flame spreaders with hot soapy water, making sure to carefully dry them. Do not clean in a dishwasher. Make sure the gas outlet zones are perfectly clean. The natural colour of the pot grids in the pot placing section may alter over time due to the heat.
MAINTENANCE AND REPAIR
Before any maintenance operations disconnect the appliance from the mains power supply. In case of any operation problems, contact the Franke Technical Service Centre.
Make sure that maintenance on electrical components is carried out only by the manufacturer or the customer service. Use original spare parts only. Make sure that damaged cables are changed only by the manufacturer or the customer service.
When contacting the customer service, please provide the following information:
-type of fault - appliance model (Art. / Cod.) - serial number (S.N.)
This information is given on the data plate on the booklet or under the hob.
If the hob doesn't operate correctly, before calling the Franke Technical Service Centre, refer to the Troubleshooting Guide to determine the problem:
TROUBLESHOOTING GUIDE
Type of failure - Check if:
A
The burner fails to ignite, does not stay lit, or the flame is not steady.
1. The gas or electrical supplies are not shut off. 2. The gas supply tap is not open. 3. The refillable gas cylinder (liquid gas) is not empty. 4. The burner openings are not clogged. 5. The plug end is not dirty. 6. All the burner parts have not been positioned correctly. 7. There are no draughts near the hob. 8. When lighting the burner, the knob has not been pressed for enough time to activate the protection device (see page 9 "Intended use"). 9. The burner openings are not clogged near the thermocouple. 10. The minimum gas setting is not correct.
B
The containers (pots, pans, kettles) are not stable.
11. The bottom of the container is not perfectly flat. 12. The container is not centered on the burner. 13. The grids have not been exchanged or positioned incorrectly.
If after the above checks the fault still occurs, get in touch with the nearest Franke Technical Service Centre.
DISPOSAL
Packaging
All packaging materials (cardboard, plastic film (PE) and polystyrene (EPS)) are marked and should, if possible, be collected for recycling and disposed of in an environmentally friendly way.
Disconnection
Disconnect the appliance from the mains. With a fixed appliance, this must be carried out by a qualified electrician.
Disposal
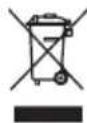
The symbol on the product or on the packaging indicates that the device must not be disposed of in the domestic waste.
Dispose of the device, which is to be discarded, via a specialised waste collection point for electronic and electrical devices.
CUSTOMER SERVICE
Refer to the contact address for your country on the back page or on our website: www.franke.com
In accordance with the Directive 2012/19/EU, regarding the reduction of the hazardous substances used in electrical and electronic appliances, and waste disposal.
Proper separate waste collection of the scrapped appliance for subsequent recycling, treatment and environmentally-friendly disposal helps prevent a potentially negative impact on the environment and health and facilitates recycling of the materials used in appliance construction.
SAFETY INSTRUCTIONS
FHSM7554GDC 730mm 510mm 560mm 480mm 40mm
FHMA7554G
DC/DCL
FHSM 905 4G DCL 880 mm 510 mm 840 mm 480 mm 40 mm
FHMA 9054G DCL
Place the sealing strip around the opening and set the hob in place. Secure the appliance with screws and brackets. Remove any excess length of the sealing strip.
Connection to the gas supply
MAINTENANCE AND REPAIR
A = 590 / 730 / 880 B = 50 C = 400 D = 700
The top surface of the device should be cleaned daily during regular use.
Accordingly, traces from the cookware and other kitchen utensils (for example, scratches or traces of the material) are completely normal. With intensive use, the traces will be more noticeable. In this case, the device will continue to work flawlessly, so there is no need to stop using it. We always guarantee the safety of our product.
Do not place foreign objects on the surface of the device. How to avoid damage to the device: In case of failure due to temperature regulation, it is necessary to turn off the hot surface and let it cool down properly. Do not place any utensils on it. Under no circumstances use cold water to cool it down. It is forbidden to lean on the device. The device is manufactured in accordance with the current safety standard and safety requirements of the Gas Directive.
Automatic safety valve
The described hot surfaces are equipped with a safety device that automatically shuts off the gas flow in case of accidental flame extinction, for example due to drafts, liquid boiling over from the cookware, or temporary interruptions in the gas supply. The described device activates approximately 30 seconds after the flame disappears.
Using the cooktop
To reduce gas consumption and increase the efficiency of the device, use cookware with a suitable diameter for the burner. In doing so, it is necessary to ensure that the flame does not extend beyond the edge of the cookware (the values of the diameters must correspond to those indicated in the following table):
The gas type and pressure are indicated on the technical data plate in the relevant section.
Before installation, make sure that the ventilation conditions (natural gas and gas pressure) and the installation of the appliance are in accordance with the installation regulations. The appliance must be installed and connected in accordance with the unified installation rules. Particular attention must be paid to the relevant requirements regarding ventilation. The installation conditions for this appliance are specified on the label (or on the data plate). Pay special attention to the ventilation requirements in the room when using the appliance. After use, always turn off the appliance using the appropriate control elements. Before lowering the lid (if present), make sure that the burners are sufficiently cool.
Risk of electric shock due to water ingress into the appliance
Installation procedure
The appliance is fixed to the furniture element using the brackets and accessories included in the kit.
Make sure that there is free access to the fixing elements from the rear of the appliance during installation. Make a hole in the countertop according to the specified dimensions. During this operation, the specified dimensions must be observed.
| Mодь Xp Yp X | Y | H | |||
| Bepx | Bepx | Bepx | |||
| FHSM 604 3G DC | 590 MM | 510 MM | 560 MM | 480 MM | 40 MM |
| FHSM 604 4G | |||||
| FHMA 604 3G DC | |||||
| FHSM 755 4G DC | 730 MM | 510 MM | 560 MM | 480 MM | 40 MM |
| FHMA 755 4G DC/DCL | |||||
| FHSM 905 4G DCL | 880 MM | 510 MM | 840 MM | 480 MM | 40 MM |
| FHMA 905 4G DCL | |||||
Apply the sealing strip around the hole, then place the appliance's hot surface into the hole. Secure the appliance with the screws and brackets. Remove the excess sealing strip that protrudes.
Gas supply connection
Connect the device to the gas supply in accordance with current regulations. Before connecting, make sure that the device matches the type of gas used. In this case, perform the operations described in the section "Replacing Injectors". When using liquefied gas, use the pressure reducer that complies with current regulations.
Connection to the gas supply can be done in the following ways:
A. Connect the gas flexible surface using a flexible hose with a diameter of 12 mm (3). To ensure proper sealing, use the rubber gasket (included in the accessories) (1). B. Connect the flexible surface using a flexible steel pipe with a non-corrugated surface (2). To ensure proper sealing, also use the rubber gasket (included in the accessories) (1). The maximum surface length is 2 linear meters.
Important: If using a non-flexible pipe, it must be installed so that it does not protrude from the movable part of the furniture. It must pass through a zone without obstacles and be checkable along its entire length.
After connecting to the gas, close the taps and turn the knobs to the minimum position to check the stability of the flame. After assembly, check the connections using soapy water to verify the presence of leaks.
WARNING: This device is intended only for cooking. It must not be used for other purposes, such as heating the room.
Do not pull the device, nor its power cord, when disconnecting the plug from the socket.
Close the gas tap when not in use.

Danger of burns!
Do not touch the burners during operation of the device. Do not touch the device with wet parts of the body.
Adjusting the burners
The burner surface is adjusted using the control knobs. To adjust the burners, perform the following steps:
Press and turn the required knob to the ignition and maximum supply position. - Hold the knob for 3-4 seconds to allow the gas to escape from the burner and heat the thermocouple. - After releasing the knob, turn it counterclockwise to adjust the flame. If the flame goes out, repeat the operation from step 1.
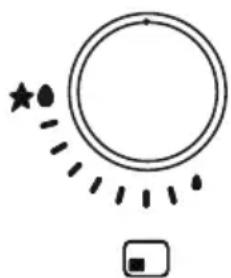
Knob symbol

Function


Po3nAIOBAAHRA Ta MAKCMAMbHN BOROHb

3oHaBapiHHa
BapnIbHa nobepxHЯ npnaJOM dIy IooJeHHoI ekCnyataui. BiNobiHo, cIiDn BID kActpynb Ta iHwOro KxOHHOro nocuy (HanpNKlaI, NopraHHu CTnpaHHa MaTePiany) E iIKOM HopMaJIbHM RaNiem. Ppi iHTeHCNBHomy BHKOpNCtAHHi cIiDn 6yTyb NOMITHIWMN. Ycbomy pa3i npnaI i HadaJI npauOBatmme 6e3DoarHNO, TOM He cIiD XBNIOBATncr. Mn 3abXdI rapaHTyEmo 6e3Neky Haoi npOdykuii.
He po3miuye CTOpOHnI npeMmTeHa noBepxHi npncTpoJ. YHKHyTN NOKOKJXeH npnaNy Y pa3i BiIMOBu chepe3 npuyweHnayTemnpaTyphoro pexmmy CIIID BIMKHyTN Cyulbny naHeIb Ta daTn Iy K CIIID OXOLOHOHTN. He cTaBTe Ha Hei KoOeH NocuI. 3a KoONX O6CTaBnH He 3aCTOCOByIte Iny OXoONJKeHH XoONHy BODy. He niHimaiTeaHa npuJa.
PnnaBnroTOBneHO 3riHNOiHNm UHHm CtaHdaptOM 6e3neKn Ta BmOrAmn 3 6e3neKn Ra3OBoI npeKtNB.
ABTomatuHn 3an06jKHN KlaNaH
LiBapnIbHi NOBepxHi MaOTb 3aNo6iXHHn npNCTpi, kHn ABTomauH NopeKpNBac NOTIKra3y, kUO pANTOM 3racaE BOROHb uepe3 npTgR, npOnBaHH 3 KAcTpyni a60 uepe3 TmucOBe NpeepuBAHH noaui ra3y. OnncAHn npNCTpi BMnKaetbc np6n3Ho uepe3 30 cekyHd nicra 3HnKHeHHn noJyM'
BnKOpncTaHH KOnΦopKn
Длma MeHwoI BnTpAtn Ra3y Ta 6iNbwoi eФeKTHBHOCTI BnKOpHCTOBuYte NocyD, WnPnHa kORO NiXoHNTb NiKoHΦopKn, CnIkyUOn 3a TmM, Uo6 BOrOb Hc BnXoINB 3a KpaNocyD (BiINOBiDaIOb HAcTynHnTa6nui):
| Конфоркa | Pan bottom min-max. Ø (recommended) |
| Дворяднa 160 - 240 MM | |
| «Експrec» 140 - 220 MM | |
| «Наповекспrec» 140 - 200 MM | |
| Довоміжнa 60 - 140 MM |
PnBnKOpNCTaHHi 6IbWoTO nocuy, HIX ce pepeD6aactbcra, KOHΦopKn Ta nobepxna pnpaNy moKyt bHaMIPHO Harpibatncr. KaIO OncaHe yBnue Mac Micce BnpoIOBx TpNbAIONo acy, nobepxHa npnPaNdy MoKe NOXOBITn (y BnAnky 3 HepKabioOuO CTannIO). Kompani Franke He Hece KODHOi BiINOBiDaIbHOCTi 3a NoIKoJKeHHn PnCtpoIO BhaclIDOK ONCaHOro Ayns.(Man.1)
He cTaBTe OndHy KacTpynHa Dbi KOHΦopKn (MaI.1). He BnKOpNCToByTe DbIKoHΦopKn OdHocHoIgOndHieI OOnHnCi Nocydy, HapnKaIad,IaKacTpynI a60 cKOBopOn Ipn6n (MaI.1). HeHaleXHe BnKOpNCtAHnpeSiTOK MoKe NOsKOJNTn BapInbHy NOBepxHIO: He cTaBTe peiITKn DOrOpn Hn3Om i He TargHiTb ix nOBapInbHi NOBepxHi. Y pa3i BnKOpNCTaHHaBvHHNXCKOBOPiOk, KaM'raHnx PnIT nIpynpriTOyBaHHraHHHO rocuNy, Kopnctyntecr HmH He iNbwe 20 xBnHn,ay pa3i TpNBanoro roTyBaHHb BiDpeRyIOHTeMIHIMAbHN BOrOH B KOHΦopci. He peKoMeHnyeTbcra BnKOpNCTOByBaTu po3ciuBaui TeNa, TaKi RaM MetaJIeBa ciTk a6o 6yIb-riKi iHsi.
OBEPEXHO: BnKOpNCTaHH NEBHOro KxOHHO NOcyuMoKe CnpuHHTn JeKy TmuaCoby DeopMaio CTaleBOI BapNbHOIO NOBepxHi. Ye HopMaJIbHe RaBnue i BOHO He BnINBaE Ha po6Otu npnaady.
Man.1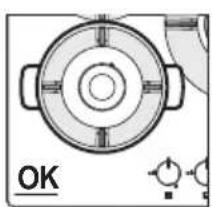
Proper installation of the grate
It is necessary to install the grate correctly
As shown in the figures
On the indicated pictograms:
Cleaning and care

Danger of burns!
Do not clean the appliance and its accessories until they have cooled down. Do not use abrasive cleaners.
Before cleaning with the sponge, do the following: turn off the appliance.
It is forbidden to use steam cleaners to clean the appliance, as steam can damage the functional or aesthetic components of the appliance surface.
Cleaning the appliance
To prevent damage, clean the hot surface after each use. To remove food residues from the hot surface, use a damp cloth or sponge. We recommend using products with acidic properties. If sugar or high-sugar foods get on the hot surface, do not remove them immediately.
Cleaning the appliance Wipe the appliance with a damp cloth and dry it. Do not allow limescale to build up. Clean the grates, caps, and burners with warm soapy water, rinse and dry them. Do not wash the burners in the dishwasher. Check the gas outlet area for cleanliness. If the burners are clogged, clean them with a needle. The openings may become blocked over time due to heating.
SERVICE AND MAINTENANCE
Before performing any operations with the appliance, disconnect it from the power supply.
If problems occur during operation of the appliance, contact the Franke service center.
Replacement of electrical components of the UPS must be performed only by the manufacturer's representative or service center. Use only original spare parts. Replacement of damaged cables is allowed only by the manufacturer's representative or service center.
When contacting the service center, you must provide the following information:
- Fault type - device model (Art. / Cod.)
- Serial number (S.N.)
This information is provided on the data plate, on the sticker or on the warranty surface.
The warranty surface is damaged if you attempt to repair it before contacting the technical service center of the Franke company. Try to follow the troubleshooting and fault elimination instructions to identify the problem:
TROUBLESHOOTING AND FAULT ELIMINATION INSTRUCTIONS
| Tун несяпавноcti Песовipte настуне: | |
| A Конфорka He розалюетс, He п探测жу极易 рогити abo полу'm' He e CTiKIM | 1 He nepekpitra noada ra3y abo elektprkn |
| 2 He bIDkpIto kpan noadai r3sy | |
| 3 Заразвий ra3obni 6balon (ckpanlenho r3sy) He e noporokhim | |
| 4 OТьор палнika He 3a6nii. | |
| 5 3aIpyuKa He e 6bpydnoio | |
| 6 Bci detani конфоркpo3miiцeti He nprabinbHo | |
| 7 Порч 3 рукopo HeMae npotrayiB | |
| 8 Пи заразлобанhi конфоркruycha Hatnckalacry npotrayom He doctatnboro acy, lo6 akTbByBatn 3axncnnpictpi (dNbiTbCsr cTospiHky 152 "KopnstvbaHny 3a npn3naueHnem") | |
| 9 OТьор конфоркHe zacmiiehi npoyr 3termonapoiu | |
| 10 He nprabinbHe halaStvbaHnHa minImaIbHoI noadai r3sy | |
| B Емностi (kactpyli, сковорідк, чayнік) e HEcTiKIMn | 11 Дно посуdu He e idealbHo pibnM |
| 12 Пocyd He bIDcentroBaHo Ha konфорci | |
| 13 Peшітki He nomiHiMiCiЯ m i po3miUyToBcI npabInbHo | |
If the fault still occurs after the checks, contact the nearest technical service center of the Franke company.
DISPOSAL
Packaging
All packaging materials (cardboard, plastic film (PE) and polystyrene (EPS)) are marked with the appropriate symbol. Where possible, they should be handed in for recycling and disposed of in an environmentally safe manner.
Disconnection
Disconnect the device from the mains before cleaning. If the device is locked, this operation must be performed by a qualified electrician.
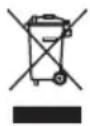
The symbol on the product means that the product must not be disposed of together with household waste.
Please hand in the appliance at a special collection point for old electrical appliances.
Directive 2012/19/EU on waste electrical and electronic equipment (WEEE) applies, as does the directive on the disposal of waste.
Proper sorting of the components of the old appliance for recycling, processing and environmentally sound disposal helps to prevent potential negative effects on the environment and human health, and also promotes the recycling of materials used in the manufacture of the appliances.
SERVICE CENTER
The contact address of the service center in your country is given on the last page of the manual, as well as on our website www.franke.com
| y! p# y # a##ll ## y#S# ## ## ## ## ## ## ## ## ## ## ## ## ## ## ## ## ## ## ## ## ## ## ## ## ## ## ## ## ## ## ## ## ## ## ## ## ## ## ## ## ## ## ## ## ## ## ## ## ## ## ## ## ## ## ## ## ## ## ## ## ## ## ## ## ## ## ## ## ## ## ## ## ## ## ## ## ## ## ## ## ## ## ## ## ## ## ## ## ## ## ## ## ## ## ## ## ## ## ## ## # # # # # # # # # # # # # # # # # # # # # # # # # # # # # # # # # # # # # # # # # # # # # # # # # # # # # # # # # # # # # # # # # # # # # # # # # # # # # # # # # # # # # # # # # # # # # # # # # # # # # (#.Cod / .Art) j# # # # # # # # # # # # # # # # # # # # # (N.S) # |
| (.Cod / .Art) | jLjLjLj | - |
| (.N.S) | LjLjLjLj | - |
Therefore, {a} {i} = {a} {1} + {2Δ}{a}_{i - 1}
15
a
j 2 1
G
y jll 122 C 80 E L 80 80
1.
Therefore D1(-2,0) and D2(0,2).
1
- ( x,y) = 1( 0,1) .
880/730/590 = A50 = B
400 = C700 = D
1
| H top | Y top | top | |||
| 40 | 480 | 560 | 510 | 590 | FHSM 604 3G DC |
| FHSM 604 4G | |||||
| FHMA 604 3G DC | |||||
| 40 | 480 | 560 | 510 | 730 | FHSM 755 4G DC |
| FHMA 755 4G DC/ DCL | |||||
| 40 | 480 | 840 | 510 | 880 | FHSM 905 4G DCL |
| FHMA 905 4G DCL |
- RISK OF INJURY
- RISK OF BURNS
- RISK OF ELECTRIC SHOCK TO ENTERING LIQUID
- CAUTION: THE USE
- RISK OF FIRE
- TECHNICAL DATA
- INSTALLATION
- CABINET REQUIREMENTS
- MINIMUM DIMENSIONS (MM)
- INSTALLATION PROCEDURE
- CONNECTION TO GAS SUPPLY
- CONNECTION TO THE GAS SUPPLY CAN BE MADE IN TWO WAYS
- ELECTRICAL CONNECTION
- ADJUSTMENT TO DIFFERENT TYPES OF GAS
- MINIMUM FLAME ADJUSTMENT
- REPLACING INJECTORS
- ACCESSING THE HOB
- INTENDED USE
- LIGHTING THE BURNERS
- AUTOMATIC SAFETY VALVE
- BURNER USE
- CORRECT POSITION OF THE GRIDS
- CLEANING AND CARE
- CLEANING THE APPLIANCE
- MAINTENANCE AND REPAIR
- TROUBLESHOOTING GUIDE
- TYPE OF FAILURE - CHECK IF
- A
- B
- DISPOSAL
- PACKAGING
- DISCONNECTION
- CUSTOMER SERVICE
- SAFETY INSTRUCTIONS
- CONNECTION TO THE GAS SUPPLY
- USING THE COOKTOP
- RISK OF ELECTRIC SHOCK DUE TO WATER INGRESS INTO THE APPLIANCE
- GAS SUPPLY CONNECTION
- CONNECTION TO THE GAS SUPPLY CAN BE DONE IN THE FOLLOWING WAYS
- DANGER OF BURNS
- ADJUSTING THE BURNERS
- KNOB SYMBOL
- FUNCTION
- ABTOMATUHN 3AN06JKHN KLANAH
- BNKOPNCTAHH KONΦOPKN
- PROPER INSTALLATION OF THE GRATE
- SERVICE AND MAINTENANCE
- SERVICE CENTER
Brand : FRANKE
Model : FHSM 755 4G DC ON E
Category : Cooker