
IR3200 - Radio Soundmaster - Free user manual and instructions
Find the device manual for free IR3200 Soundmaster in PDF.
| Brand | Soundmaster |
| Model | IR3200 |
| Product Type | Internet Radio / DAB+ / FM / Bluetooth |
| Power Supply | AC adapter 100-240 V AC, 50/60 Hz, output 12 V DC 1.5 A |
| Frequency Ranges | FM 87.5-108 MHz; DAB 174.928-239.200 MHz |
| Wireless Connectivity | Wi-Fi 2.4 and 5 GHz, 802.11 b/g, WEP/WPA/WPA2; Bluetooth v2.1+EDR |
| Supported Audio Formats | MP3, WMA, WAV, AAC, FLAC, ALAC |
| Aux Input | 3.5 mm stereo jack |
| Line Output | 3.5 mm stereo jack |
| Antenna | Integrated Wi-Fi antenna + DAB/FM telescopic antenna |
| Main Functions | Internet Radio, DAB+, FM, Bluetooth, media player (USB/DLNA), alarm, sleep, hands-free calling, equalizer, 10 presets per source |
| Display | Backlit display (adjustable brightness) |
| Remote Control | Included |
| Control App | UNDOK (iOS and Android) |
| Software Update | Via Internet, automatic or manual |
| Care and Cleaning | Clean with a dry cloth; do not use detergents or abrasive cloths |
| Safety | Do not open (risk of electric shock); use only the supplied adapter; do not expose to moisture, direct sunlight or heat sources; keep batteries away from children |
| Batteries | Use mercury- and cadmium-free batteries; do not dispose with household waste |
| Importer | Wörlein GmbH, Gewerbestrasse 12, D 90556 Cadolzburg, Germany |
| Manual available in | French, English, German, Dutch, Danish, Swedish, Norwegian, Czech, Slovak (depending on version) |
Frequently Asked Questions - IR3200 Soundmaster
User questions about IR3200 Soundmaster
0 question about this device. Answer the ones you know or ask your own.
Ask a new question about this device
Download the instructions for your Radio in PDF format for free! Find your manual IR3200 - Soundmaster and take your electronic device back in hand. On this page are published all the documents necessary for the use of your device. IR3200 by Soundmaster.
USER MANUAL IR3200 Soundmaster
Do not dispose of this product with the normal household waste at the end of its life cycle. Return it to a collection point for the recycling of electrical and electronic devices. This is indicated by the symbol on the product, user manual or packaging
The materials are reusable according to their markings. By reusing, recycling or other forms of utilization of old devices you make an important contribution to the protection of our environment.
Please contact your local authorities for details about collection points.
| 警告 | WARNING | ! |
| Risk of electric shock Do not open! | ||
| Caution: To reduce the risk of electric shock, do not remove the cover (or back). There are no user serviceable parts inside. Refer servicing to qualified service personnel. | ||

This symbol indicates the presence of dangerous voltage inside the enclosure, sufficient enough to cause electric shock.
This symbol indicates the presence of important operating and maintenance instructions for the device
Used batteries are hazardous waste and NOT to be disposed of with the household waste! As a consumer you are legally obligated to return all batteries for environmentally responsible recycling - no matter whether or not the batteries contain harmful substances*)
Return batteries free of charge to public collection points in your community or shops selling batteries of the respective kind. Only return fully discharged batteries *) marked Cd = cadmium, Hg = mercury, Pb = lead
- Only use mercury and cadmium-free batteries.
- Used batteries are hazardous waste and NOT to be disposed of with the household waste!!!
- Keep batteries away from children. Children might swallow batteries.
- Contact a physician immediately if a battery was swallowed.
- Check your batteries regularly to avoid battery leakage.
- Batteries shall not be exposed to excessive heat such as sunshine, fire or the like.
- CAUTION: Danger of explosion if battery is incorrectly replaced
- Replace only with the same or equivalent type

WARNING
DO NOT INGEST BATTERY, CHEMICAL BURN HAZARD
This product contains a coin/button cell battery. If the coin/button cell battery is swallowed, it can cause severe internal burns in just 2 hours and can lead to death. Keep new and used batteries away from children. If the battery compartment does not close securely, stop using the product and keep it away from children. If you think batteries might have been swallowed or placed inside any part of the body, seek immediate medical attention.
Safety, Environmental and Setup Instructions
- Use the device in dry indoor environments only.
- Protect the device from humidity.
- This apparatus is for moderate climates areas use, not suitable for use in tropical climates countries.
- No objects filled with liquids, such as vases, shall be placed on the apparatus.
- The mains plug or an appliance coupler is used as the disconnect device, the disconnect devices shall remain readily operable.
- Connect this device to a properly installed and earthed wall outlet only. Make sure the mains voltage corresponds with the specifications on the rating plate.
- Make sure the mains cable stays dry during operation. Do not pinch or damage the mains cable in any way.
- A damaged mains cable or plug must immediately be replaced by an authorized service center.
- In case of lightning, immediately disconnect the device from the mains supply.
Children should be supervised by parents when using the device. - Clean the device with a dry cloth only.
- Do NOT use CLEANING AGENTS or ABRASIVE CLOTHS!
- Do not expose the device to direct sunlight or other heat sources.
- Install the device at a location with sufficient ventilation in order to prevent heat accumulation.
- Do not cover the ventilation openings!
- Install the device at a safe and vibration-free location.
- Install the device as far away as possible from computers and microwave units; otherwise radio reception may be disturbed.
- Do not open or repair the enclosure. It is not safe to do so and will void your warranty. Repairs only by authorized service/ customer center.
- No naked flame sources, such as lighted candles, should be placed on the unit.
- When you are necessary to ship the unit store it in its original package. Save the package for this purpose.
- In case of malfunction due to electrostatic discharge or fast transient (burst), remove and reconnect the power supply.
- If the unit is not using for a long period of time, disconnect it from the power supply by unplugging the power plug. This is to avoid the risk of fire.
TABLE OF CONTENT
LOCATIONS OF CONTROLS 2
GETTING STARTED / SET UP 4
GET THE NETWORK ENVIRONMENT READY. 4
MAIN MENU 4
SYSTEM SETTINGS 4
SETUP WIZARD 5
EQUALISER. 7
NETWORK 7
TIME/DATE 8
BRIGHTNESS 8
LANGUAGE 8
FACTORY RESET 8
SOFTWARE UPDATE 8
INFO 8
INTERNET RADIO 9
MEDIA PLAYER 11
DAB. 15
FM 16
BLUETOOTH 17
HANDS FREE CALLING 17
UNDOK 18
SLEEP 18
ALARM. 19
TROUBLESHOOTING 20
TECHNICAL SPECIFICATIONS 21
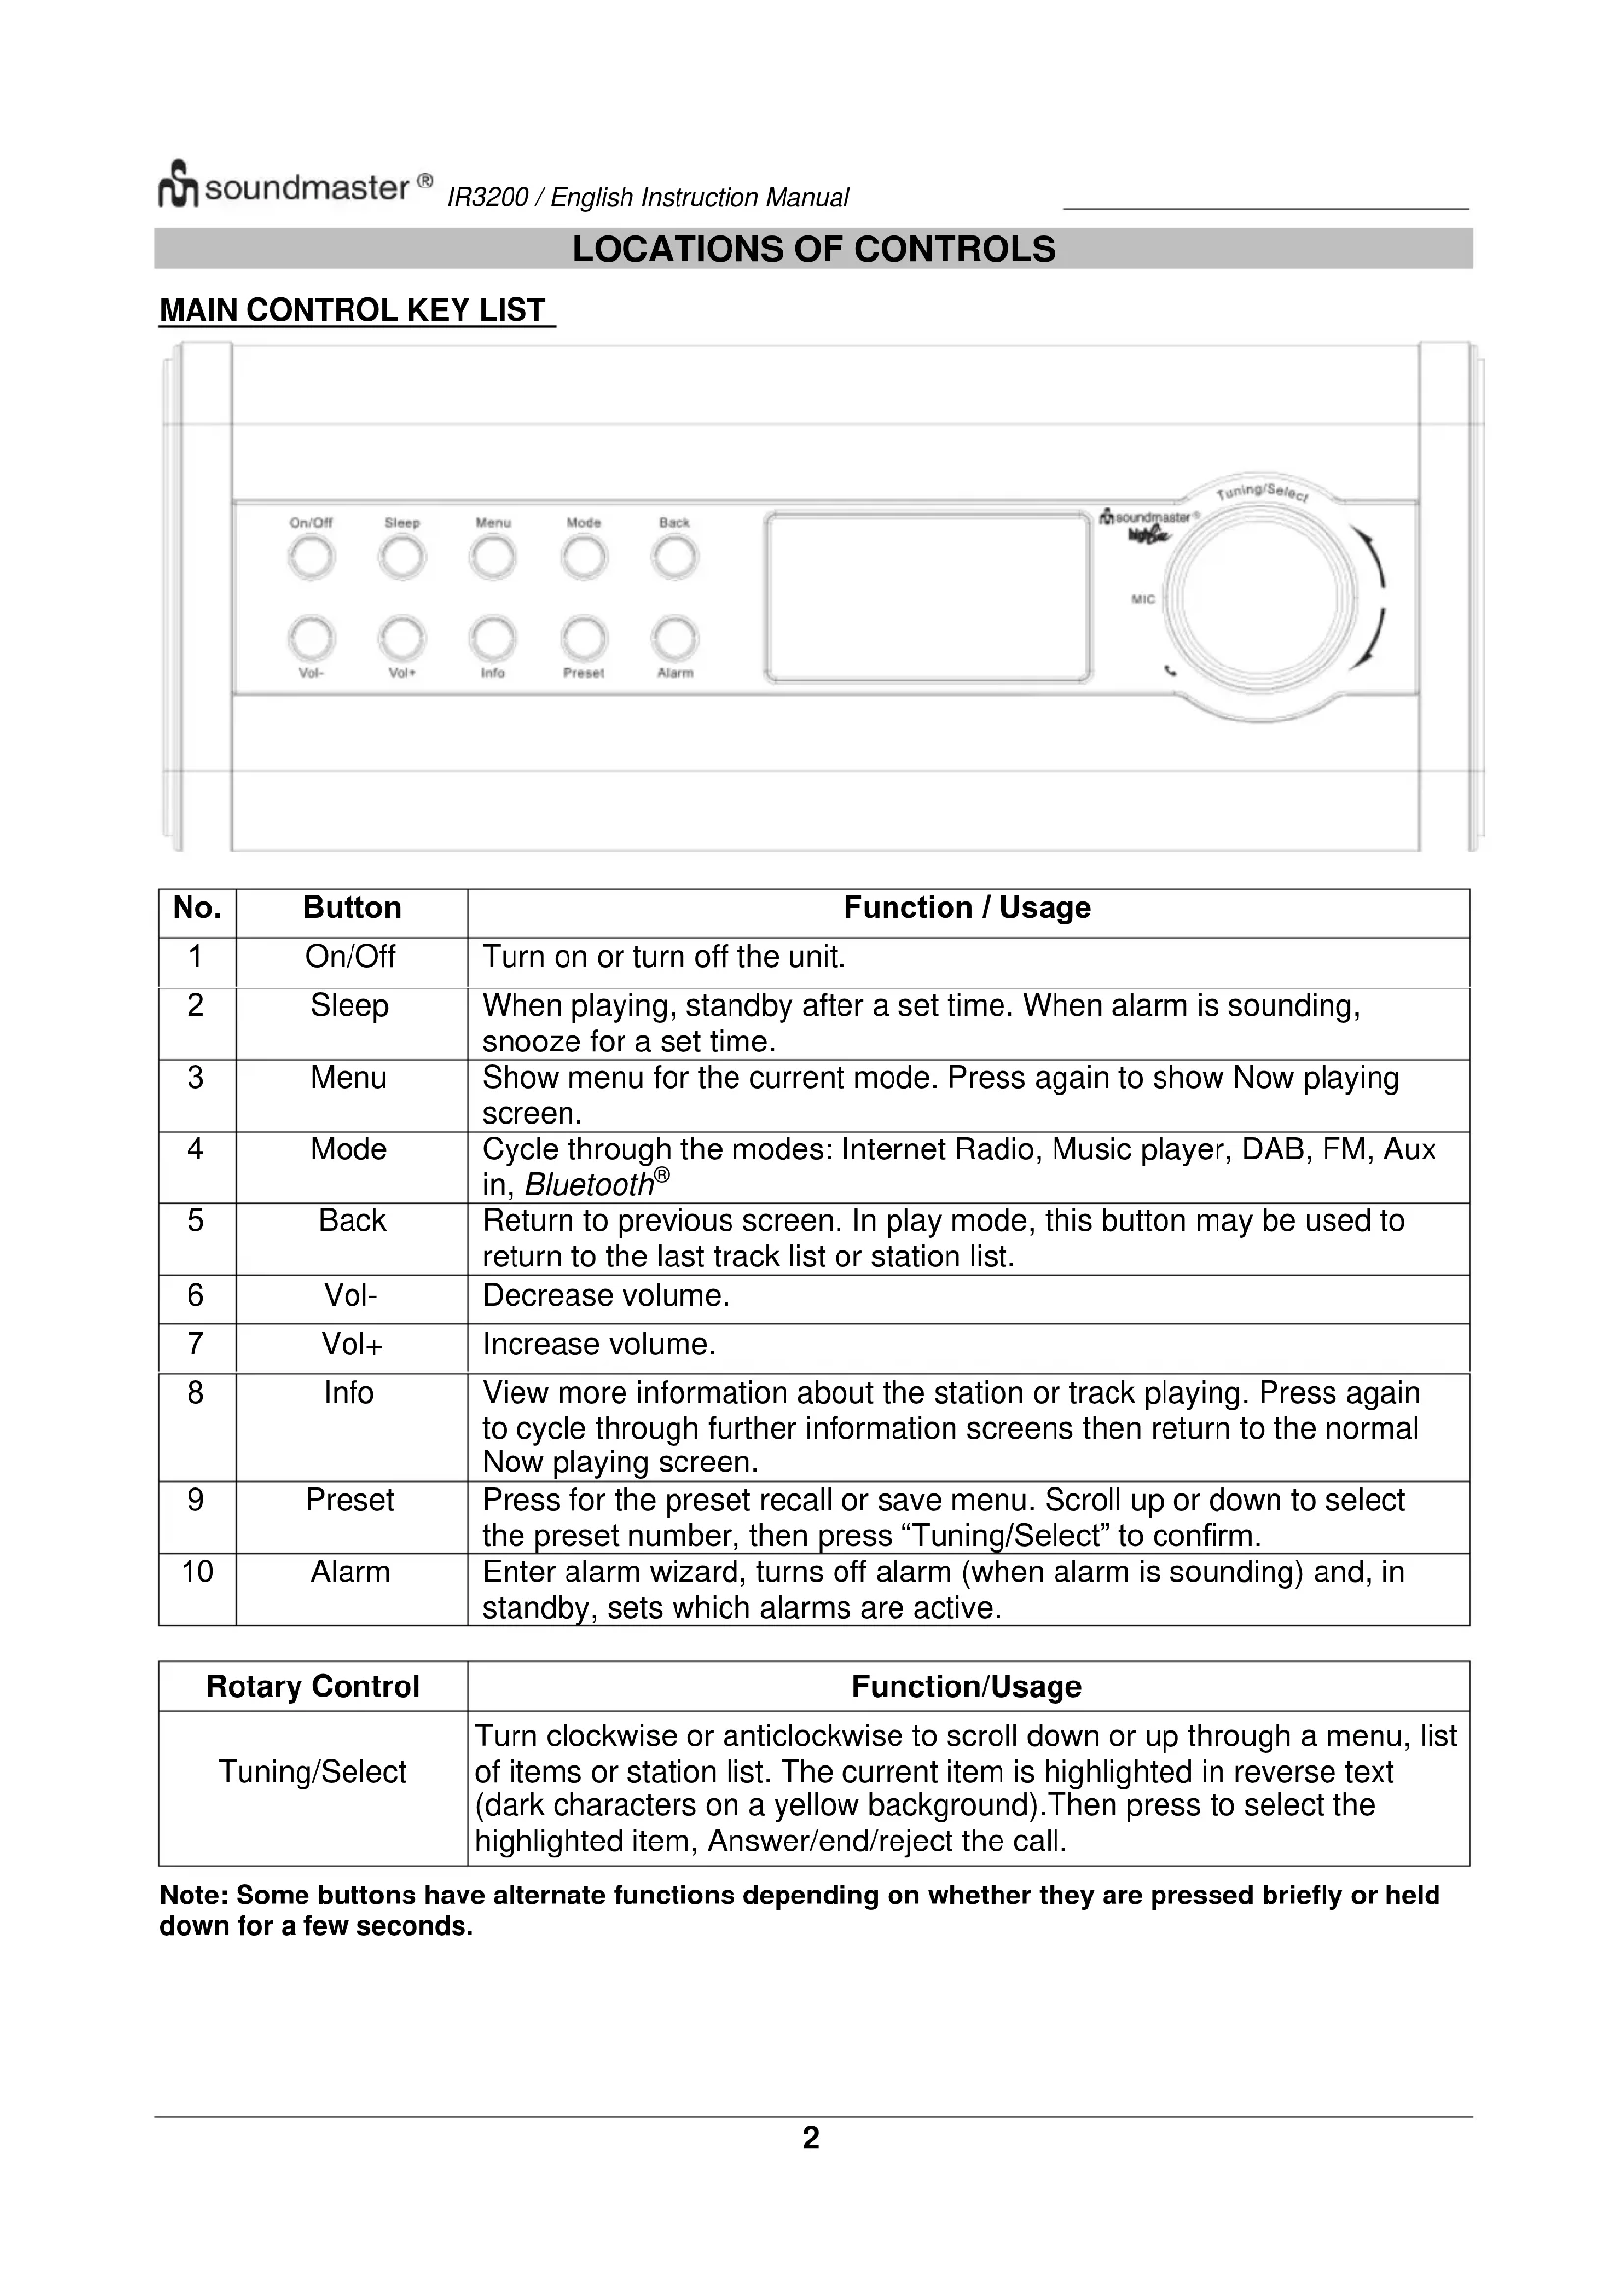
LOCATIONS OF CONTROLS
MAIN CONTROL KEY LIST

| No. | Button | Function / Usage |
| 1 | On/Off | Turn on or turn off the unit. |
| 2 | Sleep | When playing, standby after a set time. When alarm is sounding, snooze for a set time. |
| 3 | Menu | Show menu for the current mode. Press again to show Now playing screen. |
| 4 | Mode | Cycle through the modes: Internet Radio, Music player, DAB, FM, Aux in, Bluetooth® |
| 5 | Back | Return to previous screen. In play mode, this button may be used to return to the last track list or station list. |
| 6 | Vol- | Decrease volume. |
| 7 | Vol+ | Increase volume. |
| 8 | Info | View more information about the station or track playing. Press again to cycle through further information screens then return to the normal Now playing screen. |
| 9 | Preset | Press for the preset recall or save menu. Scroll up or down to select the preset number, then press “Tuning/Select” to confirm. |
| 10 | Alarm | Enter alarm wizard, turns off alarm (when alarm is sounding) and, in standby, sets which alarms are active. |
| Rotary Control | Function/Usage |
| Tuning/Select | Turn clockwise or anticlockwise to scroll down or up through a menu, list of items or station list. The current item is highlighted in reverse text (dark characters on a yellow background).Then press to select the highlighted item, Answer/end/reject the call. |
Note: Some buttons have alternate functions depending on whether they are pressed briefly or held down for a few seconds.
Remote Control Key List
The remote control operates in a similar way to the main unit control keys.
| Button | Function | Remote Control Photo |
| Standby: Turn on or back to standby mode (showing clock and date).Cancel sleep function. | ||
| Mode | Cycle through the modes: Internet Radio, Music player, DAB, FM, Aux in, Bluetooth® | |
| SleepSNZ | Sleep/Snreeze: When playing, standby after a set time. When alarm is sounding, snooze for a set time. | |
| Mute. | ||
| Vol+ | Increase volume. | |
| Menu | Menu: Show menu for the current mode. Press again to show Now playing screen. | |
| Dow | Tune up station and skip back. | |
| Up | Tune down station and skip forward. | |
| Info | Info: View more information about the station or track playing. Repeat press to cycle through further information screens. | |
| Select | Press to select the highlighted item. Play / Pause function Answer/end/reject the call. | |
| Alarm | Enter alarm wizard, turns off alarm (when alarm is sounding) and, in standby, sets which alarms are active. | |
| Preset | Press for the Preset recall or press and hold for save menu. Scroll up or down to select the preset number then press" Select" to confirm. | |
| Vol- | Decrease volume. | |
| Back | Return to previous screen. In play mode, this button may be used to return to the last track list or station list. | |
| Shift | Shift: Press to select preset 6 - 10 | |
| 5 | Set or recall preset 5 or 10 | |
| 4 | Set or recall preset 4 or 9 | |
| 3 | Set or recall preset 3 or 8 | |
| 2 | Set or recall preset 2 or 7 | |
| 1 | Set or recall preset 1 or 6 |
GETTING STARTED / SET UP
Mains operation:
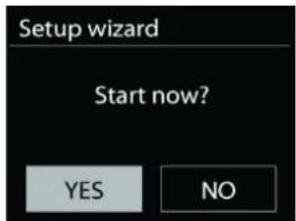
Connect the unit to a suitable power source using the power supply provided. After showing a starting screen, it will enter the last used listening mode. When the unit is started for the first time, the setup wizard will be launched automatically.
GET THE NETWORK ENVIRONMENT READY
Make sure you have setup the wireless network and you have the WEP, WPA or WPA2 security password to activate the connection.
You may also use the WPS (WiFi Protected Setup) function for easy pairing between the network device and IR3200. Check if the light indicators on the network device are in appropriate status.
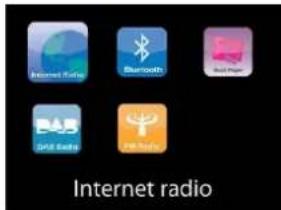
MAIN MENU
Under the main menu, you can select the following modes:
Internet Radio, Media player, DAB, FM, Bluetooth, AUX-In, Sleep and Alarm.
SYSTEM SETTINGS
At the first time operation, system asks if you want to start the Setup Wizard. The Setup wizard guides you through the basic setup parameters for time/Date and Network connection. To change any settings later all setting functions are accessible from the Settings Menu.
SETUP WIZARD
Time/date Display format 1.
Select 12 or 24 as the time format.
Auto update 2.
The time and date can be updated manually or automatically from DAB, FM or network.
Auto update works with data sent over DAB, FM or the Internet. The clock is only updated when it is in a corresponding mode, so it is suggested to select a mode you use regularly.
DAB and FM use time signals broadcast with radio transmissions. Network uses a time signal sent from the Internet radio portal when in any network connected mode.
Time zone/daylight 3.
Set your time zone. If your country uses daylight saving and it is in effect, turn on the Daylight saving option.
Manual update 4.
If you set No update, the wizard prompts you to set the time and date manually. The date and time are displayed as dd-mm-yyyy and hh:mm.
The active value appears as flashing. Adjust each value with the "Tuning/Select" knob. Once the value is set, press the knob to continue setting with next value.
Network 5.
Keep Network connected
Select this option when the unit should the network connection in standby keep, when the function is confirmed, the unit wills faster connecting the internet and it is possible to switch on the unit with the "UNDOK" app.
Note: The standby power consumption is slightly increased with this function.
WLAN region
Select the WLAN region to obtain the optimal WLAN connectivity: Europe.
Scanning for the network
IR3200 is compatible with all common network protocols and encryption methods. It searches for the available networks and list them out for you.
There will be hints for the type of network - if your network devices support WPS function, it will be [WPS] before the SSID (the name of the network device). Select the one you want to connect.
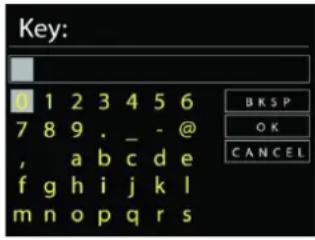
For the wireless connection, you will be asked for input the encryption in the next step. To enter the network's key, use the "Tuning/Select" knob to move the cursor through the characters and select "OK" to confirm. As each character is selected, the key is built up near the top of the display.
There are three options accessible by tuning the navigate reel back before the first characters - Backspace, OK and Cancel.
WPS encrypted network
WPS encrypted networks are identified by WPS at the start of the network name when the
IR3200 searches the available AP. Use one of the following methods of connection: There is the shortcut WPS key on the unit.
Push button
IR3200 prompts you to press the connect button on the router. It then scans for a ready Push Button Connect network and connects.
WPS Setup

Push WPS button at the other end
Press SELECT to continue
Pin
IR3200 generates an 8-digit code number which you enter into the wireless router, access point, or an external registrar.
WPS Setup

Enter PIN 98467583 at the other end
Press SELECT to continue
Skip WPS
Enter key as for a standard encrypted network.
For more information on setting up a WPS encrypted network, see your WPS router's instructions.
Completion
IR3200 attempts to connect to the selected network.
Network settings
Please wait Connecting..
It will show connected if the setup is successful. If connecting fails,
IR3200 returns to a previous screen to try again.
Press "Tuning/Select" to quit the setup wizard.
Setup wizard

Setup wizard completed
Press SELECT to exit
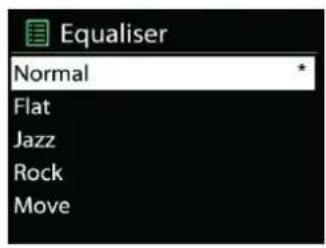
EQUALISER
Several preset EQ modes are available: Normal, Jazz, Rock, Movie, Classic, Pop, News and My EQ.
In the My EQ settings, you can create your own EQ with custom bass and treble settings.
NETWORK
Network wizard
Enter to search AP SSID, then input the WEP / WPA key or choose Push Button/Pin/Skip WPS to connect to the wireless network.
PBC Wlan setup
Push Button Configuration, it is to connect the AP that supports WPS (Wi-Fi Protected Setup).
View settings
View the information of current connected network: Active connection, MAC address, WiAn region, DHCP, SSID, IP address, Subnet mask, Gateway address, Primary DNS and Secondary DNS.
- WLAN region
Select the WLAN region to obtain the optimal WLAN connectivity: Europe or Australia.
- Manual settings
Choose wireless network connection and enable or disable DHCP (Dynamic Host Configuration Protocol).
Network profile
IR3200 remembers the last four wireless networks it has connected to, and automatically tries to connect to whichever one of them it can find. From here you can see the list of registered networks. You can delete unwanted networks by turning and pressing then choosing YES to confirm delete.
- Keep network connected
If you choose to keep network connected, the WiFi will not disconnect even you are in standby mode. Otherwise, the connection will only available in internet radio and music player modes. This option allows IR3200 to be ready for DLNA streaming in any operating modes.
When Keep network connected is selected the standby power consumption is raised.

TIME/DATE
Set the time manually or automatically update, time format, time zone and daylight.
BRIGHTNESS
You may change the backlight of each environment (Normal or standby).
LANGUAGE
Change it as your preference.
FACTORY RESET
A factory reset resets all user settings to default values, so that time and date, network configuration and presets are lost. However, the IR3200 's current software version is maintained, as is registration with the Internet radio portal. Internet radio favourites therefore remain unless you re-register your IR3200 with another account on the portal website.
SOFTWARE UPDATE
From time to time, software upgrades may be created with bug fixes and/or additional features. You can either check manually or set IR3200 to check periodically automatically (this is the default). If newer available software is detected, you will be asked if you want to go ahead with an update. If you agree, the new software is then downloaded and installed. After a software upgrade, all user settings are maintained.
NOTE: Before starting a software upgrade, ensure that IR3200 is plugged into a stable main power connection. Disconnecting power during an upgrade may permanently damage the unit.
INFO
View the firmware version and the radio ID.
INTERNET RADIO
IR3200 can play thousands of radio stations and podcasts from around the world though a broadband Internet connection.
When you select Internet radio, IR3200 directly contacts the Frontier Silicon Internet radio portal (which is supported by v-tuner) to get a list of stations.
The portal also enables multiple lists of favourite stations that you can personalize.
If you are already listening to an Internet radio station, you can press "Back" button to quickly return to the last visited branch of the menu tree, rather than Menu to go to the first menu of Internet radio mode.
- Last listened
When Internet radio mode restarts, the last-listened station is selected. To select another recently used station, enter here to select the listed station. Most recent stations appear at the top of the list.
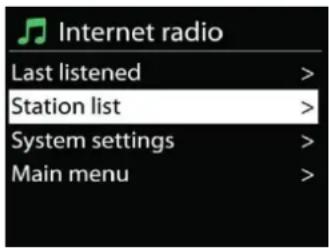
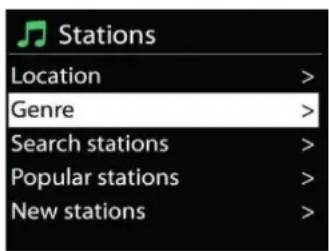
Station list
Browse Internet broadcasts that organized into different categories, Location, Genre, Popular and New. You can also find the station with Search by keyword.
- Favorites
- Favorites are stored with the Internet radio portal, and are available through all Internet radios registered on the same account. Before favorites can be used, the radio has to be registered with the Internet radio portal.
To store a playing station as a favourite, press and hold the "Tuning/Select" knob until the display shows 'Favourite added'. The station appears in the default favourites list Stations.
My added stations
Even though the Internet radio portal contains thousands of stations, you may want to listen to stations not listed. You can add your own via the portal.
To register your IR3200, choose Station list > Help > Get access code to get your radio's unique portal access code first. (Do not confuse the portal access code with the Radio ID from System settings.
Visit the portal website at www.wifiradio-frontier.com
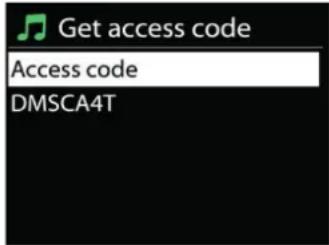
If this is your first visit to the portal, register for a new account, entering the following information:
- access code,
- your e-mail address,
- password,
radio model.
If you already have an account and wish to add an additional radio, log in to your account and select My preferences > Add another Wi-Fi radio.
Once your radio is registered with the portal, you can immediately use the Internet radio favourites and added stations features.
- Presets
To store an Internet radio preset, press and hold the "Preset" button until the display shows the Save preset screen. Select one of the 10 presets to save the current station. Or press and hold any of the "1" to "5" buttons on the remote control to store the current playing station into the preset directly.
To select a preset, press briefly on the "Preset" button, then select one of the listed preset stations. Or press any of the "1" to "5" buttons to directly recall "1" to "5" presets. Use the "Shift" button to pre-select preset number 6-10.
You can also use the later mentioned UNDOK app for storing or recalling the presets.
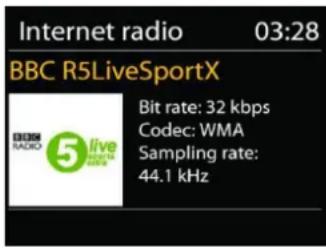
- Now playing information
While the stream is playing, the screen shows its name and description. To view further information, press "Info" button on the radio. Each time you press "Info" button, another set of information is displayed, cycle through name/description, genre/location, reliability, codec/sampling rate, playback buffer and today's date.
MEDIA PLAYER
Music player mode plays audio files in MP3, WMA, WAV, AAC, FLAC or ALAC format from a computer on the local network. If you are already playing a music file, you can press "Back" button on the radio to quickly return to the last visited branch of the menu tree.
You can use button or button to play the previous or the next track, press and hold any of these buttons to start fast rewind or forward.
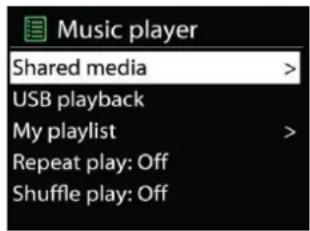
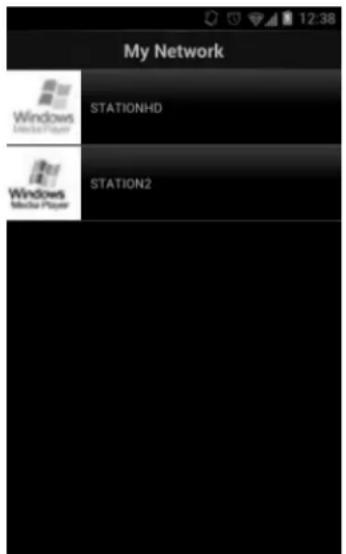
- Shared media
If you have set up shared media, you should see an entry consisting of
From this point on, the menus are generated from the shared media server. The first menu shows a list of media types, for example Music, Video, Pictures and Playlists. IR3200 can only play music and playlists.
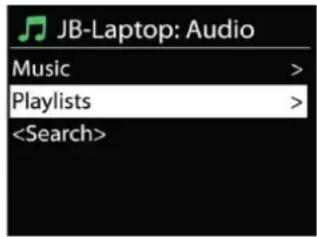
There is also a search function which finds tracks in a similar way to Internet radio search.
From Music, there are numerous ways of selecting tracks including Genre, Artist, Album,Composer and Rating. Once you have found a track you want to play, press "Tuning/Select" knob.
A short press plays the track immediately.
- Prune Server
From time to time, it maybe necessary to remove server displaying question marks in front of the server name from the server list. For example, if the device is moved to a new network or if a Wake-on-line is removed from your current network.
To perform this function: go to menu by using the Menu button > Prune servers > and select Yes.
- USB playback
From this point on, menus are generated from the folders on the USB device. Browse folders with the Tuning / Select / Snooze knob and Back button, or by using the UNDOK app. The display shows folder and file names (not necessarily track names).
Once you have found a track you want to play, press the "Tuning/Select" knob on the device or click on the song title in UNDOK app.
Repeat/Shuffle
Allow you to repeat tracks or play them in random order.
Now playing information
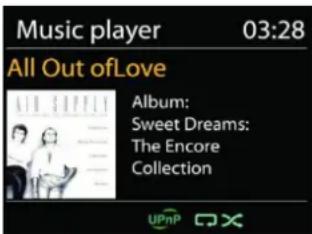
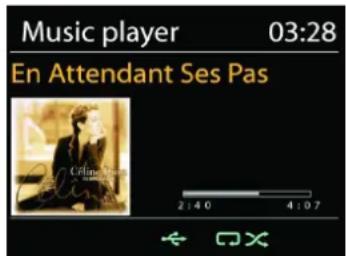
While a track is playing, the screen shows its track and artist (UPnP). There is also a progress bar with figures for elapsed and total track time. At the bottom of the screen, an icon indicates UPnP depending on the source. To view further information, press Info button.
Each time you press Info button, another set of information is displayed, cycling through the information: track/artist/progress bar/track times, album, codec/sampling rate, playback buffer and today's date.
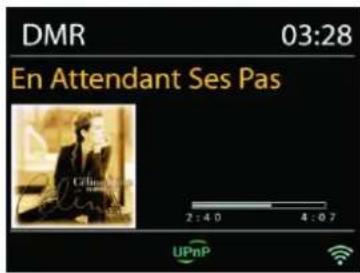
- DMR (DLNA Streaming)
Shared music is a way of music streaming which you look for the music list and control playback from IR3200. This topic will introduce another way to do the music streaming which is not necessary to control playback on IR3200.
You can share the music files from PC, Android mobile or tablet, and directly use your PC,
Android mobile, tablet or iPhone / iPad to control music playback on the IR3200. It is simple called DLNA streaming.
Control on PC
The PC system requirements for DLNA are Windows 7 or above, together with Windows Media Player 12. Setup as below:
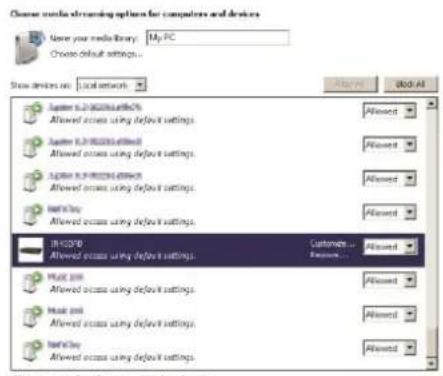
Firstly, share the media on your PC to IR3200.
Control Panel > Network and Internet > Network and Sharing Center > Media streaming options
A
Choose how much sharing options. Choose power options. Tell me about how media covering leads the privacy statement online.

Open Windows Media Player to enable Allow remote control of my Player.

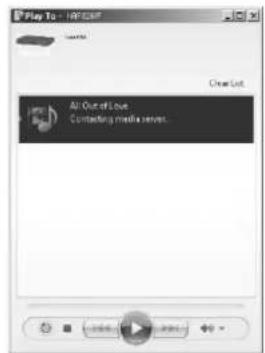
Right click any music in the library and choose Play to IR3200. Then a box of music playback pops up for the streaming.
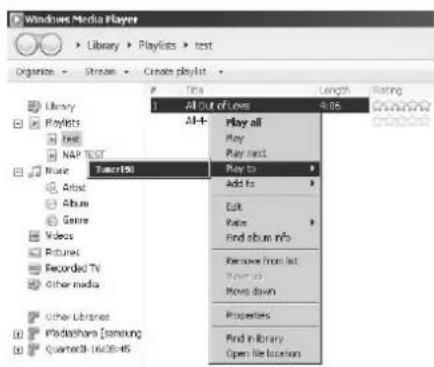
Then a box of music playback pops up for the streaming.
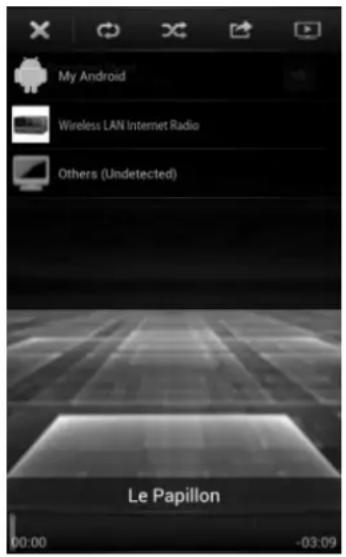
- Control on Smartphone / Tablet
You may search (with keyword: DLNA) and install any free or commercial DLNA Apps from Google Play or Apple Store if you are using Android mobile, tablet or iPhone / iPad.
It is suggested to use iMediaShare on Android mobile, tablet or iPhone/iPad.
Procedures for playing shared music on the app are as follows:
-
Select IR3200 as the player.
-
Select music server and choose the music.
NOTE: Some Apps may not support streaming music from iPhone/iPod but iPhone/iPod could still be used to control streaming music from other servers.
Some Apps may allow to play the music to multi players at the same time.
Some Apps can create a playlist if you choose several music.
Study the own instruction of the software or Apps you use to enjoy DLNA streaming if necessary.
DAB
DAB mode receives DAB or DAB plus digital radio signal and displays information about the station, streaming audio and the programme details.
- Scanning for stations
The first time you select DAB radio mode, or if the station list is empty, IR3200 automatically performs a full scan to see what stations are available. You may also need to start a scan manually to update the list of stations for one of the following reasons:
Available stations change from time to time.
- If reception was not good for the original scan, this may result in an empty or incomplete list of available stations.
- If you have poor reception of some stations (burbling), you may wish to list only stations with good signal strength.
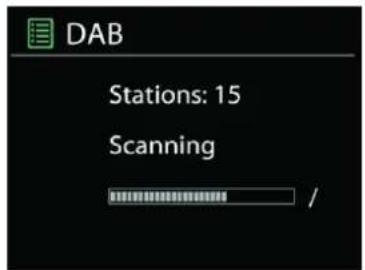
To start a scan manually, choose Full scan. To scan only stations with good signal strength, select Local scan.
Once the scan is complete, the radio shows a list of available stations.
To remove stations that are listed but not unavailable, choose Prune invalid.
Turn the navigate reel to view a list of stations and press to select. Once selected, the station plays and the screen shows information about station, track or show as broadcast.
- Presets
To store an DAB preset, press and hold the "Preset" button until the display shows the Save preset screen. Select one of the 10 presets to save the current station. Or press and hold any of the "1" to "5" buttons on the remote control to store the current playing station into the preset directly.
To select a preset, press briefly on the "Preset" button, then select one of the listed preset stations. Or press any of the "1" to "5" buttons to directly recall "1" to "5" presets. Use the "Shift" button to pre-select preset number 6-10.
You can also use the later mentioned UNDOK app for storing or recalling the presets.
- Now playing information
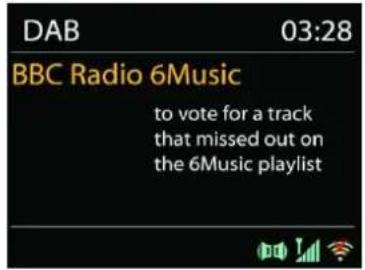
While the stream is playing, the screen shows its name and DLS (Dynamic Label Segment) information broadcast by the station giving real-time information such as programme name, track title and contact details. Stereo broadcasts are indicated with an icon at the bottom of the screen. To view further information, press Info button on the radio.
Each time you press Info button on the radio, another set of information is displayed, cycling through DLS text, programme type, ensemble name/frequency, signal strength/errror rate, bite rate/codec/channels and today's date.
SETTINGS
- Dynamic range compression (DRC)
If you are listening to music with a high dynamic range in a noisy environment, you may wish to compress the audio dynamic range. This makes quiet sounds louder, and loud sounds quieter. You can change DRC as off, low or high.
- Station order
You can choose the order of the DAB station list to be either Alphanumeric, Ensemble or Valid.
Ensemble lists groups of stations that are broadcast together on the same ensemble. Valid lists valid stations first, alphabetically, then off-air stations.
FM
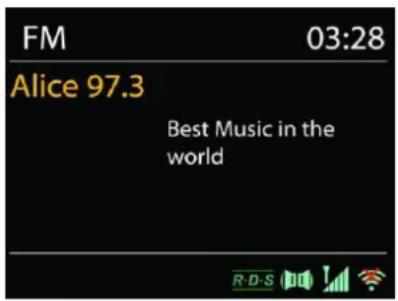
FM radio mode receives analogue radio from the FM band and displays RDS (Radio Data System) information about the station and where broadcast.
To find a station, press Tuning / Select / Snooze knob. The frequency display starts to run up as IR3200 scans the FM band. Alternatively, you can scan up or down by rotating Tuning / Select / Snooze knob.
NOTE: The tuning direction will be followed the last tuned direction.
- Preset
To store an FM radio preset, press and hold the "Preset" button until the display shows the Save preset screen. Select one of the 10 presets to save the current station. Or press and hold any of the "1" to "5" buttons on the remote control to store the current playing station into the preset directly.
To select a preset, press briefly on the "Preset" button, then select one of the listed preset stations. Or press any of the "1" to "5" buttons to directly recall "1" to "5" presets. Use the "Shift" button to pre-select preset number 6-10.
You can also use the later mentioned UNDOK app for storing or recalling the presets.
- Now playing information
While the stream is playing, the screen shows its frequency, or if RDS signal is available, station name and any further RDS information such as proramme name, title and other details. Stereo broadcasts are indicated with an icon at the bottom of the screen. To view further information, press Info button on the radio.
Each time you press Info button on the radio, another set of information is displayed, cycling through Radio text, programme type, frequency and today's date.
- SETTINGS
- Scan settings
Choose FM at first, it will go to a specific station playing. Then press "Menu" on the radio to get above table.
By default, FM scans stop at any available station. This may result in a poor signal-to-noise ratio (hiss) from weak stations. To change the scan settings to stop only at stations with good signal strength, select Yes after choosing Strong station only.
Audio settings
All stereo stations are reproduced in stereo. For weak stations, this may result in a poor signal-to-noise ratio (hiss). To play weak stations in mono, select FM weak reception: Listen in mono only and then YES.
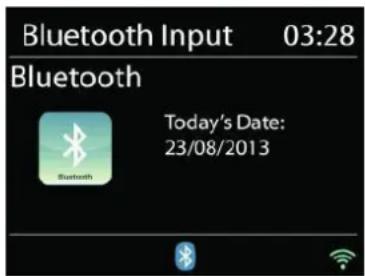
BLUETOOTH
When you select the Bluetooth mode, the device is entering to pairing and the BT icon at the bottom of the screen will flash.
Turn on your smartphone, tablet or other Bluetooth devices to search for the device.
The Bluetooth pairing name is "IR3200".
When pairing is successful, the Bluetooth indicator will light up and stop flashing.
To release BT pairing, turn off or unpair your smartphone, table or other Bluetooth devices.
Press "Tuning/Select" button on the radio to start or pause the playback. You can also press "▶" or "▶" on the remote control to play the previous or next track; And you can press and hold any of these buttons to start fast rewind or forward searching.
HANDS FREE CALLING
When your Mobile phone is connected with your device by Bluetooth® and you are in Bluetooth® mode, you can answer and end the call by pressing the "Tuning/Select" button. When the call is coming and you press and hold the "Tuning/Select" button the call will be rejected.
UNDOK
Control via the UNDOK app
The IR3200 supports remote control from Apple iPhone, iPad and Android using the UNDOK app. The apps are available in Apple's app store and Google's android play.
You can control IR3200.
The UNDOK app allows you to:
- Control all the modes of the IR3200, including internet radio, Media Player, USB playback, DAB, FM, Bluetooth and AUX-In;
- Adjust the volume level of current playback;
- Setting EQ for various audio presets;
- Setting Sleep timer;
- Editing the displayed name of the radio.
SLEEP
To set the sleep timer, select "Sleep" under "Main menu" or press "Sleep" button. Choose from Sleep OFF, 15 mins, 30mins up to 60mins.
Once you select a sleep period, the system returns to the main menu. Press "Menu" on the radio to return to the Now playing screen.
ALARM
There are two versatile wake-up alarms with snooze facility, and a sleep function to turn the system off after a set period. Each alarm can be set to start in a particular mode.
Press and hold the Alarm button on panel or select Alarms under Main menu to set or change an alarm.

Alarm 1
Enable: Daily
Time: 07:30
Mode: Internet Radio
Preset: Last listened
Volume: 10
Select the alarm number (1 or 2) then configure the following parameters:
- Enable: on/off,
- Frequency: Daily, Once, Weekends or Weekdays,
Time,
Mode: Buzzer, Internet Radio, DAB or FM, - Preset: Last listened 1 - 10,
Volume:0-32
To activate the new settings, scroll down and select Save.
The screen shows active alarms with an icon at the bottom left.
At the set time, the alarm will sound. To temporarily silence, press "Sleep" button on the unit. You can change the snooze period by pressing the "Sleep" button. The radio returns to standby for the set period, with the silenced alarm icon flashing.
Set snooze time
5 minutes
TROUBLESHOOTING
| Error | Remedy |
| The device does not switch on. | Check it the power adaptor is connected properly. |
| No sound. | 1. Turn on the sound as it may be muted 2. Increase the volume. |
| No network connection can be established. | 1. Check the LAN cable or the WLAN function. 2. Try to set an IP address at the device. 3. Activate the DHCP function on the router and make the connection again at the device. 4. A firewall is activated on the network – set the respective program in such a way that access is possible. 5. Reboot the router |
| WiFi connection cannot be established. | 1. Check the availability of WLAN network on the router. 2. Place the device closer to the router. 3. Make sure the password is correct. |
| No station is found. | 1. Check the network as well as the access point and firewall. 2. The station may not be available currently, try it again later or select another station. 3. The link of the station is changed or the station no longer transmits – ask the provider for information. 4. The link of manual added station is not correct, make sure it is correct and re-enter. |
| Hiss in FM mode | 1. Check/move the FM antenna. 2. Move the radio. |
| No stations available / burbling / intermittent in DAB mode. | 1. Move the radio. 2. Rescan local stations only (high-strength). 3. Check the local DAB coverage. |
| Alarm does not work. | 1. Switch on the alarm. 2. Due to the volume setting, refer to the solutions of “No sound”. 3. The source of alarm was set to be station but there is no network connection. Change the source of alarm or reconfigure the connection. |
| USB drive or MP3 player is not detected. | 1. Check if the USB drive or MP3 player is plugged properly. 2. Some USB hard disks need external power supply, make sure it is connected to the power. 3. Not all MP3 players can be read directly on the device, use an USB drive instead. |
| NetRemote does not show or connect to IR3200 | 1. Reopen the App. 2. If you have several streaming from several devices at the same time, it may cause crash, reboot IR3200 and/or your device. |
| All other undetermined cases. | IR3200 may process large amount of data after a period of operation, no matter in which mode, it will cause the system freeze or malfunction. Reboot IR3200 if necessary. period of operation, no matter in which mode, it will cause the system freeze or malfunction. Reboot IR3200 if necessary. |
| The normal function of the product may be disturbed by strong Electro-Magnetic Interference. If so, simply reset the product to resume normal operation by following the instruction manual. In case the function could not resume, please use the product in other location. | |
| The device may malfunction when used in areas with strong radio interference. The device will work properly again once there is no more interference. | |
| Under the environment with Conducted Immunity disturbance, the sample may malfunction. It will automatically recover to normal when the Conducted Immunity disturbance stopped. |
TECHNICAL SPECIFICATIONS
AC power adapter only usesupplied adaptor
Input: AC 100 - 240V, 50/60Hz
Output: DC 9 V 1A
Power consumption max. 15W
Frequency Coverage FM 87.5 - 108MHz
DAB 174.928 - 239.200 MHz
Line Out socket 3.5mm, stereo
Aux In socket 3.5mm, stereo
Aerial System WiFi Built-in antenna
DAB Telescopic aerial
FM Telescopic aerial
Connectivity WiFi Dual modes to support 2.4GHz and 5GHz WiFi system
802.11b and 802.11g supported with WEP and WPA/WPA2
encryption. Compatible with 802.11n routers which offer mixed
mode support for 802.11b/g.
Bluetooth v2.1 + EDR
IMPORTER
WorleinGmbHTel.:+49910371670
Gewerbestasse 12
Fax.: +49 9103 71 67 12
D 90556 Cadolzburg
Email: service@woerlein.com
Germany
All devices are allowed to access your shared media. Choose Hewlett-Packard and share options. Choose power options. Tell me about how to measuring the electricity supply voltage.

Ouvrez Windows Media Player pour activer Allow remote control of my Player.

Scannenaarhetnetwork
Open Windows Media Player om Allow remote control of my Player in te schakelen.
- Scannenaar stations
Push WPS button at the other end
Press SELECT to continue
Pin
Enheten generatorer et 8-sifret kodenummer som du legger inn i den trådløse ruteren, aktesspunktet eller en ekstern registrar.
WPS Setup

Enter PIN 98467583 at the other end
Press SELECT to continue
Hopp over WPS
Please wait Connecting..
Setup wizard completed
Press SELECT to exit
EQUALISER
Flere forhandsinnstilde EQ-moduser er tilgengelig: Normal, Flat, Jazz, Rock, Movie (film), Classic (klassik), Pop and News (nyheter).
NULLSTILLING TIL FABRIKKINNSTILLING
Control Panel > Network and Internet > Network and Sharing Center > Media streaming options
Apne Windows Media Player og aktiver Allow remote control of my Player.
Dynamic range compression (DRC)
Mode: Internet Radio
Preset: Last listened
Volume: 10
Sogning after netvarket
Then a box of music playback pops up for the streaming.
DAB
- Søgning after stationer
Mode: Internet Radio
Preset: Last listened
Volume: 10
| Error | Remedy |
| The device does not switch on. | Check it the power adaptor is connected properly. |
| No sound. | 1. Turn on the sound as it may be muted 2. Increase the volume. |
| No network connection can be established. | 1. Check the LAN cable or the WLAN function. 2. Try to set an IP address at the device. 3. Activate the DHCP function on the router and make the connection again at the device. 4. A firewall is activated on the network – set the respective program in such a way that access is possible. 5. Reboot the router |
| WiFi connection cannot be established. | 1. Check the availability of WLAN network on the router. 2. Place the device closer to the router. 3. Make sure the password is correct. |
| Wired connection cannot be established. | 1. Check the availability of LAN network on the access point. 2. Reconnect or even replace the LAN cable. |
| No station is found. | 1. Check the network as well as the access point and firewall. 2. The station may not be available currently, try it again later or select another station. 3. The link of the station is changed or the station no longer transmits – ask the provider for information. 4. The link of manual added station is not correct, make sure it is correct and re-enter. |
| Hiss in FM mode | 1. Check/move the FM antenna. 2. Move the radio. |
| No stations available / burbling / intermittent in DAB mode. | 1. Move the radio. 2. Rescan local stations only (high-strength). 3. Check the local DAB coverage. |
| Alarm does not work. | 1. Switch on the alarm. 2. Due to the volume setting, refer to the solutions of “No sound”. 3. The source of alarm was set to be station but there is no network connection. Change the source of alarm or reconfigure the connection. |
| USB driver or MP3 player is not detected. | 1. Check if the USB driver or MP3 player is plugged properly. 2. Some USB hard disks need external power supply, make sure it is connected to the power. 3. Not all MP3 players can be read directly on the device – use an USB drive instead. |
| NetRemote does not show or connect to IR3200 | 1. Reopen the App. 2. If you have several streaming from several devices at the same time, it may cause crash, reboot IR3200 and/or your device. |
| All other undetermined cases. | IR3200 may process large amount of data after a period of operation, no matter in which mode, it will cause the system freeze or malfunction. Reboot IR3200 if necessary. period of operation, no matter in which mode, it will cause the system freeze or malfunction. Reboot IR3200 if necessary. |
| The normal function of the product may be disturbed by strong Electro-Magnetic Interference. If so, simply reset the product to resume normal operation by following the instruction manual. In case the function could not resume, please use the product in other location. | |
| The device may malfunction when used in areas with strong radio interference. The device will work properly again once there is no more interference. | |
| Under the environment with Conducted Immunity disturbance, the sample may malfunction. It will automatically recover to normal when the Conducted Immunity disturbance stopped. |
TEKNISKE SPECIFICATIONER
AC strømforsyning
Push WPS button at the other end
Press SELECT to continue
Pin
Enheten skapar en 8-siffrig kod som du skriver in i den tradlosa routern, atkomstpunkten, aller pa den externa registraringsenheten.
WPS Setup

Enter PIN 98467583 at the other end
Press SELECT to continue
Skippa WPS
Angekodenforettstandardkrypteratnatverk.
Keep Network connected
Túto možnost' zvolte, ak si niektoré funkcie Jednotky vyžadujú, aby bola siet' pripojena. Ked' je zvolená tato možnost', Jednotka sa rychlo priopoji k internetu a bude možné Jednotku zapnú't cez aplikáciu „UNDOK".
Poznamka: Tato funkcia mierne zvyšuje spotrebu energia v pohotovostnom režime.
WLAN region
Na ziskanie optimaleho pripojenia WLAN zvolte oblast WLAN: Europa.
Vyhladávanie siete
Push WPS button at the other end
Press SELECT to continue
Pin
Enter PIN 98467583 at the other end
Press SELECT to continue
Skip WPS
Zadajte k'l'uc ak pre štandardnu šifrovanu siet'.
Viac informaci o nastaveni šifrovanej siete WPS si prečitate v námode na použivanie routera WPS.
- Control on Smartphone / Tablet
Mode: Internet Radio
Preset: Last listened
Volume: 10
Frequency: Off, Daily, Once, Weekends alebo Weekdays
Time
Mode: Buzzer, Internet Radio, DAB alebo FM,
- Preset: Last listened 1 - 10,
Volume:0-32
Ak si ze laté aktivovat nové nastavenie, zrolujte dole a zvolte Save.
Obrazovka zobrazuju aktívine budíky s ikonou v l'avom spodnom rohu.
Keep Network connected
Push WPS button at the other end
Press SELECT to continue
Pin
Enter PIN 98467583 at the other end
Press SELECT to continue
Skip WPS
Zadejte klic jaku standardni sifrované site.
Vice informaci o nastaveni šifrované site WPS najeznete v námodu ke smerovacis funkci WPS.
Network settings
Please wait Connecting ..
Setup wizard completed
Press SELECT to exit
EKVALIZER
- Keep network connected
From time to time, it maybe necessary to remove server displaying question marks in front of the server name from the server list. For example, if the device is moved to a new network or if a Wake-on-line is removed from your current network.
To perform this function: go to menu by using the Menu button > Prune servers > and select Yes.
- USB playback
- Control on Smartphone / Tablet
- Dynamic range compression (DRC)
If you are listening to music with a high dynamic range in a noisy environment, you may wish to compress the audio dynamic range. This makes quiet sounds louder, and loud sounds quieter. You can change DRC as off, low or high.
Station order
You can choose the order of the DAB station list to be either Alphanumeric, Ensemble or Valid.
Ensemble lists groups of stations that are broadcast together on the same ensemble. Valid lists valid stations first, alphabetically, then off-air stations.
FM
Mode: Internet Radio
Preset: Last listened
Volume: 10
Frequency: Off, Daily, Once, Weekends nebo Weekdays
Time
Mode: Buzzer, Internet Radio, DAB nebo FM
- Preset: Last listened 1-10
Volume: 0-32
Hereby, Wörlein GmbH declares that this device is in compliance with the essenal requirements and other relevant provisions of Direcve 2014/53/EU.
A copy of the Declaaron of Conformity may be obtained at the following locaon:
Worlein GmbH, Gewerbestrasse 12, D 90556 Cadolzburg, Germany
Email: info@woerlein.com
Tel.: +49 9103 71 67 0
