
IAN 271470 - Rowing Machine CRIVIT - Free user manual and instructions
Find the device manual for free IAN 271470 CRIVIT in PDF.
| Product type | Multifunctional apartment rowing machine |
| Brand | Crivit |
| Model | IAN 271470 |
| Dimensions (L × W × H) | approx. 50 × 30 × 15 cm |
| Item weight | approx. 2,270 g (2.27 kg) |
| Max user weight | 100 kg |
| Power supply | None (manual device) |
| Standards | DIN EN ISO 20957-1, DIN EN 957-2 class H (Household use) |
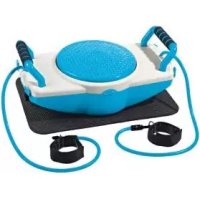
| Main functions | Balance board, balance board with resistance bands, balance board with handles, press-up board, press-up board with resistance bands, twist board, twist board with resistance bands, stretching board |
| Included accessories | 1 balance board, 2 handles, 2 resistance bands, 1 fitness mat, 1 DVD, 1 poster, 1 instruction manual |
| Maximum band stretch | 2.30 m |
| Tensile force (example at 120 cm) | approx. 16 N (tolerance +/-20%) |
| Care and cleaning | Clean with clean water, dry with a soft cloth. Do not use harsh chemicals. Store in a dry, temperate place. |
| Safety | Max user weight 100 kg; do not use if weight exceeds; free space of at least 0.6 m around; check condition before each use; do not use if damaged; check bands regularly; use by one person at a time. |
| Spare parts and repairability | Use only original spare parts. Repairs under warranty or after warranty via customer service. |
| Warranty | 3 years from date of purchase (material and manufacturing defects) |
| General information | Manufactured with care under constant supervision. Complies with safety standards. Household use. |
Frequently Asked Questions - IAN 271470 CRIVIT
User questions about IAN 271470 CRIVIT
0 question about this device. Answer the ones you know or ask your own.
Ask a new question about this device
Download the instructions for your Rowing Machine in PDF format for free! Find your manual IAN 271470 - CRIVIT and take your electronic device back in hand. On this page are published all the documents necessary for the use of your device. IAN 271470 by CRIVIT.
USER MANUAL IAN 271470 CRIVIT
Instructions for use
NL BE
FITNESS-BOARD
Gebruiksaanwijzing
IT
FITNESS BOARD
Technical specifications 16
Intended use 16
Safety notice regarding use 16-17
Exercise notice 17
Warming up and stretching 17-18
Workout 18-22
Maintenance, storage 22
Instructions for disposal 22
3 years warranty 22
Personal workout information 23
NL ⑧BE
Leveromvang 34
With your purchase you have decided on a high-quality product. Get to know the product before you start to use it.
Carefully read the following instructions for use.
Use the product only as described and only for the given areas of application.
Keep these instructions safe. When passing the product on to a third party, always make sure that the documentation is included.
Contents
1 x Exercise & balance board
2 × Handle
2 × Resistance bands
1 × Fitness mat
1 x DVD with exercise examples
1 x Poster with exercise examples
1 x Instructions for use
Technical specifications
This exercise equipment complies with the
DIN EN ISO 20957-1, DIN EN 957-2 class H
(Home area)

Max. weight of the user: 100kg
Dimensions: approx. 50 × 30 × 15cm
(L× W× H)
Product weight: approx. 2.270g

Please note that the force values
in the table could differ from the actual
force values because of the mater
properties of the fitness bands.
Resistance bands strength table
| Length (cm) approx. | 120 140 160 185 230 |
| Strength (N) approx. | 16 21 26 31 38 |
Intended use
The article is designed for private, indoor use and may not be used for commercial, medical, or therapeutic purposes.

Safety notice regarding
use
Warning! Danger of injury!
- This fitness board is designed for a maximal body weight of 100kg . Do not use this product if you are heavier than this weight.
- Please consult your doctor before you start your workout. Please ensure that your health is in a suitable condition for the workout.
- Always keep the instructions manual with the exercise guidelines handy.
- Stick to the workout guidelines which are specified in these instructions. Otherwise, you risk seriously damaging your health.
Overexertion and working out too much can cause severe injuries. Always remember to warm up before exercising and work within your capabilities. If you suffer from physical discomfort, feeling weak or tired immediately stop your workout and contact your doctor. - Check before each use that the fitness board is correctly set-up for the respective exercise.
- Only use this product in firm level flooring and away from stairs and landings.
- Ensure that the fitness board sits firmly and securely on the ground so that it does not slide away.
- Always use the accompanying protective mats to protect delicate flooring (e.g. parquet).
The product can only ever be used by one person at a time. - The resistance bands may exclusively be used with the fitness board.
- If you use the product as a balance board with the resistance bands never stand on the turntable.
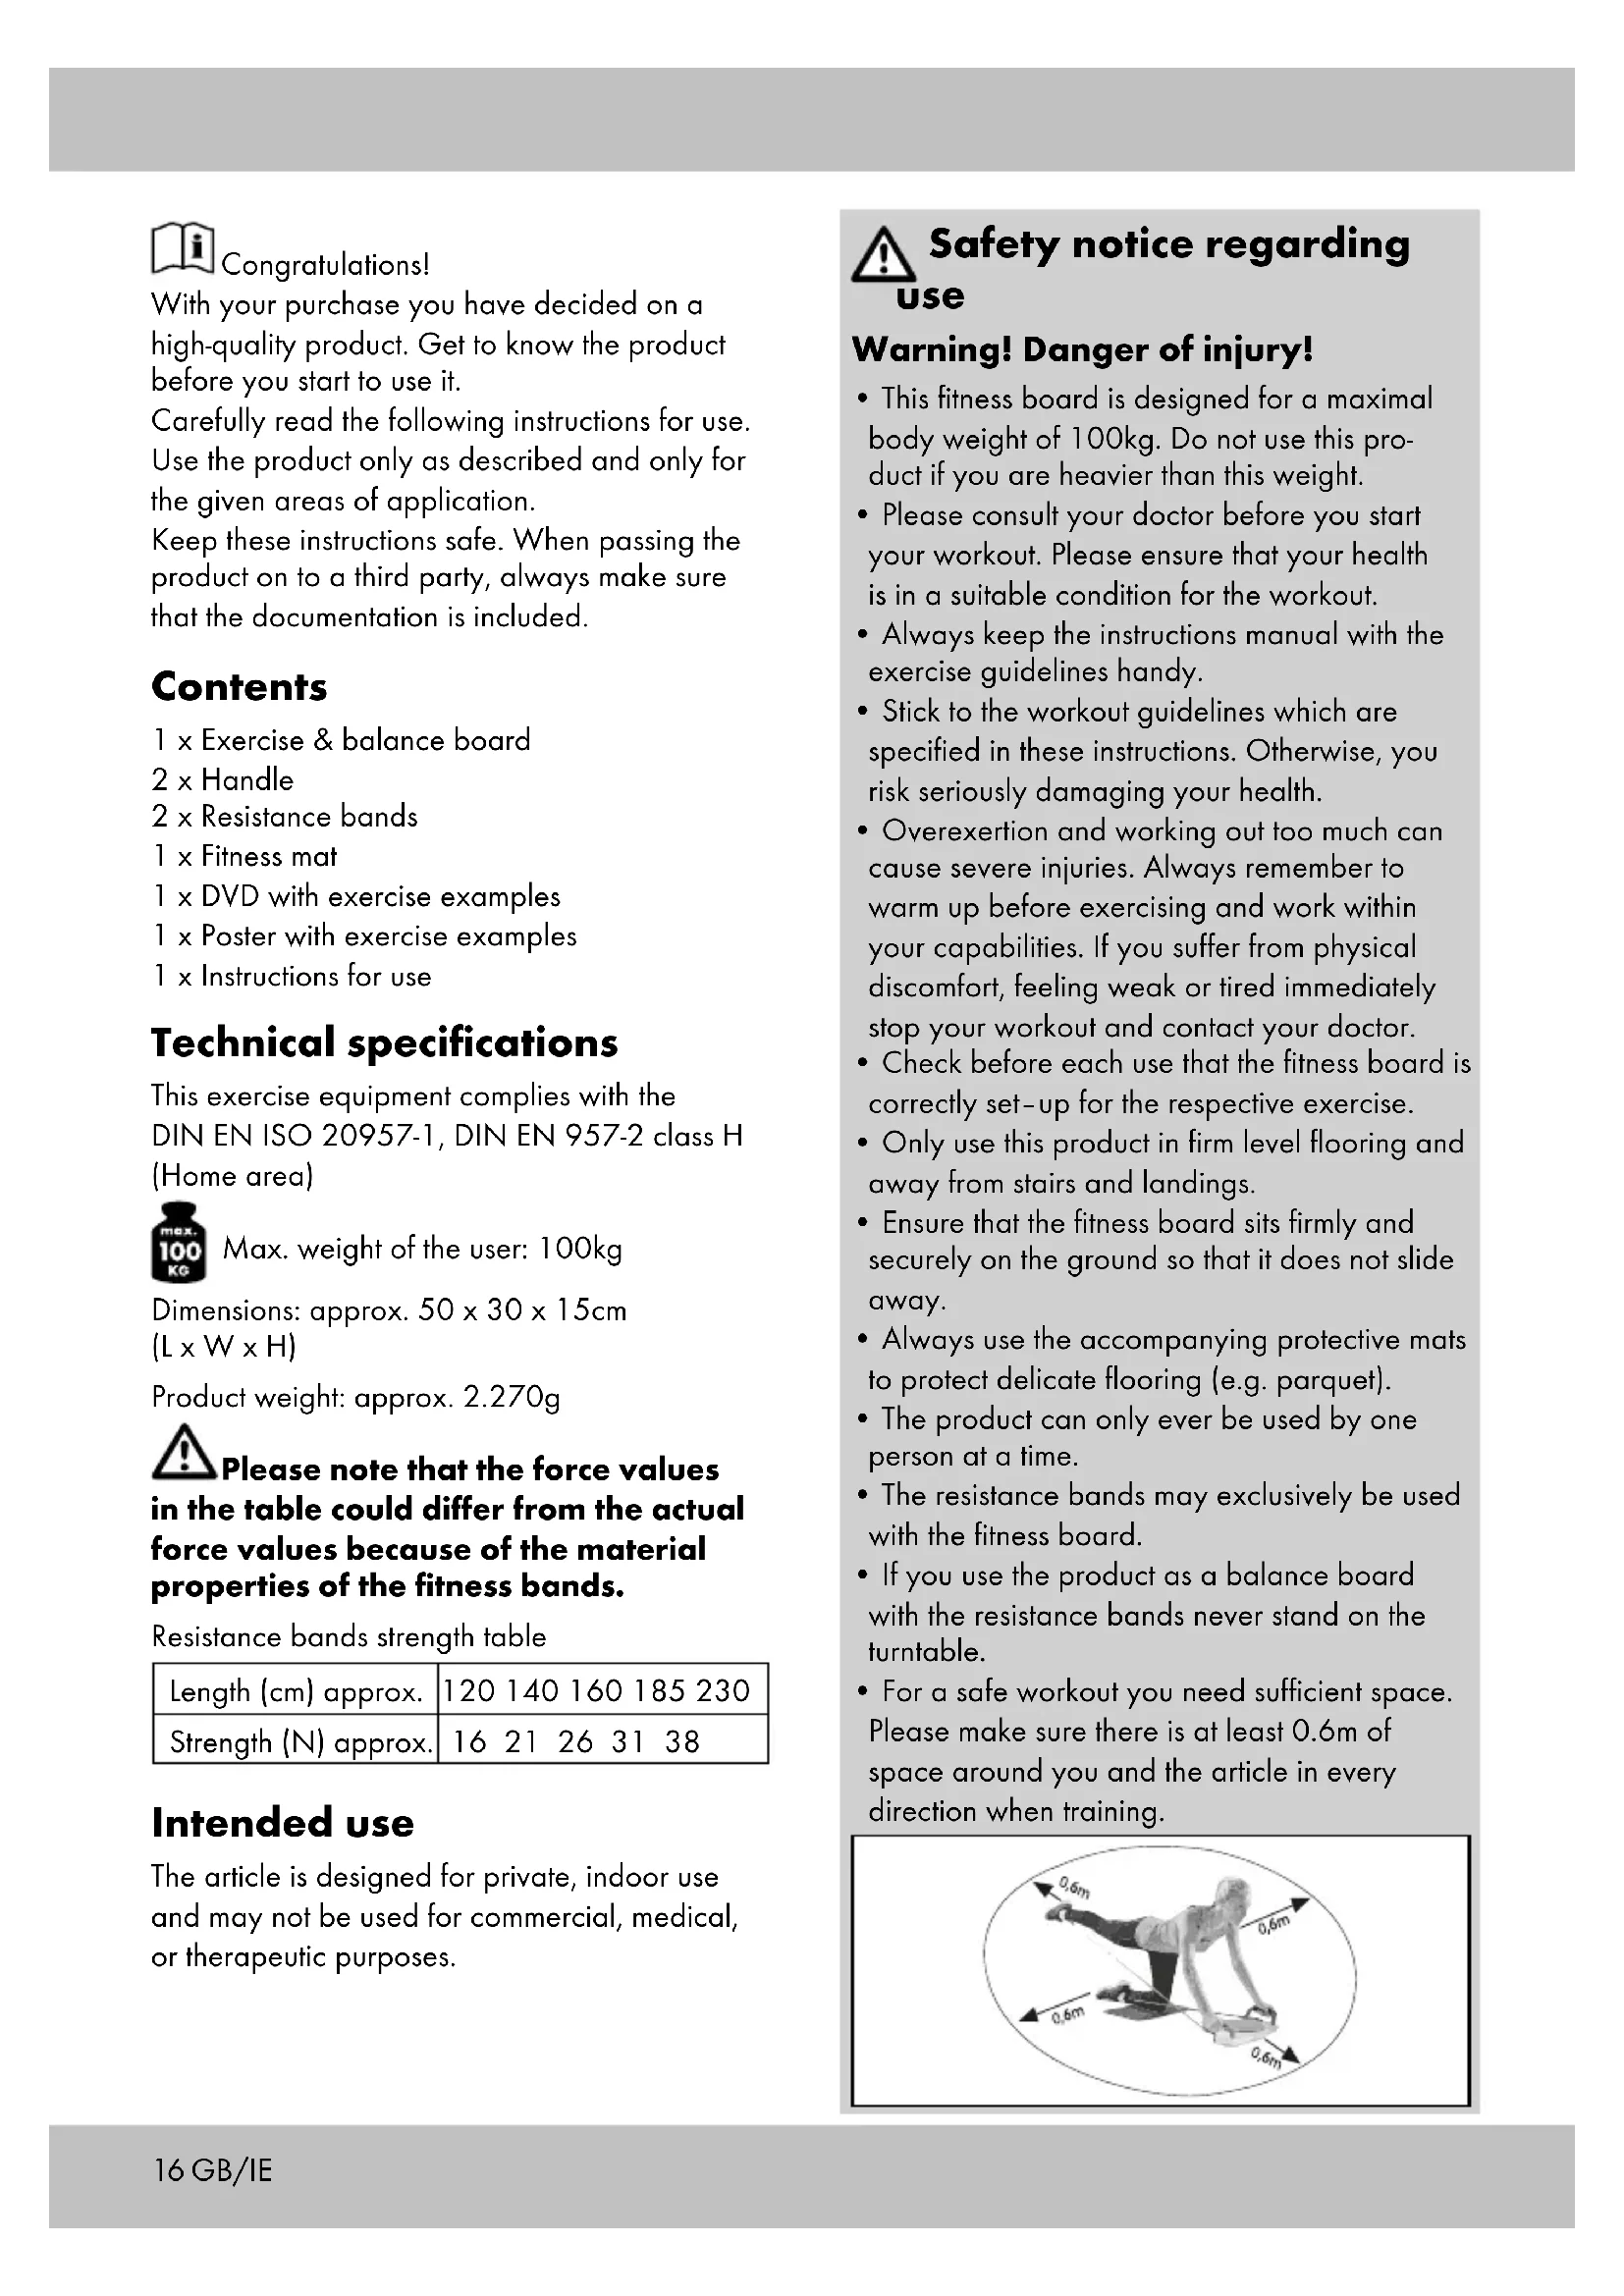
- For a safe workout you need sufficient space. Please make sure there is at least 0.6m of space around you and the article in every direction when training.
Special caution - danger of injury for children!
- As children exhibit natural instinct to play and propensity to experiment, it is likely that situations and behaviours will arise for which the training devices have not been designed, and as such parents and other supervisors should be aware of their responsibility. Allow their use only when the child's mental and physical development permits. This article is not intended to be a toy.
! Damage through wear and tear
- The product may only be used if it is in impeccable condition. Always check the product before each use. The safety of the fitness-board can only be guaranteed if it is regularly checked for damage and wear and tear.
- The resistance bands may not be stretched further than 2.30m .
- Regularly check the resistance bands. Check for rips and damage. Defective parts must no longer be used.
- Protect the device from high temperatures and moisture.
- Use, exclusively, the original additional parts.
Exercise notice
The following exercises only show a range of exercises. You can find further exercises in the relevant specialised literature.
- Wear comfortable sports clothes and shoes.
- Warm yourself up before every workout and gradually cool down. Please read our recommendations on warming up and cooling down.
- Ensure that you have sufficient space surrounding you for your workout.
- Do the exercises at a level tempo.
- Keep to the instructed sequence of movements.
Caution! Avoid working out too intensely!
When starting to workout 2-3 minutes per exercise is sufficient. With daily workouts you could extend that in a week to 5-10 minutes. However, the maximum workout time of 1 hour should not be exceeded.
- Take sufficient breaks between exercises and ensure that you drink enough.
Caution!
- If you feel discomfort or unwell stop the exercise immediately and contact your doctor.
- Do not stretch the resistance bands longer than 2.30m .
- The strength chart shows how much power is needed to pull the resistance bands to the corresponding length. The tolerance range for the power: + / - 20% (See strength chart for the expander under Technical specifications).
Warming up and stretching
Take enough time to warm up and cool down before and after each workout. The following exercises have been designed for this purpose. Repeat each of the respective exercises 2-3 times.
Warming up your neck muscles
- Stand in a relaxed position. Using your hand, pull your head gently to the left and then to the right. This exercise helps stretch both sides of your neck.
- Make circular movements with your head, changing the direction. Repeat until your neck feels loose and relaxed.
Warming up your arms and shoulders
- Stretch one arm out sideways in front of your chest and using your other hand, carefully press it towards your body. After a while change arms. Remember not to press beyond the point of feeling a slight pull in your arm.
- Alternatively, move your arms over and behind your head in a bent position and using your other hand, gently press down on your elbow.
- Grasp your hands behind your back and carefully pull them upwards. If you bend the upper part of your body forwards, all the muscles will be warmed up.
-
To loosen up your shoulders, carefully make circular movements with both shoulders - first towards the front, then towards the back.
-
Pull your shoulders upwards several times and then let them fall back down again. After repeating this exercise a few times, your shoulders should feel warm and loose.
Warming up and stretching your leg muscles
- Stand up straight with your right leg bent upwards. Hold your leg with your right hand for a while. To make this exercise easier, you can hold onto something with your other hand, e.g. a wall or a table. Repeat with your other leg.
- Stand with your legs apart and bend one of your knees slightly. Hold this position for a while before changing legs. This exercise helps stretch the inside of your legs.
- Warm up your ankles by taking one foot off the floor and slowly making circular movements to the left and then to the right. After a while, change feet.
Overview of the exercised muscle groups
The following muscle groups are primarily focussed on during the corresponding exercises:
| Fig. C Balance board | Leg muscles |
| Fig. D Balance board with resistance bands | Arm, leg and shoulder muscles |
| Fig. E Balance board with handles | Arm, shoulder, stomach, and chest muscles |
| Fig. F Press-up board | Arm, leg, stomach, and lower back muscles |
| Fig. G Press-up board with resistance bands | Arm, stomach, and leg muscles |
| Fig. H Twist board | Torso muscles |
| Fig. I Twist board with resistance bands | Upper body muscles |
Workout
Balance board (Fig. C)

This exercise requires complete ankle movement. If in doubt contact your doctor!

When using the balance board never stand on the turntable!
Recommended workout duration:
Beginners: 2-3 minutes
Intermediates: 5-10 minutes
Set-up and workout
All you need for this exercise is the mat for slip resistance. Open the board at the side flap locks and take out the resistance bands and the handles. Then close the board again and place it on the mat.
- Step carefully onto the fitness board and slowly begin to rock from side to side.
Keep your upper body upright. Be sure to make smooth, even movements. Keep your stomach tensed throughout and pull your shoulder blades towards your spine. Use your arms to keep balance at first. - Once you have a feeling for the movement, you can move your arms with the movement as if running slowly. Keep your arms tensed and steadily increase the speed to an easy jog.
- When you feel confident enough, swing your arms above your head, to exercise your entire body.
- Try out various movements and positions with your arms.
Balance board with resistance bands (Fig. D)

Note!
You must only perform this exercise if your ankles are fully mobile. If in doubt, please consult your doctor.
When using this equipment as a balance board, never stand on the turntable, otherwise risk of injury will occur.
The resistance bands must not be stretched longer than 2.30m . The tolerance for the strength: +/- 20%.
Recommended workout duration:
Beginners: 2-3 minutes
Intermediates: 5-10 minutes
Set-up and workout
The board remains closed during this exercise as well. Remove the handles for this exercise. Attach the fitness bands to both sides of the fitness board by pulling the ends of the bands a little longer to thread them into the openings on the side of the board. In order to remove the fitness bands later, just pull them out of the recesses by stretching them slightly (figure A).
- Place the fitness board on the rubber mat.
- Take the fitness band handles in your hands and climb carefully onto the board. Straighten your upper body into an upright position.
- Begin to rock carefully to the side until you find your balance and get a feel for the movement. Spread your weight evenly over the foot of the leg you are standing on. Keep your stomach tensed throughout and pull your shoulder blades towards your spine.
- Extend one arm upwards, alternating arms. Your right arm is pointing upwards while your right leg is rocking downwards and vice versa. Keep your arms tensed throughout.
- When you feel confident, increase the intensity and carry out the arm movement forwards and backwards, or move your arms alternately away from your body to the left and right.
- This exercise trains all the muscle groups in your body
Balance board with handles (Fig. E)
Recommended workout duration:
Beginners: 2-3 minutes
Intermediates: 5-10 minutes
Set-up and workout
The board remains closed during this exercise. Insert the ends of the handles into the holes on the fitness board (see fig. B). To remove the handles later, pull on them with some force while shaking them gently. The rubber mat serves partly as a surface for your knees during this exercise. Make sure you keep your back straight during this exercise. Avoid hollowing your back and tense your buttocks and stomach throughout.
- Distribute your weight evenly between the front of both feet and straighten your spine.
- Pull your shoulder blades towards your spine and keep your arms tensed.
- Kneel on the rubber mat and take the handles on the board in your hands. Bend over forwards a little and begin to rock gently. Keep your back straight.
- If you feel strong enough, continue this exercise in a press-up position. To do this, place the board on the rubber mat, take the handles in your hands, and place your feet about two-thirds of your body length behind you. Make absolutely sure to avoid hollowing your back.
Note: keep your lower back (lumbar spine) stable and hold your cervical vertebrae in line with your spine. Do no overextend your head.
Press-up board (Fig. F)
Recommended workout duration:
Beginners: 2-3 minutes
Intermediates: 5-10 minutes
Set-up and workout
In order to use the press-up board, you only need to remove the lower part of the fitness board. To do this, open the side clips and put the lower part aside. The handles stay on the upper part of the board.
Make sure you keep your back straight during this exercise. Avoid hollowing your back and keep your stomach tensed throughout.
- Pull your shoulder blades towards your spine and keep your arms tensed.
- Kneel on the rubber mat in front of the fitness board and take the handles on the board in your hands. Now slowly move your body up and down. Make sure you spread your weight evenly between your knees.
- You can vary this exercise by lifting your feet off the floor and crossing them behind your buttocks. This is a variation of the press-up.
- To strengthen your leg muscles, lift one knee off the floor while kneeling, and stretch that leg backwards and upwards in a gentle movement a few times. Hold your pelvis straight and make sure that the knee that is supporting you is directly below your hip. Then change legs. You can also change after each extension.
- To increase the difficulty, lift your knees off the floor and extend your legs backwards.
Spread your weight evenly between the front of your feet. Now do press-ups. Keep your back straight and do not overdo it.
Correct execution of the movement is more important for the effectiveness of training than the number of press-ups.
Press-up board with resistance bands (Fig. G)
Recommended workout duration:
Beginners: 2-3 minutes
Intermediates: 5-10 minutes
Set-up and workout
The handles stay on the board for the following exercise. In addition the fitness bands need to be attached to both sides of the fitness board. To do this, pull the ends of the bands a little longer to thread them into the openings on the side of the board.
- Attach the fitness bands to your feet using the loops.
-
Take up the same position as for the exercise on the press-up board without the training bands. Your hands grip the handles and your feet are parallel on the floor.
-
Tense your stomach and bring your upper body into an upright position.
- Hold your pelvis straight and ensure that your knee is directly below your hip.
- In this position lift one knee off the floor and extend your leg backwards and upwards a few times with a gentle movement.
- Pull your shoulder blades towards your spine.
- Change legs. You can also change after every extension.
- Lie flat on your back. Place your head on the upturned lower part of the fitness board to support your head and spine.
- While lying down place your feet on the board at an angle of 90^ as if you were standing on it.
- Take the fitness band handles in your hands and hold them at an angle of 90^ beside your body.
- Your legs remain extended and exert counter-pressure on the press-up board.
- Now move your left and right hand alternately towards your shoulder.
- Sit on the rubber mat. While sitting place your feet at an angle of 90^ on the press-up board.
- Take the fitness band handles in your hands.
- Tense your stomach muscles and move your upper body into an upright position.
- Angle your arms next to your body and lean your back backwards slightly. Keep your shoulders and arms in the starting position.
- Make sure that your cervical vertebrae are upright during the exercise and that your head is not overextended.
Twist board (Fig. H)
Recommended workout duration:
Beginners: 2-3 minutes
Intermediates: 5-10 minutes
Set-up and workout
You only require the upper part of the fitness board for this exercise. Remove the handles and fitness bands as described above.
- Place the upper part on the rubber mat and climb carefully onto the twist board.
-
Spread your weight equally over both feet and bend your knees slightly.
-
Hold your pelvis straight and pull your shoulder blades towards your spine.
- Move your upper body into an upright position and keep your stomach and arms tensed.
- Twist slowly backwards and forwards until you feel confident. It is possible to turn up to 40^ in both directions on the twist board.
- At first use your arms to keep balance. Later you can follow the side-to-side movements with your arms.
- To increase difficulty and training intensity, you can bend your knees during this movement.
- When you feel completely sure, you can change the position of your arms. For example, you can lift them above your head during the movement.
- For an 'active break' place the twist board on a wide stool and carry out the movements sitting down.
Twist board with resistance bands (Fig. 1)
Recommended workout duration:
Beginners: 2-3 minutes
Intermediates: 5-10 minutes
Set-up and workout
For this exercise you only need the upper side of the fitness board and the fitness bands. They are fixed to the sides as described above.
Remove the handles for this exercise. Stand the board on the rubber mat. The band may not be stretched to more than 2.30m . The tolerance range for the force is + / - 20% .
- Start slowly. First, use the resistance bands to stabilise. Do the same movements you did with the twist board exercises without the resistance bands.
- Straighten your upper body to an upright position and hold your body, stomach, and arms tensed.
- Sideways rotational movements are possible in both directions up to 40^ .
-
When you feel stable, you can work out your arms next. Try arm movements in different directions. Move your arms simultaneously or alternate your left and right arm. You determine the speed and the level of difficulty.
-
Now, carefully position yourself next to the twister (or turntable) on the fitness board. Alternately stretch your arms sideways above your head. When doing so, make sure your body remains straight. The movement is just from the arms.
After a while, use both arms simultaneously. You can also carry out this movement forwards.
! Note!
The following exercises are also suitable as stretching exercises following training with the fitness board.
Stretching board (Fig. J)
Recommended workout duration:
Stretch each side 3 times for 30-40 seconds, alternating between the sides.
Important: extend slowly to the stretch position and then also release slowly.
Set-up and workout
Remove the handles for these exercises.
You only need the bottom part of the fitness board to use it as a stretching board. Place it upside down on the rubber mat.
- Sit on the floor in front of the fitness board and place your feet on it. Your legs should be stretched out, as far as possible.
- Hold your feet using both hands and pull your head as far as it goes towards your knees. Repeat several times.
- Now, take one leg off the fitness board and place it on the floor stretched out sideways. Repeat the exercise alternating between your right and left leg.
- Position yourself in a forward lunge with one leg on the fitness board. Slowly stretch forwards and while doing so, bend your front leg. The more you bend, the more intense the exercise is. In order to increase the level of difficulty, move your back leg further back. Try to maintain this position for a while and then change legs.
-
You can also try to touch the ground with the knee of your back stretched leg. This additionally stretches your upper thigh.
-
To stretch all of the back leg muscles, stand on the board with your feet pointed upwards. Keep your legs stretched out. Now try to touch your toes with the tips of your fingers. Repeat several times.
Maintenance, storage
The product must be stored dry and clean at normal room temperature.
IMPORTANT! Only clean using water; never with aggressive cleaning products. Wipe dry using a normal cleaning cloth.
Instructions for disposal
Please dispose of the packaging and the product in an environmentally-friendly manner! Dispose of this product via an authorised waste disposal company or via your local council. Please observe the current regulations.
3 years warranty
The product was produced with great care and under constant supervision. You receive a three-year warranty for this product from the date of purchase. Please retain your receipt. The warranty applies only to material and workmanship and does not apply to misuse or improper handling. Your statutory rights, especially the warranty rights, are not affected by this warranty.
With regard to complaints, please contact the following service hotline or contact us by e-mail. Our service employees will advise as to the subsequent procedure as quickly as possible. We will be personally available to discuss the situation with you.
Any repairs under the warranty, statutory guarantees or through goodwill do not extend the warranty period. This also applies to replaced and repaired parts. Repairs after the warranty are subject to a charge.
IAN:271470
GB Service Great Britain Tel.: 0871 5000 720 (£0.10/Min.) E-Mail: deltasport@lidl.co.uk
IE Service Ireland
Tel.: 1890 930 034
(0,08 EUR/Min., (peak))
(0,06 EUR/Min., (off peak))
E-Mail: deltasport@lidl.ie
All items are also available for purchase directly from our online shop: www.delta-sport.info
Personal workout information
| Date | ||||||
| Exercise Sets | Repetitions | Sets | Repetitions | Sets | Repetitions | |
| Balance board | ||||||
| Balance board with resistance bands | ||||||
| Balance board with handles | ||||||
| Press-up board | ||||||
| Press-up board with resistance bands | ||||||
| Twist board | ||||||
| Twist board with resistance bands | ||||||
| Stretching board | ||||||
| Date | ||||||
| Exercise Sets | Repetitions | Sets | Repetitions | Sets | Repetitions | |
| Balance board | ||||||
| Balance board with resistance bands | ||||||
| Balance board with handles | ||||||
| Press-up board | ||||||
| Press-up board with resistance bands | ||||||
| TwIST board | ||||||
| Twist board with resistance bands | ||||||
| Stretching board |

Felicitations!
Avances: 5-10 minutes
Avances: 5-10 minutes
Avances: 5-10 minutes
Planche de press-up (ill. F)
Durée recommendée :
Avances: 5-10 minutes
Avances: 5-10 minutes
Avances: 5-10 minutes
Avances: 5-10 minutes
Balance-board (afb. C)
Opmerking!
Beginners: 2-3 minutes
Gevorderden: 5-10 minutes
Montage en training
Beginners: 2-3 minutes
Gevorderden: 5-10 minutes
Montage en training
Beginners: 2-3 minutes
Gevorderden: 5-10 minutes
Montage en training
Press-up-board (afb. F)
Aanbevolen duur:
Beginners: 2-3 minutes
Gevorderden: 5-10 minutes
Montage en training
Press-up-board met trainingsbanden (afb. G)
Aanbevolen duur:
Beginners: 2-3 minutes
Gevorderden: 5-10 minutes
Montage en training
Beginners: 2-3 minutes
Gevorderden: 5-10 minutes
Montage en training
Beginners: 2-3 minutes
Gevorderden: 5-10 minutes
Montage en training
Stretching-board (afb. J)
Aanbevolen duur:
Elke ziche 3 × 30 - 40 seconden lang afwisseledrekken.
Devido as caracteristicas do materi


- FITNESS-BOARD
- FITNESS BOARD
- NL ⑧BE
- Contents
- Technical specifications
- Intended use
- Safety notice regarding
- use
- Warning! Danger of injury!
- Special caution - danger of injury for children!
- ! Damage through wear and tear
- Exercise notice
- Caution! Avoid working out too intensely!
- Caution!
- Warming up and stretching
- Warming up your neck muscles
- Warming up your arms and shoulders
- Warming up and stretching your leg muscles
- Overview of the exercised muscle groups
- Workout
- Balance board (Fig. C)
- Recommended workout duration:
- Set-up and workout
- Balance board with resistance bands (Fig. D)
- Note!
- You must only perform this exercise if your ankles are fully mobile. If in doubt, please consult your doctor.
- Balance board with handles (Fig. E)
- Note: keep your lower back (lumbar spine) stable and hold your cervical vertebrae in line with your spine. Do no overextend your head.
- Press-up board (Fig. F)
- Press-up board with resistance bands (Fig. G)
- Twist board (Fig. H)
- Twist board with resistance bands (Fig. 1)
- ! Note!
- The following exercises are also suitable as stretching exercises following training with the fitness board.
- Stretching board (Fig. J)
- Maintenance, storage
- Instructions for disposal
- years warranty
- Felicitations!
- Planche de press-up (ill. F)
- Balance-board (afb. C)
- Opmerking!
- Montage en training
- Press-up-board (afb. F)
- Aanbevolen duur:
- Press-up-board met trainingsbanden (afb. G)
- Stretching-board (afb. J)
Brand : CRIVIT
Model : IAN 271470
Category : Rowing Machine