IAN 68863 - Bathtub panel MIOMARE - Free user manual and instructions
Find the device manual for free IAN 68863 MIOMARE in PDF.
| Product type | Folding bath screen, 3 panels |
| Brand | Miomare |
| Model | IAN 68863 |
| Dimensions (open) | H 1400 x W 1270 x D 30 mm |
| Dimensions (closed) | H 1400 x W 450 x D 72 mm |
| Weight | 7080 g |
| Frame material | Aluminum |
| Glass material | Plastic (synthetic glass) |
| Glass thickness | 2 mm |
| Number of panels | 3 |
| Installation type | Wall mounting |
| Use | Indoor, private bathroom |
| Warranty | 2 years |
| Recommended cleaning | Soft cloth, neutral pH, no abrasive products |
| Kit contents | Folding screen, 3 upper sealing strips, 3 lower sealing strips, 3 stainless steel screws, 3 wall plugs ∅ 8 mm, Allen key |
| Mounting accessories | Aluminum wall connecting profile |
| Compliance | EN 14428 |
| Power supply | None (non-electric product) |
Frequently Asked Questions - IAN 68863 MIOMARE
User questions about IAN 68863 MIOMARE
0 question about this device. Answer the ones you know or ask your own.
Ask a new question about this device
Download the instructions for your Bathtub panel in PDF format for free! Find your manual IAN 68863 - MIOMARE and take your electronic device back in hand. On this page are published all the documents necessary for the use of your device. IAN 68863 by MIOMARE.
USER MANUAL IAN 68863 MIOMARE
natural_image
Interior view of a bathroom with a white bathtub, glass partition, and a sink (no text or symbols visible)
Badewannen-Faltwand
Folding bathtub screen
Operation and Safety Notes

GB Operation and Safety Notes Page 11
Product description and proper use ...... Page 12
Delivery scope Page 12
Equipment Page 12
Technical data Page 12
Safety
Safety instructions Page 12
Danger! Page 12
Caution! Page 13
Installation
You will need the following materials for installation ...... Page 13
Use
Opening the folding screen ...... Page 14
Closing the folding screen Page 14
Cleaning and maintenance
Page 14
Disposal
Page 14
Warranty / Service
Warranty Page 14
Service Page 15
Declaration of conformity ...... Page 15
Folding bathtub screen VS3L
Introduction
Please read these operating instructions thoroughly and carefully. Open out the pages showing the illustrations and figures. These instructions are part of this product and contain important information relating to initial use and handling. Please always observe all safety instructions. If you have any questions please contact the service office. Please keep these instructions in a safe place and pass them on to anyone else as necessary.
Product description and proper use
The 3-part folding bathtub screen is suitable for wall mounting and for private use in enclosed bathrooms only. The three folding elements can be opened out on rectangular acrylic bathtubs, steel bathtubs, cast iron bathtubs, including hydro massage bathtubs, to form a plane screen wall. Any other use or modification of the product constitutes improper use and poses a serious risk of accident. The manufacturer is not liable for damage caused by improper use or incorrect handling of the product.
Delivery scope
Please check immediately after unpacking that the delivery scope (see also Figure A) is complete and that all the individual parts are in perfect condition.
1 x folding bathtub screen, 3-part
3 x upper plastic seals
3 x lower plastic seals
3 x steel screws, 4 x 40 mm, stainless
3 x 8 mm diameter dowels
1 x hexagonal spanner
Equipment
The 3-part folding bathtub screen VS3L has the features shown below.
① Folding bathtub screen, 3-part
② Upper plastic seals
③ Lower plastic seals
④ Wall connection profile
⑤ Fastening screws
⑥ Plain washers
Fastening material
⑦ Steel screws 4 x 40 mm, stainless
⑧ 8 mm diameter dowels
⑨ hexagonal spanner
Technical data
Material:
Wall connection profile: aluminium
Frame profile: aluminium
Panel areas: plastic
Seals: plastic
Dimensions:
Opened: (w) 1400 x (l) 1270 mm x (d) 30 mm (incl. seals)
Closed: (w) 1400 x (l) 450 x (d) 72 mm
Glass thickness: 2 mm
Thickness of aluminium frame with glass: 14 mm
Depth of wall connection
profile: 30 mm
Weight: approx. 7080 g
Safety
Safety instructions
The following instructions are for your own safety and satisfaction when using the folding bathtub screen. Please note that non-compliance with these safety instructions can lead to a serious risk of accident.
Explanation of symbols and terms used:
Dangerous voltage: failure to observe this instruction endangers life and health.
Failure to observe this instruction endangers property.
Following this advice will help you to achieve optimal results.
Danger:
- Do not leave small children unsupervised with the packaging material. There is a risk of fatal accident by suffocation.
- Do not leave children unsupervised with the product. There is a risk of fatal accident and injury.
○ Make sure before connecting the hammer drill to the mains power supply that the mains electricity is 230 V \~ 50 Hz in accordance with regulations and is equipped with a 16 ampere fuse. There is otherwise a risk of fatal accident by electric shock. Please also read the operating and safety instructions for your drill.
○ Installation must be carried out in dry conditions, protected from moisture. There is otherwise a risk of fatal accident and injury.
- Do not damage any gas, electricity, water, oil or telecommunication lines when installing the product on the wall. This
poses a risk of fatal accident and injury.
- The product must not be used as an aid for getting into the bathtub. This poses a risk of fatal accident and injury.
○ Make sure that you do not injure yourself by getting trapped when using the product. This poses a risk of injury.

Caution:
- The product must only be used with the supplied original parts. Otherwise there is a risk of damage.
Before assembly and initial use of the product, check that the delivery is complete and undamaged. Otherwise there is a risk of damage as a result of improper use.
☐ Check before initial use of the product that all components are assembled in accordance with the instruction manual. Otherwise there is a risk of damage. - The product must not be used for storage purposes. Otherwise there is a risk of damage.
Take care not to cause general damage when drilling the mounting holes in the wall tiles.
o Prevent discoloration of and damage to the folding bathtub screen. Do not use bleaching agents, aggressive cleaning and scouring agents, solvents or cleaning agents containing acetone and chlorine for cleaning purposes.
The product must only be repaired by an authorized and skilled specialist. Otherwise there is a risk of damage and loss of the warranty.
Installation

Do not damage any gas, electricity, water, oil or telecommunication lines when fitting the product on the wall. This poses a risk of fatal accident and injury.

Check the conditions relating to bathroom installations in your lease agreement.
• Clear space around bathtub.
- Use masking tape to tape up the areas next to the silicone filling.
- Smooth the surface of the silicone filling with a mixture of washing-up liquid dissolved in tap water. Dip the tip of your finger into the mixture and smooth it over the silicone and repeat if necessary.
The three opening elements are aligned with the wall connection profile either for left or right-hand installation. Position the folding screen as required by turning it by 180^ .
You will need the following materials for installation
- Felt-tip pen
- Pencil
- Tape measure
-
Spirit level
-
Slotted screw driver
- Hammer drill
- Rock drill with 8 mm diameter
- Moisture-proof silicone, approx. 80 g
- Mixture of: washing-up liquid dissolved in approx. 100 ml tap water
-
Crepe adhesive tape
-
Unpack all the parts and check that they are undamaged and complete.
- Decide on the installation position of the folding screen.
- Make sure when choosing the installation position that fittings, taps, handles for getting in and out of the bathtub, sloping ceilings or projecting walls will not hinder opening and closing of the folding screen.
See Fig. B:
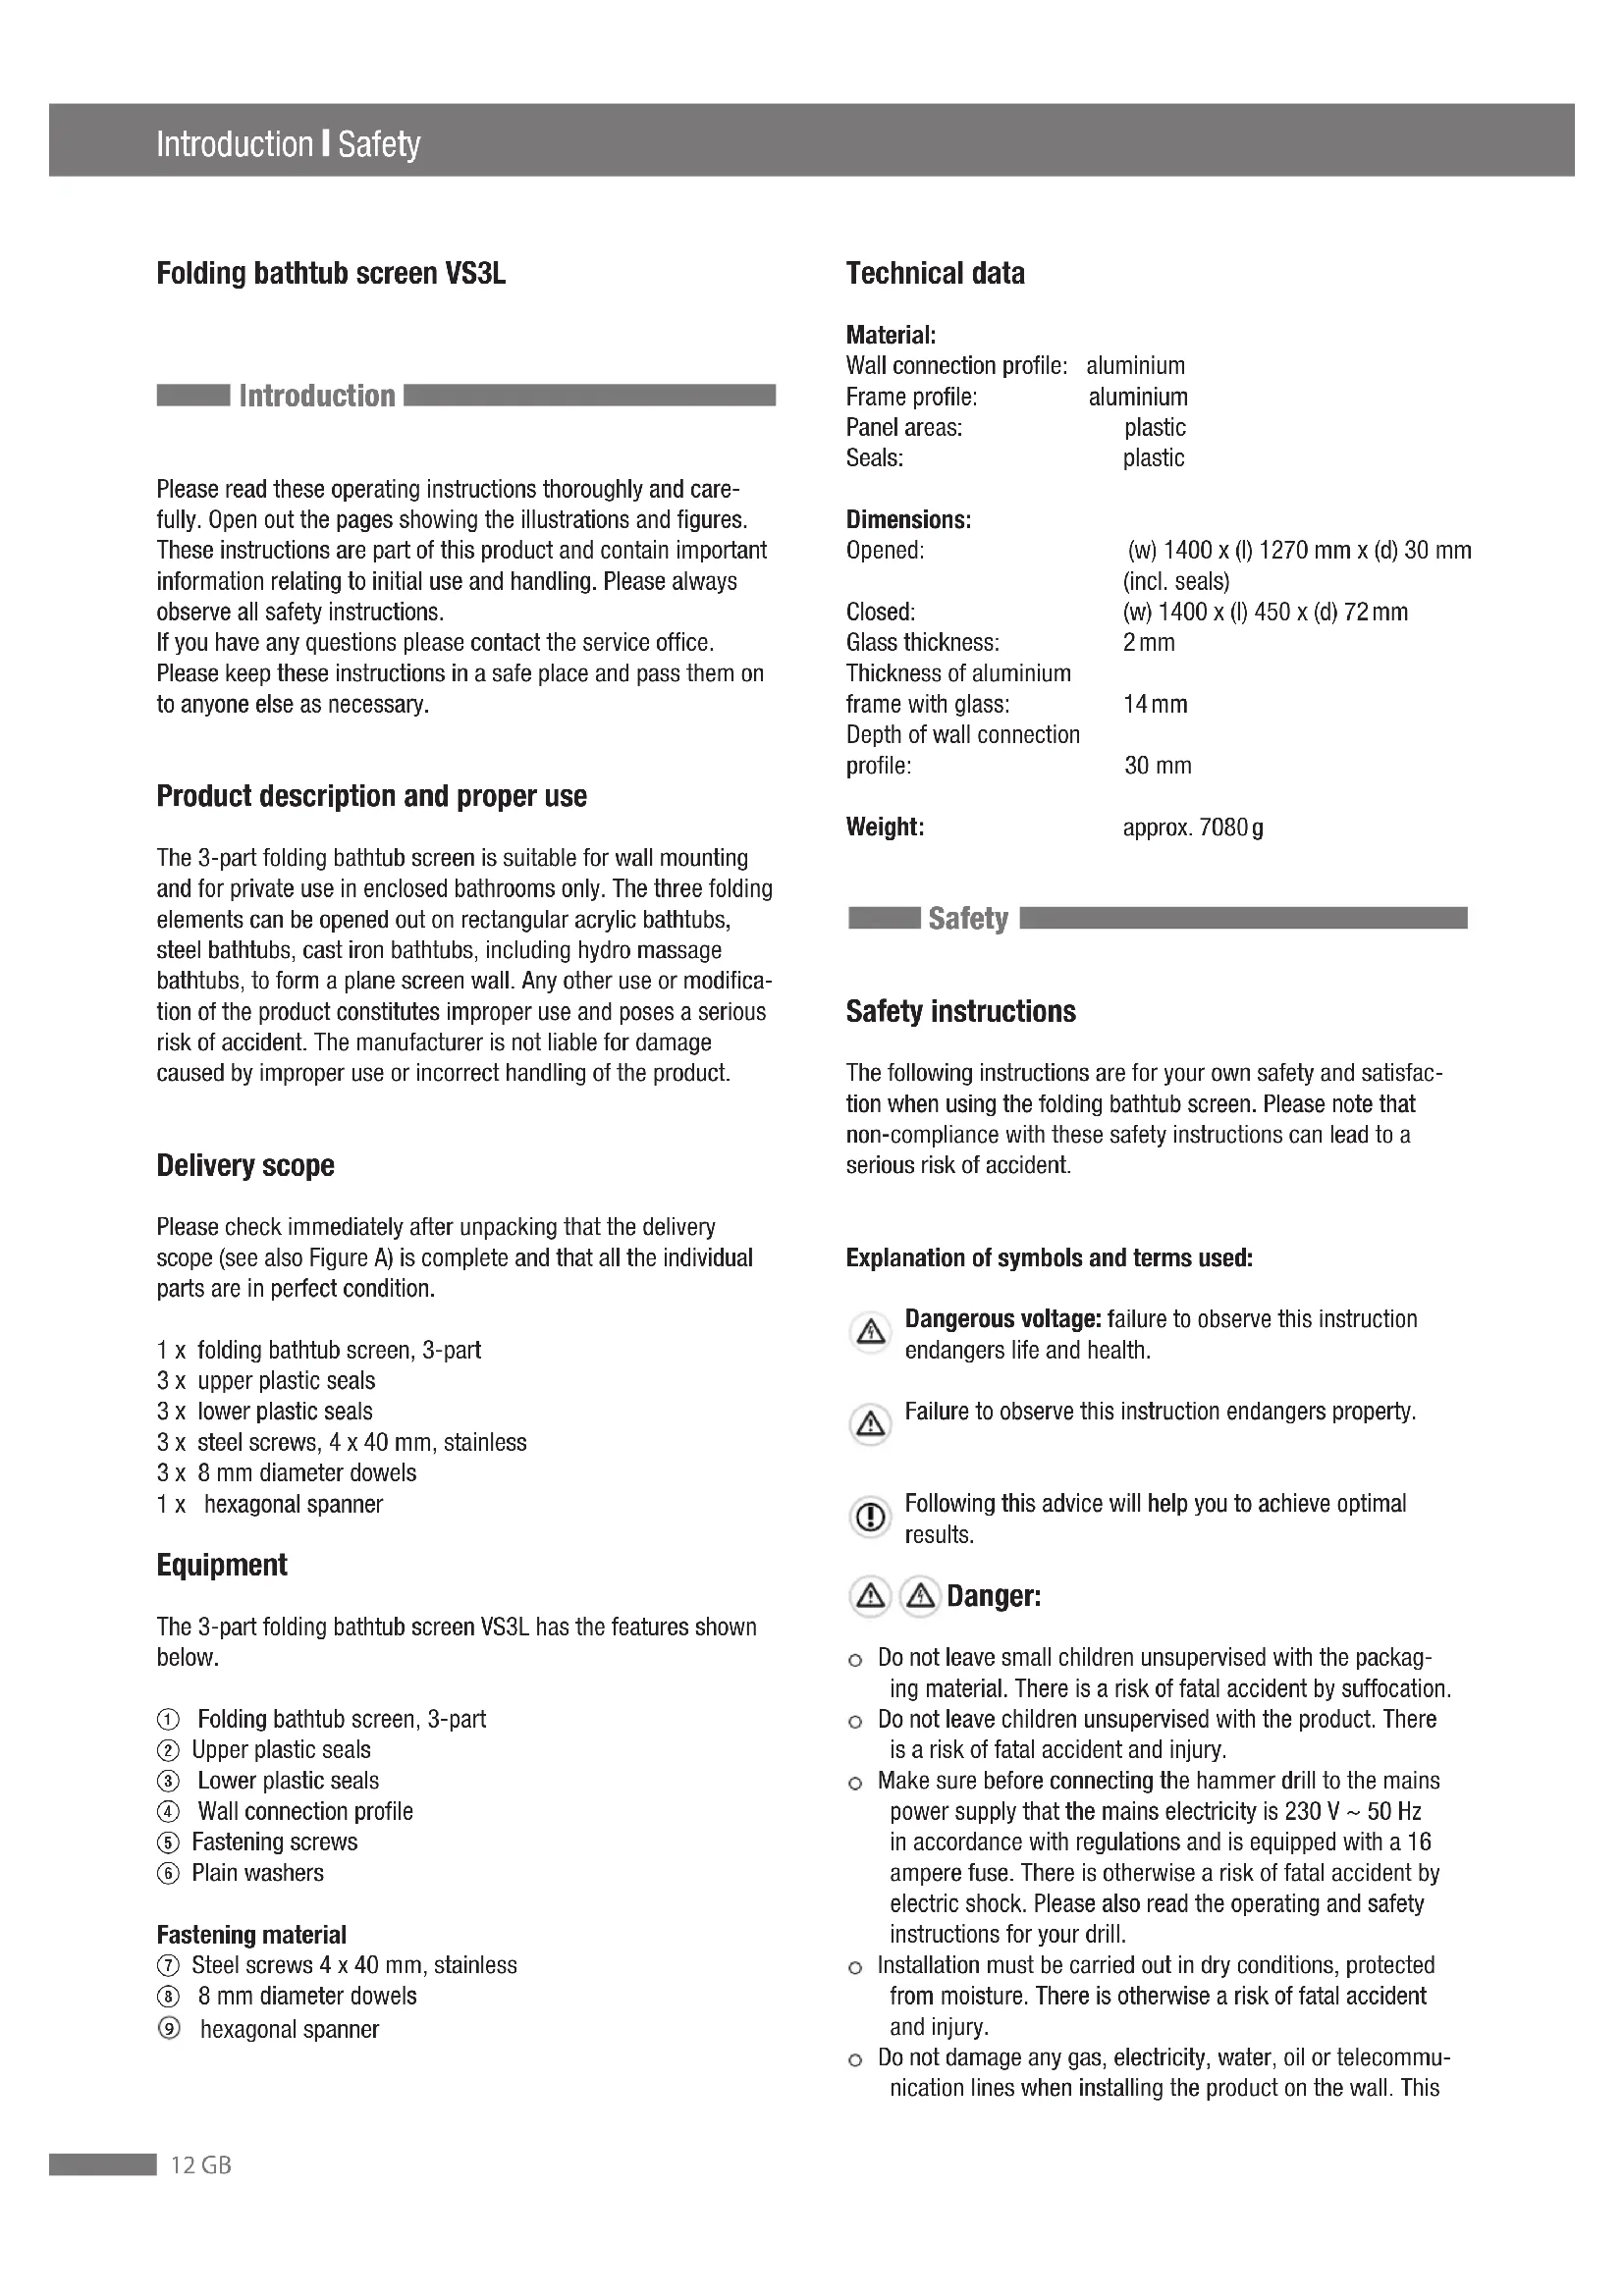
- Screw the 3 fastening screws ⑤ with the 3 washers ⑥ completely out of the screw threads of the wall connection profile ④.
- Remove the wall connection profile from the frame profile of the outside folding screen element.
See Fig. C:
- Hold the wall connection profile together with the spirit level vertically on the wall. The wall connection profile must be in the centre of the edge of the bathtub.
- Mark the 3 drill holes on the wall with the felt-tip pen (tiles) or the pencil (joints).
See Fig. D:
- Drill the 3 holes for mounting the folding bathtub screen. Use a 8 mm diameter rock drill to do this.
First drill the holes to a depth of approx. 5 mm at slow speed, then increase the speed and continue drilling to a depth of approx. 50 mm. Take care that you do not cause any general damage to the wall material.
- Insert the 3 dowels ⑧ flush into the drilled holes.
See Fig. E:
- Screw the wall connection profile with the 3 fastening screws ⑦ in the dowels so that it is tight and flush.
See Fig. F:
The following steps apply to both left and right-hand installation. See also Fig. A.
- Choose the plastic seals according to the sizes in millimetres shown in Fig. F for the individual folding screen elements.
- Fit the 3 upper plastic seals ② into the groove on the upper edges of the 3 folding screen elements so that they fit correctly.
Please note that the plastic seals must be inserted in the groove with the ends first.
- In the area of the joints (grey plastic cover) make sure that the seals outside the groove lie straight on the upper or lower edge.
- Then fit the 3 lower plastic seals ③ into the groove on the bottom edges of the 3 folding screen elements so that they
fit correctly. The broad drain-off lips must point towards the bathtub.
See Fig. G:
- Level out any uneven areas between the wall connection profile and the edge of the bath with silicone.
- Insert the folding bathtub screen fully in the wall connection profile. Take care that it is installed correctly – the smooth side of the plastic panel must be on the inside / the rough side of the plastic panel on the outside.
- Guide the 3 fastening screws ⑤ with the 3 washers ⑥ through the outer folding screen element.
- Screw the 3 fastening screws gently into the thread of the wall connection profile – do not screw them tight.
See Fig. H:
- Open the folding screen fully along the edge of the bath.
- Position the folding screen so that the lower plastic seals are lying exactly parallel on the edge of the bath.
- Screw the 3 fastening screws with the 3 washers tight into the screw threads of the outer element.
- Make sure that the folding screen is positioned exactly parallel on the edge of the bath when open and flush against the wall when closed.
- Position the folding screen exactly. If necessary, loosen the fastening screws and screw them back on after aligning the folding screen.
See Fig. I:
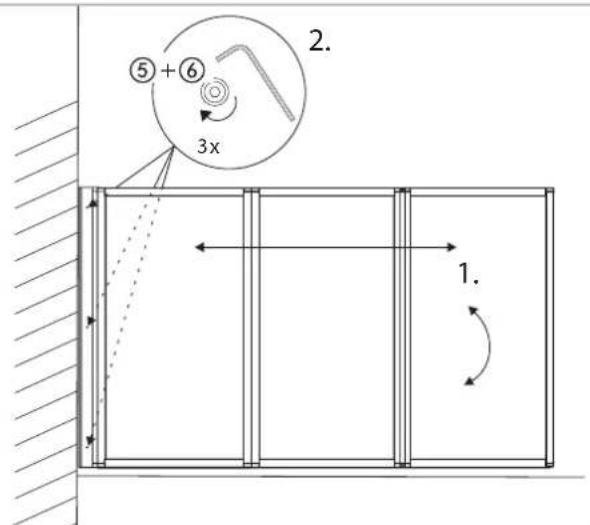
Note: on smooth walls it is not necessary to use silicone between the wall connection profile and the wall.
Level out uneven areas with silicone as follows:
- Fill the gaps between the inner and outer side of the wall connection profile and the wall with silicone along the full length.
- Fill the gaps between the frame profile of the outer folding screen elements and the wall connection profile with silicone to a height of 100 mm.
Before you can use the folding bathtub screen, the silicone filling must have set completely. Please observe the manufacturer's information with regard to the setting time of the silicone used.
Use
You can use the folding screen as a splash guard on the bathtub for showering. You can open out and close the folding screen from the outside or inside of the bath.
Opening the folding screen
- Open out the folding screen fully so that it runs parallel on the edge of the bath.
Closing the folding screen
- Close the folding screen so that it is flush against the wall.
Cleaning and maintenance
- The folding bathtub screen requires no maintenance.
- After showering, rinse any remaining care products off the open folding screen into the bath with water.
- Remove the remaining drops of water from the plastic panels of the folding screen with a standard rubber scraper.
- Remove the remaining drops of water from the wall connection profile and the frame profiles of the folding screen with a soft cloth.
- Remove any dirt with a cloth and a standard pH-neutral cleaning agent.
- Prevent discoloration of and damage to the folding bathtub screen. Do not use bleaching agents, aggressive cleaning and scouring agents, solvents or cleaning agents containing acetone and chlorine for cleaning purposes.
- If you have removed the folding bathtub screen, it should be kept clean and dry at room temperature in the original packing.
Disposal

Please dispose of any unwanted packaging material at a local disposal facility. The recyclable packaging materials have been selected for their ecologically compatible and disposable properties.
Please contact your district or city council with regard to possibilities for disposing of the folding bathtub screen once it has served its useful life.
In this way you are complying with legal requirements and contributing to protecting the environment.
Warranty / Service
Warranty
This product has a warranty of 2 years from the date of purchase. The product was manufactured with care and inspected thoroughly before delivery. Please keep your receipt as proof of purchase.
If you have a claim under the warranty, please call the service office for your country. This is the only way to ensure that your device can be sent in free of charge.
This warranty covers material or manufacturing defects only. Never use the product for any purpose other than that for which it was intended. Do not carry out any work or modification yourself, since you will otherwise lose your right to claim under the warranty. This warranty does not restrict your statutory rights.
Service
If you have any queries, please contact our service office.
Here you will receive all necessary information regarding service questions such as returns, etc.
E-mail: service@ravak.com
Ravak a.s.
Obecnicka 285
26181 Příbram 1, CZ
Declaration of conformity
This product satisfies the requirements of the valid European and national directives
Its conformity has been verified. The appropriate declarations and documents are retained by the manufacturer.

Ravak a.s., Obecnicka 285, 26181 Příbram 1, CZ 05
EN 14428
Folding bathtub screen/ shower screen with plastic panels
Cleanability: passed
Breaking properties: passed
Durability: passed
Introduction
Zone vetrate: Plastica
Piegata: (A) 1400 x (L) 450 mm x (P) 72 mm
natural_image
Top-down line drawing of a bathtub with a circular opening and vertical rod inserted (no text or symbols)H
text_image
⑤ + ⑥ 3x 2. 1.|
text_image
Silicone 100 mm Silicone SiliconeIAN 68863
RAVAK a.s.
Obecnická 285
261 81 Příbram 1 CZ
© RAVAK a.s.