5C60M8690 - Microwave Oven BLAUPUNKT - Free user manual and instructions
Find the device manual for free 5C60M8690 BLAUPUNKT in PDF.
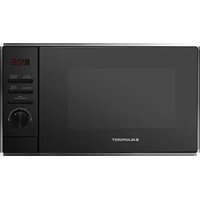
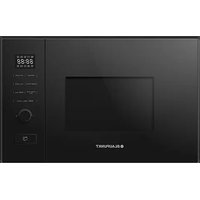
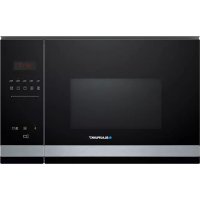
| Product type | Built-in combination microwave oven |
| Brand | Blaupunkt |
| Model | 5C60M8690 |
| Dimensions (W x D x H) | 595 mm x 568 mm x 454 mm |
| Net weight | Approximately 38.8 kg |
| Interior volume | 50 liters |
| Power supply | 230 V, 50 Hz, 16 A |
| Maximum power | 3000 W |
| Microwave power | 900 W |
| Cooking functions | Microwave only, grill, fan-assisted, natural convection, combi (microwave + grill), pizza mode, bottom heat, automatic defrost, automatic programs (13), rapid preheat |
| Shelf levels | 4 (side racks) |
| Included accessories | Barbecue grill, enamel drip tray, glass drip tray, hooks and side racks |
| Display and controls | Digital display, Smart Slider, touch keys, timer, child lock |
| Care and cleaning | Clean with soapy water or vinegar solution; do not use steam cleaner or abrasive products |
| Safety | Child lock, automatic shut-off, overheating protection |
| Spare parts and repairability | Accessories available at www.blaupunkt-einbaugeraete.com; repairs by qualified after-sales service |
| General information | Compliant with WEEE directive 2012/19/EC; manual available in several languages |
Frequently Asked Questions - 5C60M8690 BLAUPUNKT
User questions about 5C60M8690 BLAUPUNKT
0 question about this device. Answer the ones you know or ask your own.
Ask a new question about this device
Download the instructions for your Microwave Oven in PDF format for free! Find your manual 5C60M8690 - BLAUPUNKT and take your electronic device back in hand. On this page are published all the documents necessary for the use of your device. 5C60M8690 by BLAUPUNKT.
USER MANUAL 5C60M8690 BLAUPUNKT
natural_image
Line drawings of three different kitchen appliances with an inset showing internal components (no text or symbols)text_image
① a ② b ③natural_image
Pure mechanical component diagram without any text, numbers, or symbolsnatural_image
Close-up of a metal panel with a handle and internal components, no visible text or symbolsnatural_image
Close-up of a white mechanical component with metal rods and a small rectangular block, no visible text or symbols.natural_image
Close-up of a metal ladder with a hanging hook and arrow indicating force (no text or symbols)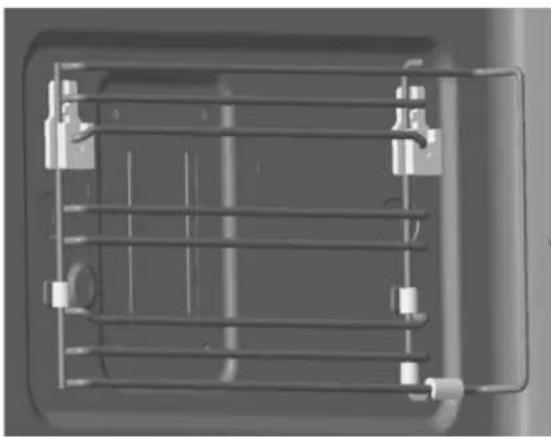
natural_image
Top-down view of a mechanical or electrical component with metal grid and mounting brackets (no visible text or symbols)INBETRIEBNAHME
natural_image
Two glass items: a spoon inside and a cross symbol crossed out (no text or labels)PN: 16170000A67345
TABLE OF CONTENTS
3 IMPORTANT SAFETY INSTRUCTIONS
6 Causes of damage
7 INSTALLATION
9 OPERATING THE APPLIANCE
9 Operating elements
10 Functions and display
11 Setting the parameters
11 Fan
12 Accessories
16 START-UP
16 Setting the time
16 Preheating the oven
16 Cleaning accessories
17 SETTING THE OVEN
17 Setting the heating mode and temperature
18 Fast preheat
19 THE MICROWAVE
19 Notes on ovenware
20 Microwave power settings
21 Setting the microwave
22 COMBINATION FUNCTION
22 Setting the combination function
23 AUTOMATIC PROGRAMMES
23 Setting a programme
25 Defrost programmes
27 PRESET COOKING PROGRAMMES
27 TIME SETTINGS
27 Setting the cooking time
28 Setting the time
28 Setting the timer
28 CHILD LOCK
29 CARE AND CLEANING
29 Cleaning agents
31 Technical data
31 TROUBLESHOOTING
32 ACRYLAMIDE IN FOOD
33 ENERGY-SAVING AND ENVIRONMENTAL TIPS
33 Saving energy
33 Environmentally friendly disposal
Precautions to avoid exposure to excessive microwave radiation energy
(a) Never use this appliance with the door open, as you will be exposed to harmful microwave radiation. The safety interlock must not be tampered with or rendered inoperative.
(b) Do not place any objects between the front of the appliance and the door and make sure that there is no dirt or cleaning residue on the sealing surfaces.
(c) WARNING: If the door seals or the door are damaged, the appliance may not be used again until it has been repaired by a qualified person.
Additional information
If the appliance is not kept properly clean, its surface may be damaged. This can shorten the life of the appliance and create dangerous situations.
IMPORTANT SAFETY INSTRUCTIONS
WARNING
Always follow these basic precautions to reduce the risk of fire, electric shock, personal injury, or exposure to excessive microwave radiation when using your appliance:
- This appliance may be used by children over 8 years of age and by persons with reduced physical, sensory or mental abilities or lack of experience and knowledge provided that they have been instructed in the use of the appliance by a person responsible for them and that they understand and appreciate the risks and dangers involved. Children must not play with the appliance. Children may only clean and maintain this appliance under supervision.
- Read and follow these instructions: PRECAUTIONS TO AVOID EXPOSURE TO EXCESSIVE MICROWAVE RADIATION ENERGY
- Ensure that the appliance and its power cable are out of reach of children under 8 years of age.
- If the power cable is damaged, it must be replaced by the manufacturer, the manufacturer's service partner, or a similarly qualified technician to avoid hazards.
-
WARNING: Maintenance or repair work, for which the cover for protection against microwave energy must be removed, may only be carried out by qualified persons.
-
WARNING: Liquids and other food products must never be heated in closed containers as there is a risk that the containers may explode.
- This appliance may be used by children over 8 years of age and by persons with reduced physical, sensory or mental abilities or lack of experience and knowledge provided that they have been instructed in the use of the appliance by a person responsible for them and that they understand the risks and dangers involved. Children must not play with the appliance. The appliance may only be cleaned and maintained by children over 8 years of age under the supervision of a responsible adult.
- Do not leave the appliance unattended when heating food in plastic or cardboard containers, as there is a risk of fire.
- Only use accessories suitable for microwave ovens.
- Switch off the appliance in case smoke is generated or pull out the power plug from the socket. Keep the door of the appliance closed to extinguish any flames that may occur.
- Heating drinks in the microwave/oven combination unit can cause delayed boiling. Be careful when removing the container.
- If you are warming up baby bottles or baby jars, stir or shake them after heating and check the temperature to avoid burning your baby.
- Hard-boiled eggs and eggs in shells should never be heated in the appliance, as they may explode even after they have been heated in the appliance.
- The appliance should be cleaned regularly and food residue should be removed.
- Failure to maintain the appliance in a clean condition may result in wear of the appliance surfaces, which may reduce the service life of the appliance and lead to dangerous situations.
- The appliance must be operated with the decorative door open. (for units with a decorative door).
- This appliance is intended for use in households and similar environments such as
– staff kitchen areas in shops, offices and other work environments; - farms;
– by guests of hotels, motels and other lodging establishments. - WARNING: Accessible parts of the appliance become hot during use. Small children should be kept away from the appliance.
- Do not use a steam cleaner to clean the appliance.
- This microwave/oven combination unit is designed to heat food and beverages. Drying food or clothing and heating heat pads, slippers, sponges, damp cloths or similar items can cause injury and fire.
- The surface of the built-in cabinet in which the appliance is located can become very hot.
-
WARNING: The appliance and its accessible parts become hot during use. Do not touch the heating elements. Children under 8 years of age must be monitored constantly or kept away from the appliance.
-
The appliance becomes hot during use. Do not touch the heating elements inside the oven.
- Metal containers for food and beverages must not be heated in the appliance.
- Do not use sharp abrasive cleaning agents or sharp metal scrapers to clean the glass in the oven door, as these can scratch the surface, which can cause the glass to shatter.
- This appliance is a built-in appliance.
- WARNING: When the combination mode is used, children should only use the appliance under the supervision of an adult due to the high temperatures involved.
CAUSES OF DAMAGE
Caution!
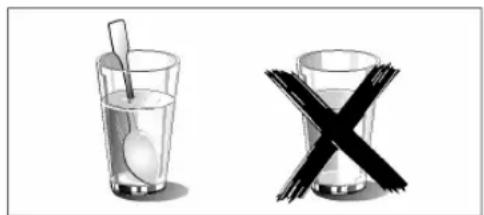
- Sparking: Metal, e.g. a spoon in a glass, must be at least 2 cm away from the oven walls and the inside of the door. Sparks can irreparably damage the glass on the inside of the door.
• Water in the hot cooking chamber: Never pour water into the hot cooking chamber. This will produce steam. The temperature change can cause damage. - Moist food: Do not store moist food for long periods in a closed cooking chamber. Do not use the appliance to store food. This can lead to corrosion.
- Cooling with the appliance door open: Only allow the cooking chamber to cool down with the appliance door closed. Do not allow anything to become jammed in the appliance door. Even if the door is left open only a crack, the fronts of adjacent appliances may be damaged over time.
- If the seal is heavily soiled, the appliance door will not close properly. This could damage the fronts of adjacent appliances. Always keep the seal clean.
- Operation of the microwave/oven combination unit without food: Operating the appliance without food in the cooking chamber can cause an overvoltage. Never switch on the appliance when there is no food in the cooking chamber. One exception to this rule is a short ovenware test (see section “Notes on ovenware”).
- Using the appliance door to place or set down objects: Do not place anything on the open appliance door. Do not place cookware or accessories on the appliance door.
- Carrying the device: Do not carry or hold the device by the door handle. The door handle cannot support the weight of the appliance and may break off.
- Microwave popcorn: Never set the microwave power too high. Use a power setting below 600 watts. Always place the popcorn bag on a glass plate. The glass plate can crack in case of excess stress.
- Do not allow liquid that has boiled over to leak into the interior of the appliance through the turntable drive. Always keep an eye on the cooking process. Select a shorter cooking time first and increase it as required.
- The oven should be cleaned regularly and all food deposits should be removed as they may still explode even after the heating process is complete.
- If you fail to keep the appliance in a clean condition, this may result in wear on the surfaces of the appliance, which may reduce the life of the appliance and lead to dangerous situations.
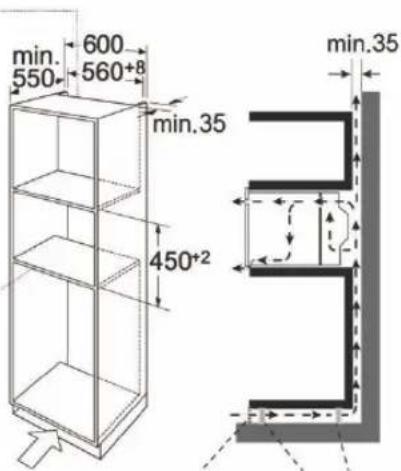
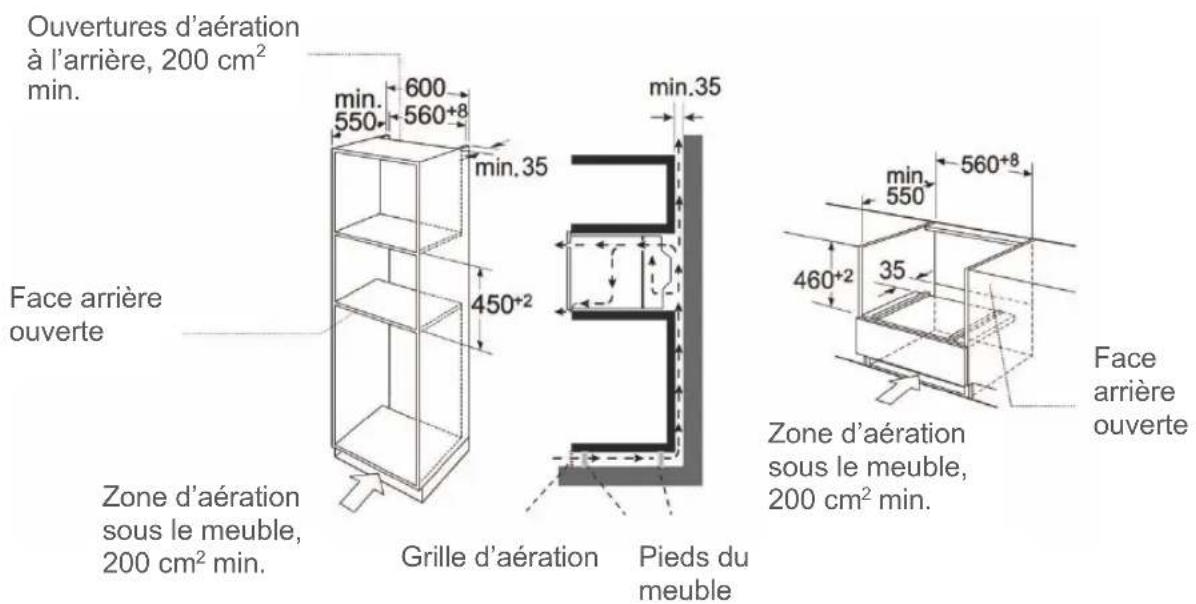
INSTALLATION
BUILT-IN APPLIANCES
• The appliance is only intended for installation in a kitchen.
• This appliance is not intended for use as a table appliance or inside a cabinet.
• The built-in cabinet may not have a rear panel behind the unit.
- A distance of at least 35 mm must be maintained between the wall and the rear wall or the floor of the appliance located above it.
- The built-in cabinet must have a ventilation opening of 200 cm ^2 at the front. For this purpose, the base plate must be cut back or a ventilation grille must be fitted.
• The ventilation slots and air intake openings must not be covered.
- Safe operation of this appliance can only be guaranteed if it has been installed in accordance with these installation instructions.
• The installer is liable for all damage caused by improper installation.
• The cabinets in which the appliance is installed must be sufficiently heat-resistant.
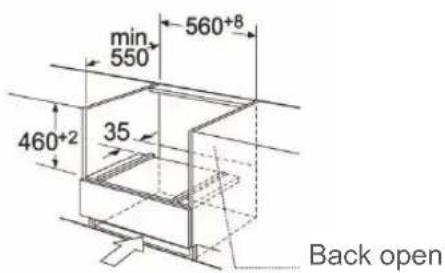
INSTALLATION DIMENSIONS
Ventilation openings at the rear, at least 200 cm ^4
Back open
Ventilation area underneath the cabinet min. 200 cm ^4
text_image
min. 550 600 560+8 min.35 450+2 min.35Ventilation grille Cabinet feet
text_image
min 550 560+8 460+2 35 Back openVentilation area underneath the cabinet min. 200 cm ^4
Do not carry or hold the device by the door handle. The door handle cannot support the weight of the appliance and could break off.
- Carefully push the appliance into the opening and make sure that it is centred.
- Open the door and fasten the appliance with the screws provided.
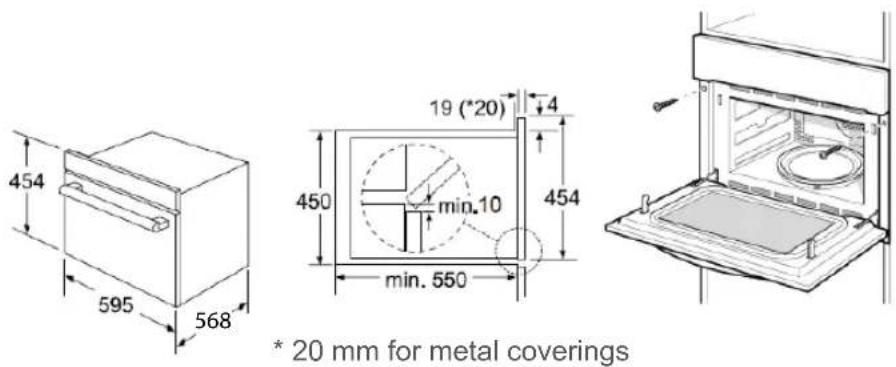
text_image
454 595 568 19 (*20) 4 450 min.10 454 min. 550 * 20 mm for metal coverings(a) Push the unit fully in and place it in the middle of the opening.
(b) Do not kink the connecting cable.
(c) Fasten the appliance with the screws.
(d) The gap between the worktop and the appliance must not be closed by additional strips.
Important information
Electrical connection
This appliance is equipped with a plug and may only be connected to a properly installed earthed socket. Only a qualified electrician who observes the relevant regulations may install the power plug or replace the connection cable. If the plug is no longer accessible after installation, an all-pole disconnector with a contact gap of at least 3 mm must be provided on the installation side. The installation must guarantee touch protection.
OPERATING THE APPLIANCE
This section will help you familiarise yourself with your new appliance.
It explains the control panel and the individual control elements. You will also find information about the cooking chamber and accessories.
OPERATING ELEMENTS
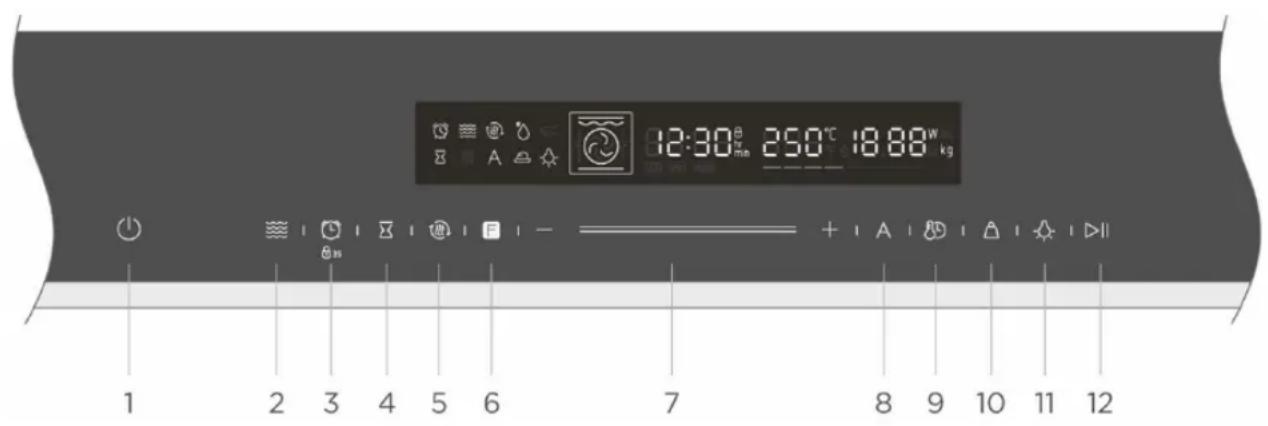
text_image
12:30°C 250°C 18:88W kg 1 2 3 4 5 6 7 8 9 10 11 12 | 1. ON/OFF | Switches the oven on/off. |
 | 2. Microwave symbol | Use the microwave and microwave/oven combination function. |
 | 3. Timer/child lock | Use timer/press button for 3 seconds to turn on child lock. |
 | 4. End time | Set an end time for the cooking process. |
 | 5. Fast preheat | For fast preheating. |
 | 6. Oven function | Press this symbol to change the operating mode. Press and hold for 5 seconds to change it quickly. |
 | 7. Smart Slider | You can use the Smart Slider or the “+/-” buttons to change the values shown on the display. |
 | 8. Automatic programmes | Use automatic programmes. |
 | 9. Time/temperature | Set the clock time in standby mode/Switch between time setting and temperature. |
 | 10. Weight | Tap this symbol to set the weight for the automatic programmes. |
 | 11. Lamp ON/OFF | Switches the lamp on/off. |
 | 12. Start/pause | Starts and interrupts the cooking process. |
Use the function buttons to set the cooking mode.
| Function | Use | |
| — | Top/bottom heat | The upper and lower heating elements work together to cook the food. The oven must be preheated to the required temperature. Ideal for slow-cooking dishes such as casseroles and stews. |
| Hot air | For baking on several levels (e.g. baking trays with chocolate biscuits). | |
| Top/bottom heat + circulation | Up to 4 dishes can be cooked at the same time on different levels in a convenient and time-saving way without mixing flavours or smells. | |
| Grilling with radiant heat | The best results can be achieved by using the upper guide rails for small products and the lower guide rails for large products. | |
| Dual grill + circulation | For gratin dishes and browning roasted vegetables. | |
| Dual grill | The grill elements and top heat work simultaneously, ensuring quick and even browning | |
| Pizza mode | Pizza is cooked perfectly with additional heat from the bottom and sides of the oven, making the pizza base crispy. | |
| — | Bottom heat | Ideal for slow-cooking dishes such as casseroles and stews. |
| Microwave | Defrosting, warming and cooking. | |
| Microwave + hot air | For shortening the cooking time of large portions with a browning effect. | |
| Microwave + dual grill + circulation | For quick browning on top. This function cooks the ingredients to the core. | |
| Microwave + pizza mode | For quick browning on the bottom. This function cooks the ingredients to the core. | |
| * | Defrosting | 3 Defrost programmes |
| A | Automatic programmes | 13 Cooking programmesThe heating type and the cooking time are based on the weight. |
Use the setting buttons to adjust the parameters.
| Parameter | Function | ||
| Automatic menu | Select from 13 automatic programmes From P 01 to P 13. | ||
| Select the cooking temperature. | |||
| Temperature | — | 100 °C – 235 °C | 50 °C – 250 °C |
| ◎ | 50 °C – 250 °C | — 50 °C – 235 °C | |
| ~ | 50 °C – 235 °C | 50 °C – 250 °C | |
| ~ | 100 °C – 235 °C | 100 °C – 250 °C | |
| ~ | 100 °C – 250 °C | 50 °C – 250 °C | |
| ~ | 100 °C – 235 °C | ||
| Weight | Set the weight of the product to be cooked. | ||
| Time | Set the cooking duration. | ||
| Microwave | Select the microwave power: 100 W, 300 W, 500 W, 700 W and 900 W. | ||
FAN
Your appliance has a fan. The fan switches on during operation. Hot air escapes above the door.
The fan continues to run for a while after the cooking process is complete.
Caution!
Do not cover the ventilation slots. This may cause the unit to overheat.
NOTES:
- The appliance remains cool during microwave operation. The fan switches on automatically. The fan can continue to run even after the microwave has finished operating.
- Condensation may form on the door, inside walls and on the floor. This is normal and does not affect microwave operation. Wipe away the condensation after cooking.
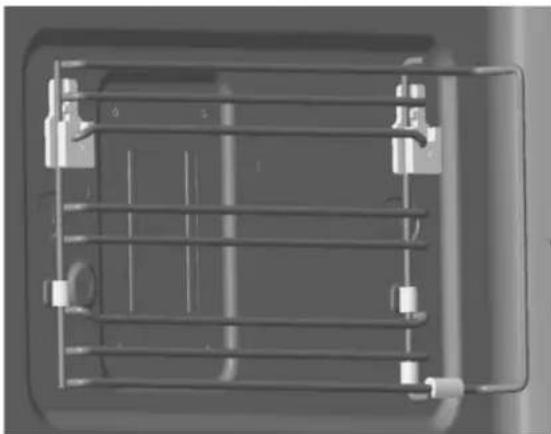
ACCESSORIES
Your appliance is supplied with several accessories. Here you will find an overview of the accessories supplied and information on their correct use.
Accessories included
Your appliance is equipped with the following accessories:
Grill griddle

For grilling items like steaks and sausages or toasting bread.
Baking tray
For safety reasons, the baking tray should be pushed onto a guide rail instead of directly onto the floor of the oven cavity.
Baking tray – Enamel tray

For making cake rolls, for frying whole chickens. The enamel tray must not be used for cooking with the microwave function.
Baking tray – Glass tray
The glass tray should be used for cooking with the microwave function. For collecting liquids such as water and fat while baking and frying. To ensure the best cooking results, the glass tray should be pushed into the lowest guide rail as shown in the illustration.

natural_image
Line drawings of three different kitchen appliances with one showing a close-up view of the interior (no text or symbols present)Inserting accessories
The cooking chamber has four guide rails. The guide rails are counted from bottom to top. The accessories can be pulled out about halfway without tilting.
Note
The accessories can become deformed when hot. This does not affect their function. Once they have cooled down, they will return to their original shape.
Use only original accessories. It is specially designed for your appliance. You can find the right accessories in our online shop at www.blaupunkt-einbaugeraete.com or from your specialist dealer.
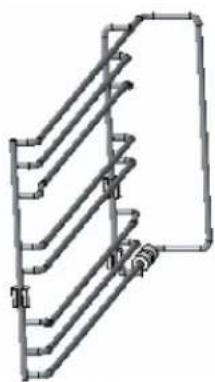
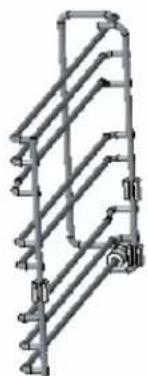
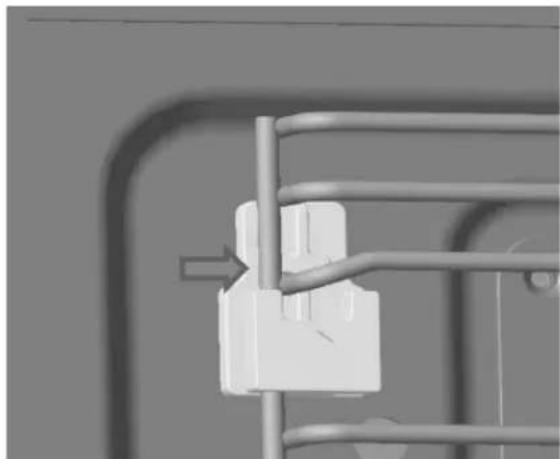
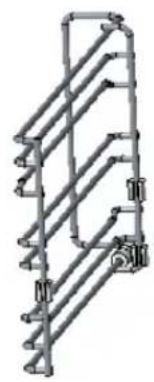
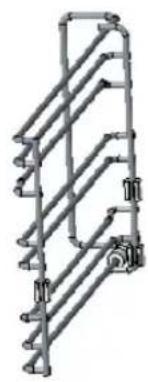
Mounting hooks and guide rails
1. Mounting the hooks.

text_image
① a ② b ③① First install the hook in hole a;
② Then push the hook into hole b;
③ Finally, push the hook into the right place.
- There are left and right guide rails.
natural_image
Pure mechanical component diagram without any text, numbers, or symbolsLeft guide rail
natural_image
Pure mechanical linkage diagram without any text, numbers, or symbolsRight guide rail
- Mounting the left and right guide rails (the example shows how to mount the left guide rail).
① Lift the guide rail over the left notch of the hook;
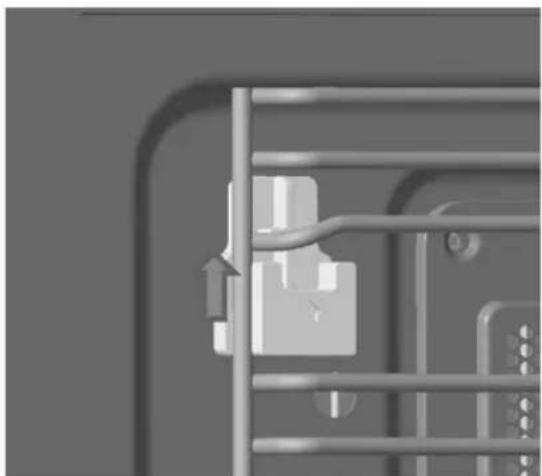
natural_image
Close-up of a metal panel with a pull arrow and internal components (no visible text or symbols)② Move the guide rail to the right as illustrated;
natural_image
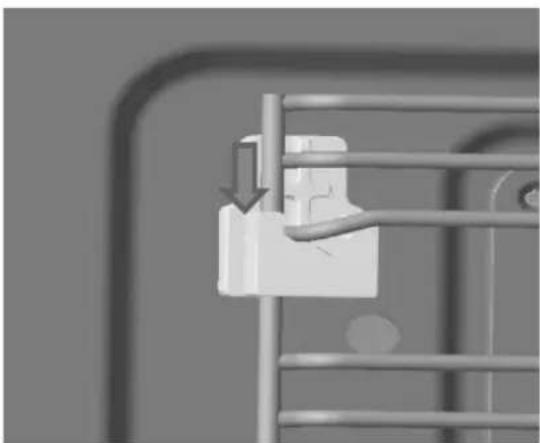
Close-up of a white mechanical component mounted on a metal frame, with no visible text or symbols.③ Push the guide rail down into the notch of the hook;
④ Finished.
natural_image
Close-up of a metal ladder with a hanging hook and arrow indicating downward motion (no text or symbols)
natural_image
Top-down view of a mechanical or electrical component with metal grid and mounting brackets (no visible text or symbols)START-UP
This chapter tells you everything you need to do before you use your oven for the first time to prepare food. Read the section entitled Safety Instructions first.
SETTING THE TIME
- In standby mode, tap the 🎨 button to go to the clock setting. "00:00" will be displayed and the hour numbers will flash.
- Tap — or + or move the Smart Slider — to adjust the hour numbers. The number entered should be between 0 and 23.
- Tap 📋 to confirm your entry. The minute numbers will now flash.
- Tap — or + or move the Smart Slider — to adjust the minute numbers. The number entered should be between 0 and 59.
- Tap ☐ to confirm the clock setting. The clock will now flash. The time is set. The appliance will enter standby mode.
PREHEATING THE OVEN
To remove the smell of the new stove, heat it up when it is empty and closed. One hour with hot air at 250 °C is ideal. Make sure that no packaging residue remains in the cooking chamber.
- In standby mode, tap the F button once. The default temperature will light up on the display.
- Tap the F button repeatedly until lights up. The preset hot air temperature will appear on the display.
- Tap — or + or move the Smart Slider — to set the temperature to 250 °C.
- Tap 📋 to set the cooking time. "00:00" will flash.
- Tap — or + or move the Smart Slider — to set the cooking time to 60 minutes.
- Tap ▷|| . The oven will begin preheating.
CLEANING ACCESSORIES
Before using the accessories for the first time, clean them thoroughly with hot soapy water and a soft tea towel.
SETTING THE OVEN
You can set the oven in different ways. Here we will explain how to select the desired heating mode and temperature/grill setting. You can also select the cooking time for your dish. Please also read the section about time settings.
SETTING THE HEATING MODE AND TEMPERATURE
Example: Grilling with radiant heat at 200 °C for 25 minutes.
- In standby mode, tap the F button once. The default temperature will light up on the display.
- Tap the F button repeatedly until lights up. The preset temperature for grilling with radiant heat will appear on the display.
- Tap — or + or move the Smart Slider — to set the temperature to 200 °C.
- Tap 📋 to set the cooking time. "00:00" will flash.
- Tap — or + or move the Smart Slider — to set the cooking time to 25 minutes.
- Tap ▷|| . The oven will begin preheating.
Opening the door during a cooking process
The cooking process will be paused. After closing the door, tap the button. The cooking process will continue.
Stopping the cooking process
Tap ▷|| to interrupt the cooking process. Tap ▷|| to resume the cooking process.
Changing the cooking time
This can be done at any time. Tap 📋 repeatedly until the cooking time flashes. Then tap — or + or move the Smart Slider — to set the cooking time.
Changing the temperature
This can be done at any time.
Tap — or + or move the Smart Slider — to set the temperature.
Cancelling the cooking process
This can be done at any time. Tap ⏻ to call up standby mode.
Fast Preheat ensures that your oven reaches the set temperature especially quickly.
Fast Preheat is available for the following heating types:
 | Top/bottom heat |  | Dual grill + circulation |
 | Hot air |  | Dual grill |
 | Top/bottom heat + circulation |  | Pizza mode |
 | Grilling with radiant heat | — | Bottom heat |
To achieve a good cooking result, you should not put food in the oven until the preheating phase is complete.
-
Set the heating type and temperature.
-
Tap

The symbol will light up on the display.
The oven will begin preheating.
The preheating process is complete
A signal will sound. The symbol Ⓜ will flash on the display. Place your dish in the oven.
Cancelling Fast Preheat
The Fast Preheat function can be cancelled by touching the button.
During Fast Preheat, the function can be cancelled by touching the ⏻ button.
NOTE:
Only when you hear the signal and the Preheat symbol flashes can you open the door and place food in the cooking chamber.
THE MICROWAVE
Microwaves heat up food. The microwave can be used alone or in combination with another heating type. This section provides information on microwave dishes and how to set the microwave.
NOTE:
The step sizes for the microwave controller are as follows:
0–1 min : 1 second
1–3 min : 10 seconds
3–15 min : 30 seconds
15–60 min : 1 minute
Over 60 min : 5 minutes
NOTES ON OVENWARE
Suitable ovenware
Suitable ovenware is heat-resistant ovenware made of glass, glass ceramic, porcelain, ceramic or heat-resistant plastic. These materials are also suitable for microwave ovens.
You can also use serving dishes. This saves you from having to transfer food from one container to another. You should only use ovenware with gold or silver decorations if the manufacturer guarantees that it is suitable for microwave use.
Unsuitable ovenware
Metal ovenware is unsuitable. Metal does not allow microwaves to pass through. Food in covered metal containers will remain cold.
Caution!
Sparking: metal, e.g. a spoon in a glass, must be at least 2 cm away from the oven walls and the inside of the door.
Sparks can irreparably damage the glass on the inside of the door.
Dish test
Only switch on the microwave if there is food in it. An exception to this rule is a short dish test. Carry out the following test if you are not sure whether your ovenware is suitable for microwave ovens:
- Heat the empty ovenware at maximum power from 30 seconds to 1 minute.
- During this time, check the temperature occasionally. The ovenware should be cold or warm enough to be touched.
The ovenware is not suitable if it becomes hot or sparks are generated.
MICROWAVE POWER SETTINGS
Tap ≈ to set the microwave power.
| 100 W | Defrosting sensitive foodsDefrosting irregularly shaped foodThawing ice creamRising dough |
| 300 W | DefrostingMelting chocolate and butter |
| 500 W | cooking rice and soup |
| 700 W | WarmingCooking mushrooms and musselsCooking dishes with eggs and cheese |
| 900 W | Boiling water, warmingCooking chicken, fish, vegetables |
NOTES:
- When you touch a button, the selected power will light up.
- The microwave power can be set to 900 watts for a maximum of 30 minutes. With all other power settings, the maximum cooking time is 1 hour and 30 minutes.
Example: Power: 300 W, cooking time: 17 minutes
- In standby, tap the ≈ button to access the microwave function. The default microwave power of 900 W will be displayed. The default cooking time will also flash.
- Tap — or + or move the Smart Slider — to set the cooking time to 17 minutes.
- Tap ≈ to set the microwave power. Tap — or + or move the Smart Slider — to set the power to 300 W.
- Tap ▷||
The cooking process will begin. The cooking time will be counted down in the display.
The cooking time has elapsed
A signal will sound. The microwave function is complete.
Opening the door during a cooking process
The cooking process will be paused. After closing the door, tap the ▷|| button. The cooking process will continue.
Changing the cooking time
This can be done at any time. Tap — or + or move the Smart Slider — to set the cooking time.
Changing the microwave power
This can be done at any time. Tap ≈ and then — or + or move the Smart Slider ____ to set the microwave power.
Stopping the cooking process
Briefly tap ▷||. The process will be cancelled. Tap ▷|| again to resume the cooking process.
Cancelling the cooking process
This can be done at any time. Tap ⏻ to call up standby mode.
NOTES:
• If you open the appliance door during the cooking process, the fan may continue to run.
COMBINATION FUNCTION
In this case, the grill and the microwave are used at the same time. Cooking in the microwave means that your dishes are finished faster while they are nicely browned by the grill.
You can switch on all power settings of the microwave.
Exception: 700 and 900 watts
SETTING THE COMBINATION FUNCTION
Example: ≈+ Microwave + pizza mode with 500 W and 190 °C for 17 minutes.
- In standby mode, tap the 🎨 button, then tap F repeatedly to set the combination function. Stop tapping when 🔒 and ≈ appear on the display. The default microwave power will be displayed and the default temperature will flash.
- Tap — or + or move the Smart Slider — to set the temperature to 190 °C.
- Tap 📄 to confirm the temperature. The default cooking time will flash. Tap — or + or move the Smart Slider — to set the cooking time to 17 minutes.
- Tap ≈. The default microwave power will flash. Tap — or + or move the Smart Slider to set the power to 500 W.
- Tap ▷|| . The oven will begin preheating.
The cooking process will begin. The cooking time will be counted down in the display.
The cooking time has elapsed
A signal will sound. The combination function is complete.
Opening the door during a cooking process
The cooking process will be paused. After closing the door, briefly tap the ▷|| button. The process will then be resumed.
Stopping the cooking process
Briefly tap ▷||. The process will be cancelled. Tap ▷|| again to resume the cooking process.
Changing the cooking time
This can be done at any time. Tap 📄 repeatedly until the cooking time flashes. Then tap — or + or move the Smart Slider — to set the cooking time.
Changing the microwave power
This can be done at any time. Tap ≈ and then — or + or move the Smart Slider to set the microwave power.
Changing the temperature
This can be done at any time.
Tap — or + or move the Smart Slider — to set the temperature.
Cancelling the cooking process
This can be done at any time. Tap ⏻ to call up standby mode.
AUTOMATIC PROGRAMMES
The automatic programmes make it very easy to prepare food. You only have to select the programme and enter the weight of your food. The automatic programme will make the optimum settings. You can choose from 13 programmes.
Always place the food in the cold cooking chamber.
SETTING A PROGRAMME
- In standby, tap the A button to access the microwave programmes. The first programme number will flash on the display.
- Tap — or + or move the Smart Slider — to select the programme number.
- Tap .
- Tap — or + or move the Smart Slider — to set the weight. The cooking time will then be displayed.
- Tap ▷|| . The programme will start. The cooking time will be counted down in the display.
Automatic menu
| Programme number | Dish | Weight (g) |
| P 01** | Fresh vegetables | 200 |
| 400 | ||
| 600 | ||
| P 02** | Potatoes peeled/boiled | 240 |
| 480 | ||
| 720 | ||
| P 03 | Baked potatoes | 450 |
| 1000 | ||
| P 04 | Chicken pieces (frozen) | 450 |
| P 05* | Cake | 400 |
| 500 | ||
| 600 | ||
| P 06* | Apple tart | 2400 |
| P 07* | Quiche | 1000 |
| P 08** | Warming soup | 200 |
| 400 | ||
| 600 | ||
| P 09** | Warming plate | 250 |
| 350 | ||
| P 10** | Warming sauce/stew | 100 |
| 200 | ||
| 300 | ||
| P 11 | Frozen pizza | 200 |
| 400 | ||
| 600 | ||
| P 12* | Frozen chips | 300 |
| 400 | ||
| 500 | ||
| P 13 | Lasagne | 1600 |
NOTES:
- The programmes with a * are preheated. During preheating, the cooking time is paused and the Preheat symbol lights up. After preheating, a signal will sound and the Preheat symbol will flash.
- The programmes with ** only use the microwave function.
The programme is finished
A signal will sound. The oven will stop.
Changing the programme
Once you have started the programme, you cannot change the programme number and weight.
Cancelling the programme
Tap to cancel the programme.
Changing the cooking time
If you use automatic programmes, you cannot change the cooking time.
DEFROSTING PROGRAMMES
You can use the 3 defrosting programs to defrost meat, poultry and bread.
- In standby, tap the A button to access the microwave programmes.
The first programme number will flash on the display. - Tap — or + or move the Smart Slider — to select the programme number.
- Tap .
- Tap — or + or move the Smart Slider — to set the weight. The cooking time will then be displayed.
- Tap ▷II . The programme will start. The cooking time will be counted down in the display.
NOTES:
- Preparing food
Use food that has been frozen at -18 °C and stored in the thinnest possible portion sizes. Remove the food to be defrosted from the packaging and weigh it. You need to know the weight to set the programme.
- When meat or poultry is defrosted, liquid is produced. Drain this liquid when turning the meat or poultry. Under no circumstances use it for other purposes and do not let it come into contact with other foods.
- Ovenware
Place the food on a flat, microwaveable dish, such as a porcelain or glass plate, but do not cover it.
- When defrosting chicken and chicken portions (d 01) an acoustic signal will sound twice to indicate that the food needs to be turned over.
- Rest period
The defrosted food should be left to stand for a further 10 to 30 minutes until it has reached a uniform temperature. Large pieces of meat require a longer rest period than smaller pieces.
Flat pieces of meat and products made from minced meat should be separated before the rest period.
After this resting period, you can continue preparing the food, although thick pieces of meat may still be frozen in the middle. Now the offal can also be removed from the poultry.
| Programme number | Defrosting | Weight range (kg) |
| d 01* | Meat | 0.10 – 1.50 |
| d 02* | Poultry | 0.10 – 1.50 |
| d 03* | Fish | 0.10 – 0.80 |
* Place the food on the glass tray during defrosting.
* When you hear 3 beeps, turn the food over.
Then tap the start button to continue the defrosting process.
PRESET COOKING PROGRAMMES
More flexibility and convenience: the appliance can be programmed so that the end time and cooking time can be pre-set.
- In standby, tap the button. The symbol will light up and the hour numbers will flash.
- Tap — or + or move the Smart Slider — to set the hour numbers. The number entered should be between 0 and 23.
- Tap ☒ to confirm your entry. The minute numbers will now flash.
- Tap — or + or move the Smart Slider — to set the minute numbers. The number entered should be between 0 and 59.
- Tap to end the preset.
- Set the heating type and temperature.
- Tap ▷II to complete the setting process.
The preset time has elapsed
A signal will sound. The cooking time will begin.
Specifications
Before you can use preset cooking programmes, you must set the clock. Once the preset cooking programmes have been set, the clock can no longer be adjusted.
TIME SETTINGS
Your oven has various options for setting the time. Use the 📄 button to access the menu and switch between the individual functions. A previously selected time setting can be changed directly with the Smart Slider.
SETTING THE COOKING TIME
The cooking time can be set on the oven. The oven will switch off automatically after the cooking time has elapsed. This means that you do not have to interrupt other tasks to switch off the oven.
The cooking time cannot be unintentionally exceeded.
The cooking time will begin. The cooking time will be counted down in the display.
The cooking time has elapsed
A signal will sound. The oven will stop.
See Start-up.
Changing the clock time
Repeat the steps for setting the clock.
SETTING THE TIMER
You can use the clock as a timer. It runs independently of the oven. The timer has its own acoustic signal. This enables you to tell whether the timer or a cooking time has elapsed.
- In standby mode, tap 🔒 to set the timer. "00:00min" will flash.
- Tap — or + or move the Smart Slider — to set the cooking time.
- Tap to start the timer.
CHILD LOCK
The oven has a child lock to prevent children from accidentally switching it on.
No settings can be made when the child lock is on. The only exceptions are the clock and the timer.
Switching on the child lock
In standby mode, press and hold the ⏻ button for about 3 seconds. A long beep will sound and the ⏻ symbol will appear on the display. The child lock is activated.
Switching off the child lock
In the locked state, press and hold the ⏻ button for about 3 seconds. A long beep will sound and the ⏻ symbol will disappear. The child lock is deactivated.
CARE AND CLEANING
With good care and cleaning, your appliance will retain its appearance and remain fully functional for a long time. We will now explain to you how to properly care for and clean your appliance.
Danger of electric shock!
Penetrating moisture can cause an electric shock. Do not use high-pressure or steam cleaners.
Risk of burns!
Never clean the appliance immediately after switching it off. Always let the appliance cool down.
Danger of serious damage to health!
If the oven door or door seal is damaged, microwave energy can escape. Never use the appliance if the oven door or door seal is damaged. Contact customer service.
NOTES:
- Slight differences in colour on the front of the device are due to the use of different materials such as glass, plastic and metal.
- Shadows on the door panels that look like stripes are caused by reflections of the interior lighting.
- Unpleasant odours, such as after the preparation of fish, can be removed very easily. Put a few drops of lemon juice in a cup of water. Place a spoon in the container so that the liquid does not start boiling. Heat the water for 1 to 2 minutes at maximum microwave power.
CLEANING AGENTS
Please follow the instructions in the table so that the different surfaces are not damaged by using the wrong cleaning agents.
Do not use:
- Sharp or abrasive cleaning agents.
- Metal or glass scrapers for cleaning the pane in the oven door,
• Metal or glass scrapers for cleaning the door seal, - Hard scouring or cleaning sponges.
- Cleaning agents with high alcohol content.
Wash new sponges and cloths thoroughly before use.
Allow all surfaces to dry thoroughly before using the appliance again.
| Area | Cleaning agent |
| Front of appliance | Warm soapy water:Clean with a tea towel and then dry off with a soft cloth. Do not use glass cleaner or a metal/glass scraper for cleaning. |
| Stainless steel front | Warm soapy water:Clean with a tea towel and then dry off with a soft cloth. Remove lime spots, grease, starch and albumin (e.g. protein) immediately. Rust can form under such spots. Special stainless steel cleaning agents are available from specialist dealers. Do not use glass cleaner or a metal/glass scraper for cleaning. |
| Cooking chamber | Hot soapy water or a vinegar solution:Clean with a tea towel and then dry off with a soft cloth.If the oven is very dirty: Do not use oven spray or other aggressive oven cleaners or abrasive cleaning products. Scouring sponges, rough sponges and pan cleaners are also unsuitable. These objects scratch the surface. Allow interior surfaces to dry thoroughly. |
| Baking rack | Warm soapy water:Clean the baking rack with stainless steel cleaning agent or in the dishwasher. |
| Door panel | Glass cleaner:Clean with a tea towel. Do not use a glass scraper. |
| Seal | Warm soapy water:Clean with a tea towel – do not scrub. Do not use a metal or glass scraper for cleaning. |
TECHNICAL DATA
| Rated voltage | 230 V, 50 Hz |
| Maximum power | 3000 W |
| Rated output (microwave) | 900 W |
| Rated current | 16 A |
| Oven capacity | 50 l |
| Outer dimensions without handle | 595 (W) × 568 (D) × 454 (H) mm |
| Net weight | approx. 388 kg |
TROUBLESHOOTING
Malfunctions often have simple explanations. Please refer to this troubleshooting guide before calling customer service.
If a dish doesn't turn out exactly as you want it to, please read the cooking guide, where you will find many cooking tips and tricks.
Danger of electric shock!
Incorrectly performed repairs are hazardous. Repairs may only be carried out by one of our trained service technicians.
Troubleshooting
| Problem | Possible causes | Remedy/information | |
| The appliance does not work. | Problem with the circuit breaker. | Look inside the fuse box and check that the appliance's circuit breaker is working. | |
| The power plug is not plugged in. | Insert the power plug. | ||
| Power failure | Check that the kitchen lamp is working. | ||
| The appliance does not work. Appears on the display. | The child lock is activated. | Deactivate the child lock (see: Child lock). | |
| The microwave does not switch on. | The door is not completely closed. | Check whether food residue or dirt deposits are trapped in the door. | |
| It takes longer than usual to heat food in the microwave. | The selected microwave power is too low. | Select a higher power level. | |
| A larger portion than usual has been placed in the appliance. | Double the amount = almost twice the cooking time. | ||
| The food was colder than usual. | Stir or turn the food while cooking. | ||
| A specific operating mode or power level cannot be set. | Temperature, power or combined setting is not possible for this operating mode. | Select the permissible settings. | |
| E-01 | appears on the display. | The thermal safety switch-off is activated. | Contact customer service. |
| E-04 | appears on the display. | The thermal safety switch-off is activated. | Contact customer service. |
| E-17 | appears on the display. | Fast Preheat is not working. | Contact customer service. |
ACRYLAMIDE IN FOOD
Which foods are affected?
Acrylamide is mainly produced in cereal and potato products that are heated to high temperatures, such as potato crisps, chips, toast, rolls, bread, fine baked goods (cookies, gingerbread, biscuits).
| To minimise the formation of acrylamide during food preparation | |
| General information | Keep the cooking times to a minimum. Cook the food until it is golden brown, but not too dark. Large, thick pieces of food contain less acrylamide. |
| Baking biscuits Chips | Max. 200 °C top/bottom heat or max. 180 °C circulation.Max. 190 °C top/bottom heat or max. 170 °C circulation. Egg white and egg yolk reduce the formation of acrylamide. Distribute the food thinly and evenly on the baking tray. Cook no more than 400 g per baking tray so that the potato chips do not dry out. |
ENERGY-SAVING AND ENVIRONMENTAL TIPS
This section contains tips on how to save energy when baking and roasting and how to dispose of your appliance correctly.
SAVING ENERGY
• Only preheat the oven if this is indicated in the recipe or in the operating instructions.
• Use dark, black lacquered or enamelled baking tins. They absorb heat particularly well.
- Open the oven door as rarely as possible during cooking, baking or roasting.
- It is best to bake several cakes one after the other. This is the most effective way to utilise the heat of the oven. It also shortens the baking time for the second cake. You can also place two loaf tins next to each other.
- When cooking for longer periods, you can switch off the oven 10 minutes before the end of the cooking time and use the remaining heat to finish the cooking process.
ENVIRONMENTALLY FRIENDLY DISPOSAL
Dispose of the packaging in an environmentally friendly way.
This device complies with the European directive 2012/19/EC on Waste Electrical and Electronic Equipment (WEEE). This directive provides an EU-wide regulatory framework for the collection and recycling of waste equipment.
Heating food

Risk of scalding!
There is a possibility of delayed boiling when a liquid is heated. This means that the liquid reaches its boiling temperature without the usual bubbles rising to the surface. Even if the container is moved just a little, the hot liquid can suddenly boil over and splash. When heating liquids, a spoon must always be placed in the container. This prevents delayed boiling.
natural_image
Two glass items: a spoon inside and a cross symbol crossed out (no text or labels)PN: 16170000A67345
TABLE DES MATIÈRES
3 CONSIGNES DE SÉCURITÉ
DIMENSIONS D'ENCASTREMENT
natural_image
Line drawings of three different kitchen appliances with an inset showing internal components (no text or symbols)Pose des accessoires
text_image
① a ② b ③natural_image
Pure mechanical component diagram without any text, numbers, or symbolsnatural_image
Close-up of a mechanical component with a pipe and bracket (no visible text or symbols)natural_image
Close-up of a white mechanical component with metal rods and a small rectangular block, no visible text or symbols.natural_image
Close-up of a metal ladder with a hanging hook and arrow indicating force (no text or symbols)
natural_image
Mechanical assembly diagram showing a grid-like structure with mounting brackets and a central shaft (no text or symbols)MISE EN SERVICE
PLATS ALLANT AU FOUR ADAPTÉS
PLATS ALLANT AU FOUR NON ADAPTÉS
natural_image
Two glassware illustrations: a spoon inside and a cross symbol (no text or labels)natural_image
Line drawings of three different kitchen appliances with an inset showing internal components (no text or symbols)text_image
① a ② b ③natural_image
Pure technical line drawing of a mechanical component without any text, numbers, or symbolsLinker inschuifrail
natural_image
Pure mechanical linkage diagram without any text, numbers, or symbolsRechter inschuifrail
natural_image
Close-up of a mechanical component with a lever and bracket (no visible text or symbols)natural_image
Close-up of a white mechanical component mounted on a metal frame, no visible text or symbolsnatural_image
Close-up of a metal ladder with a hanging hook and arrow indicating force (no text or symbols)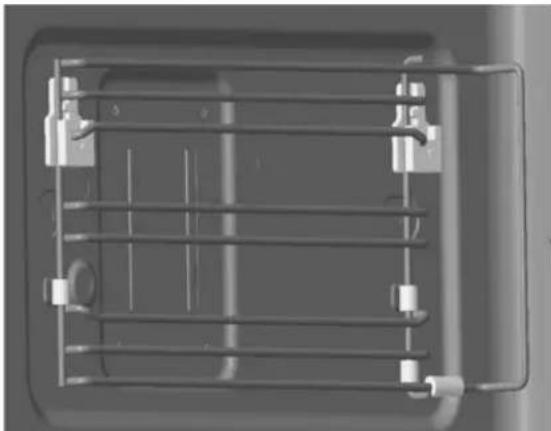
natural_image
3D rendering of a mechanical cage or enclosure with metal framework and mounting brackets (no text or symbols visible)INBEDRIJFSTELLING
ACRYLAMIDE IN LEVENSMIDDELEN
natural_image
Two glass bowls: one with a spoon and the other with a black X symbol (no text or labels)PN: 16170000A67345
INDICE
3 AVVERTENZE IMPORTANTI PER LA SICUREZZA
6 Cause dei danni
7 MONTAGGIO
9 UTILIZZO DELL'APPARECCHIO
text_image
12:30 250°C 18.88W kg + A B C D E F G H I J K L M N O P Q R S T U V W X Y Z A B C D E F G H I J K L M N O P Q R S T U V W X Y Z 1natural_image
Line drawings of three different kitchen appliances with one showing a close-up view of internal components (no text or symbols)text_image
① a ② b ③natural_image
Pure mechanical component diagram without any text, numbers, or symbolsnatural_image
Close-up of a mechanical component with a lever and bracket (no visible text or symbols)natural_image
Close-up of a white mechanical component with metal rods and a small square block, no visible text or symbolsnatural_image
Close-up of a metal cage with a hanging hook and arrow indicator (no text or symbols)natural_image
Top-down view of a mechanical or electrical enclosure with horizontal metal grating and mounting brackets (no text or symbols visible)MESSA IN FUNZIONE
natural_image
Two glassware illustrations: one with a spoon inside, the other with a black X symbol (no text or labels)PN: 16170000A67345
INNEHÅLLSFÖRTECKNING
3 VIKTIGA SÄKERHETSANVISNINGAR
6 Skadeorsaker
7 MONTERING
9 ANVÄNDA PRODUKTEN
9 Manöverelement
natural_image
Line drawings of three different kitchen cabinets with one showing a close-up view of the interior (no text or symbols present)text_image
① a ② b ③natural_image
Pure mechanical component diagram without any text, numbers, or symbolsVänster gejd
natural_image
Pure mechanical linkage diagram without any text, numbers, or symbolsHöger gejd
natural_image
Close-up of a metal panel with a pull switch and wiring (no visible text or symbols)natural_image
Close-up of a white mechanical component mounted on a metal frame, with no visible text or symbols.natural_image
Close-up of a metal ladder with a hanging hook and arrow indicating force (no text or symbols)④ Klart.
natural_image
Top-down view of a mechanical cage or rack structure with no visible text or symbolsDRIFTSÄTTNING
natural_image
Two glass items: a spoon inside and a cross symbol crossed out (no text or labels)PN: 16170000A67345
ÍNDICE
natural_image
Line drawings of three different kitchen appliances with one showing a close-up view of internal components (no text or symbols)text_image
① a ② b ③natural_image
Pure technical line drawing of a multi-layered mechanical or electrical component (no text or symbols)natural_image
Close-up of a mechanical component with a curved bracket and internal structure (no visible text or symbols)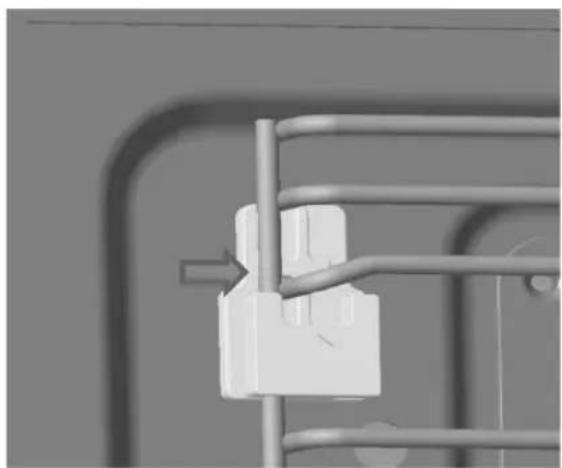
natural_image
Close-up of a white mechanical component mounted on a metal frame, with no visible text or symbols.natural_image
Close-up of a metal ladder with a hanging hook and arrow indicating force (no text or symbols)
natural_image
3D rendering of a metal rack with attached fixtures (no text or symbols visible)PUESTA EN MARCHA
natural_image
Two glassware illustrations: one with a spoon inside, the other with a black X symbol (no text or labels)PN: 16170000A67345
Service
text_image
BLAUPUNKT