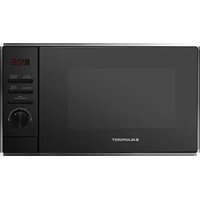
5M38O1630 - Microwave Oven BLAUPUNKT - Free user manual and instructions
Find the device manual for free 5M38O1630 BLAUPUNKT in PDF.

| Product type | Built-in microwave oven |
| Brand | Blaupunkt |
| Model | 5M38O1630 |
| Rated voltage | 230 V~ 50 Hz |
| Microwave input power | 1270 W |
| Microwave output power | 800 W |
| Grill power | 1000 W |
| Control type | Rotary knobs and electronic controls with digital display |
| Cooking functions | Microwave, Grill, Combination (C-1 and C-2) |
| Defrost | By weight (100-2000 g) and by time (up to 95 min) |
| Auto menus | 8 (Pizza, Meat, Vegetables, Pasta, Potatoes, Fish, Beverage, Popcorn) |
| Timer | Yes, up to 95 minutes |
| Quick cooking | 30 seconds at maximum power, in increments |
| Child lock | Yes, press and hold STOP/Clear |
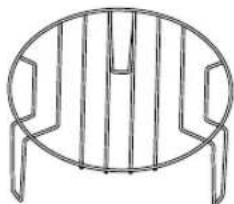
| Included accessories | Glass tray, drive ring, raised grill rack |
| Installation | Built into a 60 cm wide cabinet, minimum height 850 mm |
| Grounding | Required, plug with grounding |
| Maintenance | Regular cleaning, use a damp cloth and lemon for the walls |
| Allowed materials | Glass, microwave-safe plastic, paper, cardboard, cling film |
| Prohibited materials | Metal, aluminum, metal closures, wood, foam |
Frequently Asked Questions - 5M38O1630 BLAUPUNKT
User questions about 5M38O1630 BLAUPUNKT
0 question about this device. Answer the ones you know or ask your own.
Ask a new question about this device
Download the instructions for your Microwave Oven in PDF format for free! Find your manual 5M38O1630 - BLAUPUNKT and take your electronic device back in hand. On this page are published all the documents necessary for the use of your device. 5M38O1630 by BLAUPUNKT.
USER MANUAL 5M38O1630 BLAUPUNKT
natural_image
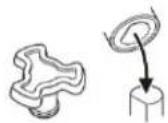
Simple line drawing of a circular tray with four small objects at the center (no text or symbols)Glasteller

Drehtellerring
Bedienungsanleitung
Drehtellerschaft
natural_image
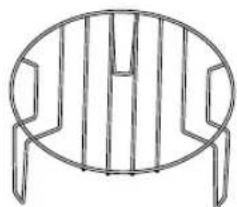
Simple line drawing of a circular table with vertical bars and three legs (no text or symbols)A) Bedienfeld
B) Drehtellerschaft
C) Mikrowellenfenster
D) Türelement
natural_image
Line drawing of a microwave oven with cooling unit and fan (no text or symbols)HINWEISE:
natural_image
Line drawing of a microwave oven with two screws attached (no text or symbols)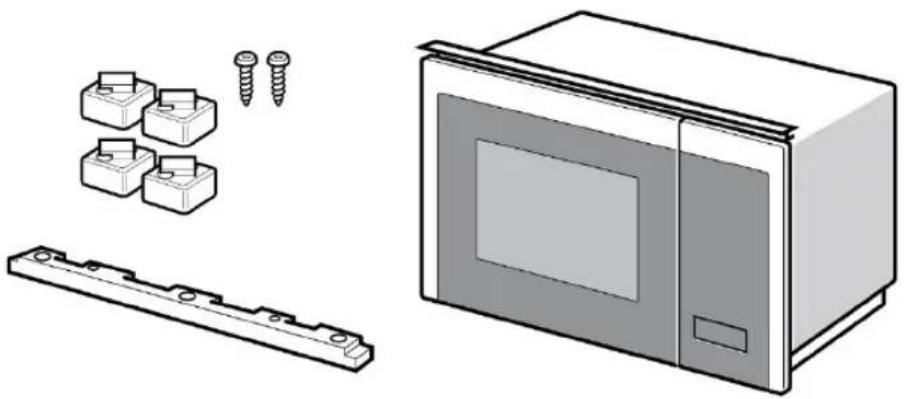
natural_image
Illustration of a microwave oven with screw fasteners and mounting bracket (no text or symbols)1

2
natural_image
Two technical illustrations of a cabinet with checkmark and cross symbols, no text or labels present
3 Additional information
3 Specifications
4 IMPORTANT SAFETY INSTRUCTIONS
6 Risk of electric shock
7 Cleaning
8 UTENSILS
8 Risk of injury
8 Utensil test
9 Materials that you can use in the microwave
10 Materials to avoid in the microwave
11 Designation of appliance parts and accessories
12 Installing the turntable
13 INSTALLATION AND CONNECTION
14 Install Instruction
18 Important information with plug
18 Important information without plug
19 FUNCTIONS
19 Clock Setting
19 Microwave Cooking
20 Grill or Combi. Cooking
20 Defrost By Weight
21 Defrost By Time
21 Multi-Stage Cooking
21 Kitchen Timer
22 Auto Menu
23 Speedy Cooking
23 Child lock
23 Inquiring Function
23 Specification
24 TROUBLESHOOTING
Read these instructions carefully before using your microwave and store them in a safe place.
By following the instructions you can look forward to many years of reliable operation of your appliance.
STORE THESE INSTRUCTIONS IN A SAFE PLACE.
PRECAUTIONS TO PREVENT EXPOSURE TO EXCESSIVE MICROWAVE RADIATION ENERGY
a) Never use this appliance with the door open, as you will be exposed to harmful microwave radiation. The safety interlock must not be tampered with or rendered inoperative.
b) Do not place any objects between the front of the appliance and the door and make sure that there is no dirt or cleaning residue on the sealing surfaces.
c) WARNING: If the door seals or the door are damaged, the appliance may not be used again until it has been repaired by a qualified person.
ADDITIONAL INFORMATION
If the appliance is not kept properly clean, its surface may be damaged. This can shorten the life of the appliance and create dangerous situations.
SPECIFICATIONS
| Model | 5M38O1630 |
| Rated voltage | 230 V~ 50 Hz |
| Microwave input power | 1270 W |
| Microwave output power | 800 W |
| Grill | 1000 W |
IMPORTANT SAFETY INFORMATION
WARNING!
Always follow these basic precautions to reduce the risk of fire, electric shock, personal injury or exposure to excessive microwave radiation energy when using your appliance:
- Read and follow these instructions: PRECAUTIONS TO AVOID EXPOSURE TO EXCESSIVE MICROWAVE RADIATION ENERGY
- This appliance can be used by children 8 years of age or older and persons with restricted physical, sensory or intellectual capabilities or a lack of experience and knowledge, if they are supervised by a responsible person or if they have received instructions on how to use the appliance safely, and understand the associated hazards. Children may not play with the appliance. Children may only clean and maintain this appliance under supervision.
- Ensure that the appliance and its power cable are out of reach of children under 8 years of age.
- If the power cable is damaged, it must be replaced by the manufacturer, the manufacturer's customer service department or a similarly qualified technician to avoid hazards.
- WARNING: Ensure that the appliance is switched off before replacing the bulb to avoid the risk of electric shock.
- WARNING: Maintenance or repair work, for which the cover for protection against microwave energy must be removed, may only be carried out by qualified persons.
- WARNING: Liquids and food products must never be heated in closed containers as there is a risk that the containers may explode.
- Do not leave the appliance unattended when heating food in plastic or cardboard containers, as there is a risk of fire.
- Only use accessories microwave-safe.
- Switch off the appliance in case smoke is generated or pull out the power plug from the socket. Keep the door of the appliance closed to extinguish any flames that may occur.
- Heating drinks in the microwave can cause delayed boiling. Be careful when removing the container.
- If you are warming up baby bottles or baby jars, stir or shake them after heating and check the temperature to avoid burning your baby.
- Eggs in shells and hard boiled eggs should never be heated in the appliance, as they may explode even after the heating process in the appliance is complete.
- Information on cleaning door seals, cooking chambers and adjacent parts.
- The appliance should be cleaned regularly and food residue should be removed.
-
Failure to maintain the appliance in a clean condition may result in wear of the appliance surfaces, which may reduce the service life of the appliance and lead to dangerous situations.
-
This appliance is designed for household use and similar applications, such as:
-
staff kitchens in shops, offices and other work environments;
- by customers in hotels, motels and other similar residential environments;
- farmhouses;
-
bed and breakfasts.
-
This microwave is designed to heat food and drinks. Drying food or clothing and heating heat pads, slippers, sponges, damp cloths or similar items can cause injury and fire.
-
Metal containers for food and beverages must not be heated in the appliance.
-
Do not use a steam cleaner to clean the appliance.
-
To prevent overheating, the appliance must not be installed behind a decorative door. (However, this does not apply to appliances with decorative doors).
-
This microwave is a built-in appliance.
-
The appliance must be operated with the cabinet door open.
-
Make sure that the turntable is not pushed out of the appliance when removing containers. (For fixed and built-in appliances used more than 900 mm above the floor that have a removable turntable. However this does not apply to appliances with a horizontal, bottom-hinged door).
-
The surface of the built-in cabinet in which the microwave is located can become very hot.
-
Do not use sharp, abrasive cleaning agents or sharp metal scrapers to clean the glass in the oven door, as these can scratch the surface, which can cause the glass to shatter.
-
WARNING: The appliance and its accessible parts become hot during use. Do not touch the heating elements. Children under 8 years of age must be monitored constantly or kept away from the appliance.
-
The appliance becomes hot during use and remains hot after use. Do not touch the heating elements inside the oven.
-
WARNING: Accessible parts of the appliance become hot during use and remain hot after use. Small children should be kept away from the appliance.
-
WARNING: When the combination mode is used, children should only use the appliance under the supervision of an adult due to the high temperatures involved.
READ THE FOLLOWING INFORMATION CAREFULLY AND STORE IT FOR FUTURE REFERENCE
TO AVOID A RISK OF INJURY, THE APPLIANCE MUST BE EARTHED.
RISK OF ELECTRIC SHOCK
DANGER
Touching some internal components may result in serious injury or death. Never dismantle this appliance.
WARNING
- Improper use of the earthing may result in electric shock.
- Do not insert the plug into a power outlet until the equipment is properly installed and earthed.
- This appliance must be earthed. In the event of an electrical short circuit, earthing reduces the risk of electric shock by providing a means of draining the electrical current.
- This appliance is equipped with an earthing plug. The plug must be plugged into a properly installed and earthed outlet.
- Consult a qualified electrician or service technician if you do not fully understand the earthing instructions, or if you are in doubt as to whether the equipment is properly earthed.
Before cleaning, disconnect the appliance from the power supply.
- After use, clean the cooking chamber with a damp cloth.
- Clean the accessories with soapy water.
- When soiled, the door frame and seal as well as adjacent parts must be carefully cleaned with a damp cloth.
- Do not use sharp, abrasive cleaning agents or sharp metal scrapers to clean the glass in the oven door, as these can scratch the surface, which can cause the glass to shatter.
- Cleaning tip – To make it easier to clean the walls of the cooking chamber that may come into contact with food: Place half a lemon in a bowl, add 300 ml of water and heat it for 10 minutes at full power. Wipe the oven clean with a soft, dry cloth.
UTENSILS
CAUTION
RISK OF INJURY
Maintenance or repair work, for which the cover for protection against microwave energy must be removed, may only be carried out by qualified persons.
See the instructions under “Materials that you can use in the microwave or which you should avoid in the microwave”. Certain non-metallic utensils are not suitable for use in the microwave. In case of doubt, you can test the relevant utensil as follows.
UTENSIL TEST
- Fill a microwave-safe container with 1 cup of cold water (250 ml) and the relevant utensil.
- Heat at maximum power for 1 minute.
- Carefully touch the utensil. If the empty utensil is warm, do not use it for cooking in the microwave.
- Do not exceed a cooking time of 1 minute.
MATERIALS THAT YOU CAN USE IN THE MICROWAVE
| Utensils | Comments |
| Cooking container | The base of the cooking container must be at least 5 mm (3/16 inches) above the turntable. Incorrect use can damage the turntable. |
| Crockery | Only if it is microwave-safe. Follow the manufacturer's instructions. Do not use crockery with cracks or chips. |
| Glass containers | Always remove the lid. Only use to heat food until they just start to warm.Most glass containers are not heat-resistant and may break. |
| Glasses | Only use heat-resistant glasses for the oven. Make sure that no metal fittings are present. Do not use crockery with cracks or chips. |
| Cooking bag for the oven | Follow the manufacturer's instructions. Do not seal with metal ribbons. Create slits to allow the steam to escape. |
| Paper plates and cups | Only use for brief cooking/warming. The appliance must not be left unattended during the cooking process. |
| Paper towels | To cover meals while heating and to absorb grease.Only use under supervision for brief cooking. |
| Baking paper | Use as a cover to prevent spatter or for steaming. |
| Plastic | Only if it is microwave-safe. Follow the manufacturer's instructions. Should be labelled “microwave-safe”. Some plastic containers become soft when the food in them gets hot. “Cooking bags” and tightly closed plastic bags should be slit open, perforated or ventilated as per the instructions on the packaging. |
| Cling film | Only if it is microwave-safe. To cover food during cooking in order to retain moisture. Make sure that the cling film does not come into contact with the food. |
| Thermometer | Only if microwave-safe (meat and sugar thermometer). |
| Wax paper | Use as a cover to prevent spatter and store moisture. |
MATERIALS TO AVOID IN THE MICROWAVE
| Utensils | Comments |
| Aluminium bowls | Can lead to arcing.Place food in a microwave-safe bowl. |
| Food carton with metal handle | Can lead to arcing.Place food in a microwave-safe bowl. |
| Utensils made of metal or with metal fittings | Metal shields the food from the microwave radiation energy.Metal fittings can lead to arcing. |
| Metal fasteners | Can lead to arcing and fire in the oven. |
| Paper bags | Can lead to fire in the oven. |
| Foam material | Foam material can melt or contaminate the liquid on the inside when exposed to high temperatures. |
| Wood | Wood dries out when used in a microwave and can crack or tear. |
DESIGNATION OF APPLIANCE PARTS AND ACCESSORIES
(In case of any differences between the appliance and the pictures in this manual, the product is authoritative).
Remove the oven and all materials from the carton and oven cavity. Your oven comes with the following accessories:

natural_image
Simple line drawing of a circular object with four small protrusions at the center (no text or symbols)Glass Tray
Turntable Ring Assembly
Instruction Manual
Turntable Shaft
natural_image
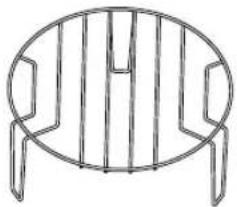
Simple line drawing of a circular table with chairs and legs (no text or symbols)Higher Wire Rack (Can't be set in microwave function)
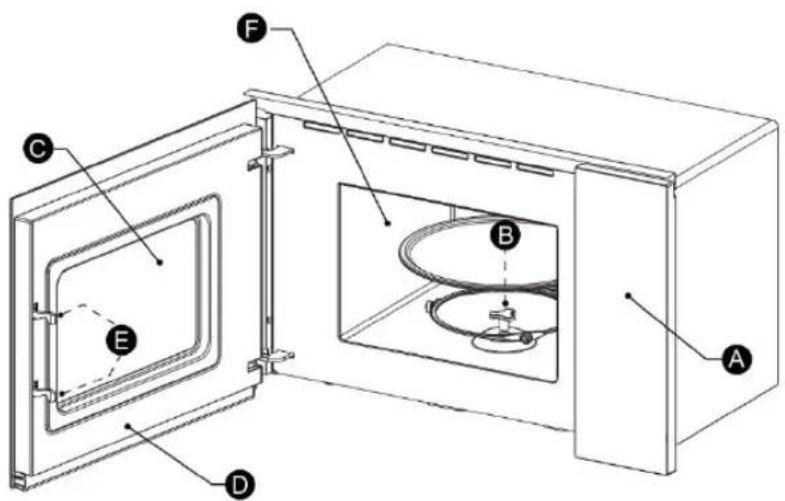
A) Control panel
B) Turntable shaft
C) Observation window
Clean the cooking chamber and insert the turntable. For new installations, make sure that all packaging and transport ties have been removed from the turntable support. Before you use the appliance for the first time to prepare food, you must correctly insert the turntable. You need to clean the cooking chamber and the accessories.
Insert the turntable as follows:
-
Place the turntable ring unit ③ in the recess in the cooking chamber.
-
Place the glass tray ① on the turntable ring unit ③. Attach the raised, curved lines in the centre of the base of the glass tray between the three spokes of the support. Make sure that the glass tray ① latches in the turntable support ② in the centre of the cooking chamber base. The rollers on the support should fit into the bottom edge of the turntable.
natural_image
Line drawing of a microwave oven with cooling unit and fan (no text or symbols)NOTES:
- Never use the appliance without the turntable. Make sure that it has correctly latched into place. The turntable can rotate clockwise and counterclockwise.
- Never place the glass tray upside down. The glass tray should never be restricted.
- The glass tray as well as the turntable ring unit must always be used when cooking.
- Some foods and food containers are always placed on the glass tray for cooking.
- Never restrict the movement of the turntable.
- If the glass tray or turntable ring unit is cracked or breaks, contact your nearest authorised Service Centre.
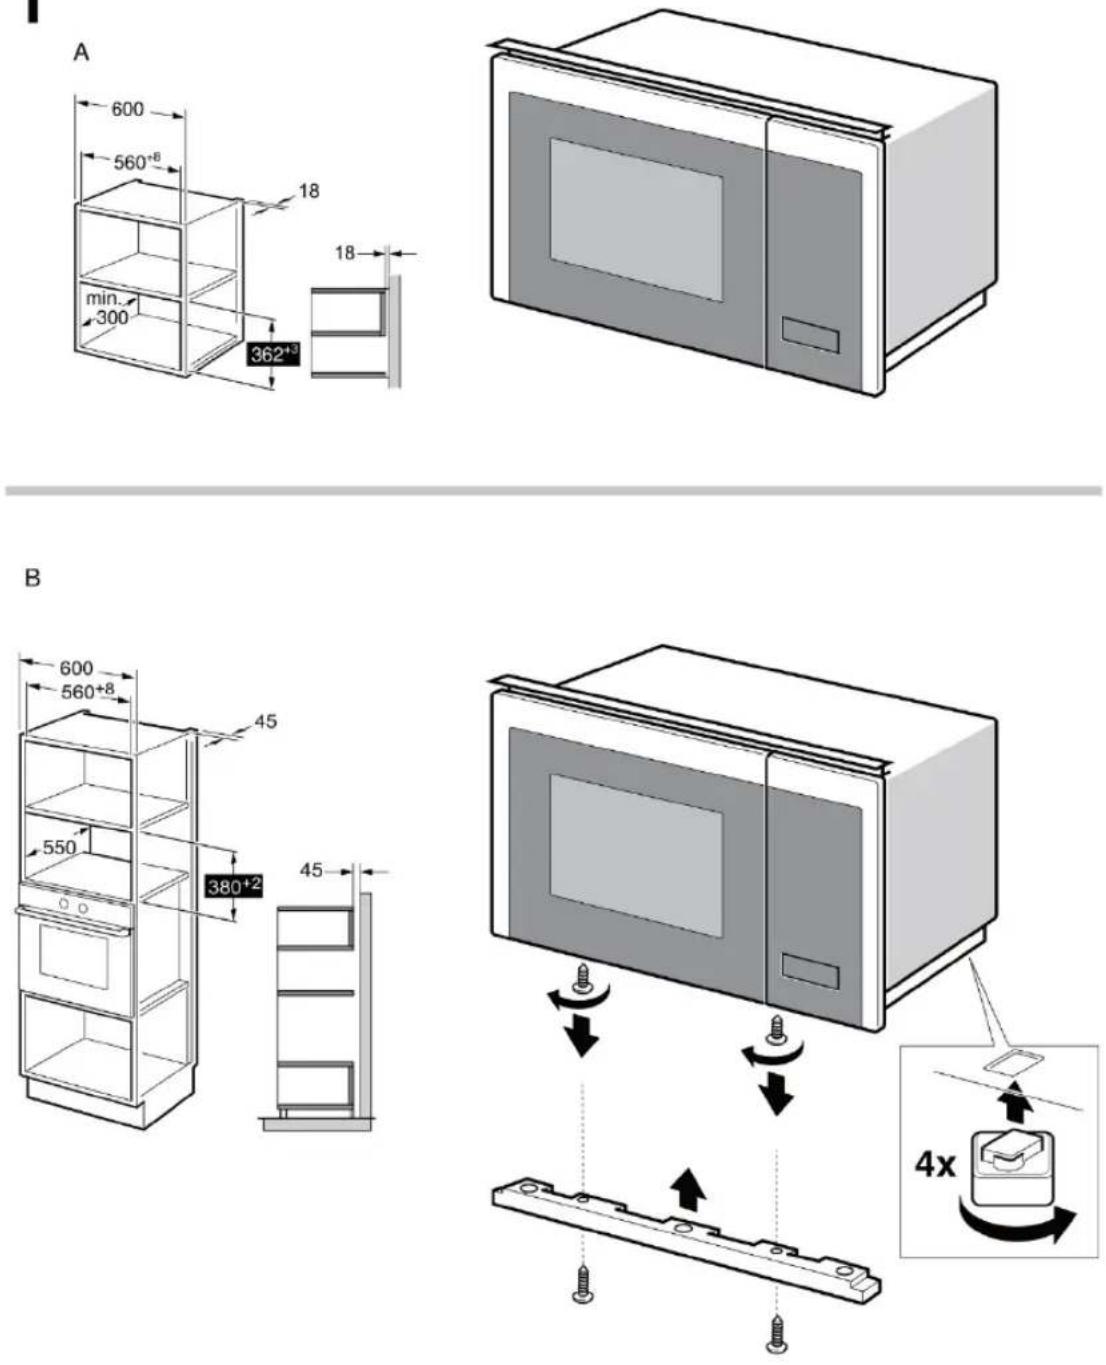
INSTALLATION AND CONNECTION
- This appliance is only intended for domestic use.
- This oven is only intended for use as a built-in oven. It is not intended for use on a counter or in a cabinet.
- Please note the specific installation instructions.
- The appliance can be installed in a tall cabinet 60 cm wide.
- This appliance is equipped with a plug and may only be connected to a properly installed earthed socket.
- The power supply must match the voltage indicated on the type plate.
- Only an authorised electrician is permitted to install the power socket and replace the connection cable. If the plug is no longer accessible after installation, a pole separator with a contact gap of at least 3 mm must be provided at the installation site.
- Adapters, socket strips and extension cables must not be used. Overloading can lead to risk of fire.

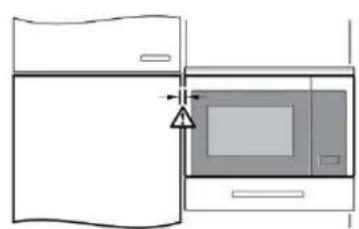
natural_image
Warning symbol of a triangle with steam and smoke (no text)ACCESSIBLE PARTS MAY BECOME HOT DURING OPERATION AND REMAIN HOT AFTERWARDS.
The following must be noted:
Electrical connection
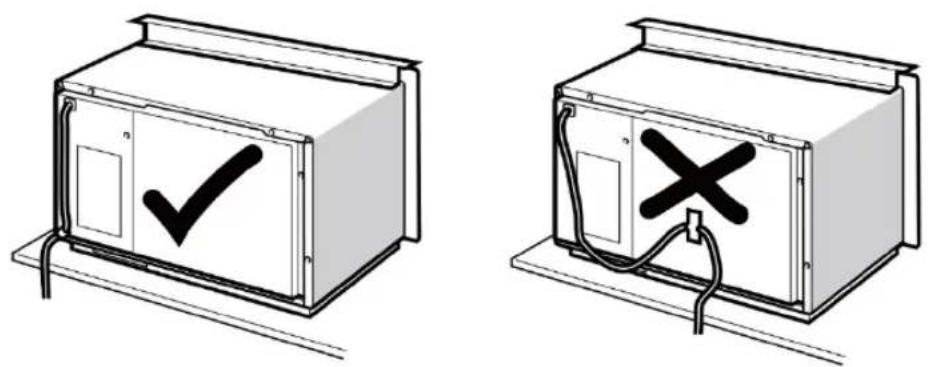
The appliance is fitted with a plug and must only be connected to a properly installed earthed socket. Only a qualified electrician who takes the appropriate regulations into account may install the socket or replace the connecting cable. If the plug is no longer accessible following installation, an all-pole isolating switch must be present on the installation side with a contact gap of at least 3 mm. Contact protection must be ensured by the installation.
Fitted units
The installation cupboard must not have a back panel behind the appliance. Minimum installation height: 850 mm.
Ventilation slots and intakes must not be covered.
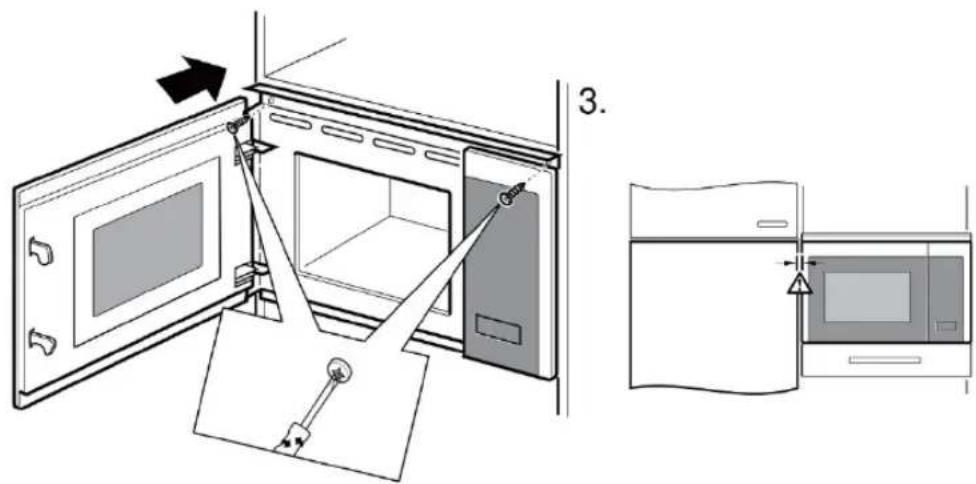
Appliance in a wall-hanging unit - Fig. 1A
Appliance in a tall unit - Fig.1B
Installing the oven - Fig. 2
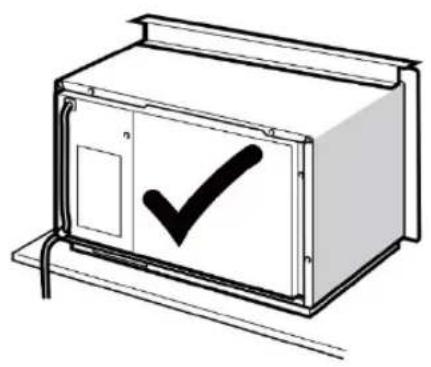
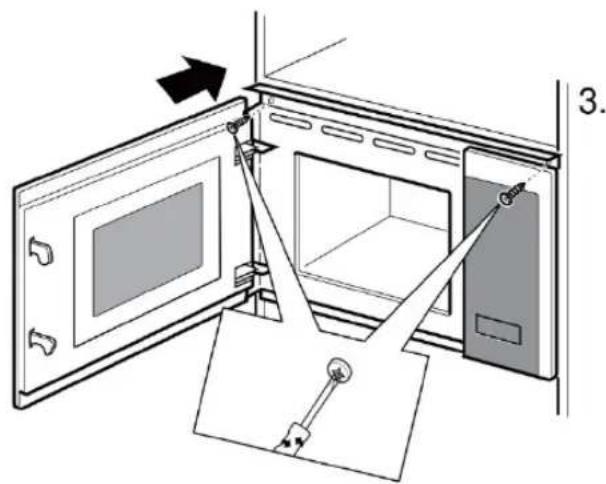
Note: Do not trap or kink the mains lead.

natural_image
Illustration of a microwave oven with two screws attached (no text or symbols)
natural_image
Illustration of a microwave oven with screw bolts and two small components, alongside a metal bracket (no text or symbols)1

Electrical connection
- This appliance is equipped with a plug and may only be connected to a properly installed earthed socket.
- Only a qualified electrician who observes the relevant regulations may install the power plug or replace the connection cable. If the plug is no longer accessible after installation, an all-pole disconnector with a contact gap of at least 3 mm must be provided on the installation side.
- Contact protection must be ensured by the installation.
- Fuse protection: see the operating instructions for the technical data.
IMPORTANT INFORMATION WITH PLUG
- The appliance is designed for permanent installation with a three-pole mains cable and may only be connected by an authorised specialist in accordance with the wiring diagram.
- Only a qualified electrician who observes the relevant regulations may replace the connection cable.
- Do not use multiple plugs, socket strips or extensions. There is a risk of fire in the event of overload.
- If the plug is no longer accessible after installation, an all-pole disconnector with a contact gap of at least 3 mm must be provided.
Connect the wires of the power cable as per the following colour coding:
Green and yellow Earthing < (E)
Blue Neutral conductor (N)
Brown Live conductor (L)
Great Britain:
Do not connect the appliance to a 13 A plug and do not protect it with a 13 A fuse. The appliance must be protected with a 16 A fuse or higher. The appliance must be disconnected from the power supply during all installation work. Protection against accidental contact must be in place when installing the appliance.
This microwave oven uses modern electronic control to adjust cooking parameters to meet your needs better for cooking.
1. Clock Setting
When the microwave oven is electrified, the oven will display "0:00", buzzer will ring once. The oven will enter to waiting state.
(1) Press "Kitchen Timer/Clock" twice, the hour figures will flash.
(2) Turn „”, to adjust the hour figures, the input time should be within 0--23.
(3) Press "Kitchen Timer/Clock" to confirm, the minute figures will flash.
(4) Turn " 🔍" to adjust the minute figures, the input time should be within 0--59.
(5) Press "Kitchen Timer/Clock" to finish clock setting.
„:“ will flash. The current time will display.
Note: If the clock is not set, it would not function when powered.
2. Microwave Cooking
(1) Press the "Microwave" key once, and "P100" will display.
(2) Press "Microwave" repeatedly or turn " 🔍 " to select the microwave power. "P100", "P80", "P50", "P30", "P10" will display in order.
(3) Press "Start/+30Sec./Confirm" to confirm setting.
(4) Turn " 🔍" to adjust the cooking time. (The maximum cooking time is 95 minutes)
(5) Press "Start/+30Sec./Confirm" to start cooking.
Note: The step quantities for the adjustment time of the coding switch are as follow:
0-1 min.: 5 seconds
1-5 min.: 10 seconds
5- 10 min. : 30 seconds
10-30 min.: 1 minute
30- 95 min. : 5 minutes
Microwave Power Chart
| Microwave Power | High | Med.High | Med. | Med.Low | Low |
| Display | P100 | P80 | P50 | P30 | P10 |
3. Grill or Combi. Cooking
(1) Press "Grill/Combi." once, the screen will display "G", and press "Grill/Combi." repeatedly
or turn " 🔍" to choose the power you want, and "G", "C-1" or "C-2" will display. Press "Start/+30Sec./Confirm" to confirm the power.
(2) Turn " 🔍" to set cooking time. (The maximum cooking time is 95 minutes)
(3) Press "Start/+30Sec./Confirm" again to start cooking.
Example:
If you want to use 55% microwave power and 45% grill power(C-1) to cook for 10 minutes, you can operate the oven as the following steps.
(1) Press "Grill/Combi." once, the screen displays „G“.
(2) Continue to press "Grill/Combi." until the screen displays.
(3) Press "Start/+30Sec./Confirm" to confirm.
(4) Turn " 🔍" to adjust the cooking time until the oven displays "10:00".
(5) Press "Start/+30Sec./Confirm" to start cooking.
Combination Power instructions:
| Program | Display | Microwave Power | Grill Power |
| Grill | G | 0 % | 100 % |
| Combi.1 | C-1 | 55 % | 45 % |
| Combi.2 | C-2 | 36 % | 64 % |
Note: If half the grill time passes, the oven sounds twice, and this is normal. In order to have a better effect of grilling food, you should turn the food over, close the door, and then press "Start/+30Sec./Confirm" to continue cooking. If no operation, the oven will continue working.
4. Defrost By Weight
(1) Press "Weight Defrost" once, the screen will display „dEF1“.
(2) Turn " 🔍" to select the food weight. The range of weight is 100 - 2000g.
(3) Press "Start/+30Sec./Confirm" key to start defrosting.
Note: If half the defrost time passes, the oven sounds twice, and this is normal. In order to have a better effect of defrosting, you should turn the food over, close the door, and then press "Start/+30Sec./Confirm" to continue cooking. If no operation, the oven will continue working.
5. Defrost By Time
(1) Press "Time Defrost" once, the screen will display „dEF2“.
(2) Turn " 🔍" to select the cooking time. The maximum time is 95 minutes.
(3) Press „Start/+30Sec./Confirm“ key to start defrosting.
Note: If half the defrost time passes, the oven sounds twice, and this is normal. In order to have a better effect of defrosting, you should turn the food over, close the door, and then press" Start/+30Sec./Confirm " to continue cooking. If no operation, the oven will continue working.
6. Multi-Stage Cooking
2 stages can be maximally set. If one stages is defrosting, it should be put in the first stage automatically. The buzzer will ring once after each stage and the next stage will begin.
Note: Auto menu and speedy cooking cannot be set as one of the multi-stage.
Example:
If you want to defrost the food for 5 minutes, then to cook with 80% microwave power for 7 minutes.
The steps are as following:
(1) Press "Time Defrost" once, the screen will display „dEF2“.
(2) Turn " 🔍" to adjust the defrost time of 5 minutes.
(3) Press "Microwave" once, the screen will display „P100“.
(4) Press "Microwave" repeatedly to choose microwave power till "P80" displays.
(5) Press "Start/+30Sec./Confirm" to confirm.
(6) Turn " 🔍" to adjust the cooking time of 7 minutes.
(7) Press "Start/+30Sec./Confirm" to start cooking.
7. Kitchen Timer
1) Press "Kitchen Timer/Clock" once, the screen will display „00:00“.
2) Turn " 🔍" to enter the correct timer. (The maximum cooking time is 95 minutes)
3) Press "Start/+30Sec./Confirm" to confirm setting.
4) When the kitchen time is reached, the buzzer will ring 5 times.
If the clock has been set (24-hour system), the screen will display the current time.
Note: The kitchen Time is different from 24-hour system. Kitchen Timer is a timer.
8. Auto Menu
1) In waiting state, turn " 🔍" right to choose the menu.
2) Press "Start/+30Sec./Confirm" to confirm the menu you choose.
3) Turn " 🔥" to choose the the weight of food.
4) Press "Start/+30Sec./Confirm" to start cooking.
The menu chart:
| Menu | Weight | Display | Power |
| A1 Pizza | 200 g | 200 g | 100%(Mic.) |
| 400 g | 400 g | ||
| A2 Meat | 250 g | 250 g | 100%(Mic.) |
| 350 g | 350 g | ||
| 450 g | 450 g | ||
| A3 Vegetable | 200 g | 200 g | 100%(Mic.) |
| 300g | 300 g | ||
| 400 g | 400 g | ||
| A4 Pasta | 50g (with 450g cold water) | 50 g | 80%(Mic.) |
| 100g (with 800g cold water) | 100 g | ||
| A5 Potato | 200 g | 200 g | 100%(Mic.) |
| 400 g | 400 g | ||
| 600 g | 600 g | ||
| A6 Fish | 250 g | 250 g | 80%(Mic.) |
| 350 g | 350 g | ||
| 450 g | 450 g | ||
| A7 Beverage | 1cup (about 120ml) | 1 | 100%(Mic.) |
| 2cups (about 240ml) | 2 | ||
| 3cups (about 360ml) | 3 | ||
| A8 Popcorn | 50 g | 50 g | 100%(Mic.) |
| 100 g | 100 g |
9. Speedy Cooking
1) In waiting state, press "Start/+30Sec./Confirm" key to cook with 100% power level for 30 seconds. Each press on the same key can increase 30 seconds. The maximum cooking time is 95 minutes.
2) During the microwave, grill, combination cooking and the defrost by time process, press "Start/+30Sec./Confirm" to increase the cooking time.
3) Under the states of auto menu and defrost by weight, cooking time cannot be increased by pressing "Start/+30Sec./Confirm".
4) In waiting state, turn " 🔊" left to choose the cooking time. After adjusting the cooking time, press "Start/+30Sec./Confirm" to start microwave cooking with 100% power lever.
10. Lock Function for Children
Lock:
In waiting state, press "STOP/Clear" for 3 seconds to enter the children-lock state and the current time will display if the time has been set, otherwise, the screen will display " [::]
Lock quitting:
In locked state, press "STOP/Clear" for 3 seconds, the lock is released.
11. Inquiring Function
1) In cooking states of microwave or grill and combination.
Press "Microwave" or "Grill/Combi.", the current power will be displayed for 3 seconds.
2) If the clock has been set, during cooking state, press "Kitchen Timer/Clock" to check the current time. It will be displayed for 3 seconds.
12. Specification
1) If the door is opened in the process of cooking, close the door and then press "Start/+30Sec./Confirm" to continue cooking.
2) Once the cooking programme has been set, "Start/+30Sec./Confirm" is not pressed in 1 minutes. The current time will be displayed. The setting will be cancelled.
3) The buzzer sounds once by efficient press, inefficient press will be no response.
TROUBLESHOOTING
| NORMAL | |
| The microwave interferes with the TV reception. | Interference with the radio and TV reception is possible when operating a microwave. This is similar to the interference caused by small electrical appliances such as mixers, vacuum cleaners and electric fans. This is normal. |
| Weak oven light | When cooking in the microwave at low power, the oven light can become weaker. This is normal. |
| Steam collects at the door, hot air escapes from the ventilation slots | Steam can rise from food during cooking. It usually escapes from the ventilation slots. It occasionally also collects at a cool place, like the oven door. This is normal. |
| The oven was accidentally started without food. | Operating the appliance without food is prohibited. This is very dangerous. |
| PROBLEM | POSSIBLE CAUSE | REMEDY |
| Oven cannot be started. | (1) The power cable is not inserted correctly. | Pull out the plug. Plug it in again after 10 seconds. |
| (2) The fuse is blown or the circuit breaker tripped. | Replace the fuse or reset the circuit breaker (have it repaired by the specialists at our company). | |
| (3) Problem with the power socket. | Test the outlet with other electrical devices. | |
| The oven is not heating. | (4) The door is not closed correctly. | Close the door firmly. |
The symbol of the crossed-out wheeled bin on the product or its packaging means that the appliance is not suitable for disposal in household waste and that it requires separate disposal. You can deposit the old appliance at a suitable municipal collection point for waste electrical and electronic equipment free of charge, e.g. a recycling centre. The addresses can be provided by your city or local council.
Alternatively, you can return small waste electrical appliances with an edge length of up to 25 cm to retailers with a sales area for electrical and electronic appliances of at least 400 m2 or food retailers with a total sales area of at least 800 m2, which offer electrical and electronic appliances at least multiple times a year, free of charge. Larger old appliances can be returned to the retailer from which you purchase a new appliance of the same type, which predominantly performs the same function as the new appliance, free of charge. For the requirements for returning an old appliance in the event of the delivery of a new appliance, please contact your retailer.
Where possible, please remove all (rechargeable) batteries as well as all lamps that can be removed non-destructively, before disposing of the product.
Please note that you are independently responsible for deleting personal data on the appliance to be discarded.
TABLE DES MATIÈRES
3 MESURES DE PRÉCAUTION
natural_image
Simple line drawing of a circular object with five small protrusions at the center (no text or symbols)Plateau en verre
natural_image
Simple line drawing of an oval table with chairs and legs (no text or symbols)natural_image
Line drawing of a microwave oven with cooling unit and fan (no text or symbols)REMARQUES :
LES PIÈCES ACCESSIBLES PEUVENT DEVENIR CHAUDES PENDANT LE FONCTIONNEMENT.
INSTRUCTIONS D'INSTALLATION
natural_image
Illustration of a microwave oven with screw bolts and two small components, alongside a metal bracket (no text or symbols)2

natural_image
Simple line drawing of a cabinet with a checkmark on the door (no text or symbols)
natural_image
Diagram of a device with a black X-shaped symbol on the front panel, connected to wires and a base (no text or labels)


natural_image
Diagram of a microwave oven with a door and control panel, showing no text or symbolsINFORMATIONS IMPORTANTES AVEC LA PRISE
24 PROBLEEMOPLOSSING
natural_image
Simple line drawing of a circular tray with four small objects on its surface (no text or symbols)Glazen schaal
Draaiplateau-assemblage
Gebruiksaanwijzing
Draaiplateauschacht
natural_image
Simple line drawing of an oval table with chairs and legs (no text or symbols)A) Bedieningspaneel
B) Draaiplateauschacht
C) Kijkvenster
D) Deurassemblage
natural_image
Line drawing of a microwave oven with cooling unit and fan (no text or symbols)AANWIJZINGEN:
natural_image
Line drawing of a microwave oven with two screws attached (no text or symbols)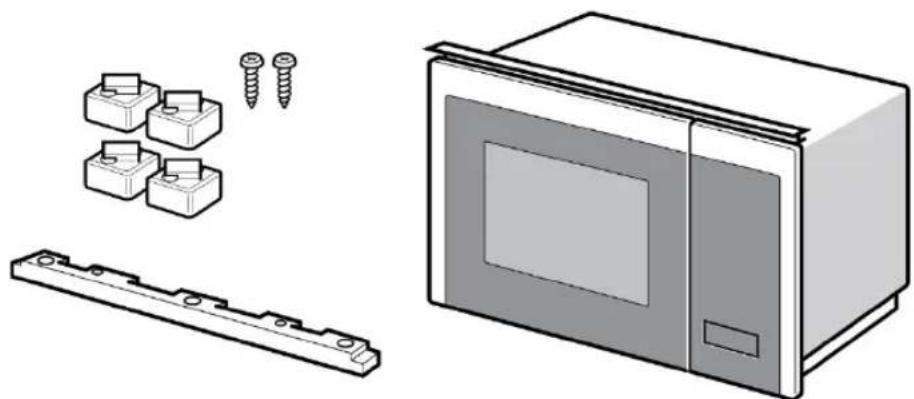
natural_image
Illustration of a microwave oven with screw bolts and two small components, alongside a metal bracket (no text or symbols)1

2
natural_image
Simple line drawing of a cabinet with a checkmark on the door (no text or symbols)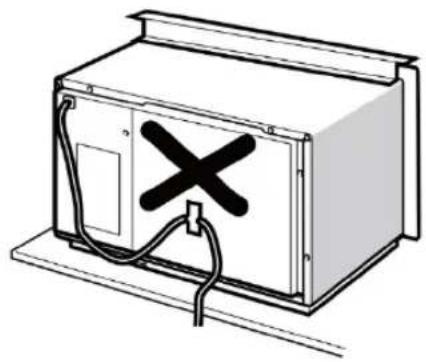
natural_image
Diagram of a cabinet with a double X mark on the door, connected to wires and a base (no text or symbols)


natural_image
Diagram of a microwave oven with a door and control panel, no text or symbols presentnatural_image
Simple line drawing of a circular tray with four small objects on each side (no text or symbols)Vassoio di vetro
natural_image
Simple line drawing of a circular table with vertical bars and two legs (no text or symbols)natural_image
Line drawing of a microwave oven with cooling unit and fan (no text or symbols)NOTA:
LE PARTI ACCESSIBILI POSSONO SURRISCALDARSI DURANTE E DOPO IL FUNZIONAMENTO.
natural_image
Line drawing of a microwave oven with two screws attached (no text or symbols)
natural_image
Illustration of a microwave oven with screw bolts and two small components, alongside a metal bracket (no text or symbols)1
2

natural_image
Simple line drawing of a cabinet with a checkmark on the door (no text or symbols)
natural_image
Diagram of a device with a black X-shaped symbol on the front panel, connected to wires and a base (no text or labels)


natural_image
Diagram of a microwave oven with a door and control panel, no text or symbols presentINFORMAZIONI IMPORTANTI CON SPINA
Attacco elettrico
natural_image
Simple line drawing of a circular object with four small dots at the center (no text or symbols)Glasfad
natural_image
Simple line drawing of a circular table with legs and chairs (no text or symbols)A) Kontrolpanel
B) Aksel til drejeskive
C) Observationsvindue
natural_image
Line drawing of a microwave oven with a circular vent and tray (no text or symbols)ANVISNINGER:
DE TILGÆNGELIGE DELE KAN BLIVE VARME UNDER OG EFTER BRUG.
Bemærk følgende:
Elektrisk tilslutning
natural_image
Line drawing of a microwave oven with two screws attached (no text or symbols)
natural_image
Illustration of a microwave oven with screw bolts and two small components, alongside a metal bracket (no text or symbols)1

2

natural_image
Two technical illustrations of a cabinet with checkmark and cross symbols, no text or labels present.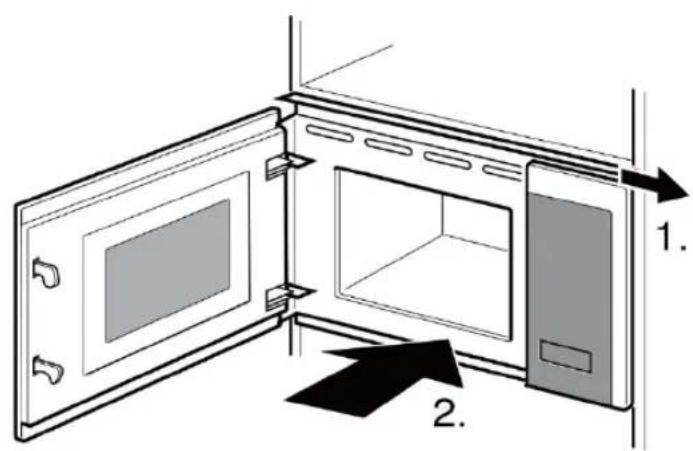

Elektrisk tilslutning
natural_image
Simple line drawing of a circular object with four small protrusions at the center (no text or symbols)Bandeja de vidrio
natural_image
Simple line drawing of a circular metal grate with three legs (no text or symbols)A) Panel de control
natural_image
Line drawing of a microwave oven with a circular vent and tray (no text or symbols)NOTAS:
natural_image
Warning symbol of a triangle with steam rising (no text or numbers)LAS PARTES ACCESIBLES PUEDEN CALENTARSE DURANTE Y DESPUÉS DEL FUNCIONAMIENTO.
natural_image
Illustration of a microwave oven with two screws attached (no text or symbols)
natural_image
Illustration of a microwave oven with screw bolts and two small components, alongside a metal bracket (no text or symbols)1

2

natural_image
Simple line drawing of a cabinet with a checkmark on the door (no text or symbols)
natural_image
Diagram of a device with a black X-shaped symbol on the front panel, connected to wires and a base (no text or labels)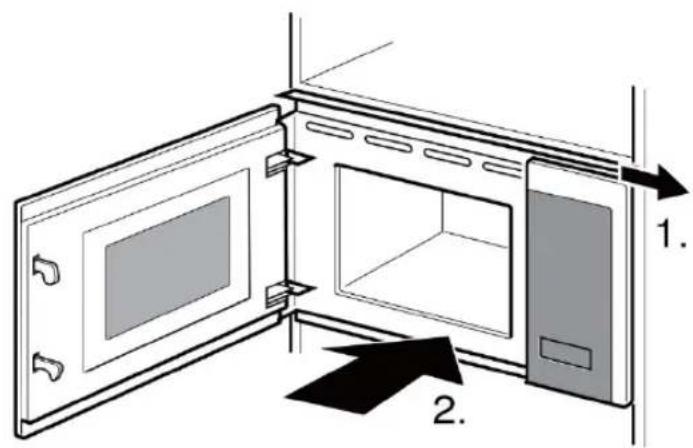
natural_image
Diagram of a microwave oven with a door and control panel, showing no text or symbols