
PUD 30 A1 - Drilling template PARKSIDE - Free user manual and instructions
Find the device manual for free PUD 30 A1 PARKSIDE in PDF.

| Product type | Universal drilling jig |
| Brand | Parkside |
| Model | PUD 30 A1 |
| Intended use | For making dowel joints (angled, T-shaped, face surfaces) for wooden pieces from 12 to 30 mm thick |
| Drilling diameters | 6 mm, 8 mm and 10 mm (drilling sleeves included) |
| Included items | Universal drilling jig, adjustable stop, locking screw, instruction manual |
| Safety | Check before use, do not allow children to use without supervision, unplug before assembly, clamp workpiece tightly |
| Maintenance and cleaning | Soft dry brush for sawdust, dry cloth; do not use abrasive products |
| Storage | Clean and dry place, away from sunlight |
| Disposal | Via an approved company or municipal service; follow regulations |
| Customer service France | Tel. 0800 919270, Email: kompernass@lidl.fr |
| Customer service Belgium | Contact the service mentioned in the manual |
| Number of pages in the manual | 124 pages (PDF) |
Frequently Asked Questions - PUD 30 A1 PARKSIDE
User questions about PUD 30 A1 PARKSIDE
0 question about this device. Answer the ones you know or ask your own.
Ask a new question about this device
Download the instructions for your Drilling template in PDF format for free! Find your manual PUD 30 A1 - PARKSIDE and take your electronic device back in hand. On this page are published all the documents necessary for the use of your device. PUD 30 A1 by PARKSIDE.
USER MANUAL PUD 30 A1 PARKSIDE
Operating instructions
FR BE
GABARIT DE PERÇAGE UNIVERSEL
Mode d'emploi
CZ
UNIVERZÁLNÍ POMŮCKA PRO HMOŽDINKY
Návod k obsluze
SK
UNIVERZÁLNA POMÓCKA NA KOLÍKY
Návod na obsluhu
DK
UNIVERSEL DYVELHJÄLP
GB/IE Operating instructions Page 1
natural_image
Diagram of a mechanical device with labeled parts (no readable text or symbols)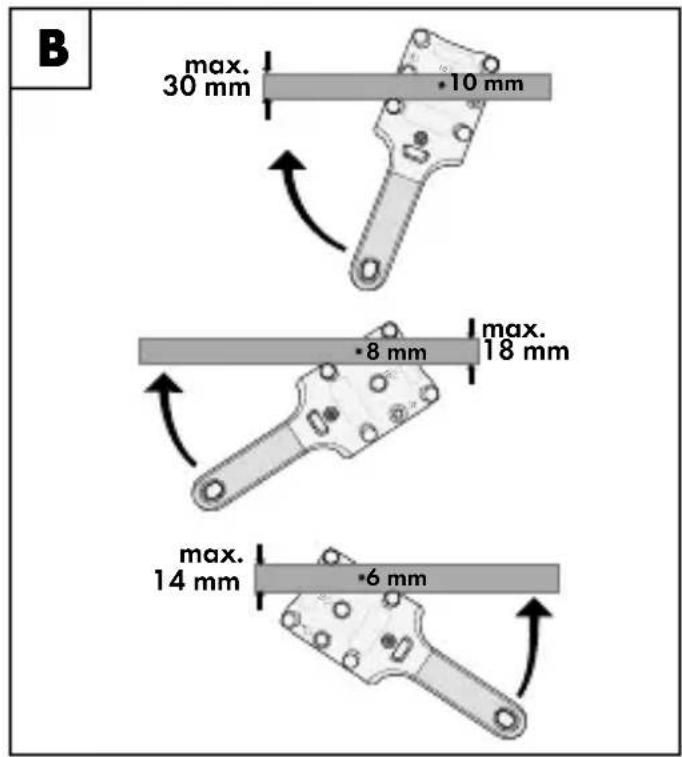
natural_image
Technical line drawing of a mechanical device with two views: top shows a lever mechanism, bottom shows a chain handle assembly (no text or symbols)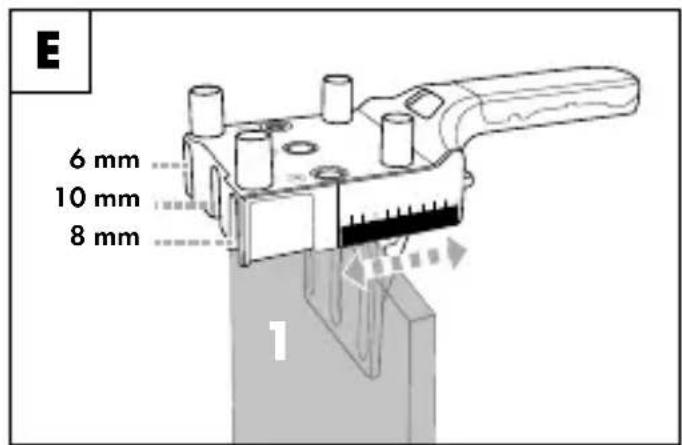
Contents
Introduction. 2
Information about these operating instructions....2
Proper use 2
Safety 3
Package contents 4
Use....4
Make preparations....4
Processing wooden workpiece 1 .... 5
Corner joints....6
Face joints 7
T-joints....8
Maintenance and storage 8
Disposal....9
Service....10
Importer 10
Introduction
Information about these operating instructions

Congratulations!
You have purchased a high-quality product. Familiarise yourself with the product before using it for the first time. To do this, read the following operating instructions thoroughly. Use the product only as described and for the range of applications specified. Keep these operating instructions in a safe place. Please also pass these operating instructions on to any future owner(s).
Proper use
This product is used exclusively for making dowel connections. Three drill bushes in sizes 6, 8 and 10 ~mm are provided for this purpose. You can use the product to create corner, T and face joints. The product is suitable for wooden workpieces from 12 to 30 ~mm .
Commercial or industrial use is not permitted. No liability will be assumed in cases of improper use. No liability will be assumed for damage caused by misuse or improper handling, the use of force or unauthorised modification. The risk is borne solely by the user.
Safety
- Check the product before every use to make sure it is in perfect condition. Do not use the product if it is damaged in any way.
■ Do not allow children to use the product unless they are being supervised. Children are not always able to correctly recognise potential dangers. This product is not a toy.
This product is not intended for use by individuals (including children) with reduced physical, sensory, or mental capabilities. It may also not be used by individuals who lack experience and/or knowledge unless they are supervised by a person responsible for their safety or have received instructions on how to use the product from such a person.


Please observe the operating instructions for the drill/cordless screwdriver when using the product.
■ Unplug the appliance before fitting or changing parts.
■ All parts must be properly fitted before use, otherwise there is a risk of serious injury!
■ Never remove the fitted protective devices.
■ Firmly clamp the wooden workpiece you are working on.
■ Ensure that you are standing firmly and the wooden workpiece is stable.
Package contents
• Universal Dowel Jig
- Adjustable stop
- Locking screw
• These operating instructions
NOTE
▶ Check the package for completeness and signs of visible damage.
If the delivery is incomplete or damage has occurred as a result of defective packaging or during transport, contact the customer service hotline (see section Service).
Use
Make preparations
NOTE
In addition to the package contents, you will need a drill or cordless drill driver and a drill bit with a depth stop to use the product.
Use the following table to select the correct drill bush or dowels for your wooden workpiece.
| Wood thickness | Drill bush/dowel |
| 12-14 mm 6 mm | |
| 15-18 mm 8 mm | |
| 19-30 mm 10 mm |
◆ Mark your wooden workpieces, e.g. with and 2 so you can tell them apart (see Fig. A).
◆ Mark the places on the wooden workpieces that you want to join, e.g. with a X (see Fig. A).
Processing wooden workpiece 1
◆ Clamp the wooden workpiece, e.g. to a work table (see Fig. A).
- Set the drilling depth for wooden workpiece. Use a drill with a depth stop. Measure the dowel length. For face joints, set half the dowel length plus 1 mm plus 26 mm for the thickness of the product itself. For corner and T-joints, set the dowel length plus 6 mm plus 26 mm for the thickness of the product itself and minus the thickness of wooden workpiece 2
Place the product on the front edge of wooden workpiece and clamp it between the guide bolts. Depending on which drill bush you are using, the product must be applied accordingly (see Fig. B).
- Secure the product to the wooden workpiece by pressing from the side.
◆ Insert the drill into the drill bush and drill a hole (see Fig. C).
◆ Fill the drill holes with wood glue.
◆ Insert the dowels into the drill holes.
Corner joints
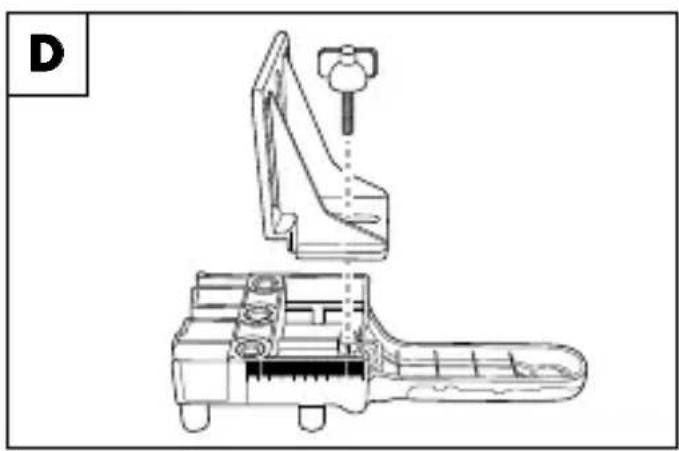
- Attach the adjustable stop to the underside of the product and screw in the locking screw loosely (see Fig. D).
Place the drill bush onto a dowel on wooden workpiece Push the adjustable stop against wooden workpiece 1 tighten the locking screw and remove the product (see Fig. E). This determines the correct spacing for the drill holes in wooden workpiece 2
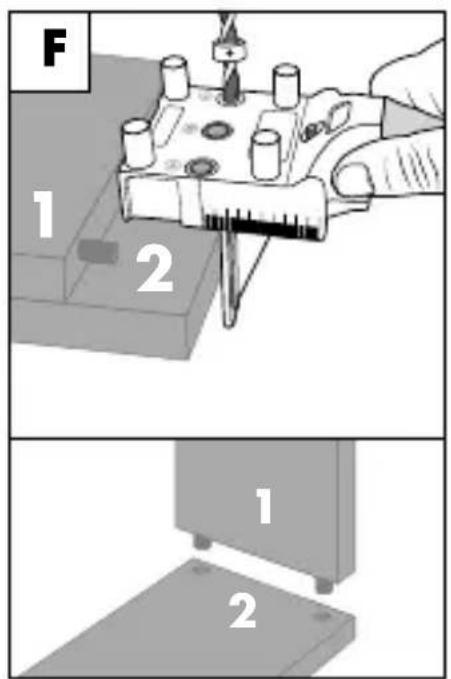
◆ Place wooden workpiece parallel onto wooden workpiece 2 (see Fig. F).
♦ Push the product up to the stop on wooden workpiece ^2 (see Fig. F).
◆ Clamp both wooden workpieces firmly into place.
◆ Readjust the drilling depth to minus 6 mm of the thickness of wooden workpiece 2 plus 26 mm for the thickness of the product itself.
◆ Slide the product with the matching guide groove to the drill bush over the dowel until it stops (see Fig. F).
◆ Insert the drill into the drill bush and drill a hole (see Fig. F).
◆ Fill the drill holes with wood glue.
Join the two wooden workpieces.
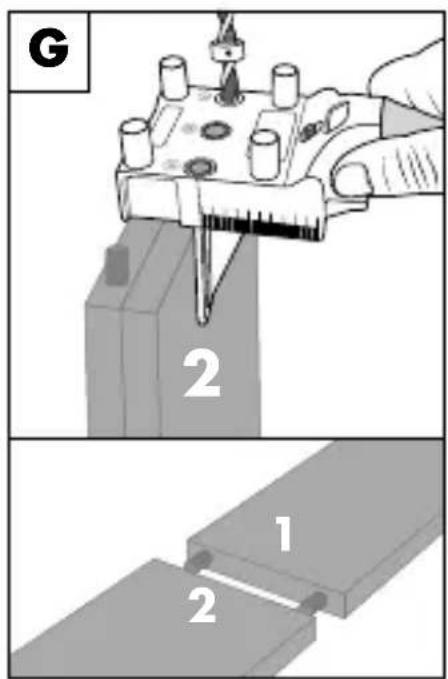
Face joints
- Attach the adjustable stop to the underside of the product and screw in the locking screw loosely (see Fig. D).
◆ Place the drill bush onto a dowel on wooden workpiece Push the adjustable stop against wooden workpiece 1 tighten the locking screw and remove the product (see Fig. E). This determines the correct spacing for the drill holes in wooden workpiece 2
◆ Clamp both wooden workpieces flush together, e.g. on a workbench (see Fig. G).
Leave the drilling depth as for wooden workpiece.
◆ Slide the product with the matching guide groove to the drill bush over the dowel until it stops (see Fig. G).
◆ Insert the drill into the drill bush and drill a hole (see Fig. G).
◆ Fill the drill holes with wood glue.
Join the two wooden workpieces.
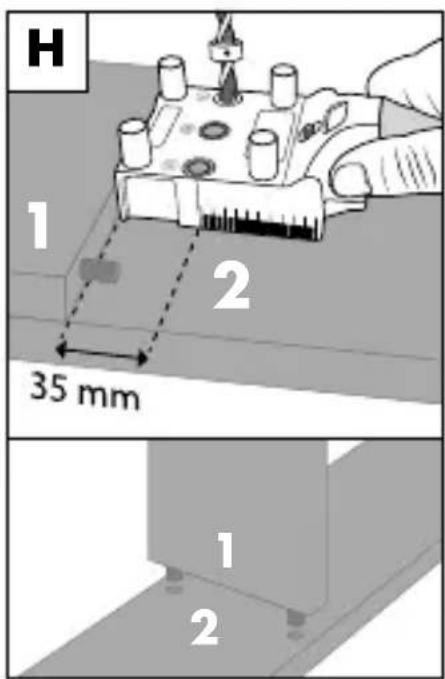
T-joints
◆ Remove the stop if necessary.
Draw a line on wooden workpiece where you want to attach wooden workpiece 1 (see Fig. H).
- Clamp wooden workpiece at a distance of 35 mm to the marked line parallel on wooden workpiece 2(see Fig. H).
◆ Readjust the drilling depth to minus 6 mm of the thickness of wooden workpiece 2 plus 26 mm for the thickness of the product itself.
◆ Slide the product with the matching guide groove to the drill bush over the dowel flush with wooden workpiece 1(see Fig. H).
◆ Insert the drill into the drill bush and drill a hole (see Fig. H).
◆ Fill the drill holes with wood glue.
♦ Join the two wooden workpieces.
Maintenance and storage
ATTENTION! PROPERTY DAMAGE!
▶ Do not use aggressive or abrasive cleaning agents, as they can damage the surfaces of the product.
Use a soft dry brush to remove the sawdust from the product.
You can also clean the product using a dry cloth.
◆ Store the product in a clean, dry location away from direct sunlight.
- Use a soft dry brush to remove the sawdust from the product. - You can also clean the product using a dry cloth. - Store the product in a clean, dry location away from direct sunlight.
Disposal

Dispose of the product via an approved waste disposal company or your municipal waste disposal facility.
Comply with all applicable regulations. Please contact your waste disposal facility if you are in any doubt.

Your local community or municipal authorities can provide information on how to dispose of the worn-out product.

The product is recyclable, subject to extended producer responsibility and is collected separately.

Dispose of the packaging in an environmentally friendly manner.
Note the labelling on the packaging and separate the packaging material components for disposal, if necessary. The packaging materials are labelled with abbreviations (a) and numbers (b) with the following meanings:
1 - 7: plastics,
20-22: paper and cardboard,
80-98: composites.
Service

Service Great Britain
Tel.: 0800 404 7657
E-Mail: kompernass@lidl.co.uk

Servicelreland
Tel.: 1800 101010
E-Mail: kompernass@lidl.ie
IAN 382543_2110
Importer
Please note that the following address is not the service address.
Please use the service address provided in the operating instructions.
KOMPERNASS HANDELS GMBH
BURGSTRASSE 21
44867 BOCHUM
GERMANY
www.kompernass.com
Inhaltsverzeichnis
Einführung....12
KOMPERNASS HANDELS GMBH
BURGSTRASSE 21
44867 BOCHUM
DEUTSCHLAND
www.kompernass.com
Sommaire
Introduction....22
KOMPERNASS HANDELS GMBH
BURGSTRASSE 21
44867 BOCHUM
ALLEMAGNE
www.kompernass.com
Inhoud
Inleiding....32
KOMPERNASS HANDELS GMBH
BURGSTRASSE 21
44867 BOCHUM
DUITSLAND
www.kompernass.com
Obsah
Úvod 42
POZOR! HMOTNÉ ŠKODY!
KOMPERNASS HANDELS GMBH
BURGSTRASSE 21
44867 BOCHUM
NĚMECKO
www.kompernass.com
Spis treści
Wstep....52
KOMPERNASS HANDELS GMBH
BURGSTRASSE 21
44867 BOCHUM
NIEMCY
www.kompernass.com
Obsah
Úvod 62
KOMPERNASS HANDELS GMBH
BURGSTRASSE 21
44867 BOCHUM
NEMECKO
www.kompernass.com
Índice
Introducción 72
natural_image
Simple line drawing of a five chasing recycling symbol (three chasing arrows in a triangle)KOMPERNASS HANDELS GMBH
BURGSTRASSE 21
44867 BOCHUM
ALEMANIA
www.kompernass.com
Indholdsfortegnelse
Introduktion 82
KOMPERNASS HANDELS GMBH
BURGSTRASSE 21
44867 BOCHUM
TYSKLAND
www.kompernass.com
Indice
Introduzione 92
natural_image
Simple line drawing of a recycling symbol (three chasing arrows) with no text or labelsKOMPERNASS HANDELS GMBH
BURGSTRASSE 21
44867 BOCHUM
GERMANIA
www.kompernass.com
Tartalomjegyzék
Bevezető 102
KOMPERNASS HANDELS GMBH
BURGSTRASSE 21
44867 BOCHUM
NÉMETORSZÁG
www.kompernass.com
Kazalo
Uvod 112
Informacije o teh navodilih za uporabo.... 112
Predvidena uporaba.... 112
Varna uporaba....113
Vsebina kompleta 114
Uporaba 114
Priprave 114
Obdelava lesenega obdelovanca 1 ..... 115
Kotni spoji....116
Čelni spoji. 117
T-spoji 118
Čiščenje in shranjevanje....118
Odstranjevanje med odpadke ..... 119
Proizvajalec 120
Pooblaščeni serviser.... 120
Uvod
Informacije o teh navodilih za uporabo

Iskrene čestitke!
KOMPERNASS HANDELS GMBH
BURGSTRASSE 21
44867 BOCHUM
NEMČIJA
www.kompernass.com
Pooblaščeni serviser

ServisSlovenija
Tel.: 080 080 917
E-Mail: kompernass@lidl.si
IAN 382543_2110


KOMPERNASS HANDELS GMBH
BURGSTRASSE 21
44867 BOCHUM
GERMANY
www.kompernass.com
Last Information Update · Stand der Informationen · Version des informations
Stand van de informatie · Stav informací · Stan informacji · Stav informácií
Estado de las informaciones · Tilstand af information · Versione delle informazioni
- GABARIT DE PERÇAGE UNIVERSEL
- UNIVERZÁLNÍ POMŮCKA PRO HMOŽDINKY
- UNIVERZÁLNA POMÓCKA NA KOLÍKY
- UNIVERSEL DYVELHJÄLP
- Contents
- Introduction. 2
- Safety 3
- Package contents 4
- Use....4
- Maintenance and storage 8
- Disposal....9
- Service....10
- Importer 10
- Introduction
- Information about these operating instructions
- Proper use
- Safety
- Package contents
- NOTE
- Use
- Make preparations
- Processing wooden workpiece 1
- Corner joints
- Face joints
- T-joints
- Maintenance and storage
- ATTENTION! PROPERTY DAMAGE!
- Disposal
- Service
- Importer
- Inhaltsverzeichnis
- Einführung....12
- Sommaire
- Introduction....22
- Inhoud
- Inleiding....32
- Obsah
- Úvod 42
- POZOR! HMOTNÉ ŠKODY!
- Spis treści
- Wstep....52
- Úvod 62
- Índice
- Introducción 72
- Indholdsfortegnelse
- Introduktion 82
- Indice
- Introduzione 92
- Tartalomjegyzék
- Bevezető 102
- Kazalo
- Uvod 112
- Varna uporaba....113
- Vsebina kompleta 114
- Uporaba 114
- Čiščenje in shranjevanje....118
- Odstranjevanje med odpadke ..... 119
- Proizvajalec 120
- Pooblaščeni serviser.... 120
- Uvod
- Informacije o teh navodilih za uporabo
- Pooblaščeni serviser
- KOMPERNASS HANDELS GMBH
Brand : PARKSIDE
Model : PUD 30 A1
Category : Drilling template