
SSPM 6 A2 - Electric salt grinder SILVERCREST - Free user manual and instructions
Find the device manual for free SSPM 6 A2 SILVERCREST in PDF.

| Product Type | Electric Salt/Pepper Grinder |
| Brand | SilverCrest |
| Model | SSPM 6 A2 |
| Power Supply | 6 AAA 1.5 V batteries (LR03, Micro) |
| Material | Plastic and stainless steel (grinding mechanism) |
| Dimensions (H x Ø) | Approx. 23.3 x 5.5 cm |
| Weight | Approx. 335 g |
| Reservoir Capacity | Approx. 60 g of coarse salt or peppercorns |
| Fineness Adjustment | Rotary adjustment screw underneath: turn left for coarse, right for fine |
| Operation | Press button to grind; auto-stop when released |
| Indicator Light | Indicates the appliance is operating |
| Intended Use | Grind coarse salt or peppercorns for domestic use |
| Safety | Do not immerse in water; do not open the housing; use only with dry food; keep out of reach of children |
| Care and Cleaning | Wipe exterior with a slightly damp cloth; do not wash in dishwasher; do not clean the grinding mechanism |
| Storage | Empty the reservoir and remove batteries if not used for a long time; store in a dry, clean place |
| Basic Troubleshooting | If the grinder does not work: check batteries, polarity, or unblock the mechanism by turning the appliance upside down and pressing the button |
| Package Contents | Grinder, 6 AAA batteries, user manual |
| Warranty | 3 years from date of purchase |
| Country of Origin | China (not explicitly stated, but typical for SilverCrest) |
| Standards | Complies with EU and national directives |
Frequently Asked Questions - SSPM 6 A2 SILVERCREST
User questions about SSPM 6 A2 SILVERCREST
0 question about this device. Answer the ones you know or ask your own.
Ask a new question about this device
Download the instructions for your Electric salt grinder in PDF format for free! Find your manual SSPM 6 A2 - SILVERCREST and take your electronic device back in hand. On this page are published all the documents necessary for the use of your device. SSPM 6 A2 by SILVERCREST.
USER MANUAL SSPM 6 A2 SILVERCREST
ELECTRIC SALT OR PEPPER MILL Operating instructions and safety instructions
- Intended use 16
- Package contents 16
- Technical specifications 17
- Safety instructions 17
- Copyright 21
6.Before you start 21 - Getting started 21
7.1 Inserting the batteries/filling the mill 21
7.2 Using the mill 21
7.3 Changing the grind setting 21
- Cleaning 22
- Storage when not in use 22
10.Troubleshooting 22
10.1 The mill does not work 22
- Environmental regulations and disposal information 23
- Conformity notes 24
13.Warranty information 25
Congratulations!
By purchasing the SilverCrest SSPM 6 A2 electric salt/pepper mill, hereinafter referred to as the mill, you have opted for a quality product.
Before first using it, familiarise yourself with the way the mill works and read these operating instructions through carefully. Be careful to follow the safety instructions and only use the mill as described in the operating instructions and for the applications given.
Keep these operating instructions in a safe place. If you pass the mill on to someone else, make sure to give them all the relevant documents with it. The operating instructions form part of the product.
1. Intended use
This mill is a household device and is only intended for grinding peppercorns and coarse salt. It may not be used in tropical climates. The mill has not been designed for corporate or commercial applications. Use the mill for private purposes only. Any use other than that mentioned above does not correspond to the intended use. This mill fulfils all relevant standards and directives relating to CE Conformity. Any modifications to the mill other than recommended changes by the manufacturer may result in these standards no longer being met. The manufacturer accepts no liability for any damage or malfunctions resulting from this. Only use accessories supplied with the device by the manufacturer.
Observe the regulations and laws in the respective country of use.
2. Package contents
Remove the mill and all accessories from the packaging. Remove the packaging material and check that all components are complete and undamaged. If you find anything missing or damaged, please contact the manufacturer.
Mill
- 6 batteries
These operating instructions
These operating instructions have a fold-out cover. On the inside of the cover, the mill is shown with figures indicated. You can keep this page folded out whilst reading the different chapters of these operating instructions. This allows you to refer to the relevant controls at any time. The meanings of the numbers are as follows:
| 1 | Top section |
| 2 | Button |
| 3 | Motor |
| 4 | Contact |
| 5 | Contact |
| 6 | Container |
| 7 | Protective cap |
| 8 | Light |
| 9 | Adjusting screw |
3. Technical specifications
| Manufacturer TARGA GmbH | |
| Name SilverCrest SSPM 6 A2 | |
| Power supply 9 V | — |
| Battery type 6x AAA 1.5 V (Micro, LRO3) | |
| Dimensions (H x Ø) | approx. 23,3 x 5,5 cm |
| Weight approx. 335 g |
The technical data and design may be changed without prior notice.
4. Safety instructions
Before you use the mill for the first time, please read the following notes in this manual and heed all warnings, even if you are familiar with handling electronic and household devices. Keep these operating instructions in a safe place for future reference. If you sell the mill or give it away, pass on the operating instructions at the same time. The operating instructions are part of the mill.
Explanation of symbols used

DANGER! This symbol and the word "Danger" denote a potentially dangerous situation. Ignoring it can lead to severe injury or even death.

WARNING! This symbol denotes important information for the safe operation of the mill and user safety.


This symbol denotes further information on the topic.
This symbol designates products whose physical and chemical composition has been tested and found to be non-hazardous to health when used in contact with food in accordance with the requirements of Regulation EU 1935/2004.

Manufacturer's address

DANGER! Personal safety!
- This mill may be used by children over the age of 8 and by persons with reduced physical, sensory, or intellectual abilities or with limited experience or knowledge, if under supervision or if they have been instructed in the safe use of the mill and have understood the resulting dangers.
- Do not allow children to play with the mill.
- The product must not be cleaned or maintained by unsupervised children.

DANGER! Packaging material is not a toy. Do not allow children to play with plastic bags. There is a risk of suffocation.
Store the mill out of the reach of children.

DANGER! Batteries
Insert the batteries with the correct polarity. Refer to the diagram inside the battery compartment. Do not attempt to recharge the batteries and do not dispose of the batteries in a fire. Do not mix battery types (old and new or carbon and alkaline, etc.). Remove the batteries when the device is not to be used for an extended period. Improper use may cause explosions and danger to life.
Batteries must never be opened or deformed, as this could result in chemicals leaking out which could cause injuries.
If the batteries have leaked, remove them immediately to prevent damage to the mill. You can wipe off any battery fluid by using a dry, absorbing cloth. Always wear protective gloves! Avoid any skin contact.
If the battery fluid comes into contact with the skin or eyes, rinse immediately with plenty of water and seek medical aid.
If a battery is swallowed, seek medical help immediately.
Empty batteries must be removed from the device and must be disposed of properly.
Do not short-circuit any battery contacts.
Non-rechargeable batteries must not be recharged.
Do not short-circuit the batteries.

DANGER! Risk of injury!
- Never open the housing on the mill. There is a risk of injury if the device is assembled incorrectly! Doing so will also void the warranty.
- A damaged mill must not be put into operation. There is a danger of injury!
- Make sure that no fire hazards (e.g. burning candles) are placed on or near the mill. Fire hazard!

WARNING! Damage to equipment
- Never immerse the mill in water or other liquids. If liquid does penetrate the mill, remove the batteries immediately and contact our hotline (see "Warranty information" section).
- Do not expose the mill to any direct heat sources (e.g. heaters), direct sunlight or artificial light.
- Take care that the mill is not subject to excessive impacts or vibrations.
- Do not introduce any foreign bodies into the device.
- The mill must not come into contact with hot surfaces.
- The mill must be filled with peppercorns or coarse salt only.
- Keep the mill clean.
5. Copyright
All the contents of this user manual are protected by copyright and provided to the reader for information only. Copying data and information without the prior explicit written consent of the author is strictly forbidden. This also applies to any commercial use of the contents and information. All texts and diagrams are up-to-date as of the date of printing. Subject to change without notice.
6. Before you start
Remove the SSPM 6 A2 mill and all accessories from the packaging and check that the package contents are complete. Keep the packaging material away from children and dispose of appropriately.
7. Getting started
7.1 Inserting the batteries/filling the mill
- Hold the container (6) firmly and turn the top section (1) anti-clockwise until the arrow on the top section (1) is lined up with the symbol on the container (6).
- Remove the top section (1) from the container (6).
- Remove the motor (3) from the container (6).
- Insert the batteries with the correct polarity (note + and -). The correct polarity is labelled on the batteries and inside the battery compartment.
- Fill the container (6) with peppercorns or coarse salt. Fill the container (6) up no higher than the padlock symbols and
- Place the motor (3) onto the container (6). Make sure that the contacts (4) of the motor (3) are aligned properly with contacts (5) on the container (6).
- Place the top section (1) onto the container (6).
- Hold the container (6) firmly and turn the top section (1) clockwise until the arrow on the top section (1) is lined up with the symbol on the container (6).
7.2 Using the mill
- Remove the protective cap (7) on the bottom of the container (6).
- Keep the button (2) pressed to switch on the mill. The light (8) lights up when the device is in use.
- Replace the protective cap (7) onto the bottom of the container (6) after use.
7.3 Changing the grind setting
- Remove the protective cap (7) on the bottom of the container (6).
- Turn the adjusting screw (9) slightly anti-clockwise for a coarser grind setting.
-
Turn the adjusting screw (9) slightly clockwise for a finer grind setting.
-
Replace the protective cap (7) onto the bottom of the container (6).

Under some circumstances, hard peppercorns can block the mill's grinding mechanism. Grains of salt can also block the grinding mechanism because they absorb moisture or have different levels of hardness. If this happens, turn the mill upside-down and press the button (2) to release the pepper or salt from the grinding mechanism. If necessary, you can also shake the mill gently as you do so to help release the blockage.
8. Cleaning

WARNING about property damage
Do not use abrasive or astringent detergents or tools which could scratch the surface (e.g. metal sponges). Otherwise, the mill could get damaged.
Do not clean the mill and its accessories in the dishwasher, as this may cause irreparable damage.
Never immerse the mill in water or other liquids. No liquid must penetrate into the mill.
- Clean the housing of the mill with a soft, slightly damp cloth, using a mild dish-washing detergent for stubborn dirt.
- Dry all items thoroughly.
It is not necessary to clean the grinder and the container (6).
9. Storage when not in use
If the mill is not to be used for an extended period, store it in a safe, clean and dry place.
- Remove the batteries.
- Empty the container (6).
- Before storing the mill, clean the device as described in the previous chapter.
10. Troubleshooting
If your mill does not work as normal, follow the instructions below to try to solve the problem. If working through the tips below does not fix the fault, please contact our hotline (see "Warranty information" section).
10.1 The mill does not work
- The batteries are empty. Replace the batteries with new batteries of the same type. Please note the instructions in chapter "Inserting the batteries/filling the mill".
- The batteries aren't inserted properly. Please note the instructions in chapter "Inserting the batteries/filling the mill".
11. Environmental regulations and disposal information
| Devices marked with this symbol are subject to the European Directive 2012/19/EU. All electrical and electronic devices must be disposed of separately from household waste at official disposal centres. Avoid damage to the environment and risks to your personal health by disposing of the device properly. For further information about proper disposal, contact your local government, disposal bodies or the shop where you bought the device. | |
| The symbol of the crossed-out wheelie bin on conventional and rechargeable batteries indicates that they cannot be disposed of in normal domestic waste but must be disposed of separately. Where batteries contain toxic materials, the chemical symbol of the toxic material is shown underneath the symbol, with meanings as follows: - Pb: Battery contains lead - Cd: Battery contains cadmium - Hg: Battery contains mercury You are obliged by law to return used batteries. Old batteries can contain toxic materials which can be damaging to health or the environment if not properly stored or disposed of. Batteries also contain important raw materials, such as iron, zinc, manganese and nickel, which can be reused. After use, you can return the batteries to us or to a local collection point (e.g. in retail outlets or a local collection point) free of charge. Please note that batteries must be disposed of fully discharged at appropriate collection points for old batteries. If disposing of batteries which are not fully discharged, take precautions to prevent short circuits. | |
| Dispose of all packaging in an environmentally friendly manner. Cardboard packaging can be taken to paper recycling centres or public collection points for recycling. Any film or plastic contained in the packaging should be taken to your public collection points for disposal. |
Only relevant for France:


ÉLÉMENTS D'EMBALLAGE


The product, the accessories, the printed material and the packaging are recyclable. They are subject to enhanced manufacturer responsibility and are sorted and collected separately.

Please note the markings on the packaging material when disposing of it, it is labelled with abbreviations (a) and numbers (b), the meanings of which are as follows:
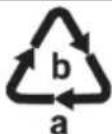
1-7: plastic / 20-22: paper and cardboard / 80-98: composite materials.
| Symbol | Material | Contained in the following packaging elements for this product |
| 01 PET | Polyethylene terephthalate | Shrink film containing the batteries |
| 20 PAP | Corrugated cardboard Sales | packaging |
12. Conformity notes

The product complies with the requirements of the applicable European and national directives. Evidence of conformity has been provided. The manufacturer has the relevant declarations and documentation.

The product complies with the requirements of the applicable national directives for Great Britain.
The complete EU Declaration of Conformity is available for download from this link:
https://www.targa.gmbh/downloads/conformity/426799_2301.pdf
13. Warranty information
Warranty of TARGA GmbH
Dear Customer,
This device is sold with three years warranty from the date of purchase. In the event of product defects, you have legal rights towards the seller. These statutory rights are not restricted by our warranty as described below.
Warranty conditions
The warranty period commences upon the date of purchase. Please keep the original receipt in a safe place as it is required as proof of purchase. If any material or manufacturing faults occur within three years of purchase of this product, we will repair or replace the product free of charge as we deem appropriate.
Warranty period and legal warranty rights
The warranty period is not extended in the event of a warranty claim. This also applies to replaced and repaired parts. Any damage or defects discovered upon purchase must be reported immediately when the product has been unpacked. Any repairs required after the warranty period will be subject to charge.
Scope of warranty
The device was carefully manufactured in compliance with stringent quality guidelines and subjected to thorough testing before it left the works. The warranty applies to material and manufacturing faults. This warranty does not cover product components which are subject to normal wear and which can therefore be regarded as wearing parts, or damage to fragile components such as switches, rechargeable batteries or components made of glass. This warranty is void if the product is damaged, incorrectly used or serviced. To ensure correct use of the product, always comply fully with all instructions contained in the user manual. The warnings and recommendations in the user manual regarding correct and incorrect use and handling of the product must always be observed and complied with. The product is solely designed for private use and is not suitable for commercial applications. The warranty is rendered void in the event of incorrect handling and misuse, if it is subjected to force, and also if any person other than our authorised service technicians interfere with the device. No new warranty period commences if the product is repaired or replaced.
Submitting warranty claims
To ensure speedy handling of your complaint, please note the following:
Before using your product for the first time, please read the enclosed documentation carefully. Should any problems arise which cannot be solved in this way, please call our hotline.
Always have your receipt, the product article number as well as the serial number (if available) to hand as proof of purchase.
-
If it is not possible to solve the problem on the phone, our hotline support staff will initiate further servicing procedures depending on the fault.
-
You can find this and many more manuals, product videos and installation software available for download at www.lidl-service.com. This QR code takes you directly to the LIDL service page (www.lidl-service.com). There, you can enter the item number (IAN) to access your operating manual.


Service

Phone: 0800 404 7657
E-Mail:
targa@lidl.co.uk

Phone: 1800
101010
E-Mail:
targa@lidl.ie

Phone: 800
62230
E-Mail:
targa@lidl.com.mt

Phone: 8009
4241
E-Mail:
targa@lidl.com.cy
IAN:426799_2301

Manufacturer
Please note that the following address is not a service address. First contact the service point stated above.
TARGA
GmbH
Coesterweg 45
59494 Soest
GERMANY
Table des matieres
Cher client, chere clientele,
Cher client, chere clientele,
https://www.targa.gmbh/downloads/conformity/426799_2301.pdf
13. Garantie
https://www.targa.gmbh/downloads/conformity/426799_2301.pdf
https://www.targa.gmbh/downloads/conformity/426799_2301.pdf
https://www.targa.gmbh/downloads/conformity/426799_2301.pdf
13. Garantioplysninger
TARGA GmbH - Garanti
Kaere kunde,
https://www.targa.gmbh/downloads/conformity/426799_2301.pdf
https://www.targa.gmbh/downloads/conformity/426799_2301.pdf
- Congratulations!
- Intended use
- Package contents
- Technical specifications
- Safety instructions
- Explanation of symbols used
- DANGER! Personal safety!
- DANGER! Batteries
- DANGER! Risk of injury!
- WARNING! Damage to equipment
- Copyright
- Before you start
- Getting started
- Inserting the batteries/filling the mill
- Using the mill
- Changing the grind setting
- Cleaning
- WARNING about property damage
- Storage when not in use
- Troubleshooting
- The mill does not work
- Environmental regulations and disposal information
- Only relevant for France:
- Conformity notes
- Warranty information
- Warranty of TARGA GmbH
- Warranty conditions
- Warranty period and legal warranty rights
- Scope of warranty
- Submitting warranty claims
- Service
- Manufacturer
- Table des matieres
- Garantie
- Garantioplysninger
- TARGA GmbH - Garanti
Brand : SILVERCREST
Model : SSPM 6 A2
Category : Electric salt grinder