Cloud II Wireless - Headphones HYPERX - Free user manual and instructions
Find the device manual for free Cloud II Wireless HYPERX in PDF.
User questions about Cloud II Wireless HYPERX
0 question about this device. Answer the ones you know or ask your own.
Ask a new question about this device
Download the instructions for your Headphones in PDF format for free! Find your manual Cloud II Wireless - HYPERX and take your electronic device back in hand. On this page are published all the documents necessary for the use of your device. Cloud II Wireless by HYPERX.
USER MANUAL Cloud II Wireless HYPERX
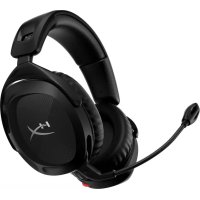
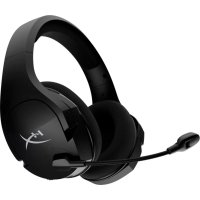
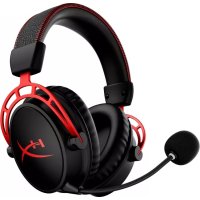
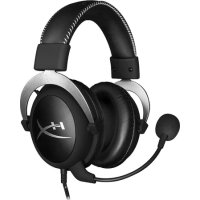
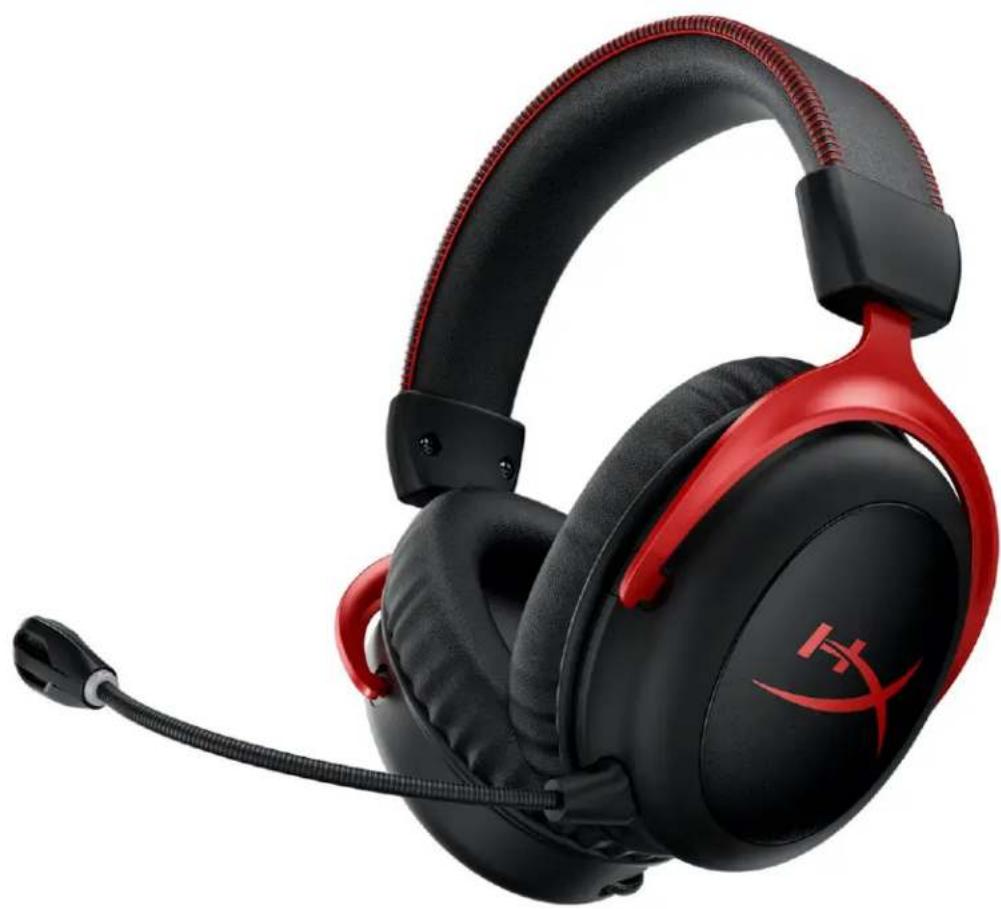
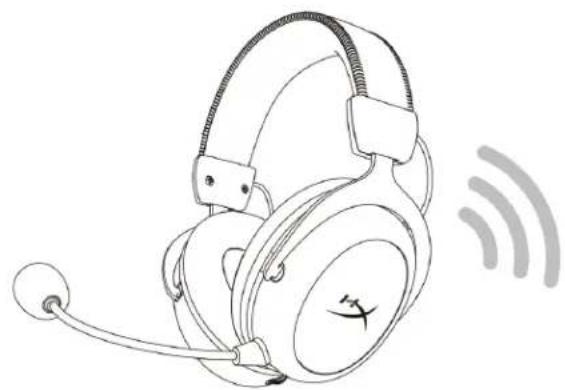
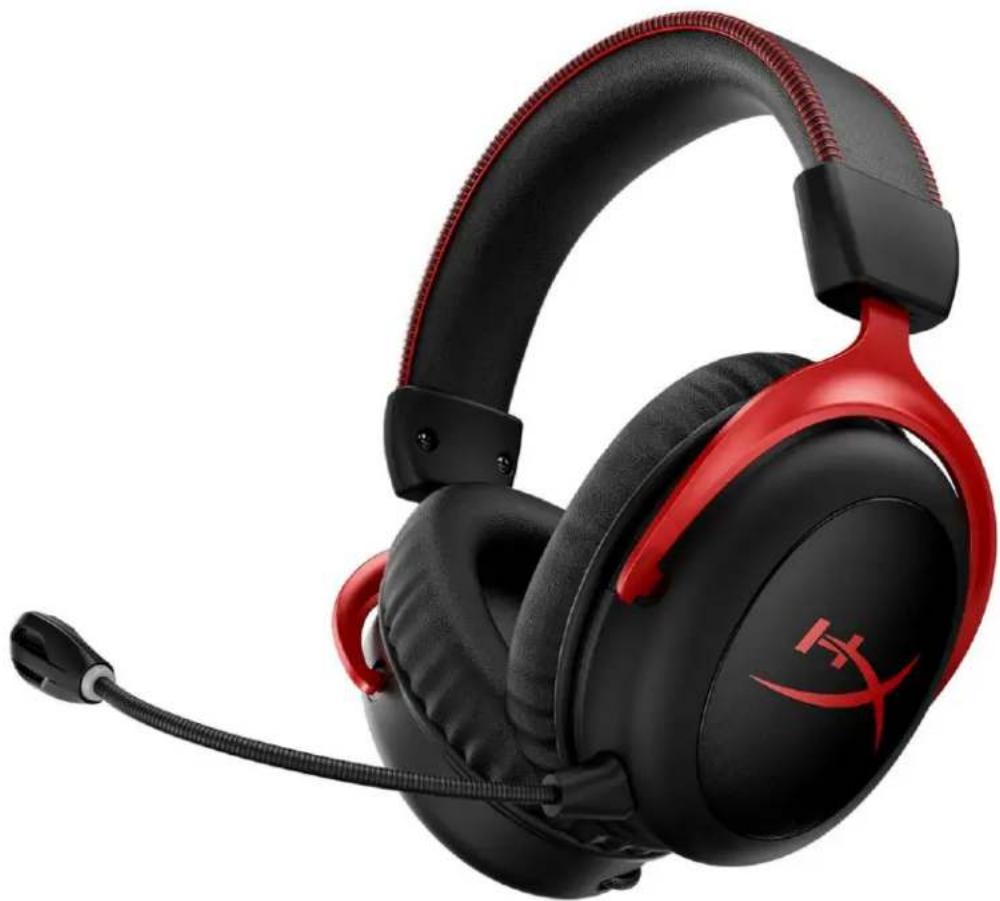
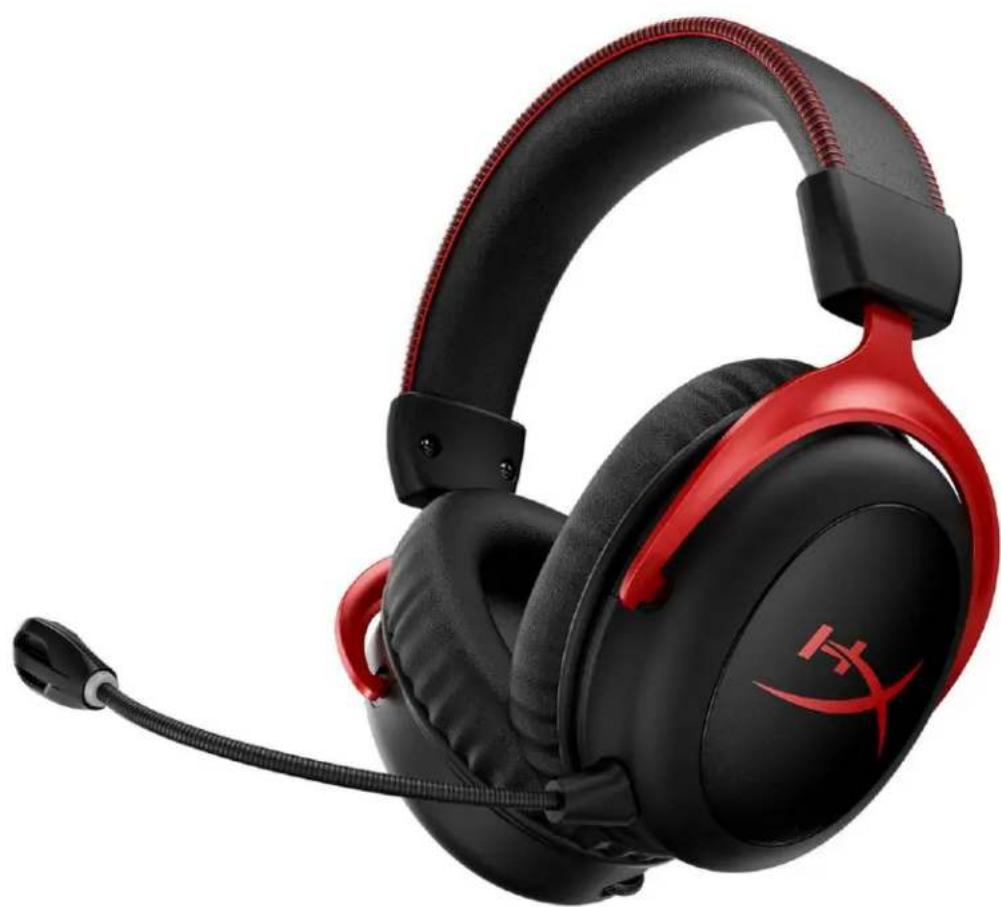
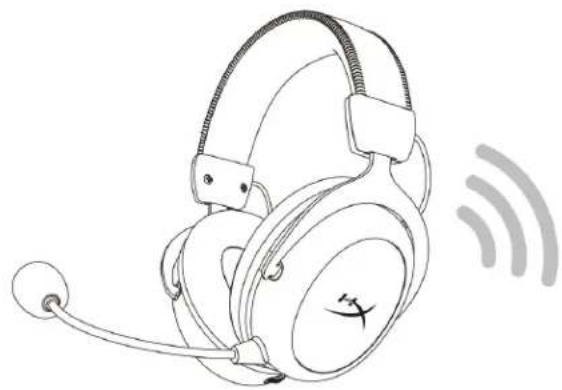
HyperX Cloud II Wireless
Find the language and latest documentation for your HyperX Cloud II Wireless here.
HyperX Cloud II Wireless Installation Guide
For instructions in English
Para instrucciones en Espanol
+ .Fur Anleitungen in Deutsch
Pour des instructions en Francais
Per le istruzioni in Italiano
... Por as instruções em Português
Instrukcje w jezyku Polskim
ДяИнструкцииHaPycckom
C. Turkce talimatlar icin
日本語マニアル用
.
nunununun
* DExem hong dan bang tieng Viet
Simplified Chinese......简体中文说明书
Traditional Chinese ....繁體中文說明
.
HyperX Cloud II Wireless
Part Numbers
HHSC2X-BA-RD/G
TABLE OF CONTENTS
Overview 3
Specifications 4
Setting up with PC 5
Setting up with PlayStation 4. 9
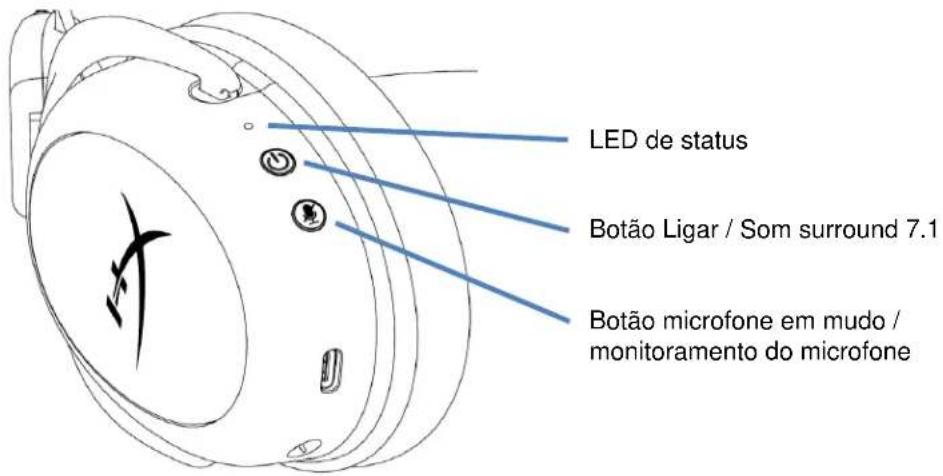
Controls 10
Mic mute / mic monitoring button. 10
Power button / 7.1 Surround Sound button 10
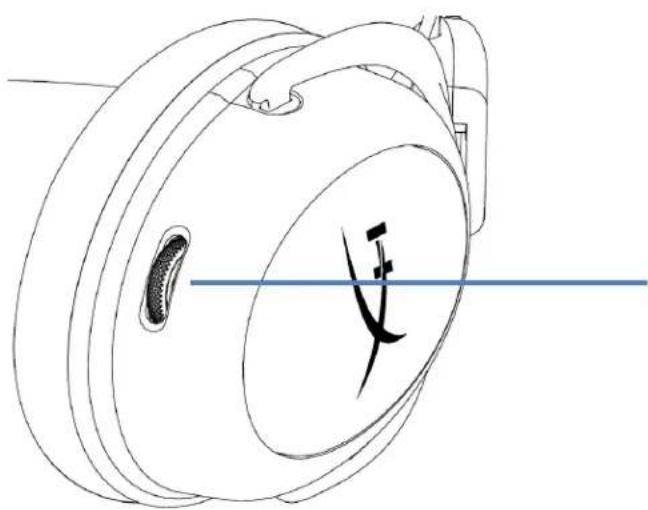
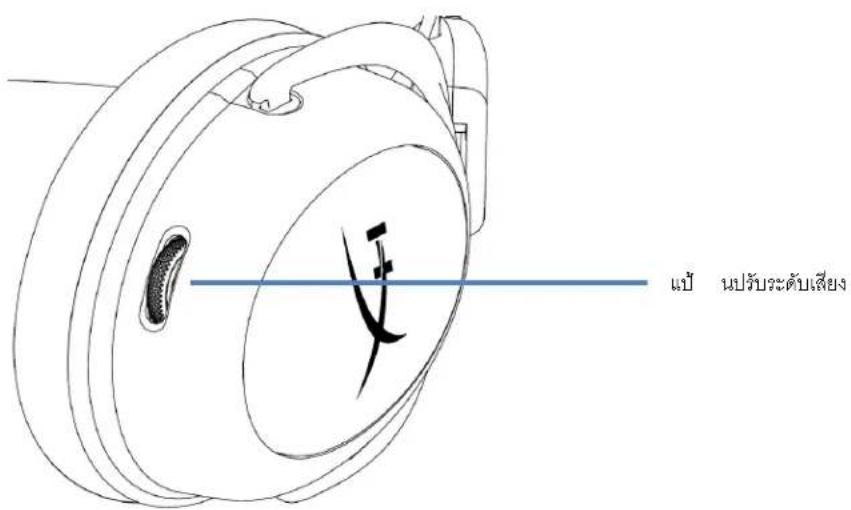
Volume wheel 11
Status LED 10
Charging the Headset 12
Wired charging 12
HyperX NGENUITY Software 12
Manually Pairing the Headset and USB Adapter 13
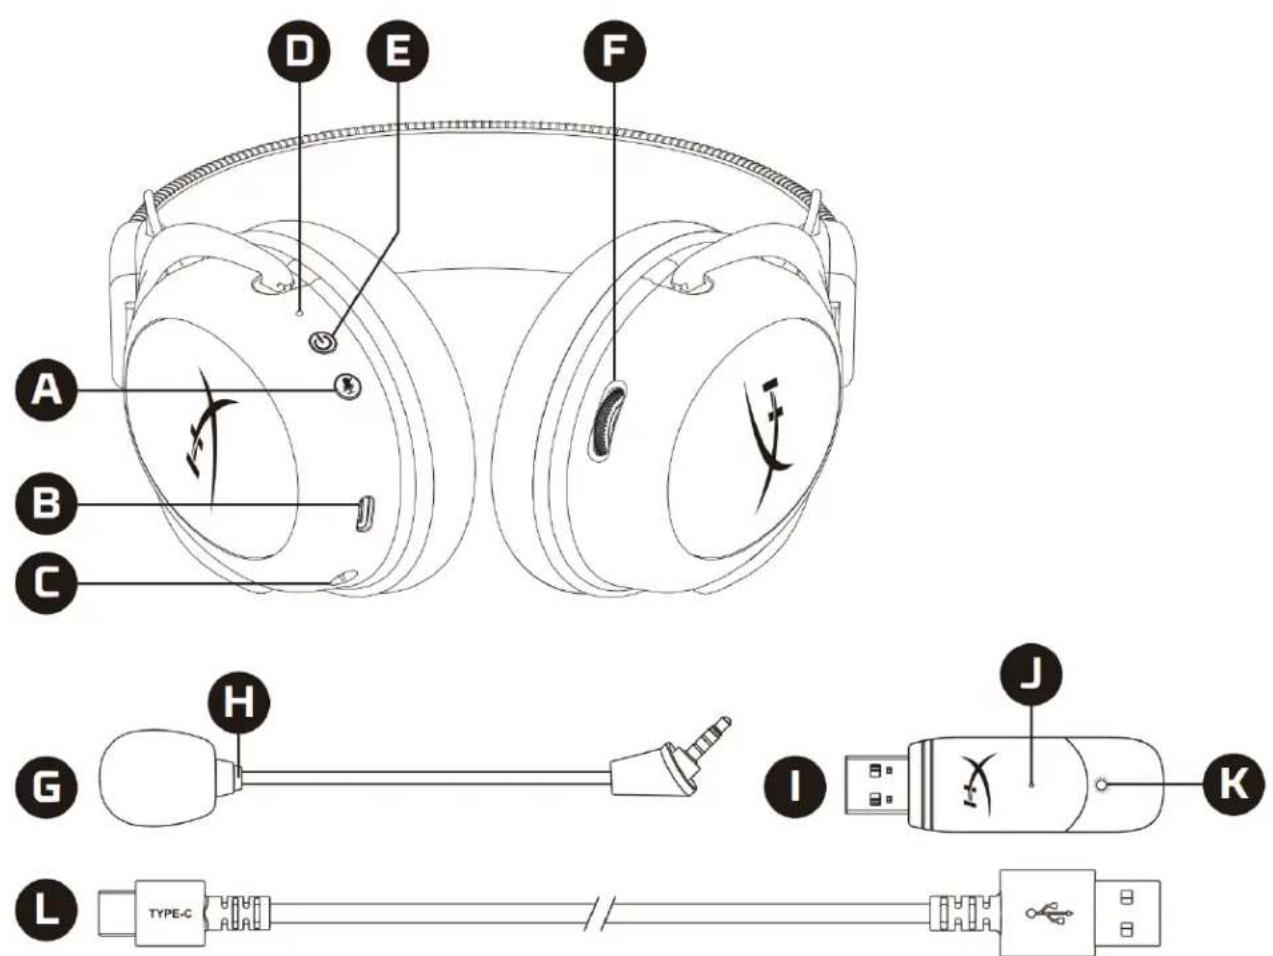
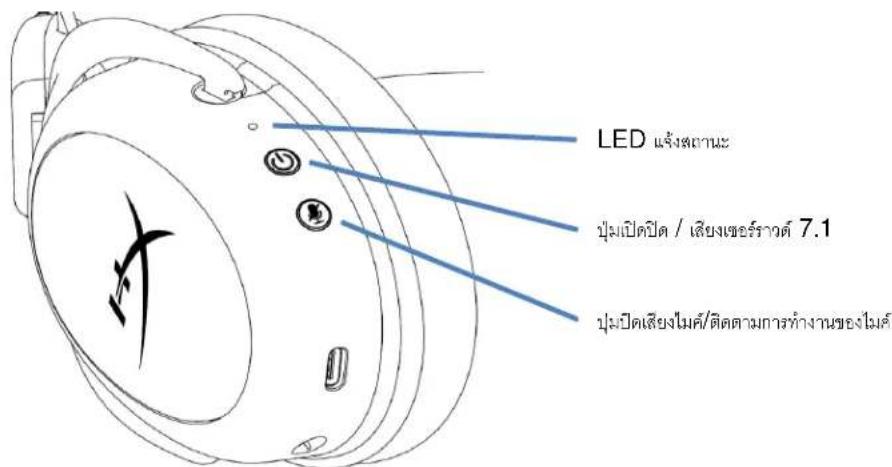
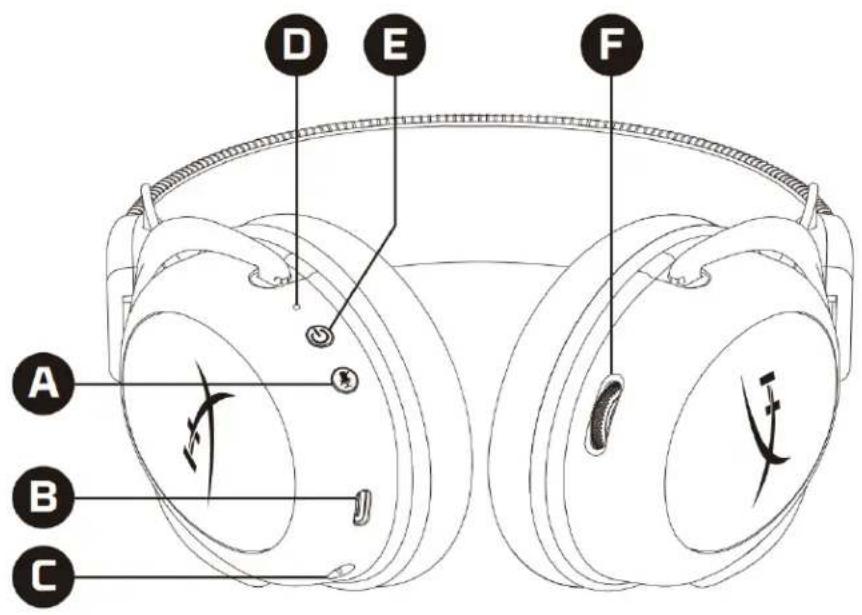
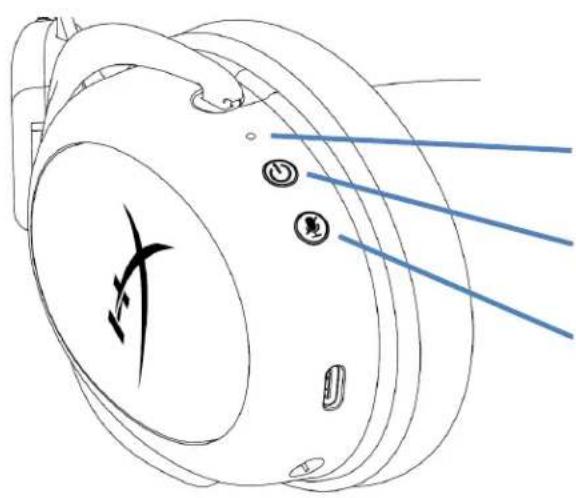
Overview
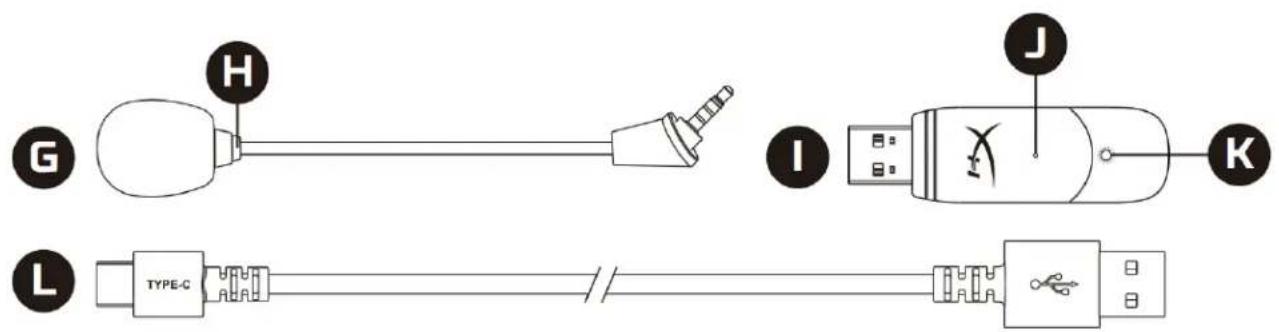
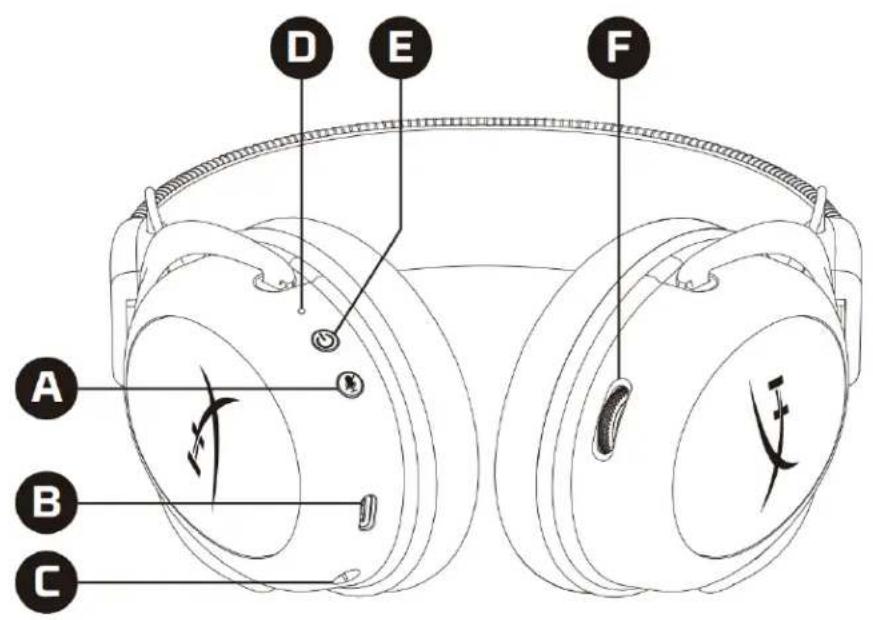
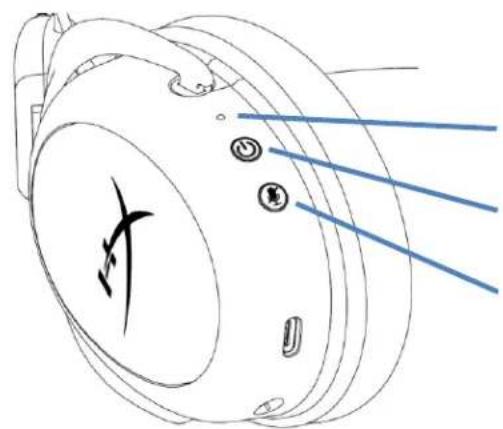
A. Mic mute / mic monitoring button
B. USB charge port
C. Microphone port
D. Status LED
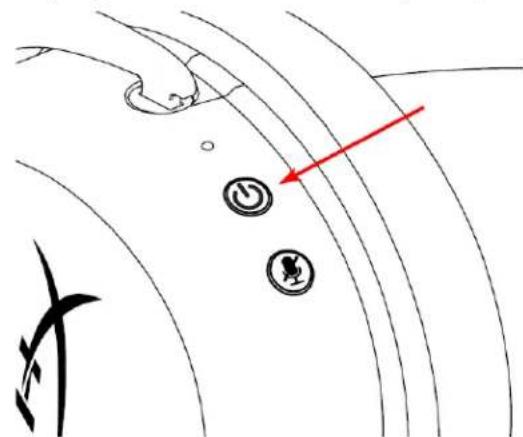
E. Power / 7.1 Surround Sound button
F. Volume wheel
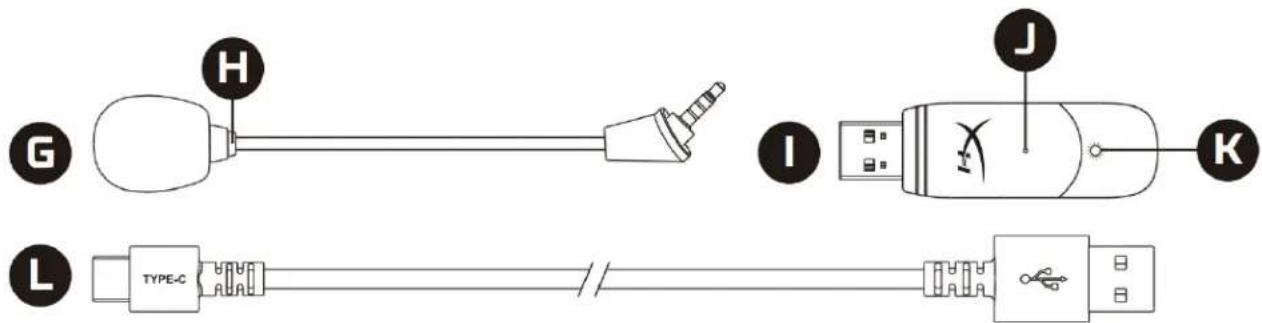
G. Detachable microphone
H. Microphone mute LED
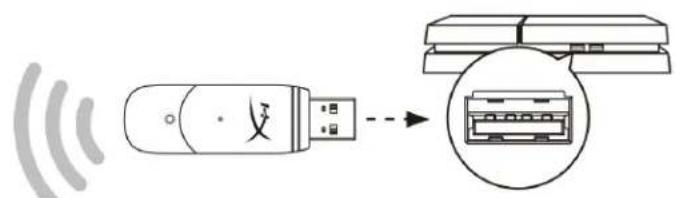
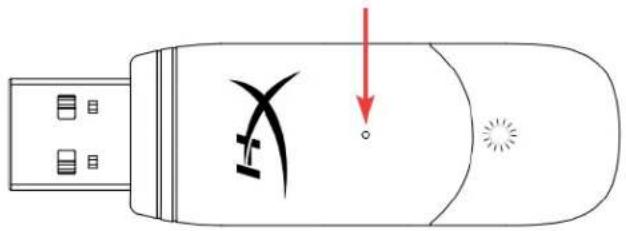
I. USB adapter
J. Wireless pairing pin hole
K. Wireless status LED
L. USB charge cable
Specifications
Headphone
Driver: Dynamic, 53mm with neodymium magnets
Type: Circumaural, Closed back
Frequency response: 15Hz-20kHz
Impedance: 60 Ω
Sound pressure level: 104dBSPL/mW at 1kHz
T.H.D.: ≤ 1%
Weight: 300g
Weight with mic: 309g
Cable length and type: USB charge cable (0.5m)
Microphone
Element: Electret condenser microphone
Polar pattern: Bi-directional, Noise-cancelling
Frequency response: 50Hz - 6.8kHz
Sensitivity: -20dBV (1V/Pa at 1kHz)
Battery life*
30 hours
Wireless Range**
2.4 GHz
Up to 20 meters
*Tested at 50% headphone volume. Battery life varies depending upon the usage.
**Wireless range may vary due to environmental conditions.
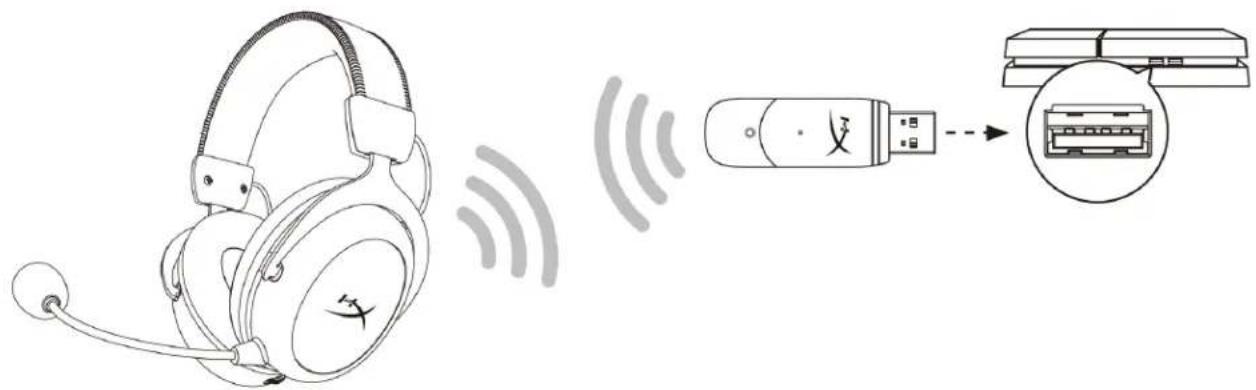
Setting up with PC
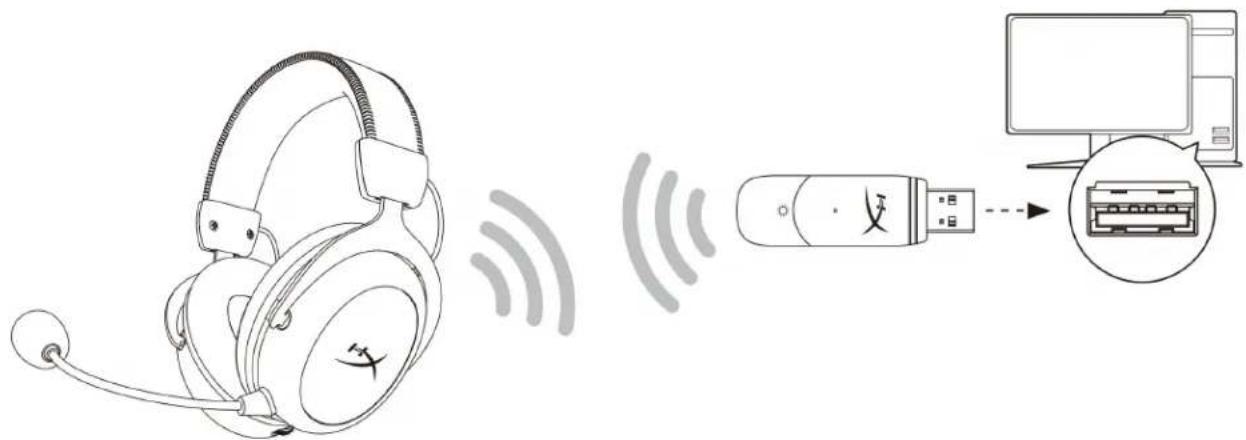
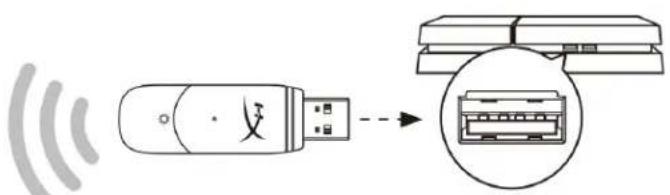
- Connect the wireless USB adapter to the PC.
- Power on the headset.
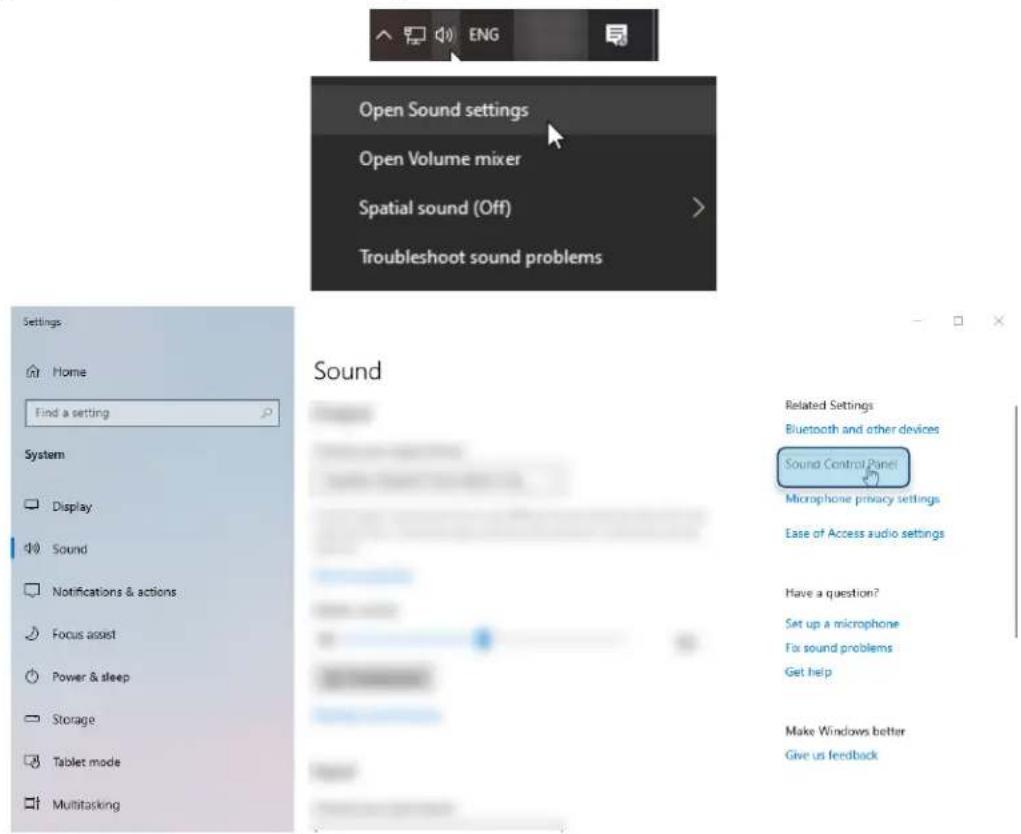
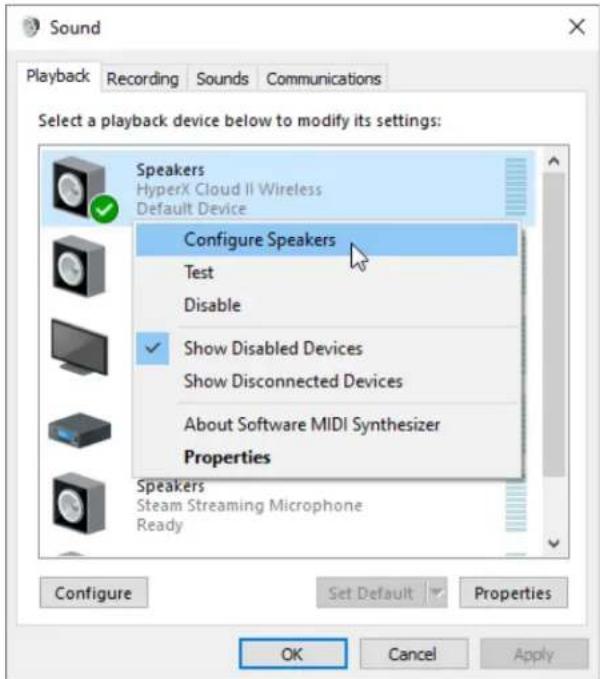
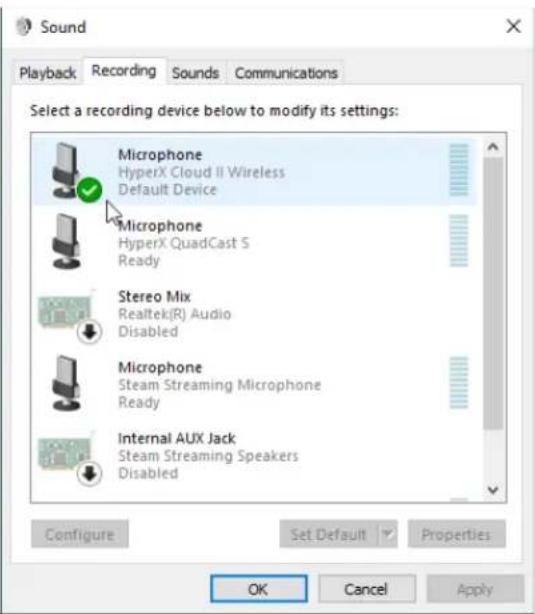
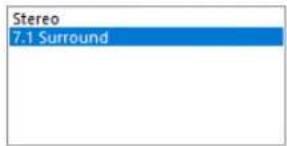
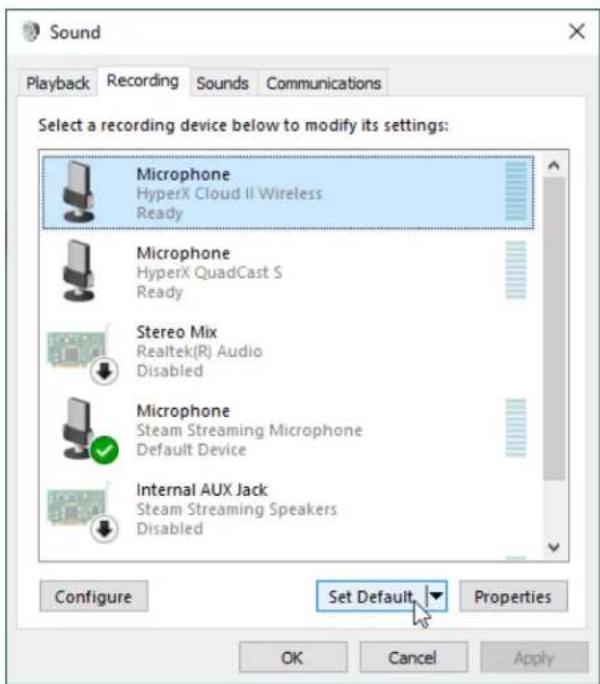
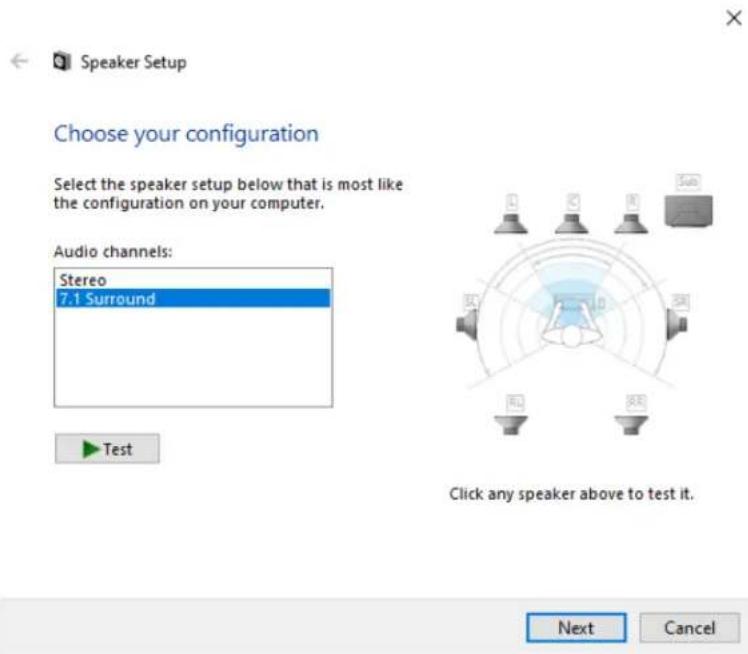
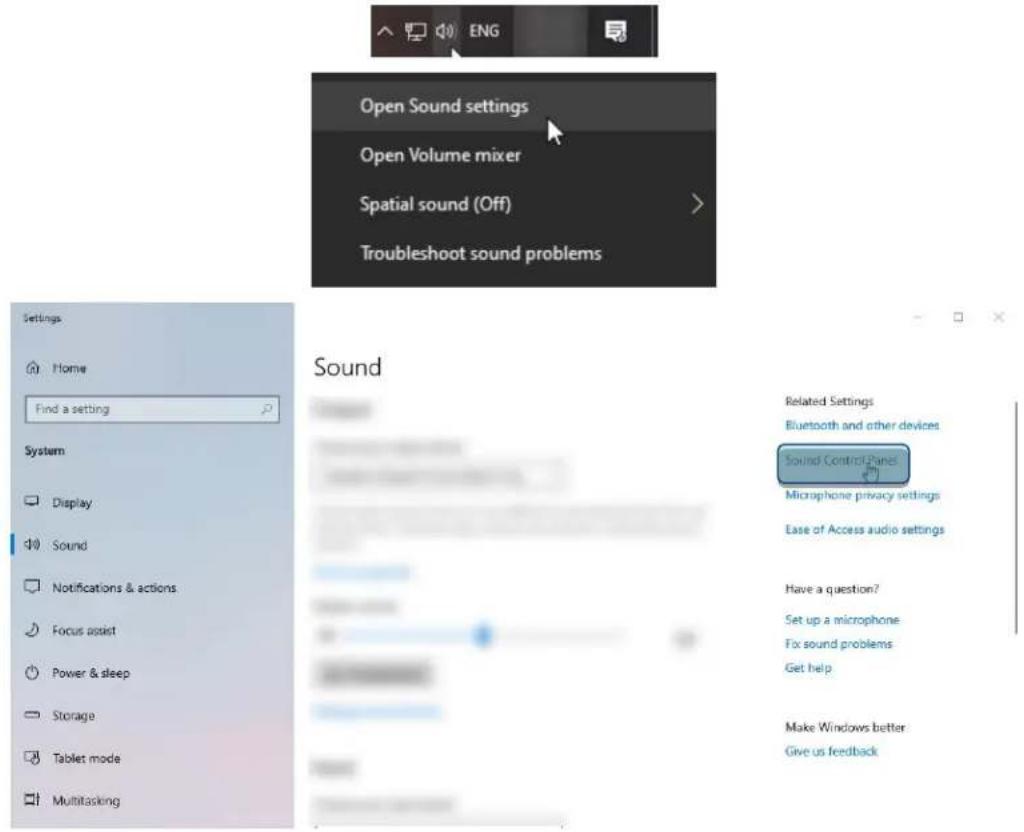
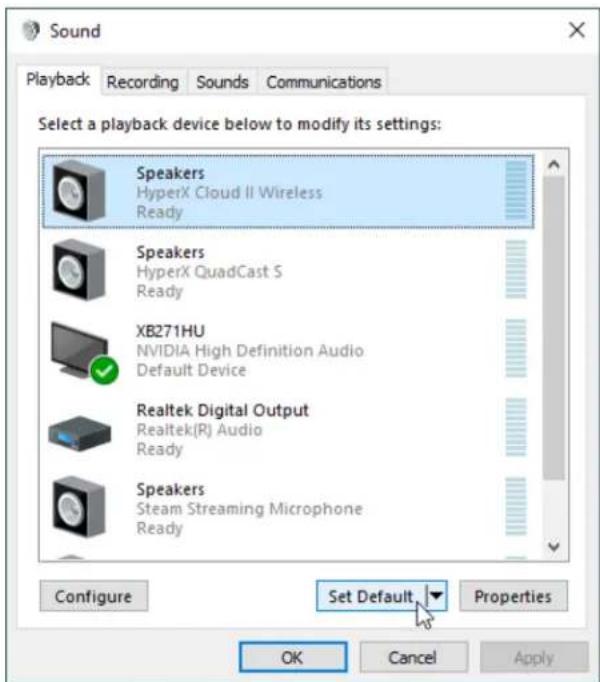
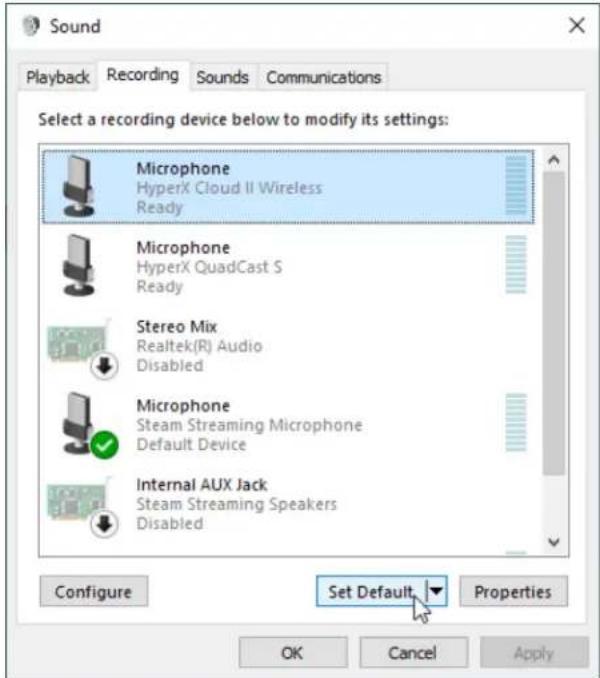
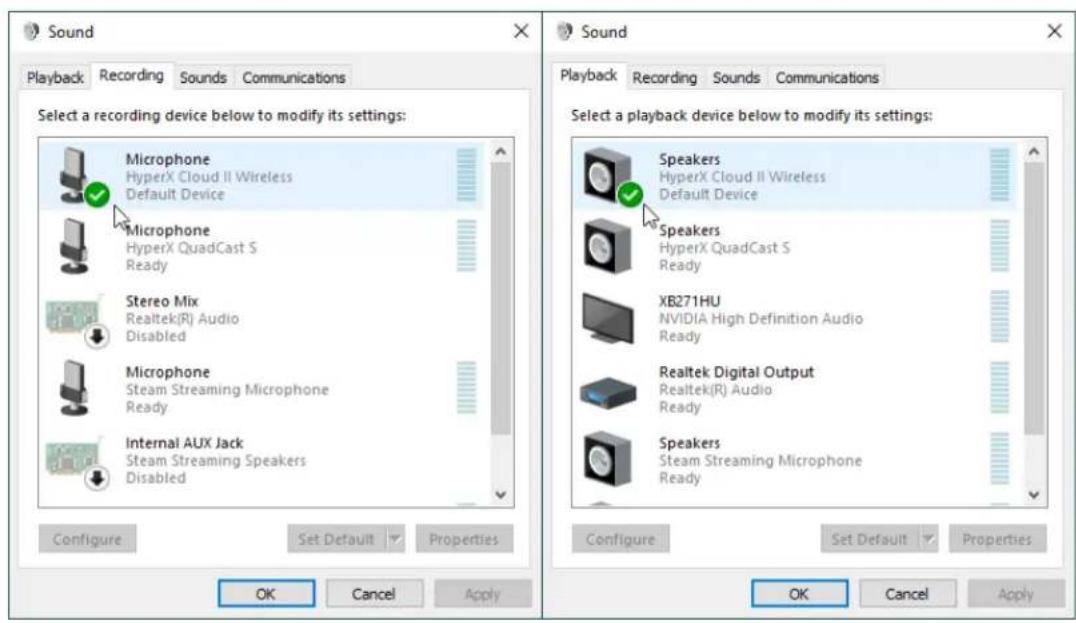
- Right click speaker icon > Select Open Sound settings > Select Sound Control Panel
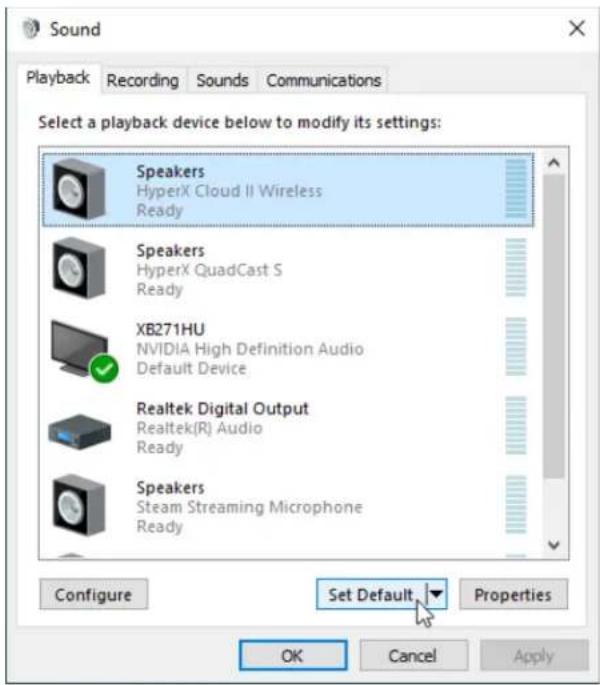
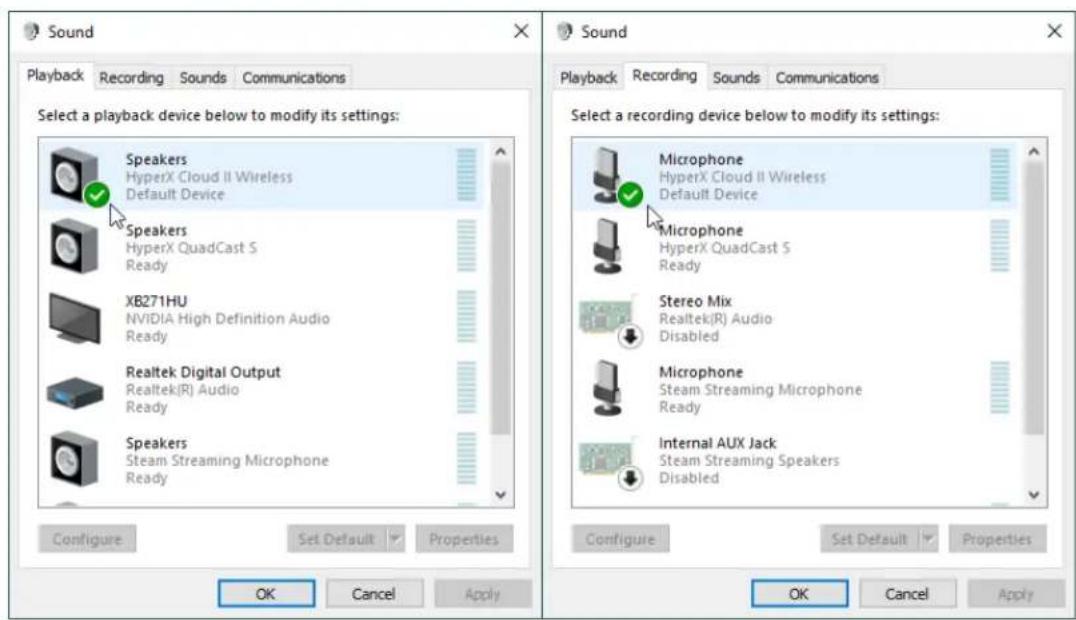
- Under the Playback tab, click on "HyperX Cloud II Wireless" and click on the Set Default button.
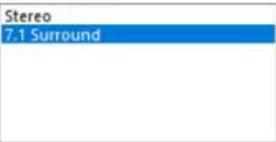
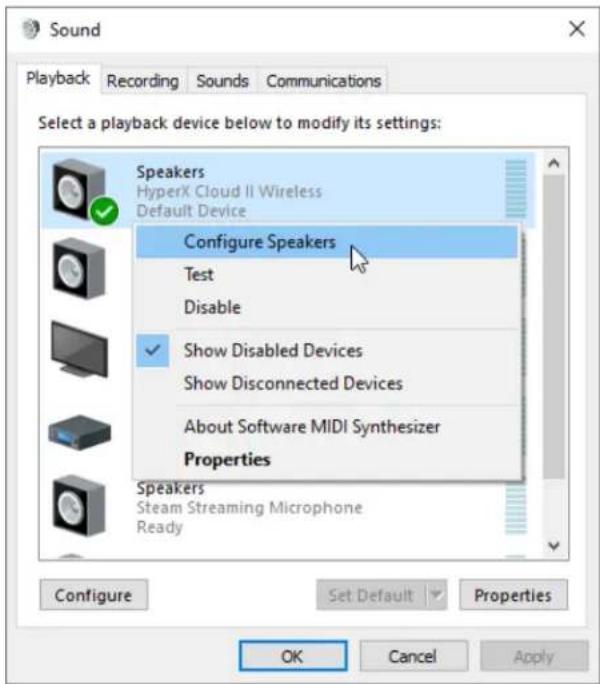
- Right click on "HyperX Cloud II Wireless" and click on Configure Speakers.
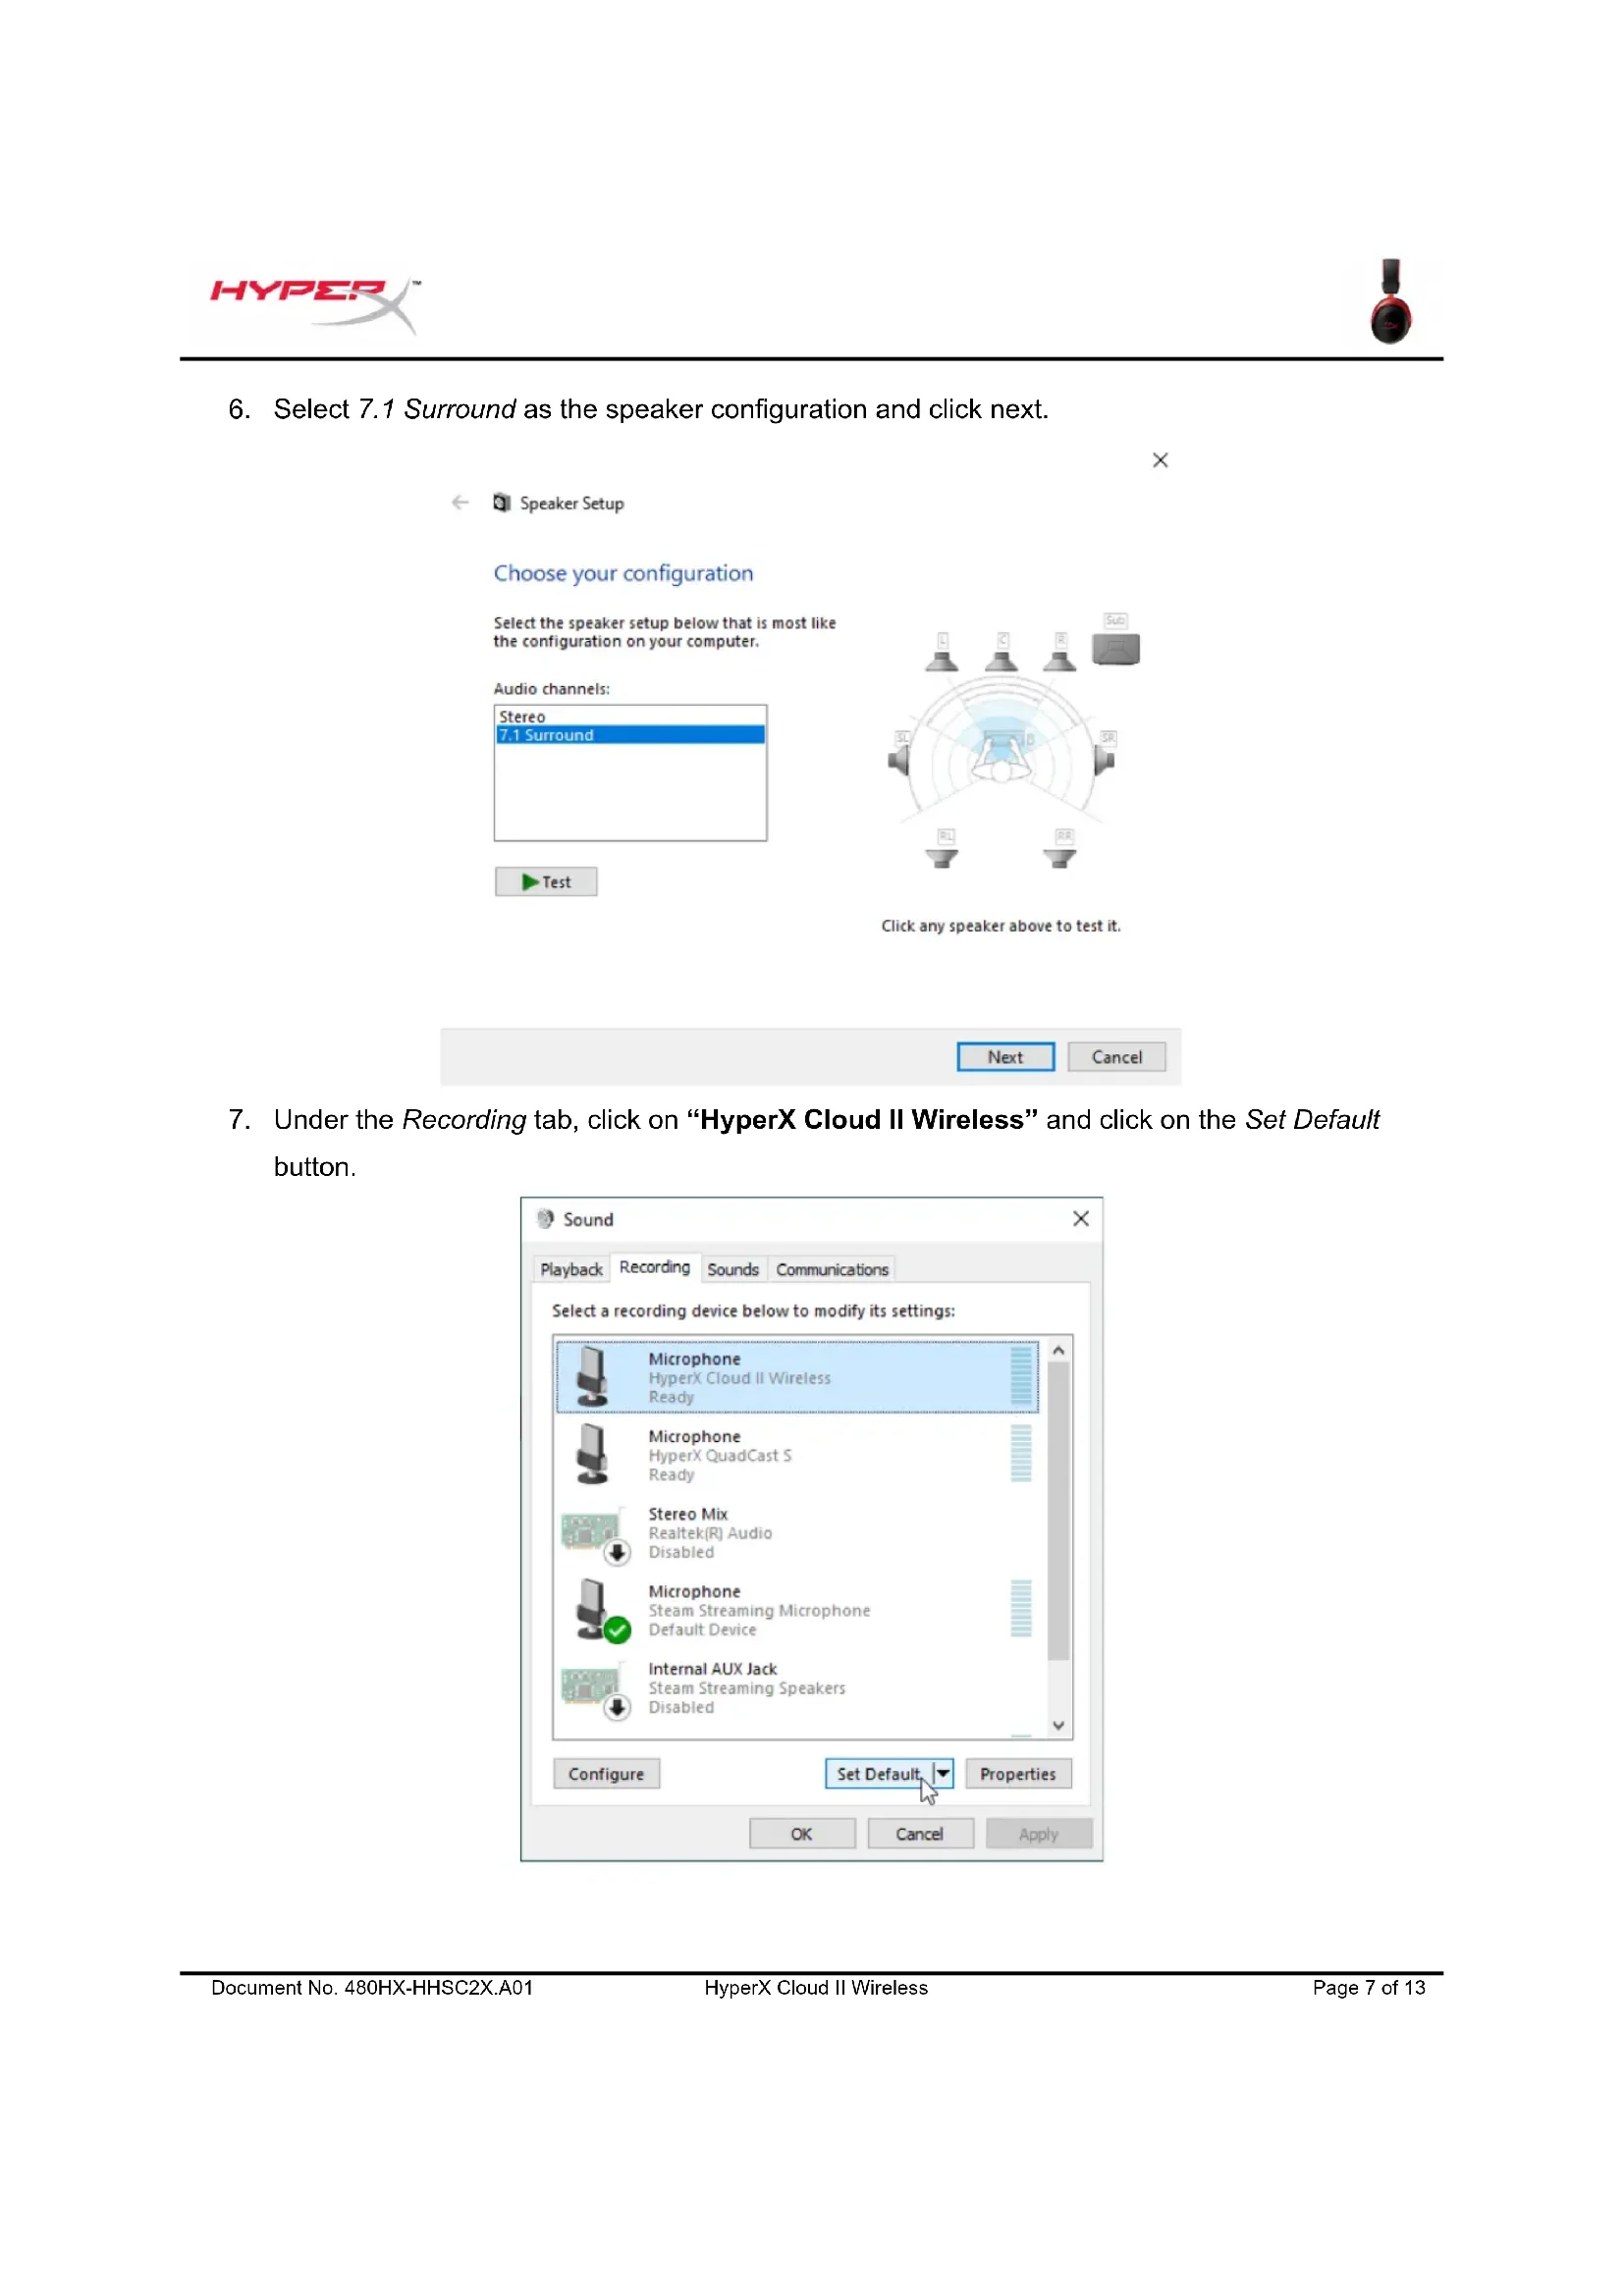
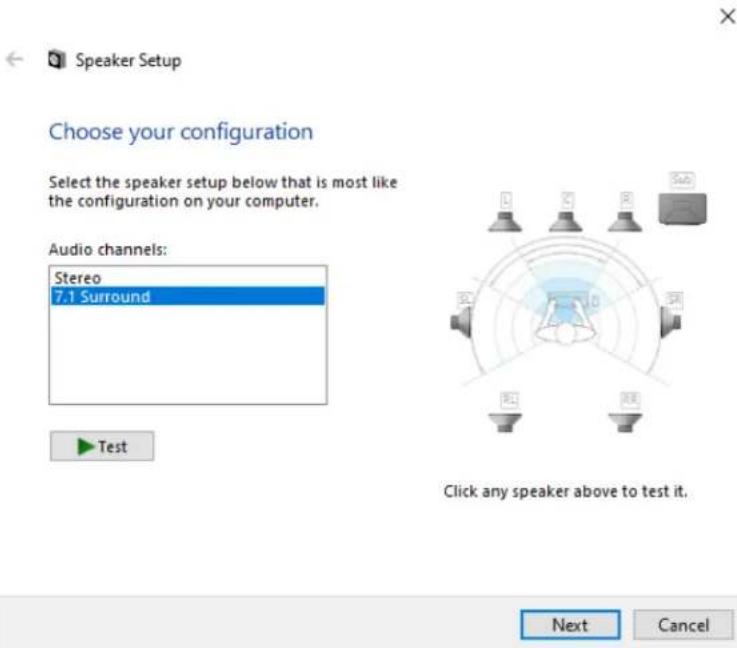
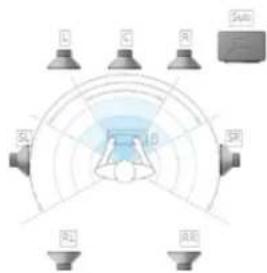
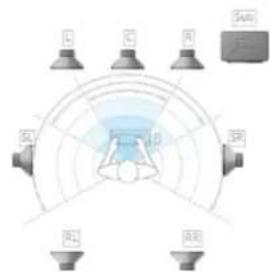
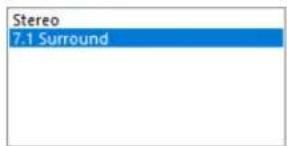
- Select 7.1 Surround as the speaker configuration and click next.
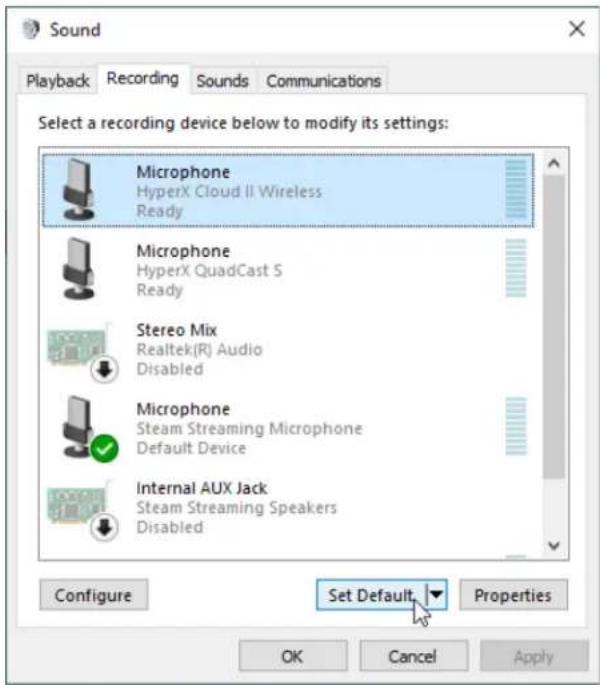
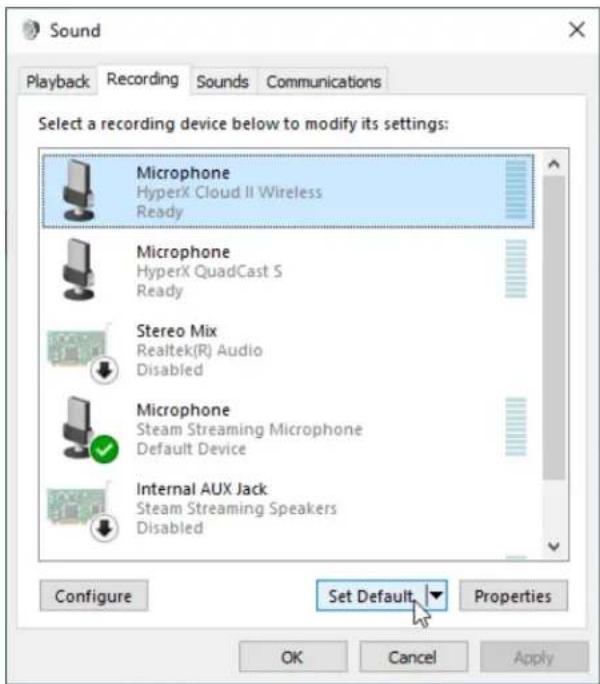
- Under the Recording tab, click on "HyperX Cloud II Wireless" and click on the Set Default button.
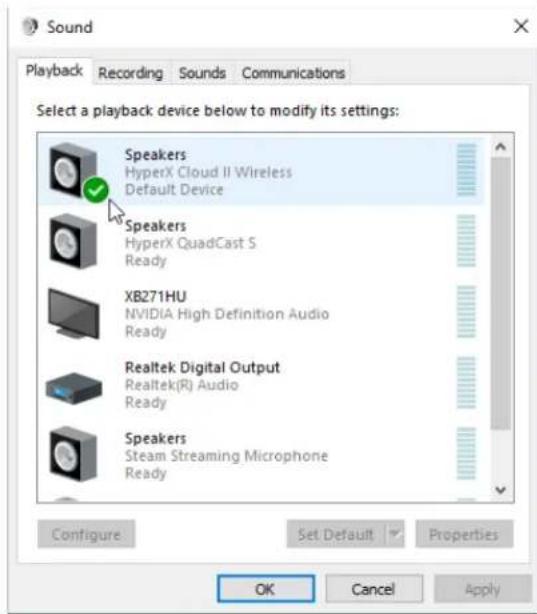
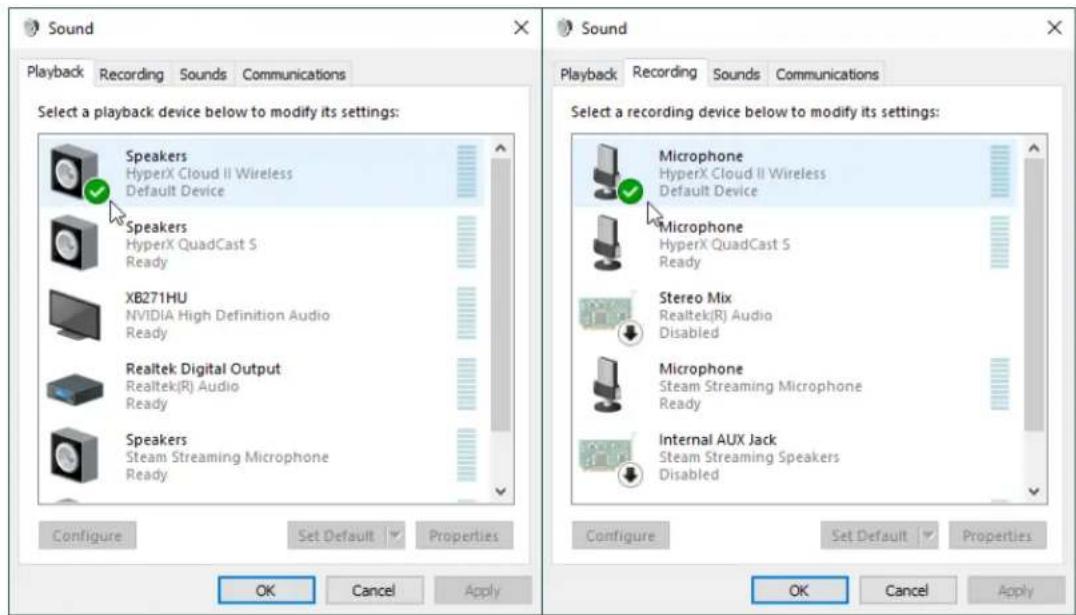
- Under the Playback tab, verify that "HyperX Cloud II Wireless" is set as Default Device and Default Communication Device. Under the Recording tab, verify that "HyperX Cloud II Wireless" is set as Default Device.
Setting up with PlayStation 4
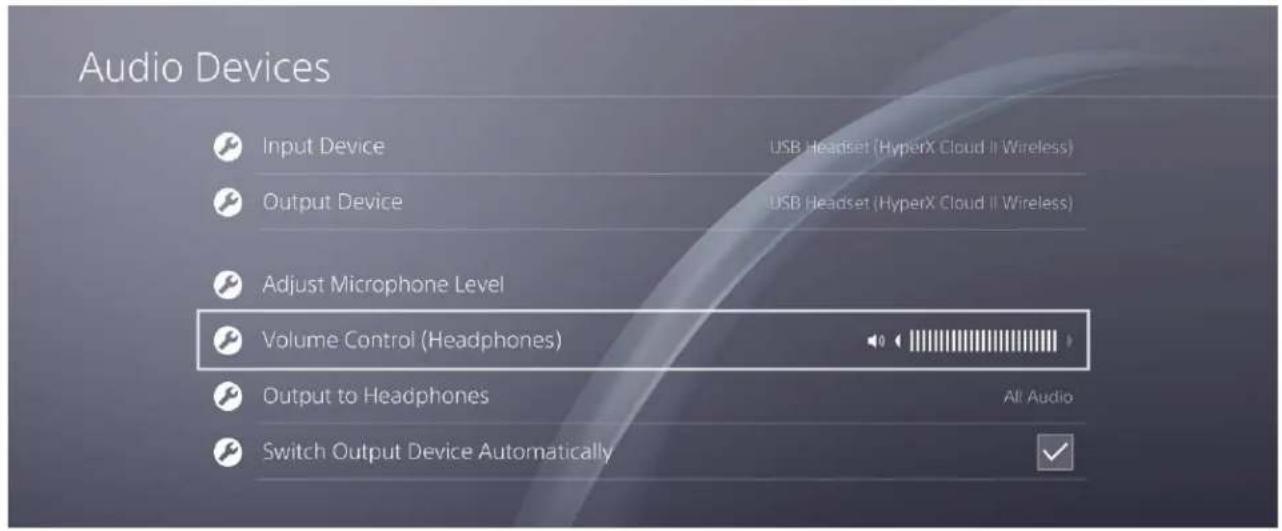
- Set Input Device to USB Headset (HyperX Cloud II Wireless)
- Set Output Device to USB Headset (HyperX Cloud II Wireless)
- Set Output to Headphones to All Audio
- Set Volume Control (Headphones) to maximum.
Audio Devices

Input Device
USB Headset (HyperX Cloud II Wireless)

Output Device
USB Headset (HyperX Cloud II Wireless)

Adjust Microphone Level

Volume Control (Headphones)


Output to Headphones

Switch Output Device Automatically
All Audio

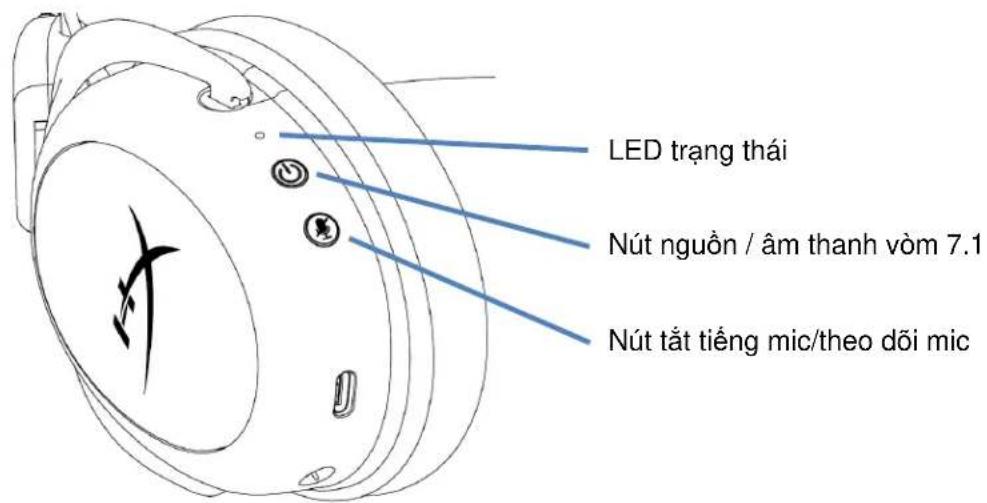
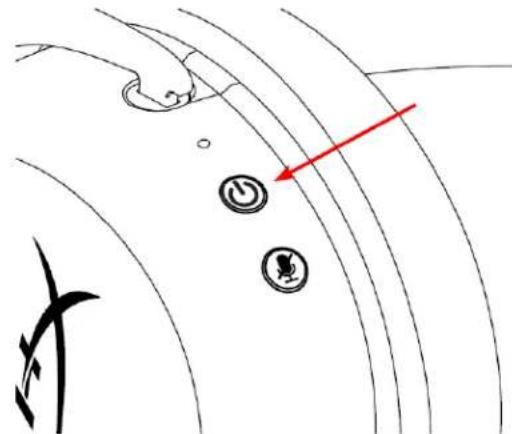
Controls
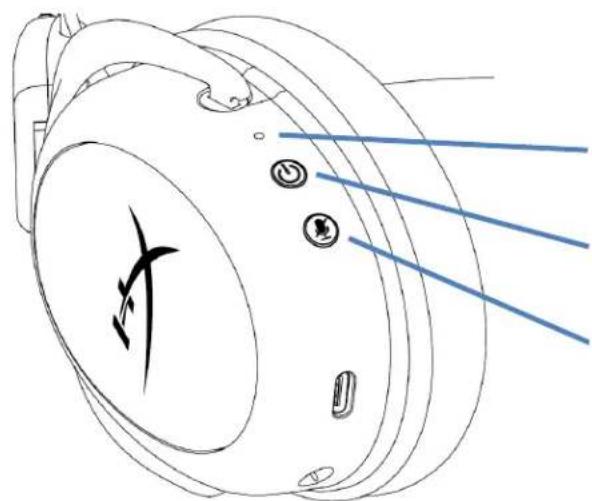
Status LED
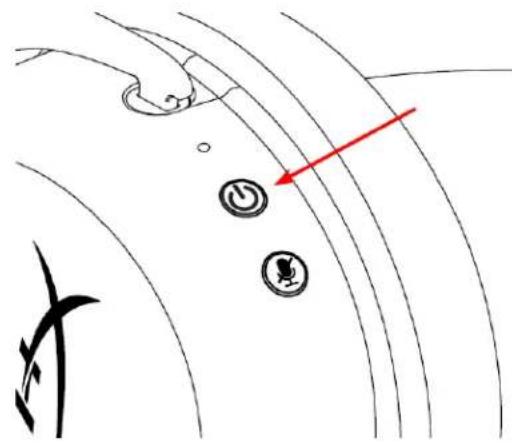
Power / 7.1 Surround Sound button
Mic mute / mic monitoring button
Status LED
| Status | Battery Level | LED |
| Pairing | - | Flash green and red every 0.2s |
| Searching | - | Slow breathing green |
| Connected | 90% - 100% | Solid green |
| 15% - 90% | Blinking green | |
| < 15% | Blinking red |
Power / 7.1 Surround Sound button
- Hold for 3 seconds to power headset on/off
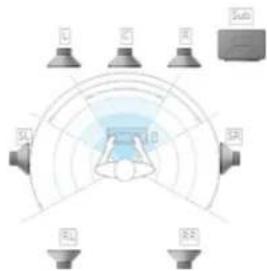
- Press to toggle 7.1 Surround Sound * on/off
Virtual 7.1 surround sound outputs as a 2 channel stereo signal to be used with stereo headphones.
Mic mute / mic monitoring button
- Press to toggle mic mute on/off
LED On - Mic muted
LED Off - Mic active
- Hold for 3 seconds to toggle mic monitoring on/off
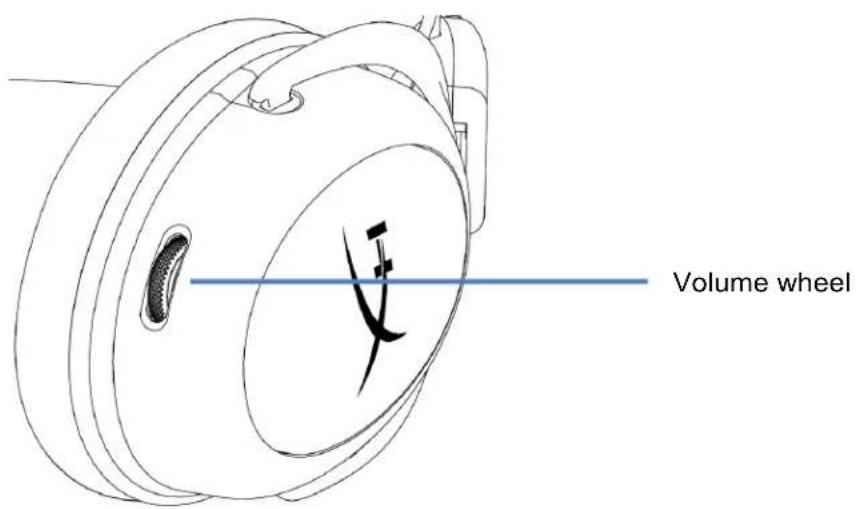
Volume wheel
- Scroll up and down to adjust volume level
WARNING: Permanent hearing damage can occur if a headset is used at high volumes for extended periods of time
Charging the Headset
It is recommended to fully charge your headset before first use.
When charging the headset, the headset status LED will indicate the current charge status.
| Status LED | Charge Status |
| Solid green | Fully charged |
| Breathing green | 15% - 99% battery level |
| Breathing red | < 15% battery level |
Wired charging
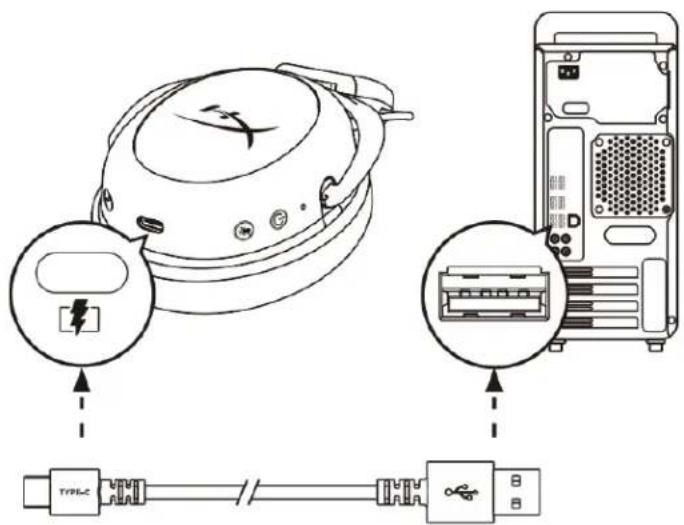
To charge the headset via wired, plug the headset to a USB port with the USB charge cable.
HyperX NGENUITY Software
Download NGENUITY software at: hyperxgaming.com/ngenuity

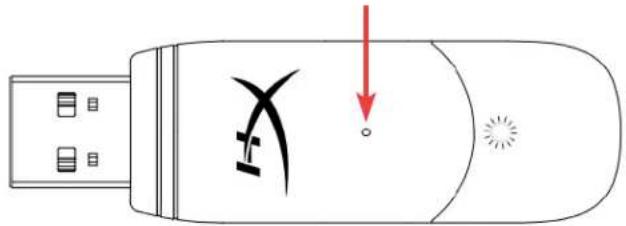
Manually Pairing the Headset and USB Adapter
The headset and USB adapter are automatically paired together out of the box. But if manual pairing is needed, follow the steps below to pair the headset and USB adapter.
- While the headset is powered off, hold down the power button until the headset status LED starts blinking red/green rapidly. The headset is now in pairing mode.
- While the USB adapter is plugged in, use a small tool (e.g. paper clip, SIM tray ejector, etc.) to hold down the button inside the pin hole until the USB adapter LED starts blinking rapidly. The USB adapter is now in pairing mode.
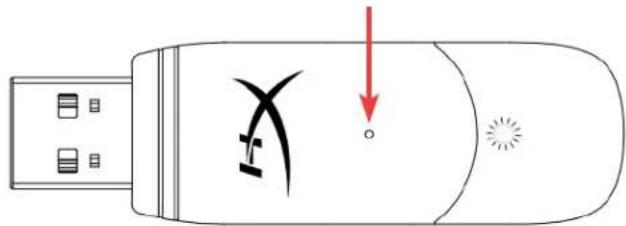
- Wait until both the headset LED and the USB adapter LED are solid. The headset and USB adapter are now paired together.
Questions or Setup Issues?
Contact the HyperX support team at: hyperxgaming.com/support/
HyperX Cloud II Wireless
Choose your configuration
Select the speaker setup below that is most like the configuration on your computer.
Audio channels:
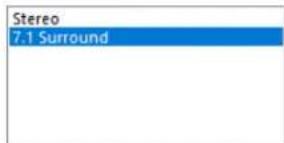
Test
Click any speaker above to test it.
Next
Cancel
USB Headset (Hybrid Cloud Wireless)

Output Device
USB Headset (HyperX Cloud II Wireless)

Adjust Microphone Level

Volume Control (Headphones)


Output to Headphones
All Audio

Switch Output Device Automatically

Controles

LED de estado
USB Hubset (Hyphen Cloud II Wireless)

Output Device
USB Headset (HyperX Cloud II Wireless)

Adjust Microphone Level

Volume Control [Headphones]


Output to Headphones
All Audio

Switch Output Device Automatically

Bedienelemente

Status-LED
Einschalt- / 7.1 Surround Sound-Taste
Choose your configuration
Select the speaker setup below that is most likely to the configuration on your computer.
Audio channels:

Test

Click any speaker above to test it.

USB Headset (Hybrid Cloud Wireless)

Output Device
USB Headset (HyperX Cloud II Wireless)

Adjust Microphone Level

Volume Control (Headphones)


Output to Headphones
All Audio

Switch Output Device Automatically

Commands

Voyant LED d'etat
Bouton alimentation/Son Surround 7.1
Bouton Alimentation/Son Surround 7.1
Choose your configuration
Select the speaker setup below that is most like the configuration on your computer.
Audio channels:

Test

Click any speaker above to test it.
Next
Cancel
USB Headset (Hybrid Cloud Wireless)

Output Device
USB Headset (HyperX Cloud II Wireless)

Adjust Microphone Level

Volume Control (Headphones)


Output to Headphones

Switch Output Device Automatically
All Audio

Controlli

LED di stato
Pulsante Accensione/Audio Surround 7.1
Choose your configuration
Select the speaker setup below that is most like the configuration on your computer.
Audio channels:
Test

Click any speaker above to test it.

Cancel
USB Headset (Hybrid Cloud Wireless)

Output Device
USB Headset (HyperX Cloud II Wireless)

Adjust Microphone Level

Volume Control (Headphones)


Output to Headphones
All Audio

Switch Output Device Automatically

Controles
LED de status
H. CBeToIIOJ KHOJIKN BbIKIIOUeHIN MnKpOoHa
I. USB-aanTep
J. KoHTaKTHoe MmKpOoTBePcTne dIra coprJaEHHa 6ecnpoBODHoro yCTpOuCTBa
K.CBeToIONoHbI INDnKaTOp COCTOHN HecnpoBOdHoro yctpoiCTBa
L. USB-ka6eJb dIJI 3apAdkn
TexHnueckne xapakTepcntkN
Hayushnkn
HAMK:HNHAMUeCKN(53MM)CHEOIMMOBbIMMaHTaM
TIN: OXBtBbAHOUne, 3aKpbItoro TUNa
YactoTHaXapaKTepeCTnka:15T-20K
IMpeDAnC:60OM
YpOBeHb 3BykoBOr DaBHeHn: 104 dSPL/MBT npn 1KtU
Ko3ΦΦnueHT HeJIHHeHbIX NcKaJKeHn: ≤ 1%
Macca: 300 r
Macca c mKpOhoHOM: 309r
Динани Тин ka6eЯ:USB-ka6eь 3apяdkn (0,5M)
MnKpOΦoH
3IeMeHr: 3JIeKTpEThbIKoHDeHcTOpHbIMNKpOfoH
Dnarpamma HanpaBneHHocTn: DByHapBaJeeHHa, c yMOnoDaBJeHHem
YactoTHaXapaKTepeNtka:50T-6,8K
UyBCTBNTeHocTb:-20dB(1B/Na npn 1KfU)
Cpok aBToHOMHO pa6oTbI OT 6aTapeu*
30 yacob
Dnana30H DeiCTBna 6ecnpoBOHorO coeHHenna**
2,4ΓΓ
D0 20 metpoB
- TéctnpoBaHne npoBeHeO npu rpoMKoCTn HayuHnKOB 50%. Bpemra pa6oTbI aKKymyJrToPA 3aBNCIT OT INHTeHCNBHOCTn IcNoJIb3OBAHn.
**Dnana3OH deiCTBn 6ecnpoBOHO CoeHHeHn MoKeT BapbnpoBaTbcR B 3aBNCMOCTN OT yCNOBn OKpykaIOSe Cpebl.
CBeToIIOHbI INHnKaTOp COCTOHHa
KhONka NITAHNA / o6bemHOrO 3ByKa7.1
KhONka OTKJIIOUeHn/peRNCtpaun 3BvKa MMKPOD0Ha
CBeToIOHbI INHnKaTOP COCTOHN
CBeToAnD BKn. MKNPOoH OTKJIIOHeH
CBeToIOnIO BbIKN.-MnKpOfoH BKJIOueH
- YdepxnBaTe HaxaToB TeueHne 3 cekyHd, yTO6bI BKNIOHTb NIN BBIKIOHTb peHCTpaUHO 3Byka MnkpoOHa.
KonecnopepynilpoBkn rpoMkoCTn
KoIecnO peRyInpOBKn rpOMKOCTN
- IcnoIb3yIte npOKpyTky BBepx n BnI3 dIypeRyInpOBKn ypOBHr romKocTn.
PPEyIeHHe. IcnoJIb3ObaHne rapHHTpybl npn BbICOKo rPOMKocTn B TeueHne npoJXtBHO BpeMeHN MOxET npNBecTN K Heo6paTMOMy HApUeHIO cnyxa.
3apЯdka rapHNTypbl
IpeepnepBbIM nCNOb3OBaHHe m peKOMeHdyETc rONHOCTbIO 3apAINTb rapHNTpy.
Iprn 3aprAke raphHtpybl CBeToNDnHbIM HnDKaTOp COCTOHNRApHNTpybl 6yDeT NOKa3bIBaTb Tekyuee COCTOHNHe 3aprKn.
- Побождente, пoka CBeToIIOIbI rapHITypbl n USB-aIaITepa He NaHyT CBeHTbcra He nppepbIBHO.
ConpXeHne raphnTypb n USB-aanTepa BbInonHeNo.
BopocbI nn npo6JeMbI c hacTrokoN?
CBAKNTecb c KOMaHDoTexHnuecko nOndepkKn HyperX no aDpecy: hyperxgaming.com/support/.
HyperX Cloud II Wireless
Parca Numaralari
HHSC2X-BA-RD/G
ICINDEKILER
GenelGorunum 3
Teknik Ozellikler 4
PC ayarlari 5
PlayStation 4 ayarlari 9
Kontroller 10
Durum LED'i 10
Guc/7.1 Surround Ses duugmesi 10
Choose your configuration
Select the speaker setup below that is most likely to the configuration on your computer.
Audio channels:

Test
Click any speaker above to test it.

- Kayit sekmesinden "HyperX Cloud II Wireless" ögesine tiklatin ve Varsayilan Olarak Ayarla dügmesine tiklatin.
USB Headset (Hybrid Cloud Wireless)

Output Device
USB Headset (HyperX Cloud II Wireless)

Adjust Microphone Level

Volume Control (Headphones)


Output to Headphones
All Audio

Switch Output Device Automatically

Kontroller

Durum LED'i
Choose your configuration
Select the speaker setup below that is most like
the configuration on your computer
Audio channels:
Test
Click any speaker above to test it.
Next
Cancel
USB Headset (HyperX Cloud II Wireless)

Output Device
USB Headset (HyperCloud | Wireless)

Adjust Microphone Level

Volume Control (Headphones)


Output to Headphones
All Audio

Switch Output Device Automatically

ト口一儿

ST一夕S LED
電源/7.1 沙瓦卜下沙瓦卜下木子
マイクミート/Mイクモニーネロ
St一夕S LED
USB Headset (HyperX Cloud II Wireless)

Output Device
USB Headset (HyperX Cloud II Wireless)

Adjust Microphone Level

Volume Control (Headphones)


Output to Headphones
All Audio

Switch Output Device Automatically

则
上映LED
7.1 7.1.1
i
图 3.10
| 상품万元以上 | 버닝지수지 | LED |
| 체어름 | - | 0.2万元以上 naked-stock과 직원以上的 naked-stock |
| 相關Stock | - | 上述范围内 naked-stock是不同的 naked-stock |
| 展览会贓売 | 90% - 100% | naked-stock은 不는 naked-stock |
| 15% - 90% | naked-stock이로 naked-stock | |
| < 15% | naked-stock이로 naked-stock |
第7.1 陆L运三歌韵
3
7.1社
7.1 7.1.1
咔耶克卡贝
·
。LED封別- 叶氏克頁全封
LED
aRe Wai 1NGENUITY hxgaming.com/ngenuity

HTI 1
哉在人,如:
https://hypergaming.com/support/
HyperX Cloud II Wireless

H
HHSC2X-BA-RD/G
3
4
m#n PC 5
PlayStation 4 9
aououu 10
LED 10
Joumal/Interscience 7.1 10
10
11
12
12
HyperX NGENUITY 12
mssnnnneennnnnnnnnnnne USB
JW
A. 与 n = 1 的 n 2
B. 250KB USB
C. neapolitan
D. LED
E. 7.1
F.
G. Wurwunumwunum
H. LED
I. USB
J.
K. LED
L. 1000 USB
7
i
15.2016: 53 191. wuJiHuaNnWnWnWnWnWnWnWnWnWn
L
15Hz-20kHz
60Ω
104dBSPL/mW 1kHz
T.H.D.: ≤ 1%
unn:300n.
unwnwneuln:309n.
annnnnnaaennnnne: ananee USB (0.5 n.)
Jainsiwu
- 7.1 Surround wauuuaaennnnae
- Recording "HyperX Cloud II Wireless" Set Default
- Playback "HyperX Cloud II Wireless" Default Device Default
Communication Device Recording "HyperX Cloud II Wireless" Default Device
PlayStation 4
- Input Device USB Headset (HyperX Cloud II Wireless)
- Output Device USB Headset (HyperX Cloud II Wireless)
- Output to Headphones All Audio
- Volume Control (Headphones)
Audio Devices

Input Device
USB Headset (HyperX Cloud II Wireless)

Output Device
USB Headset (HyperX Cloud II Wireless)

Adjust Microphone Level

Volume Control (Headphones)


Output to Headphones
All Audio

Switch Output Device Automatically

#
LED
| xxxxxx | xxxxxx | LED |
| xxxxxx | - | new大陆大陆大陆大陆0.2㎡ |
| xxxxxx | - | new大陆大陆大陆大陆 |
| xxxxxx | 90% - 100% | new大陆大陆大陆 |
| 15% - 90% | new大陆大陆大陆 | |
| < 15% | new大陆大陆大陆 |
7.1
nann 3 nnnnne nnnnnae
7.1
7.1 4
1 20
newwaiy
LED
LED
nannnnnnnnnnnnnnnnnnnnnnnnnnnnnnnnnnnnnnnnnnnnnnnnnnnnnnnnnnnnnnnnnnnnnnnnnnnnnnnnnnnnnnnnnnnnnnnnnnnn
山
Anou: enwnnnnnaeennnnnnnnnnnnnnnnnnnnnnnnnnnnnnnn
nnaaannnnn
NGENUITY: hyperxgaming.com/ngenuity

nssnnnnaaennnnnne nnnnne nnnnne nnnnne nnnnne nnnnne nnnnne nnnnne nnnnne nnnnne nnnnne nnnnne nnnnne nnnnne nnnnne nnnnne nnnnne nnnnne nnnnne nnnnne nnnnne nnnnne nnnnne nnnnne nnnnne nnnnne
ywnwosuunlne USB sgnnngnnnns nnnnnnne nnnnnnnne nnnnnnnnne nnnnnnnnne nnnnnnnnne nnnnnnnnne nnnnnnnnne nnnnnnnnne nnnnnnnnne nnnnnnnnne nnnnnnnnne nnnnnnnnne nnnnnnnnne nnnnnnnnne nnnnnnnnne nnnnnnnnne nnnnnnnnne nannnnnne nannnnnne nannnnnne nannnnnne nannnnnne nannnnnne nannnnnne nannnnnne nannnnnne nannnnnne nannnnnne nannnnnne nannnnnne nannnnnne nannnnnne nannnnnne nannnnnne nannnnnne nannnnnne nannnnnne nenn
- uusgeyovlwnu hnuiulipnlaedkndn LED uusennuusaywosnauuuaa/ien 7 gnuwvglhunue
- uueeuaeeuaaues USB 1uieaeiaen (山 山 山 山 山 山 山 山 山 山 山 山 山 山 山 山 山 山 山 山 山 ) SIM 4) enanipnuluaan an n qun
-
- LED USB
yauuuaaunuiu USB
HyperX: hyperxgaming.com/support/
HyperX Cloud II Wireless
Ma san pham
HHSC2X-BA-RD/G
MUC LUC
Tong quat 3
Thong so ky thai. 4
Thiét lapeoi PC 5
Thiet Iap voi PlayStation 4 9
Nut dieu khien 10
LED trang thai 10
Nut nguon / am thanh vom 7.1 10
Nut tát tiéng mic/theo dōi mic 10
Num dieu chinh am luong 11
Sac tai nghe 12
Sac cóDay 12
Pham mem HyperX NGENUITY 12
Ghép noi tai nghe va bó chuyén dòi USB mòt cach thu cóng 13
Tong quat
A. Nútátieng mic/theodōi mic
B. Cóng sāc USB
C. Cóng micro
D. LED trang thai
E. Nút nguñon / am thanh vom 7.1
F. Num dieu chinh am luong
G. Mic roi
H. LED tát iéng micro
I. Bô chuyén dōi USB
J. Lō changhép nài khongday
K. LED trang thai khong day
L. Cap sac USB
Thong so ky thai
Tai nghe
Màng loa: Dong, 53mm voi nam cham dát hiém
Loai: Chup dαu, Dong kαn
Dap tuyén tan so: 15Hz-20kHz
Trokhang:60Ω
Muc ap suat am: 104dBSPL/mW o 1kHz
Loai cuc: Hai huong, khur on
Dáp túyen tan so: 50Hz-6,8kHz
Dônhay: -20dBV (1V/Pa 0.1kHz)
Thoi luong pin*
30 giò
Dai khongday**
2,4 GHz
Tói da 20 mét
*Da duoc kiem ngiem o muc am luong tai nghe 50%. Thoi luong pin khac nhau tuy theo cach su dung.
**Dai khong day co the khac nhau do dieu kien moi truong.
Thiet lape voi PC

- Ket não bó chuyen bó USB khongDay vói PC.
- Bāt tānghe lén.
- Nhap chuot phai vao bieu tupng loa > Chon Open Sound settings > Chon Sound Control Panel
- Trong the Playback, nhap vao "HyperX Cloud II Wireless" va nhap vao nut Set Default.

- Nhap chuot phai vao "HyperX Cloud II Wireless" va nhap vao Configure Speakers.

- Chon 7.1 Surround lam cau hinh loa va nhap vao Next.

- Trong the Recording, nhap vao "HyperX Cloud II Wireless" va nhap vao nut Set Default.
- Trong the Playback, xac nhān rang "HyperX Cloud II Wireless" duoc dāt lam Default Device va Default Communication Device. Trong the Recording, xac nhān rang "HyperX Cloud II Wireless" duoc dāt lam Default Device.
Thiet lape voi PlayStation 4

- Dāt Input Device thanh USB Headset (HyperX Cloud II Wireless)
- Dat Output Device than USB Headset (HyperX Cloud II Wireless)
- Dāt Output to Headphones than All Audio
- Dät Volume Control (Headphones) len muc toi da.
Audio Devices

Input Device
USB Headset (Hybrid Cloud Wireless)

Output Device
USB Headset (HyperX Cloud II Wireless)

Adjust Microphone Level

Volume Control (Headphones)


Output to Headphones
All Audio

Switch Output Device Automatically

Nut dièu khièn
LED trang thai
USB Headset (HyperX Cloud II Wireless)

Output Device
USB Headset (HyperX Cloud II Wireless)

Adjust Microphone Level

Volume Control (Headphones)


Output to Headphones
All Audio

Switch Output Device Automatically

控件

状态LED
电源/7.1环绕立体声按钮
麦克风静音/麦克风监控按钮
状态LED
USB Headset (HyperX Cloud II Wireless)

Output Device
USB Headset (HyperX Cloud II Wireless)

Adjust Microphone Level

Volume Control (Headphones)


Output to Headphones
All Audio

Switch Output Device Automatically

控制功能

LED 狀態指示燈
電源/7.1環繞音效鍵
麦克風靜音/麦克風監聽(Sidetone 侧音)键
LED 紅態指示燈
HyperX Cloud II Wireless"
"HyperX Cloud II Wireless" 5
.6
X
Speaker Setup
Choose your configuration
Select the speaker setup below that is most like the configuration on your computer.
Audio channels:
Test

Click any speaker above to test it.
No
Cancel
"HyperX Cloud II Wireless"
JlalX Cloud ll Wireless" HyperX Cloud ll Wireless"
PlaySt

(USB (HyperX Cloud II Wireless 1.
(USB (HyperX Cloud II Wireless 2.
- 0
4.
pail yalic
LED
7.1
jSall j/ j
CLLED
glln aagb cgl gaa gaaa aal aalee aee
aLwJnJzJrJ
J 1
a a a a a a a a a a a a a a a a a a a a a a a a a a a a a a a
hyperxgaming.com/ngenuity: NGENUITY

USB
a a a a a a a a a a a a a a a a a a a a a a a a a a a a a a a a
1
1
12
USBLEDCLALLED
12 USB
i 1
/hyperxgaming.com/support HyperX