
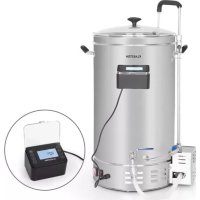
Mundschenk 3XL - Beer dispenser Klarstein - Free user manual and instructions
Find the device manual for free Mundschenk 3XL Klarstein in PDF.

| Product type | Beer brewing system (automatic brewing system) |
| Brand | Klarstein |
| Model | Mundschenk 3XL |
| Article number | 10035022 |
| Power supply | 220-240 V ~ 50/60 Hz |
| Power | 3000 W |
| Total tank capacity | 70 L (65 L up to max mark) |
| Display | Digital display with temperature, power, and timer settings |
| Operating modes | Manual and Automatic (up to 9 steps) |
| Temperature range | Adjustable from 0°C to 100°C (display in °C or °F) |
| Circulation pump | Integrated with flow control valve |
| Special functions | Memory of settings, temperature correction (C1), reminders for adding ingredients |
| Cleaning | Recommended cleaning before first use with appropriate product at 60°C for 30 minutes in circulation |
| Safety | Automatic shutdown in case of overheating (ERR-2), dry run protection, low temperature detection (ERR-1) |
| Tank material | Stainless steel (assumed) |
| Supplied accessories | Malt basket, lower and upper filter screens, telescopic tube, angled circulation hose, cooling coil (mentioned in the process) |
| Approx. dimensions | Approximately 50 x 50 x 70 cm (estimate based on capacity) |
| Approx. weight | Approximately 15-20 kg (estimate) |
| Intended use | Domestic and equivalent (office kitchens, farms, hotels, etc.) |
| Manufacturer | Chal-Tec GmbH, Wallstraße 16, 10179 Berlin, Germany |
| Reparability | Repairs only by an authorized professional workshop; do not open yourself |
Frequently Asked Questions - Mundschenk 3XL Klarstein
User questions about Mundschenk 3XL Klarstein
0 question about this device. Answer the ones you know or ask your own.
Ask a new question about this device
Download the instructions for your Beer dispenser in PDF format for free! Find your manual Mundschenk 3XL - Klarstein and take your electronic device back in hand. On this page are published all the documents necessary for the use of your device. Mundschenk 3XL by Klarstein.
USER MANUAL Mundschenk 3XL Klarstein
INHALTSVERZEICHNIS
Unit 6 Riverside Business Centre
Brighton Road
Shoreham-by-Sea
BN43 6RE
United Kingdom
SICHERHEITSHINWEISE
natural_image
Four-panel image showing a metallic filter component with a central rod, each with a circular cross-section view (no text or symbols visible)natural_image
Three-panel image showing a stainless steel container, a hand holding a black tool, and a metallic bowl with a pipe (no visible text or symbols)natural_image
Symbol of a trash bin crossed with a diagonal line, no text or numbers presentCongratulations on purchasing this device. Please read the following instructions carefully and follow them to prevent possible damages. We assume no liability for damage caused by disregard of the instructions and improper use. Scan the QR code to get access to the latest user manual and more product information.

CONTENT
Safety Instructions 16
Assembly 18
Cleaning the System 19
Display and Settings 20
Brewing Process (example) 24
Recipe Selection in Auto Mode 25
Troubleshooting 26
Hints on Disposal 26
TECHNICAL DATA
| Item number 10035022 | |
| Power supply 220-240 V ~ 50/60 Hz | |
| Performance 3000 W | |
| Capacity | 70 L to the top |
| 65 L to the „max“ line |
MANUFACTURER & IMPORTER (UK)
Manufacturer:
Chal-Tec GmbH, Wallstrasse 16, 10179 Berlin, Germany.
Importer for Great Britain:
Chal-Tec UK limited
Unit 6 Riverside Business Centre
Brighton Road
Shoreham-by-Sea
BN43 6RE
United Kingdom
SAFETY INSTRUCTIONS
Hints on Connection
- Read all instructions carefully.
- Check the product rating label and make sure the water urn voltage is fit for your outlet voltage before using.
• The plug should be connected to the earth block. - Do not use the water boiler if the cord or plug is damaged, it should be replaced before using.
- If the water boiler malfunctions or is damaged, please call customer services for checking and repairing.
- Switch off the button before removing the plug.
• Always switch off before trying to move the water boiler. - Grasp the plug when you remove it. Do not pull the cord.
- Do not let the power cord hang over edge of a table.
- Place the water boiler securely at the centre of the table.
- Do not switch on the water boiler if the water tank is empty.
- Do not place the water boiler near a gas cooker, electric burner or heated oven.
• Power cord and plug must not touch water in the case of a leakage. - Please remove the plug from outlet, and cool off the plug before cleaning.
- Press the Switch Off button, and remove the plug after using.
- This appliance is intended to be used in household and similar applications such as: staff kitchen areas in shops, offices and other working environments, farm houses, by clients in hotels, motels and other residential type environments, bed and breakfast type environments. Do not use this appliance outdoors.
• The appliance requires a 13Amp -16Amp plug. - The appliance is only to be installed in locations where it can be overseen by trained personnel.
• Never leave the unit unattended.
Instructions for safe use

CAUTION
Risk of bruns! The surface of the water boiler gets very hot during use. Do not touch the surface.
- Do not remove the lid while boiling.
- Position the lid so that steam is directed away from the handle.
- Do not carry the urn while it contains water.
- If the appliance is overfilled, boiling water may overflow.
- If the power supply cord is damaged, it must be replaced by the manufacturer or its service agent or a qualified person in order to avoid a hazard.
- Young children should be supervised to ensure that they do not play with the appliance.
- The appliance is not suitable for installation in an area where a water jet could be used.
- The appliance must not be cleaned by a water jet. The appliance must not be immersed in water or liquid.
Note: Children must not use the appliance! Persons with reduced physical, sensory or mental capabilities or those with a lack of experience and knowledge may only use the device if they are instructed on how to do so by a person responsible for their safety, or if they are supervised and understand the hazards associated with the use of the device.
ASSEMBLY
Structure of the system
With the vessel, almost all styles of beer can be brewed. To do this successfully, the system must be correctly set up. Make yourself familiar with the features of the system.
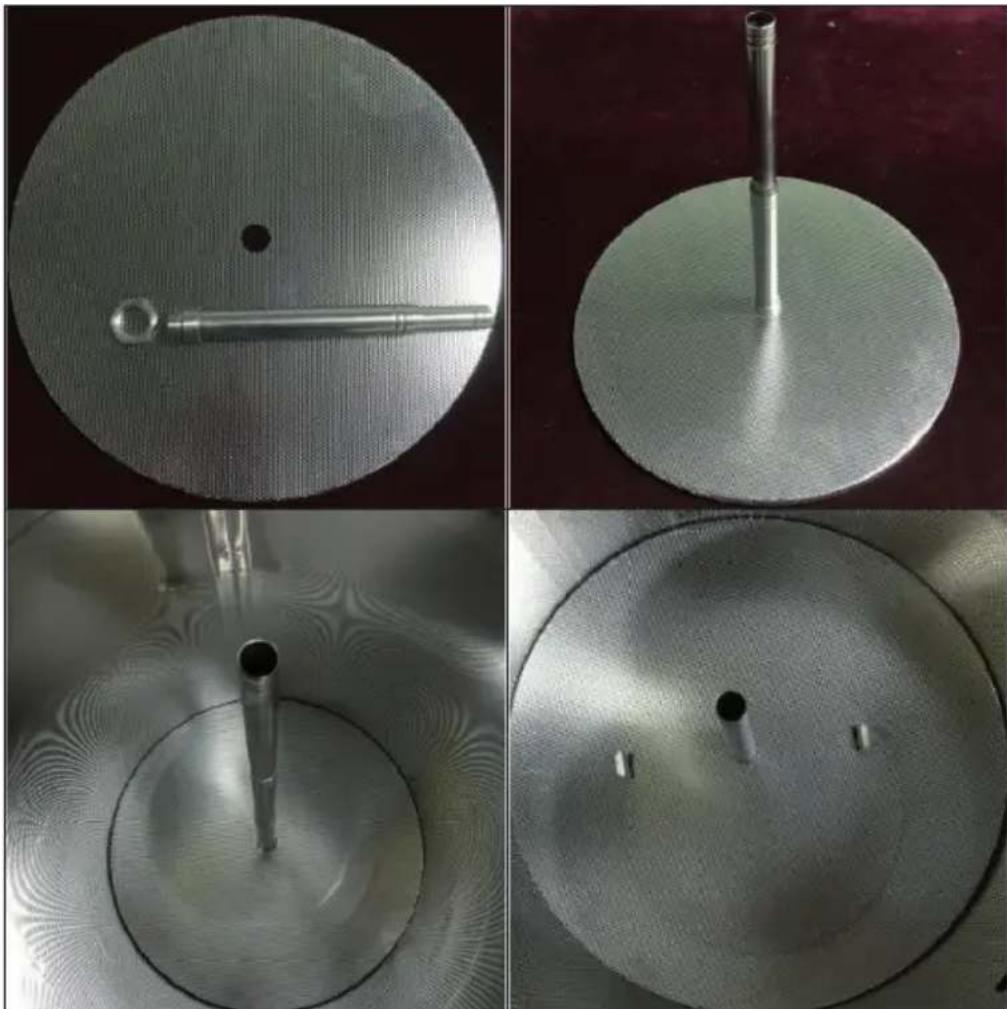
Assembly of telescopic tube and strainer insert
1 Screw the telescopic tube to the lower filter screen (the screen without the two small handles).
2 Place the lower filter screen with the telescopic tube in the basket.
3 Insert the basket into the tank using the basket handle.
4 Adjust the ideal height of the telescopic tube according to the volume of malt.
5 While adding the ingredients, place the black cap on the telescopic tube to prevent it from clogging.
6 Then place the upper filter sieve (the sieve with the two small handles) in the basket and insert the telescopic tube through the central hole of the upper filter sieve.
natural_image
Four-panel image showing a metallic filter or sensor device with internal components, including a cylindrical rod and a pipette tip (no text or symbols visible)Assembly of the circulation line
natural_image
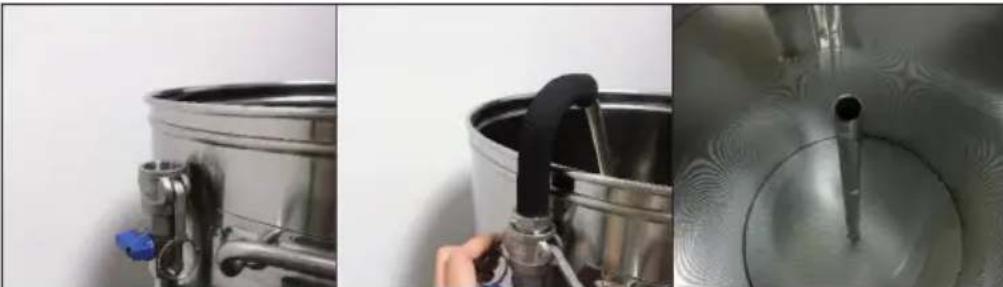
Three-panel image showing a stainless steel container, a hand holding a black tool, and a metallic bowl with a pipe (no visible text or symbols)Note: Do not run the pump without water. The boiler must be filled with water before the pump is switched on. We recommend using the pump during the mashing process.
1 Identify the thicker end of the bent pipe. This is the end that you connect to the circulation pipe that runs along the outside of the brewer.
2 Insert the bent pipe. Push down the two handles on the connector to fix the pipe in place.
3 Switch the pump on after the above procedure.
4 Set the correct circulation speed with the blue valve. If the pump speed is too high, the grain basket will overflow down the central pipe and the bottom of the boiler can run dry, causing components to burn and the appliance to overheat.
5 Adjust the flow rate until a satisfactory circulation speed is achieved.
6 Switch off the pump after mashing. Do not remove the bent pipe until the valve is closed and the pump is switched off.
CLEANING THE SYSTEM
Before the brewing machine is used to brew beer, it should be thoroughly cleaned. To this end, the items must be checked for contamination. If any exist, they must be removed with a suitable cleaning agent. After assembling the system, fill the system with about 5-10 liters of water and a suitable cleaning agent. This cleaning mixture should circulate at about 60 degrees for half an hour. Afterwards, the device including all lines must be rinsed with water. After this process, the brewing kettle can be used to brew beer.
DISPLAY AND SETTINGS
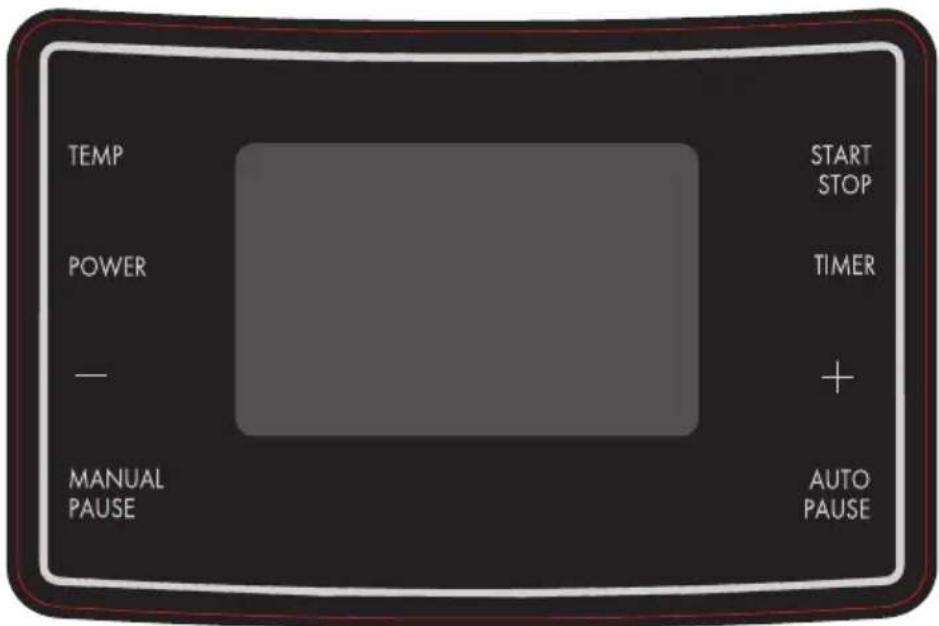
Manual Mode Setting
1 Switch on the power switch, then press the MANUAL button.
2 TEMP is for Temperature setting, POWER is for Wattage setting, TIMER is for session timing. All 3 of these must be set before machine will start. These can be set in any order.
3 Press START button when all 3 settings have been made, and the manual session will start.
4 The default boiling temperature is 100^ C in our program, the timer will not be triggered if temperature does not indicate 100^ C. In this case, please put the cover on for 1-2 minutes (or see below) to achieve 100^ C on the display.
5 If the machine starts to boil, but shows a lower temp on the display, make the following adjustment to set the temp at 100^ C and trigger the timer.
6 Press „-“ and „+“ button together until the display shows the C1/F1 sign.
Temperature correction range is from -10 °C to +10 °C. Press TEMP button after finnishing the temperature correction.
7 Press Manual/Pause button during heating, machine back to edit page. You can edit Temp/Power/Timer, then press Manual/button again to confirm and machine back to heating.
8 Long press TEMP for 5 seconds, switch degree centigrade to Fahrenheit. This operation only can be proceeded when you switch on the machine before any setting.
Memory Function in Manual Mode
1 Press MANUAL/PAUSE button in edit page for 5 seconds, and release it. You can record the last setting, There is ringing sound of bell for successful recording.
2 Press START button after above operation, machine back to work, and carry out the input data.
3 Press STOP button, machine stop working.
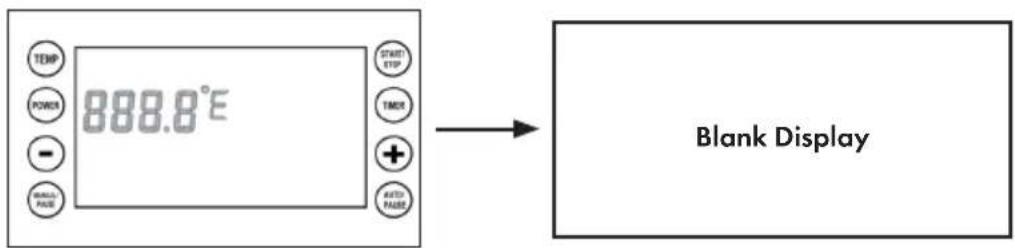
4 Long press AUTO/PAUSE button in BLANK PAGE as below (display shown current temperature only as below) for 5 seconds to restore factory settings, there's a slower ringing for restoring successfully. There's a slower ringing for restoring successfully.
| MANUAL/PAUSE | ||
| TEMP POWER TIMER | ||
| Press START button. The machine starts working. There is an „H" flashing at the top left corner. | ||
| Press MANUAL/PAUSE during heating. Machine back to edit page. You can edit TEMP, POWER, and TIMER. Press MANUAL button to confirm. | ||
| Press MANUAL/PAUSE button in edit page for 5 seconds, then release it. You will hear a ringing bell sound. It means you have recorded the data successfully. | ||
| Press MANUAL again, the machine goes back to work. | Press STOP. The machine stops working. | |
Auto Mode Setting
1 Switch on the device, then press AUTO button.
2 S1 will be shown on the top left corner, input the 3 settings - TEMP, TIMER and POWER. (as above)
3 After you have set the 1st program, press AUTO button again then enter into 2nd program setting. 3rd to 6th programs are set as 1st and 2nd.
4 When you have entered up to 9 steps as you require, press the START button to confirm the above step mashing settings.
5 When you have entered up to 9 steps as you require, press the START button to confirm the above step. This program only supports one boiling setting in each Recipe. You can adjust the boiling power during operation anytime. The step after boiling will be skipped if 9 steps is too much for you. This program only supports one boiling setting in each Recipe. You can adjust the boiling power during operation anytime.
6 When S1 temperature is reached, there's reminder ringing, timer will not countdown unless you press auto button to confirm. It is ingredients filling reminder.
7 The boiling reminder is same as above, when machine finish the step before boiling, there is reminder ringing, program will not enter boiling step unless you press AUTO button for confirmation. It is sparging reminder.
8 PAUSE button will stop the element and timer working temporarily, and you can amend the data, afterward, press AUTO to continue.
9 Press START button when auto mode is running, you can skip the step you do not need instantly.
10 Setting hop reminder in boiling process, press - or + for countdown timer setting. Press TIMER button for 2nd, 3rd...9th setting. The countdown timer must be boiling leads time>1st >2nd>3rd...>9th. Press START button start to heat.
11 Long pressing POWER and TIMER buttons for 5s in BLANK PAGE, operation enter to recipe selection. Press "-" or "+" to choose required recipe. Recipe storage is up to 9 programs. Press Start button to confirm the selected recipe, BLANK PAGE will be shown on display, then press AUTO/PAUSE button enter the chosen recipe edit page. You can press START button to run the picked up program instantly or press AUTO/PAUSE button to edit/check the program step by step
12 If you press STOP button to skip all the step, machine stop working, and display shown END, bell ringing for 30s, press the STOP button again enter to BLANK PAGE.
Memory Function in Auto Mode
1 After setting all the data you need in auto mode, press STOP button until BLANK PAGE. Please do not switch off the machine! Follow below step for recording.
2 Press MANUAL button enter manual edit page, then long press MANUAL button for 5 seconds then release it. You can record the last manual and auto mode setting. There is ringing sound of bell for successful recording.
3 Switch off/on the machine, then press AUTO button, the 1st step of last chosen program will be shown on the display.
4 Press START button, machine start working.
5 Our program not support batch storage. Each recording need to repeat above instruction.
BREWING PROCESS (EXAMPLE)
• Always Clean the machine before and after use.
- Assemble the Bazooka filter to the tap, and add the required quantity of water before switching on.
- Heat up the water to 66-68°C, then add the grain into grain basket and stir it gently.
- When the correct temperature is reached, start the circulation pump and regulate the flow as described in the next paragraph.
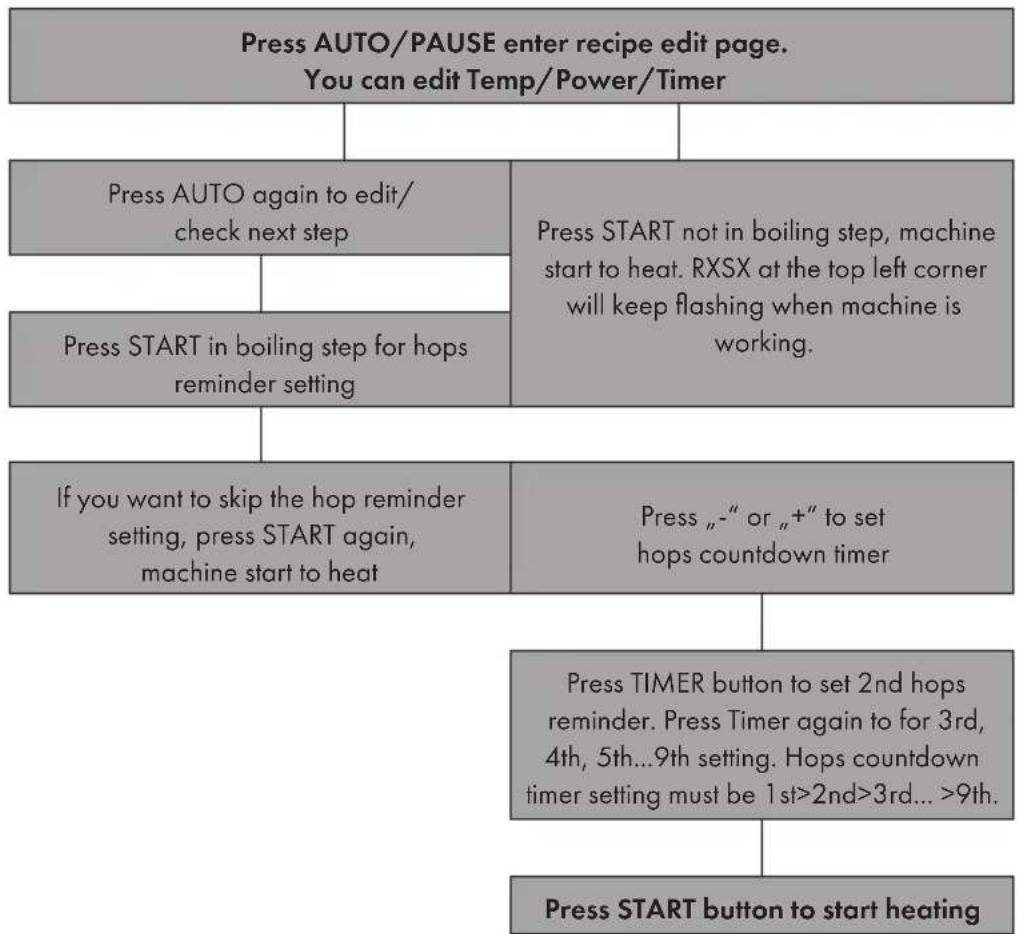
flowchart
graph TD
A["Press AUTO/PAUSE enter recipe edit page.<br>You can edit Temp/Power/Timer"] --> B["Press AUTO again to edit/check next step"]
B --> C["Press START not in boiling step, machine start to heat. RXSX at the top left corner will keep flashing when machine is working."]
B --> D["Press START in boiling step for hops reminder setting"]
D --> E["If you want to skip the hop reminder setting, press START again, machine start to heat"]
E --> F["Press "-" or "+" to set hops countdown timer"]
F --> G["Press TIMER button to set 2nd hops reminder. Press Timer again to for 3rd, 4th, 5th...9th setting. Hops countdown timer setting must be 1st>2nd>3rd... >9th."]
F --> H["Press START button to start heating"]
RECIPE SELECTION IN AUTO MODE
Press Power & Timer for 5 seconds in BLANK PAGE, enter to Recipe selection operation
Press „-“ or „+“ for recipe selection.
Press Start/Stop to confirm the chosen Recipe enter BLANK PAGE. Please do not switch off the machine.
Press Auto/Pause button enter chosen recipe edit page. You can edit Power/Timer/Temp or press Start/Stop button to start the machine.
• The default time for the 1st pass is 60 minutes (depending on the recipe).
- The temperature for the 2nd pass is 78 - 80^ , the run time is 20 minutes (depending on the recipe).
- After mashing, carefully lift the grain basket by the handle and attach it to the rim of the kettle
- Sprinkle the basket with water to remove any sugar residue from the grain in the basket, and then drain the basket for another 10 minutes. Remove it afterwards
- Heat the appliance up to boiling temperature. The cooking time is 90 minutes (depending on the recipe).
- Add the remaining ingredients at the right time according to your recipe.
- Immerse the cooling coil 15 minutes before the end of the cooking process to sterilize it.
- After cooking, cool the mash to 20 °C with the help of the cooling coil before filling it into a fermentation vessel via the drain tap on the front of the boiler.
TROUBLESHOOTING
| Problem Possible cause and suggested solution | |
| Ingredients stuck in the pump. | Flush the pump by connecting a hose to the curve pipe. |
| Dismantle the pump to remove the ingredients. | |
| Failing to reach 100 °C. Put lid on for 1 to 2 mins.Do temperature correction. | |
| Temperature correction. Do | temperature correction. Press „-“ and „+“ at the same time enter into C1 temperature correction setting.Setting range is from -10°C to +10°C (or -50 °F. to +50 °F, respectively). Press Temp button to confirm the setting and exit the temperature correction page |
| ERR-1 shown on display. Temperature is lower than -20 °C, low temperature warning.Possible sensor failure. Please contact Customer Service. | |
| ERR-2 shown on display. Temperature is higher than 120 °C, overheat/boil-dry warning.Sensor failure, please contact dealer for replacement. | |
| During the heating process, the device suddenly goes off. | Reduce the heating temperature. |
HINTS ON DISPOSAL

natural_image
Symbol of a trash bin crossed with a diagonal line, no text or numbers presentIf there is a legal regulation for the disposal of electrical and electronic devices in your country, this symbol on the product or on the packaging indicates that this product must not be disposed of with household waste. Instead, it must be taken to a collection point for the recycling of electrical and electronic equipment. By disposing of it in accordance with the rules, you are protecting the environment and the health of your fellow human beings from negative consequences. For information about the recycling and disposal of this product, please contact your local authority or your household waste disposal service.
Estimado cliente:
ÍNDICE DE CONTENIDOS
Unit 6 Riverside Business Centre
Brighton Road
Shoreham-by-Sea
BN43 6RE
United Kingdom
natural_image
Four-panel image showing a metallic filter or sensor device with internal components, no visible text or symbols.natural_image
Three-panel image showing a stainless steel container, a hand holding a black tool, and a circular metallic dish with a pipe (no visible text or symbols)natural_image
Symbol of a trash bin crossed with a diagonal line, no text or numbers presentSOMMAIRE
Unit 6 Riverside Business Centre
Brighton Road
Shoreham-by-Sea
BN43 6RE
United Kingdom
CONSIGNES DE SÉCURITÉ
natural_image
Four-panel image showing a metallic filter component with a central rod, each with a circular cross-section view (no text or symbols visible)natural_image
Three-panel photo sequence showing a stainless steel mixing bowl, a hand holding a tool, and a circular tank with a pipe (no visible text or symbols)natural_image
Symbol of a trash bin crossed with a diagonal line, no text or labels presentINDICE
PRODUTTORE E IMPORTATORE (UK)
Produttore:
Chal-Tec GmbH, Wallstraße 16, 10179 Berlino, Germania.
Unit 6 Riverside Business Centre
Brighton Road
Shoreham-by-Sea
BN43 6RE
United Kingdom
AVVERTENZE DI SICUREZZA
natural_image
Four-panel image showing a metallic filter component with a central rod, each with a circular cross-section view (no text or symbols visible)natural_image
Three-panel image showing a stainless steel container, a hand holding a black tool, and a circular metallic dish with a tube (no visible text or symbols)natural_image
Symbol of a trash bin crossed with a diagonal line, no text or numbers present
- INHALTSVERZEICHNIS
- SICHERHEITSHINWEISE
- CONTENT
- MANUFACTURER & IMPORTER (UK)
- Manufacturer:
- Importer for Great Britain:
- SAFETY INSTRUCTIONS
- Hints on Connection
- Instructions for safe use
- CAUTION
- ASSEMBLY
- Structure of the system
- Assembly of telescopic tube and strainer insert
- Assembly of the circulation line
- CLEANING THE SYSTEM
- DISPLAY AND SETTINGS
- Manual Mode Setting
- Memory Function in Manual Mode
- Auto Mode Setting
- Memory Function in Auto Mode
- BREWING PROCESS (EXAMPLE)
- RECIPE SELECTION IN AUTO MODE
- TROUBLESHOOTING
- HINTS ON DISPOSAL
- Estimado cliente:
- ÍNDICE DE CONTENIDOS
- SOMMAIRE
- CONSIGNES DE SÉCURITÉ
- INDICE
- PRODUTTORE E IMPORTATORE (UK)
- AVVERTENZE DI SICUREZZA
Brand : Klarstein
Model : Mundschenk 3XL
Category : Beer dispenser