Brauheld Smart 45 - Beer dispenser Klarstein - Free user manual and instructions
Find the device manual for free Brauheld Smart 45 Klarstein in PDF.
| Product type | Beer brewing (beer dispenser) |
| Brand | Klarstein |
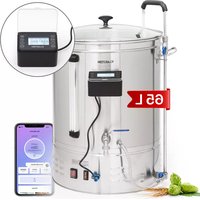
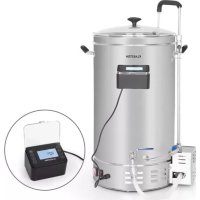
| Model | Brauheld Smart 45 |
| Maximum capacity (liquid only) | 45 L |
| Maximum capacity (liquid and malt) | 55 L |
| Power supply | 220-240 V, 50/60 Hz |
| Power | 100-3300 W |
| Display | Digital screen with temperature, power and time adjustment |
| App control | Yes, via Klarstein app (WiFi 2.4 GHz) |
| Main functions | Temperature adjustment (30-100 °C), power (100 W - max), time (1-99 min), single-step mode, multi-step mode, temperature calibration |
| Material | Stainless steel (tank, pipes, filter) |
| Maintenance | Clean parts in contact with wort after each brewing; do not use acidic, alkaline or salty products; do not put in dishwasher |
| Safety | Automatic shut-off, overheating protection, risk of burns (hot surfaces), do not leave unattended |
| Weight | Approximately 15 kg (estimate) |
| Dimensions (L x W x H) | Approximately 40 x 40 x 50 cm (estimate) |
Frequently Asked Questions - Brauheld Smart 45 Klarstein
User questions about Brauheld Smart 45 Klarstein
0 question about this device. Answer the ones you know or ask your own.
Ask a new question about this device
Download the instructions for your Beer dispenser in PDF format for free! Find your manual Brauheld Smart 45 - Klarstein and take your electronic device back in hand. On this page are published all the documents necessary for the use of your device. Brauheld Smart 45 by Klarstein.
USER MANUAL Brauheld Smart 45 Klarstein
| 456 | |||
| Cancel EZ Mode | Cancel | Done | |
| Reset the device first. Power on the device and confirm that the indicator is blinking rapidly. Note: please complete the network distribution within 3 minutes after resetting the device. | Adding device... Ensure that the device is powered on. | Added successfully Mash boiler Device added successfully | |
| Perform not pairing as prompted. | 01:58 | ||
| Confirm the indicator is blinking rapidly. Next | Scan devices. | Register on Cloud | Initiate the device. |
Einstufiger Modus
Member of Berlin Brands Group
Handwerkerstr. 11
15366 Dahlwitz-Hoppegarten
Deutschland
Berlin Brands Group UK Ltd
PO Box 1145
Oxford, OX1 9UW
United Kingdom
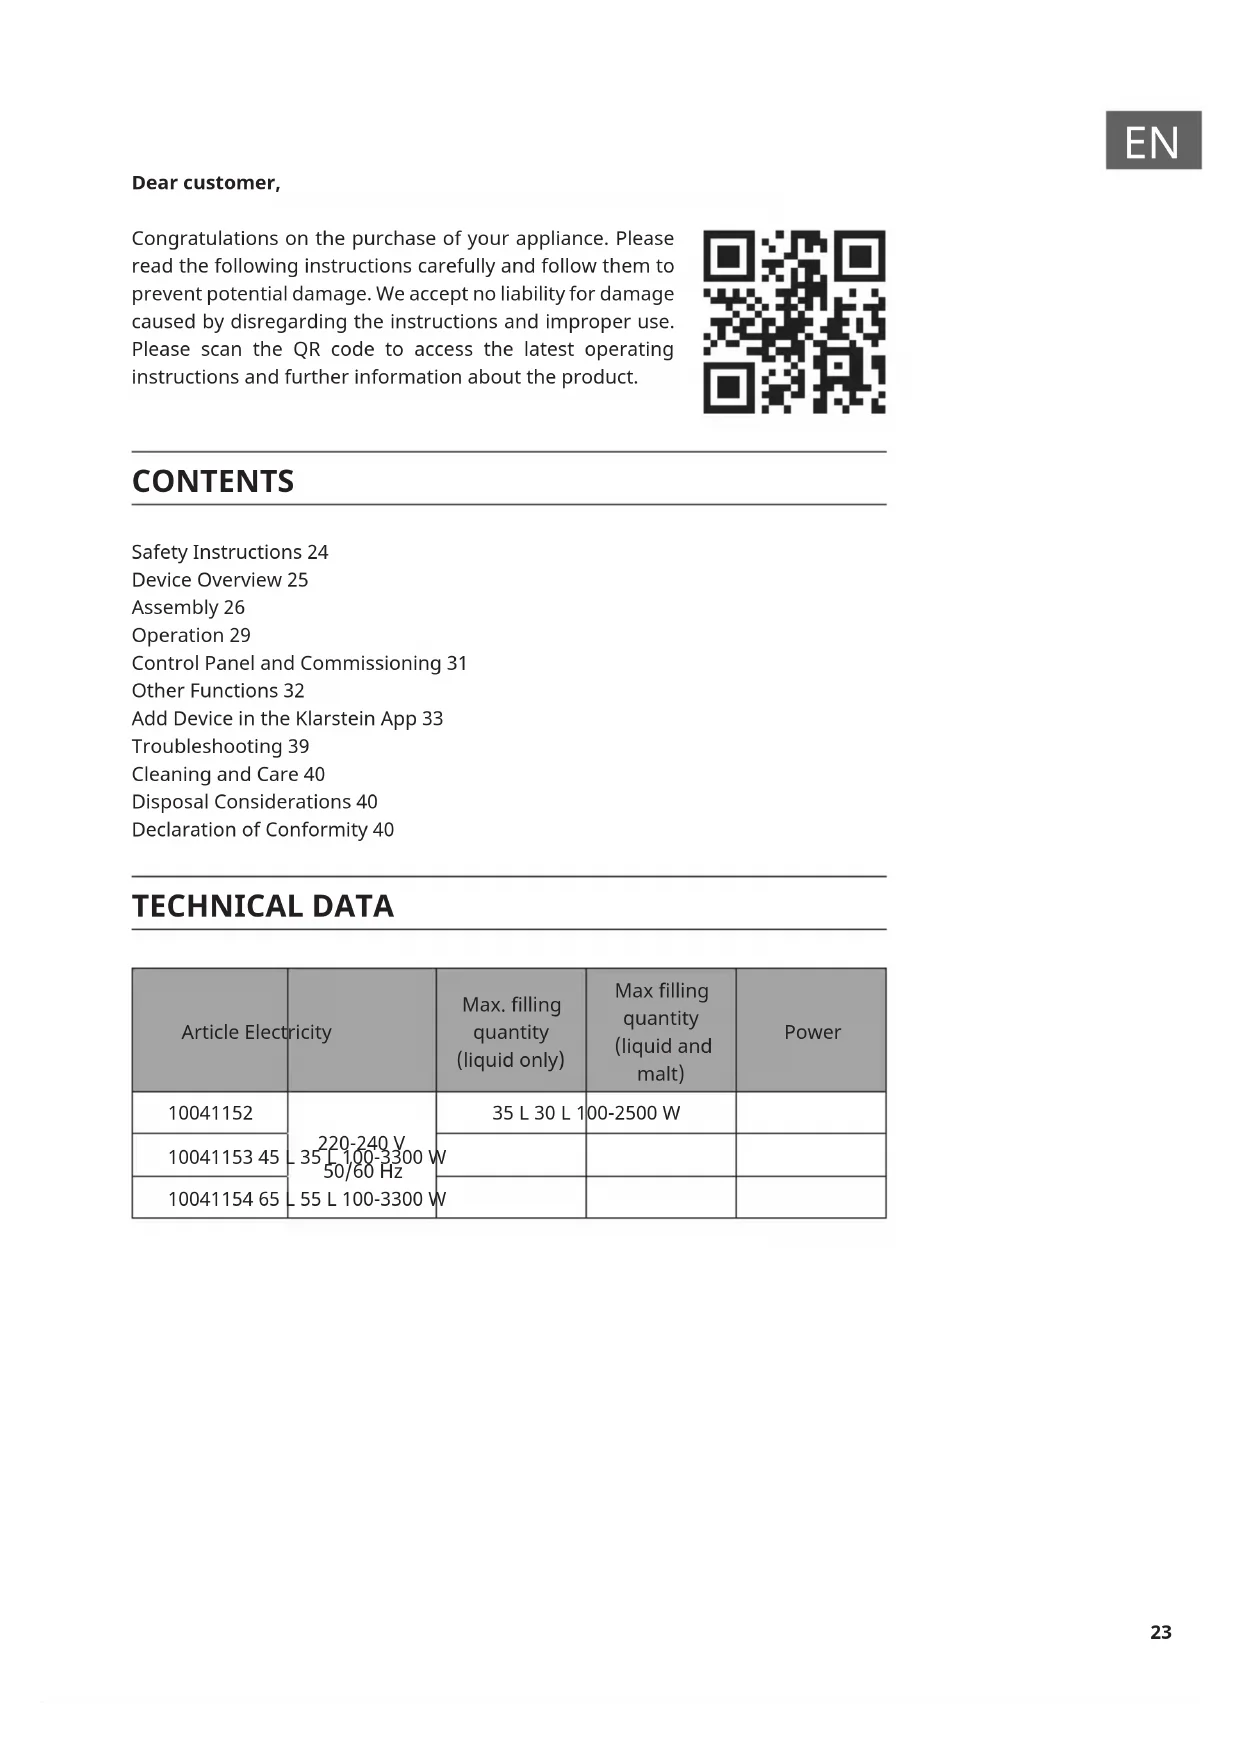
Congratulations on the purchase of your appliance. Please read the following instructions carefully and follow them to prevent potential damage. We accept no liability for damage caused by disregarding the instructions and improper use. Please scan the QR code to access the latest operating instructions and further information about the product.

CONTENTS
Safety Instructions 24
Device Overview 25
Assembly 26
Operation 29
Control Panel and Commissioning 31
Other Functions 32
Add Device in the Klarstein App 33
Troubleshooting 39
Cleaning and Care 40
Disposal Considerations 40
Declaration of Conformity 40
TECHNICAL DATA
| Article Electricity | Max. filling quantity (liquid only) | Max filling quantity (liquid and malt) | Power |
| 10041152 | 35 L 30 L 100-2500 W | ||
| 10041153 45 | 50/60 Hz | ||
| 10041154 65 | 55 L 100-3300 W |
SAFETYINSTRUCTIONS
- Children must not use the appliance! Mentally, sensory and physically impaired persons may only use the device if they have been informed in detail about the functions and safety precautions by a supervisor responsible for them beforehand and understand the associated risks.
- Check the voltage on the product label before use. Ensure that you only connect the appliance to sockets with the appropriate voltage.
- Do not use the device with a damaged power cord. If the power cord is damaged, it must be replaced by the manufacturer, an authorised specialist company or a similarly qualified person.
- Switch off the device after each use and pull the plug out of the socket.
- Before cleaning, remove the plug from the socket and allow the device to cool down completely.
- Place the device securely in the centre of the work surface.
- Do not let the cable hang over the edge of the work surface.
- Do not switch on the appliance when the tank is empty.
- Do not place the device near gas stoves, electric stoves or ovens.
- Make sure that the plug and power cord do not get wet in case the unit leaks.
- The appliance is intended for use in the home and similar environments only. It is not intended for commercial use. These include kitchens in offices, farms, hotels, motels and establishments offering bed & breakfast.
- Do not leave the device unattended during operation.
- Do not remove the lid while the contents are boiling.
- When removing the lid, hold it so that the steam flows away from you.
- Do not move the device while there is liquid in it.
- To ensure that the liquid does not overflow, do not overfi ll the device.
- If the power cord is damaged, it must be replaced by the manufacturer, an authorised specialist company or a similarly qualified person.
- Make sure that children do not play with the device.
- Do not place the unit near water or in damp rooms.
- Do not clean the device with a high-pressure cleaner and do not immerse the device in water.

CAUTION
Risk of burns! Parts of the unit can become very hot during use. Do not touch the surfaces during use.
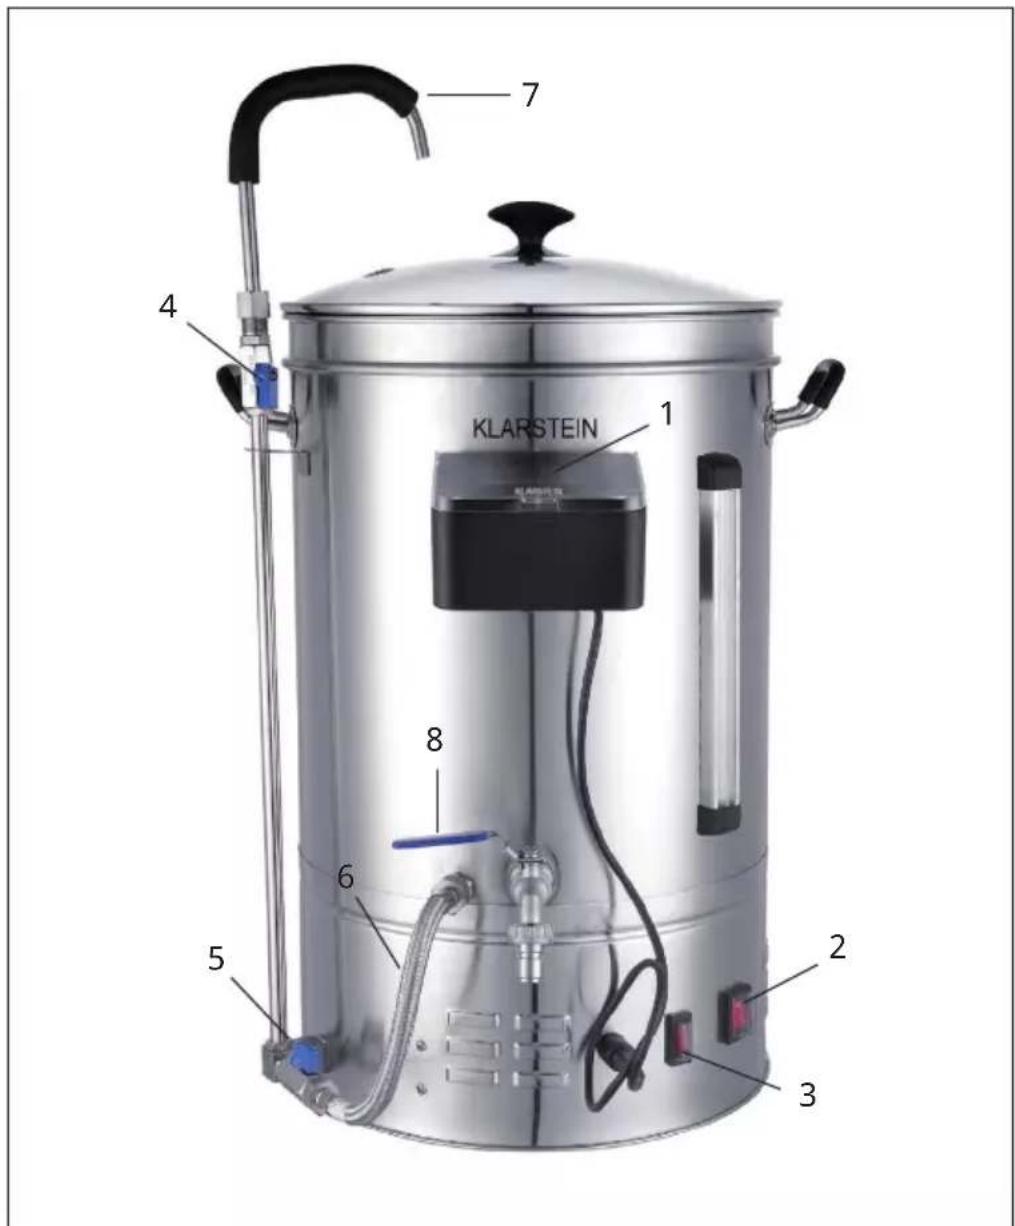
| 1 Control panel 5 | Valve against burning (Anti-Burn-Circulation) | |
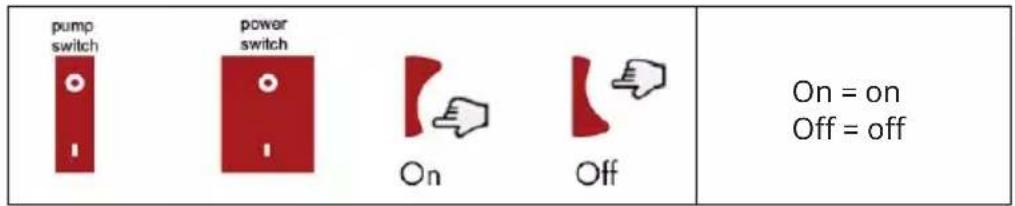
| 2 Power switch 6 | Line against burning (Anti-Burn-Circulation) | |
| 3 Pump switch 7 | Recirculation line (Mash Flow Technology) | |
| 4 Recirculation vent (Mash Flow Technology) | 8 Outlet tap |
ASSEMBLY
Individual parts
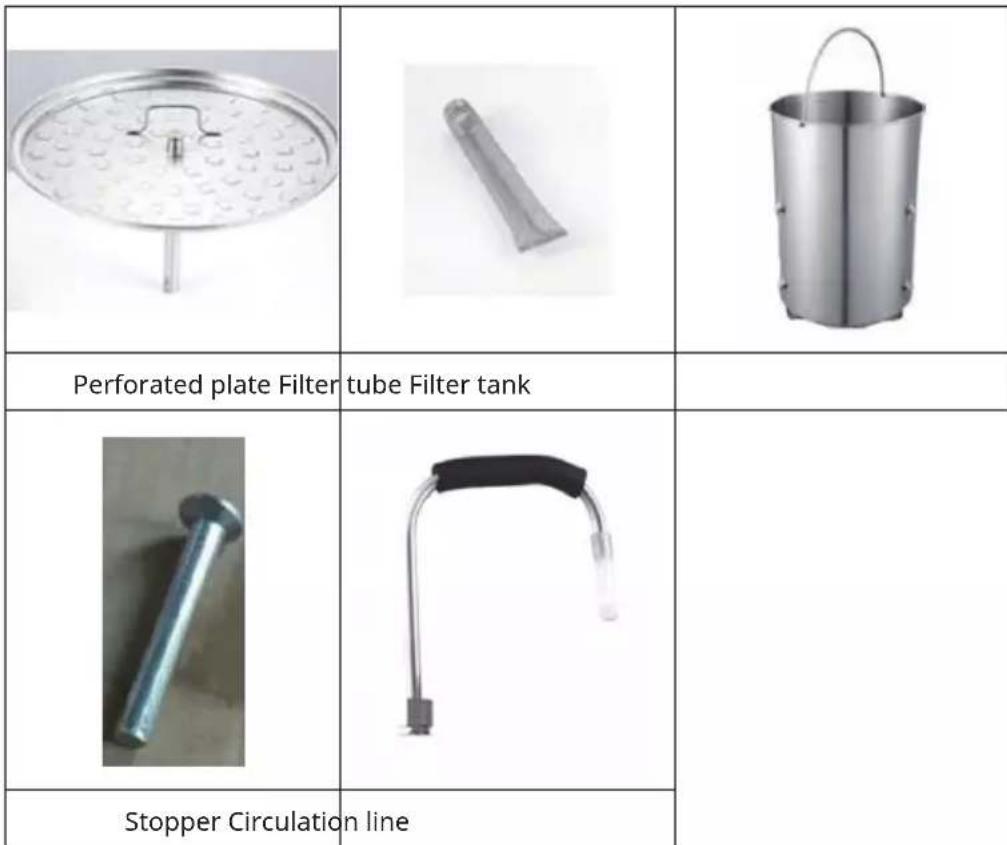
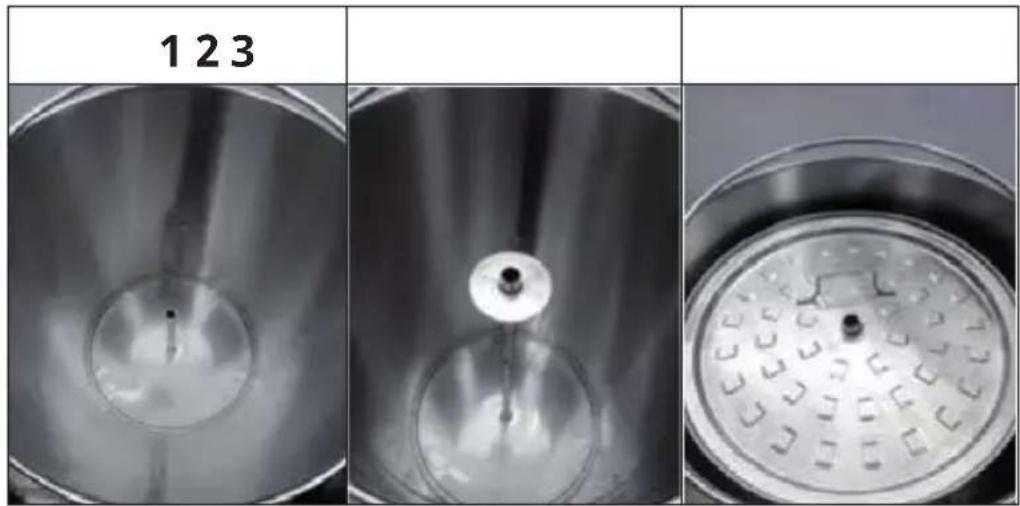
Connecting the filter tube
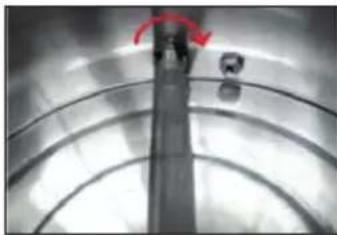
Installation of the perforated plate
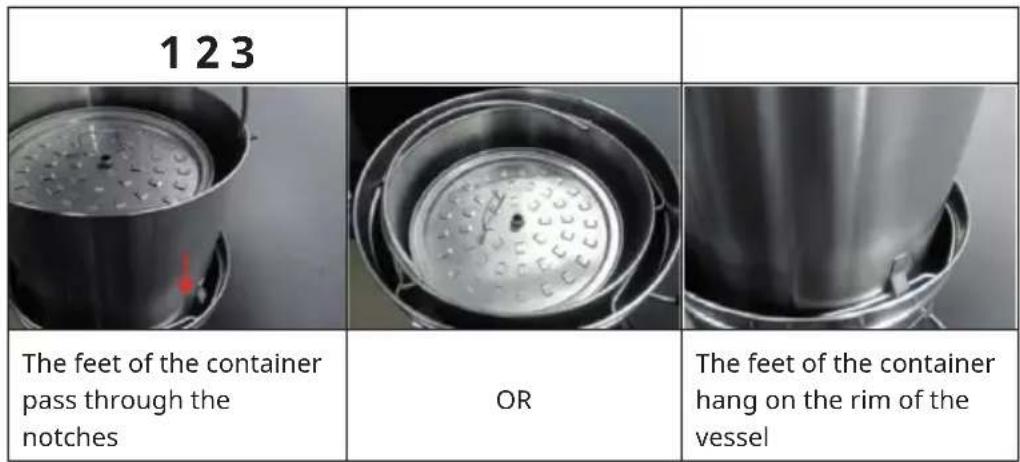
Installation of the filter container
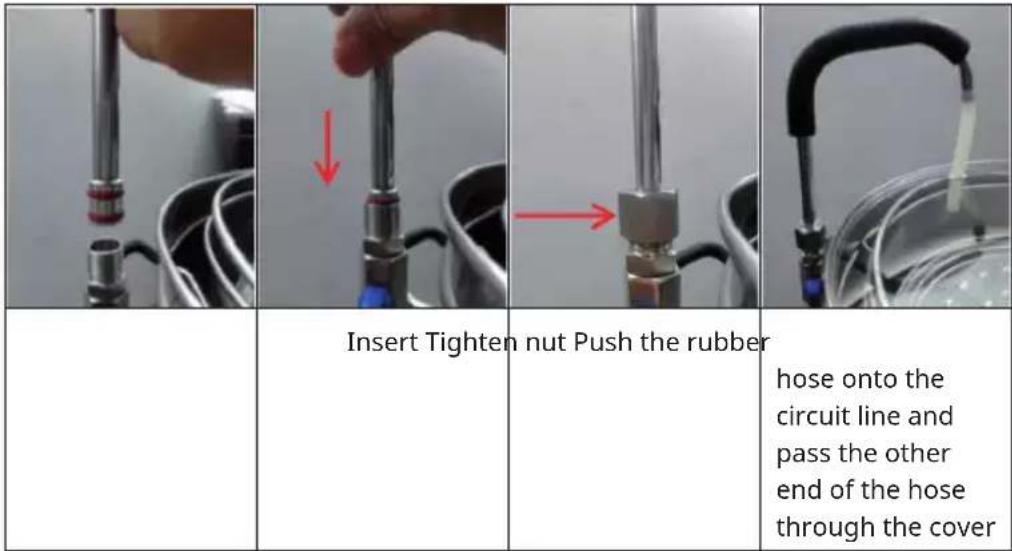
Installation of the circulation line
OPERATION
Connection of the control panel
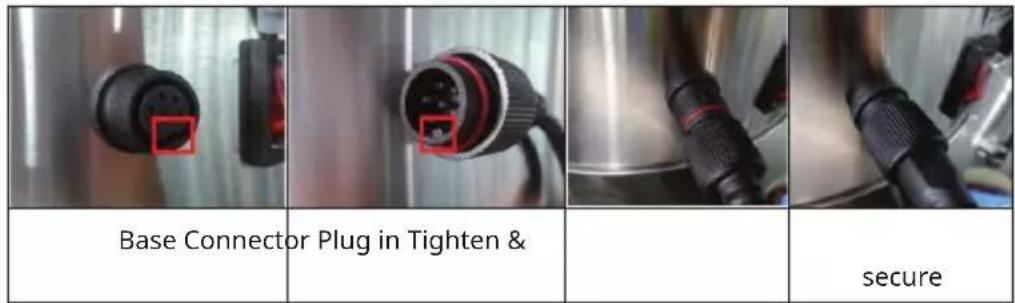
Note: Do not overtighten the plug, otherwise the base may come loose or be damaged.
Operation of the switch
Operating the outlet tap
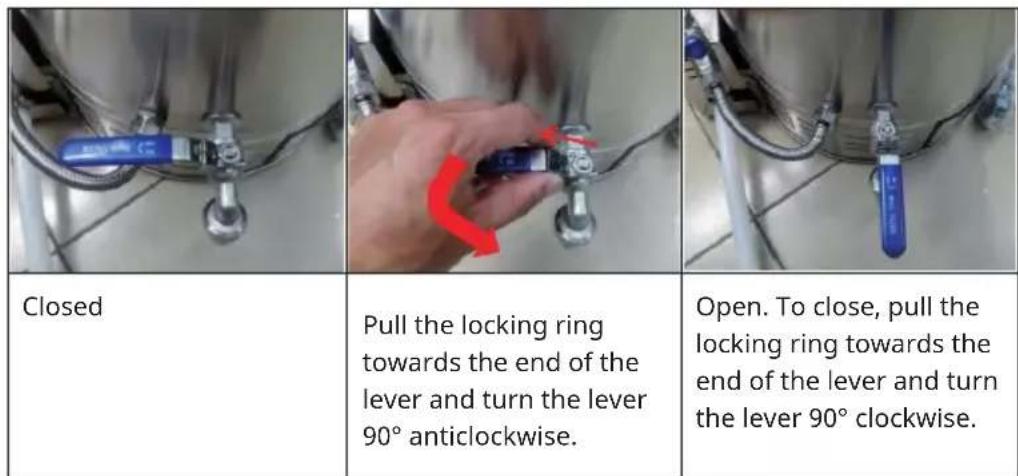
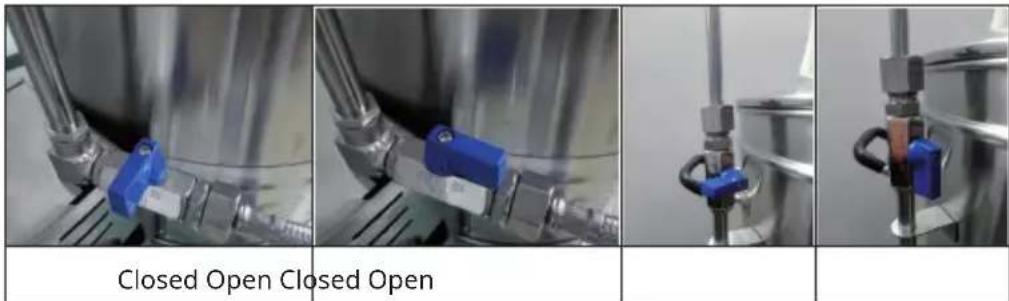
Valve operation
Note: Never open the circuit valve before installing the circuit pipe and pass the pipe through the cover. Otherwise, hot water or wort can cause burns.
CONTROL PANEL AND COMMISSIONING
Control panel
| TEMP POWER — RESET KLARSTEIN START STOP TIME + C/F | |
| Temp Temperature adjustment from 30 °C - 100 °C | |
| Power Adjustment of the power from 100 W to maximum power | |
| Time Setting the time between 1 and 99 minutes | |
| Start/Stop Starting/stopping a programme | |
| Reset Resetting the machine during connection | |
| C/F Changing the temperature display | |
| + Increase value | |
| - Decrease value |
Switching on the appliance
| 15°C -- Min Power --00W Target --°C | After plugging in and switching on, the current temperature is displayed on the screen. |
OTHER FUNCTIONS
Note: In one step mode, if you want to change the setting of any step (temperature/power/time) during operation, press the TEMP/POWER or TIME button once and press the (+/-) button to change.

If the boiling temperature does not match the temperature displayed in the thermometer, hold down the (+/-) buttons simultaneously for 3 seconds and correct the displayed temperature by up to +/- 10°C. To do this, press the (+/-) button. Then wait 5 seconds to save the selected value. You can also correct the temperature before commissioning the machine. Once corrected, it is saved and you do not have to correct it the next time, unless the temperature is inaccurate again.
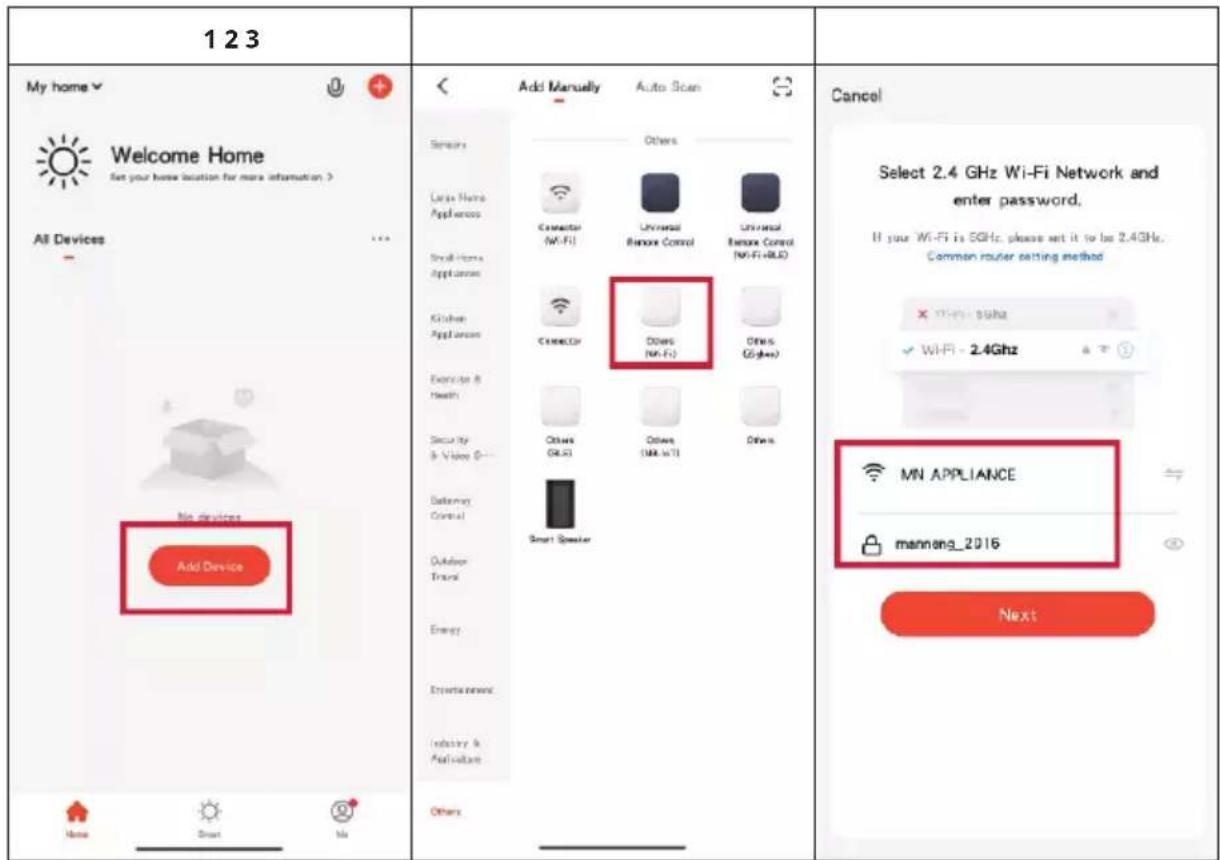
ADD DEVICE IN THE KLARSTEIN APP
After you have registered and logged in, it is necessary to add the device in the app under 2.4 GHz network. Select Add device. Select Others (WiFi). Select the desired WLAN network and enter the network key. Confirm your entry. After confirmation, the display flashes quickly. Press the RESET button for 3 seconds until the indicator light starts flashing. Wait while units are being searched for. As soon as a unit has been successfully added, the indicator light lights up permanently.
| 456 | |||
| Cancel EZ Mode | Cancel | Done | |
| Reset the device first. Power on the device and confirm that the indicator is blinking rapidly. Note: please complete the network distribution within 3 minutes after resetting the device. | Adding device... Ensure that the device is powered on. | Added successfully Mash boiler Device added successfully | |
| Perform net pairing as prompted. | 01:58 | ||
| Confirm the indicator is blinking rapidly. Next | Scan devices. | Register on Cloud | Initiate the device. |
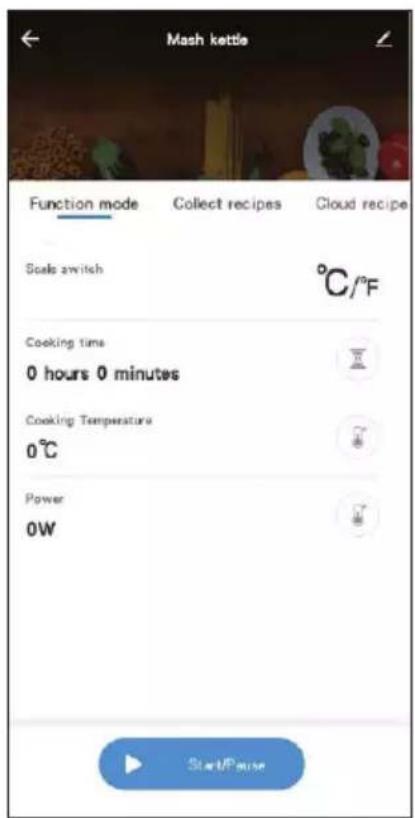
One-step mode
This mode can be used without an app if the network connection cannot be established.
| 15°C 30 Min Power 1000W Target 90°C | Press the TEMP, TIME and POWER buttons in succession and select the desired temperature, time and power. |
| Mashing 15°C 30 Min Power 1000W Target 90°C | To start operation, press the START/STOP button once. |
This mode can also be used with app if the network connection can be established.
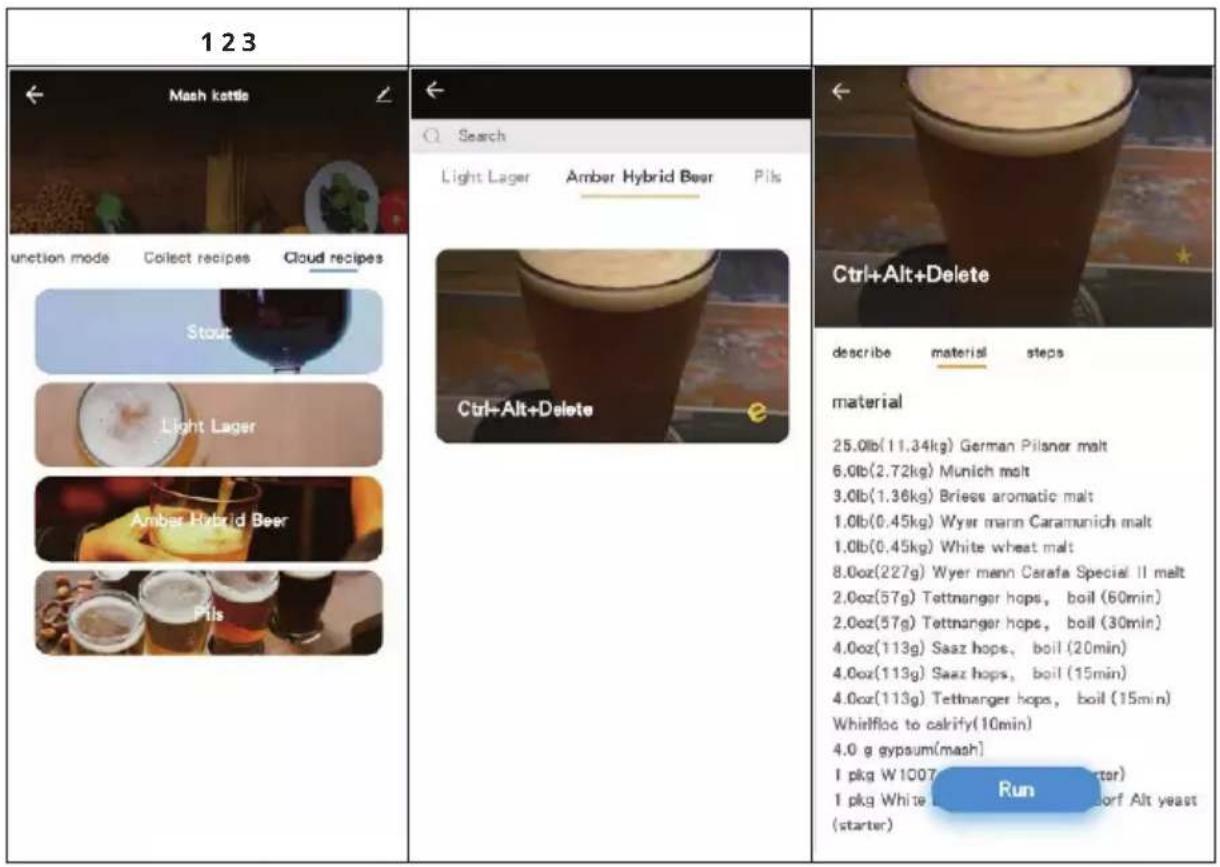
Multi-step mode
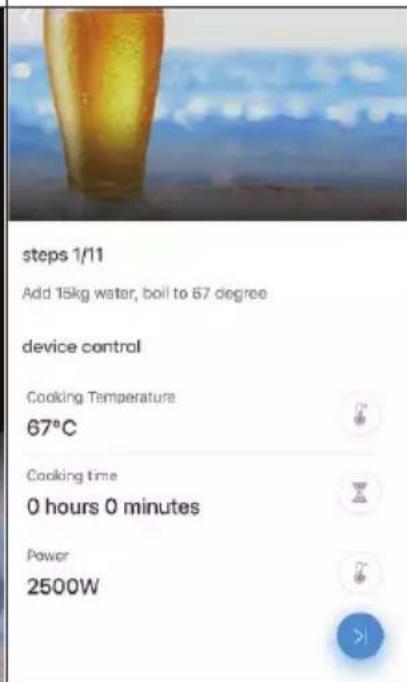
In this mode, several steps can be carried out in succession through the recipes in the app. Select Cloud Recipes and choose the type of beer you want. Afterwards, some recipes will be suggested to you. Select the desired recipe and press Run to start the machine.
456
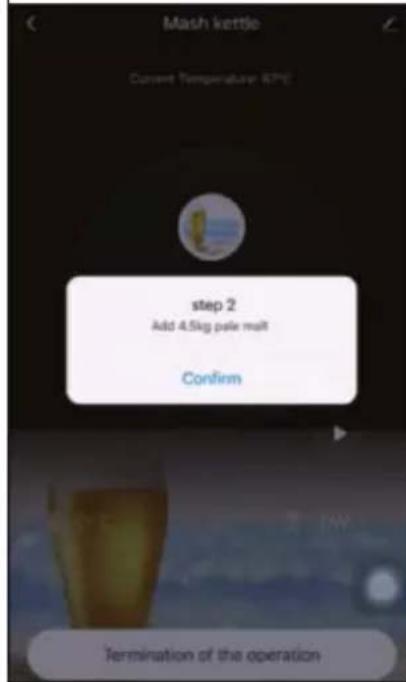
Some additional instructions appear on the screen if it is necessary to add more ingredients.
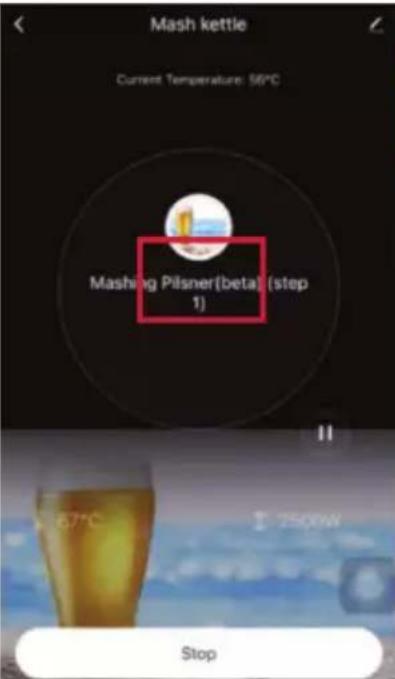
While the machine is in operation, you can view all the necessary steps of the recipe and the respective settings by pressing on the recipe.
| 789 | ||
| < Mash kettle Current Temperature: 100°C Warm Pinser(beta) (step 9) 00,05 Reset the time Termination of the operation | < Mash kettle Current Temperature: 56°C Mashing Pinser(beta) (step 11) < 2000W Stop | < Settings Personal Information Account and Security Sound App Notification Scan device in homepage Temperature Unit Dark Mode About Privacy Settings Network Diagnosis Clear Cache 5.6TM> |
| While the appliance is in operation, you can press the TEMP, POWER or TIME buttons, if necessary, to adjust the temperature, power or time | While the unit is in operation, it can be stopped by pressing the START/STOP button | Clear the cache to access updates or solve problems. |
TROUBLESHOOTING
| Problem Possible | cause Method of solution | |
| No power after switching on the on/off switch. | The control panel cable is not connected to the board. | Connect the control panel cable to the circuit board. |
| Heating before adding water and the thermostat was overloaded. | Wait until the brewing equipment has cooled down to below 175 °C. | |
| The control panel display shows E1. | The temperature sensor cable is not connected to the board. | Reconnect the sensor cable to the board. |
| No heating up after finishing the setting steps. | The start button was not pressed long enough. | Press and hold the start button for 3 seconds. |
| Cable not properly connected. | Connect the cable properly. | |
| The water is not pumped out of the outlet tap. | The outlet tap is not open. | Open the outlet tap. |
| Air or bubbles in the pump. | Make sure the water level is above the discharge opening, stop the pump, open one of the valves and open the discharge tap to let the air escape from the pump. | |
| The wort is not pumped out. | Air or bubbles in the pump. | Make sure the water level is above the discharge opening, stop the pump, open one of the valves and open the discharge tap to let the air escape from the pump. |
| Filter pipe or filter container are clogged. | Switch off the brewing equipment, remove all the wort as soon as it has cooled down and clean the filter pipe and filter container. | |
| The wort is too thick and sticky. | Top up with water. |
CLEANING AND CARE
- All parts that have been in contact with the wort should be cleaned after the brewing process.
- Do not clean small parts in the dishwasher.
- Do not use acidic, alkaline or salty liquids for cleaning.
Water and mild cleaning agents are suitable. - The pipes can be cleaned by pumping hot water through them.
DISPOSAL CONSIDERATIONS
If there is a legal regulation for the disposal of electrical and electronic devices in your country, this symbol on the product or on the packaging indicates that this product must not be disposed of with household waste. Instead, it must be taken to a collection point for the recycling of electrical and electronic equipment. By disposing of it in accordance with the rules, you are protecting the environment and the health of your fellow human beings from negative consequences. For information about the recycling and disposal of this product, please contact your local authority or your household waste disposal service.
DECLARATION OF CONFORMITY

Manufacturer:
Chal-Tec GmbH, Wallstrasse 16, 10179 Berlin, Germany.
Importer for Great Britain:
Berlin Brands Group UK Ltd
PO Box 1145
Oxford, OX1 9UW
United Kingdom
Hereby, Chal-Tec GmbH declares that the radio equipment type Brauheld Pro is in compliance with Directive 2014/53/EU. The full text of the EU declaration of conformity is available at the following internet address: use.berlin/10041152
For Great Britain: Hereby, Chal-Tec GmbH declares that the radio equipment type Brauheld Pro is in compliance with the relevant statutory requirements. The full text of the declaration of conformity is available at the following internet address: use.berlin/10041152
Estimado cliente:
| 456 | |||
| Cancel EZ Mode | Cancel | Done | |
| Reset the device first. Power on the device and confirm that the indicator is blinking rapidly. Note: please complete the network distribution within 3 minutes after resetting the device. | Adding device... Ensure that the device is powered on. | Added successfully Mash boiler Device added successfully | |
| Perform net pairing as prompted. | 01:58 | ||
| Confirm the indicator is blinking rapidly. Next | Scan devices. | Register on Cloud | Initiate the device. |
Modo de un paso
Berlin Brands Group UK Ltd
PO Box 1145
Oxford,OX1 9UW
United Kingdom
Cher client, chere clientele,
| 456 | |||
| Cancel EZ Mode | Cancel | Done | |
| Reset the device first. Power on the device and confirm that the indicator is blinking rapidly. Note: please complete the network distribution within 3 minutes after resetting the device. | Adding device... Ensure that the device is powered on. | Added successfully Mash boiler Device added successfully | |
| Perform not pairing as prompted. | 01:58 | ||
| Confirm the indicator is blinking rapidly. Next | Scan devices. | Register on Cloud | Initiate the device. |
Mode à un niveau
Berlin Brands Group UK Ltd
PO Box 1145
Oxford,OX1 9UW
United Kingdom
| 456 | |||
| Cancel EZ Mode | Cancel | Done | |
| Reset the device first. Power on the device and confirm that the indicator is blinking rapidly. Note: please complete the network distribution within 3 minutes after resetting the device. | Adding device... Ensure that the device is powered on. | Added successfully Mash boiler Device added successfully | |
| Perform net pairing as prompted. | 01:58 | ||
| Confirm the indicator is blinking rapidly. Next | Scan devices. | Register on Cloud | Initiate the device. |
Berlin Brands Group UK Ltd
PO Box 1145
Oxford,OX1 9UW
United Kingdom