Alan HP108 - Marine VHF Radio ALBRECHT - Free user manual and instructions
Find the device manual for free Alan HP108 ALBRECHT in PDF.
User questions about Alan HP108 ALBRECHT
0 question about this device. Answer the ones you know or ask your own.
Ask a new question about this device
Download the instructions for your Marine VHF Radio in PDF format for free! Find your manual Alan HP108 - ALBRECHT and take your electronic device back in hand. On this page are published all the documents necessary for the use of your device. Alan HP108 by ALBRECHT.
USER MANUAL Alan HP108 ALBRECHT
The brand Alan is owned by:

Cte international
Headquarters
Via Sevare, 7 - 42124 Roggio Emilia - Italy
Tel. +39 0522 509411 Fax +39 0522 509435
www.michonbeurope.com

Alan
signal Communisatier
CE
Produced at imported by: CTE INTERNATIONAL sd
V.a. R.Sevard 7 42124 Manoscale - Reggio Emilia - Italy
The use of this transaction can be subject to national restrictions
Read the instructions carefully before installation and use.

text_image
Alan HP 08 VHF/UHF Transceiver - Ricetrasmettitore VHF/UHF 0.0 0.0 ITProfessional Portable Radio

Alan
Professional communication
For information about the warranty please visit www.midiandeurope.com
- All articles deploying the nominal (individual land) or the body, packaging or induction instrument of some, must not be thrown away and normal exposed cone had brought to the waste disposal centre arranged by the national Importer. Here, the various machines will be divided by characterists and recyclers, thus making an important contribution to environmental production
| Gruppi | Canali | HP108 | HP408L | HP408H |
| BANK1 | ch1-16 | ● | ● | ● |
| BANK2 | ch17-32 | ● | ● | ● |
| BANK3 | ch33-48 | ● | ● | ● |
| BANK4 | ch49-64 | ● | ● | ● |
| BANK5 | ch65-80 | ● | ● | ● |
| BANK6 | ch81-96 | ● | ● | ● |
| BANK7 | ch97-112 | ● | ● | ● |
| BANK8 | ch113-128 | ● | ● | ● |
| BANK9 | ch129-144 | ● | ● | ● |
| BANK10 | ch145-160 | ● | ● | ● |
| BANK11 | ch161-176 | ● | ● | ● |
| BANK12 | ch177-192 | ● | ● | |
| BANK12 | ch177-180 | ● |
TO: Time-operated scan
) CO: Carrier-operated scan
Main indicators/controls....4
Accessory installation....7
Recharge of the battery pack 8
Care and maintenance 9
Base functions....9
HP108/408 modes....9
Functions of the menu key 9
Technical specifications....15
HP108/408
Reliable, sturdy and light-weight!
Alan HP 108/408 represents the new generation of VHF/UHF transceivers, suitable for professional purposes and useful in any situation where reliable communications are needed.
HP108/408 is supplied with many functions, such as 'Busy Channel Lock Out', memory channels, tx power selectable to 5W (high); some of its features are programmable to customize the equipment according to your needs.
Main features
Frequency band (according to the model):
VHF 136/174MHz – UHF 400/470MHz and 465/520MHz (export version)
Operating mode: VHF-VHF or UHF-UHF depending on the version
Output power: 5W VHF/ UHF
Memory channels: HP108: 256 - HP408L: 298 - HP408H: 180
) 50 CTCSS tones and 107 DCS codes
Channel spacing: 12,5KHz
Frequency or channel displayed
, VOX function
Scan function
) Selectable tx power: high (5W)
Li-Ion battery pack 7.4V 1600mAh
Busy channel lock out (BCLO)
) Tx power level indicator on the display
Scrambler 1/8 levels or voice compressor
TOT (Time out timer)
Selective call 5 tones and 5+5
Squelch
Battery save
The package includes:
HP108/408 transceiver
antenna
Li-Ion battery pack
desktop charger
adaptor
1 belt clip
user manual
if any of the above-described parts are missing, ask your retailer.
Warning
! Before using the transceiver, enquire about the local rules concerning the use of VHF/UHF equipments.
! Do not attempt to open the radio. You may damage it and therefore invalidate the warranty.
! Do not handle the transceiver by its antenna!
! Do not transmit without antenna.
! Do not wet the radio or use it next to water sources; humidity may corrode the electronic circuits.
! Turn off the radio while parked in a gasoline service station.
! Do not expose the equipment to excessive vibrations or direct sunlight for a long time.
! In case the radio diffuses smell or smoke, switch it off immediately and remove the battery.
! Turn off the transceiver before entering an inflammable and explosive environment.
! To avoid any possible damages to the equipment, use only original accessories.
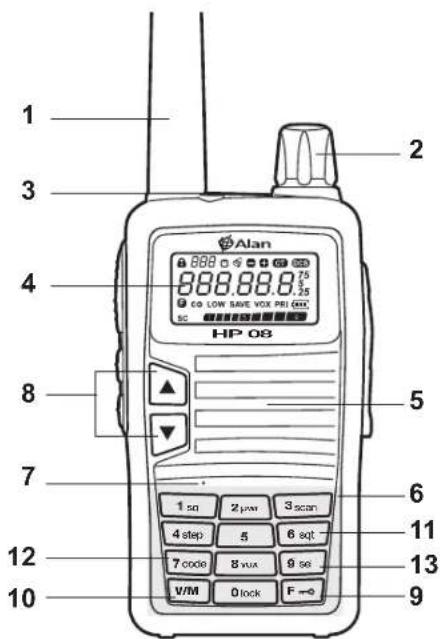
MAIN INDICATORS / CONTROLS
text_image
1 2 3 4 HP 08 5 6 7 8 9 10 11 12 13 Alan 888.88.875 CO LOW SAVE VOX PRI CO* SC 1 sq 2 μw 3 scan 4 step 5 6 sqt 7 code 8 vux 9 sq V/M 0 lock F →- ANTENNA
- ON/OFF/VOLUME KNOB: to turn on/off the radio and adjust the volume.
- LED: lights red during the transmission and green in reception.
- DISPLAY LCD: shows the operating status of the radio.
- LOUDSPEAKER
- ALPHANUMERICAL KEYPAD
- MICROPHONE
- ▲/▼: to select the frequency and the menu contents.
- F button: to select the radio's functions
- V/M button: to confirm the desired settings
- 6 sqt button: to enable the sub-audio tones
- 7 code button: to select the sub-audio tones
- F -o + 9 sel buttons: to select the menu functions

text_image
PTT 14 15 16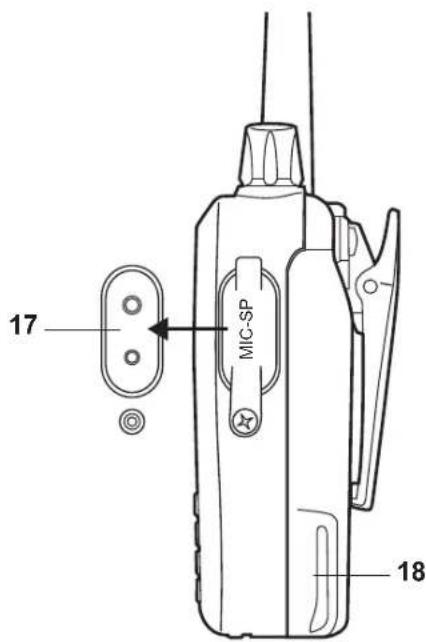
text_image
17 MIC-SP 18- PTT: push it to transmit (led lights red) and release it to receive (green led).
- BACKLIGHT BUTTON: push it to activate the display and keypad Backlight. If the selective call is enabled, push the button to send it; if a tone is enabled, push this button to send the tone.
- MONITOR BUTTON: To enable / disable the squelch.
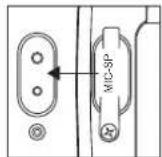
- MIC/SPK EXTERNAL JACK: to connect a microphone, loudspeaker or programming cable.
- BATTERY PACK
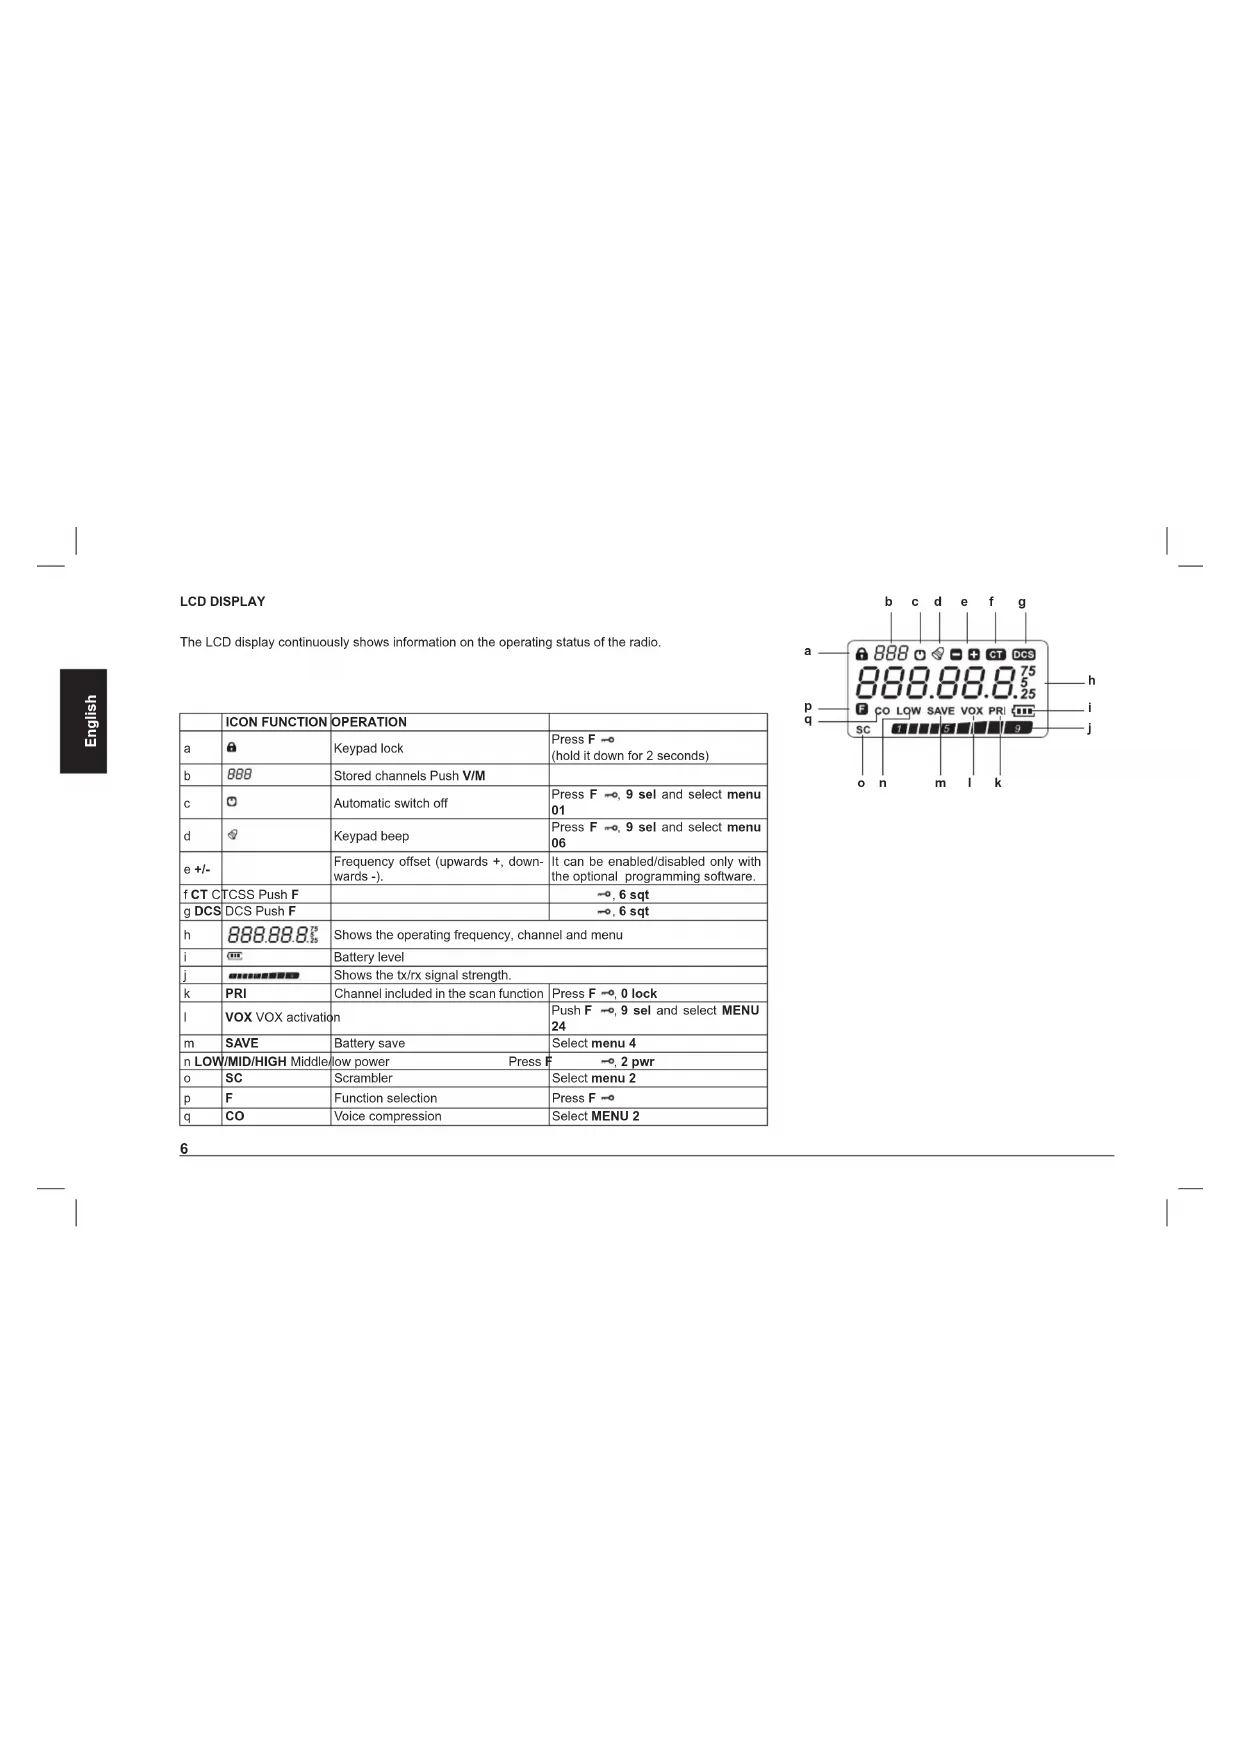
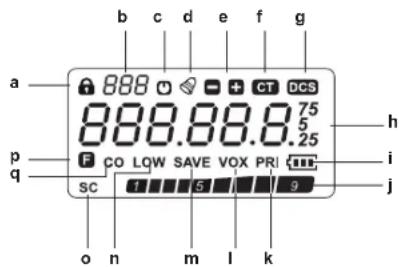
LCD DISPLAY
The LCD display continuously shows information on the operating status of the radio.
| ICON FUNCTION | OPERATION | ||
| a | Keypad lock | Press F (hold it down for 2 seconds) | |
| b | 888 | Stored channels Push V/M | |
| C | Automatic switch off | Press F , 9 sel and select menu 01 | |
| d | Keypad beep | Press F , 9 sel and select menu 06 | |
| e +/- | Frequency offset (upwards +, downwards -). | It can be enabled/disabled only with the optional programming software. | |
| f CT CT CSS Push F | , 6 sqrt | ||
| g DCS | DCS Push F | , 6 sqrt | |
| h | 888.88.875 | Shows the operating frequency, channel and menu | |
| i | Battery level | ||
| j | Shows the tx/rx signal strength. | ||
| k | PRI | Channel included in the scan function | Press F , 0 lock |
| l | VOX VOX activation | Push F , 9 sel and select MENU 24 | |
| m | SAVE | Battery save | Select menu 4 |
| n LOW/MID/HIGH Middle/low power Press F , 2 pwr | |||
| o | SC | Scrambler | Select menu 2 |
| p | F | Function selection | Press F |
| q | CO | Voice compression | Select MENU 2 |
text_image
a p q SC o n m l k 888 0 - + CT DCS 888.88.8 75 5 .25 h i jACCESSORY INSTALLATION
Installing/removing the battery pack
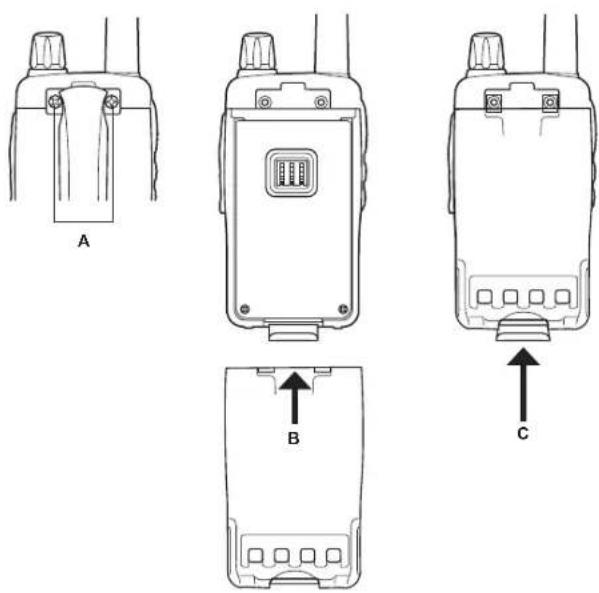
Installing
Unscrew the belt clip (A), match the two guides of the battery pack into the grooves of the radio (B) and hook the battery pack with the battery holder (C). Screw the belt clip.
To remove it, unscrew the belt clip, unhook the battery holder and remove the battery pack.
Installing/removing the belt clip
The belt clip can be fixed/removed with the supplied fixing screws (A).
Installing/removing the antenna
Screw the antenna clockwise into the antenna connector until it firmly locks. Screw it counter clockwise to remove it.
Connecting the mike/speaker (optional)
Remove the rubber cap of the mike jacks and connect the mike/speaker.
RECHARGE OF THE BATTERY PACK
HP108/408 is supplied with a Li-Ion battery pack, 7.4V 1600mAh.
Before its first use, the battery pack is not completely charged.
The battery provides maximum efficiency after 3-4 full charge/recharge cycles.
Warnings on the use of battery packs
Use the original battery pack only. Other types of batteries may cause explosions or personal injuries.
Never dispose batteries into fire and never expose them to high temperature, they may explode causing fire or explosions. Strictly follow the disposal regulations of your country.
While charging is in progress, the ambient temperature should be between 0^ and 40^ .
The equipment is best charged with the radio off.
Replace the battery pack when the operating time decreases even though it is fully charged.
) Partial recharges reduce the battery life.
Do not charge the radio/battery pack if they are wet!
Recharge
When the display shows, the battery pack is discharged.
Please recharge it
The charge indicator shows the charge status as follows:
| LED CHARGE STATUS | |
| Red (fix) Charging | |
| Green (fix) Completed |
The use of non-original battery packs may cause serious damages to the equipment, explosions or personal injuries.
Recharge of the battery pack:
- Connect the jack of the wall adaptor into the desktop charger plug.
- Connect the socket of the wall adaptor to a mains power socket.
- Place the transceiver/ battery pack into the desktop charger slot.
- The battery contacts must be properly connected to the charging terminals. The charger led lights red.
- After 3 hours approx. the charge is completed; the charger led lights green. Remove the radio/battery pack.
Attention
) If the charger led blinks before placing the battery pack into the charger, switch it off: this means a malfunctioning of the charger itself.
Remove the radio/battery pack from the charger only when the recharge is completed!
If the led continues to blink even though the charge is completed, the battery pack is probably damaged.
CARE AND MAINTENANCE
Clean the radio with a soft cloth. Do not use alcohol or abrasive substances! When you do not use the equipment, cover the MIC-SP connector.
BASE FUNCTIONS
Switching on/off
To turn on the radio, rotate the ON/OFF/VOLUME knob clockwise until you hear a beep. Rotate it counter-clockwise to switch it off.
Volume adjustment
Turn the ON/OFF/VOLUME knob clockwise to increase the volume, counterclockwise to reduce it.
Squelch adjustment
The squelch is a feature able to reduce the background noise when no signals are received.
Squelch can be adjusted in 9 different levels.
Hold down F → and 1 sql: the current squelch level is displayed.
Select the desired level by means of the ▲/▼ buttons.
To confirm your selection, press any key except BACKLIGHT and MONITOR.
Transmission
Press and hold [PTT] and speak in a normal voice.
During the transmission, the led lights red.
To extend the battery life, you can select the low power. You can choose amongst 3 power levels: high, middle and low.
To receive, release the PTT.
HP108/408 MODES
1) Memory channel mode (CH) - Channel name displayed
With CH mode, you can access the stored channels: select the stored channel by using ▲/▼. This mode is possible if you have set at least one channel.
2) Menu Mode (MENU)
To select the menu of the radio, press F → (F blinking) and then 9 sel. The menu settings can be changed by means of the ▲/▼ buttons.
FUNCTIONS OF THE MENU KEY
Menu includes the radio's settings that can be modified upon your needs.
General use of the menu
Press F → till F blinks on the display; push 9 sel to enter the menu.
Select the desired function by pressing ▲/▼.
Press F → to enter the desired setting; select the activation/deactivation with ▲/▼ and confirm your selection by pressing F →/PTT/V/M.
Push V/M to exit.
Menu functions
| MENU | Displayed function Setting | |
| 1 | APO(Automatic switch off) OFF, 1-15 hours | |
| 2 | APRO | OFF/COMP/SCRAMB |
| 3 | BANK(Channel group) | BANK, NO BANK |
| 4 | BATSAV (Battery save) | ON/OFF |
| 5 | BCLO(Busy channel lockout) | OFF/WAVE/QT-DCS |
| 6 | BEEP(keypad beep) | ON/OFF |
| 7 | SCR NO(scrumbler) | 1-8 groups (optional) |
| 8 | DC VLT(DC voltage) | Battery voltage |
| 9 | LAMP(BACKLIGHT) | OFF/CONT/KEY |
| 10 LOCK (Keypad lock) K+S /PTT/KEY/ALL | |
| 11 MSGSET (Message edit) Programmable | |
| 12 NAME (Channel name displayed) FREQ/ALPHA | |
| 13 NM SET (Channel name edit) Programmable | |
| 15 OPNMSG (Welcome message displayed) OFF/DC/MSG | |
| 16 PWD (open password) ON/OFF | |
| 17 PWD W (password setting) Programmable | |
| 18 ROGER (end transmission tone) ON/OFF | |
| 19 SCN MD (scan mode) TO/CO/SE | |
| 20 STE(side tone eliminate) ON/OFF | |
| 21 TOT (time-out timer) OFF/from 6 sec to 7 min | |
| 22 TXSTOP (transmission stop) ON/OFF | |
| 23 VOX ON/OFF | |
| 24 VOX D (VOX delay) 1S, 2S, 3S, 4S | |
| 25 VOX S (VOX sensitivity levels) | 1-3 |
| 26 VXB (busy VOX) | ON/OFF |
Automatic switch off (APO)
With this function, the unit automatically turns off at a preset time (from 1 to 15 hours from the setting). One minute before the switching off, "APO" blinks on the display and a warning beep is heard.
To enable/disable the APO feature:
Access menu 1 by pressing F→ and 9 sel, choose the desired setting with the ▲/▼ and confirm by pressing again 9 sel.
Voice mode (APRO)
From menu 2 you can activate two different voice modes:
COMP: Compander, it allows to improve the signal/noise ratio.
) SCRAMB: scrambler
(to activate one of these modes, follow the general procedure described in par.
'General use of the menu' at page 9).
Channel groups
When this function is enabled, the stored channels belong to groups of channels.
BANK: channel group function activated.
The channels will be divided into 15 channel groups
| Group | Channels | HP108 | HP408L | HP408H |
| BANK1 | ch1-16 | ● | ● | ● |
| BANK2 | ch17-32 | ● | ● | ● |
| BANK3 | ch33-48 | ● | ● | ● |
| BANK4 | ch49-64 | ● | ● | ● |
| BANK5 | ch65-80 | ● | ● | ● |
| BANK6 | ch81-96 | ● | ● | ● |
| BANK7 | ch97-112 | ● | ● | ● |
| BANK8 | ch113-128 | ● | ● | ● |
| BANK9 | ch129-144 | ● | ● | ● |
| BANK10 | ch145-160 | ● | ● | ● |
| BANK11 | ch161-176 | ● | ● | ● |
| BANK12 | ch177-192 | ● | ● | |
| BANK12 | ch177-180 | ● | ||
| BANK13 | ch193-208 | ● | ● | |
| BANK14 | ch209-224 | ● | ● | |
| BANK15 | ch225-240 | ● | ● | |
| BANK16 | ch240-256 | ● | ● | |
| BANK17 | ch257-272 | ● | ||
| BANK18 | ch273-288 | ● | ||
| BANK19 | ch289-298 | ● |
NO BANK: channel group function deactivated; the channels are displayed in sequence, with no group of belonging.
Battery Save (BATSAV)
The battery save feature allows to reduce the consumption in order to extend the battery life. It is interrupted when you press any button or open the squelch. To enable this feature, select the 'BATSAV' (04) menu and follow the general procedure described in paragraph 'General use of the menu' at page 9. When the battery save is active, 'SAVE' appears on the display.
Busy Channel Lockout (BCLO)
When the radio receives a signal, it stops transmitting to avoid interferences on the busy channel.
To enable/disable the BCLO, enter the menu 05 (BCLO) and follow the procedure described in paragraph 'General use of the menu' at page 9.
Keypad tone (BEEP)
When you press any key, a beep is heard.
To activate/deactivate this tone, enter the menu 06 (BEEP) and follow the procedure of paragraph 'General use of the menu'.
Scrambler setting (SCR NO)
The scrambler is designed to protect your communications: they can be heard only by the users that have set the same level as yours (8 levels available). You can activate this feature from menu 2 and choose the option 'SCRAMB'. (Follow the general procedure described in par. 'General use of the menu' at page 9). The scrambler does not guarantee the total safety of your communications.
Battery voltage (DC VLT)
To display the battery voltage, select the menu 08 and push F →
Display and keypad backlight(LAMP)
To enable/disable the keypad/display BACKLIGHT, enter the menu 09 and push F →. You can choose amongst 3 options:
OFF: No backlight
KEY: backlight activated(5 seconds for every operation).
It will automatically interrupt if no operation is done.
To interrupt the backlight, press BACKLIGHT.
CONT: Continuous backlight.
To illuminate the display and the keypad in stand-by mode, press BACKLIGHT and release it to stop it (stays active for 5 seconds).
Keypad lock (LOCK)
To avoid accidentally changing the radio settings, you can activate the keypad lock.
To lock any key, press and hold F→ for 2 seconds.
Press F →, 9 sel to enter menu 10 (LOCK). 4 options are available:
K+S: Lock of the keypad and ▲/▼ buttons
PTT: Lock of PTT button to avoid accidental transmissions
KEY: Keypad lock to avoid accidental pressures.
ALL: Lock of all the keys.
To confirm and exit push 9 sel.
Editing a message when the radio is turned on (MSGSET)
To edit a message, there are 5 alphanumeric characters available.
Procedure:
- Press F →, "F" blinks on the display. Press 9 sel to enter the menu MSG-SET (11).
- Press F → to edit the message. The first character blinks; use the ▲/▼ buttons to select numbers/letters or blanks.
- Press 9 sel to move to the second character.
- Repeat steps 2 and 3 and push F → to end.
- To delete or write again one character press 7 code.
- To write again the whole message, push V/M.
Editing the channel name (NM SET)
To edit the channel name, you have 5 alphanumeric characters at disposal.
Procedure:
Press F → , "F" blinks on the display; push 9 sel to enter menu 13.
To edit the channel name press F→. The first character blinks; use ▲/▼ to
select numbers/letters or blanks.
To edit the second character push 9 sel
Repeat steps 2 and 3 and push F → to end.
To delete or write again one character press 7 code.
To write again the whole message, push V/M.
Frequency/channel name displayed (NAME)
When a channel is stored, its frequency does not appear on the display. To show it, enter menu 12 and choose the desired mode by pushing ▲/▼:
ALPHA: shows the channel.
) FREQ: shows the frequency.
Welcome message (OPNMSG)
With this function you can set what will be displayed when you turn on the radio.
Select menu 15 and choose amongst these options:
OFF: when you switch on the radio, the frequency or channel is displayed.
DC: the battery voltage is displayed.
MSG: the message you set will be displayed.
Password (PSWD)
To insert the password, enter menu 17. The characters to edit are 4 (you can change them by pushing V/M). Once defined the password, go to menu 16 to enable/disable it.
Roger beep (ROGER)
The roger beep is a short audio tone emitted by the radio when you release the PTT button at the end of the transmission.
To enable/disable it go to menu 18 and follow the general procedure described in par. 'General use of the menu'.
Scan type (SCN MD)
To select the scan types (TO/CO/SE), enter menu 19. (see paragraph 'SCAN').
Side Tone Eliminate (STE)
This function allows to eliminate the background noise after receiving a signal. It's particularly useful when you use a headset connected to your radio.
Note: The function must be activated on both radios.
Enter the menu 20 to activate/deactivate this function.
Time-Out Timer (TOT)
Time-Out-Timer temporarily blocks the transmission if it is used over a maximum time previously programmed.
When the maximum time is reached, the radio beeps and is forced in reception mode.
To activate/deactivate the TOT, enter menu 21 and use the ▲/▼ buttons for the selection (from 6 sec to 7 min).
TXSTOP (menu 22): if enabled, it is not possible to transmit.
VOX (VOX)
The VOX function allows hands-free communications: just speak and the radio switches to transmission.
To activate/deactivate it, enter menu 23.
When this function is active, VOX appears on the display.
VOX delay (VOX D)
This option keeps the radio in transmission mode after you stop talking; it's useful to avoid interrupting the transmission while you are still talking.
To adjust the delay, enter menu 24 and select the desired level (1s, 2s, 3s, 4s) with ▲/▼ and confirm by pressing 9 sel.
VOX Sensitivity (VOX S)
You can choose 8 different sensitivity levels. Enter menu 25, select the desired level by using the ▲/▼ buttons and confirm by pressing 9 sel.
VOX Busy (VXB)
This function is useful to stop the transmission if the radio receives a signal. Vox Busy can be activated/deactivated from menu 26.
Selective call 5 tones 5+5 / 6 tones 6+6
The selective call is a signaling system which uses audio tones in sequence (usually "5 tones" selective calls) to call a specific station or group(s). In this case you will only receive calls that have your selective call identification code (a number) or calls sent to the group you belong to.
A selective call is sent by pushing MONITOR (fix call) and BACKLIGHT (variable call). You can send a selective call also in 5+5 or 6+6 mode.
STATUS DIGIT: this function allows to send one status (programmed by software) after a selective call.
ANI: it is set by pressing, releasing the PTT button, or both. This function allows to send your own ID programmed by software.
For further details, please read the programming software instructions. This function can be only set by the optional programming software (PRG08).
CTCSS / DCS
The CTCSS/DCS tones are a sort of 'access codes' and enable the radio to communicate only with the other users set on the same frequency and on the same CTCSS/DCS tone. HP108/408 has 50 CTCSS tones and 107 DCS codes available (I/N Inverted – Normal).
You can choose amongst 7 different settings:
- OFF: No CTCSS/DCS tone in tx and rx.
- TONE: CTCSS tone set on the tx frequency only.
- CTCSS : CTCSS tone set on both tx and rx frequency.
- D CODE : DCS code set on the tx frequency only.
-
DCS: DCS code set on both tx and rx frequency.
-
T DCS: CTCSS set on the tx frequency and DCS code set on the rx frequency.
- D TSQL: Reception on the CTCSS tone and transmission on the DCS code. CT or DCS icons on the display indicate the activation that you have set.
Setting the CTCSS/DCS tones
Press F → and 6 sqt; select the desired tone by pushing ▲/▼.
To confirm push F →.
Set the rx CTCSS/DCS tone by pressing F → and 7 code.
Select the CTCSS/DCS tone with ▲/▼
Press F → to set the tx/rx CTCSS/DCS tone; use the ▲/▼ to select it.
Confirm with F →.
CTCSS tone frequency chart
| 67.0 103.5 | 159.8 199.5 | ||
| 69.3 107.2 | 162.2 203.5 | ||
| 71.9 110.9 | 165.5 206.5 | ||
| 74.4 114.8 | 167.9 210.7 | ||
| 77.0 118.8 | 171.3 218.1 | ||
| 79.7 123.0 | 173.8 225.7 | ||
| 82.5 127.3 | 177.3 229.1 | ||
| 85.4 131.8 | 179.9 233.6 | ||
| 88.5 136.5 | 183.5 241.8 | ||
| 91.5 141.3 | 186.2 250.3 | ||
| 94.8 146.2 | 189.9 254.1 | ||
| 97.4 151.4 | 192.8 | ||
| 100.0 156.7 | 196.6 |
DCS code (I/N) frequency chart
| 017 073 165 263 365 466 654 | ||||
| 023 074 172 265 371 503 662 | ||||
| 025 114 174 266 411 506 664 | ||||
| 026 115 205 271 412 516 703 | ||||
| 031 116 212 274 413 523 712 | ||||
| 032 122 223 306 423 526 723 | ||||
| 036 125 225 311 431 532 731 | ||||
| 043 131 226 315 432 546 732 | ||||
| 047 132 243 325 445 565 734 | ||||
| 050 134 244 331 446 606 743 | ||||
| 051 143 245 332 452 612 754 | ||||
| 053 145 246 343 454 624 | ||||
| 054 152 251 346 455 627 | ||||
| 065 155 252 351 462 631 | ||||
| 071 156 255 356 464 632 | ||||
| 072 162 261 364 465 645 |
SCAN
HP108/408 can scan the previously set channels for activity.
There are three types of scanning:
SE: the radio stops on a busy channel and exits from the scanning mode.
TO: Time-operated scan: the scanning will stop when the radio detects a signal on a busy channel and will resume after 5 seconds even though the signal is still present.
CO: Carrier-operated scan: the scanning will stop on an active channel till the signal is detected. It will resume scanning after 2 seconds when the channel is no longer active.
Note: Scanning is interrupted by pushing MONITOR and resumes work-
ing when you release the button.
Selecting the scanning type
Press F →, 9 sel and select menu 19 (SCN MD).
To enter the menu, press F → and by means of the ▲/▼ buttons, choose the type of scanning amongst SE, CO or TO.
Confirm your selection by pressing F → or PTT or 9 sel.
Scanning the stored channels
To start scanning, press F → and 3 scan.
The scanning starts from the channel currently in use.
To invert the scanning direction, press ▲/▼.
To exit from this setting, push F → or PTT.
Note: The scan can be done between 2 channels at least.
Before starting the scan feature, the squelch must be deactivated.
Scanning exclusion
Some memory channels can be excluded from the scanning. Procedure:
Select the channel to exclude.
) Press F → and 0 lock to set this feature.
Note: in this case, PRI disappears from the display.
All the channels that do not show PRI on the display are excluded from the scanning.
Keypad lock
To avoid accidentally changing the frequency or the radio settings, the keypad can be locked.
Press the F → button for 2 seconds to activate/deactivate the keypad lock. When this function is enabled, the display shows 🔒
Editing from the keypad
Edit the channel number by pressing the keypad buttons (3 digits max, for example '003'). The radio will show the number of the channel.
TECHNICAL SPECIFICATIONS
| General | |||
| Characteristics Units Value/Measurements | |||
| Frequency MHz HP108: from 136 to 174; HP408L: from 400 to 470; HP408H (export version): from 465 to 520 | |||
| Number of Programmable Channels - HP108: 256; HP408L: 298; HP408H (export version): 180 | |||
| Channel Spacing KHz 12.5 | |||
| Rated Power Supply Vdc 7.4 | |||
| Battery Capacity mAh Li-Ion 1.600 | |||
| Duty Cycle hours | 5% on TX at the maximum power | 85% on RX at 60 % | |
| 90% on RX with closed squelch in power save mode | |||
| Antenna Impedance | Ohm | 50 | |
| Speaker Impedance | Ohm | 4 | |
| Frequency Stability | ppm | ±2.5 | |
| Operating Temperature Range | °C | From: -25 to +55 | |
| Transmitter | |||
| Output Power (±1 dB) | W | 0.5 / 5 VHF -UHF | |
| Spurious Emissions | μW | from 9 KHz to 1 GHz | < 0,25 |
| from 1 to 4 GHz | < 1 | ||
| Modulation System | - F3E (FM) | ||
| Modulation | KHz | ±2,5 | |
| Audio Distortion - 5 % or less | |||
| Maximum Deviation | KHz | ±2.5 | |
| Adjacent Channel Power Attenuation | DB | <-60 / -70 | |
| Receiver | |||
| Configuration | Double Conversion Superetherodyne | ||
| Sensitivity (at 12 dB SINAD) | μV | < 0.35 | |
% of the maximum rated ,
| Squelch Sensitivity (SINAD) | μV | 0,25 with < 2dB hysteresis |
| Selectivity (Adjacent Channel) dB At least -65 / -75 | ||
| Spurious Response Rejection dB > 70 | ||
| Intermodulation dB > 65 | ||
| Hum & Noise Suppression dB < -45 / < -40 | ||
| Audio Output (1 KHz at 5% T.H.D.) mW 400 | ||
| Mechanical Specifications | ||
| Size (Battery Pack Included) mm 97 x 53 x 33 (HxLxD) | ||
| Weight (Battery Pack Included) g 256 | ||
| Battery - Back slide battery | ||
| Accessories Connector / Programming - 2.5 and 3.5 mm standard monophonic jacks | ||
| Moisture & Dust Resistance - According to the IP54 regulations | ||
Specifications are subject to change without notice.
WARNING
Direct plug-in ac/dc power supply must be used for disconnecting the transceiver from the mains; the desktop charger must be positioned close to the unit and easily accessible.
Index
Indicadores principales....4
| Grupos | Canales | HP108 | HP408L | HP408H |
| BANK1 | ch1-16 | ● | ● | ● |
| BANK2 | ch17-32 | ● | ● | ● |
| BANK3 | ch33-48 | ● | ● | ● |
| BANK4 | ch49-64 | ● | ● | ● |
| BANK5 | ch65-80 | ● | ● | ● |
| BANK6 | ch81-96 | ● | ● | ● |
| BANK7 | ch97-112 | ● | ● | ● |
| BANK8 | ch113-128 | ● | ● | ● |
| BANK9 | ch129-144 | ● | ● | ● |
| BANK10 | ch145-160 | ● | ● | ● |
| BANK11 ch161-176 ● ● ● |
| BANK12 ch177-192 ● ● |
| BANK12 ch177-180 ● |
| BANK13 ch193-208 ● ● |
| BANK14 ch209-224 ● ● |
| BANK15 ch225-240 ● ● |
| BANK16 ch240-256 ● ● |
| BANK17 ch257-272 ● |
| BANK18 ch273-288 ● |
| BANK19 ch289-298 ● |
Indications/Controles 4
Installation des Accessoires ....7
| Groupes | Canaux | HP108 | HP408L | HP408H |
| BANK1 | ch1-16 | ● | ● | ● |
| BANK2 | ch17-32 | ● | ● | ● |
| BANK3 | ch33-48 | ● | ● | ● |
| BANK4 | ch49-64 | ● | ● | ● |
| BANK5 | ch65-80 | ● | ● | ● |
| BANK6 | ch81-96 | ● | ● | ● |
| BANK7 | ch97-112 | ● | ● | ● |
| BANK8 | ch113-128 | ● | ● | ● |
| BANK9 | ch129-144 | ● | ● | ● |
| BANK10 | ch145-160 | ● | ● | ● |
| BANK11 | ch161-176 | ● | ● | ● |
| BANK12 | ch177-192 | ● | ● | |
| BANK12 | ch177-180 | ● | ||
| BANK13 | ch193-208 | ● | ● | |
| BANK14 | ch209-224 | ● | ● | |
| BANK15 | ch225-240 | ● | ● | |
| BANK16 | ch240-256 | ● | ● |
BANK17 ch257-272 •
BANK18 ch273-288 •
BANK19 ch289-298 •
| BANK1 ch1-16 ● ● ● |
| BANK2 ch17-32 ● ● ● |
| BANK3 ch33-48 ● ● ● |
| BANK4 ch49-64 ● ● ● |
| BANK5 ch65-80 ● ● ● |
| BANK6 ch81-96 ● ● ● |
| BANK7 ch97-112 ● ● ● |
| BANK8 ch113-128 ● ● ● |
| BANK9 ch129-144 ● ● ● |
| BANK10 ch145-160 ● ● ● |
| BANK11 ch161-176 ● ● ● |
| BANK12 ch177-192 ● ● |
| BANK12 ch177-180 ● |
| BANK13 ch193-208 ● ● |
| BANK14 ch209-224 ● ● |
| BANK15 ch225-240 ● ● |
| BANK16 ch240-256 ● ● |
| BANK17 ch257-272 ● |
| BANK18 ch273-288 ● |
| BANK19 ch289-298 ● |
Chamada selectiva com 5 tons 5+5/6 tons 6+6
| Ομάδες | κανάλια | HP108 | HP408L | HP408H |
| BANK1 | ch1-16 | ● | ● | ● |
| BANK2 | ch17-32 | ● | ● | ● |
| BANK3 | ch33-48 | ● | ● | ● |
| BANK4 | ch49-64 | ● | ● | ● |
| BANK5 | ch65-80 | ● | ● | ● |
| BANK6 | ch81-96 | ● | ● | ● |
| BANK7 | ch97-112 | ● | ● | ● |
| BANK8 | ch113-128 | ● | ● | ● |
| BANK9 ch129-144 • • • |
| BANK10 ch145-160 • • • |
| BANK11 ch161-176 • • • |
| BANK12 ch177-192 • • |
| BANK12 ch177-180 • |
| BANK13 ch193-208 • • |
| BANK14 ch209-224 • • |
| BANK15 ch225-240 • • |
| BANK16 ch240-256 • • |
| BANK17 ch257-272 • |
| BANK18 ch273-288 • |
| BANK19 ch289-298 • |