DR 316 - Marine VHF Radio ALBRECHT - Free user manual and instructions
Find the device manual for free DR 316 ALBRECHT in PDF.

| Product type | Internet Radio / DAB+ / FM / Media Player |
| Brand | Albrecht |
| Model | DR 316 C |
| Power supply | Mains adapter 12 V DC, 1.5 A |
| Power consumption | Approx. 18 W max |
| Network connectivity | Wi-Fi 802.11 b/g/n, compatible WEP/WPA/WPA2 |
| Supported audio formats | MP3, AAC, WMA, FLAC, WAV |
| Reception modes | Internet Radio, DAB/DAB+, FM RDS |
| Auxiliary input | 3.5 mm stereo jack socket |
| Headphone output | 3.5 mm jack socket |
| Built-in speaker | Yes, monaural |
| Display | Backlit LCD display |
| Remote control | Yes, with CR2025 battery included |
| Alarm functions | 2 alarms with Buzzer, Internet, DAB or FM mode |
| Sleep timer | Yes, adjustable from 15 to 60 minutes |
| Presets | 10 per mode (Internet, DAB, FM) |
| DLNA / UPnP | Yes, compatible with Bubble UPnP and others |
| Menu languages | French, German, English, etc. (multilingual) |
| Software update | Automatic or manual via Internet |
| Warranty | 2 years |
| Dimensions | Approx. 300 x 180 x 120 mm (estimated) |
| Weight | Approx. 1.5 kg (estimated) |
| Cleaning | Dry cloth only |
| Safety | Do not expose to rain or moisture; use only the supplied adapter |
| Spare parts and repairability | No user-serviceable parts; contact customer service for any repairs |
Frequently Asked Questions - DR 316 ALBRECHT
User questions about DR 316 ALBRECHT
0 question about this device. Answer the ones you know or ask your own.
Ask a new question about this device
Download the instructions for your Marine VHF Radio in PDF format for free! Find your manual DR 316 - ALBRECHT and take your electronic device back in hand. On this page are published all the documents necessary for the use of your device. DR 316 by ALBRECHT.
USER MANUAL DR 316 ALBRECHT
natural_image
Product display of four electronic devices: audio, remote control, charging plug, and USB flash unit (no visible text or symbols on devices themselves)4 Vor Erstgebrauch
▶II: Wiedergabe/Pause/Stopp.
natural_image
Close-up of a black mechanical component with a white arrow pointing left and a plus sign on the right side (no readable text or symbols)text_image
Internet radio 09:00 Apple FM Utada Hikary - First Love (Remix) Apple-FM.nettext_image
Setup wizard Start now? YES NO
text_image
Connected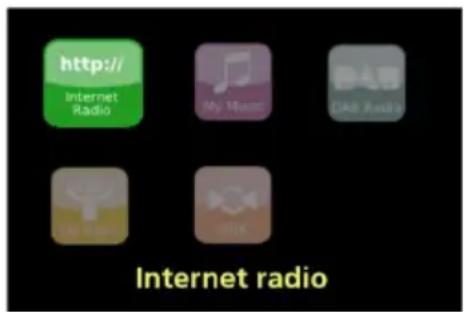
text_image
http:// Internet Radio My Music Dall Radio Air News aTR Internet radiotext_image
Setup wizard Start now? YES NOtext_image
FM Scan setting Audio setting System settings > Main menu >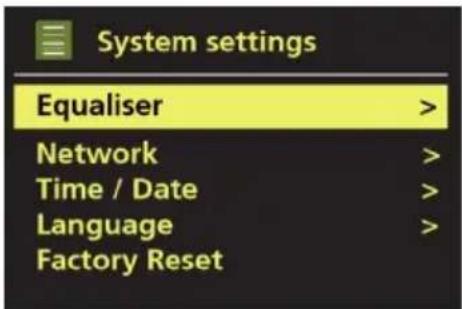
text_image
System settings Equaliser > Network > Time / Date > Language > Factory Reset >text_image
Main menu FM AUX in Sleep Alarms System settings >flowchart
graph TD
    A["System settings\nEqualiser\nNetwork >\nTime/Date >\nLanguage >\nFactory Reset >\nSoftware update\nSoftware Upgrade\nSetup wizard\nInfo\nBacklight >"] --> B["Normal | Flat | Jazz | Rock | Movie | Classic | Pop | News | My EQ | My EQ profile setup"]
    A --> C["Network Menu\nNetwork wizard\nPBC Wlan setup\nView settings\nWlan region >\nManual settings\nNetwork profile >"]
    A --> D["Set Time/Date\nAuto update >\nSet format >\nSet timezone >\nDaylight savings"]
    A --> E["English | Danish | Dutch | Finnish | French | German | Italian | Norwegian | Polish | Portuguese | Spanish | Swedish | Turkish"]
    A --> F["Timeout >\nPower-on Level >\nStandby Level >"]
    A --> G["Alarms Menu\nAlarm 1: Off [00:00"]\nAlarm 2: Off["00:00"]]
    H["Main menu\nInternet radio\nMusic player\nDAB\nFM\nAUX in\nSleep\nAlarms\nSystem settings >"] --> I
text_image
My EQ profile setup Bass: 0 Treble: 0 Loudness: Off
text_image
Bass Bass 0 dB -14 0 +149.2 Netzwerk
text_image
Network settings Please wait Connecting. /text_image
WPS Setup Push WPS button at the other end Press SELECT to continuetext_image
Auto update Update from DAB Update from FM Update from Network * No updatetext_image
Language English Danish Dutch Finnish Frenchtext_image
Software update Check periodically for new versions? YES* NOtext_image
Internet radio 09:00 Apple FM Utada Hikary - First Love (Remix) Apple-FM.nettext_image
Internet radio Last listened Station list > System settings > Main menu >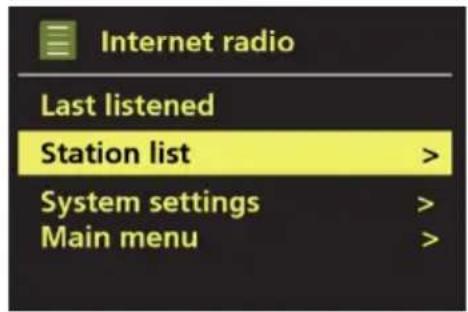
text_image
Internet radio Last listened Station list > System settings > Main menu >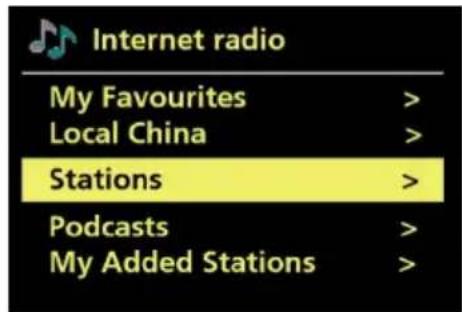
text_image
Internet radio My Favourites > Local China > Stations > Podcasts > My Added Stations >
text_image
Stations Location > Genre > Search stations Popular stations > New stations >10.1 Favoriten
text_image
Stations Location > Genre > Search stations Popular stations > New stations >text_image
Stations Location > Genre > Search stations Popular stations > New stations >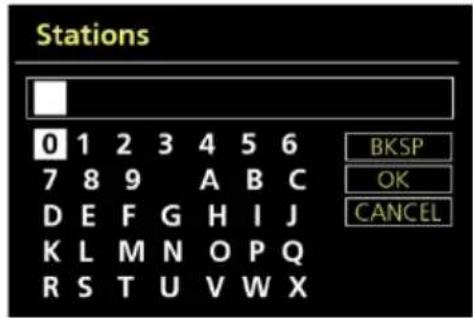
text_image
Stations 0 1 2 3 4 5 6 7 8 9 A B C D E F G H I J K L M N O P Q R S T U V W X BKSP OK CANCELtext_image
Search stations 1 Alba Scotland 69am 1 Business Radio 1 Mix Radio EDM 1 Mix Radio Trance 1 Top Fun Radiotext_image
Get access code Access code P69KF6Etext_image
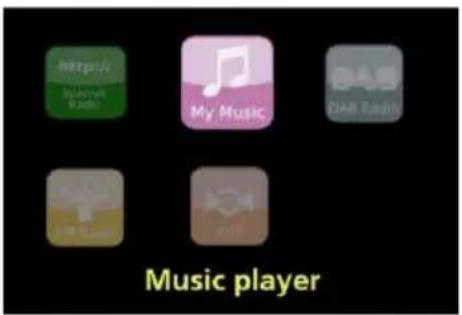
Music player Shared media > My playlist Repeat play: Off Shuffle play: Off Clear My playlist >text_image
LIQUAN-PC: liquan: Music > Playlists >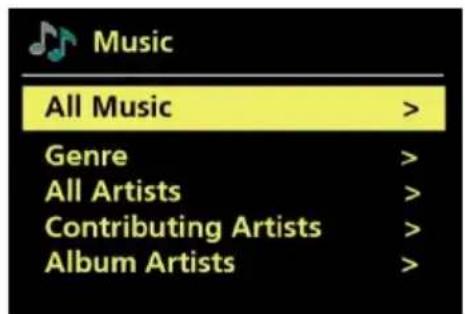
text_image
Music All Music > Genre > All Artists > Contributing Artists > Album Artists >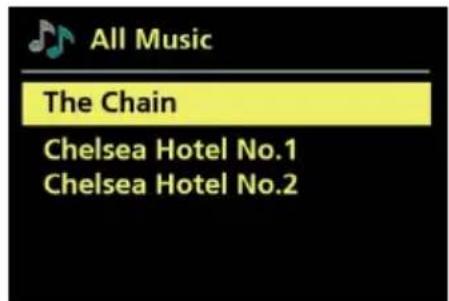
text_image
All Music The Chain Chelsea Hotel No.1 Chelsea Hotel No.2text_image
http:// My Music DAB Music Music player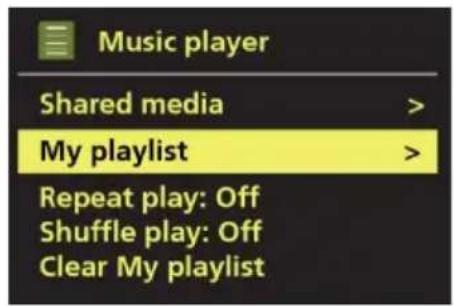
text_image
Music player Shared media > My playlist > Repeat play: Off Shuffle play: Off Clear My playlisttext_image
My playlist 01 Speakers On - Radio Bird On The Wire Heal the World The Chaintext_image
My playlist Delete from My playlist? YES NOtext_image
Media Sharing Share music, pictures, and video on your network. Learn more about sharing. Sharing settings ✓ Share my media to: Settings... iRadio Allow Deny Customize... How does sharing change firewall settings? OK Cancel Applytext_image
Scan Stations: 0 Scanning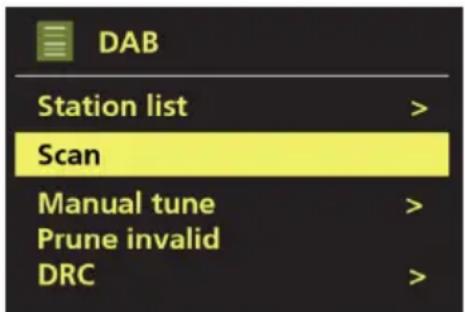
text_image
DAB Station list > Scan Manual tune > Prune invalid DRC >text_image
Station order Alphanumeric * Ensemble Valid14 UKW-Radiomodus
text_image
FM 09:00 89.80MHz FM Radio14.3 Einstellungen
text_image
FM station scan Strong stations only? YES NO*text_image
FM weak reception Listen in Mono only? YES NO*15 Aux-In-Modus
text_image
Alarm 1 Enable: Off Time: 00:00 Mode: Internet radio Preset: Last listened Volume: 24service@alan-electronics.de
natural_image
Exterior view of a wooden Albericht audio console with control knobs and a remote control (no visible text or symbols on main body)User Manual
English
1 Important Safety Notes
TO PREVENT FIRE OR SHOCK HAZARD, DO NOT USE THIS PLUG WITH AN EXTENSION CORD, RECEPTACLE OR OTHER OUTLET UNLESS THE BLADES CAN BE FULLY INSERTED TO PREVENT BLADE EXPOSURE. TO PREVENT FIRE OR SHOCK HAZARD, DO NOT EXPOSE THIS APPLIANCE TO RAIN OR MOISTURE.

The lightning flash with arrowhead symbol, within an equilateral triangle is intended to alert the user to the presence of insulated 'dangerous voltage' within the product's enclosure that may be of sufficient magnitude to constitute a risk of electric shock to persons.
WARNING: TO REDUCE THE RISK OF ELECTRIC SHOCK DO NOT REMOVE COVER (OR BACK), NO USER SERVICEABLE PARTS INSIDE REFER SERVICING TO QUALIFIEDSERVICE PERSONNEL.
The exclamation point within an equilateral triangle is intended to alert the user to the presence of important operating and maintenance (servicing) instructions in the literature accompanying the appliance.
- Read these instructions.
- Keep these instructions.
- Heed all warnings.
- Follow all instructions.
- Do not use this apparatus near water.
- Clean only with dry cloth.
- Do not block any ventilation openings. Install in accordance with the manufacturer's instructions.
- Do not install near any heat sources such as radiators, heat registers, stoves, or other apparatus (including amplifiers) that produce heat.
- Protect the power cord from being walked on or pinched particularly at plugs, convenience receptacles, and the point where they exit from the apparatus.
- Only use attachments / accessories specified by the manufacturer.
- Unplug this apparatus during lightning storms or when unused for long periods of time.
- Refer all servicing to qualified service personnel. Servicing is required when the apparatus has been damaged in any way, such as power-supply cord or plug is damaged, liquid has been spilled or objects have fallen into the apparatus, the apparatus has been exposed to rain or moisture, does not operate normally, or has been dropped.
- This appliance shall not be exposed to dripping or splashing water and no object filled with liquids such as vases shall be placed on the apparatus.
- Do not overload wall outlet. Use only power source as indicated.
- Use replacement parts as specified by the manufacturer.
- The product may be mounted to a wall only if recommended by the manufacturer.
- Upon completion of any service or repairs to this product, ask the service technician to perform safety checks.
Welcome
Thank you for purchasing the Albrecht DR 316 C radio. Your DR 316 C is designed to provide you with hours of music enjoyment with simple, convenient access to thousands of Internet radio stations worldwide and furthermore with DAB, the new DAB + as well as FM and music streaming options. No matter whether you are in Alaska and want to listen to Hawaiian music, or whether you want to listen to classical music, hard rock or jazz the DR315 brings you home the radio station of your choice.
2 Table of content
1 Important Safety Notes....40
2 Table of content....41
3 Content of package....43
4 Before you start 43
4.1 Language 43
5 Overview of your DR 316 C....44
5.1 Front Panel....44
5.2 Back Panel 45
5.3 Remote control....46
6 Screens....47
7 Getting started/setup....49
7.1 Setup wizard 49
8 Operation....50
8.1 Menu Navigation....50
8.2 Presets 52
9 Settings 53
9.1 Equaliser 53
9.2 Network....54
9.2.1 Network Wizard 54
9.2.2 PBC Wlan setup (WPS setup)....55
9.2.3 View Settings 55
9.2.4 Wlan region....55
9.2.5 Manual settings....56
9.2.6 Network profile....56
9.3 Time/Date....56
9.3.1 Set Time/Date 56
9.3.2 Auto update (from DAB, FM or Network) 56
9.3.3 Set Format 57
9.4 Language 57
9.5 Factory Reset 57
9.6 Software update....58
9.7 Setup Wizard....58
9.8 Info 58
9.9 Backlight....59
10 Internet radio mode 59
10.1 Favourites....60
10.2 Browse 60
10.3 Search....61
10.4 My Added Stations 62
10.5 Now playing information....62
10.6 Internet radio portal registration 63
11 Music player mode....64
11.1 Shared media (from UPnP media server)....65
11.2 My Playlist....66
11.3 Repeat/shuffle....67
11.4 Prune servers....67
11.5 Now playing information....67
11.6 Setting up a music server....67
11.7 Sharing media with Windows Media Player 68
11.8 Use "Play To" in Windows 7 to stream media....68
11.9 Use "Play To" in Windows Media Player 69
12 DLNA Function....69
13 DAB radio mode....70
13.1 Scanning for stations....70
13.2 Now playing information....71
13.3 Settings 71
13.4 Station order....71
14 FM radio mode 72
14.1 Selecting stations....72
14.2 Now playing information....72
14.3 Settings 73
14.3.1 Scan setting....73
14.3.2 Audio setting....73
15 Aux in mode....73
16 Alarms and sleep 74
16.1 Alarms 74
16.2 Sleep....74
17 Warranty and Recycling Information....75
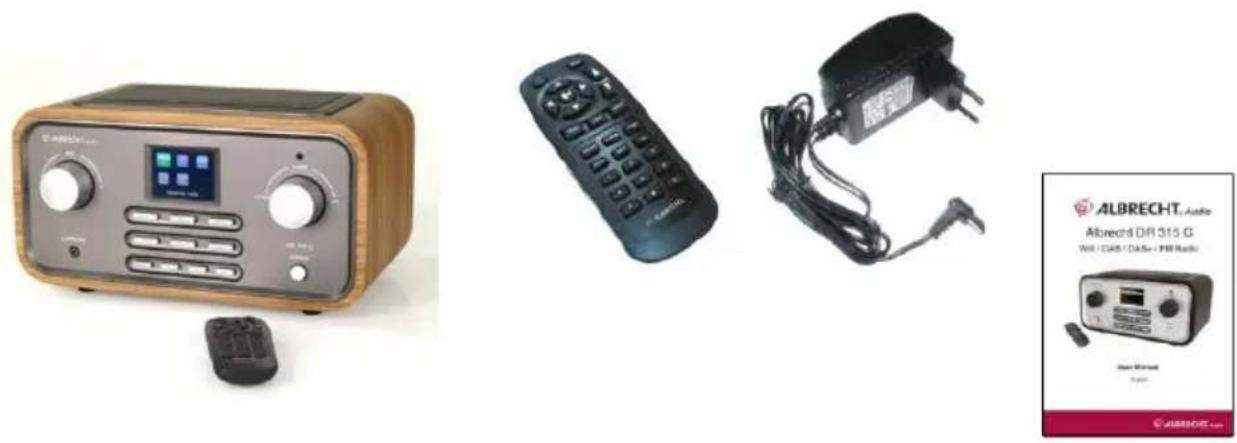
3 Content of package
Please make sure that the following content are included in the package:
- DR 316 C Main unit
- Power supply
- User Manual
- Remote control
natural_image
Product display image showing four electronic devices: a beige audio recorder, a black remote control, a black charging plug, and a digital audio kit labeled 'ALBRECHT_Antle'.4 Before you start
Before you can use your internet radio, you need the following:
- A broadband internet connection. A wireless access point connected to your broadband internet is recommended.
- If your wireless network is configured to use WEP (Wired Equivalent Privacy) or WPA (Wi-Fi Protected Access) data encryption, it is important that you know your WEP or WPA code to connect to your network.
• Supports 2.4GHz and 5GHz Wifi (802.11a/b/g/n)
Depending on your wireless router and your environment the internet radio should work anywhere within up to 20-30 meters of the wireless access point.
Before continuing, make sure that your wireless access point is turned on and connected to your broadband internet. Please refer to your wireless access point manual to get this part working.
4.1 Language
The default language is German. To change, select Menu > System settings > Language >, then select your language.

text_image
System settings Equaliser > Network > Time / Date > Language > Factory Reset >5 Overview of your DR 316 C
After taking your DR 316 C out of the package, please spend some time to familiarize yourself with its features.
5.1 Front Panel
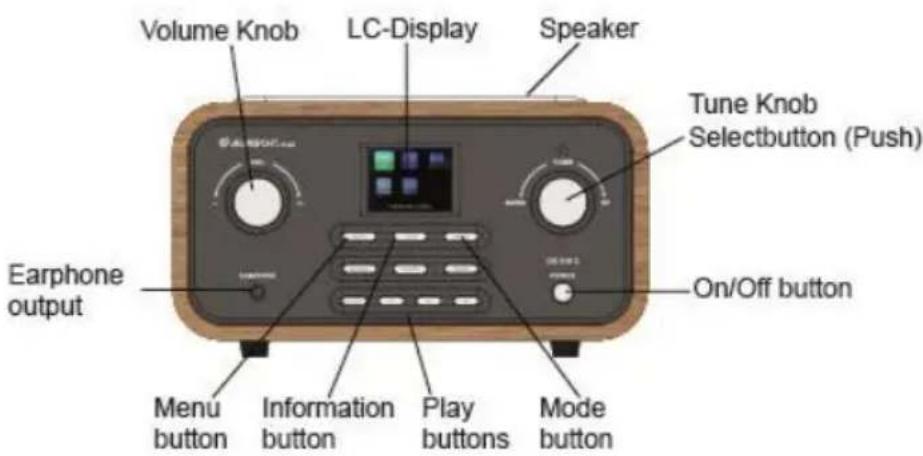
text_image
Volume Knob LC-Display Speaker Tune Knob Selectbutton (Push) Earphone output On/Off button Menu button Information button Play buttons Mode buttonVOL: Turn to increase/decrease the sound volume. Press to mute/unmute.
TUNE: By turning the TUNE knob you can navigate through the menus. By pressing the TUNE knob you confirm the currently highlighted selection.
MENU: Show menu for the current mode. Press again to show Now playing screen.
INFO: With this button you can cycle through the additional information of each mode.
MODE: By pressing MODE the DR 316 C will cycle through the different modes: Internet Radio, My Music, DAB (DAB+), FM and AUX in.
ALARM: Enters alarm wizard, turns off alarm (when alarm is sounding) and in standby, sets which alarms are active.
PRESET: Press for the Preset recall/Save menu. Scroll up/down to select the preset number then press 'Select' to confirm. There are 10 presets each for Internet radio, DAB and FM modes.
BACK: Return to previous screen. In play mode, this button may be used to return to the last track list or station list.
SLEEP: When playing, standby after a set time.
When alarm is sounding, snooze for a set time.
◀◀ : Previous: Select start of track, previous track or hold to scan down/rewind.
▶II : Play/pause/stop.
▶▶▶ : Next: Select next track or hold to scan up/fast forward.
POWER: Turns the DR 316 C on/off.
EARPHONE: If you want to listen to the music with your earphones connect them to this socket.
5.2 Back Panel
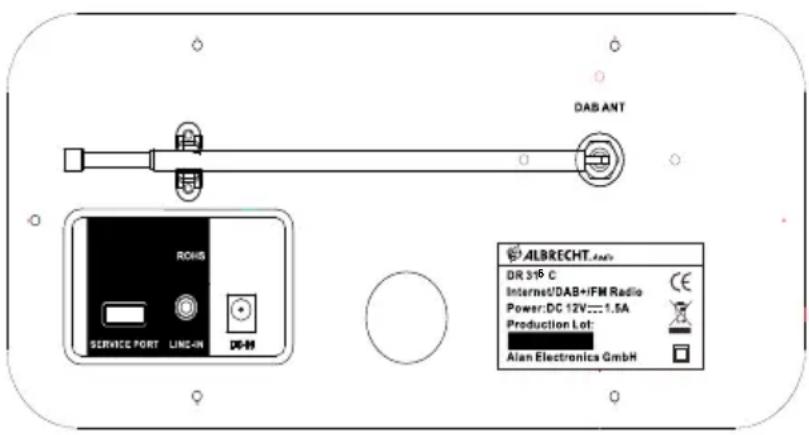
text_image
DAB ANT ROHS SERVICE PORT LINE-IN DE-89 ALBRECHT.405 DR 3/6 C Internet/DAB+IFM Radio Power:DC 12V....1.5A Production Lot: Alan Electronics GmbHAs shown below, DR 316 C has connectors (from left to right) for the following:
• USB service port (Attention! Not for charging electronics devices)
- Line in
• DC power in (12 V)
5.3. Remote control
☐: Standby: Turn on or back to standby mode (showing clock and date). Cancel sleep function.
Mute: The button MUTE toggles the muting of the radio.
Navigation buttons: Please use this buttons to navigate through the menu.
Select .Pressing this button confirms the current selected option.
Volume: Pressing the buttons VOL △VOL ▽ increases or decreases the volume.
◀◀ : Previous: Select start of track, previous track or hold to scan down/rewind.
▶II : Play/pause/stop.
▶▶: Next: Select next track or hold to scan up/fast forward.
Alarm: Using this key opens up the alarm settings.
Menu: Show menu for the current mode. Press again to show Now playing screen.
Mode: Cycle through the modes: Internet Radio, Music player, DAB, FM, Aux in.
text_image
MUTE VOLUME ALARM MENU MODE PRESET INFO 10+ 1 2 3 4 5 6 7 8 9 ALBRECHT. AudioPreset: Press for the Preset recall/Save menu. Scroll up/down to select the preset number then press 'Select' to confirm. There are 10 presets each for Internet radio, DAB and FM modes.
Info: View more information about the station or track playing. Repeat press to cycle through further information screens.
Memory buttons: By pressing and holding one of the buttons 1-10 you can save one of your favorite radio stations to a preset. Short pressing recalls the station associated to the preset.
natural_image
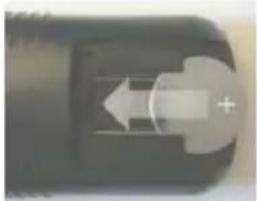
Close-up of a mechanical component with directional arrows, no visible text or symbolsBattery: Before the first use of the remote control you have to insert the provided CR 2025 lithium battery. This type of battery should last many month or even years when used on a regular basis. The battery has to be inserted so the + sign shows upwards.
6 Screens
The screen shows various menus, dialogues and displays, as described below.
There are basically six types of screen:
- Standby (clock)
- Mode
- Now playing
- Dialogue
- Error/Information
- Mode list screen
- Menu
Where there is more text than can be fitted onto a screen, the text automatically scrolls left to right after a brief pause.
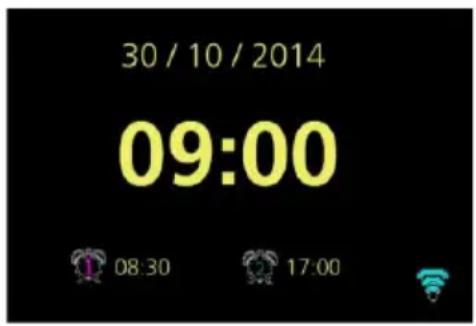
The Standby screen shows the time, date and any active alarm times.
If the Network is set to be active during Standby the Network Icon is shown.

text_image
30 / 10 / 2014 09 : 00A splash screen is displayed for each mode. Press Mode button, then left/right knob select mode change. After a second, DR 316 C enters the displayed mode.

text_image
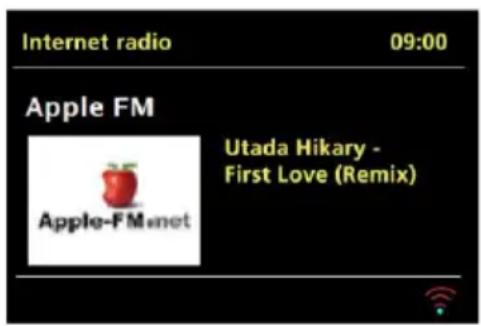
http:// Internet Radio Internet radioNow playing screens show information about the audio source and track now playing, album art, slideshow or station logo, where available.
text_image
Internet radio 09:00 Apple FM Utada Hikary - First Love (Remix) Apple-FM.netDialogue screens are shown to allow the user to change settings. They vary in complexity from simple Yes/No options up to the scrollable network passphrase input screen.
The selected option is highlighted with a white background.
Dialogue screens mark the currently saved setting with an asterisk (*).
Error/Information screens give specific messages for a few seconds, then change automatically to another screen.
Mode list screen – to display all the available modes for user selection.
Menu Screens – for details of menu screens see under Section 7.1 Menu Navigation.

text_image
Setup wizard Start now? YES NO
text_image
Connected
text_image
http:// Internet Radio My Music DLR Radio Internet radio7 Getting started/setup
DR 316 C is a sophisticated multi-source media player. To simplify the set up process as much as possible, when DR 316 C is first started a setup wizard helps take you through the basic steps to enable connections with the different audio sources.
The various listening modes have different requirements:
- Internet Radio requires a suitable internet broadband connection (usually wireless network).
• Music Player requires connection to wireless network connected device.
• DAB/FM requires a DAB/FM broadcast signal via the built in antenna.
- Aux-In requires connection via the Aux-In socket.
To start DR 316 C, connect the unit to a suitable power source using the power supply provided. The unit starts up. (there may be a few seconds delay before the display is initialised)
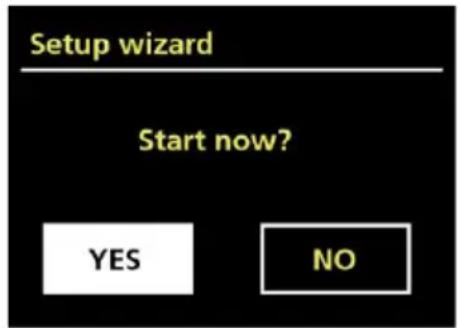
After showing a Starting screen DR 316 C will normally enter the last used listening mode. The first time DR 316 C is started (or after being reset to factory settings) the setup wizard is launched automatically.
7.1 Setup wizard
When DR 316 C is started for the first time, it runs through a setup wizard to configure settings for date/time and network. Once this has finished, the system is ready to use in most modes.
* Note: To change these settings later, select Menu > System settings > and select the required settings option.
To run the setup wizard again, select Menu > System settings > Setup wizard.
Select Yes to start the setup wizard.
If you choose No, the next screen asks if you would like to run the wizard next time DR 316 C is started. The system then starts without configuring time/date and network settings and enters the Main Menu.
text_image
Setup wizard Start now? YES NOThe Setup wizard guides you through the basic setup parameters for Time/Date and Network connection. For details see the relevant settings in section 8 Settings. To change any settings later all setting functions are accessible from the Settings Menu.
8 Operation
After the initial setup, DR 316 C is ready for operating in most Modes.
To select a Mode, press MODE, then turn clockwise or anticlockwise of the rotary to scroll left or right through the mode list. Press Select to confirm the current highlighted mode, mode splash screen will be displayed. After a brief moment DR 316 C switches to that mode. The last station or track previously used in that mode is selected. If this is not possible, DR 316 C scans for relevant stations, networks, or prompts the user for appropriate input. See the relevant Mode section for details of how to use each listening mode.
text_image
http:// Internet Radio My Music ODA News My Music Internet radio8.1 Menu Navigation
To enter the menu tree in a particular mode press MENU. To move back a menu level press BACK. To exit the menu system, press MENU again.
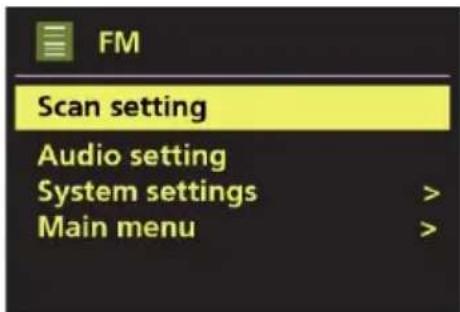
Each mode has a Mode menu, with options specific to that mode. For example, the FM mode menu has two mode specific options: Scan setting and Audio setting.
In addition, each mode menu has two final options: System settings > and Main menu >. The ‘>’ indicates options leading to further menus.
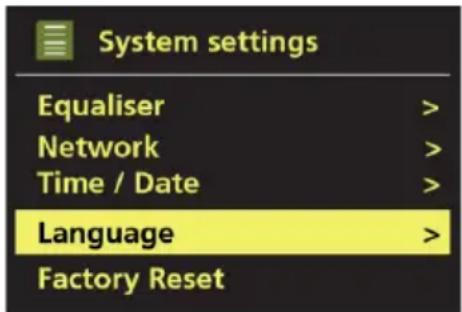
The System settings menu presents system setting functions to allow the user to setup how the unit behaves. This includes: Equaliser, Network, Time/Date, Language, Factory Reset, Software update, Software upgrade, Setup wizard, Info and Backlight parameters.
text_image
FM Scan setting Audio setting System settings > Main menu >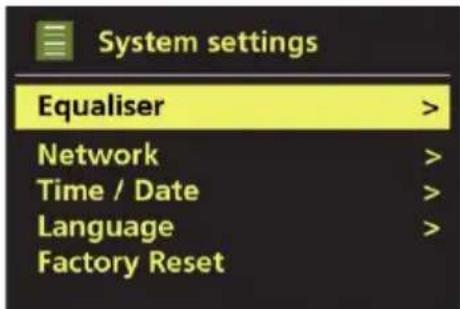
text_image
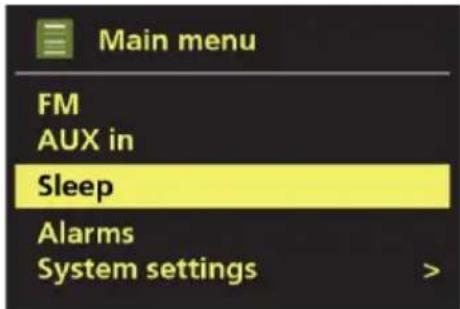
System settings Equaliser > Network > Time / Date > Language > Factory Reset >The Main menu presents an alternative method for selecting listening modes plus sleep and alarm functions.
text_image
Main menu FM AUX in Sleep Alarms System settings >Some menus, for example the System settings menu, have several submenus. A menu map for the various listening modes and the System Settings and Main menu is shown on the following page.
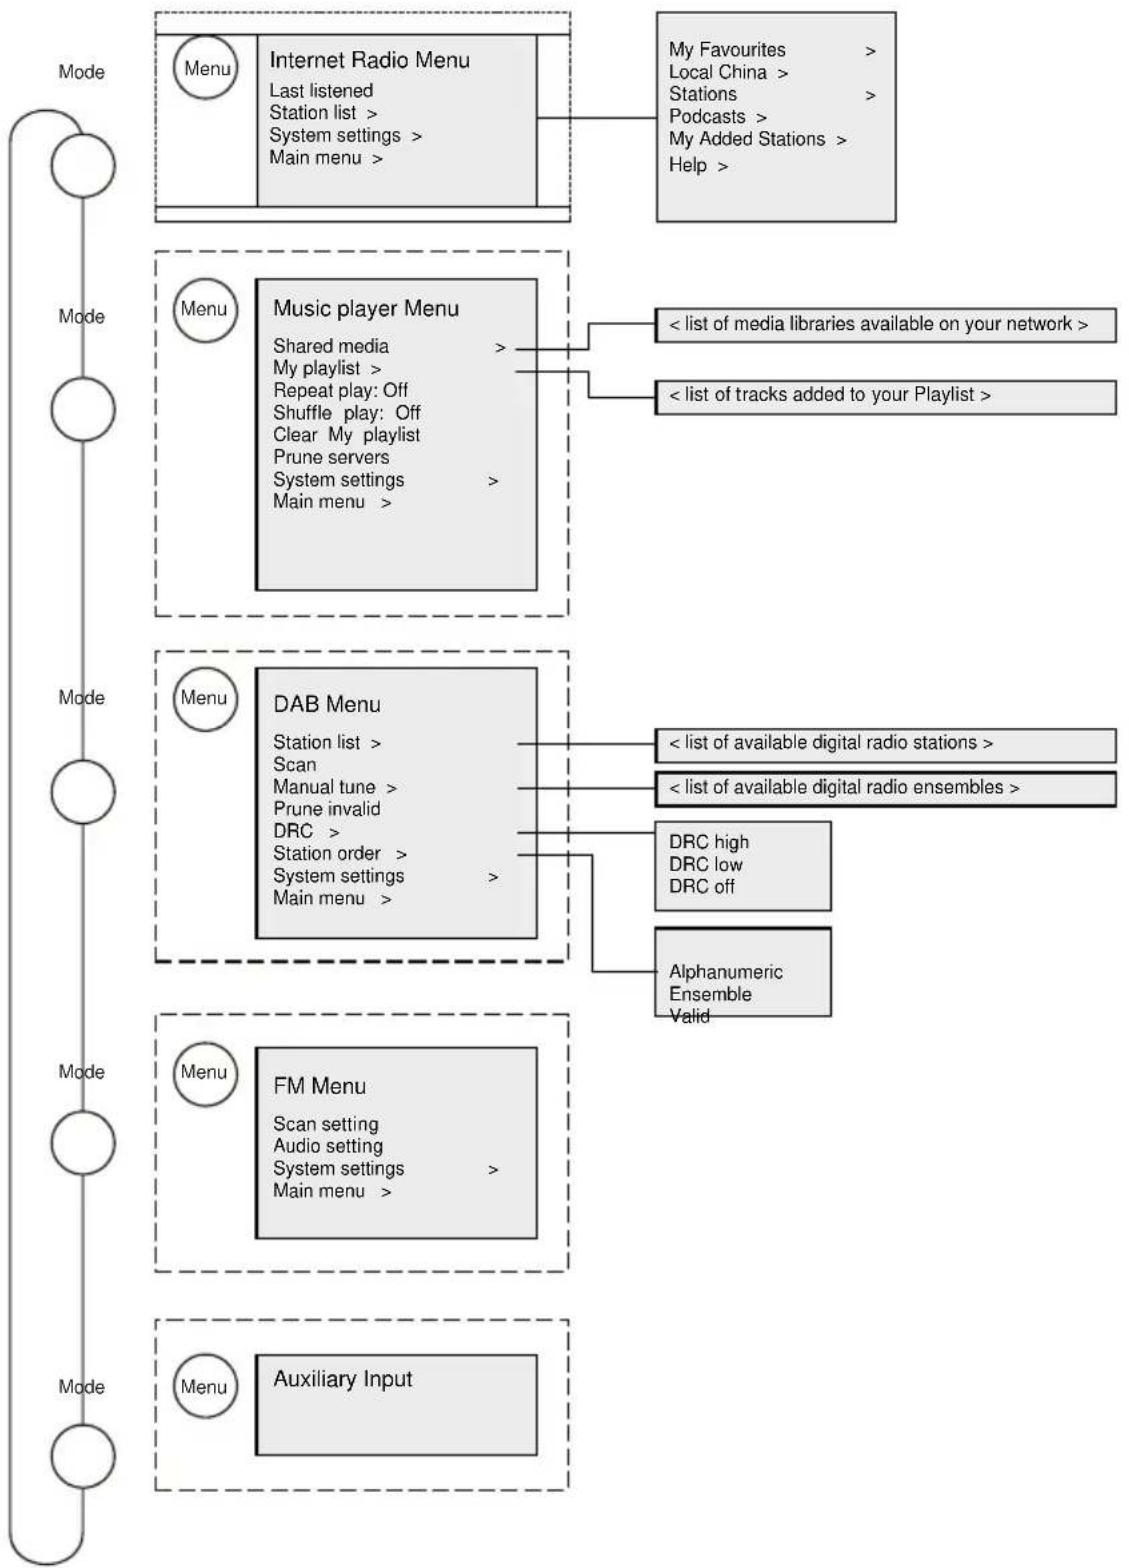
flowchart
graph TD
    A["Menu"] --> B["Internet Radio Menu"]
    B --> C["Main menu >"]
    C --> D["My Favourites > Local China > Stations > Podcasts > My Added Stations > Help >"]
    E["Menu"] --> F["Music player Menu"]
    F --> G["Shared media > My playlist > Repeat play: Off Shuffle play: Off Clear My playlist Prune servers System settings > Main menu >"]
    G --> H["< list of media libraries available on your network >"]
    G --> I["< list of tracks added to your Playlist >"]
    J["Menu"] --> K["DAB Menu"]
    K --> L["Station list > Scan Manual tune > Prune invalid DRC > Station order > System settings > Main menu >"]
    L --> M["< list of available digital radio stations >"]
    L --> N["< list of available digital radio ensembles >"]
    O["Menu"] --> P["FM Menu"]
    P --> Q["Scan setting Audio setting System settings > Main menu >"]
    Q --> R["DRC high DRC low DRC off"]
    Q --> S["Alphanumeric Ensemble Valid"]
    T["Menu"] --> U["Auxiliary Input"]
Figure 1 Mode Menu Structure
flowchart
graph TD
    A["System settings"] --> B["Main menu"]
    A --> C["Network Menu"]
    A --> D["Alarms Menu"]

    B --> E["Internet radio"]
    B --> F["Music player"]
    B --> G["DAB"]
    B --> H["FM"]
    B --> I["AUX in"]
    B --> J["Sleep"]
    B --> K["Alarms"]
    B --> L["System settings"]

    C --> M["Normal | Flat | Jazz | Rock | Movie | Classic | Pop | News | My EQ | My EQ profile setup"]

    C --> N["Network wizard"]
    C --> O["PBC Wlan setup"]
    C --> P["View settings"]
    C --> Q["Wlan region >"]
    C --> R["Manual settings"]
    C --> S["Network profile"]

    C --> T["Set Time/Date"]
    C --> U["Auto update >"]
    C --> V["Set format"]
    C --> W["Set timezone >"]
    C --> X["Daylight savings"]

    C --> Y["English | Danish | Dutch | Finnish | French | German | Italian | Norwegian | Polish |<br>    -Portuguese | Spanish | Swedish | Turkish"]

    C --> Z["Timeout >"]
    Z --> AA["Power-on Level >"]
    Z --> AB["Standby Level"]

    C --> AC["Alarms 1: Off [00:00"]]
    C --> AD["Alarm 2: Off [00:00"]]
Figure 2 System Settings and Main Menu
8.2 Presets
In Internet Radio, DAB and FM modes, up to ten preset stations can be stored and recalled. Presets are stored in the radio cannot be accessed from other radios.
To store the current radio station as a preset, press and hold Preset until the display shows the Save preset screen. Select one of the 10 presets to save the currently playing station.
To select a preset, press Preset briefly, then select one of the listed preset stations. When a preset station is playing, its preset store number Pn (P1, P2 etc) is shown in the bottom of the screen.
9 Settings
All the settings parameters for DR 316 C are available on the Settings menu.
Settings menu options:
- Equaliser
- Network
- Time/Date
- Language
- Factory Reset
- Software update
- Software Upgrade
- Setup Wizard
- Info
- Backlight
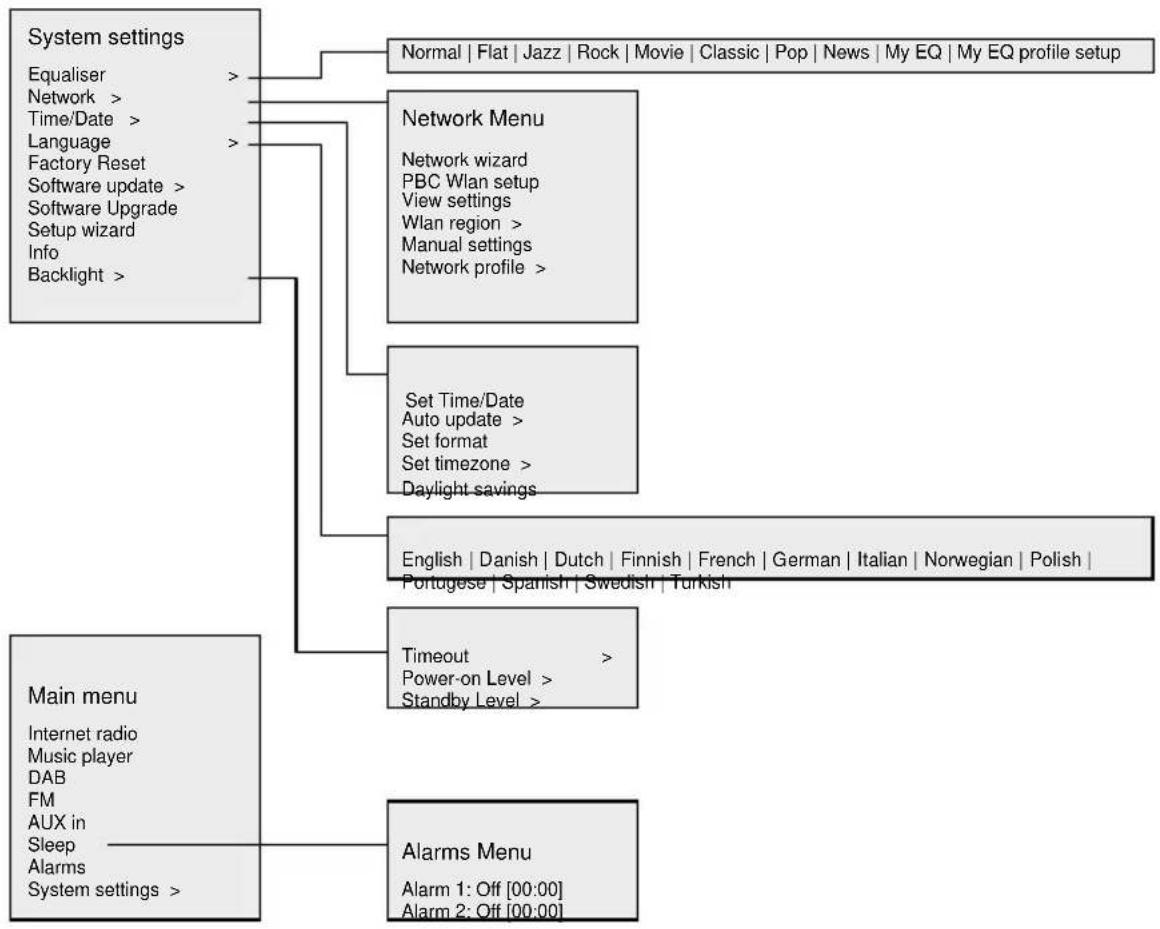
9.1 Equaliser
Several preset EQ modes are available, also a user-defined setting (My EQ).
To choose an EQ setting, select Menu > System settings > Equaliser.
You can then choose from a variety of preset modes and My EQ.
text_image
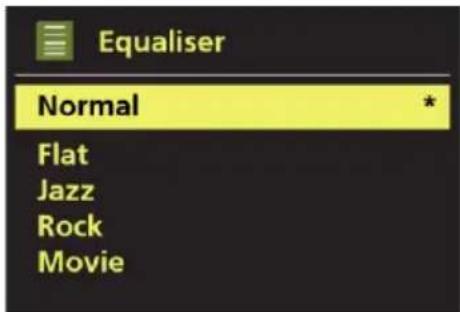
Equaliser Normal Flat Jazz Rock MovieThe last option 'My EQ profile setup' allows you to define your own settings for the 'My EQ' option with custom bass, loudness and treble settings.
text_image
My EQ profile setup Bass: 0 Treble: 0 Loudness: Off
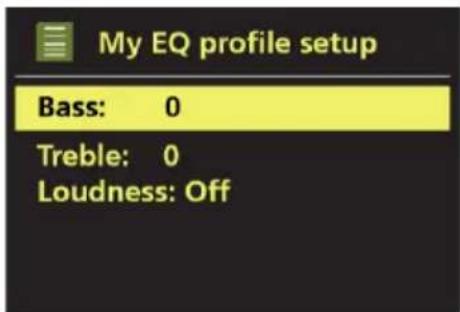
text_image
Bass Bass 0 dB -14 0 +149.2 Network
- Network wizard
- PBC Wlan setup
- View settings
- Wlan region
- Manual settings
- Network profile
DR 316 C is compatible with all common network protocols and encryption methods, including Wi-Fi Protected Setup (WPS).
To connect DR 316 C to your network, you need to the following:
- A Wi-Fi wireless router, together with passphrase key, if set.
To select a network use either the Network wizard or Manual settings.
9.2.1 Network Wizard
This guides you through the necessary steps to join a network. This is also automatically run as part of the Setup wizard. The screens and options presented will depend on the type of network and network protection used.
Selecting a network
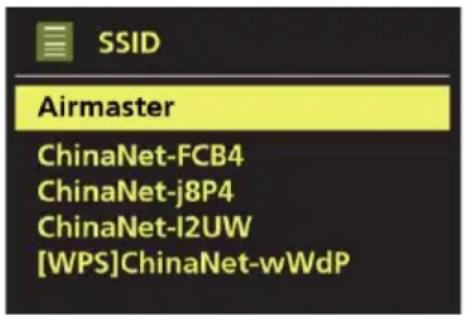
When the Network wizard is chosen DR 316 C automatically scans for available wireless networks and presents a list of SSID's (Service Set Identifier) for the networks. Those options starting with WPS in brackets indicates encrypted networks offering Wi-Fi Protected Setup (WPS) options, for further details see under section 8.2.2 WPS Setup (Wi-Fi Protected Setup).
DR 316 C remembers login details for the last four wireless networks it has connected to and will automatically connect to them when they are available. If connection to a network is temporarily lost, DR 316 C will automatically reconnect.
Wi-Fi network (SSID)
select a network from the list.
If the network is open (non-encrypted), DR 316 C connects and no further details are required, see Completion below.
text_image
SSID Airmaster ChinaNet-FCB4 ChinaNet-j8P4 ChinaNet-l2UW [WPS]ChinaNet-wWdPStandard encrypted network
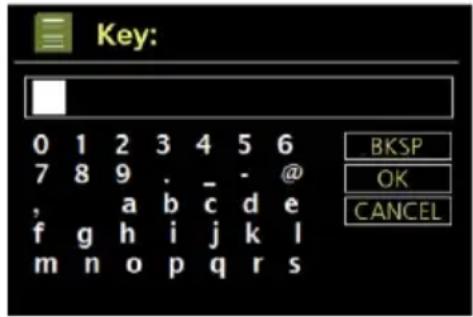
If the wireless network is protected the next screen presents options to enter the network key or passphrase.
To enter the network's key (passphrase), highlight the relevant character and press to select each character in turn. As each character is selected, the key is built up and displayed in the field at the top of the display.
The three options – Backspace, OK and Cancel are included in the selection loop. There can be accessed just using the TUNE knob or Remote control on the Navigation key control, which moves the selection highlight.
DR 316 C connects to the selected network.
If connecting fails, DR 316 C returns to a previous screen to try again. To exit the process use the BACK/MENU button.
If the network connection is lost, DR 316 C automatically reconnects.
9.2.2 PBC Wlan setup (WPS setup)
PBC Wlan(WPS) encrypted networks are identified by '[WPS]' at the start of the network name. Select and follow the prompts. For more information on setting up a WPS encrypted network, see your WPS router's instructions.
text_image
Key: 0 1 2 3 4 5 6 7 8 9 . - @ , a b c d e f g h i j k l m n o p q r s BKSP OK CANCEL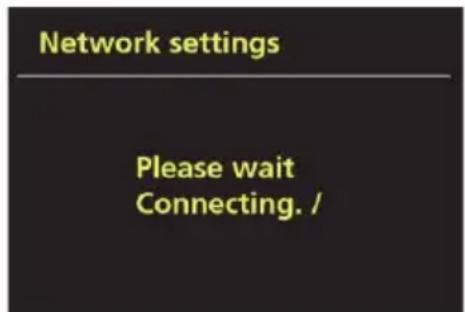
text_image
Network settings Please wait Connecting. /
text_image
WPS Setup Push WPS button at the other end Press SELECT to continue9.2.3 View Settings
Displays the settings details for the current network setup, including:
• Active connection
- MAC Address
- Wlan region
- DHCP
- SSID
- IP Address
- Subnet mask
- Gateway address
- Primary DNS
- Secondary DNS
9.2.4 Wlan region
Presents a list of regions to configure the appropriate wlan behaviour of DR 316 C. Select the appropriate region for the location in which DR 316 C will be used.
9.2.5 Manual settings
There are also other options for viewing and manually altering network settings from Menu > System settings > Network > (for example setting up a Wireless network). Users experienced with networking may find these options useful for diagnosing and fixing network problems.
- Wireless
- DHCP enable / disable
9.2.6 Network profile
This displays a list of the networks remembered by DR 316 C (up to a maximum of 4). You can see the list of registered networks through Menu > System settings > Network > Network profile >. From here you can delete unwanted networks by turning and pressing TUNE key.
9.3 Time/Date
Time/Date menu options:
- Set Time/Date
- Auto Update
- Set Format
- Set timezone
- Daylight savings
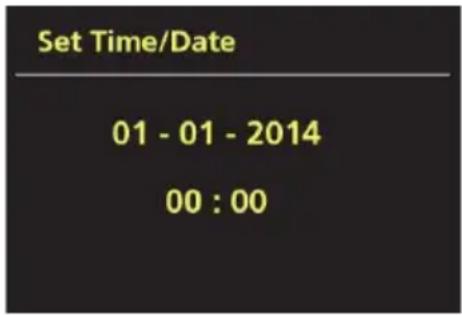
9.3.1 Set Time/Date
The date and time are displayed as dd-mm-yyyy and hh:mm AM/PM with the first value, dd, active (flashing).
Use Tune knob adjust each value. As each value is set by pressing the Tune knob control, the next value becomes active ready for adjustment.
text_image
Set Time/Date 01 - 01 - 2014 00 : 009.3.2 Auto update (from DAB, FM or Network)
Auto-update works with data sent over DAB, FM or the Internet. The clock is only updated when in a corresponding mode, so it is best to select a mode you use regularly. DAB and FM use time signals broadcast with radio transmissions.
Network uses a time signal sent from the Frontier Silicon Internet radio portal when in any network-connected mode.
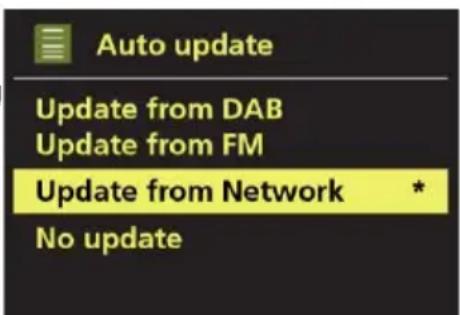
text_image
Auto update Update from DAB Update from FM Update from Network * No update- Select Update from DAB, Update from FM, Update from Network or No update.
- If you are updating from the network, set your time zone.
- If your country uses daylight saving, the automatically updated time from the network may be wrong by one hour. When daylight savings are in effect (during the winter), turn on the Daylight savings option to rectify this.
DR 316 C will auto-update from the selected source when time information is available.
9.3.3 Set Format
Allows you to change between 12 and 24 hour display.
9.4 Language
The default language is German. To change, select Menu > System settings > Language >, then select your language.
text_image
System settings Equaliser > Network > Time / Date > Language > Factory Reset >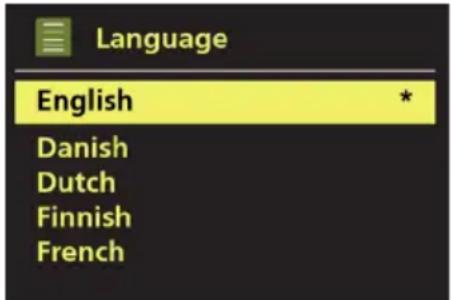
text_image
Language English Danish Dutch Finnish French9.5 Factory Reset
A factory reset resets all user settings to default values, so time/date, network configuration and presets are lost. However, the radio's current software version is maintained, as is registration with the Internet radio portal. Internet radio favourites therefore remain unless you re-register your radio with another account on the portal website.
To perform a factory reset, select Menu > System settings > Factory reset Proceed > Yes.
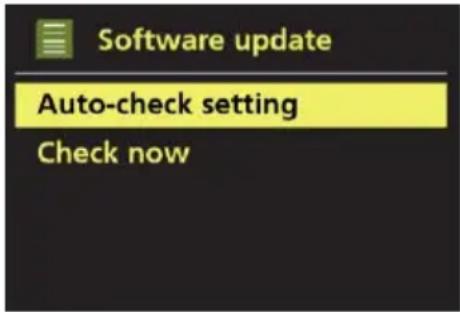
9.6 Software update
From time to time, Frontier Silicon may make software upgrades available with bug fixes and/or additional features. You can either check manually, or set DR 316 C to check periodically automatically (this is the default). If DR 316 C detects that newer software is available, it asks if you want to go ahead with an update. If you agree, the new software is then downloaded and installed. After a software upgrade, all user settings are maintained.
CAUTION: Before starting a software upgrade, ensure that DR 316 C is plugged into a stable mains power connection. Disconnecting power during a software update may permanently damage the unit.
To turn automatic checking on or off, select Menu > System settings > Software update > Auto-check setting.
text_image
Software update Auto-check setting Check now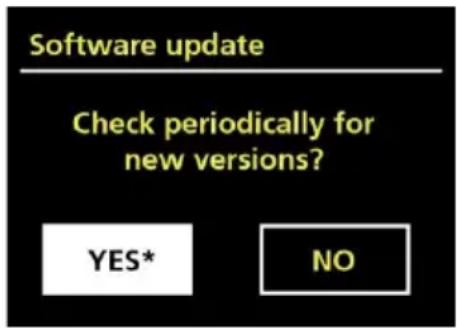
text_image
Software update Check periodically for new versions? YES* NO9.7 Setup Wizard
This allows you to run the Setup wizard at any time. Guides you through the essential settings in the following order:
- Date/Time – Set format
- Auto update – select clock update source or No Update.
- Set Time/Date (this step is only needed if the 'No Update' option is selected in Auto update)
- Network wizard automatically runs (see section 8.2.1 Network Wizard)
Once you are connected to a network the wizard is completed.
9.8 Info
Shows details of the current system Including:
- SW Version: Software version number
- Radio ID: Unique code used to identify this particular radio device.
- Friendly name: (name by which the radio is identified on a network.)
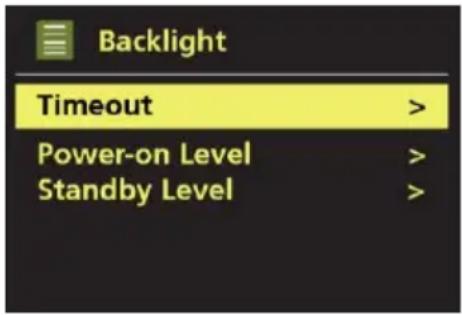
9.9 Backlight
The DR 316 C display can be set to dim, when in Standby, after a Timeout period. This option allows you to set the timeout period and the brightness settings (Power-on level) and (Standby level).
- Timeout - On, 10 sec, 20 sec, 30 sec, 45 sec, 60 sec, 90 sec, 120 sec and 180 sec are available.
- Power-on level - High, Medium and Low are available.
- Standby level - Medium and Low are available.
text_image
Backlight Timeout > Power-on Level > Standby Level >10 Internet radio mode
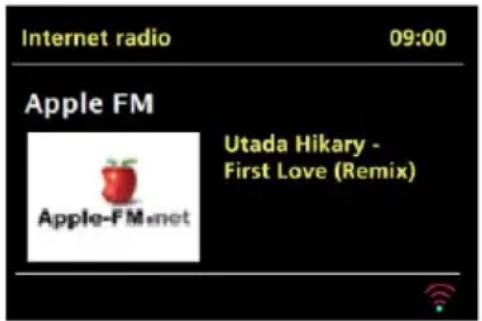
DR 316 C can play thousands of radio stations and podcasts from around the world through a broadband Internet connection.
When you select Internet radio mode, DR 316 C contacts the Frontier Silicon Internet radio portal to get a list of stations, organised into different categories like Country, Most popular and Genre. Once you select a station, DR 316 C connects directly to that station.
text_image
Internet radio 09:00 Apple FM Utada Hikary - First Love (Remix) Apple-FM.netThe portal also enables multiple lists of favourite stations that you can personalise, for example Andy's stations, Jo's favourites, Talkshows. To use the favourites feature, register your radio with the portal website as described in Section 9.6 Internet radio portal registration. If you have several Frontier Silicon radios, you can register them all on the same account so that each radio has access to your favourites lists. It is possible to add favourites either directly through DR 316 C or through any computer with a web browser.
To enter Internet Radio mode, either press MODE until the display shows Internet Radio or select Menu > Main menu > Internet Radio.
There are several ways of selecting stations:
-
Presets
-
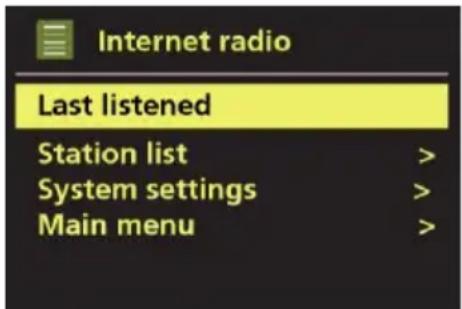
Last listened
When Internet radio mode restarts, the last-listened station is selected. To select another recently used station, select Menu > Last listened then one of the stations listed. Most recent stations appear at the top of the list.
text_image
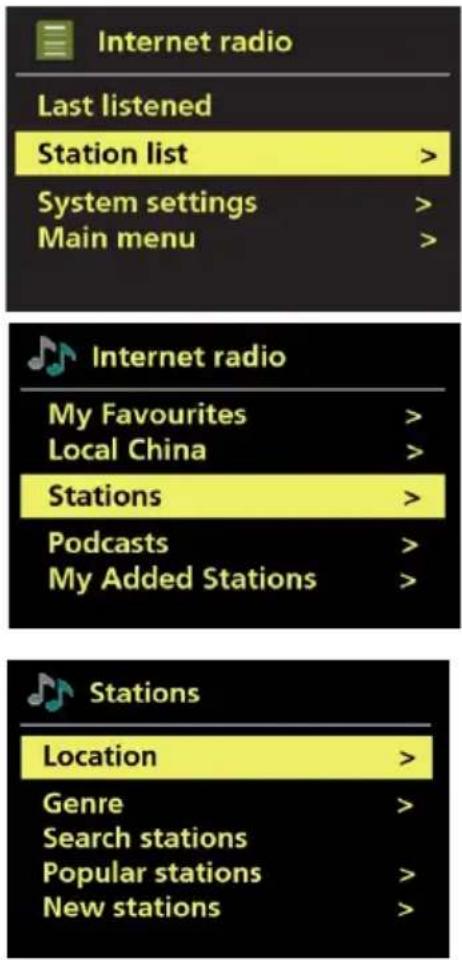
Internet radio Last listened Station list > System settings > Main menu >- From the portal through the Menu > Station list > Stations.
Including:
- Location – find a radio station based on its location in the world.
- Genre – Search for stations broadcasting the type of music you like.
- Search stations – Search for a station name.
- Popular stations – lists the most popular, listened to stations on the internet.
- New stations – lists the latest stations broadcasting.
text_image
Internet radio Last listened Station list > System settings > Main menu >10.1 Favourites
Favourites are stored on the Internet radio portal. Before you set up an account on the portal from its Web interface, the favourites are associated solely with the radio on which you set them. After you set up a portal account, all the favourites from your different radios are merged into a combined favourites list. This combined list is available to all the radios on your account.
To store a playing station as a favourite, press and hold TUNE knob until the display shows 'Favourite added'. The station appears in the default favourites list Stations.
To select a favourite, select Menu > Station list > My favourites > [Favourites list] > [Station].
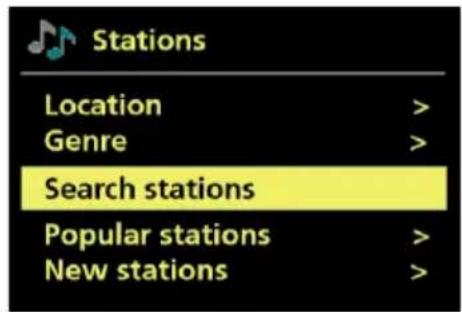
10.2 Browse
To browse Internet broadcasts, select Menu > Station list >.
Browse through the menus to find appropriate broadcasts.
For example: Select Stations.
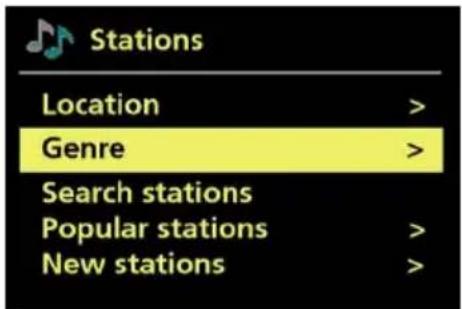
And the Stations menu is displayed, select Genre.
To see the Genre menu, select Blues.
The Blues menu allows you to select a station from a complete list or from specific countries.
Choose a radio station, adjust to this station from the list.
text_image
Stations Location > Genre > Search stations Popular stations > New stations >
text_image
Genre Alternative > Ambient > Big Band > Bluegrass > Blues >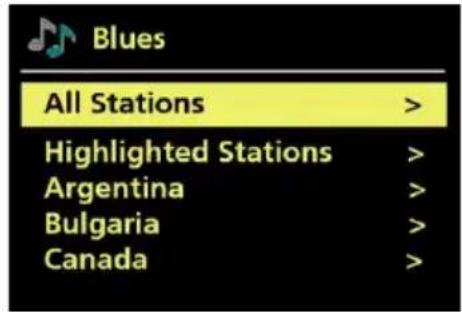
text_image
Blues All Stations > Highlighted Stations > Argentina > Bulgaria > Canada >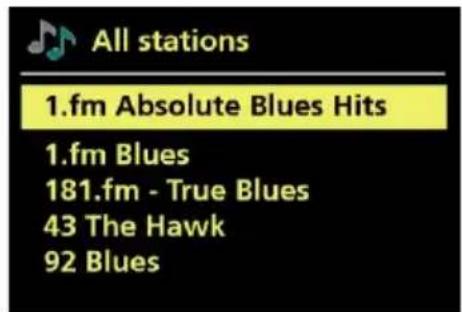
text_image
All stations 1.fm Absolute Blues Hits 1.fm Blues 181.fm - True Blues 43 The Hawk 92 Blues10.3 Search
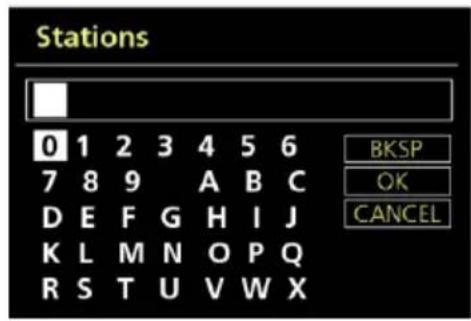
You can also search through Internet broadcasts for stations or podcasts with particular keywords in their title.
To search, select Menu > Station list > Stations > Search stations.
text_image
Stations Location > Genre > Search stations Popular stations > New stations >Enter a keyword by selecting characters then OK. The search entry screens are similar in operation to the Wi-Fi passphrase entry screen.
Select a broadcast from the list.
For podcasts, you may be able to select a particular episode.
text_image
Stations 0 1 2 3 4 5 6 7 8 9 A B C D E F G H I J K L M N O P Q R S T U V W X BKSP OK CANCEL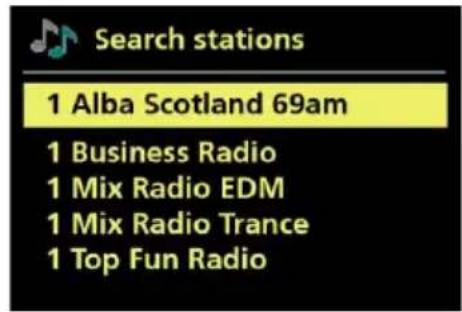
text_image
Search stations 1 Alba Scotland 69am 1 Business Radio 1 Mix Radio EDM 1 Mix Radio Trance 1 Top Fun Radio10.4 My Added Stations
Even though the Internet radio portal contains thousands of stations, you may want to listen to stations not listed. You can add your own stations via the portal. These added stations are accessible from DR 316 C by selecting Menu > Station list > My Added Stations > [Station].
10.5 Now playing information
While the stream is playing, the screen shows its name and description. If artist and track information is available, this is also shown. To view further information, press INFO. Each time you press INFO, another set of information is displayed, cycling through the following details:
• Artist and track name (default; where available)
- Station description
• Station genre and Show country
- Signal reliability
- Bit rate, Codec and Sampling Rate
- Playback buffer
- Today's Date
Furthermore the station cover is displayed. You can switch between full screen and minimized view by pressing Select.
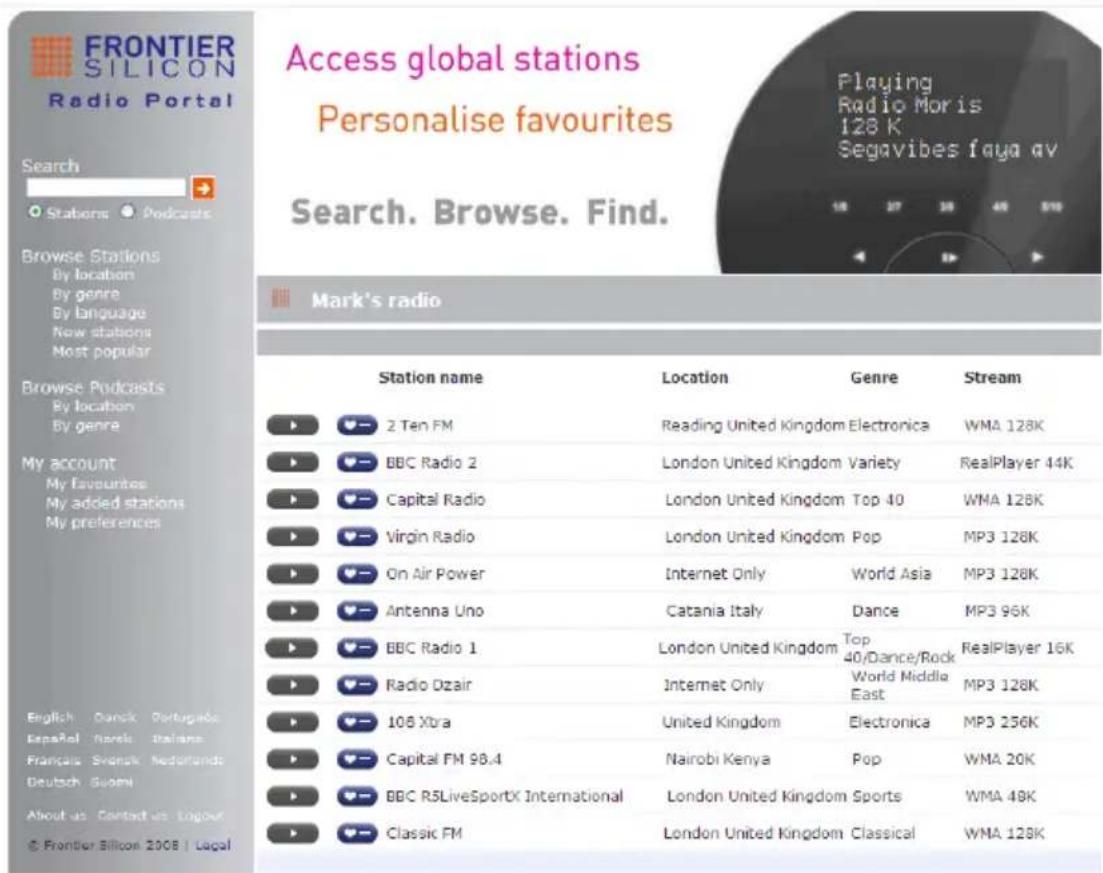
10.6 Internet radio portal registration
The Frontier Silicon Internet radio portal website allows you to organise your favourites lists and also listen to Internet radio on a computer.
text_image
FRONTIER SILICON Radio Portal Access global stations Personalise favourites Search. Browse. Find. Mark's radio Station name Location Genre Stream ► 2 Ten FM Reading United Kingdom Electronica WMA 128K ► BBC Radio 2 London United Kingdom Variety RealPlayer 44K ► Capital Radio London United Kingdom Top 40 WMA 128K ► Virgin Radio London United Kingdom Pop MP3 128K ► On Air Power Internet Only World Asia MP3 128K ► Antenna Uno Catania Italy Dance MP3 96K ► BBC Radio 1 London United Kingdom Top 40/Dance/Rock RealPlayer 16K ► Radio Dzair Internet Only World Middle East MP3 128K ► 108 Xtra United Kingdom Electronica MP3 256K ► Capital FM 98.4 Nairobi Kenya Pop WMA 20K ► BBC R5LiveSportX International London United Kingdom Sports WMA 48K ► Classic FM London United Kingdom Classical WMA 128KTo register your DR 316 C with the portal, switch to Internet radio mode as described in Section 9.
Then obtain your radio's unique portal access code by selecting Menu > Station list > Help > Get access code > Access code.
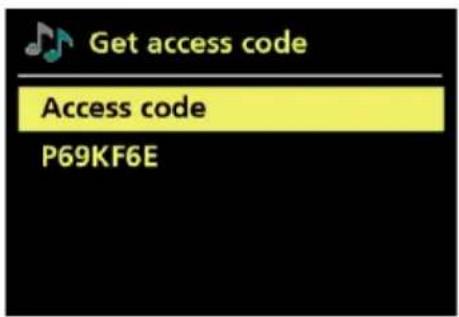
text_image
Get access code Access code P69KF6ENote: The displayed access code is only valid for a few minutes. If you fail to register your radio within the time window, you will need to repeat the above step to get a new access code and try again. Do not confuse the portal access code with the Radio ID (from Menu > System settings > Info).
Visit the portal website.
If this is your first visit to the portal, register for a new account, entering the following information:
- access code,
- your e-mail address,
- passphrase,
• radio model (DR 316 C)
If you already have an account and wish to add an additional radio, log in to your account and select My preferences > Add another Wi-Fi radio.
Once your radio is registered with the portal, you can immediately use the Internet radio favourites and added stations features.
11 Music player mode
Music player mode from the computer or hard drive on your local network plays such as MP3s, AACs, WMAs or FLACs etc audio files.

text_image
Music player 09:00 Frank Ocean Artist: Super Rich Kids 0:24 1:28 UPnPTo enter Music player mode, either press MODE until the display shows Music player, or select [Menu] > Main menu > Music player.
Once in music player mode, press MENU, then select either Shared media.
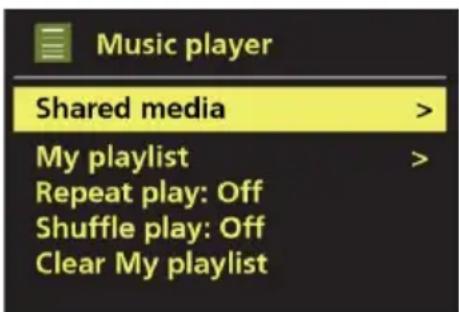
text_image
Music player Shared media > My playlist > Repeat play: Off Shuffle play: Off Clear My playlist >If you are already playing a music file, you can press BACK rather than MENU to quickly return to the last visited branch of the menu tree. For example, listening to the track 1 of an album through browsing shared media as described in section 10.1 below.
Pressing BACK would return you to the track listing for the album. Pressing BACK again would list all available albums by the same artist. Pressing BACK again would list all album artists, and so on.
You can use ◀◀ and ▶▶ to move through tracks. Press and hold to rewind or fast forward quickly to select previous or next track.
11.1 Shared media (from UPnP media server)
In music player mode press MENU, then select Shared media.
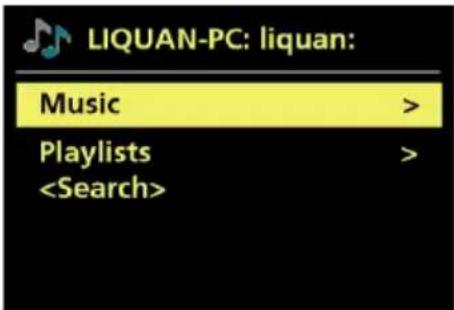
If you have set up shared media (see section 7.6 Setting up a music server for details), you should see an entry consisting of
From this point on, the menus are generated from the shared media server (typically Windows Media Player). The first menu shows a list of media types, for example Music, Video, Pictures and Playlists.
There is also a search function, which finds tracks in a similar way to Internet radio search, as described section 9.3.
In the Music menu there are numerous options for selecting tracks. Select one of the options to find the music you want to listen to.
text_image
LIQUAN-PC: liquan: Music > Playlists >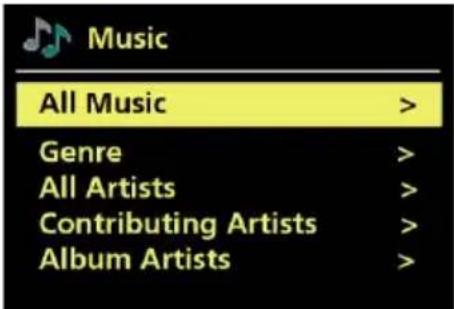
text_image
Music All Music > Genre > All Artists > Contributing Artists > Album Artists >
text_image
All Music The Chain Chelsea Hotel No.1 Chelsea Hotel No.2Once you have found a track you want to play, press Select. A short press plays the track immediately and a long press adds the track to 'My playlist'. You can also add entire albums to 'My playlist'.
Playlists you have created on your shared media server can be accessed and played via the Playlists option in the Shared media menu.
11.2 My Playlist
DR 316 C holds a queue of up to 500 tracks in My playlist. Playlist tracks can be a mixture from multiple (available) UPnP servers. To manage the playlist, select [Menu] > My playlist.
text_image
http:// RUNNING MUSIC My Music Diab Radio Music player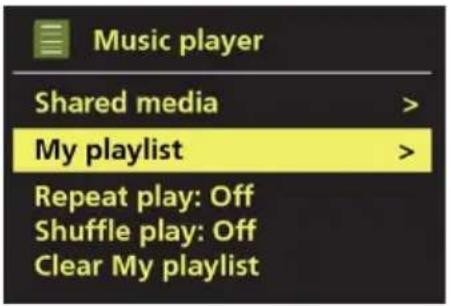
text_image
Music player Shared media > My playlist > Repeat play: Off Shuffle play: Off Clear My playlist- To view playlists, scroll through the turning TUNE. UPnP tracks show their track name.

text_image
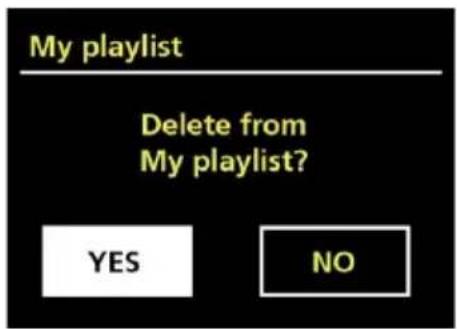
My playlist 01 Speakers On - Radio Bird On The Wire Heal the World The Chain• To erase a track from the playlist, long press TUNE knob, then confirm YES.
text_image
My playlist Delete from My playlist? YES NOIf you select a track/album/folder for instant playback (without using the playlist), the playlist is preserved. The playlist is also preserved during standby.
11.3 Repeat/shuffle
You can choose to repeat play or shuffle play repeat tracks or play them in random order.
11.4 Prune servers
From time to time it may be necessary to remove servers displaying question marks in front of the server name from the server list. For example, if the device is moved to a new network or if a Wake-on-LAN server is removed from your current network.
To perform this function go to [Menu] > Prune servers > Yes.
11.5 Now playing information
While a track is playing, the screen shows its track and artist (UPnP). There is also a progress bar with figures for elapsed and total track time. At the bottom of the screen, an icon indicates UPnP depending on the source. To view further information, press INFO.
Each time you press INFO, another set of information is displayed, cycling through:
- UPnP: playback progress bar (default), artist, album, bit rate/codec/sampling rate, playback buffer, date.

text_image
Music player 09:00 Frank Ocean Artist: Super Rich Kids 0:24 1:28 UPnP11.6 Setting up a music server
In order for DR 316 C to play music files from a computer, the computer must be set up to share files or media.
UPnP media sharing allows devices like DR 316 C to play music from a shared media library, navigating through tag menus such as Artist, Album or Genre. If you are running a suitable server system such as a PC with Windows Media Player 10 or later (WMP), and your music library is well-tagged, then it is recommended to use media sharing. Only the UPnP server needs to be set up.
11.7 Sharing media with Windows Media Player
The most common UPnP server is Windows Media Player (10 or later). Alternatively, other UPnP platforms and servers may be used. To set up WMP for media sharing, perform the following steps:
- Ensure that the PC is connected to the network.
- Ensure that the radio is powered on and connected to the same network.
- In WMP, add to the media library the audio files and folders you want to share with DR 316 C (Library > Add to Library...).
- In WMP, enable media sharing (Library > Media sharing...).
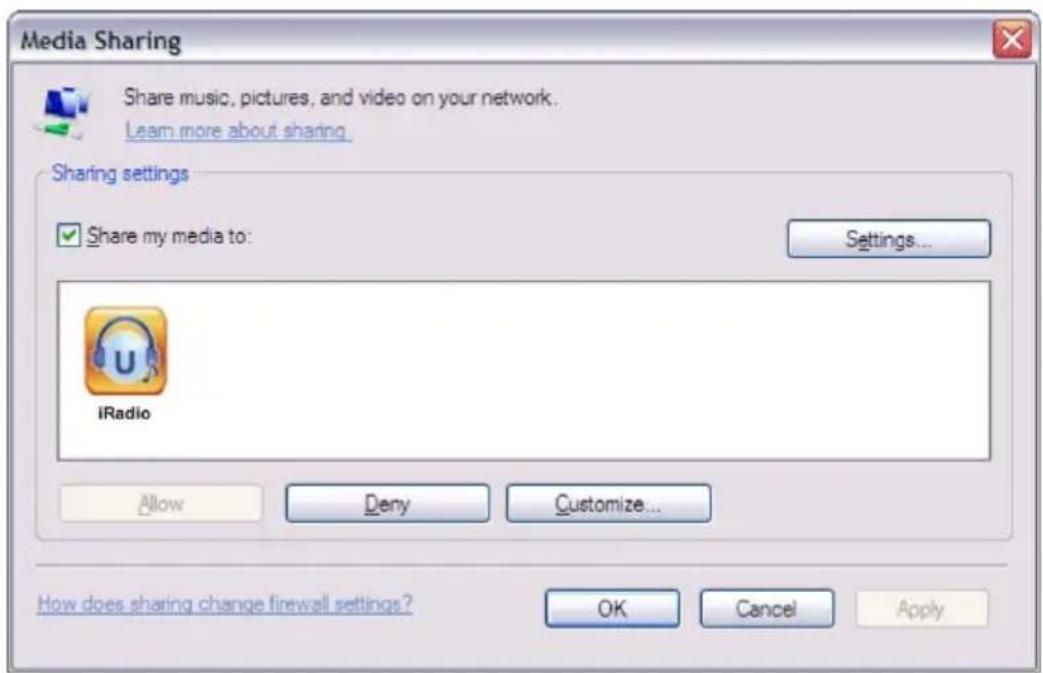
text_image
Media Sharing Share music, pictures, and video on your network. Learn more about sharing. Sharing settings ✓ Share my media to: Settings... iRadio Allow Deny Customize... How does sharing change firewall settings? OK Cancel ApplyMake sure that the radio has access to the shared media by selecting it and clicking Allow. You can also set a name for the shared media in Settings... Click OK to close the dialogue boxes.
The PC is now ready to stream the music to the radio. The WMP UPnP service runs in the background; there is no need to start WMP explicitly.
11.8 Use "Play To" in Windows 7 to stream media
One of the new Windows 7 features includes a feature called "Play To" and this lets your PC running Windows 7 control DR 316 C to push media and use as a universal remote control for your media collection.
11.9 Use "Play To" in Windows Media Player
Windows Media Player makes it easy to manage your media, find items that you want to play, and open Play To. To select items that you want to play, follow these steps:
-
Click the Start button, click All Programs, and then click Windows Media Player.
-
If the Player is currently open and you're in Now Playing mode, click the Switch to Library button in the upper-right corner of the Player.
-
If the list pane is closed or if the Burn or Sync tabs are exposed, click the Play tab.
-
Find the items that you want to play in the Player Library, then drag those items from the details pane into the list pane.
-
Click the 'Play to' button at the top of the list pane . click the device on your network that will receive the media.
-
In the 'Play To' dialog box, use the playback controls to play, pause, or stop the media stream, and to change to the next or previous item in the list.
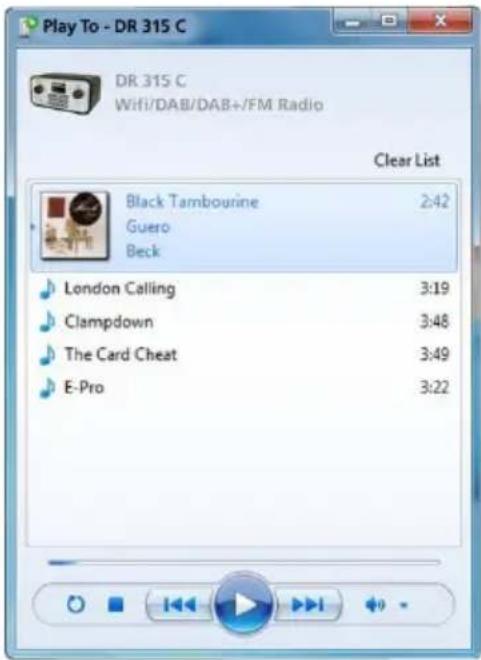
text_image
Play To - DR 315 C DR 315 C Wifi/DAB/DAB+/FM Radio Clear List Black Tambourine 2:42 Guero Beck London Calling 3:19 Clampdown 3:48 The Card Cheat 3:49 E-Pro 3:2212 DLNA Function
Besides UPnP the DR 316 C supports DLNA function. You can share music files from PC or Android mobile and use your PC/Android mobile/iPhone/iPad to control music playback on the DR 316 C. (It is not required to control each playback on the DR 316 C.)
You may search and install any free or commercial DLNA apps from Google Play or Apple Store if you are using an Android mobile, tablet or iPhone / iPad. It is suggested to use Bubble UPnP (a guide on how to use the app can be found at page 153).
- When using DLNA music streaming function on the DR 316 C, you can only control the volume and standby via the unit. It is restricted to control the other functions.
- Stop DLNA on PC, mobile or tablet before you resume DR 316 C's own control.
13 DAB radio mode
DAB radio mode receives DAB/DAB+ digital radio and displays information about the station, stream and track playing.
To enter DAB mode, either press MODE until the display shows DAB Radio or select [Menu] > Main menu > DAB.
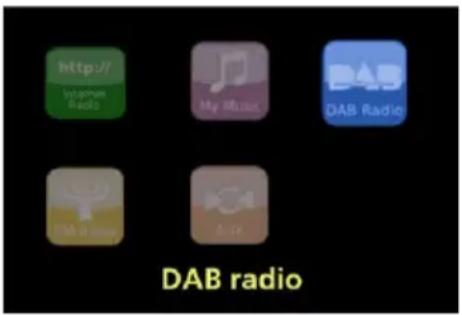
text_image
http://www.radio My Music DAB Radio DAB radio Aire13.1 Scanning for stations
The first time you select DAB radio mode, or if the station list is empty, DR 316 C automatically performs a full scan to see what stations are available. You may also need to start a scan manually to update the list of stations for one of the following reasons:
• Available stations change from time to time.
- If reception was not good for the original scan (for example the antenna was not up), this may result in an empty or incomplete list of available stations.
- If you have poor reception of some stations (burbling), you may wish to list only stations with good signal strength.
To start a scan manually, select [Menu] > Scan.
Once the scan is complete, the radio shows a list of available stations.

text_image
Scan Stations: 0 Scanning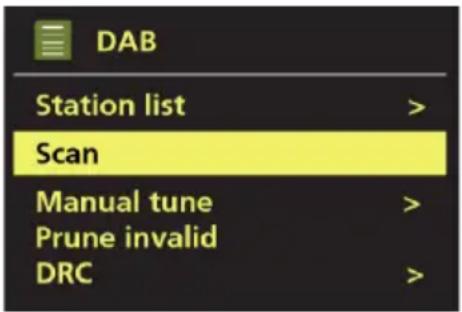
text_image
DAB Station list > Scan Manual tune > Prune invalid DRC >A question mark before a station in a list indicates that the station is currently unavailable. Depending on the cause of the loss of signal this may be only temporary.
Stations that are unlikely to be available again (for example you have moved out of the broadcast range of a station), can be removed from the station list.
To remove stations that are listed but unavailable, select [Menu] > Prune invalid.
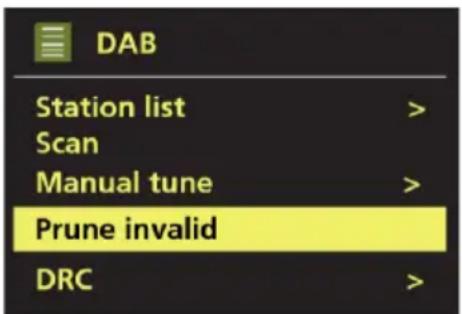
text_image
DAB Station list > Scan Manual tune > Prune invalid DRC >13.2 Now playing information
While the stream is playing, the screen shows its name and DLS (Dynamic Label Segment) information broadcast by the station giving real-time information such as programme name, track title and contact details. Stereo broadcasts are indicated with an icon at the top of the screen. To view further information, press INFO.
Each time you press INFO, another set of information is displayed, Circulating through DLS text, programme type, ensemble name/frequency, signal strength/error rate, bit rate/codec/channels, date and DL Plus (if available).
Furthermore the DAB Slideshow is displayed. You can switch between Full screen and minimized view by pressing Select.

text_image
DAB 09:00 02DBC 2 Digital Broadcasting Corporation HK Ltd13.3 Settings
Dynamic range compression (DRC)
Some DAB broadcasts offer dynamic range compression (DRC). This feature allows radios to compress the dynamic range of the output audio stream, so that the volume of quiet sounds is increased and the volume of loud sounds is reduced. This can be useful if you are listening to music with a high dynamic range in a noisy environment (for example classical music).
To change the DRC of DR 316 C, select [Menu] > DRC >. Options included:
- DRC high
- DRC low
- DRC off
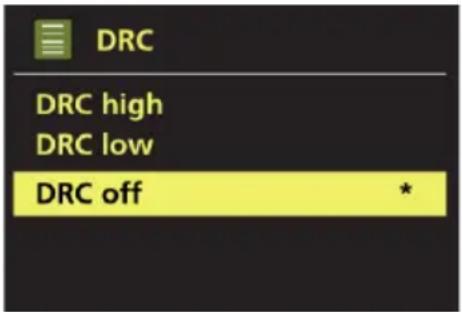
text_image
DRC DRC high DRC low DRC off *13.4 Station order
You can choose the order of the DAB station list to be either Alphanumeric, Ensemble or Valid. Ensemble lists groups of stations that are broadcast together on the same ensemble, for example BBC or South Wales local. Valid lists valid stations first, alphanumerically, then off-air stations.
To change station order, select [Menu] > Station order >, then Alphanumeric, Ensemble or Valid.
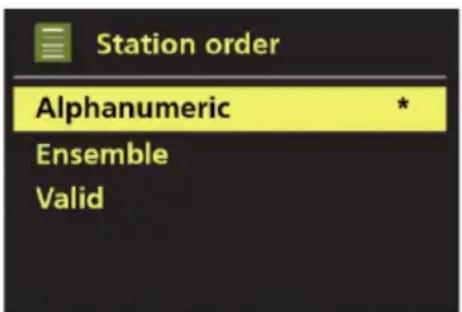
text_image
Station order Alphanumeric * Ensemble Valid14 FM radio mode
FM radio mode receives analogue radio from the FM band and displays RDS (Radio Data System) information about the station and show (where broadcast).
To enter FM mode, either press MODE until the display shows FM Radio or select [Menu] > Main menu > FM.
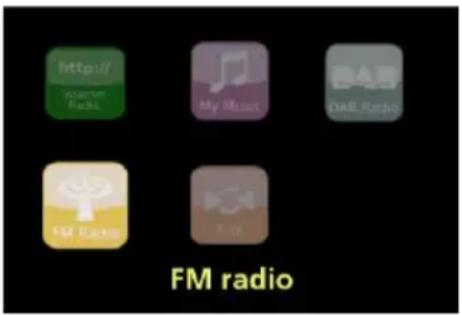
text_image
http://www.naste Radio My Music DAB Radio FM Radio Other FM radio14.1 Selecting stations
To find a station, press TUNE knob. The frequency display starts to run up as DR 316 C scans the FM band. Alternatively, you can scan up or down by pressing and holding the ◀◀◀ or ▶▶◀ buttons or tune manually with quick presses, or by turning the TUNE control.
Note: Scanning can be set to search for strong signals only, (see 12.3 Settings below) Preset stations can be stored and recalled as described in Presets.
14.2 Now playing information
While an FM station is playing, the screen shows one of the two following sets data:
- If RDS information is available, by default the service name (i.e. station name) is displayed. You can cycle through further RDS information by pressing INFO. Each time you press INFO, another set of information is displayed, cycling through RDS radio text, RDS programme type, frequency and today's date.
- If no RDS information is available, the currently tuned frequency is shown.
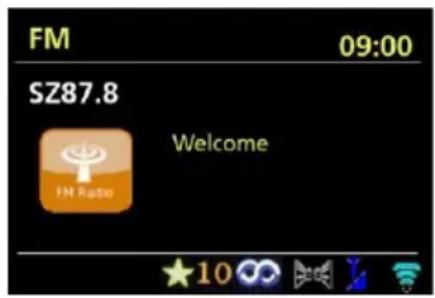
text_image
FM 09:00 SZ87.8 Welcome FM Radio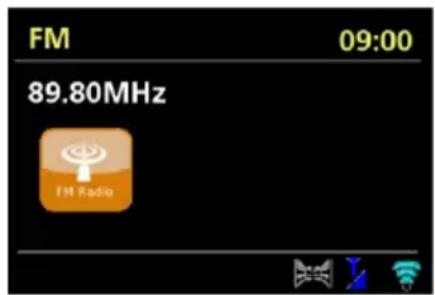
text_image
FM 09:00 89.80MHz FM Radio14.3 Settings
14.3.1 Scan setting
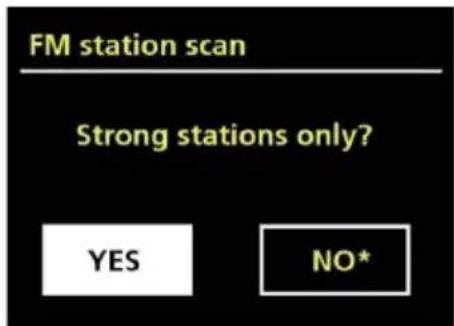
By default, FM scans stop at any available station. This may result in a poor signal-to-noise ratio (hiss) from weak stations. To change the scan settings to stop only at stations with good signal strength, select [Menu] > Scan setting > Strong stations only? > Yes.
text_image
FM station scan Strong stations only? YES NO*14.3.2 Audio setting
By default, all stereo stations are reproduced in stereo. For weak stations, this may result in a poor signal-to-noise ratio (hiss). To play weak stations in mono, select [Menu] > Audio setting > FM weak reception: Listen in mono only? > Yes.

text_image
FM weak reception Listen in Mono only? YES NO*15 Aux in mode
Aux in mode plays audio from an external source such as an MP3 player.
To play audio with Aux in mode
- Turn the volume low on both DR 316 C, if adjustable the audio source device.
- Connect the external audio source to the Aux In 3.5 mm stereo socket.
- Either press MODE until the display shows AUX in or select [Menu] > Main menu > AUX in.
- Adjust the volume of DR 316 C (and if necessary the audio source device) as required.

text_image
http:// Internet R2008 My Music DAD Radio VAR Aux in AUX16 Alarms and sleep
As well as a clock/calendar, there are two versatile wake-up alarm with snooze facility, and a sleep function to turn the system off after a set period. Each alarm can be set to start in a particular mode.
text_image
30 / 10 / 2014 09:00 08:30 17:0016.1 Alarms
To set or change an alarm, either press Alarm or select [Menu] > Main menu > Alarms.
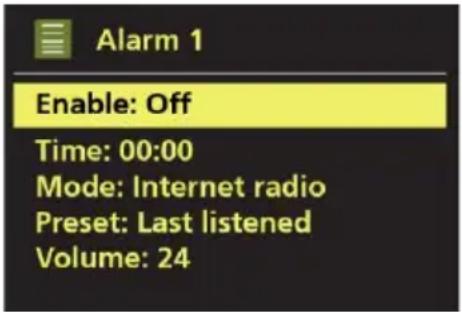
Select the alarm number (1 or 2) then configure the following parameters:
- Enable: Off, Daily, Once, Weekends or Weekdays.
• Time: 00:00 (adjust as necessary).
• Mode: Buzzer, Internet radio, DAB, FM. - Preset: Last listened or 1-10.
• Volume: 0 - 32. - Save: To save these settings and set the alarm, scroll down and select Save.
text_image
Alarm 1 Enable: Off Time: 00:00 Mode: Internet radio Preset: Last listened Volume: 24Note: If you press BACK or MENU to exit the Alarm settings without saving, a dialogue screen is displayed asking if you wish to save the changes or not.
The Now Playing, screen shows active set alarms with an icon at the bottom left. The Standby screen shows active set alarms with an icon and the alarm time.
16.2 Sleep
To set the sleep timer, press the SLEEP key repeatedly to cycle through the sleep time options: Sleep OFF, 15 MINS, 30 MINS, 45 MINS or 60 MINS.
Alternatively select [Menu] > Main menu > Sleep and select from the sleep time options. Once you select a sleep period, the system returns to the main menu. Press MENU to return to the Now playing screen.
To cancel a sleep time, select Sleep OFF from the sleep options using either of the above methods.
Note: A sleep time is automatically cancelled if DR 316 C is put into Standby.
17 Warranty and Recycling Information
We are legally obliged to include disposal and warranty information as well as EU declaration of conformity with the use instructions in different countries for every unit. Please find this information on the following pages.
2-Year Warranty from Date of Purchase
The manufacturer/retailer guarantees this product for two years from date of purchase. This warranty includes all malfunctions caused by defective components or incorrect functions within the warranty period excluding wear and tear, such as exhausted batteries, scratches on the display, defective casing, broken antenna and defects due to external effects such as corrosion, over voltage through improper external power supply or the use of unsuitable accessories. Defects due to unintended use are also excluded from the warranty.
Please contact your local dealer for warranty claims. The dealer will repair or exchange the product or forward it to an authorized service center.
You can also contact our service partner directly. Please include your proof of purchase with the product and describe the malfunction as clearly as possible.
WEEE and Recycling

The European laws do not allow any more the disposal of old or defective electric or electronic devices with the household waste. Return your product to a municipal collection point for recycling to dispose of it. This system is financed by the industry and ensures environmentally responsible disposal and the recycling of valuable raw materials.
Service Address and Technical Hotline (for units sold in Germany)
Contact our service hotline by phone +49 (0) 6103 / 9481 - 66 (regular costs for German fixed network) or e-mail at service@alan-electronics.de
Conformity Declaration
We declare herewith that our radio corresponds to the European Directives (R&TTE, LVD and EMC) and Standards (EN 300 328 V1.8.1, EN 301 489-1, EN 301 489-17, EN 60 950-1). The latest Declaration of Conformity may be downloaded any time from http://service.alan-electronics.de

Printing errors reserved.
Information in this user manual are subject to change without prior notice.
© 2016 Alan Electronics GmbH
Albrecht DR 316 C
natural_image
Exterior view of a wooden Albrecht audio device with control knobs and a remote control (no visible text or symbols on main body)Guide d'utilisateur
Français
▶II : Lire/pause/stop.
natural_image
Close-up of a cylindrical battery with a white arrow indicating leftward motion and a plus sign on the side (no text or symbols)text_image
Internet radio 09:00 Apple FM Utada Hikary - First Love (Remix) Apple-FM.nettext_image
Setup wizard Start now? YES NO
text_image
Connectedtext_image
Setup wizard Start now? YES NOtext_image
FM Scan setting Audio setting System settings > Main menu >
text_image
System settings Equaliser > Network > Time / Date > Language > Factory Reset >text_image
Main menu FM AUX in Sleep Alarms System settings >text_image
My EQ profile setup Bass: 0 Treble: 0 Loudness: Off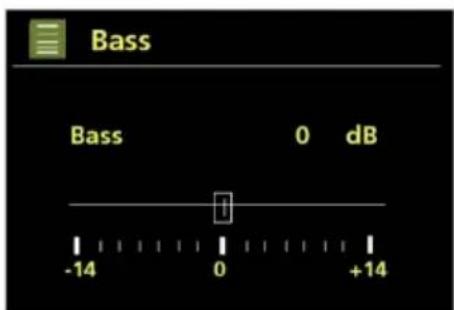
text_image
Bass Bass 0 dB -14 0 +149.2 Réseau
le protocole WPS (Wi-Fi Protected Setup).
text_image
Network settings Please wait Connecting. /text_image
WPS Setup Push WPS button at the other end Press SELECT to continuetext_image
Auto update Update from DAB Update from FM Update from Network * No updatetext_image
Language English Danish Dutch Finnish Frenchtext_image
Software update Check periodically for new versions? YES* NO9.7 Assistant de configuration
text_image
Internet radio 09:00 Apple FM Utada Hikary - First Love (Remix) Apple-FM.nettext_image
Internet radio Last listened Station list > System settings > Main menu >text_image
Internet radio Last listened Station list > System settings > Main menu >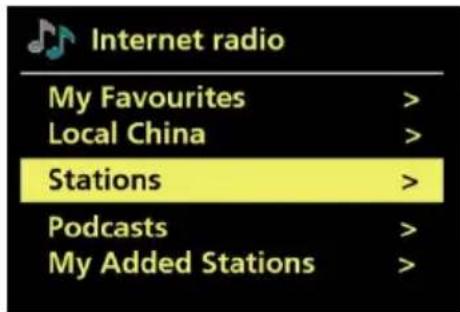
text_image
Internet radio My Favourites > Local China > Stations > Podcasts > My Added Stations >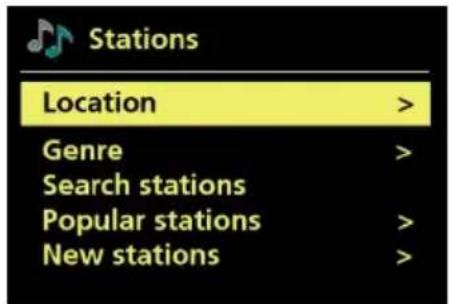
text_image
Stations Location > Genre > Search stations Popular stations > New stations >text_image
Stations Location > Genre > Search stations Popular stations > New stations >
text_image
Genre Alternative > Ambient > Big Band > Bluegrass > Blues >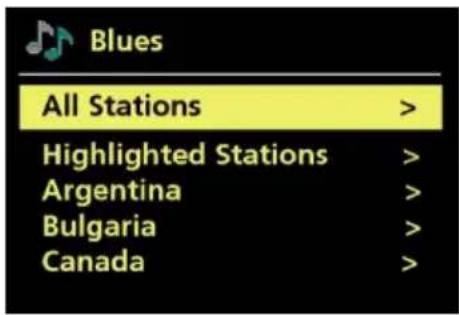
text_image
Blues All Stations > Highlighted Stations > Argentina > Bulgaria > Canada >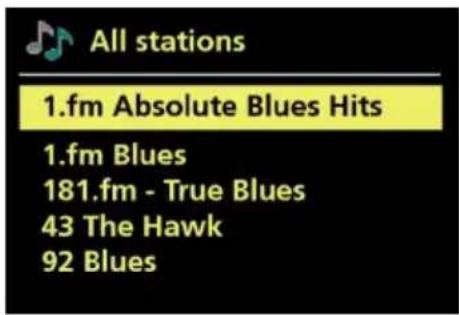
text_image
All stations 1.fm Absolute Blues Hits 1.fm Blues 181.fm - True Blues 43 The Hawk 92 Blues10.3 Recherche
text_image
Stations Location > Genre > Search stations Popular stations > New stations >text_image
Stations 0 1 2 3 4 5 6 7 8 9 A B C D E F G H I J K L M N O P Q R S T U V W X BKSP OK CANCELtext_image
Search stations 1 Alba Scotland 69am 1 Business Radio 1 Mix Radio EDM 1 Mix Radio Trance 1 Top Fun Radiotext_image
Get access code Access code P69KF6Etext_image
Music player Shared media > My playlist Repeat play: Off Shuffle play: Off Clear My playlist >text_image
LIQUAN-PC: liquan: Music > Playlists >text_image
Music All Music > Genre > All Artists > Contributing Artists > Album Artists >
text_image
All Music The Chain Chelsea Hotel No.1 Chelsea Hotel No.2text_image
http://i Internet Radio My Music OAB Radio Music player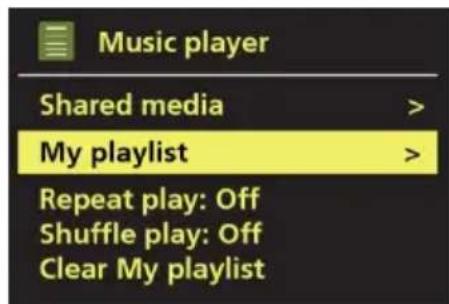
text_image
Music player Shared media > My playlist > Repeat play: Off Shuffle play: Off Clear My playlisttext_image
My playlist 01 Speakers On - Radio Bird On The Wire Heal the World The Chaintext_image
My playlist Delete from My playlist? YES NOtext_image
Media Sharing Share music, pictures, and video on your network. Learn more about sharing. Sharing settings ✓ Share my media to: Settings... iRadio Allow Deny Customize... How does sharing change firewall settings? OK Cancel Applytext_image
http:// suspended Radio My Music DAB Radio DAB radio13.1 Recherche de stations
text_image
Scan Stations: 0 Scanning
text_image
DAB Station list > Scan Manual tune > Prune invalid DRC >text_image
Station order Alphanumeric * Ensemble Valid14 Mode radio FM
text_image
http:// print user Radio My Music DAS Radio FM Radio FM radiotext_image
FM 09:00 89.80MHz FM Radio14.3 Réglages
text_image
FM station scan Strong stations only? YES NO*14.3.2 Paramètres audio
text_image
FM weak reception Listen in Mono only? YES NO*text_image
Alarm 1 Enable: Off Time: 00:00 Mode: Internet radio Preset: Last listened Volume: 24natural_image
Close-up of a mechanical component with directional arrows indicating flow or movement (no text or symbols)text_image
Internet radio 09:00 Apple FM Utada Hikary - First Love (Remix) Apple-FM.nettext_image
Setup wizard Start now? YES NO
text_image
Connected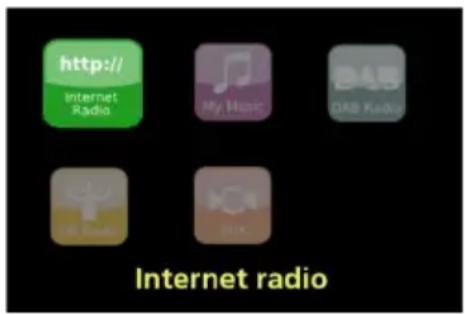
text_image
http:// Internet Radio My Music ORB Radio DRK Radio Internet radiotext_image
Setup wizard Start now? YES NOtext_image
FM Scan setting Audio setting System settings > Main menu >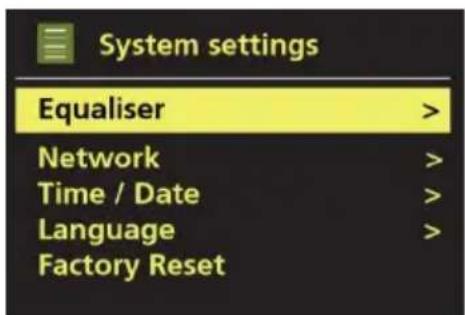
text_image
System settings Equaliser > Network > Time / Date > Language > Factory Reset >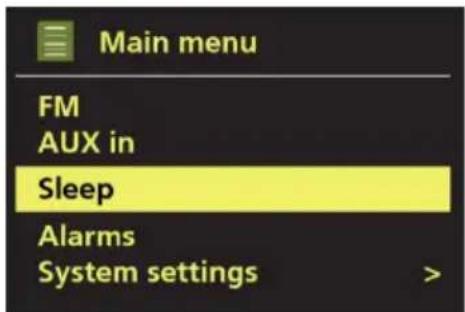
text_image
Main menu FM AUX in Sleep Alarms System settings >text_image
My EQ profile setup Bass: 0 Treble: 0 Loudness: Off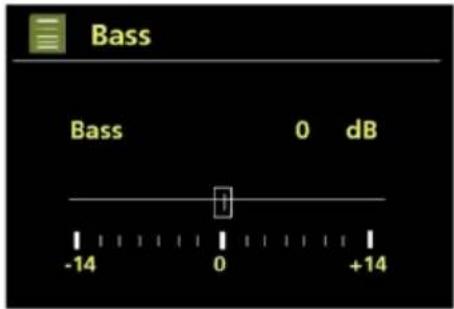
text_image
Bass Bass 0 dB -14 0 +149.2 Rete
text_image
Network settings Please wait Connecting. /text_image
WPS Setup Push WPS button at the other end Press SELECT to continuetext_image
Auto update Update from DAB Update from FM Update from Network * No updatetext_image
Language English Danish Dutch Finnish Frenchtext_image
Software update Check periodically for new versions? YES* NOtext_image
Internet radio 09:00 Apple FM Utada Hikary - First Love (Remix) Apple-FM.net- Dal portale attraverso Menu > Station list > Stations.
Incluso:
text_image
Internet radio Last listened Station list > System settings > Main menu >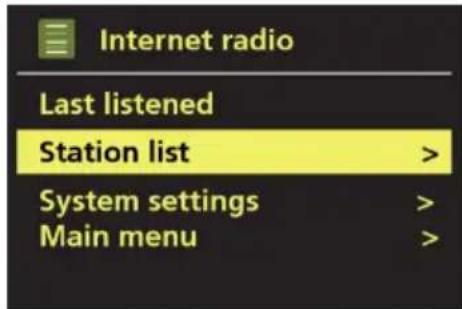
text_image
Internet radio Last listened Station list > System settings > Main menu >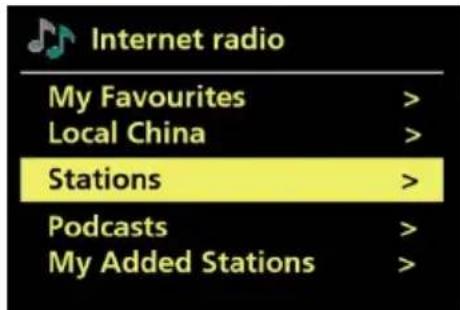
text_image
Internet radio My Favourites > Local China > Stations > Podcasts > My Added Stations >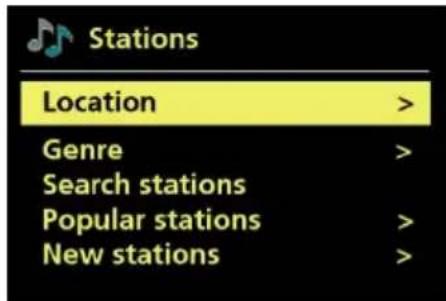
text_image
Stations Location > Genre > Search stations Popular stations > New stations >10.1 Preferiti
text_image
Stations Location > Genre > Search stations Popular stations > New stations >text_image
Stations Location > Genre > Search stations Popular stations > New stations >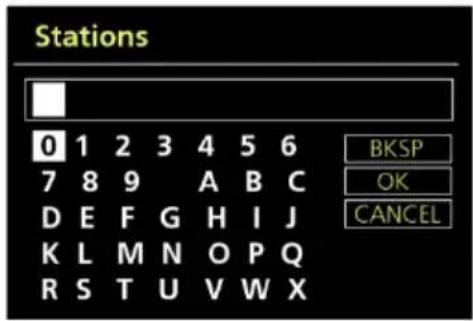
text_image
Stations 0 1 2 3 4 5 6 7 8 9 A B C D E F G H I J K L M N O P Q R S T U V W X BKSP OK CANCELtext_image
Search stations 1 Alba Scotland 69am 1 Business Radio 1 Mix Radio EDM 1 Mix Radio Trance 1 Top Fun Radiotext_image
Get access code Access code P69KF6Etext_image
Music player Shared media > My playlist Repeat play: Off Shuffle play: Off Clear My playlist >text_image
LIQUAN-PC: liquan: Music > Playlists >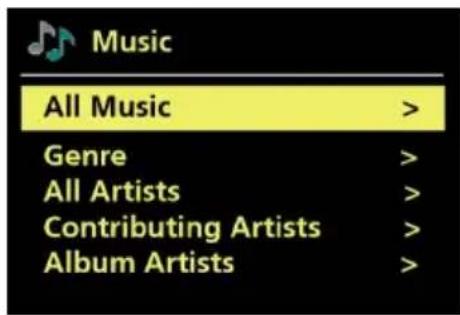
text_image
Music All Music > Genre > All Artists > Contributing Artists > Album Artists >
text_image
All Music The Chain Chelsea Hotel No.1 Chelsea Hotel No.2text_image
http:// Power of Radio My Music Diet Radio Music player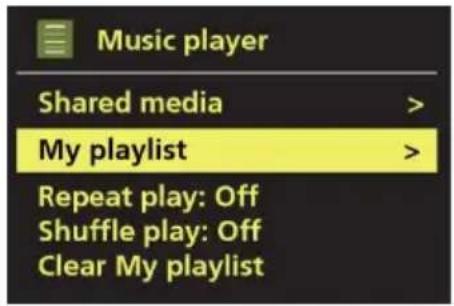
text_image
Music player Shared media > My playlist > Repeat play: Off Shuffle play: Off Clear My playlist >text_image
My playlist 01 Speakers On - Radio Bird On The Wire Heal the World The Chaintext_image
My playlist Delete from My playlist? YES NOtext_image
Media Sharing Share music, pictures, and video on your network. Learn more about sharing. Sharing settings ✓ Share my media to: Settings... iRadio Allow Deny Customize... How does sharing change firewall settings? OK Cancel Applytext_image
Scan Stations: 0 Scanning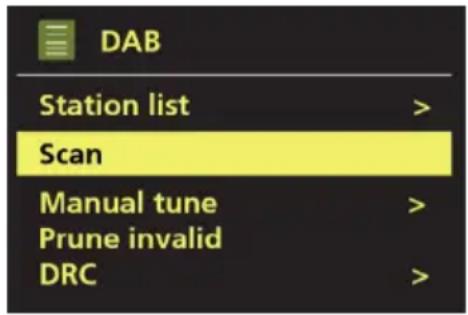
text_image
DAB Station list > Scan Manual tune > Prune invalid DRC >text_image
Station order Alphanumeric * Ensemble Validtext_image
http:// www.ew Radio My Music DAB Radio FM Radio Other FM radiotext_image
FM 09:00 89.80MHz FM Radio14.3 Impostazioni
text_image
FM station scan Strong stations only? YES NO*text_image
FM weak reception Listen in Mono only? YES NO*15 Modalità Aux in
text_image
Alarm 1 Enable: Off Time: 00:00 Mode: Internet radio Preset: Last listened Volume: 24The DLNA functionality shall be demonstrated with the Bubble UPnP application, which is developed by the company Bubblesoft. This app is available in two versions. One is free of charge and the other is offering more functions at the cost of a fee. In this example we are showing the free of charge version.
The basic requirement for a proper usage is that radio as well as smartphone are connected to the same network.


Français:
Once this is done you can start Bubble UPnP on your smartphone. After starting it please open the tab Devices.
In the upper green bordered area you can see all available Renderers. Here you can select on which device the music shall be played. It may take some time until every available device is detected, this depends on your network. On the screenshot you can see that the device AirMusic is not yet available as a renderer.
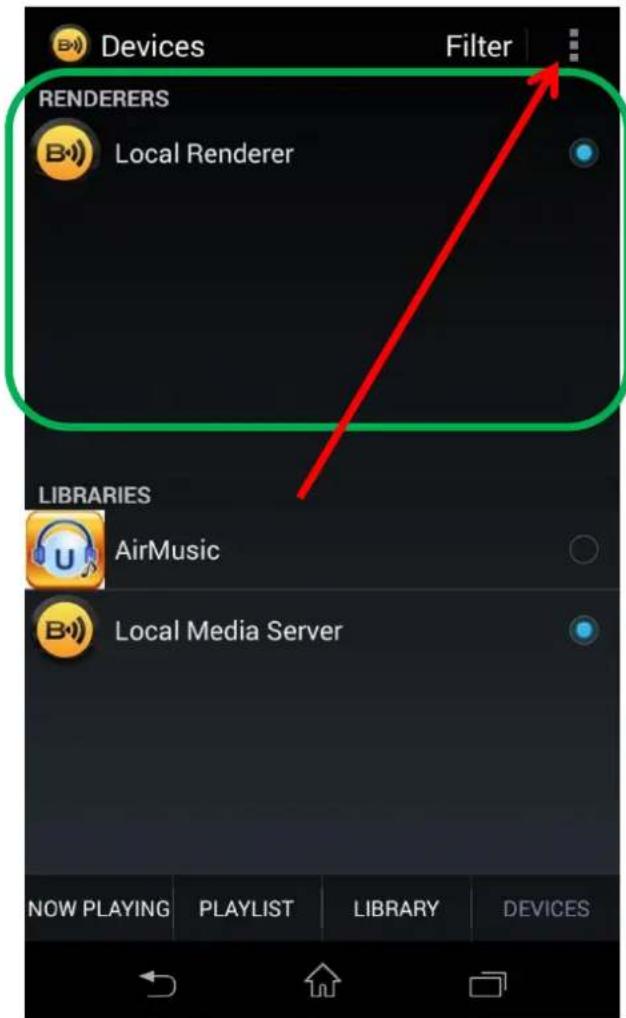
text_image
Devices Filter RENDERERS Local Renderer LIBRARIES AirMusic Local Media Server NOW PLAYING PLAYLIST LIBRARY DEVICESIn the lower blue bordered area you can choose from which device the music shall be streamed in order to be played on the device selected under Renderers. Here you can find additional options. These depend on the tab you have currently selected.
Tab this button in order to open the Devices tab.
Now the radio has been detected as a renderer and can be selected.
The DLNA registration name which the radio is using can be changed by opening the menu Settings⇒DLNA Setup. The default name for this radio is Internet Radio DR 470.
In this example the radio has been selected as renderer and library. With these settings you can select on your phone which internet radio station shall be played by the radio.
To select the station please tap the button Library.
After pressing the button Library you will see the folders which are provided by the radio.
Here you can see on which device or in which folder you currently are.
The blue framed folders are provided by the radio and contain the same information as if you would open the corresponding menu on your radio.
Local Radio
My Favorite
Radio Station/Music
History
You open the folders by simply tapping on them.
In the folder Radio Station/Music you can find all stations which are available on the radio. You can browse them by genre or region.
The folder Local Radio contains the stations which are available in the country where the radio is currently located. In this example Germany. You can also select those stations via Radio Station/Music⇒Land/Region⇒Europe⇒Germany.
The History folder is showing the last stations which have been played on the radio.
To start playing a station from one of the folders you simply tab on the station.
If you start playing a station you will find it in the tab Playlist.
As internet radio stations stream their programm continuously the remaining playing time will be displayed as 23:59:59
In the tab Now Playing additional information will be displayed (e.g. station logo, album, cover, etc.) depending on what each station provides.
If you would like to stream music from your mobile phone, you have to switch to the tab Devices and change the following settings.
In the field Libraries select Local Media Server. Local means in this case the device which runs the app. This is most of the times your smartphone.
Alternatively you can also playback music from a different device within your network. In this example
there is a notebook available, which provides music through the Windows Media Player.
If you now switch to the tab Library you will see exactly the same folder structure as on your smartphone. In this example the folder Music has already been selected. You can change folders by tapping on them.
Here the folder Genres⇒Rock has been selected. Only one album is available.
If you would like to add the complete folder to your playlist without deleting the current one, press the + button Press on the album name to reach the title list. You can listen to the complete album by pressing the play button. If you would like to add a song to your playlist (while keeping your current playlist) you have to press and hold the song title.
A menu will appear, select Enqueue in it. The song will be added at the end of the playlist.
Or you can press directly on a song title to listen to it. Please note that this will delete your current playlist!
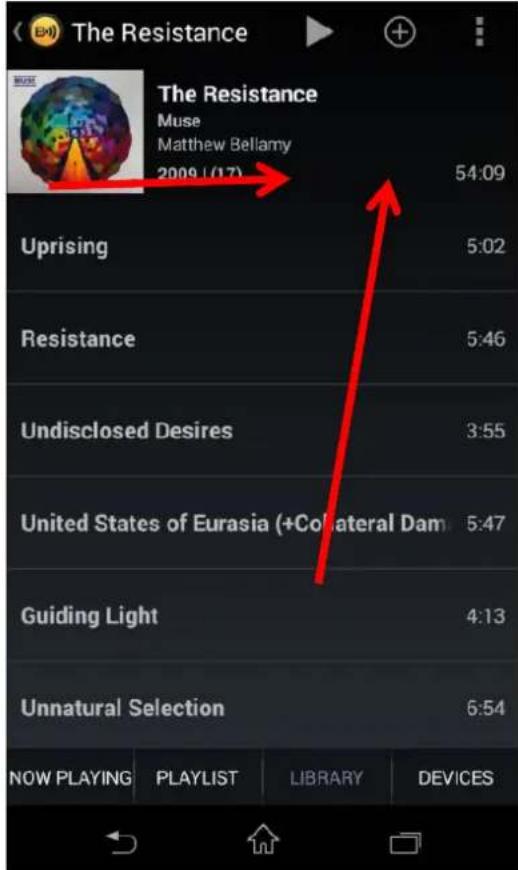
text_image
The Resistance Muse Matthew Bellamy 2009 (17) 54:09 Uprising 5:02 Resistance 5:46 Undisclosed Desires 3:55 United States of Eurasia (+Colateral Dam 5:47 Guiding Light 4:13 Unnatural Selection 6:54 NOW PLAYING PLAYLIST LIBRARY DEVICEStext_image
Playlist Uprising The Resistance Muse 0:08 / 5:02 Resistance The Resistance Muse 5:46 Undisclosed Desires The Resistance Muse 3:55 United States of Eurasia (+Collateral Dam... The Resistance Muse 5:47 Guiding Light The Resistance Muse 4:13 Unnatural Selection The Resistance Muse 6:54 MK Ultra NOW PLAYING PLAYLIST LIBRARY DEVICESSwitch to the tab Playlist to see all selected titles. They will be played in the order displayed. If you would like to switch to random playback (shuffle), select it in the options.
In the tab Now Playing you will see the currently played song. Besides the playback controls additional information like the album cover will be displayed here.