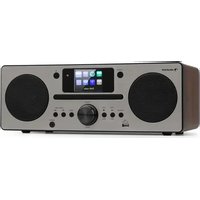
DisGo Box 100 - Hi-fi system Auna - Free user manual and instructions
Find the device manual for free DisGo Box 100 Auna in PDF.

User questions about DisGo Box 100 Auna
0 question about this device. Answer the ones you know or ask your own.
Ask a new question about this device
Download the instructions for your Hi-fi system in PDF format for free! Find your manual DisGo Box 100 - Auna and take your electronic device back in hand. On this page are published all the documents necessary for the use of your device. DisGo Box 100 by Auna.
USER MANUAL DisGo Box 100 Auna
Berlin Brands Group UK Ltd
PO Box 1145
Oxford, OX1 9UW
United Kingdom
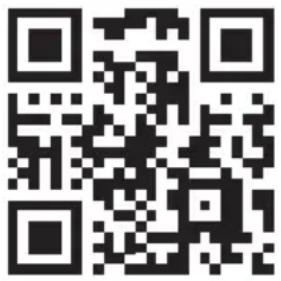
Congratulations on purchasing this equipment. Please read this manual carefully and take care of the following hints to avoid damages. Any failure caused by ignoring the items and cautions mentioned in the instruction manual are not covered by our warranty and any liability. Scan the QR code to get access to the latest user manual and other information about the product.
CONTENTS
Specifications 18
Safety Instructions 19
Overview 20
Getting started 23
Operation 24
Disposal Considerations 27
Declaration of Conformity 27
SPECIFICATIONS
| Item 10033685 10033686 | ||
| Power supply Mains operation Internal battery | 230 V~ 50/60 Hz 12 V= 7 A 12 V 4,5 A = | |
| RMS power 100 W 50 W | ||
| Connections SD, USB, LINE IN, LINE OUT, MIC1, MIC2, GIT, DC IN, AC IN | ||
| Speakers 1 x 10" woofer + 2x tweeter | 2x 10" woofer + 2x tweeter | |
| Scope of supply Device, 2 VHF microphones, user manual | ||
BT
Frequency 2402-2480 MHz
Maximum radio-frequency power 4 dBm
Mikrophone
Frequency range 96 MHz
179-202MHz
Maximum radio-frequency power 10mV
SAFETY INSTRUCTIONS
Read the safety instructions and the manual carefully, before operating the appliance.
- Keep the instructions manual in a safe place, so you can refer to it later.
- Follow all necessary operating steps.
- Do not place the appliance in a humid location, neither a place which with electromagnetic fields, direct sunlight, and do not expose it to high temperatures.
- If you do not use the appliance for a ling time, pull the plug and take the batteries out of the microphone.
- Pull the plug before cleaning the unit. Do not use volatile gasses, thinners or other chemical cleaners.
- Only use accessories produced by the manufacturer.
- The appliance must only be powered according the ratings on the rating label.
- Do not carry out maintenance and repairs by yourself. The dangerous voltage in the appliance can cause an electric shock, when being opened. Repairs must only be carried out by the qualified customer service.
- If a part must be replaced, it must comply with the manufacturer's specification or be an original spar part.
- If the appliance is broken or does not function properly, contact the customer service. Do not open the housing to make any repairs.
Designated use
- This device is for the transmission of speech and singing. It is solely designed and may only be used for this purpose. It may only be used in the manner described in this manual.
- This appliance is not intended for use by persons (including children) with reduced physical, sensory or mental capabilities, or lack of experience and knowledge, unless they have been given supervision or instruction concerning use of the appliance by a person responsible for their safety.
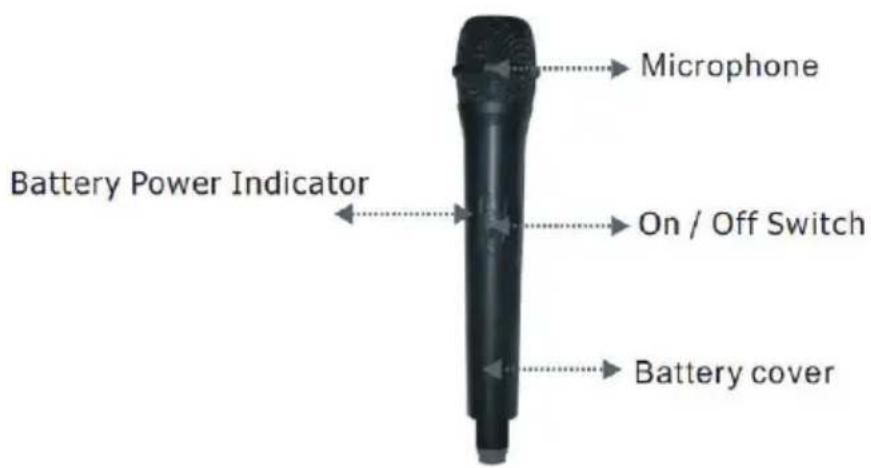
- The microphone system includes microphones with an integrated transmitter, which serve wireless transmission to the receiving unit. The systems operate within the UHF range (863.1 MHz & 864.5 MHz). The transmission range is 50m and depends on the local conditions. The appliance are designed for indoor use only.
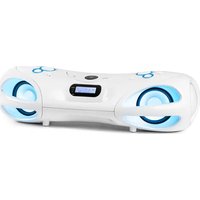
OVERVIEW

Front view
| 7-band EQ | 1 | 10 | Mic 1 In |
| Level LEDs | 2 | 11 | Mic 2 In |
| Battery LED (red: charging green: fully charged) | 3 | 12 | Mic volume |
| Volume | 4 | 13 | Mic echo |
| Treble | 5 | 14 | Display |
| Bass | 6 | 15 | USB socket |
| Mlcrophone priority on/off | 7 | 16 | Navigation buttons; IR sensor |
| Guitar volume | 8 | 17 | SD card slot |
| Guitar in | 9 |
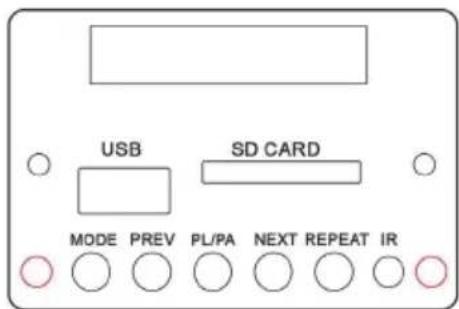
Navigation buttons
Rear
| Audio In (RAC) 14 LED light effects on/off | |
| AC-in socket (12 V=) 2.5 Power AC / off (charge)/ DC IN | |
| Battery 12 V input (230 V~/50 Hz) | 3 |
Remote control
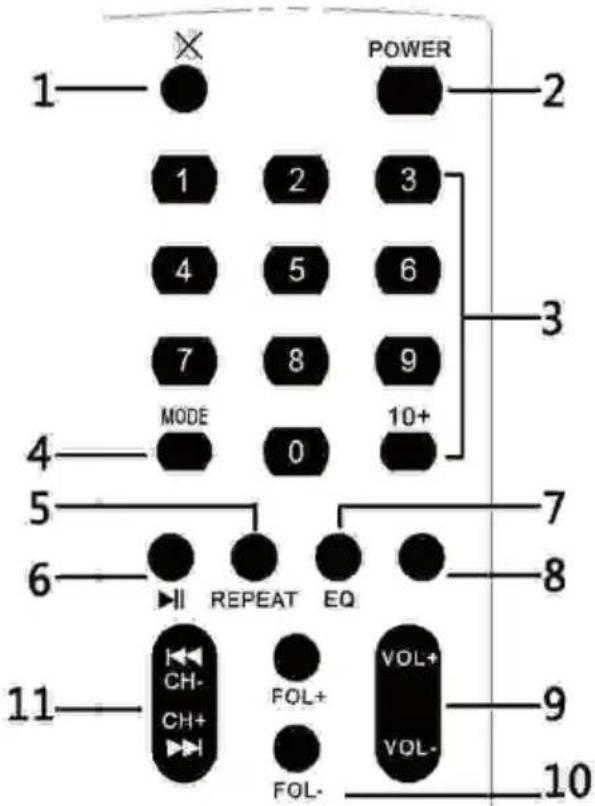
1 Mute
2 Power on/off
3 Num Pad
MODE 4 (USB/SD/Line/BT)
5 Repeat
6 Play/pause
7 EQ preset
8 no function
9 Volume ^+ /
10 Folder + / -
Previous Track / channel Next track / channel
GETTING STARTED
Battery charging
This device is equipped with a with a rechargeable battery. The batty will be charged automatically as soon as the device is connected to power. After recharging, the device switches to trickle charging. However, do not leave the device constantly connected to a socket. Turning off the device via remote control switches it to standby mode, which consumes more power than switching it completely off at the panel of the appliance.
ATTENTION: Before first use, fully charge the battery for at least 8 hours. Only after having charged the battery for three times, the battery reaches its full capacity.
Charge the battery before and after each usage for a lasting battery performance.
First use / charging the battery
Before your first mobile use (without grid power), charge the battery of the device fully.
Connect the device to an ordinary wall socket via power adapter. The charging time is about 5.8 hours. The state of charge is indicated by the LED on the back. The LED will get out when the batty is fully charged.
OPERATION

Warning: Danger of electric shock
The appliance must under no circumstances be exposed to fire. Do not open the housing of the appliance.
First steps
- Connect the AC IN to a household mains outlet, using the supplied mains cord. Or connect the DC 12V IN with a matching AC/DC adapter, connecting the latter to a household mains socket.
- Switch the POWER switch on the rear to the AC position when using the AC mains cord, switch to DC position when using an AC/DC power adapter. Switch to OFF to turn off. Use the POWER/STANDBY button on the device front panel or on the RC to switch the unit on/off.
- Select the desired function mode by pressing MODE repeatedly.
- Rotate the Volume knob to adjust the output volume.
- Optional: Connect other audio equipment such as PA or another amplifier to the LINE IN.
- Connect microphones to the MIC1 and MIC2 sockets on the front. Turn MIC VOL down completely beforehand.
- Connect guitars or other musical instruments to the GIT IN. Turn the GIT VOL down completely beforehand.
Wireless microphoneConnect the AC IN to a household mains outlet, using the supplied mains cord. Or connect the DC 12V IN with a matching AC/DC adapter, connecting the latter to a household mains socket.
Switch the POWER switch on the rear to the AC position when using the AC mains cord, switch to DC position when using an AC/DC power adapter. Switch to OFF to turn off. Use the POWER/STANDBY button on the device front panel or on the RC to switch the unit on/off.
Select the desired function mode by pressing MODE repeatedly.
Rotate the Volume knob to adjust the output volume.
Optional: Connect other audio equipment such as PA or another amplifier to the LINE IN.
Connect microphones to the MIC1 and MIC2 sockets on the front. Turn MIC VOL down completely beforehand.
Connect guitars or other musical instruments to the GIT IN. Turn the GIT VOL down completely beforehand.
- Turn on the speaker and set the input to BT (MODE). The unit will beep to indicate it is ready to be paired with a BT device.
- Enter into the BT connections on your BT device and locate DisGo Box and connect to this device. At this point you can start playing audio from your BT device.
- To connect a different device, go to your BT connections on your BT device and disconnect it from the speaker.
- This speaker doesn't support Hands-free function (call function), when it is playing music, you get an incoming call from Mobile, the music will pause. After the call, music will play again.
USB/SD
Connect USB drives or SD cards with music files to the respective sockets on the front panel. Use the PREV/NEXT/PLAY/STOP buttons to navigate through your media library.
REPEAT: Press this button to repeat the current track on the USB/SD input (ONE or ALL).
REC: Press to record from microphone.
LINE
Connect external media players to the LINE IN using an RCA cable. Select the LINE IN mode with the MODE button. Make sure the audio output of your external media player is turned up. Adjust the master output volume with the volume knob of this device.
EQ
Switch the MASTER EQUALIZER on/off using the EQ ON/OFF switch on the front panel. Press EQ on the RC repeatedly to toggle through preset EQs.
DISPOSAL CONSIDERATIONS

If there is a legal regulation for the disposal of electrical and electronic devices in your country, this symbol on the product or on the packaging indicates that this product must not be disposed of with household waste. Instead, it must be taken to a collection point for the recycling of electrical and electronic equipment. By disposing of it in accordance with the rules, you are protecting the environment and the health of your fellow human beings from negative consequences. For information about the recycling and disposal of this product, please contact your local authority or your household waste disposal service.
This product contains batteries. If there is a legal regulation for the disposal of batteries in your country, the batteries must not be disposed of with household waste. Find out about local regulations for disposing of batteries. By disposing of them in accordance with the rules, you are protecting the environment and the health of your fellow human beings from negative consequences.
DECLARATION OF CONFORMITY

Manufacturer:
Chal-Tec GmbH, Wallstrasse 16, 10179 Berlin, Germany.
Importer for Great Britain:
Berlin Brands Group UK Ltd PO Box 1145 Oxford, OX1 9UW United Kingdom
Hereby, Chal-Tec GmbH declares that the radio equipment type DisGo Box is in compliance with Directive 2014/53/EU. The full text of the EU declaration of conformity is available at the following internet address: use.berlin/10033685
For Great Britain: Hereby, Chal-Tec GmbH declares that the radio equipment type DisGo Box is in compliance with the relevant statutory requirements. The full text of the declaration of conformity is available at the following internet address: use.berlin/10033685
Chere cliente, cher client,
Berlin Brands Group UK Ltd
PO Box 1145
Oxford, OX1 9UW
United Kingdom