SGG 1 - Vacuum Cleaner Kärcher - Free user manual and instructions
Find the device manual for free SGG 1 Kärcher in PDF.
Download the instructions for your Vacuum Cleaner in PDF format for free! Find your manual SGG 1 - Kärcher and take your electronic device back in hand. On this page are published all the documents necessary for the use of your device. SGG 1 by Kärcher.
USER MANUAL SGG 1 Kärcher
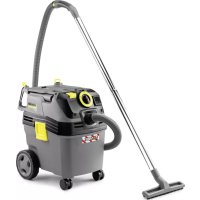
dB(A) ≤70 12 DE– 1 Please read and comply with these original instructions prior to the initial operation of your appliance and store them for later use or subsequent own- ers. – The non-compliance of the operating and safety instructions may lead to damages of the appliance and to dan- gers for the operator and other persons. – In case of transport damage inform ven- dor immediately. – When unpacking the product, make sure that no accessories are missing and that none of the package contents have been damaged. Notes about the ingredients (REACH) You will find current information about the ingredients at: www.kaercher.com/REACH DANGER Pointer to immediate danger, which leads to severe injuries or death. 몇 WARNING Pointer to a possibly dangerous situation, which can lead to severe injuries or death. 몇 CAUTION Pointer to a possibly dangerous situation, which can lead to minor injuries. ATTENTION Pointer to a possibly dangerous situation, which can lead to property damage. – This device is exclusively intended for removing trod-in chewing gum residue from surfaces. – This appliance is suitable for commer- cial use. Contents Environmental protection ... EN 1 Danger or hazard levels ... EN 1 Proper use ... EN 1 Safety instructions... EN 2 Device elements ... EN 4 Symbols on the machine... EN 4 Start up ... EN 4 Operation ... EN 5 Transport... EN 6 Storage ... EN 6 Care and maintenance ... EN 6 Troubleshooting ... EN 6 Warranty ... EN 7 Accessories and Spare Parts . EN 7 Consumables ... EN 7 EU Declaration of Conformity . EN 7 Technical specifications ... EN 8 Environmental protection The packaging material can be recycled. Please do not throw the packaging material into household waste; please send it for recycling. Old appliances contain valuable materials that can be recycled; these should be sent for recy- cling. Batteries and accumula- tors contain substances that must not enter the environment. Please dispose off old devices, batteries and rechargeable bat- teries through suitable waste collection systems. Danger or hazard levels Proper use 13EN– 2 – In addition to the information contained in the operating instructions, all statuto- ry safety and accident prevention regu- lations must be observed. – Warning and information plates on the machine provide important directions for safe operation. DANGER Risk of injury! – The operator must use the appliance properly. The person must consider the local conditions and must pay attention to third parties, in particular children, when working with the appliance. – Never leave the machine unattended so long as it is running. – The appliance may only used by per- sons who have been instructed in han- dling the appliance or have proven qualification and expertise in operating the appliance or have been explicitly assigned the task of handling the appli- ance. The appliance must not be oper- ated by children, young persons or per- sons who have not been instructed ac- cordingly. – This appliance is not intended for use by persons with reduced physical, sen- sory or mental capabilities. – Children should be supervised to pre- vent them from playing with the appli- ance. – Always use appropriate gloves while working on the device. – The appliance/accessories must not be modified. – To avoid risks, all repairs and replace- ment of spare parts may only be carried out by the authorised customer service personnel. – Keep packaging films away from chil- dren, there is a risk of suffocation! DANGER – If you are wearing a pacemaker, we recommend that you contact your phy- sician or the manufacturer of the pace- maker regarding possible cautions be- fore you operate this appliance. – Not all pacemakers are radiation-proof to emitted high frequency/electrical magnetic fields in a close vicinity, which could lead to problems while operating this appliance. – If your physician is not able to guaran- tee its flawless operation, do not use this appliance! DANGER – The battery may only be charged using the original charger provided. – Check the charger for damage before every use. Do not continue to use a damaged charger and have any dam- aged parts repaired by technical spe- cialists only. – Do not use the charger if dirty or wet. – The mains voltage must match the volt- age mentioned on the type plate of the charger. – Do not operate the charger in explosive environment. – No metal parts may touch the contacts on the charger plug, short circuit haz- ard. – Avoid contact with liquids oozing out of defective battery packs. Rinse thor- oughly if you accidentally come in con- tact with the fluid. Also consult a doctor if the fluid comes in contact with your eyes.
The battery is designed to be fully charged before each use. Safety instructions Pacemaker Battery/charger 14 EN– 3 DANGER – Read the safety instructions on the gas cartridge. – Protect from direct sunlight. – Do not subject to temperatures above 50 °C. – Do not refill. – Do not puncture or burn. – Replace the gas cartridge only in a well ventilated location with no sources of ig- nition. – Immediately replace lost or damaged seals on the valve tube. – Screw only hand-tight into the valve tube to avoid damaging the screw threads. – Shake empty gas cartridges to check for any residual liquid. – Dispose of empty gas cartridges in a safe place. – Store in a cool and dry place. – Check that the gas valves are closed before inserting or removing the gas cartridges. – Close the gas valves each time after operation. – Use the device only when both cartridg- es are fitted. – Switch off the device immediately if you smell gas (except when inserting or re- moving the gas cartridges). – The device may only be operated with gas cartridges from KÄRCHER (SGG 1 Gas Cartridge). – The device is not operationally safe when other gas cartridges are used. – The device may only be operated with detergent from KÄRCHER (SGG 1 RM 799). DANGER – Read the safety instructions on the de- tergent. DANGER – Wear appropriate protective gear. – Operate and move the device only in a vertical orientation. Do not allow the de- vice to stand under pressure for a long period of time. – Operate the lance in a vertical position only. – Never remove the lance. – Never set the lance down during opera- tion. – Do not touch the exhaust manifold on the lance (minimum clearance of 60 cm). – Do not block the exhaust manifold on the lance. – Ensure that there is adequate ventila- tion or provision for diverting the ex- haust gas while operating the appliance in closed rooms (risk of poisoning). – Allow the lance to cool down for 3 min- utes after operation before setting it down. – Unplug the control unit when the device is not in use.
Use only spare parts and consumables approved by KÄRCHER that have been obtained from KÄRCHER or an official sales partner. Gas cartridges Detergent Application 15EN– 4 1Gas valve 2 Valve tube hose 3 Gas cartridge (not in scope of delivery) 4 Valve tube 5 Detergent hose 6 Special cover for detergent tank 7 Detergent tank (not in scope of delivery) 8 Device cover 9 Machine casing 10 Nameplate 11 Charger 12 Lance 13 Brush (not in scope of delivery) 14 Nozzle 15 Exhaust manifold 16 Operating unit 17 Charging socket 18 Control unit connection socket 19 Operating hour counter 20 Device cover lock 21 Carrying rack 22 Ignition 23 Detergent filling level warning 24 Detergent supply controller 25 On/off switch 26 Battery charge level test button 27 Battery charge indicator Note: Please read the operating instruc- tions of the charger manufacturer, espe- cially the chapters on safety instructions! The battery is partially charged at the time of delivery. Charge it before appliance startup and then as and when required. Plug the charging cable of the charger into the charging socket on the device. Plug the charger into a suitable mains socket. – The charging indicator flashes green during the charging process. – The charging indicator light up green continuously when the charging pro- cess is finished. – Contact Customer Service if the charg- ing indicator flashes red. – The charging time is approx. 4 hours. – A fully charged battery provides an op- erating time of approx. 8 hours. Park the machine on an even surface. Press in the latches at both sides and remove the device cover. 1 Gas cartridge socket 2 Detergent socket 3 Valve tube hose 4 Special cover for detergent tank 5 Detergent hose Insert the detergent tank into the cas- ing. Unscrew the original cover of the deter- gent tank. Device elements Symbols on the machine Risk of burns on account of hot surfaces! Start up Charge the battery Making the plant ready for operations
16 EN– 5 Slide the detergent hose as far as pos- sible into the detergent tank and screw the special cover tight. Pull out the valve tube. If necessary, turn both gas valves on the valve tube clockwise to close off the gas supply. Check the seals on the valve tube for signs of damage and replace if neces- sary (see Care and Service). Screw the gas cartridges hand-tight clockwise onto the valve tube and insert them into the casing. Turn both gas valves on the valve tube anticlockwise to switch on the gas sup- ply. Fit the device cover and engage the latches. Take care to ensure that no hoses are kinked or jammed. Screw the brush onto the nozzle on the lance. Put appliance on your back. Illustration Latch the closure and adjust the hip belt. Illustration Adjust the appliance to your body by pulling on the middle tensioners. Do not pull too tight, the main load should be on the hip belt. Illustration Adjust the position of the appliance on your back by pulling on the end tension- ers. Illustration Engage the lock and adjust the chest strap. Connect the plug on the control unit to the socket on the device and screw the union nut tight. Press the battery charge level test but- ton on the control unit. The charging state of the battery is displayed. No LED lights up: Charge the battery (see Initial startup) Note: A black warning symbol appears on the red label on the exhaust manifold on the lance when the exhaust manifold is hot. The symbol disappears again when the ex- haust manifold has cooled down. Note: The device may only be switched on when carried on the back as described. Set the detergent supply controller to 0. Switch on the device at the on/off switch and wait for 5 seconds. Press the ignition button. The ignition process is audible. Set the detergent supply controller to 10 and wait until detergent escapes from the nozzle on the lance. Set the detergent supply controller to 0 and wait for 1 minute until the boiler has heated up. Set the detergent supply controller to a value between 1 and 10 depending on the surface and the area to be cleaned (recommended: 2-3). Note: The detergent filling level warning lights up when the detergent tank is empty. Carrying frame - adjust the hip belt, shoulder straps and chest strap Connect the control unit Operation Check the charging state of the battery Turning on the Appliance 17EN– 6 Note: Clean a small test area before per- forming the actual cleaning process in or- der to check that the surface will not be damaged. Note: Do not scrub while cleaning and do not exert pressure on the surface being cleaned because the own weight of the lance is sufficient. Place the lance on the surface to be cleaned and wait 2-3 seconds. Work on the chewing gum residue with circular movements of the brush until it dissolves. Brush over the surface with a broom and check that the chewing gum resi- due has been completely removed. Repeat the cleaning process if neces- sary. Switch off the device at the on/off switch. Allow the lance to cool down for 3 min- utes before setting it down. Park the machine on an even surface. DANGER Risk of burns! Warning of hot exhaust man- ifold. The hoses and lines of the device must be emptied after every period of operation. Note: When emptying the device, take care that no surfaces are damaged by the deter- gent. Press in the latches at both sides and remove the device cover. Turn both gas valves on the valve tube clockwise to close off the gas supply. Remove the gas cartridges from the casing and unscrew anticlockwise from the valve tube. Screw on the special cover of the deter- gent tank and remove the detergent tank from the casing. Switch on the device at the on/off switch. Set the detergent supply regulator to 10 and wait until no more liquid escapes from the nozzle on the lance. Switch off the device at the on/off switch. Disconnect the control unit from the de- vice. 몇 CAUTION Risk of injury and damage! Observe the weight of the appliance when you transport it. When transporting in vehicles, secure the appliance according to the guide- lines from slipping and tipping over. 몇 CAUTION Risk of injury and damage! Note the weight of the appliance in case of storage. Store the device only in dry, adequately ventilated spaces. DANGER Switch off the device prior to all work on the device. Press in the latches at both sides and remove the device cover. Pull out the valve tube. Carefully lever out the seal on the valve tube using a screwdriver. Take care to ensure that the gas cartridge threads are not damaged. Insert a new seal. Have the maintenance of the device performed by the customer service. DANGER Switch off the device prior to all work on the device. Cleaning operations Turn off the appliance After each operation Transport Storage Care and maintenance Replace the seal on the valve tube Maintenance intervals Yearly Troubleshooting 18 EN– 7 Switch on the device at the on/off switch. Open the gas valve. – Battery empty Charge the battery. – Gas cartridge empty Replace the gas cartridge. Replace the detergent tank. If malfunction can not be fixed, the de- vice must be checked by customer ser- vice. The warranty terms published by the rele- vant sales company are applicable in each country. We will repair potential failures of your appliance within the warranty period free of charge, provided that such failure is caused by faulty material or defects in man- ufacturing. In the event of a warranty claim please contact your dealer or the nearest authorized Customer Service centre. Please submit the proof of purchase. Only use original accessories and spare parts, they ensure the safe and trouble-free operation of the device. For information about accessories and spare parts, please visit www.kaercher.com. We hereby declare that the machine de- scribed below complies with the relevant basic safety and health requirements of the EU Directives, both in its basic design and construction as well as in the version put into circulation by us. This declaration shall cease to be valid if the machine is modified without our prior approval. 5.959-553 The undersigned act on behalf and under the power of attorney of the company man- agement. Authorised Documentation Representative S. Reiser Alfred Kärcher GmbH Co. KG Alfred-Kärcher-Str. 28 - 40 71364 Winnenden (Germany) Phone: +49 7195 14-0 Fax: +49 7195 14-2212 Winnenden, 2017/01/01 Appliance is not running Detergent filling level warning lights
Customer Service Warranty Accessories and Spare Parts Consumables Description Order No. SGG 1 Consumable Kit – Gas cartridge – Detergent – Stainless steel brush
Chief Executive Officer Head of Approbation 19EN– 8 Technical specifications SGG 1 Charger V
Chief Executive Officer Head of Approbation 163HR– 8 Tehnički podaci SGG 1 Punjač V
Chief Executive Officer Head of Approbation 171SR– 8 Tehnički podaci SGG 1 Punjač V
Chief Executive Officer Head of Approbation 188 ET– 8 Tehnilised andmed SGG 1 Laadur V