T20 - Vacuum Cleaner DREAME - Free user manual and instructions
Find the device manual for free T20 DREAME in PDF.
| Product type | Cordless stick vacuum |
| Brand | Dreame |
| Model | T20 |
| Rated voltage | 25.2 V |
| Rated power | 450 W |
| Battery capacity | 2800 mAh / 70.56 Wh |
| Charging time | Approximately 4 hours |
| Battery type | Rechargeable lithium-ion (model P2032-7S1P-BW/P2032-7S1P-BWA/P2032-7S1P-BWC) |
| Floor types | Tile, marble, short carpet |
| Suction levels | Eco, Medium/Auto, Turbo |
| Display | LED screen with battery indicator, mode and warnings |
| Filtration | Cyclone system + pre-filter + washable filter |
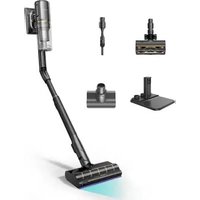
| Included accessories | Smart multi-brush bar, mini electric brush, 2-in-1 brush nozzle, crevice nozzle, extendable coupling tube, extension rod, 2-in-1 charging and storage station |
| Intended use | Domestic, indoor dry surfaces |
| Continuous mode | Electronic lock to free your finger |
| Safety | Automatic shut-off in case of overheating or blockage, child supervision recommended |
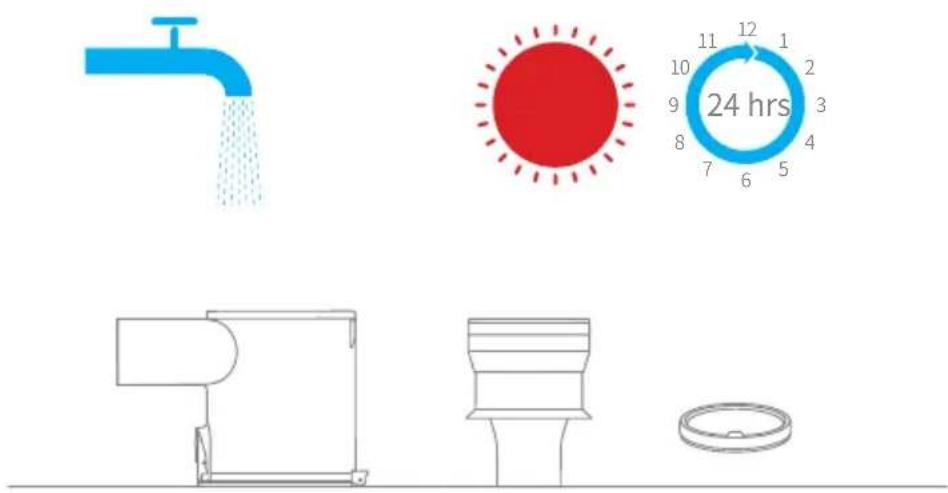
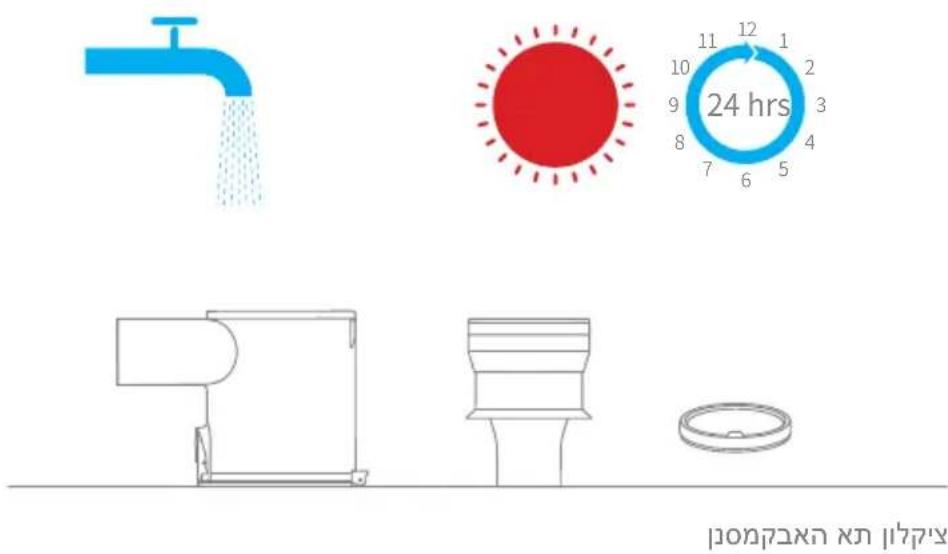
| Maintenance | Regular cleaning of the dust tank, washing filters and brushes with water, drying 24h |
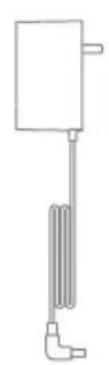
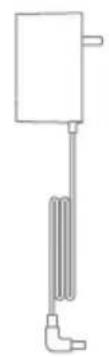
| Charger | Model YLS0251B-E300080 (EU) / YLS0241A-U300080 (UK) / YLS0241A-A300080 (AU), 30 V, 800 mA |
| Standards | Compliant with European directives (CE) |
| Repairability | Removable and replaceable battery, spare parts available via after-sales service |
| Recycling | WEEE - do not dispose of with household waste, battery to be recycled separately |
Frequently Asked Questions - T20 DREAME
User questions about T20 DREAME
0 question about this device. Answer the ones you know or ask your own.
Ask a new question about this device
Download the instructions for your Vacuum Cleaner in PDF format for free! Find your manual T20 - DREAME and take your electronic device back in hand. On this page are published all the documents necessary for the use of your device. T20 by DREAME.
USER MANUAL T20 DREAME
Dreme Cordless Vacuum Cleaner User Manual
THANK YOU FOR PURCHASING THIS DREAM VACUUM CLEANER.
Registration Quick Start
Welcome to register a Dreame account by scanning the QR code.
You are available for the User Manual and Special Offers.

With it you are obtaining a high quality product that is engineered for optimal performance. If you have any questions on the product, please contact us: aftersales@dreame.tech.
EN User Manual
DE Benutzerhandbuch 25
FR Manuel d'utilisation 50
IT Manuale utente 75
ES Manual de usuario 100
RU RykoBoDCTBO noIb3OBaTeJ 125
SA 150
HE unnuun 174
Safety Instructions
To prevent accidents including electric shock or fire caused by improper use, please read this manual carefully before use and retain it for future reference.
Warning
- This product can be used by children aged from 8 years and above and persons with physical, sensory, intellectual deficiencies, or limited experience or knowledge under the supervision of a parent or guardian to ensure safe operation and to avoid any risk of hazards. Cleaning and maintenance shall not be made by children without supervision.
- The vacuum is not a toy. Children shall not play with or operate this product. Please exercise caution when using the vacuum near children. Do not allow children to clean or maintain the vacuum unless supervised by a parent or guardian.
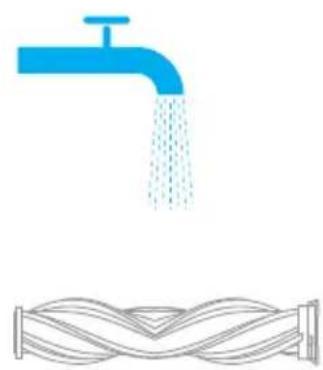
- Do not use the vacuum outdoors or on wet surfaces. Only use the vacuum on dry indoor surfaces. Do not touch the plug or any part of the vacuum with wet hands.
- To reduce the risk of fire, explosion, or injury, check to make sure the lithium battery and charging adapter are undamaged before use. Do not use the vacuum if either the lithium battery or charger is damaged.
- The smart multi-brush bar, battery, metal connector pin, and vacuum are electrically conductive and should not be immersed in water or other liquid. Make sure to dry all filters after cleaning.
- Prevent injury caused by moving parts. Turn off the vacuum before cleaning the smart multi-brush bar. The smart multi-brush bar, dust cup and filter must all be properly installed before using the vacuum.
- Only use the original charging adapter. Never use an unoriginal adapter, as this may cause the lithium battery to catch fire.
- Do not use the vacuum to pick up flammable or combustible liquids, such as gasoline, or bleach, ammonia, drain cleaners or other liquids.
- Do not use the vacuum to pick up sharp or hard objects, such as glass, nails, screws, or coins, which may damage the machine. Do not use the vacuum to pick up drywall particles, ashes like fireplace ash, or smoking or burning materials such as coal, cigarette butts or matches.
- Check the area to be cleaned before use. To prevent the openings from being blocked, clear the larger paper, spitball, plastic cloth or sharp objects (such as glass, nails, screws, coins, etc.) and any object which is larger than openings.
- Keep hair, loose clothing, fingers and other parts of the body away from the vacuum's openings and moving parts. Do not point the hose, wand or tools at your eyes or ears or put them in your mouth.
- Do not put any object into the vacuum's openings. Do not use the vacuum with any opening blocked. Keep free of dust, lint, hair, or other items which may reduce airflow.
- Do not rest the vacuum against a chair, table, or other unstable surface, as this may cause damage to the machine or personal injury. If the vacuum becomes damaged from being knocked over or is otherwise malfunctioning, please contact our authorized service department. Never attempt to disassemble the device on your own.
-
All instructions in the manual for recharging the battery must be strictly followed. Failure to properly charge the battery within the specified temperature range could damage the battery.
-
Please be extra careful when using the vacuum to clean stairs.
- Make sure the vacuum is unplugged when not used for extended periods as well as prior to performing any maintenance or repairs.
- Do not install, charge, or use this product outdoors, in bathrooms, or around a pool.
- Fire Hazard Warning: Do not apply any type of fragrance to the vacuum's filter. These types of products are known to contain flammable chemicals which may cause the vacuum to catch fire.
- This product is designed for home use only.
- Only use the original charger (Model YLS0251B-E300080 (EU) / YLS0241A-U300080 (UK) / YLS0241A-A300080 (AU)). Failing to do so may cause the lithium-ion battery to catch fire.
- Only use the approved battery type (Model P2032-7S1P-BW/P2032-7S1P-BWA/P2032-7S1P-BWC). Failing to do so may cause the lithium-ion battery to catch fire.
- Do not use and store in extremely hot or cold environments (below 0^ / 32^ or above 40^ / 104^ ). Please charge the cordless vacuum in temperature above 0^ / 32^ and below 40^ / 104^ .
We Dreame Trading (Tianjin) Co., Ltd., hereby, declares that this equipment is in compliance with the applicable Directives and European Norms, and amendments. The full text of the EU declaration of conformity is available at the following internet address: www.dreme-technology.com
For detailed e-manual, please go to https://www.dreame-technology.com/pages/user-manuals-and-faqs
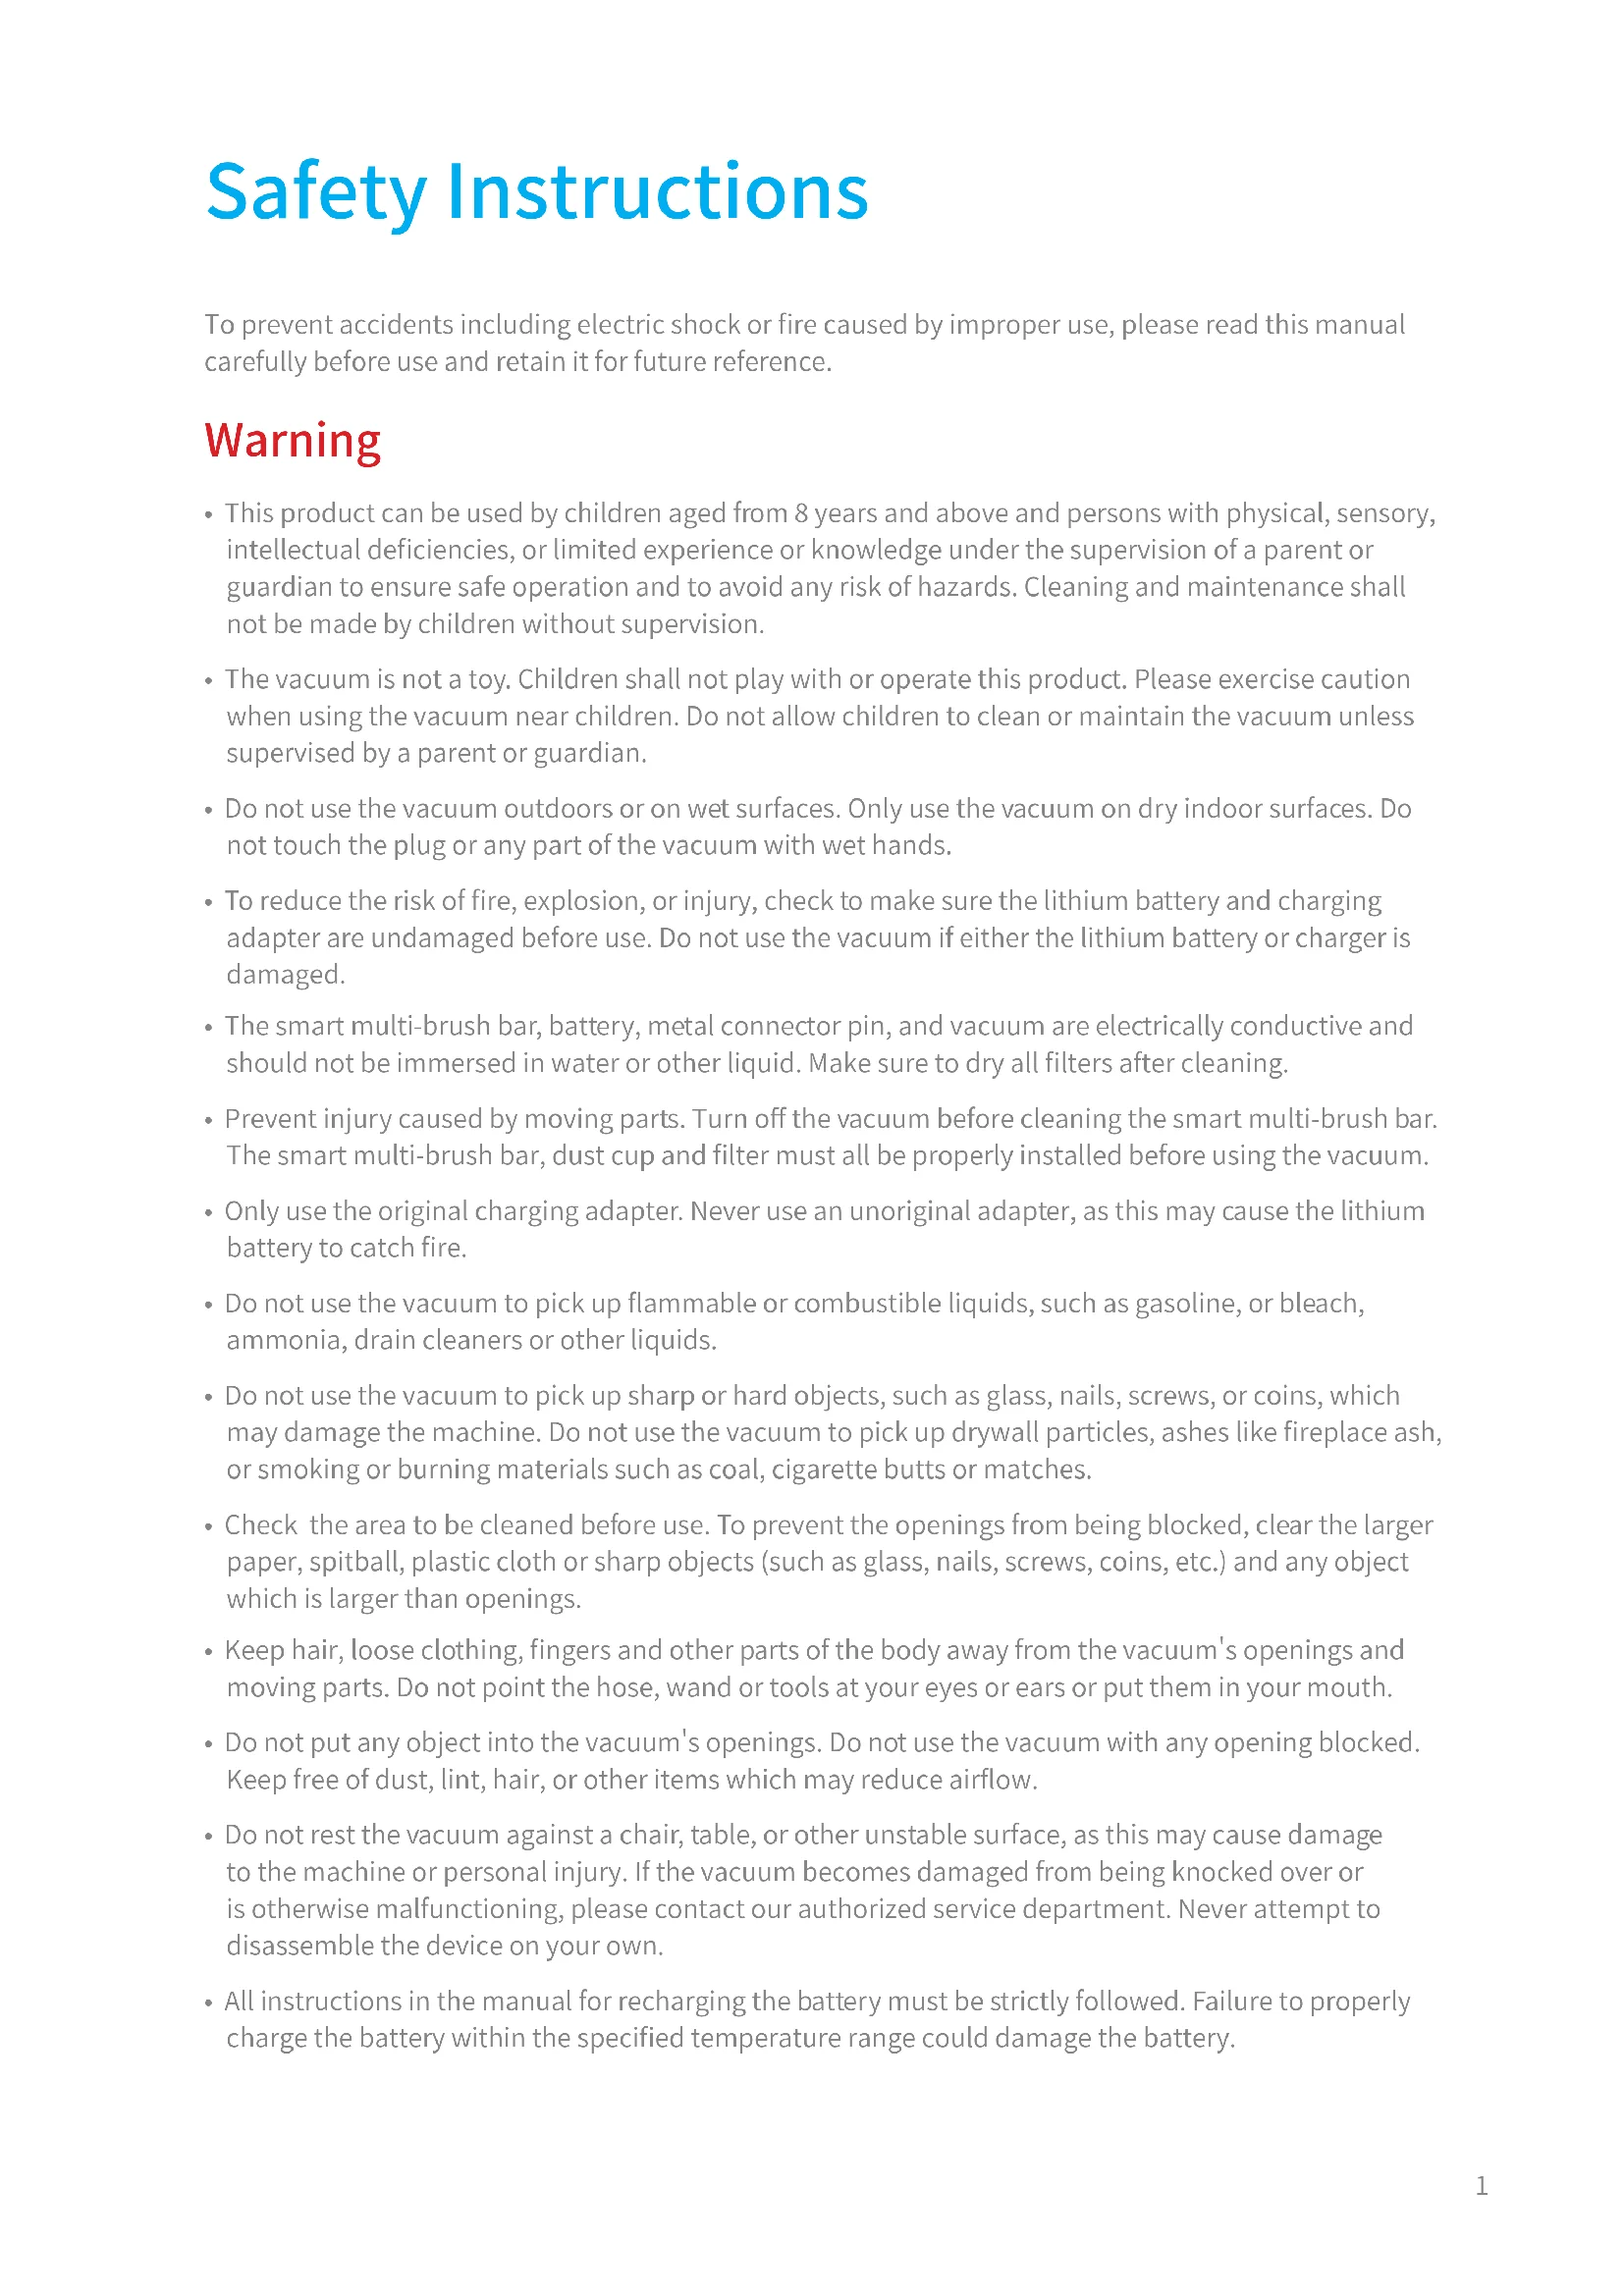
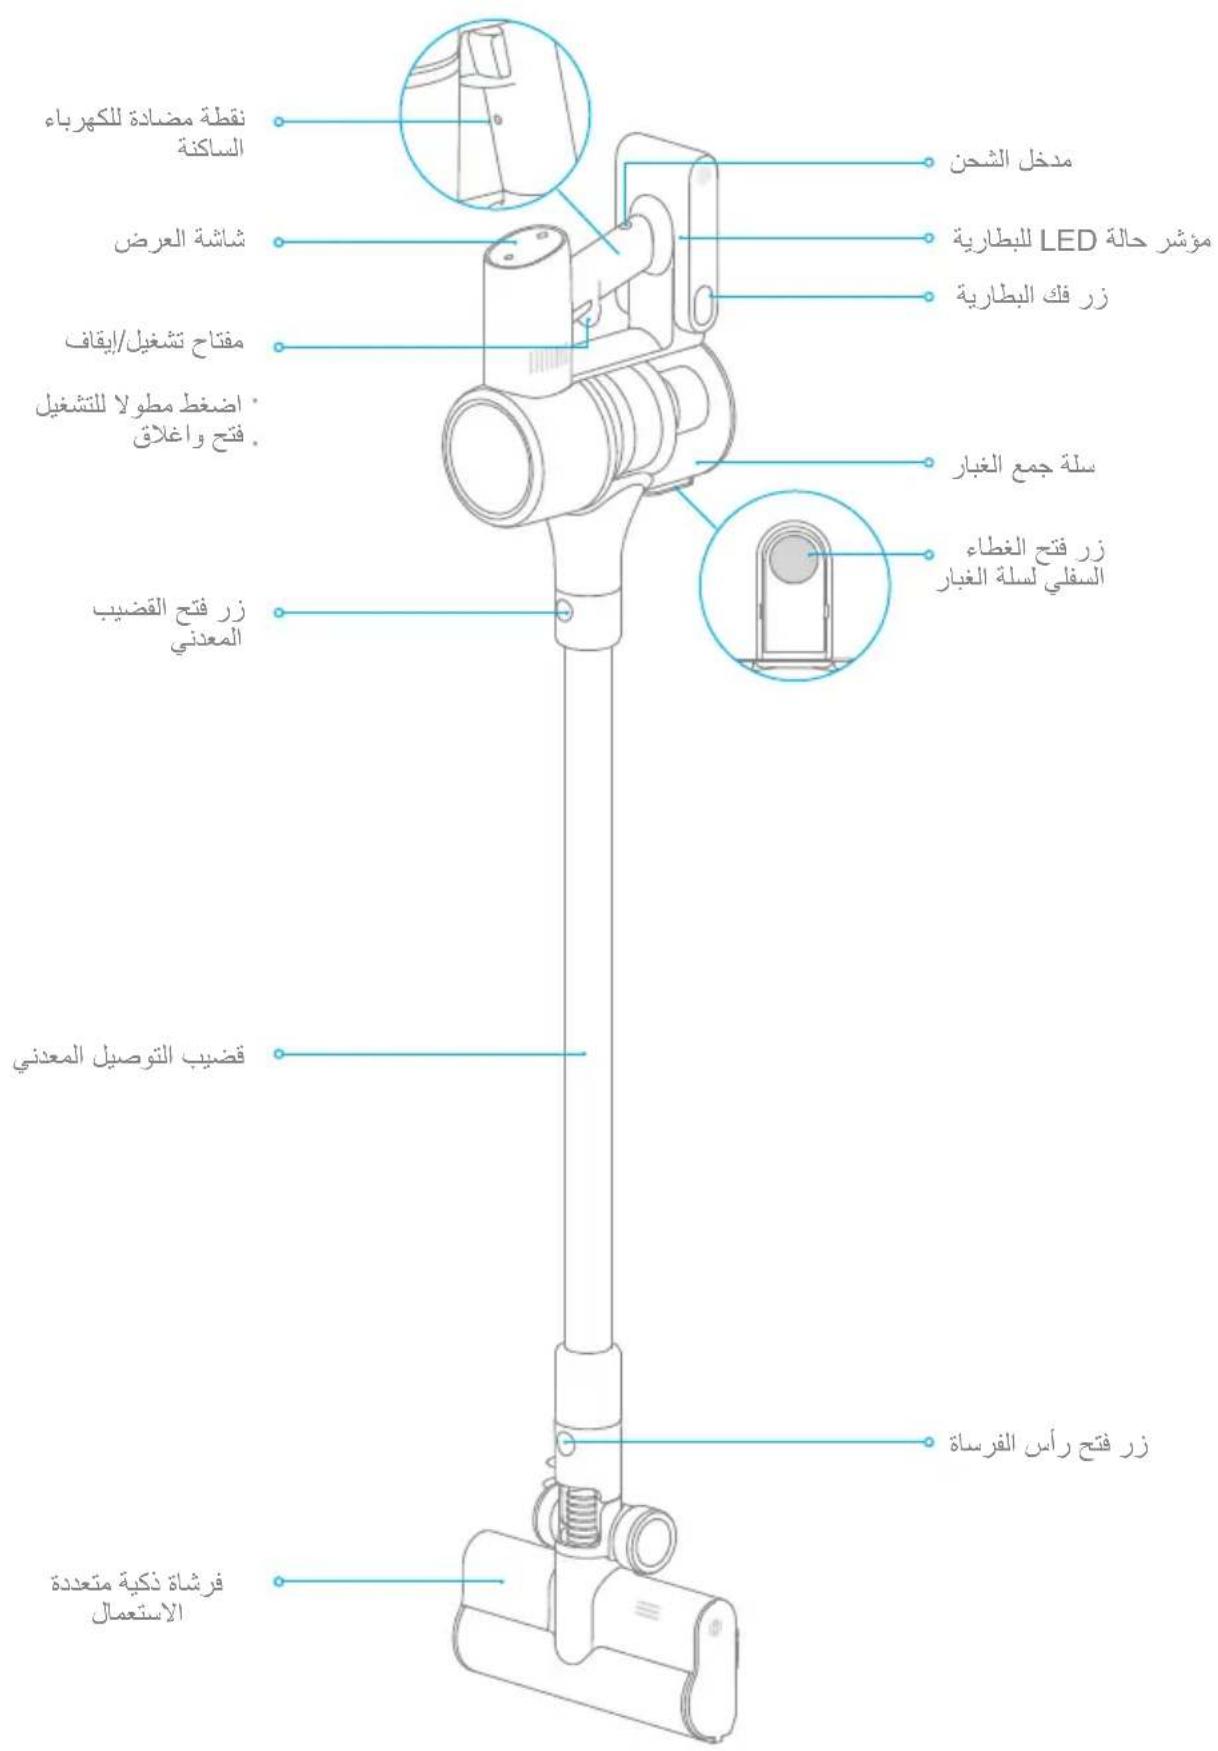
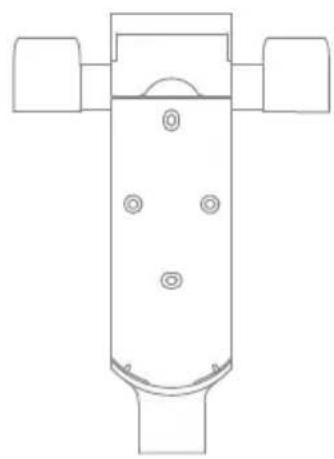
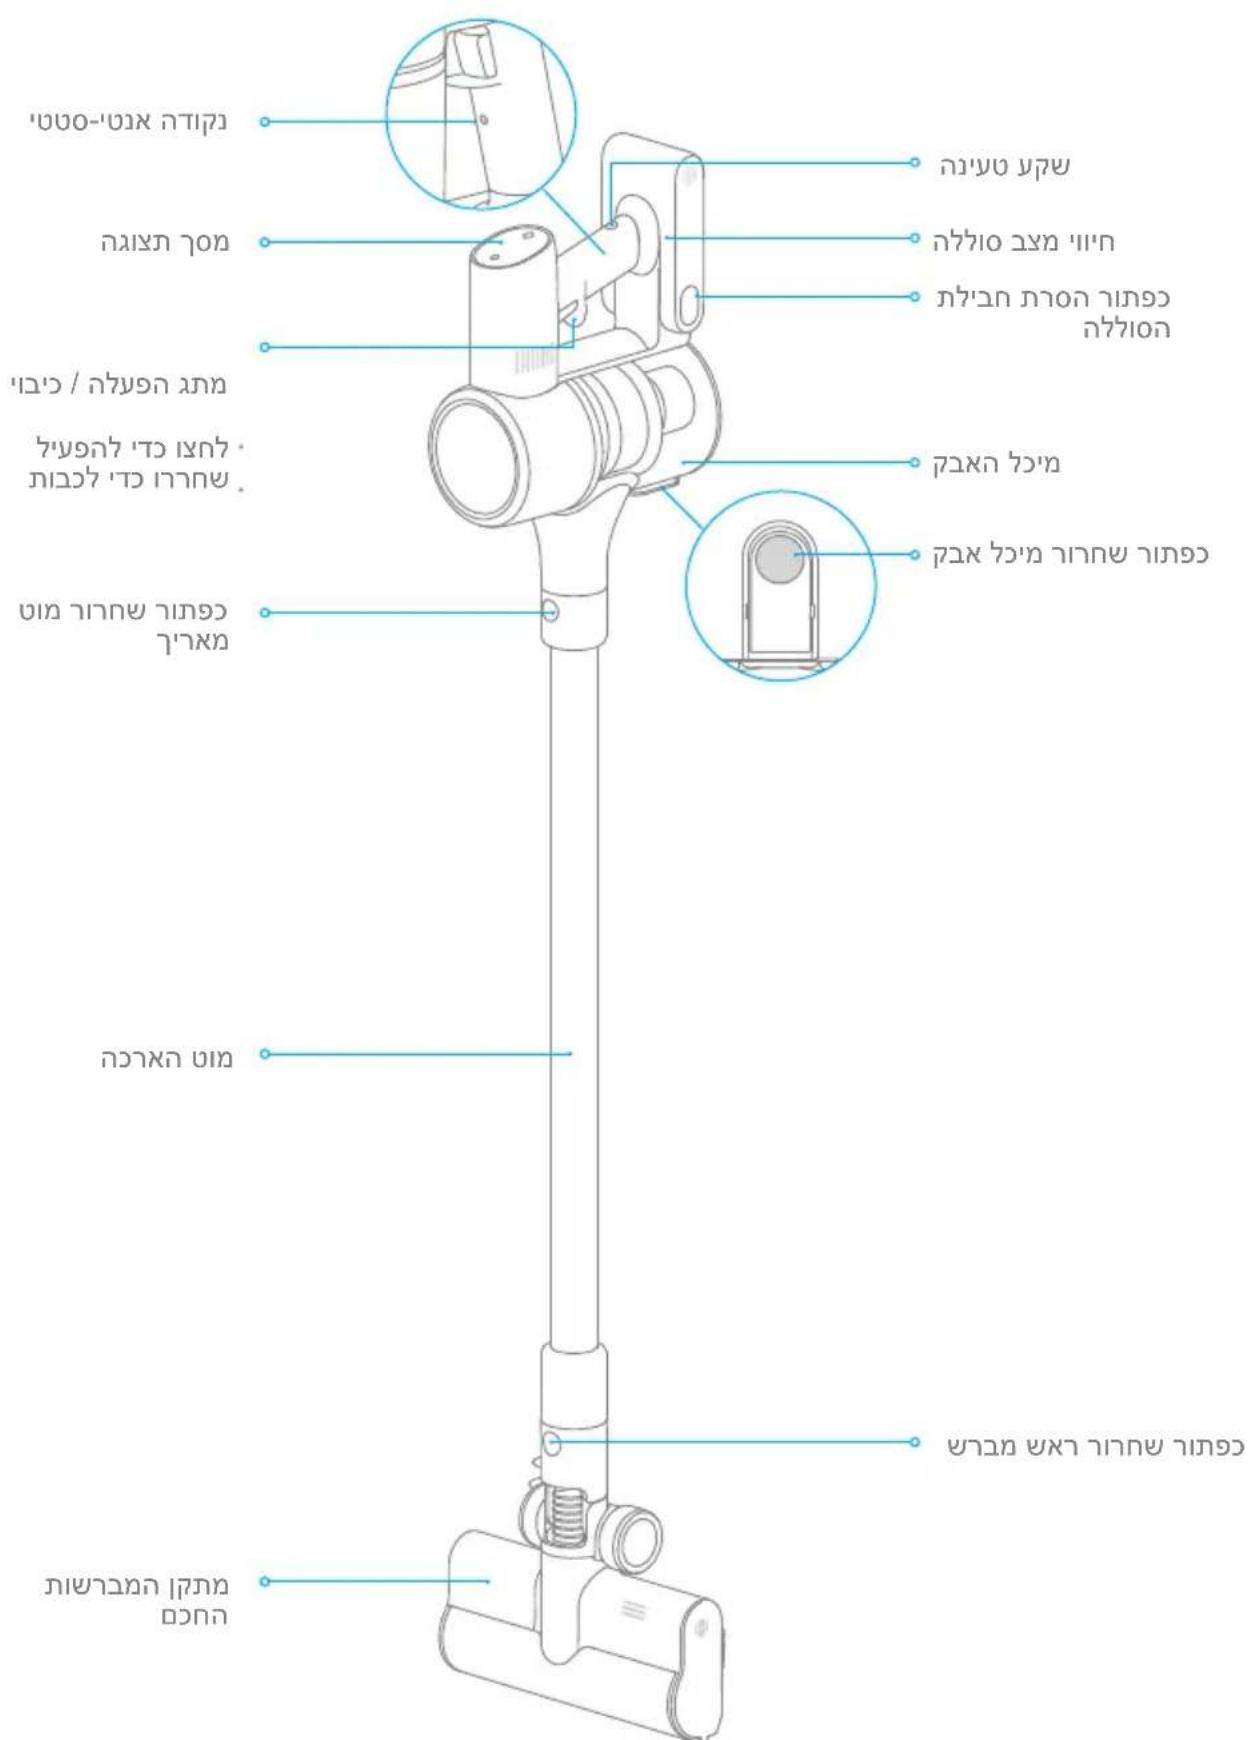
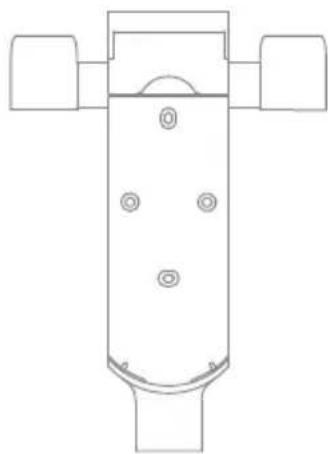
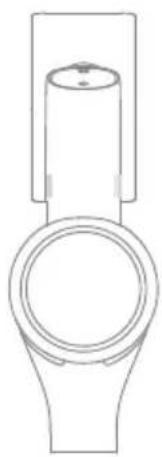
Product Overview
Component Names
Product Overview
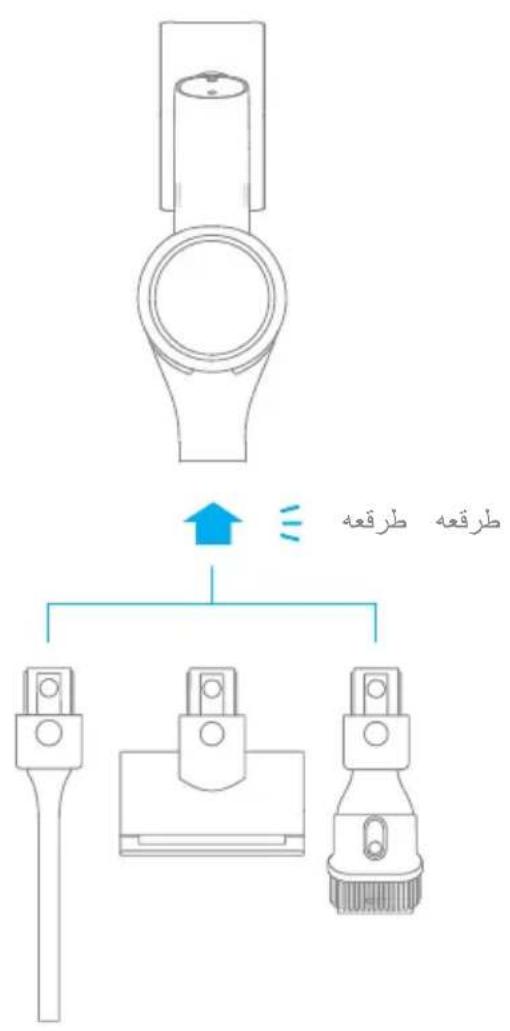
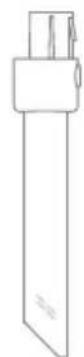
Accessories

Charger Crevice Nozzle Extension Hose 2-in-1 Brush Nozzle


Smart Multi-brush Bar Mini Electric Brush2-in-1 Chargi
Storage Mount
(Including screws × 2 wall plugs
× 2 mounting template sticker)
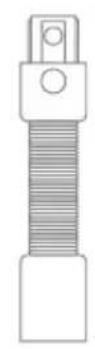
Extension Rod
Note: The images in this manual are for illustrative purposes only. The actual product may differ.
Product Overview
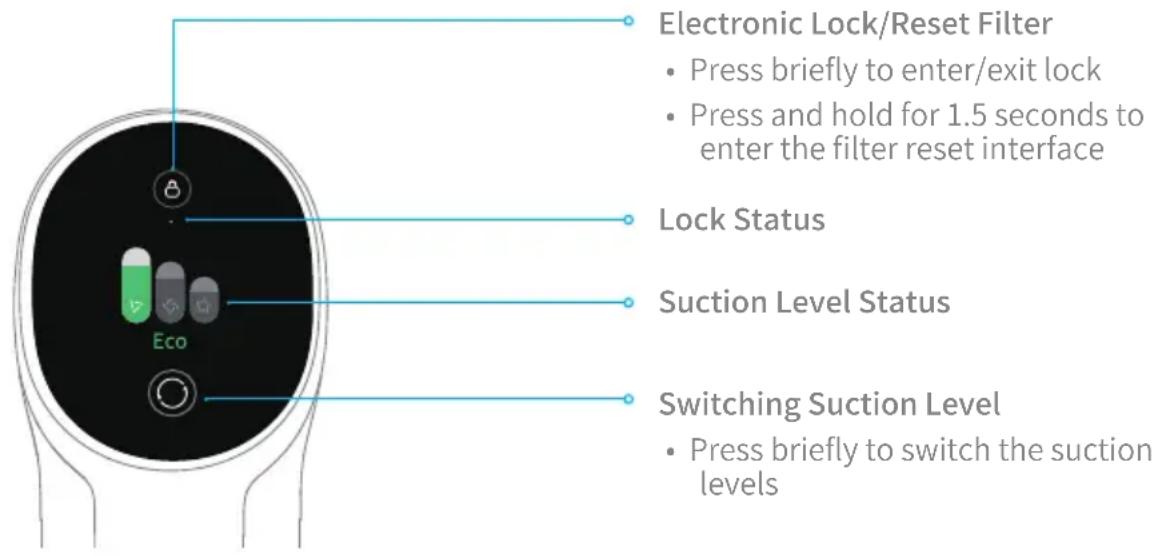
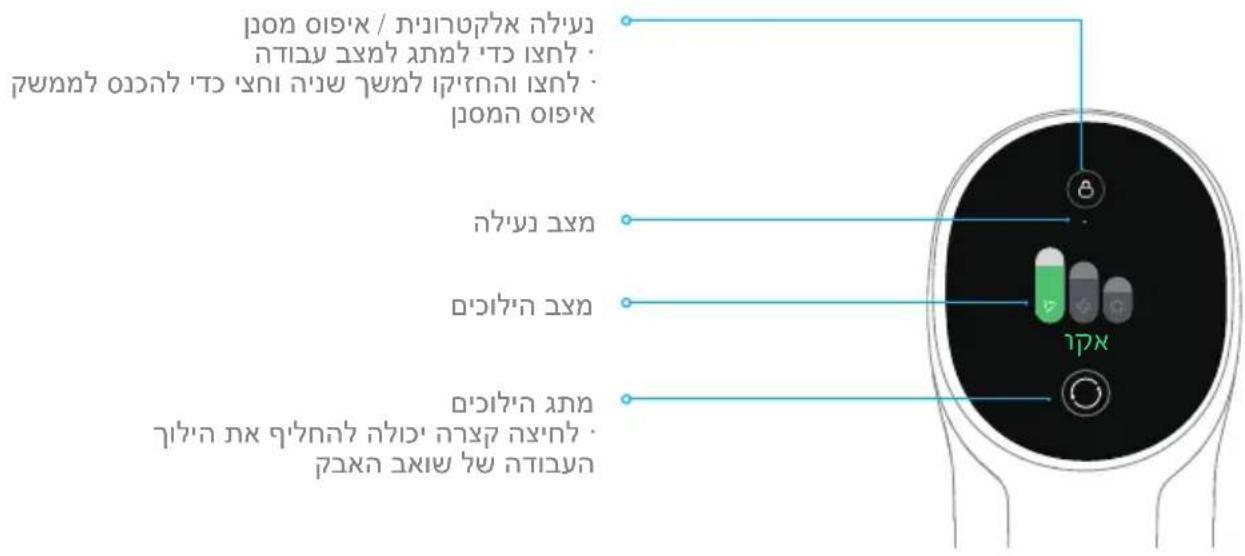
Introduction of Display Screen
Note: If the vacuum is not working properly, the screen display will produce an error message. Please refer to the troubleshooting section to find your solution.
Setting Language
Press and hold the button for 3 seconds to open the language list, then press the button to scroll through the language to select the desired one. Press and hold the button for 3 seconds to use the selected language.
Note: The display screen will return the main page if there is no operation for more than 15 seconds.
Switching Suction Level
Press the button to switch between three suction levels of eco, med/auto, and turbo. The corresponding suction level will be highlighted on the display screen.
Auto Mode will be activated and "Auto" will appear on the display screen only when using the smart multi-brush bar. The vacuum will then automatically switch the suction level between the floor/tile and the carpet.
Note:
- Stop the vacuum at any time while cleaning. Then it will continue to use the last selected suction level when started again.
- Connecting the smart multi-brush bar to the vacuum will activate the Auto Mode. In this mode, the vacuum can automatically adjust its suction level depending on the surface type.
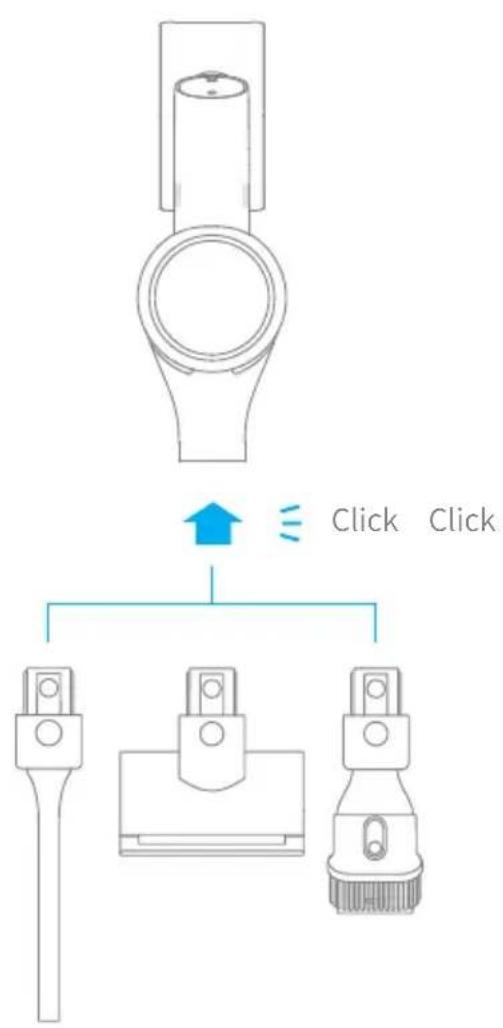
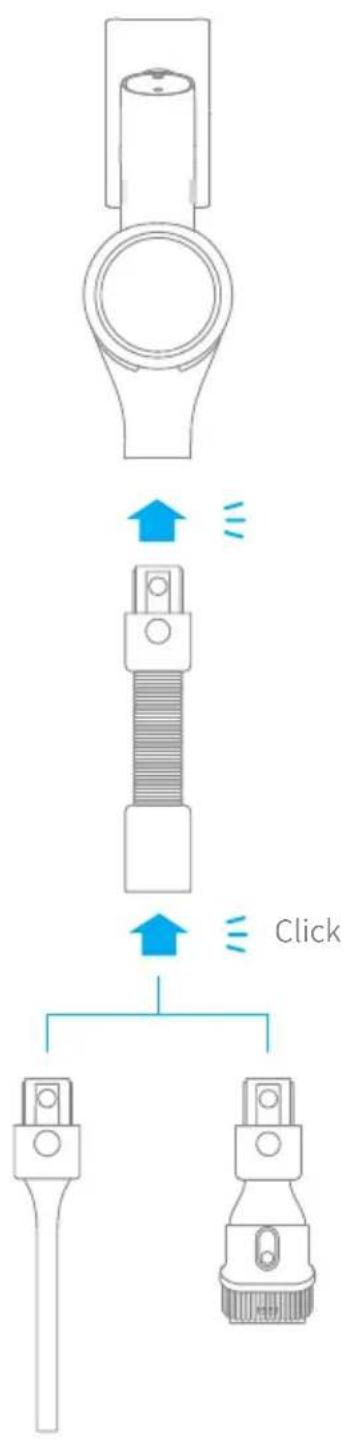
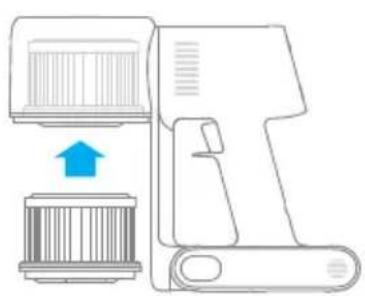
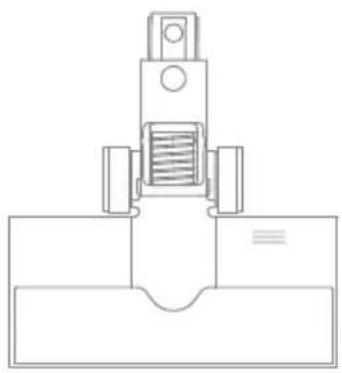
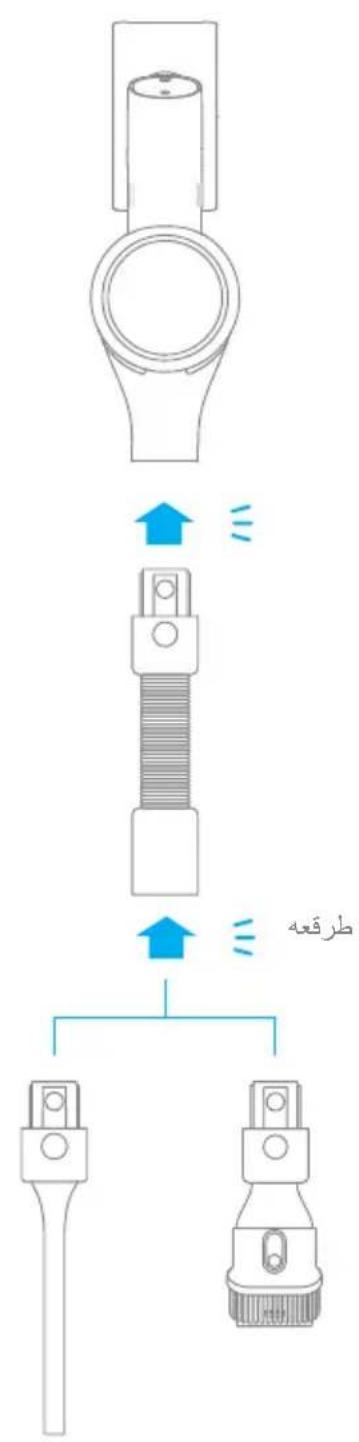
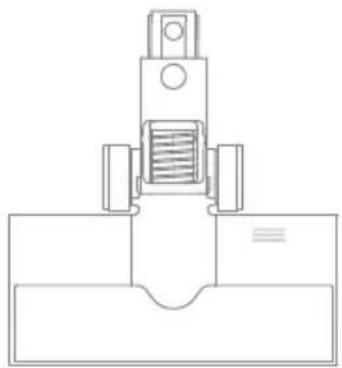
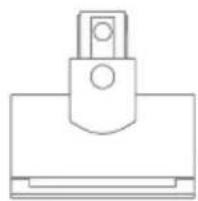
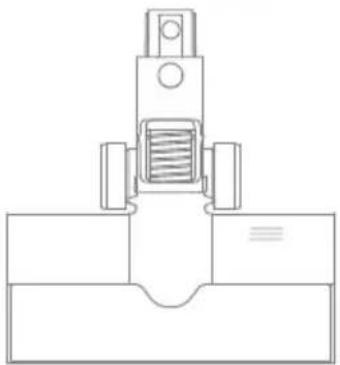
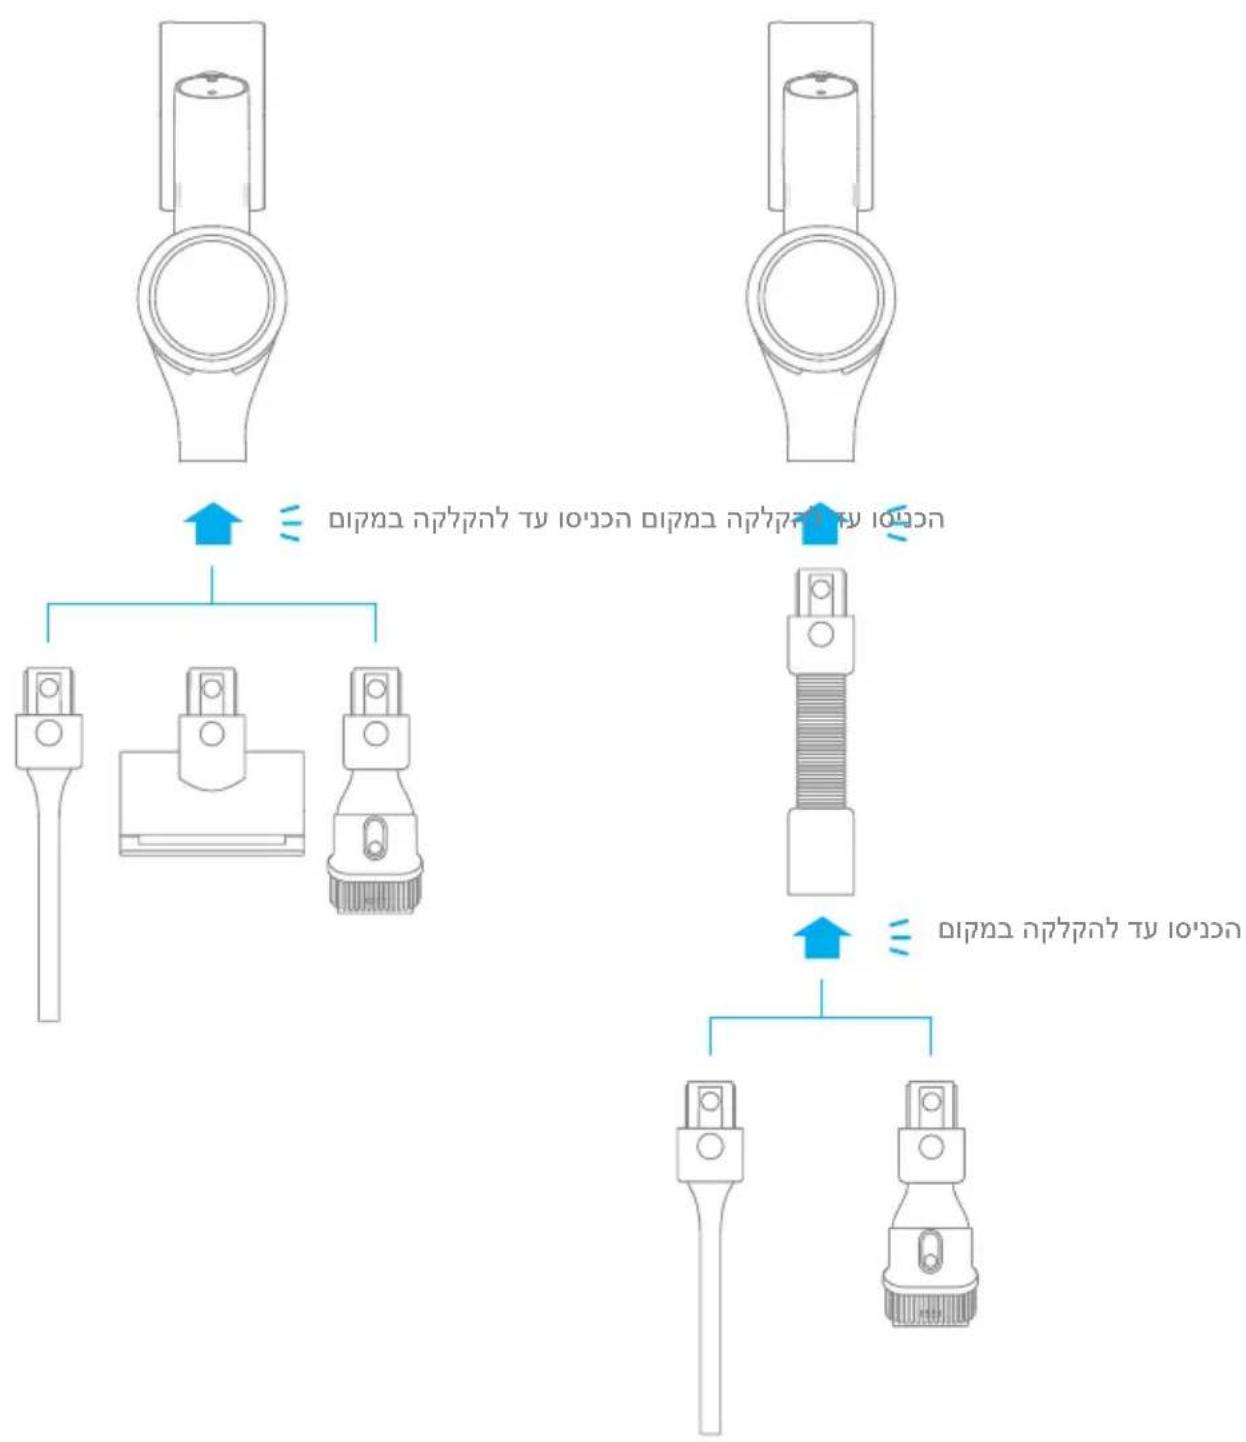
Installation
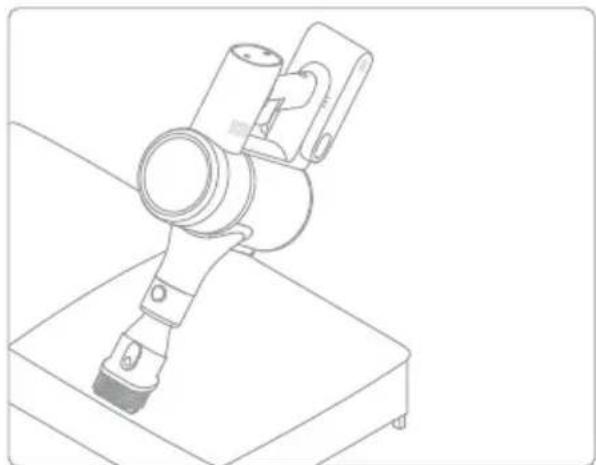
Vacuum Installation Diagram

Installation
Accessories Installation
Diagram
Installation
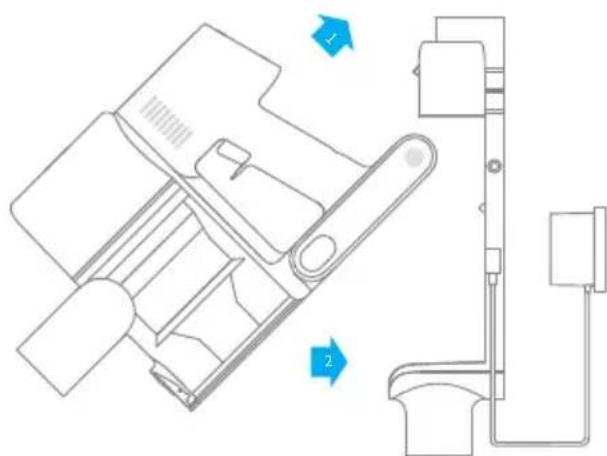
2-in-1 Charging & Storage Mount Installation Diagram
The 2-in-1 charging & storage mount is an optional accessory. You can install it based on your needs.
- The 2-in-1 charging & storage mount should be installed in a cool, dry place with an electrical outlet nearby. Prior to installing, ensure that there are no electrical wires or pipes in the space directly behind where the mount will be installed.
- The bottom of the mounting template sticker should be level and at least 103cm from the ground, and its top should have at least 30cm^ of clearance above it. (*30cm: Leave enough space just in case you may need to purchase the replaceable battery in the future.)
- Use a power drill with an 8 mm drill bit to drill a hole into each hole marker on the mounting template sticker, then insert a wall plug into each hole.
- Align the position holes on the mount with the holes on the wall. Fasten it to the wall with the included screws.

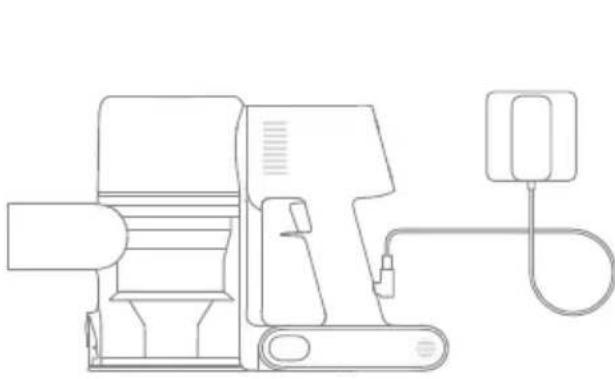
Charging
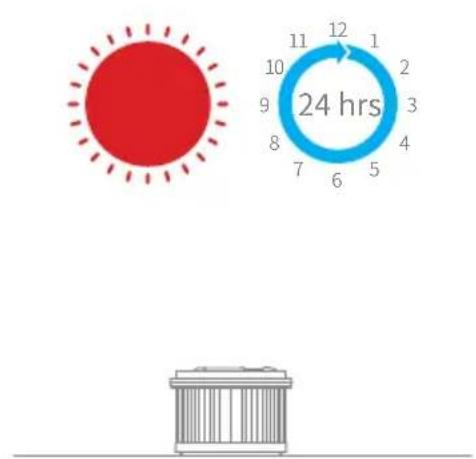
Fully charge the vacuum before using it for the first time.
Note: A full charge will take approx. 4 hours. Using Turbo Mode for a prolonged period will cause the battery to heat up, which increases charging time. Allow the vacuum to cool down for 30 minutes before charging it.
Charging Methods
Charging the vacuum with the charger Charging the vacuum on the charging mount
Battery Status Display
Display Screen
The number on the display screen represents the current battery level in a percentage during charging. When the number turns into 100, the battery is fully charged.
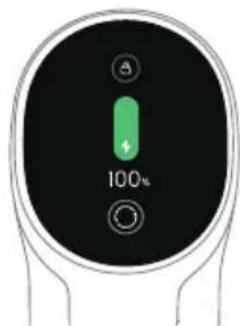
LED Battery Status Indicator
When charging, the three indicators flash and then turn bright constantly in sequence considering the battery condition. When the charging is completed, the three indicators keep solid light.

Note: Once the vacuum is fully charged, the indicator will turn off after 5 minutes, and the vacuum will enter the energy-saving mode.
How to Use
Working Methods
There are two working methods for the vacuum, which can be selected based on your needs.
Method 1: Discontinuous Cleaning Mode
Press and hold the switch of the vacuum to start working, and release it to stop immediately.
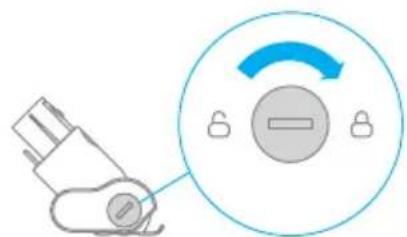
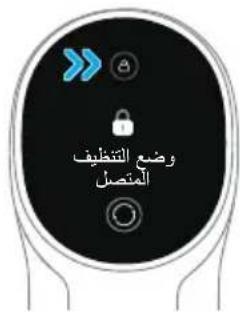
Method 2: Continuous Cleaning Mode (Electronic Lock)
Click the electronic lock key to switch to Continuous Cleaning mode, and then briefly press the on/off switch to make the vacuum in Continuous Cleaning mode.
Use the electronic lock to free your fingers and avoid finger fatigue caused by holding the switch.

Note:
- In this mode, briefly press the on/off switch to suspend the operation or start again, and the working mode of the vacuum will not change.
- Click the electronic lock again to quit the Continuous Cleaning mode.
How to Use
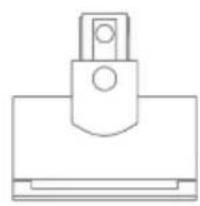
Using Different Accessories
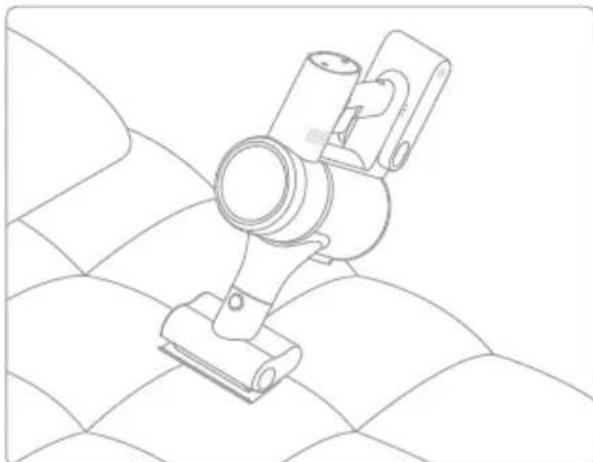
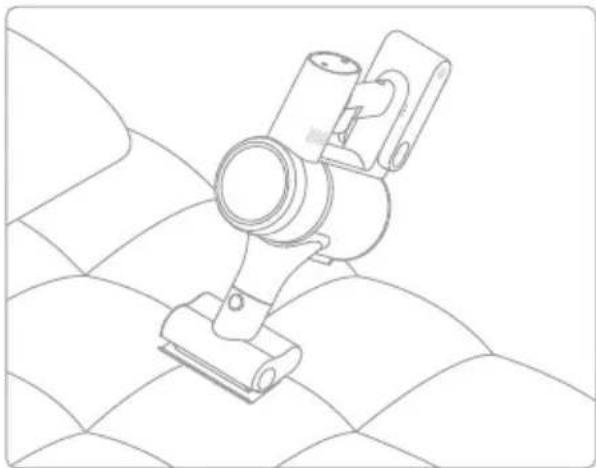
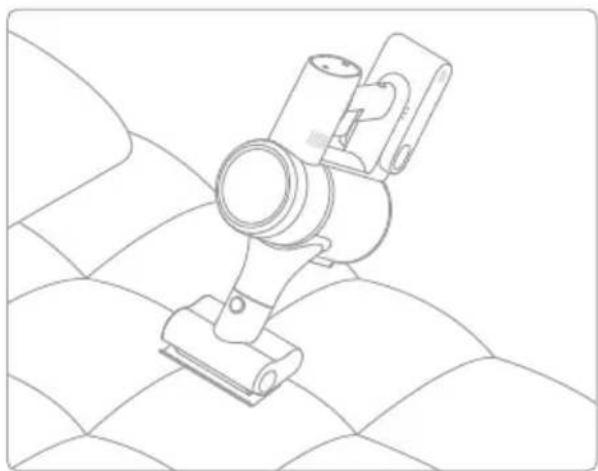
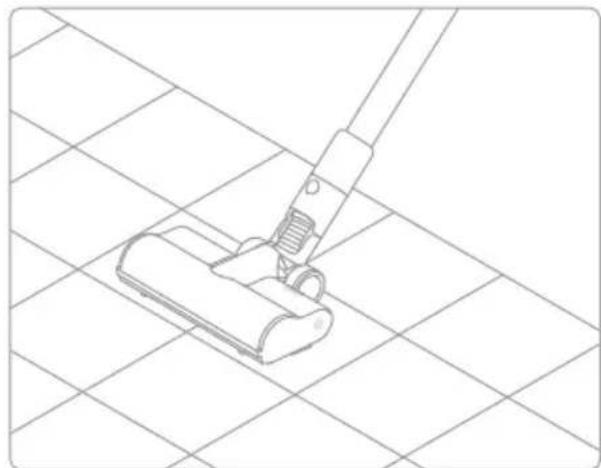
Smart Multi-Brush Bar
For cleaning floors such as marble, tile, and low pile carpet. When Auto Mode is activated, the vacuum will automatically adjust its suction level depending on the surface type.

Note: The smart multi-brush bar can be attached directly to the vacuum.
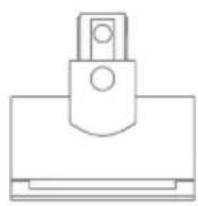
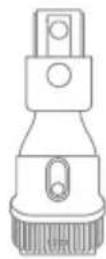
2-in-1 Brush Nozzle
For vacuuming curtains, keyboards, ceilings, sofas, vehicle interiors, coffeetables,etc.
Mini Electric Brush
For vacuuming dirt, pet hair, and other stubborn debris from sofas, bedding, and other fabric surfaces.
Note: It is not recommended to vacuum on fragile surfaces, such as silk.
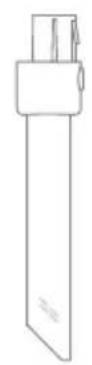
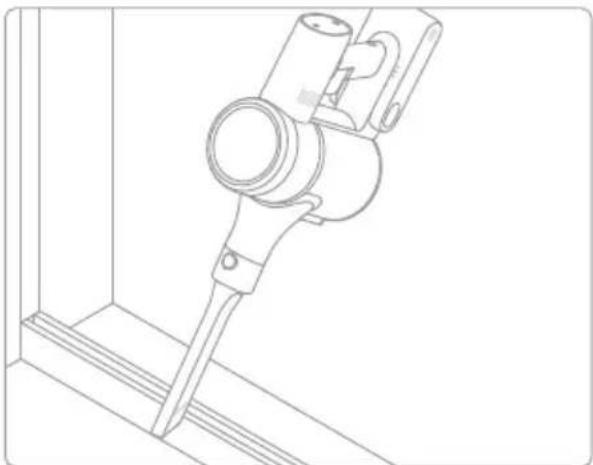
Crevice Nozzle
Suitable for vacuuming cracks, corners of doors and windows, stairs, and other hard-to-reach places.

How to Use
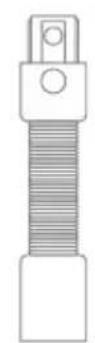
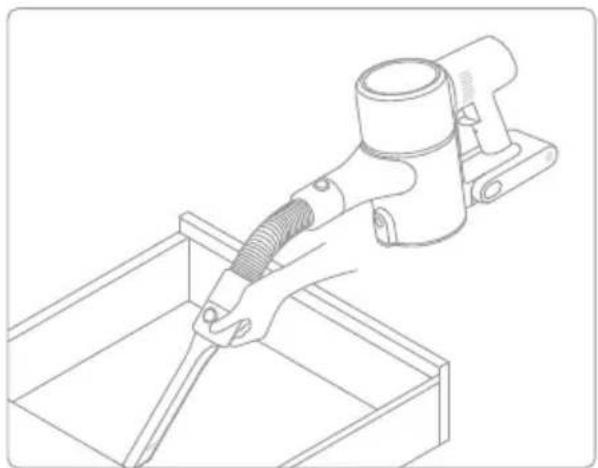
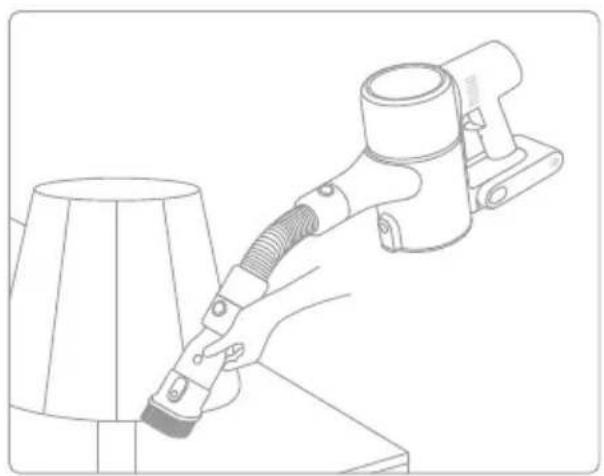
Extension Hose
Use for hard-to-reach corner cleaning.

Note:
- If any rotating part becomes stuck, the vacuum may shut off automatically. Remove any trapped foreign objects, then resume use.
- When the battery becomes overheated, the vacuum will automatically shut off. Wait until the battery temperature returns to normal, then resume use.
Care & Maintenance
Tips:
Always use genuine parts to keep your warranty from being void.
- If the filter or nozzle becomes clogged, the vacuum will stop working shortly after being turned on. Clear the tube to restore functionality.
- If the vacuum is not used for an extended period, fully charge it, unplug its charger, and store it in a cool, low-humidity environment away from direct sunlight. To avoid over-discharging the battery, recharge the vacuum at least once every three months.
Cleaning the Vacuum
Wipe the vacuum with a soft dry cloth.
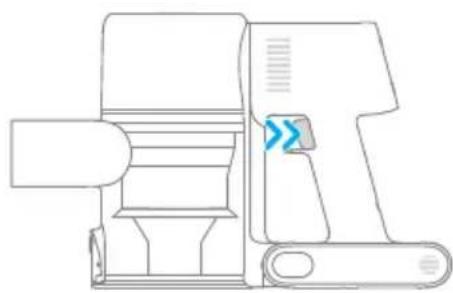
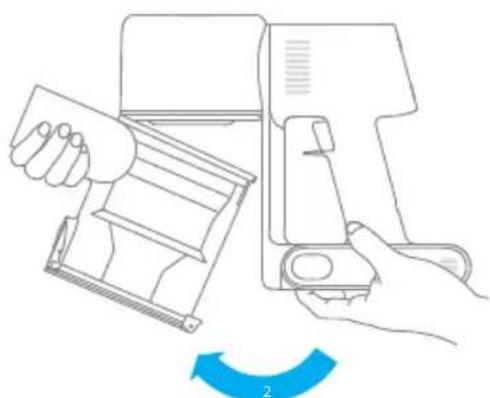
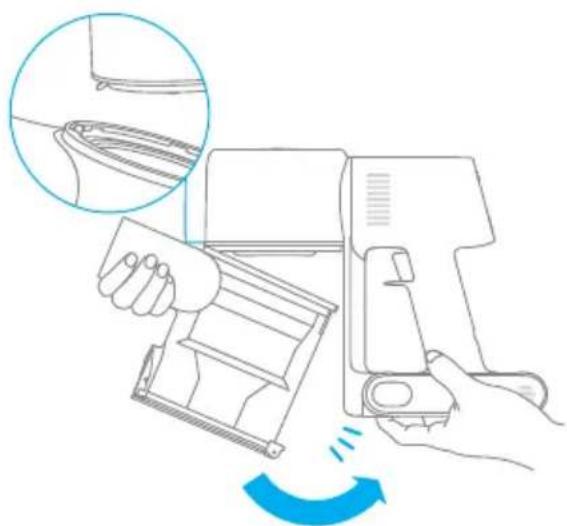
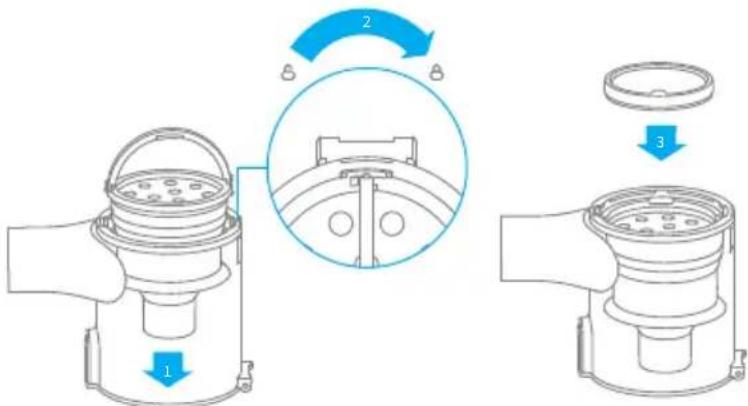
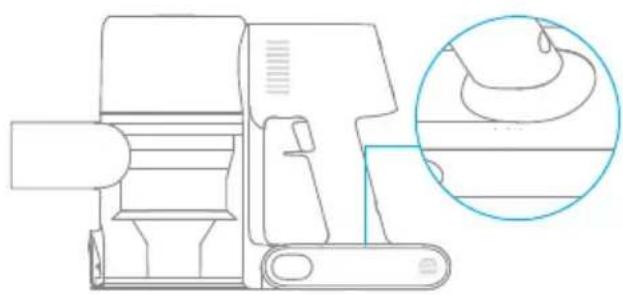
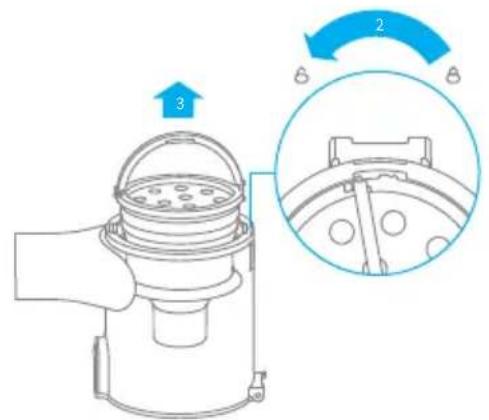
Cleaning the Dust Cup, Pre-Filter, and Cyclone Assembly
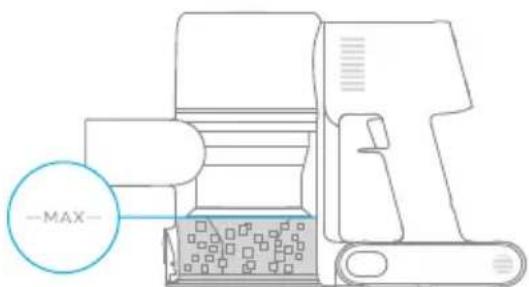
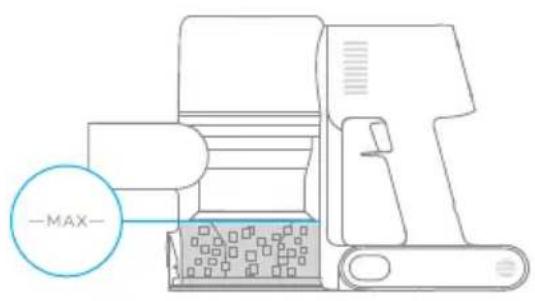
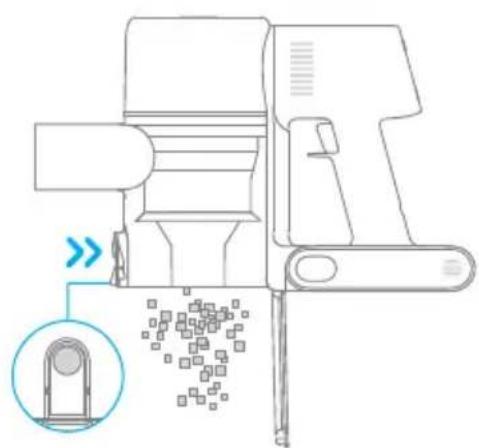
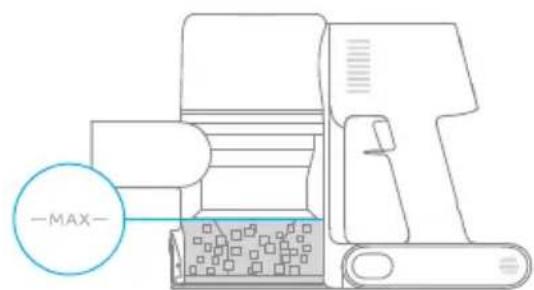
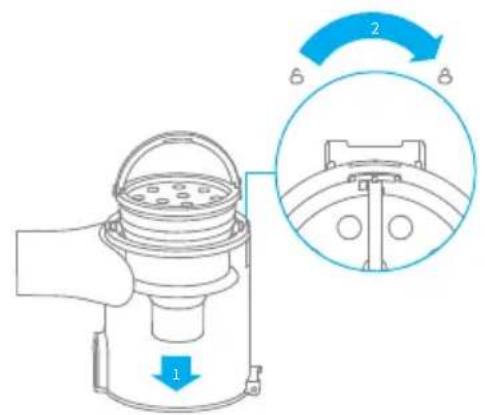
The vacuum's cleaning ability will be reduced if the dust cup is filled to the "MAX" mark. To regain performance, empty the dust cup in a timely manner. Before emptying the cup, make sure the vacuum is disconnected from the power, and do not press its power button.
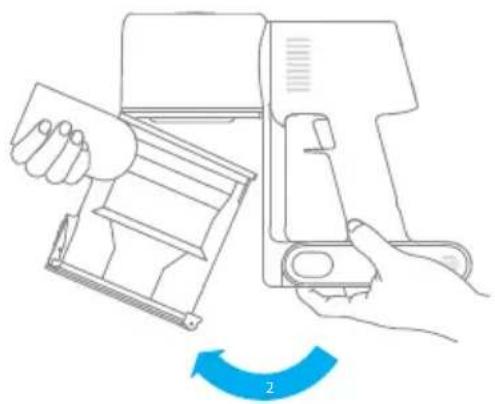
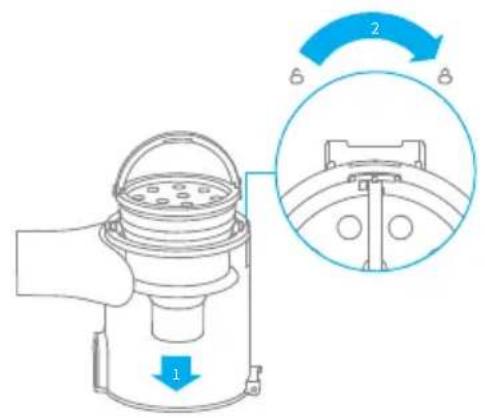
- Press the dust cup bottom cover release button, then empty the contents.
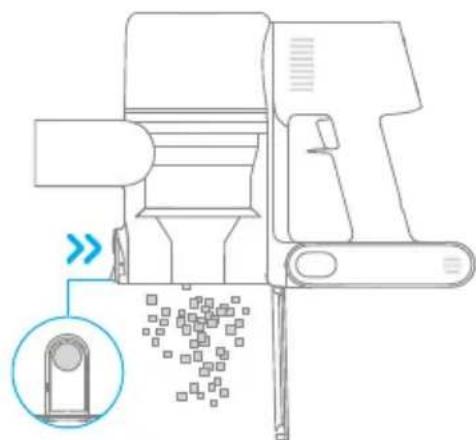
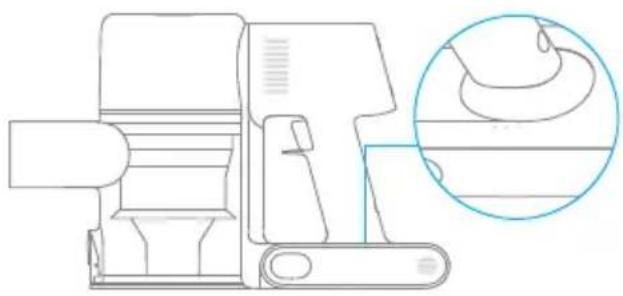
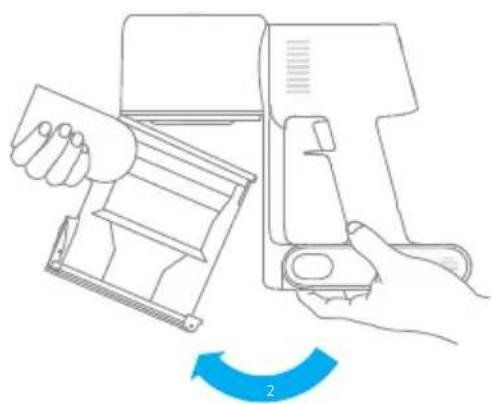
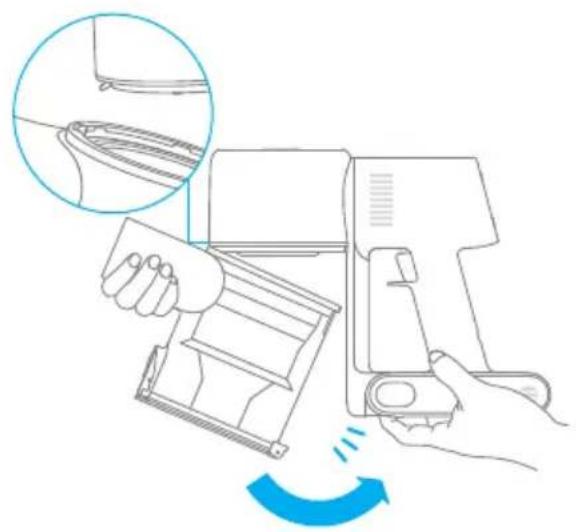
- Push the dust cup release switch in the direction indicated by the arrow, then gently remove the dust cup from the vacuum.
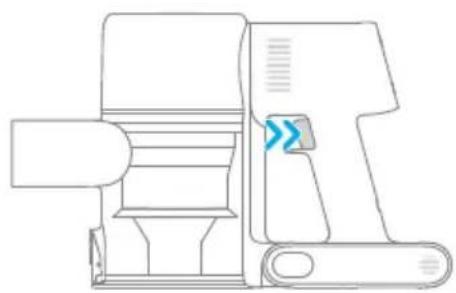
Care & Maintenance
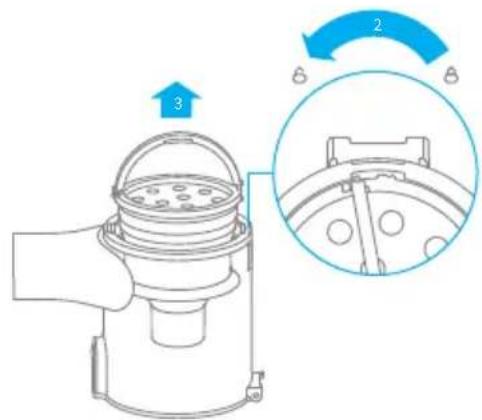
- Remove the pre-filter first, then lift the handle of the cyclone assembly and turn to counterclockwise until it stops, then pull to lift out the cyclone assembly.
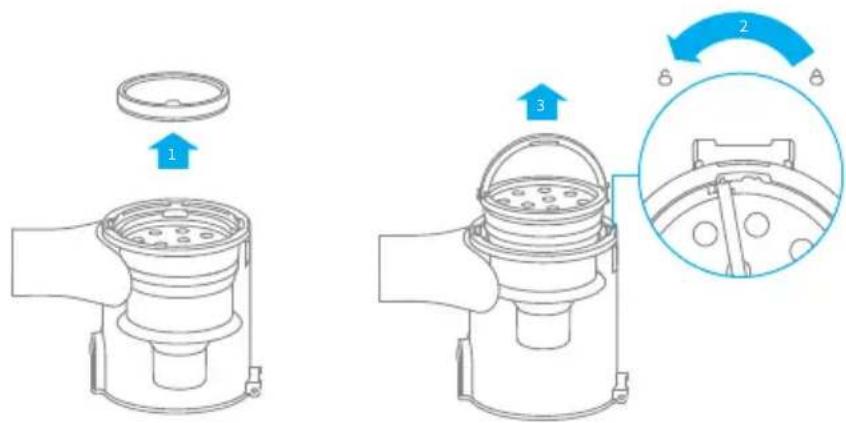
- Rinse the cyclone assembly, pre-filter and dust cup until they are clean. After washing, air dry at least 24 hours.
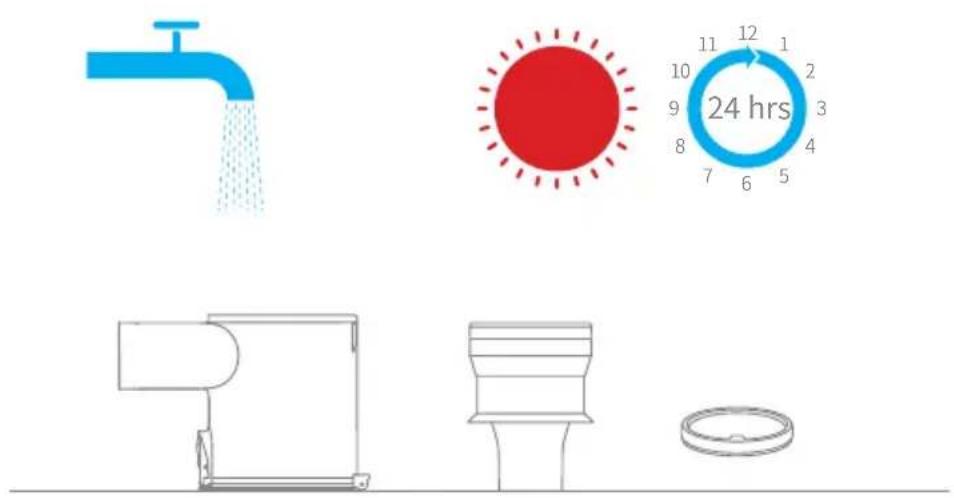
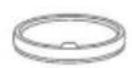
Pre-filter Dust Cup Cyclone Assembly
Note:
It is recommended to clean the dust cup once every month.
- It is recommended to clean the pre-filter at least once every 3 months and the cyclone system at least once every 6 months.
Care & Maintenance
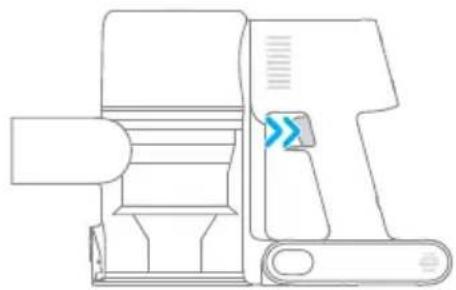
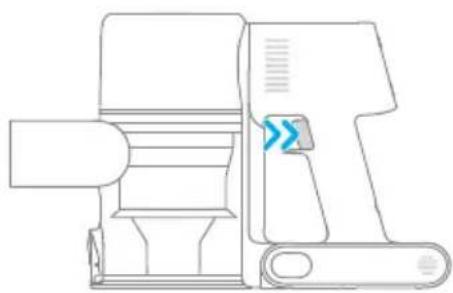
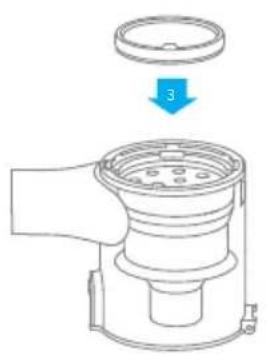
Installing the Dust Cup, Pre-Filter, and Cyclone Assembly
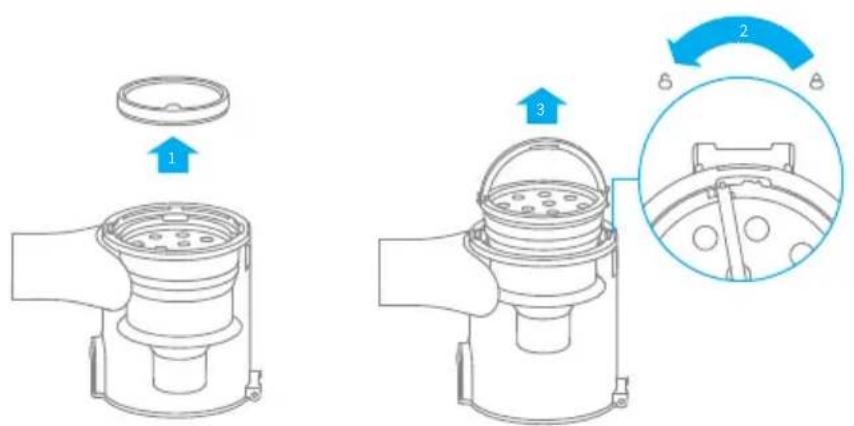
- Insert the cyclone assembly vertically into the dust cup, and make sure that the handle of the cyclone assembly line up with the slot on the left side of the dust cup. Turn the handle clockwise until it locks, then flip the handle down.
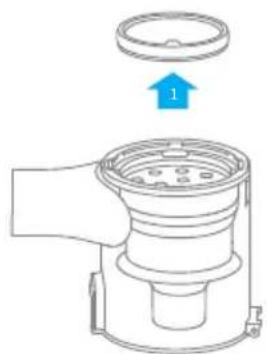
- Place the pre-filter with its front side facing up into the cyclone assembly.
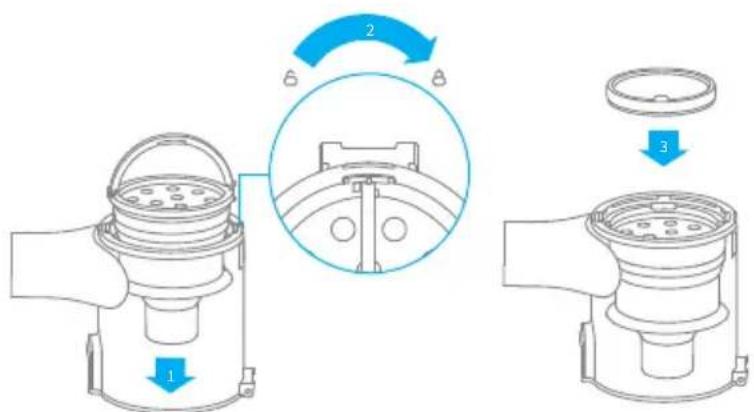
- Slightly tilt the dust cup so the slot aligns with the clip on the vacuum. Then gently push the dust cup until it clicks into place.
Care & Maintenance
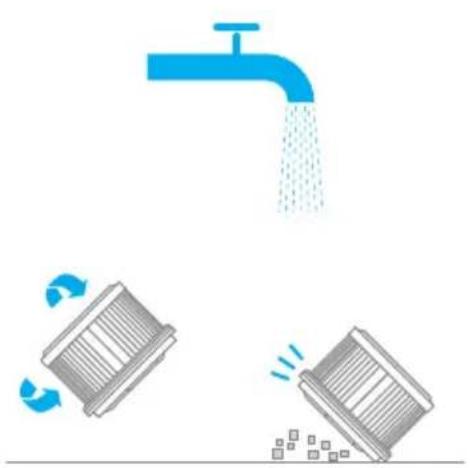
Cleaning theFilter
It is recommended to clean the filter once every 4 to 6 months.
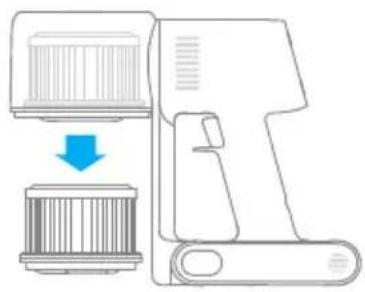
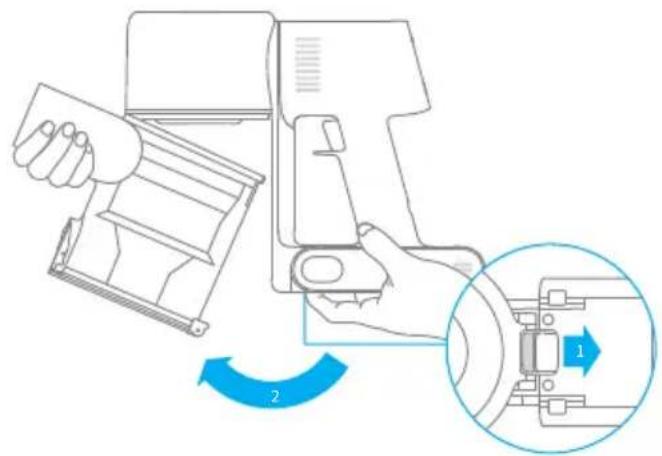
- Remove the dust cup as shown in the figure.

- Remove the filter from the vacuum by pulling it down in the direction shown in the figure.
-
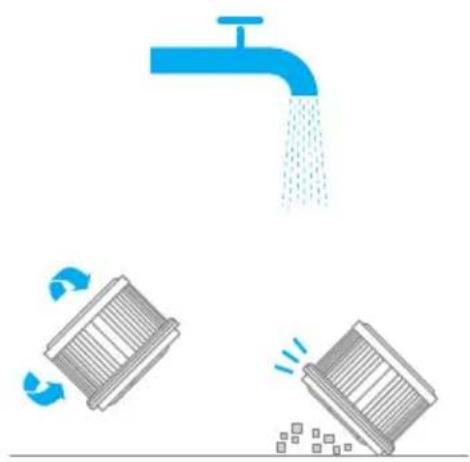
Clean the filter with clean water. Make sure you rotate the filter 360^ to thoroughly and remove all dust caught in the filter. Lightly tap the filter several times to remove any excess dirt.
-
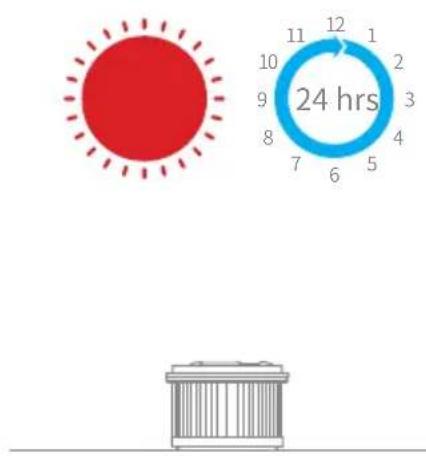
Allow the filter to air dry for 24 hours.
Note:
- Only use clean water to wash the filter. Do not use detergent.
- Do not attempt to clean the filter with a brush or finger.
Care & Maintenance
Installing theFilter
- Insert the filter into the vacuum and gently press down, as illustrated.
- Reinstall the dust cup.

Care & Maintenance
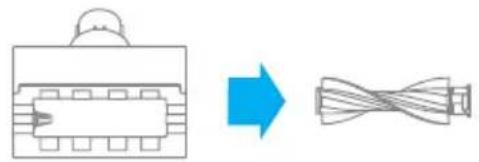
Cleaning the Smart Multi-Brush Bar
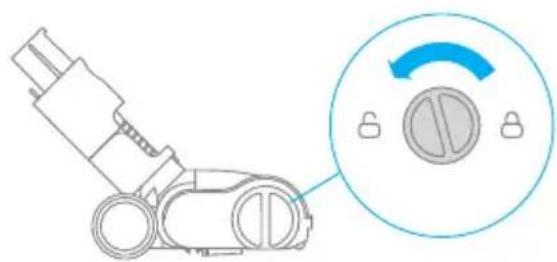
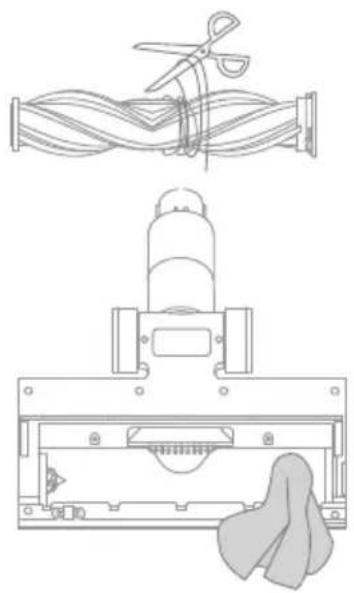
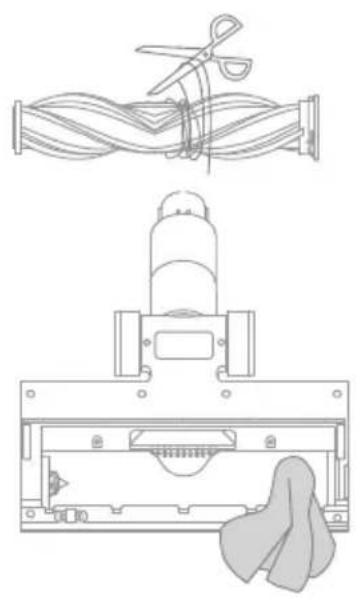
- Turn the lock counterclockwise until it stops, then remove the roller brush from the smart multi-brush bar.
- Use scissor to cut off the hairs and fibers that stick on the roller brush. Wipe the dust from the notch and transparent cover with a dry cloth or paper towel. Thoroughly dry before use.
-
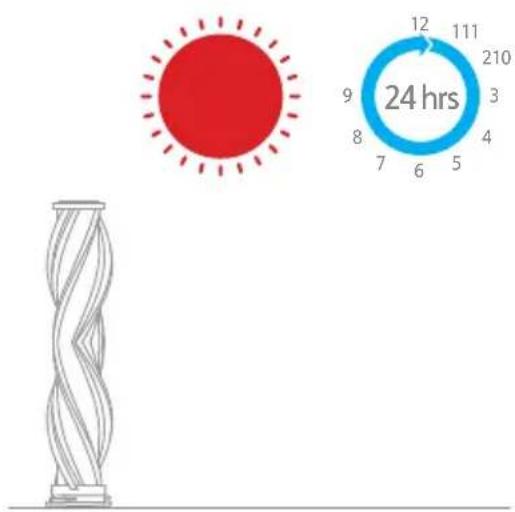
When it is dirty, rinse the roller brush with clean water until it is clean.
-
Stand the roller brush upright for at least 24 hours until it is fully dry.

Care & Maintenance
Cleaning the Mini Electric Brush
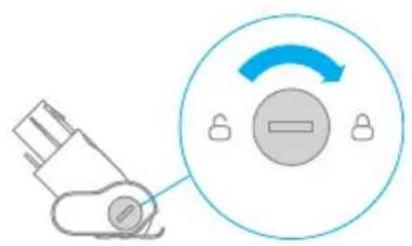
-
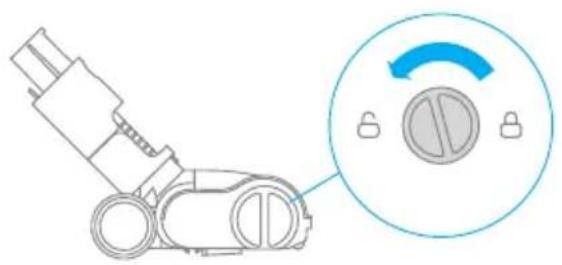
Use a coin as illustrated to rotate the lock counterclockwise until you hear a click.
-
After unlocking the roller brush, remove it from the mini electric brush, then rinse and clean the brush head.


-
Stand the roller brush upright in a well-ventilated area for at least 24 hours until it is fully dry.
-
Once the mini roller brush is dry, reinstall it by following the disassembly steps in reverse.

Care & Maintenance
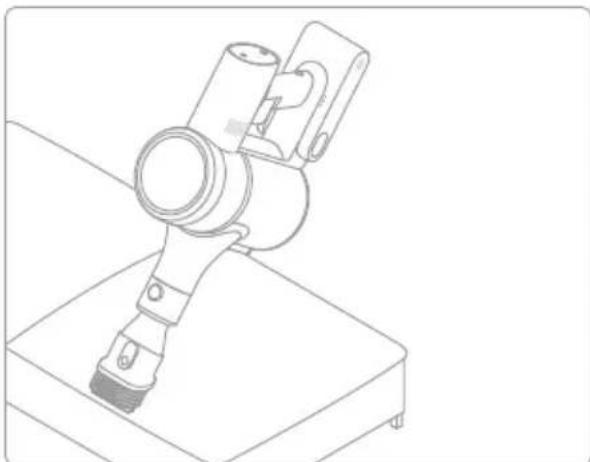
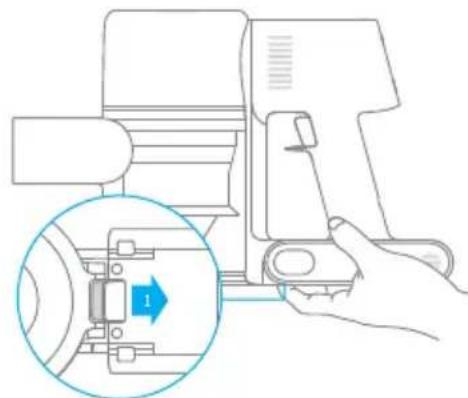
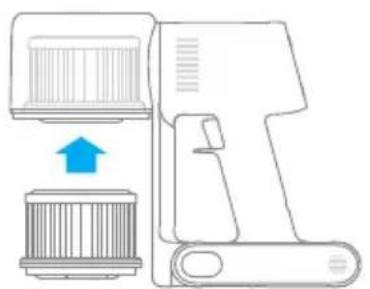
Battery Pack
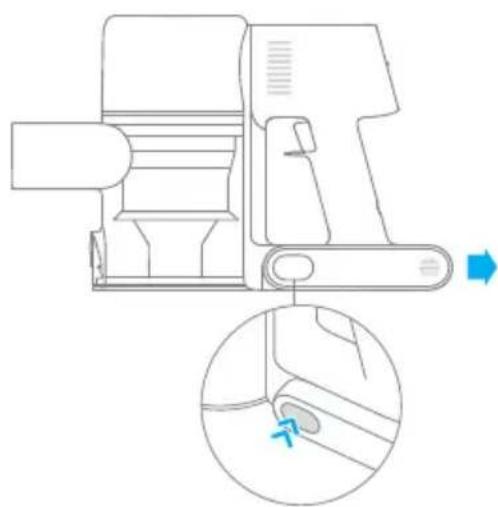
The vacuum contains a removable rechargeable lithium-ion battery pack which has a limited number of recharge cycles. After extended use, the battery pack may no longer hold a charge. If this happens, it means the battery pack has reached the end of its life cycle and needs to be replaced.
-
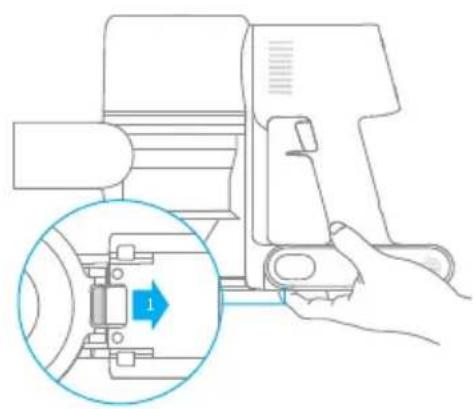
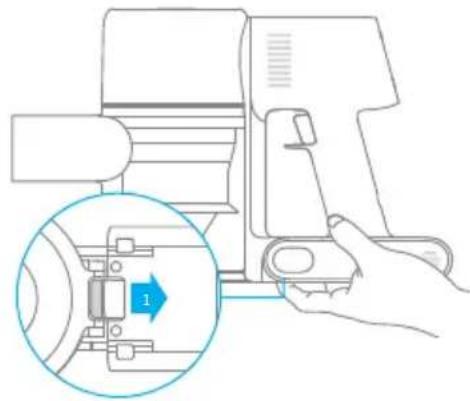
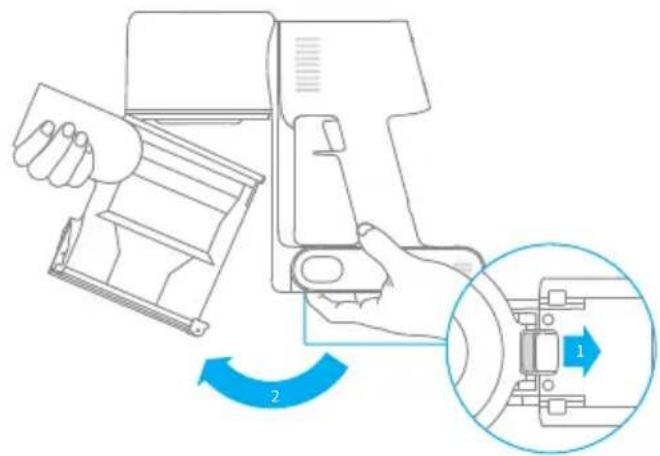
Press down the battery pack release button and slide the battery pack to the right, as illustrated, to remove it.
-
Install the new battery pack.
Specifications
| Vacuum Cleaner | |||
| Model | VTE1 | Charge Voltage | 30 V --- |
| Rated Power | 450 W | Rated Voltage | 25.2 V --- |
| Charging Time | Approx. 4 hours | Rated Capacity 2800 mAh | |
| Mini Electric Brush | |||
| Model DM002 | |||
| Rated Power | 20 W 25.2 V | Rated Voltage | --- |
| Smart Multi-brush Bar | |||
| Model | ASF1 | ||
| Rated Power | 40 W 25.2 V | Rated Voltage | --- |
| Charger | |||
| Model | YLS0251B-E300080 (EU) / YLS0241A-U300080 (UK) / YLS0241A-A300080 (AU) | ||
| Input | 100-240 V~50/60 Hz 0.8 A max | ||
| Output | 30 V --- 800 mA | ||
| Rechargeable Lithium-ion Battery Pack | |||
| Model | P2032-7S1P-BW/P2032-7S1P-BWA/P2032-7S1P-BWC | Nominal Voltage | 25.2 V --- |
| Rated Capacity | 2800 mAh 70.56 Wh | Energy | |
If the vacuum is not working properly, please refer to the troubleshooting table below.
| Errors Possible Causes | Uses Solutions | |
| Vacuum does not work. | Vacuum is out of battery or low on power. | Fully charge the vacuum, then resume use. |
| Overheat protection mode triggered by a blockage. | Clean the suction openings or air duct. Wait until the vacuum cools down, then reactivate it. | |
| Suction opening or air duct is blocked. | Clear any blockage from suction opening or air duct. | |
| Weak suction force. | Dust cup is full and/or filter assembly is clogged. | Empty the dust cup and clean the filter assembly. |
| Attachment is blocked. | Clear any blockages in the attachment. | |
| Motor makes a strange noise. | Main suction opening or extension rod is blocked. | Clear any blockage in the main suction opening or extension rod. |
| The first indicator is red after turning on the vacuum. | Battery pack is damaged. | Please contact after-sales service department to arrange maintenance. |
| The first indicator blinks red when charging the vacuum. | The charger is incompatible. | Only use the original charger to charge the vacuum. |
FAQ
| Errors Possible Causes Solutions | ||
| The battery indicator does not light up when charging. | The charger does not plug into the vacuum well. | Check whether the charger is properly plugged into the vacuum. |
| The battery is charged and switches to Sleep Mode automatically. | The vacuum runs normally. | |
| If the problem persists after ruling out the above two possibilities. | Please contact the after-sales service department for maintenance. | |
| Charging too slow | Battery temperature is too low or too high. | Wait until the battery's temperature returns normal, then resume use. |
The lithium-on battery pack contains substances that are hazardous to the environment. Before disposing of the vacuum, please first remove the battery pack, then discard, or recycle it in accordance with local laws and regulations of the country or region it is used in.
Troubleshooting
If the vacuum is not working properly, the screen display will show an error message. Please refer to the troubleshooting table to find your solution.
| Error Icon Error Message Solutions | |
| Battery overheating Please wait and continue to use after motor temperature is normal. | |
| Roller brush stuck Refer to the maintenance guide [Cleaning the Smart Multi-Brush Bar] section to clean the fiber material and hairs wrapped around the roller brush. | |
| Air duct blocked Check whether the dust cup, filter, pre-filter, extension rod, and smart multi-brush bar are blocked. Refer to the maintenance section to clean. Allow dry thoroughly before reuse. | |
| Error Please contact our after-sales service department for maintenance. |
WEEE Information
All products bearing this symbol are waste electrical and electronic equipment (WEEE as in directive 2012/19/EU) which should not be mixed with unsorted household waste. Instead, you should protect human health and the environment by handing over your waste equipment to a designated collection point for the recycling of waste electrical and electronic equipment, appointed by the government or local authorities. Correct disposal and recycling will help prevent potential negative consequences to the environment and human health. Please contact the installer or local authorities for more information about the location as well as terms and conditions of such collection points.
Sicherheitshinweise
Tuyau couple extensible
INHdkaTOp COCTOHHnA AKKymyIaTopa
BoBpeM3apAaKTPnMNraOuix
HnDnKaTopaNocJeIOBaTeIbHO MeHJOTc
HaNOCToAHbI CBeTOBO CNrHaB
3aBnCIMoCTnOTcoCToHn6aTapeu.Ppn
PONHom 3apAde aKKyMylaTopa BCE TpN
MNraOuix INDnKaTopa 6ydyT CBETNTbc
NOCToAHHO.
PpimmeaHne.
Yepe3 5 MInHyT nOcNe OKOHuaHna 3apAdkn Hndnkatop NoracHeT, a NbIeoc npeyIeT B3Heproc6eperaUoN peKIM.
"YMHa" MHOrOfoyHKcNoHaJIbHaJ 电Tka
NcnoJb3yETcIJaOuHCTKHaNoJIbHbIX NOKpbITn,HaPpIMep MpaMopa, NNNTKNIOBPOBCKOPOTKmBOPCOM. B aBTOMaTnueckOMpeXnme nblncoc MoKeT aBTOMaTnueckn peYnIpOBaTb Cnly BCacbIBaHnB 3aBNCMOCTn OT Tnna IOBepxHOCTn.
3JIeKTPnueecka MmHn-TeTka
HcnoJb3yeTcIy6OpKn rpr3n, WepctN KINBOTHBIX N dpyrnx CTOIKNX 3aqr3HeHn Ha DnBaHe, MaPace I dpyrnx TkaHeBbIX NOBepxHOCTax.

PpmeHne."ymna MHOyHKnOHaBHaJtKa MoKeT KpeNTbCHeNoCpeDCTBeHHo Ha nbIeoc.
PpimmeaHne. He peKomeHdyetcnaNoIb30BaTb nbIeCoc dny6OpKnIOBepxHocTe,Ha KOTopbIX MoryTocTaTbC 3aueKNu capaNNbl (HaNP.
UeTKa "2B1"
NcNoIb3yeTcA DnO ONUCTK N ITOp, KlaBnaTypbI,NOTOLOHOn PINTKn,CAHOHa ABTOMO6NJ,KOeINHbIX CTONIKOB N T. D.
HacadkaIJIaIeIeI
NcNoIb3yeTcIy6OpKnByrIaxDBepei, OKOH,CTeH,JIecTHnUblIpyrnxy3Knx IOBepxHOCTeI.


ПравILA заимлуataци узdenя
yDInHHTeBHaTpy6Ka
NcnoIb3yeTcA Iy6OpKn ByrIax DBepe, OKOH, CTeH, NecTHNuI IN dpyrnx y3Knx NOBepxHOCTeI.


Приимechани.
Bcnyae 3aklnnBaHna KaKoJ-lno Bpaaiouecra DeTann NbIeCoc MoKeT ABTomatNueCKn OTKnIOHTbcra. Y6epnte 3actpRbWne NOCTOPOHHe PpeMeTbI IN npOdoJIkTe y6opky.
B cnlyae neperpeBa aKKymyIaTopa nbIeocac ABTomatnueckn OTKJIouHTcra. noka TemnepaTpa aKKymyIaTopa HopmaIu3yeTcra, a 3aTe npoJOnknte y6Opky.
YxOДиpeMOnT
MepbI npedoctopoxhoctn
- IcnoIb3yIte opuHnHaJIbHbIe 3aIyactN, B npOTUBHom clyuae rapaHTnHoe 06cnyKuBaHne 6ydet HeIOCTynHO.
Bcnyae 3acopeHnA hnaKn nn "ymHO" MHOROyHKuHaJbHOJ ueTK np6oT-tnleocm MoKet BblouHTbcra cpa3y nocne 3anycka. Ounchte 3acopeHHbIe detannped NOBTOPHbIM 3anyckom.
- Ecni Bbl He nIaHpyeTe nCIOb3OBA Tb nbIeCoc B TeueHne dIITbHoro nepnoDa BpeMeH, IOnHOCTbU 3apAHTe eRO, OTKIOUHTe OT pO3ETKN IIOJXHTe Ha xpaHeHne B npoxlanHom MeCTe C Hn3KOB bIaXHOCTbU BdaII ON TnpaMbIX cONHeuHbIX Lyuei. Bo n36exKaHne n36bIToOH pa3pIckn aKKymJIaTopa 3apXaHTe nbIeCoc KaK MInHMym pa3 B Tprn Meca.
Ounstka nbilecoca
PpOtpnTe nblncoc mKo cyxO TpIko.
OuNCTKa KOHTeHepa IJIy IIJI,ΦIbTpappeBapntelbHO OUInCTKn N CIKIOHOro 6Joka
EcnKoHTeHep nIy nIy 3aOnJHeH Do OTMeTK "MAX", 3ofoKeKTHBHOCTb pa6OtblnIEcoca MoXeT 3HaunTeIbHO CHN3NTbcra. Iy OITmAmJIbHOJ pa6Otbl CBOeBpeMeHHO OuIaIte KOHTeHep dIy nIy. IpeD OUnCTKOHTeHepa y6eINTEcb, YTO nbIeCOCOTKnIOueH OT PO3ETKN, I He HaJIMaIte KHNky "Pync".
- Haxmte KhoNky ChTnHxHne KpbIuKoHTeHepa Iny PbIy B HappaBHeHH, 0603HaueHHom CTpeJIko, a 3aTeM OTKpoITe KpbIuKy N 3BLeKeNTe CoepXHMoe KOHTeHepa.

yxoДиpeMoHT
- HaKMnTe KhoNky N3BneueHnja KOnTeHepa Iny PbIy B HApPaBHeHn, 6o3HaueHHom cTpeIko, KaK Poka3aHo Ha Pnc.1, a 3aTeM N3BneKeNTe KOHTeHep Iny PbIy N3 PbIeCoca, KaK Ha Pnc.2.
- Chauana chnmte pntp npdBapntbHoi ounstkn, nobepnTe pyky uKIOHHoro 6loka npotuBaocBOI cTpeKN do ynpa, a 3aTeM n3BLeKNTe uKIOHHbI 6LOK.
yxoI npemOHr
- TuaTeNbHO npOMoIe fHbTp npedBaPHTeNbHO OUHCTKN, UKLOHbI 6LoK IN KOHTeHep dIa IbIIN BODO, a 3aTeM OTIOXHTe MHHmym Ha 24 Yaca dJa IOnHO npocuIKn.


KoHTeHepIyIyIuNcIKIOHHbI6JOK
UcTaHOBka KOHTeHepa IJIy IIbIIN, PnIbTpappeBapntbHoOuNCTKN NcIKLoHHoro 6Joka
- BCTaBbTe zHKIOHbI 6Iok BepTKKaIbHO B KOHTeHep dIy IbIIN TaK, YTO6bl pyUka ZIKLOHO 6Ioka coEHHIacb c OTBepCTnem Ha IeBOI CTeHKe KOHTeHepa dIy IbIIN. POBEPHrTe pyKу no yacBOI CTpeNke Do yNopa, a 3aTeM ONyCTnte ee.
- BcTaBbTe ΦnIbTp npedBaPnteHbHO OuNCTKN B uKNoHHbI 6LoK nepeDHei cTOpOH BBepx.
- Clerka haKIOHnTe KOHTeHep dIy IbIIN, yTo6bi erO OTBepCTne coeHNIOcB c ΦNKcaTOPOM Ha IIIEcoCe. 3aTeM OCTopoXHO HaKMITE Ha KOHTeHepOB B HAnpaBJIeHN, O6O3HaueHHOM CTpeKNo, Do IeNka, yTo6bi 3aBepNTb yCTaHOBky.

YxOДиpeMoHT
OuIncTaΦnIbTpα
PekomeHnyeTcOuIuTaBΦNJIbTpKaJkbIe4-6 MecaIeB.
1.ИЗВЛЕКИТЕ KOHTeHepДЯ ПБИΝΤaK, KaK NOKa3aHoHa pUcYHKe.
2.ДocTaHbTeФиNbTp n3 nbIeCoca DBnKHeHnEM BHN3, KaK NOKa3aHO Ha pncyHke.


3.ПромоITEФильТунстToBODOn, NOBOPaHbAЯФиьТуHa 360°,HTO6bl NOJIHOCTbU YoYdaJIbTH HaKoINBswIocB HEM Nblb.HeCKOЛБko pa3 CnerKa NOCTyUHTeNoФиьТу,HTO6bl Y6paTb N36blTOK rpr3N.
4.ПорсушиTeФильТВ TeueHne KaK MHHmym 24 yapocB.
Приимechаиме:
- Ponombyaite ΦиьтTOьko YnCTOи BODо. He nCnoJIb3yIte YnCTaIue cpeIcTBA.
He ouuzaIte fIJIbTp 8eTKo nn nIaIbIaMn.
yXoI npMoHT
YcTaHOBKaΦnJIbTpα
- BCTaBbTe ΦnIbTpВ nbIeCoc n CJIeRka HaxMITE Ha HeRo, KaK NOKa3aHo Ha PnCyHKe.
- YctaHOBNTe KOHTeHep IJIy IIIN Ha MeCTO.

YxOДиpeMoHT
OuNCTka "ymHOJ" MHOrofoyHKUHOHaJIbHOJ 电ETKn
YcTpaHenne HeicnpaBHOCTeI
Bcnyae HencnpaBHOCTn pa6oTbI nbilecoca Ha dncnlee nOBuTcN HOpMaun O npo6JeMe. BnHmamateJIbHo npouHTaIe yka3aHHyU INHOpMaunIO N3yuNTe Ta6JNuY HeNCnpaBHOCTe Ira ee ycTaPHeHn.
jai jai iiai 123 plaii pi kai ai no sll lcls jiaia jia jia jia jia jia jia jia jia jia jia jia jia jia jia jia jia jia jia jia jia jia jia jia jia jia jia jia jia jia jia jia jia jia jia jia jia jia jia jia jia jia jia jia jia
Jabaln jai 15
ailll i
e jg 1 g aal 1 1 1 1 1 1 1 1 1 1 1 1 1 1 1 1 1
ii 100
aill jaiil 1
aill 1 a
g jll g jlll l jlll g jlll g jlll g jlll g jlll g jlll
j 1
Lalai 1a 1i jil
jll jll lal ng nnnnnaa aasaa aaii aai iie
a 1
y
g jai jai gai jai gai jai gai jai
a a a a a a a a a a a a a a a a a a a a a a a a a
i 1
a 1
aaii i 1
aill sall aaiinl ie gll aal slal
a a a a a a a a a a a a a a a a a a a a a a a a a a a a a a a a a a a a a
yjlll jlll jlll jlll jlll jlll jlll jlll jlll jlll jlll jlll jlll
J 1
.
Jia jiall plzilu paas qidll 1
YLS0251B-E300080 (EU)/ YLS0241A-U300080 (UK)/ YLS0241A-A300080 (AU)
y
P2032-7S1P-BW/P2032-7S1P-BWA/P2032-7S1P-BWC
1
a1 = 23a0


aill jao a y g ddoia pcl 1 2 2

2 2 2 2 2 2 2 2 2
Joo 12
jzssll jwjj
a

Jg 100000000000000000000000000000000000000000000000000000000
a111111
i 3 3 3
aaii 15 no jiaacnss
ai + 1bi = bi - 1bi
gall gll gll gll / gill / gill gill gill gill gill gill gill gill gill gill gill gill gill gill gill gill gill gill gill gill gill gill gill gill gill gill gill gill gill gill gill gill gill gill gill gill gill gill gill gill gill gill gill gill gill gill gill gill gill gill gell
aLxo

S APQ = S AOB + S_ QPQ
y
12n j
Jaiil aai gai jy Jai jai jai jai jai jai
Lioic g aaiy jay yaiy aiil aill ayll yaii 100

4b - 2a = 0
jall jai jai jai jai jai jai jai jai jai jai jai jai jai jai jai jai jai jai jai jai jai jai jai jai jai jai jai jai jai jai jai jai jai jai jai jai jai jai jai jai jai jai jai jai jai jai jai jai jai jai jali jali jali jali jali jali jali jali jali jali jali jali jali jali jali jali jali jali jali jali jali
a
aaii i 1
aal lal g: jyj yll
Jaiuall Jaoell g: a jilal lal
1
Caiuai liuyi jie
oJoo 1yJySol
alal jlae g aaiy1 clll gaaagg 1w y
Jaxi 15
y j 1 y
joll alg 1go zcbw ic golalily xaiy y:abdo. ()(yjll)
jie 1i jao 1y 45 1s jil
4
12 2
aill gllg 1y j Jia o jiaall sLoYi aaiil auiio. alldll jjdl
cayy g jilall yg jilial l kaii i kaii aolio
aai aai
aalwglg jzglg galsg gglg jjglg jjglg jslg j

a
ailll llll
Jl Jn Jnll cly Jnll Jnll pnni Jnll 1 n nn n nn n nn n nn n nn n nn n nn n nn n nn n nn n nn n nn n nn n nn n nn n nn n nn n nn n nn n nn n nn n nn n nn n nn n nn n nn n nn n nn n nn n nn n nn n nn n nn n nn n nn n nn n nn n nn n nn n nn n nn n nn n nn n nn n nn n nn n nn n nn n nn n nn nnnn
aieiig 1
gagaialllllglsgjslglj
"MAX" 1111111111111111111111111111111111111
1
Jai jaii ai ai jy g aai oai jai jaii ay i jai jaii ai ai j! 1 Jai i jai yas L.2
- US . SOD = SOD 与 S 同边
3
S OBC = S BOC + S_ CBA
a 25 jil abill ay aai iiai lally jll g aig al bilil ciisag jil jall Jie 4. JolSll cill jialjIJIe ae Lw 24
jilal jilal gao aLg yolol pll
1 6 J5 J5 J5 J5 J5 J5 J5 J5 J5 J5 J5 J5
aagaae aae
a 1
2
3

i
4-6 5
J 2
.0000 1

Jal 24 0al 1 gll jla jla 4 JalSll
n nn nnnn nnnn nnnn nnnn nnnn nnnn nnnn nnnn nnnn nnnn nnnn nnnn nnnn nnnn nnnn nnnn nnnn nnnn nnnn nnnn nnnn nnnn nnnn nnnn nnnn nnnn nnnn nnnn nnnn nnnn nnnn nnnn nnnn nnnn
IN 100000000000000000000000000000000000000000000
107 197 197 197 197 197 197 197 197 197 197
non, nnnn nn nnnn nn nnnn nn nnnn nn nnnn nn nnnn nn nnnn nn nnnn nn nnnn nn nnnn nn nnnn nn nnnn nn nnnn nn nnnn nn nnnn nn nnnn nn nnnn nn nnnn nn nnnn nn nnnn nn nnnn nn nnnn nn nnnn nn nnnn nn nnnn nn nnnn
n nn nnnnnnnnnnnnnnnnnnnnnnnnnnnnnnnnnnnnnnnnnnnnnnnnnnnnnnnnnnnnnnnnnnnnnnnnnnnnnnnnnnnnnnnnnnnnnnnnnnnnnnnnn
n nnnn nn nnnn nnnnnnnnnnnnnnnnnnnnnnnnnnnnnnnnnnnnnnnnnnnnnnnnnnnnnnnnnnnnnnnnnnnnnnnnnnnnnnnnnnnnnnnnnnnnnnnnnnnnnnnnnnnnnnnnnnnnnnn
n nn nnnn nnnnnnnnnnnnnnnnnnnnnnnnnnnnnnnnnnnnnnnnnnnnnnnnnnnnnnnnnnnnnnnnnnnnnnnnnnnnnnnnnnnnnnnnnnnnnnnnnnnnnnnnnnnnnnnnnnnnnnnnnnn
NINU 10701111N
.
YLS0251B-E300080 (EU)/YLS0241A-U300080 (UK)/YLS0241A-A300080) 7777777777777777777777
n (P2032-7S1P-BW/P2032-7S1P-BWA/P2032-7S1P-BWC) nwnn nnwnn
ninn
D

nnnnn nn nnnn 2nnnnn
1

1 2 nonXy7 (X2 yX 2
nnonnnn n9
nun nn nnn
nannnnn nn nnnn
Tonn nn nnnn nn nn nn nn nn nn nn nn nn nn nn nn nn nn nn nn nn nn nn nn nn nn nn nn nn nn nn nn nn nn nn nn nn nn nn nn nn nn nn nn nn nn nn nn nn nn nn nn nn nn nn nn nn nn nn nn nn nn nn nn nn nn nn nn nn nn nn nn nn nn nn nn nn nn nn nn nn nn nn nn nn nn nn nn nn nn nn nn nn nn nn nn nn nn nn nn nn nn nn nn
nwn
n nn nnnn nnnn nnnn nnnn nnnn nnnn nnnn nnnn nnnn nnnn nnnn nnnn nnnn nnnn nnnn nnnn nnnn nnnn nnnn nnnn nnnn nnnn nnnn nnnn nnnn nnnn nnnn nnnn nnnn nnnn nnnn nnnn nnnn nnnn nn
:
XINNINJINNNNNNNNNNNNNNNNNNNNNNNNN
1000000000000000000000000000000000000000000
Pn
D


10


100
D'ITIN
1 2 nonxnyon nn
nno nnnn7 nn 1 n2 nnonnnn
T, 17n Tn nnn nn nnn nnn nnn nnn nnn nnn nnn nnn nnn nnn nnn nnn nnn nnn nnn nnn nnn nnn nnn nnn nnn nnn nnn nnn nnn nnn nnn nnn nnn nnn nnn nnn nnn nnn nnn nnn nnn nnn nnn nnn nnn

24 7n7 nix nix n, n'ovn nn yo" nny tv npn nn pon ,177n qin nx 190w .nirn7 niu
67 n 67n 67n 67n 67n 67n 67n
177n non nni ton nn nnn
TnDn no n 17y n qin y n Tn n 17n nn nn nn nn .1 nnn nn nn nn nn nn nn nn nn nn nn nn nn nn nn nn nn nn nn nn nn nn nn nn nn nn nn nn nn nn nn nn nn nn nn nn nn nn nn nn nn nn nn nn nn nn nn nn nn nn nn nn nn nn nn nn nn nn nn nn nn nn nn nn nn nn nn nn nn nn nn nn nn nn nn
1777777777777777777777777777.2

7nn nn 7n7.7nn nn 7nn n nn n nn n nn .3 ."y" yynn nn) nnyy

n 100n 177
TINN TINN NINN 7n nn nnn
inun n nn nn nn nn .2
1

niv 24 nnnn np7 nn .4
NINI. D'Onn nn n 173
72nn 7n non 360- n nn dion
D'vN 190n nn nn nn n 190 .n nn nn


:171n
n nn nnnnnnnnnnnnnnnnnnnnnnnnnnnnnnnnnnnnnnnnnnnnnnnnnnnnnnnnnnnnnnnnnnnnnnnnnnnnnnnnnnnnnnnnnnnnnnnnnnnnnnnnnnnnnnnnnnnnnnn
npo nnn
.2
1
nannnnn7,nnnynnnnon

Dn nn nn nnn 17nn 177
1000 2
y 1
Nn nnn nn nn nn nn nn nn nn nn nn nn nn nn nn nn nn nn nn nn nn nn nn nn nn nn nn nn nn nn nn nn nn nn nn nn nn nn nn nn nn nn nn nn nn nn nn nn nn nn nn nn nn nn nn nn nn nn nn nn nn nn nn nn nn nn nn nn nn nn nn nn nn nn nn nn nn nn nn nn nn nn nn nn nn nn nn nn nn nn nn nn nn nn nn nn nn nn nn nn nn nn
mIX 17n'7n nn nnnn 3

nunnnnnnnnnnnnnnn
1900 1907, nwnn nn nn nn nn nn nn nn nn nn nn nn nn nn nn nn nn nn nn nn nn nn nn nn nn nn nn nn nn nn nn nn nn nn nn nn nn nn nn nn nn nn nn nn nn nn nn nn nn nn nn nn nn nn nn nn nn nn nn nn nn nn nn nn nn nn nn nn nn nn nn nn nn nn nn nn nn nn nn nn nn nn nn nn nn nn nn nn nn
7y 107 77 nn yon nn 1 77n 7x uynu ty |ywn |


ninnnnnnnnnnnnnnnnnnnnnnnnnnnnnnnnnnnnnnnnnnnnnnnnnnnnnnnnnnnnnnnnnnnnnnnnnnnnnnnnnnnnnnnnnnnnnnnnnnnn
111111111111111 3 XINu Tu Ninan 24 2n n nn

nion n
y 77 77 77 77 77 77 77 77 77 77 77 77 77 77 77 77 77 77 77 77 77 77 77
nnon7,nnnnnnnnnnnnnnnnnnnnnnnnnnnnnnnnnnnnnnnnnnnnnnnnnnnnnnnnnnnnnnnnnnnnnnnnnnnnnnnnnnnnnnnnnnnnnnnnnnnnnnnnnnnnnn

| 30 | VTE1 | ||
| 25.2 | 450 | ||
| mAh 2800 | 4.5 | ||
| 30 | |||
| DM002 | |||
| 25.2 | 20 | 20 | |
| ASF1 | |||
| 25.2 | 40 | 40 | |
| YLS0251B-E300080 (EU) YLS0241A-U300080 (UK) YLS0241A-A300080 (AU) | |||
| 0.8 ~ 100-240 | |||
| 0.8 ~ 30 | |||
| 25.2 | mAh 2800 | ||
n nn nnnn nn nnnn
y 19
| ### | ||
| ### | ### | ### |
| ### | ### | ### |
| ### | ### | ### |
| ### | ### | ### |
| ### | ### | ### |
| ### | ### | ### |
| ### | ### | ### |
| ### | ### | ### |
n iDn D'iyh nixu u nixu
Dreame Technology Co., Ltd. and its subsidiaries non nn Dreame .