Supreme Connect 2 - Baby monitors Luvion - Free user manual and instructions
Find the device manual for free Supreme Connect 2 Luvion in PDF.
| Brand | Luvion |
| Model | Supreme Connect 2 |
| Product type | Baby monitor with screen and camera |
| Parent unit screen | 5-inch (12.7 cm) touch LCD screen, 800x480 pixels resolution |
| Camera | 1/4" color CMOS sensor, resolution up to 1280x720, infrared night vision (940 nm, 5 m) |
| Camera viewing angle | 55° (horizontal) |
| Motorized functions | Pan (135° left/right), tilt (90° up, 20° down) |
| Power supply | 5 V DC (power adapter included for parent unit and camera) |
| Parent unit battery | Rechargeable Li-ion, replaceable (use original Luvion battery) |
| Range | Up to 300 m in direct line of sight (camera to monitor), 150 m (camera to WiFi router) |
| Radio frequency | 2.4 GHz FHSS (between camera and monitor) + 2.4 GHz WiFi (for remote access) |
| Number of supported cameras | Up to 4 cameras |
| Main features | Two-way audio (talk-back), lullabies, sound detection (VOX), digital zoom (x1, x1.5, x2), temperature indicator, night light, feeding countdown timer |
| Remote access | Via SmartBabyCam app (iOS/Android) with WiFi connection |
| Operating temperature | -10 °C to 40 °C |
| Operating humidity | 0% to 85% |
| Housing material | Plastic |
| Package contents | Parent unit, baby unit (camera), 2 power adapters, mounting bracket, wall plugs and screws, user manual |
| Maintenance and cleaning | Clean with a soft, dry cloth. Do not use abrasive products or water. |
| Safety | Keep cords out of reach of children (strangulation risk). Do not use within 1.5 m of the crib. Use only the provided adapters. This is not a toy. |
| Spare parts and repairability | Battery and power adapters available from Luvion dealer. Do not open the product yourself (voids warranty). |
| Warranty | Keep the sales receipt. Contact the Luvion dealer or distributor for warranty issues. |
| Certifications | CE compliant, FCC/CE. Declaration of conformity available at www.luvion.com. |
Frequently Asked Questions - Supreme Connect 2 Luvion
User questions about Supreme Connect 2 Luvion
0 question about this device. Answer the ones you know or ask your own.
Ask a new question about this device
Download the instructions for your Baby monitors in PDF format for free! Find your manual Supreme Connect 2 - Luvion and take your electronic device back in hand. On this page are published all the documents necessary for the use of your device. Supreme Connect 2 by Luvion.
USER MANUAL Supreme Connect 2 Luvion
natural_image
Exterior view of a white LUVION® medical imaging device (no visible text or symbols on the device body)
natural_image
Digital display showing a sleeping baby in white outfit, labeled 'LUVION®' at bottom (no other text or symbols visible)ГОЛЮИ.

HANDLEIDING

INSTRUCTION MANUAL

MANUAL D'INSTRUCTIONS

Delft, The Netherlands
www.luvion.com
VEILIGHEIDSINSTRUCTIES
natural_image
Line drawing of a mechanical device with no visible text or symbolsBaby Unit (Camera) Ouder Unit (Monitor)

natural_image
Technical line drawing of a mechanical component with no visible text or symbolsMontageframe

natural_image
Line drawing of a tablet device with no text or symbols
natural_image
Two identical electrical connectors with wires, no visible text or symbols
Adapters Handleiding Pluggen & Schroeven

EXTRA CAMERA'S
natural_image
Line drawing of a stylized mechanical device with a circular eye and tapered top (no text or symbols)
text_image
1 | 2 3 | 4OVERZICHT OUDER UNIT (MONITOR)

text_image
Diagram of a tablet device with numbered parts labeled 1 through 6 for identification.
text_image
VOORAANZICHT 7 8 9ACHTERAANZICHT
text_image
Labeled diagram of a camera or optical instrument with numbered parts for identification
natural_image
Line drawing of a handheld device with attached electrical outlet (no text or symbols)
LET OP: LAAD DE OUDER UNIT VOLLEDIG OP BIJ EERSTE GEBRUIK.
natural_image
Line drawing of a tablet device with no text or symbols on the screen or body
text_image
LUVIONINSTALLEREN VAN DE BABY UNIT (CAMERA)
natural_image
Technical line drawing of a mechanical component before and after assembly, showing a curved component and a flanged component (no text or symbols)Wall mounted Ceiling mounted
natural_image
Line drawing of a device with a power outlet connected to a base, showing wiring and components (no text or symbols)natural_image
Line drawing of a device with a power plug and cable, showing a mechanical component with an arrow pointing to a port (no text or symbols present)BUITEN BEREIK WAARSCHUWING
natural_image
Illustration of a tablet device with a curved arrow indicating rotation (no text or symbols)MENU SCREENS >
MENU > CAMERA > PAIRING

text_image
VOX OFF Low
text_image
Smartphone screen displaying calendar, clock, and alarm clock icons with Chinese UI labelsMENU > TAALINSTELLINGEN

text_image
Smartphone screen displaying a brightness control interface with battery, speaker, and plus button icons
text_image
ON 18 24 C% F° C°
natural_image
Illustration of a tablet device displaying two icons: a warning sign and a bell, both on a blue screen (no text or symbols)MENU > FABRIEKSINSTELLINGEN

natural_image
Diagram of a device connected to a power outlet with a cable, showing no text or symbols2
text_image
Mobile app screenshot showing a baby photo editing interface with icons for change, navigation, and music playback controls.4
text_image
Mobile phone interface screenshot showing a grid of app icons including VOX, clock, globe, sun, play button, and refresh.5
text_image
PAIR RESET3
text_image
Current password is unsecure. Please change the password. OK Add Device Recornect
text_image
KPNL 4G 11:39 @ 52% Cancel Modify password OK 1.The password At least 0 characters. 2.The password contains at least one uppercase, one lowercase, one digit, and one special character. 3.Available special characters: ~ 50%**() --+(0)().? Old Old Password New New Password Confirm Confirm Password6
text_image
XPN NL 11:42 62% Baby room [Online] 85.6x180 Add Device Recipenced
text_image
Back Edit Device Baby room 9V7YGM2UVJH5ADYW111A Name Baby room Connection Status Online Advanced Setting Smart Link WiFi Settingtext_image
ADD DEVICE
text_image
Device Setting UID: SCAN SEARCH Name: Password: OK CANCEL5
text_image
Modify Password Current password is unsecure, please change the password. OK
text_image
Modify Password 1) The password At least 6 characters. 2) The password contains at least one uppercase, one lowercase, one digit, and one special character. 3) Available special characters: -1@#$%*|_++(0)Y/ Old: New: Confirm: OK Cancel RECONNECT6
text_image
BABY ROOM [Online] $154x48C RECONNECT
text_image
Edit Device BABY ROOM 9V7YGMI2UVJH5AOYW111A Name: BABY ROOM connection status Online AdvancedSetting > Smart Link > NF Setting >FIRMWARE UPDATE - IOS (KIJK VOOR ANDROID OP DE VOLGENDE PAGINA)
text_image
Back Edit Device TDGE TDGEF7588DBUEAKZ111A Name TDGE There is a new version of firmware available for update, do you need to update now? cancel OK WiFi Setting Firmware Update Back Edit Device TDGE TDGEF7588DBUEAKZ111A Name TDGE Connection Status Online Firmware update takes a while... please wait 5-8 minutes... Advanced Setting Smart Link WiFi Setting Firmware Update3
text_image
Back Edit Device TDGE TDGEF7588DBUEAKZ111A Name TDGE Connection Status Connect Fail... File download success! Advanced Setting Smart Link WiFi Setting Firmware Update Back Edit Device TDGE TDGEF7588DBUEAKZ111A Name TDGE OTA update is over, please check if the device is functioning normally! WiFi Setting Firmware Updatetext_image
Edit Device PS3P PS3P@SGLY2019/82111A Note: PS3P Warning There is a new version of firmware available for update, do you need to update now? CANCEL WIFI Setting Promote Upgrade
text_image
Edit Device PS3P PS3P00000000000000000000000000000000000000000000000000000000000000000 Name: PS3P Processing... Smart Lock WiFi Setting Forward Upgrade: 111 2 3 4 5 6 7 8 9 10 11 12 13 14 15 16 17 18 19 20 21 22 23 24 25 26 27 28 29 30 31 32 33 34 35 36 37 38 39 40 41 42 43 44 45 46 47 48 49 50 51 52 53 54 55 56 57 58 59 60 61 62 63 64 65 66 67 68 69 70 71 72 73 74 75 76 77 78 79 80 81 82 83 84 85 86 87 88 89 90 91 92 93 94 95 96 97 98 99 1113
text_image
Edit Device Paste FSP3P None FSP3P Hardware update take a white, please wait 5 minutes! Smart Link WIS Setting Firmware Upgrade
text_image
Edit Device PS3P PSIPSSSLY2TBVB2111A Name: P53P connection status Offline Advanced Setting > Smart Link > WiFi Setting > Firmware Upgrade > OTA update is over, please check if the device is functioning namely!APP MENU
text_image
Back Edit Device Baby room 9V7YGM2UVJH5ADYW111A Name Baby room ↑↓ Connection Status Online Advanced Setting > Smart Link > WiFi Setting >PROBLEEM & OPLOSSING
This device is for indoor use only
Thank you for purchasing the Luvion Supreme Connect 2. Now, you will be able to see and hear your baby (or even more babies/children by using up to three additional camera's) anywhere! In and around the house through the 5" dedicated baby monitor screen and everywhere else through your smartphone or tablet.
Please keep the original dated sales receipt for your administration and proof of warranty. For service and warranty issues, you will always be asked for a copy. For warranty issues, you may contact your Luvion dealer or your local Luvion distributor. More information can be found on our website: www.luvion.com.
This user manual provides you with all information necessary for a safe, pleasant, and easy use of the Luvion Supreme Connect 2. Before use, we ask you to thoroughly read this user manual. We ask for your special attention for the safety instructions below.
LUVION
Delft, The Netherlands
www.luvion.com
SAFETY INSTRUCTIONS
- WARNING: STRANGULATION HAZARD - Keep the power cord out of child's reach! NEVER place camera or cords within 1,5 meter of the crib or playpen.
- Never use extension cords with AC adapters to avoid entanglement.
- Only use the AC adapters provided. Plug into standard household current (100\~240 volts AC) only.
- This product contains small parts that may cause choking. Keep small parts away from children.
- This product is not intended as a toy. Please refrain children from playing with the product.
- This product is not for use as a medical monitor and its use should not replace adult supervision.
- Only use the original supplied power chargers.
- Never use the product in humid conditions or nearby water including near a bathtub, sink, laundry tub, wet basement, etc.
-
This product is intended for indoor use only.
-
It is essential that you check the operating range and condition of the transmitter monitor on initial installation and on a regular basis after that.
- Check reception regularly. Test monitor before use and after changing camera location.
- Only use the product between 10°C - 35°C, keep away from direct sunlight and other heat sources such as radiators and keep the product well ventilated during use.
- Do not attempt to open the product yourself or you may void your warranty, please contact your local dealer or distributor.
Batteries:
- Don't replace the battery by a incorrect type. Only use original Luvion Supreme Connect 2 batteries, using incompatible batteries may cause risk of explosion.
- Fully charge the monitor before first use, to ensure an optimal battery capacity. The battery is fully charged when the charging light, on the side of the monitor, turns green.
- Dispose of used batteries according to the instructions.
CONTENTS OF PACKAGE
The Supreme Connect 2 set includes the following components:

natural_image
Line drawing of a mechanical device with a circular top and base (no text or symbols)
natural_image
Technical line drawing of a mechanical component with no visible text or symbols
natural_image
Front view of a rectangular electronic device with a blank screen and control buttons (no text or symbols)Baby Unit (Camera) Parent Unit (MoMotating Frame

natural_image
Two identical electrical sensors with coiled wires, no visible text or symbols

Power Adapters User Manual Plugs & Screws
EXTRA CAMERAS
The Luvion Supreme Connect 2 supports the use of up to four cameras. Now you can monitor multiple children or rooms at the same time.

natural_image
Line drawing of a stylized camera or sensor device with no text or symbols
text_image
1 2 3 4OVERVIEW OF PARENT UNIT (MONITOR)

text_image
Diagram of a tablet device with numbered parts labeled 1 through 6 for identification.
text_image
FRONT VIEW 7 8 9BACK VIEW
- Antenna Sends & receives data to the baby unit.
- On/Off button Turns the parent unit ON or OFF.
- Microphone The sounds detected by this microphone will be transmitted to the baby unit (camera) when the Talk button is pressed.
- Sound Bar - The LED's indicate the level of sound detected by the baby unit. The amount of LED's that are lit up indicate the intensity of the detected sound.
- DC in Connect the included DC 5V power adapter to power and/or charge the parent unit.
- Screen 5" Touch Screen LCD.
- Battery compartment This compartment allows the battery to be replaced. Only use original Luvion batteries.
- Foot Enables you to position the parent unit on a fl at surface.
- Speaker Produces the sound from the baby unit.
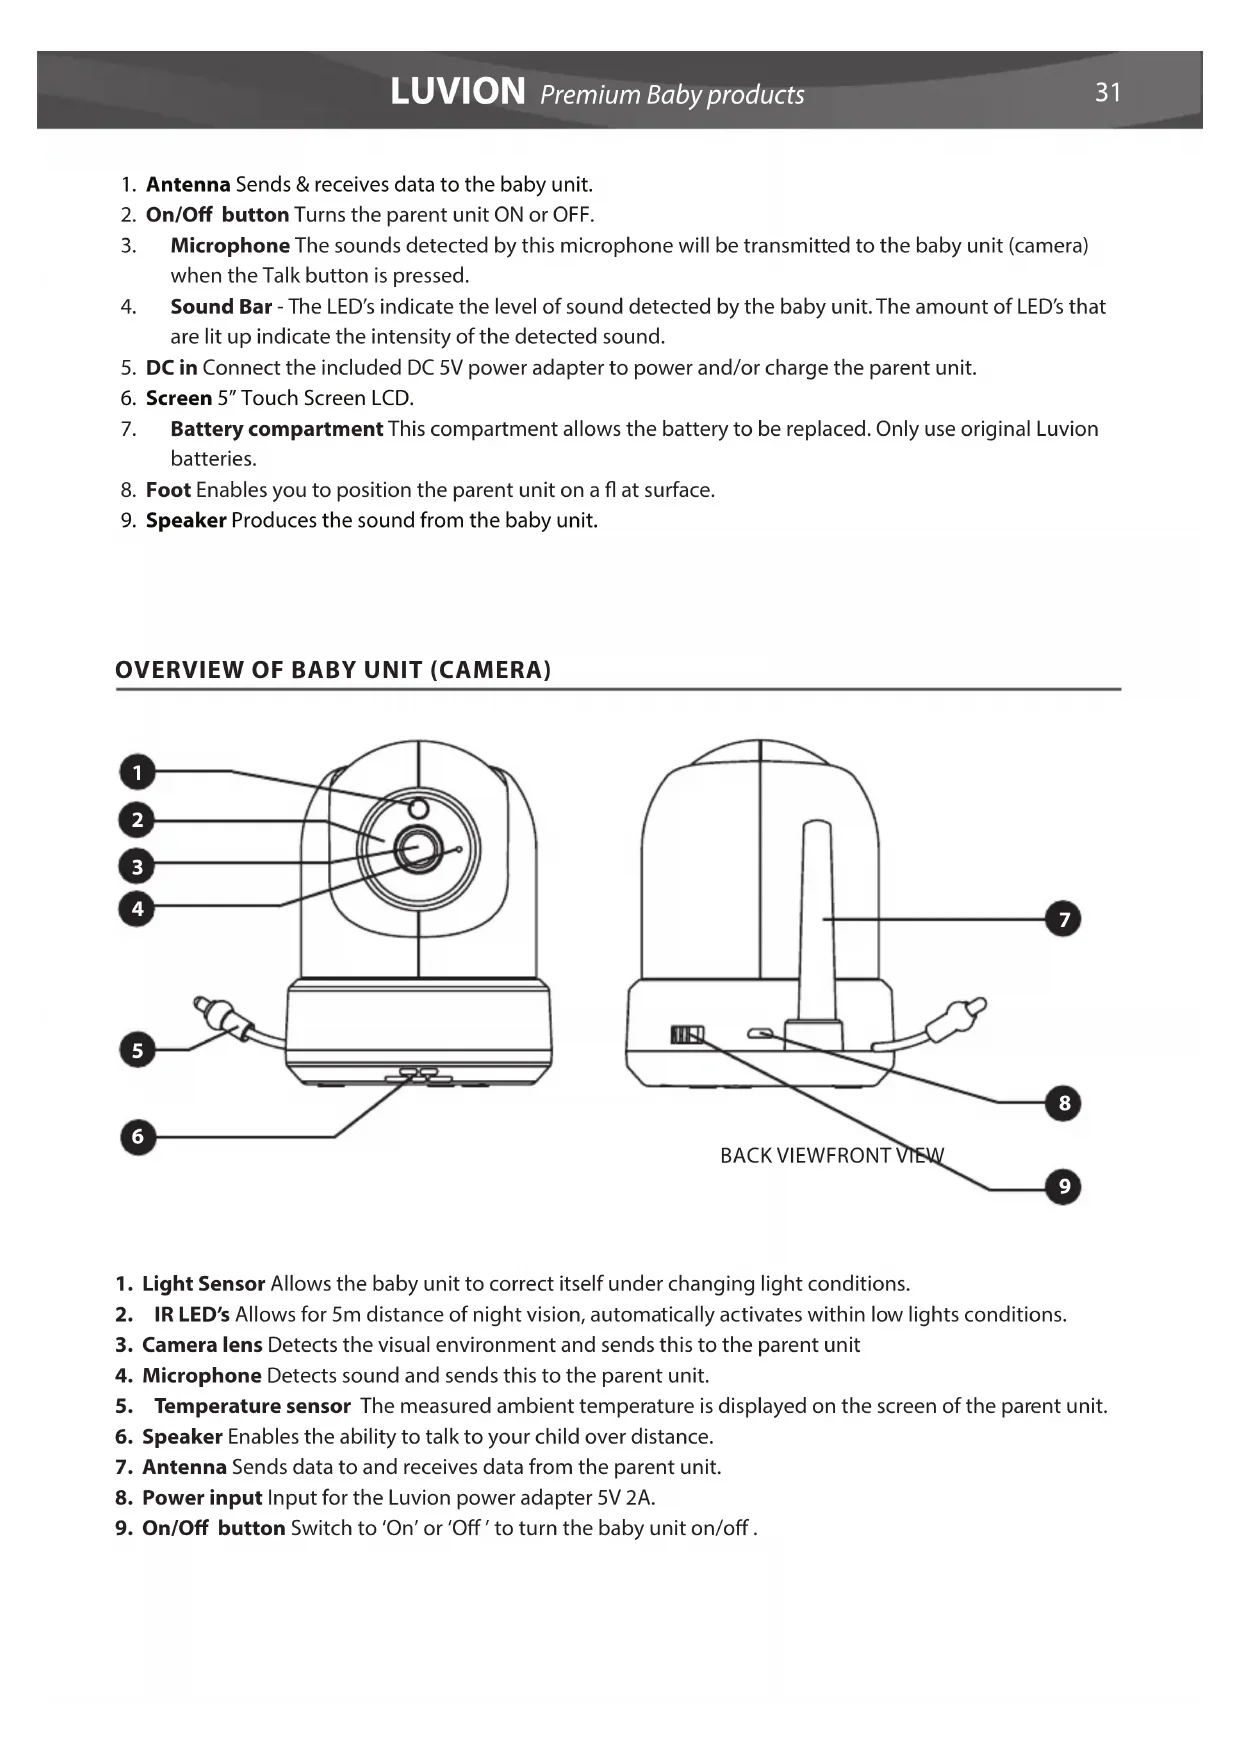
OVERVIEW OF BABY UNIT (CAMERA)

text_image
Labeled diagram of a camera or radar device with numbered parts for identification
text_image
BACK VIEWFRONT VIEW 7 8 9- Light Sensor Allows the baby unit to correct itself under changing light conditions.
- IR LED's Allows for 5m distance of night vision, automatically activates within low lights conditions.
- Camera lens Detects the visual environment and sends this to the parent unit
- Microphone Detects sound and sends this to the parent unit.
- Temperature sensor The measured ambient temperature is displayed on the screen of the parent unit.
- Speaker Enables the ability to talk to your child over distance.
- Antenna Sends data to and receives data from the parent unit.
- Power input Input for the Luvion power adapter 5V 2A.
- On/Off button Switch to 'On' or 'Off' to turn the baby unit on/off.

text_image
10 11 12BOTTOM VIEW
- Pairing button Establishes a new connection between the baby and parent unit during the pairing process. Pairing should be used when installing an additional camera or when the monitor does not recognize the baby unit. Consult page xx for more information on the pairing process.
- Mounting frame connectors Connects the baby unit to the included mounting frame, which can be attached to a wall or ceiling.
- Reset button Press this button to reset the camera or change camera mode.
GETTING STARTED
INSTALLING THE PARENT UNIT (MONITOR)
- Carefully unpack the parent unit (monitor).
- Connect the power adapter to the parent unit and power socket. The parent unit will start charging; the indication LED will now light up (red). This LED will turn green when the parent unit is fully charged. During first use, please allow the unit to completely charge to ensure optimal battery capacity.

natural_image
Line drawing of a handheld device connected to an electrical outlet (no text or symbols)
NOTE: CHARGE THE PARENT UNIT COMPLETELY BEFORE FIRST USE.
- Press and hold the on/off button. The screen will now show the Luvion introduction screen.

text_image
LUVIONINSTALLING THE BABY UNIT (CAMERA)
Before you install the baby unit (camera), carefully plan where and how you want to position it. Make sure that you take in account the length of the power cable and the position of the power socket, because the baby unit (camera) always needs to be connected to the power grid.
-
Carefully unpack the baby unit (camera).
-
Place the baby unit in the preferred position. You can place the baby unit on a table/cabinet, or you can mount it on a wall or ceiling. You can use the mounting frame to mount the camera on a wall or ceiling. With the provided plugs and screws.

NOTE: Before permanently installing the baby unit (camera), make sure that the wireless connection between the baby unit and parent unit is sufficient. Verify this when both the parent unit and baby unit are placed in the positions from which you would like to use them.

NOTE: Avoid installing the baby unit near walls or other obstruction between the baby and parent unit. For a good sound sensitivity and image it is recommended to place the baby unit between a 1,5-3m distance.

natural_image
Technical line drawing of a mechanical component before and after assembly (no text or symbols)Wall mounted Ceiling mounted
- Connect the power adapter to the baby unit and a power socket.

natural_image
Line drawing of a portable electronic device connected to a cable, showing wiring and ports (no text or symbols)- Slide the power switch to turn the camera on.

natural_image
Line drawing of a portable electronic device connected to a wall-mounted device with cable (no text or symbols)The parent unit will display the video of the baby unit, when both are switched on and within range of each other. The message "Out of range" will be displayed on the screen of the parent unit when the baby unit is outside the range of the parent unit or when the baby unit is not switched on or recognized.
USING THE SYSTEM
The video of the baby unit will be displayed on the screen of the parent unit when both are switched on. The icons on the screen are explained below.
-
Signal indicator T signal indicator shows the strength of the connection between units. no bars indicate a poor signal and 4 bars indicate the strongest signal (see table).
-
Clock 17:45 is the time that is set on the monitor
-
Channel indicator the channel indicator displays the current channel.
-
Remote monitoring locates remote monitoring status. When remote monitoring is turned on (in white), that means the camera App is accessed remotely, if not then the is in grey.
-
Zoom indicator 1 indicates that the video from the baby unit is zoomed in 1x, 1.5x or 2x.
-
Monitor Speaker Mute indicates the monitor's speaker is muted
-
Battery indicator indicates the battery level of the parent unit. The battery level indicator within will show the level of charge in five states: Low battery: Flashing Red 14 Battery: Red 12 Battery: White, 1 bar 34 Battery: White, 2 bars Full Battery: White, 4 bars (the power supply is not connected) When the power supply is connected the lightning bolt icon is displayed.
-
Temperature indicator Displays the temperature measured by the baby unit.
-
Feed time counter 📄 00:55 Shows countdown clock counting back till the feed time.
-
Night Light On/Off 📋 Indicates the night light is on/off. Turn the night light on/off from the monitor.
-
Quad Mode ☐ Press this button to switch to quad mode. When two cameras are paired, it will be split mode (two displays). You can't listen to the audio from the cameras in quad or split mode.

text_image
1 2 3 4 5 6 7 8 23 °C 00:55 9 10 11 12 le). |
- 'Talk'-indicator Press and hold this button if you want to talk to camera side, release to get monitor audio back.
Note:
a) "Talk Back" button only appears in single camera Live View mode b) If the camera unit was playing a lullaby, the lullaby will be paused until the talk back button is released c) The camera speaker volume setting is same as lullaby play level (select: > ).
When using the touch screen the view on the right will be displayed on your screen.
-
Menu Here you can change multiple monitor and camera settings.
-
Navigation Controls Use the arrow icons to remotely Pan/Tilt the camera.
-
Monitor Volume adjust the monitor volume up '+' & down '-'
-
Zoom In / Out supports x1, x1.5, x2 digital zoom ratio.
-
Lullaby ⏻ Press the Lullaby icon to turn lullabies ON/OFF. Plays 3 pre-programmed songs. Choose 1 specific song or "All" above the ♩ 2 3 or 'all' will be displayed. You can choose one specific lullaby you want to play or have all 3 lullabies play subsequently, from 1 to 2 to 3 and back to 1 again.

text_image
2:45 13 14 - + 15 15 16 17 ALLInside the monitor's menu you'll see the screen on the right.
-
Back Save the settings and return to previous page.
-
Brightness You can adjust the brightness of each individual camera.
-
Pair / Unpair Camera You can connect up to 4 cameras to your system.
-
VOX Set the VOX sensitivity to detect low or high sound levels.

text_image
VOX 18 19 20 21 22 23 24 25 26 27-
Temperature You can set Celsius or Fahrenheit, and set temperature alert high and low limit.
-
Date & Time & Timer Set up the system date & time & feed timer.
-
Camera & Alarm Volume You can adjust the camera and alarm volume.
-
Language Setting language for the monitor, six options: English, German, French, Italian, Netherlands and Spanish
- Default Reset the monitor back to its factory settings.
- Home Return to Live View.
OUT OF RANGE WARNING
When the baby unit is positioned too far away from the parent unit, the warning message "Out of Range" will appear on the screen of the parent unit and the video will start to flicker. When there is no connection between the baby and the parent unit, the screen of the parent unit will be black and display the warning message "Out of Range".
To improve the range of the baby monitor, move the antenna of the baby monitor upwards.

NOTE: If moving the baby and parent unit closer together does not help, try re-pairing the baby and parent unit. see Pairing chapter.
OUT OF RANGE

natural_image
Illustration of a tablet device with a white antenna and a gray arrow indicating rotation (no text or symbols)MENU SCREENS >
MENU > CAMERA > PAIRING

You can use the pairing function to restore the connection, make a new connection or delete a camera connection between the baby unit and parent unit. It also enables you to connect additional baby units to the parent unit. For more info see page 37 & 38.
Use the touch screen to select the chanel/camera you want to pair/unpair a camera to/from.
The parent unit will count down(or when unpairing immediately remove the camera). Briefly press the pair button on the baby unit during this time.

text_image
Unpair camera? Unpair camera? Pair additional camera? Pair additional camera?MENU > VOX (Voice operated activation)

Here you can enable/disable and change the sensitivity for the vox function for each separate camera.
The VOX can be set differently for each camera, press the camera symbols on the top of the screen to switch between cameras.
After selecting the right camera chooses whether you want VOX [On] or [Off].
If VOX is turned off the monitor screen will always stay on. When VOX mode is active the monitor will go into VOX 'sleep mode' after xx seconds.
Choose from the menu options [High] & [Low] to set the sensitivity.
When VOX sensitivity is set high, softer sounds will be detected and the monitor will be quicker to come out of VOX 'sleep mode'.

text_image
VOX OFF LowMENU > DATE, TIME & ALARM

These three menus will allow you to set the date, time & feed alarm
Press the Calendar symbol to set the date
Press the Clock symbol to set the time
Press the Alarm Clock to set a feed time alarm

text_image
Smartphone screen displaying calendar, clock, and alarm clock icons with blue backgroundMENU > LANGUAGE

The default language of the menus of the parent unit is English. However, Spanish, French, German, Italian and Dutch are also available. Use this menu to change the language.
Use the touch screen to select your preferred language.
MENU > BRIGHTNESS

You can change the brightness of the baby unit video in this menu. When the image of the video is too dark, try to increase the brightness. The minimum Brightness is no bars and the maximum Brightness is 5 bars.
Press the '-' or '+' on the touch screen decrease or increase the brightness.
The brightness can be set differently for each camera, press the camera symbols on the top of the screen to switch between cameras.
MENU > TEMPERATURE

The baby unit (camera) is equipped with a temperature sensor. You can set a temperature alert to get notified when the temperature is either too cold/hot. This feature should only be used as an indication and is not intended as a substitute for adult supervision.
Touch 'On' and 'Off' in the touch screen enable or disable the alarm. The alarm is on when 'On' is shown in your screen.
Touch the up '^' or down 'v' symbol in your touch screen in/decrease the minimum or maximum temperature for the alarm function.
Touch the 'C°' or 'F°' symbol to switch between Celsius and Fahrenheit. The value you see in your screen is active.

text_image
Engines Español Français Deutsen Italiano Nederlands
text_image
Smartphone screen displaying a weather icon with sun, battery, and playback buttons
text_image
ON 18 24 C% F° C°MENU > VOLUME

You can change the volume for the camera and for the monitor's alarm functions.
Select the camera symbol to adjust the camera volume for Talk Back and Lullabies. Use the '-' & '+' symbols to de/increase the volume level.
Select the alarm bell symbol to adjust the volume level for the monitor's alarm functions. Use the '-' & '+' symbols to de/increase the volume level.
MENU > DEFAULT SETTINGS

Use this menu to restore the Default Settings (factory settings).
Use the touch screen to confirm your choice.
After a reset the monitor settings are reset to the original factory settings.

NOTE: Restoring the Default Settings will not affect the pairing settings. The baby unit(s) will remain paired with the parent unit.

natural_image
Illustration of a tablet device displaying two icons: a warning sign and a bell, both on a blue screen (no text or symbols)
text_image
Reset to default? Yes NoPAIRING
Use the Pairing function to connect a baby unit (camera) to the parent unit (monitor). Up to 4 baby units can be connected to the monitor. They need to be paired on a different channel.
1
Switch the baby unit (camera) on by sliding the on/off button to the 'ON' position.

natural_image
Diagram of a device connected to a power outlet with a cable, showing no text or symbols2
Hold and press the On/Off button to switch the parent unit (monitor) on.

text_image
LUVION3
Tap the touch screen once to activate the operation screen on the right and then press the menu button: on the screen.

text_image
Mobile app screenshot showing a baby photo editing interface with icons and playback controls4
Press the pairing menu icon Ⓜ to open the CAMERA PAIRING menu.

text_image
VOX5
Choose one of the available camera channels to pair the new camera.

text_image
Unpair camera? Unpair camera? Pair additional camera? Pair additional camera?6
A countdown will be displayed on the screen.
Briefly press the baby unit (camera) PAIR button on the bottom of the camera to pair the baby unit (camera) to the parent unit (monitor).
The video from the camera should now be displayed on screen.

text_image
PLEASE PRESS PAIR KEY ON CAMERA SIDE 12
text_image
PWR RESETTELEPHONE/TABLET SETUP
Follow the steps below to set up your camera for remote access through your home router. After setting up the connection you can connect to your camera from anywhere through the SmartBabyCam app for Android and iOS. You can use the remote app access while simultaneously monitoring the baby through the 5" monitor!

To ensure the best possible connection to the router during the setup process please turn off the monitor.
IOS AND ANDROID INSTALLATION
1
Download and install the SmartBabyCam app for iOS or Android.
2
Turn on the camera, press and hold "reset" button until the camera flashes 3 times.
After around 5 seconds short press the reset button, the camera night light will change to fast flash.
After about 30 seconds, short push the reset button again, the night light will change to slow flash.

text_image
FLAIR RESET3
Go to your phone settings\Wireless & Networks\WLAN, find the SSID(WiFi name) with the name xxxxx111A and connect to the SSID

text_image
KPNNL 16-11 @ 52% < Instellingen Wifi Wifi ✓ 9/7YGM2UVJH5ADYW/111A MIJN NETWERKEN Luvion Premium Babyproducts 1 Luvion Premium Babyproducts 2 Luvion Premium Babyproducts 3 ANDERE NETWERKEN DIRECT-A0-HP OfficeJet 7510 Ziggo Ander... Vraag om verbinding Meld >STEP 4-6 IOS (FOR ANDROID SEE NEXT PAGE)
Below the final 3 steps for iOS, android is very similar but for the exact android instructions see the next page
4
Open the SmartBabyCam App, press "+" to add device and scan the QR code at the bottom of the camera. The UID will be automatically recognized. You'll only need to enter a camera name of your choice and the default password: 000000 and press save to confirm.

text_image
KPN NL 享 1129 03%
text_image
KPN NL 13:20 48% Cancel Add Device Add QRCode
text_image
Cancel Add Device Save Name Baby room UID 9V7YGM2UVJH5ADY... Password Wachtwoorden 1 2 3 4 5 6 7 8 9 0 - / : ; ( ) € & @ " #+- . , ? ! ' ABC spatie return5
You will now return to the start screen and see the camera is online. When you first try to access the camera it will make you change the standard password into a secure personal password. (The new password should contain at least 6 characters, with at least one uppercase letter, one lowercase letter, one digit and one special character (choose from: \~@#\$%^*()_-+=|{}].?/).

text_image
Current password is unsecure. Please change the password. OK Add Device: Recurect
text_image
KPN 3L AG 11:30 OK Cancel Modify password 1.The password At least 6 characters. 2.The password contains at least one uppercase, one lowercase, one digit, and one special character. 3.Available special characters: - 589%**().+=0().9. Old Old Password New New Password Confirm Confirm Password6
After changing the password, press the Edit Device icon , find the "WiFi Setting": Enter your WiFi network SSID (you can only connect the camera to 2.4GHz WiFi networks) and enter it's password and press send. The night light will now change to solid on, once you see the night light flash 3 times and then turn off , the set up succeeded. Please turn off the app and turn it on again, then you can remote access your camera from a smartphone anywhere.

text_image
IPN NL 专 11:42 82% Baby rooms [Online] 85.6x80 Add Device ↑ Recommendation
text_image
Back Edit Device Baby room 9V7YGM2UVJH5ADYW11A Name Baby room Connection Status Online Advanced Setting Smart Link WiFi SettingSTEP 4-6 ANDROID (FOR IOS SEE PREVIOUS PAGE)
Below the final 3 steps for android, iOS is very similar but for the exact iOS instructions see the previous page
4
Open the SmartBabyCam App, press 'add device' and press 'scan' to scan the QR code at the bottom of the camera for the UID to automatically be recognized. Set the camera name to anything of your choice and enter the default password: 000000 and confi rm.

text_image
AUTO DEVICE
text_image
Device Setting UID: SCAN SEARCH Name: Password: OK CANCEL5
You will now return to the start screen and see the camera is online. When you first try to access the camera it will make you change the standard password into a secure personal password. (The new password should contain at least 6 characters, with at least one uppercase letter, one lowercase letter, one digit and one special character (choose from: \~`@#\$%^*()_-+=|{}].?/).

text_image
Modify Password Current password is unsecua, please change the password: OK
text_image
Modify Password 1) The password At least 6 characters. 2) The password contains at least one uppercase, one lowercase, one digit, and one special character. 3) Available special characters: -1@#$%*|_++(0)Y/ Old: New: Confirm: OK Cancel RECONNECT6
After changing the password, press the Edit Device icon , find the "WiFi Setting": Select your WiFi network SSID (you can only connect the camera to 2.4GHz WiFi networks) and input it's password and press send. The night light will now change to solid on, once you see the night light flash 3 times and then turn off, the set up succeeded. Please turn off the app and turn it on again, then you can remote access your camera from a smartphone anywhere.

text_image
14:09 BABY ROOM [Online] $54x48C RECONNECT
text_image
Edit Device BABY ROOM 9V7YGM2UVJH5AOYW111A Name: BABY ROOM connection status Online AdvancedSetting > Smart Link > MF Setting >FIRMWARE UPDATE - IOS (FOR ANDROID SEE NEXT PAGE)
Below the instructions for updating the firmware for iOS, android is very similar but for the exact android instructions see the next page.
1
We recommend updating your Supreme Connect 2 camera's fi rmware whenever a new version is available. To update the fi rmware go to the live view page (the camera should be online) and touch the menu icon at the right corner and select "Firmware Update".

text_image
XPN VL 11:42 62% Baby room [Online] $5.8x180 Add Device Refresh
text_image
Back Edit Device TDGE TDGEF7588DBUEAKZ111A Name TDCE Connection Status Online Advanced Setting > Smart Link > WiFi Setting > Firmware Update >2
Press OK, to start updating the fi rmware If there is new fi rmware available. Make sure you keep the camera connected to the internet during the fi rmware installation process.

text_image
Back Edit Device TDGE TDGEF7588DBUEAKZT11A Name TDGE There is a new version of firmware available for update, do you need to update now? cancel OK WiFi Setting Firmware Update
text_image
Back Edit Device TDGE TDGEF75880BUEAKZ111A Name TDGE Connection Status Online Firmware update takes a whole, please wait 0-6 minutes... Advanced Setting Smart Link WiFi Setting Firmware Update3
When the new firmware is installed the message "OTA update is over, please check if the device is functioning normally" will be displayed. Press Ok. Please check if everything is functioning properly, your baby monitor is now ready to use.

text_image
Back Edit Device TDGE TDGEF7588DBJEAKZ111A Name TDGE ↓ Connection Status Connect Fail... File download success! Advanced Setting Smart Link WiFi Setting Firmware Update
text_image
Back Edit Device TDGE TDGEF7588DBJEAKZ111A Name TDGE OTA update is over, please check if the device is functioning normally! OK WiFi Setting Firmware UpdateFIRMWARE UPDATE - ANDROID (FOR IOS SEE PREVIOUS PAGE)
Below the instructions for updating the firmware for android, iOS is very similar but for the exact iOS instructions see the previous page
1
We recommend updating your Supreme Connect 2 camera's fi rmware whenever a new version is available. To update the fi rmware go to the live view page (the camera should be online) and touch the menu icon at the right corner and select "Firmware Update".

text_image
BABY ROOM[Online] 854x480 RECONNECT
text_image
Back Edit Device P53P P53P28ISDY2TBV8211A Name: P53P connection status Online Advanced Setting > Smart Link > WiFi Setting > Firmware Upgrade2
Press OK, to start updating the fi rmware If there is new fi rmware available. Make sure you keep the camera connected to the internet during the fi rmware installation process.

text_image
Edit Device PS3P PS3P2B55GLY215W/BZT11A Name: P53P Warning There is a new version of firmware available for update, do you need to update now? CANCEL WiFi Setting Hardware Upgrade
text_image
21:42 Name Edit Device PS3P PS3P209GLX2TB62111A Name: PS3P Processing Status: Online Smart Link: 3 WiFi Setting: 3 Hardware Upgrade: >3
When the new firmware is installed the message "OTA update is over, please check if the device is functioning normally" will be displayed. Press Ok. Please check if everything is functioning properly, your baby monitor is now ready to use.

text_image
Edit Device PSIP PSIP28SSXVZ8VB21114 Name: FS3P Firmware update takes a white, please wait 5 minutes! Smart Link Wits Setting Firmware Upgrade
text_image
Edit Device PSUP PSIPSBSSLY2TBVS2111A Name: P53P connection status Offline Advanced Setting > Smart Link > WiFi Setting > Firmware Upgrade > OTA update is over, please check if the device is functioning normally!APP MENU
Through the app it's possible to watch the live camera feed with both audio and video available while also enabling you to talk back to your baby and use the pan/tilt function of the camera. You can also take snapshots and use notifications to alert you when there is sound near the camera.
When selecting a camera live feed you will see the below 4 icons below your video feed:

Snapshot library: here you can see all stored snapshots/photos.

Snapshot: take a live snapshot/photo.

Sound/mute: Tap this icon to activate or mute the sound.

Talk Back: Tap this icon to activate/deactivate talk back, when active you can speak through the camera.
Beside these icons there are two other functions that can be controlled:
PAN/TILT: Swipe up/down or left/right to move the camera in any direction you like.
FULL SCREEN: View the camera feed in full screen by turning your phone 90° from portrait into landscape mode.
Beside the live view controls there are also some settings you can change through the menu to enter the menu press the icon. Here you can change the following settings:
NAME: Here you can change the name you gave your camera.
CONNECTION STATUS: Here you can check the current connection status. Click here to try re-establishing a connection.
ADVANCED SETTING: Press to move onto the advanced settings menu. Here you'll find the following options:
Lower video quality will provide a smoother image when the connection isn't optimal.
interval, if you set an interval the app won't provide a new notification for the selected period following a prior notification. You can also shut down notifications altogether.
SMART LINK: Currently unavailable.
WIFI SETTING: Only use upon initial install to establish a connection between the camera and router.

text_image
Back Edit Device Baby room 9V7YGM2UVJH5ADYW111A Name Baby room ↑↓ Connection Status Online Advanced Setting > Smart Link > WiFi Setting >TROUBLESHOOTING
If you have any problems with the Luvion Supreme Connect 2, there is often a quick and simple solution.
Please try the following:
| Problem Solution | |
| No video from the baby unit | 1. Check the power supply of the baby unit. Make sure the power adapter is plugged in and the green power LED is switched on.2. Make sure that the parent unit is switched on.3. Make sure that the baby unit is in range of the parent unit.4. Make sure that the parent unit is not in the VOX mode (press the power button shortly to exit the VOX mode) |
| The video is dropping / I have a constant low reception / “Out of Range” message | 1. Move the baby unit closer to the parent unit.2. Try repositioning the baby and/or parent unit (away from walls) to improve the reception.3. Place the antenna of the parent unit in the upright position.4. (re-)Pair the parent unit with the baby unit (see pairing chapter) |
| Audio problems 1. Make sure | that the volume on the parent unit is not muted. Press the + volume button on the parent unit to increase the volume.2. Make sure that there is sound within range of the baby unit microphone.3. If the unit emits a loud, screeching noise, move the baby and parent unit further apart. |
| The video is or has become choppy | 1. Try moving the baby unit closer to the parent unit.2. Remove obstructions between the baby and parent unit.3. Place the antenna of the parent unit in the upright position. |
| The battery of the parent unit runs out very fast | Use the power save mode or replace the battery with a new original Luvion battery. Original batteries can be acquired at your local luvion dealer. |
| The screen is frozen and I can’t use the on/off button to switch off the parent unit. | Try removing the battery form the parent unit to switch of the parent unit. You can use the on/off button to switch it back on after reinserting the battery. |
TECHNICAL SPECIFICATIONS
| General Specifications | |
| Operating Frequency Range 2.4GHz(FHSS) 2.4GHz(WiFi) | |
| Transmitting Power 17 dBm Max (FHSS) 15+/-1dBM (WiFi) | |
| Receiving Sensitivity -88 dBm(FHSS) -89 dBm(WiFi) | |
| Type of Spread Spectrum FHSS, WiFi | |
| Type of Modulation GSFK, 502.11g/n | |
| Data Rate 4 Mbps(FHSS), WiFi(802.11b/g/n) | |
| Transmitting Distance 300m Line of sight (Camera to monitor) | 150m Line of sight (Camera to router)Actual transmission range may vary based on your environment. Objects such as walls as well as other devices operating at 2.4Ghz can limit the maximum transmission range. |
| Baby unit (camera) | |
| Image Sensor Type 1/4" Color CMOS Image Sensor | |
| Eff ective Pixels H: 1280 px, V: 1024 px | |
| Image Resolution High:1280*720 (MAX 1.7Mbps) | Low: 854*480 (MAX 0.7 Mbps) |
| White Balance Auto | |
| Lens 3.95 mm, F 2.2 | |
| Field of View | 55° |
| IR On/Off | 15-25 Lux Off, 5-15 Lux On |
| IR LED Type/Nightvision | 940 nm / 5 m |
| Speaker Output | 0.5 W Max |
| Power Requirement | 5 Vdc +/- 10% |
| Power Consumption 1000mA+/-20mA | |
| Operating Temperature Range | - 10° ~ 40° |
| Operating Humidity Range | 0% ~ 85% |
| Environment Rating | N/A (for indoor use only) |
| Regulation Compliance | FCC/CE |
| Camera Housing Material | Plastic |
| Motor Type | Stepping motor |
| Moving Angle | Up 90° Down 20° Left/Right 135° |
| Parent unit (monitor) | |
| LCD Panel Size 5" / 12,7 cm | |
| LCD Resolution H: 800 px, V: 480 px | |
| Viewing Angle H: 140° V: 110° | |
| Power Requirement 5 Vdc 1A +/- 5 % | |
| Power Consumption 1.03A MAX. | |
| Operating Temperature Range - 10° ~ 40° | |
| Operating Humidity Range 0% ~ 85% | |
• NOTE
Outdoor use in France, Italy, Russia and Ukraine is not allowed

CE
This device is for indoor use only
This item is in compliance with the essential requirements and other relevant provisions of European Directives. The declaration of conformity is available through: https://www.luvion.nl/site/wp-content/uploads/2019/11/Conformiteitsverklaring-Supreme-Connect-2.pdf
TABLE DES MATIÈRES
| INTRODUCTION | 52 | ||
| CONSIGNES | DE | SÉCURITÉ | 52 |
| CONTENU | DU | PACKAGE | 53 |
| CAMÉRAS | SUPPLÉMENTAIRES | 53 | |
| PRÉSENTATION DE L’UNITÉ PARENTS (MONITEUR) 54 | |||
| PRÉSENTATION DE L’UNITÉ BÉBÉ (CAMÉRA) 55 | |||
| MISE | EN | ROUTE | 57 |
| MENU | 62 | ||
| COUPLAGE | 65 | ||
| INSTALLATION TÉLÉPHONE/TABLETTE | 67 | ||
| MISE À JOUR DU FIRMWARE | 70 | ||
| MENU | DE | L’APPLICATION | 72 |
| DÉPANNAGE | 73 | ||
| SPÉCIFICATIONS TECHNIQUES | 74 | ||
INTRODUCTION
Delft, The Netherlands
www.luvion.com
CONSIGNES DE SÉCURITÉ
natural_image
Line drawing of a mechanical device with a circular top and base, no text or symbols presentUnité bébé (caméra)

natural_image
Technical line drawing of a mechanical component with circular and rectangular features (no text or symbols)Support de fixation

natural_image
Line drawing of a tablet device with no text or symbolsnatural_image
Two identical electrical components with wires, no visible text or symbolsnatural_image
Line drawing of a stylized camera or remote control device with no text or symbols
text_image
1 2 3 4PRÉSENTATION DE L'UNITÉ PARENTS (MONITEUR)

text_image
Diagram of a tablet device with numbered parts labeled 1 to 6 for identification.VUE DE FACE

text_image
Technical diagram of a device with labeled components including a sensor, display, and control panelVUE ARRIÈRE
natural_image
Line drawing of a manual tool with a separate electrical outlet connected to its base (no text or symbols)
REMARQUE : CHARGEZ COMPLÈTEMENT L'UNITÉ PARENTS AVANT LA PREMIÈRE UTILISATION.
natural_image
Technical line drawing of a mechanical component before and after assembly, showing a curved component and a flanged component (no text or symbols)natural_image
Line drawing of a portable electronic device connected to a cable, showing wiring and ports (no text or symbols)natural_image
Line drawing of a portable electronic device connected to a wall-mounted device with cable (no text or symbols)| Signal strength Indicator Warning | ||
| Perfect | None | |
| Good | None | |
| Fair | None | |
| Low | Out of Range | |
| No Signal | Out of Range | |
natural_image
Illustration of a tablet device with a white antenna and a gray arrow indicating rotation (no text or symbols)ÉCRANS DU MENU >
MENU > CAMÉRA > COUPLAGE

text_image
VOX OFF LowMENU > DATE, HEURE ET ALARME

text_image
Smartphone screen displaying calendar, clock, and alarm clock icons with blue backgroundtext_image
Smartphone screen displaying a weather icon with battery and signal buttons, including a sunburst light symbol.
text_image
ON 18 24 C% F° C°natural_image
Illustration of a tablet device displaying two icons: a warning sign and a bell, both on a blue screen (no text or symbols)
text_image
Reset to default? Yes NoCOUPLAGE
natural_image
Diagram of a device connected to a power outlet with a cable, showing no text or symbols.2
text_image
Mobile app screenshot showing a baby photo editing interface with icons for navigation, balance, and music playback controls.4
text_image
Mobile phone interface screenshot showing a grid of app icons including VOX, clock, globe, sun, play button, and refresh.5
text_image
PWR RESETINSTALLATION TÉLÉPHONE / TABLETTE
text_image
RESET PICK3
text_image
KPN NL 11:29 @ 63% Add Device
text_image
KPN NL 13.26 8.48% Cancel Add Device Add QRCode
text_image
KPN 8L 11:32 Cancel Add Device Save Name Baby room UID 9V7YGM2UVJH5ADY... Password Wachtwoorden 1 2 3 4 5 6 7 8 9 0 - / : ; ( ) € & @ "- . , ? ! '
ABC spatie return5
text_image
Current password is unsecure. Please change the password. OK Add Device ↑↓ Recorrect
text_image
KPN 3L AG 11:39 @ 82% Cancel Modify password OK 1.The password At least 6 characters. 2.The password contains at least one uppercase, one lowercase, one digit, and one special character. 3.Available special characters: ~ 50%**().+e[D].1.9. Old Old Password New New Password Confirm Confirm Password6
text_image
CPN NL 11:42 82% Baby room [Online] 85.6x80 Add Device ↑ Recontact
text_image
Back Edit Device Baby room 9V7YGM2UVJH5ADYWFT11A Name Baby room Connection Status Online Advanced Setting Smart Link WiFi SettingÉTAPES 4-6 ANDROID (POUR IOS VOIR PAGE PRÉCÉDENTE)
text_image
Modify Password Current password is unclear, please change the password. OK
text_image
Modify Password 1) The password At least 6 characters. 2) The password contains at least one uppercase, one lowercase, one digit, and one special character. 3) Available special characters: - 1@#$%*|_++(0) | / Old: New: Confirm: OK Cancel RECONNECT6
text_image
Back Edit Device TDGE TDGEF7588DBUEAKZ111A Name TDGE There is a new version of firmware available for update, do you need to update now? cancel OK Smart Link WiFi Setting Firmware Update
text_image
Back Edit Device TDGE TDGEF7588DBUEAKZ111A Name TDGE Connection Status Online Firmware update taxes a white... please wait 5-6 minutes... Advanced Setting Smart Link WiFi Setting Firmware Update3
text_image
Back Edit Device TDGE TDGEF7588D8UEAKZ111A Name TDGE 1↓ Connection Status: Connect Fail... File download success! Advanced Setting Smart Link WiFi Setting Firmware Update
text_image
Back Edit Device TDGE TDGEF7588DBUEAKZ111A Name TDGE OTA update is over, please check if the device is functioning normally! OK WiFi Setting > Firmware Update >MISE À JOUR DU FIRMWARE - ANDROID (POUR IOS VOIR LA PAGE PRÉCÉDENTE)
text_image
Edit Device PS3IP PS3IP/SP3IP/SP3IP/SP3IP/SP3IP/SP3IP/SP3IP/SP3IP/SP3IP/SP3IP/SP3IP/SP3IP/SP3IP/SP3IP/SP3IP/SP3IP/SP3IP/SP3IP/SP3IP/SP3IP/SP3IP/SP3IP/SP3IP/SP3IP/SP3IP/SP3IP/SC Note: PS3IP Warning There is a new version of firmware available for update, do you need to update now? CANCEL WIFI Setting Promote Upstart
text_image
Edit Device PS3P PS3P00000000000000000000000000000000000000000000000000000000000000000000 Name: PS3P Processing... Smart LHX WiFi Setting Forward Upgrade: 111 2 3 4 5 6 7 8 9 10 11 12 13 14 15 16 17 18 19 20 21 22 23 24 25 26 27 28 29 30 31 32 33 34 35 36 37 38 39 40 41 42 43 44 45 46 47 48 49 50 51 52 53 54 55 56 57 58 59 60 61 62 63 64 65 66 67 68 69 70 71 72 73 74 75 76 77 78 79 80 81 82 83 84 85 86 87 88 89 90 91 92 93 94 95 96 97 98 99 1113
text_image
Edit Device PS3P PSSP085SLY2TBVB2111A Name: P53P connection status Offline Advanced Setting > Smart Link > WiFi Setting > Firmware Upgrade > OTA update is over, please check if the device is functioning namely!MENU DE L'APPLICATION
text_image
Back Edit Device Baby room 9V7YGM2UVJH5ADYW111A Name Baby room ↑↓ Connection Status Online Advanced Setting > Smart Link > WiFi Setting >This device is for indoor use only
Delft, The Netherlands
www.luvion.com
natural_image
Line drawing of a stylized camera or remote control device with no text or symbols
text_image
1 | 2 3 | 4text_image
Diagram of a tablet device with numbered parts labeled 1 through 6 for identification.
text_image
ВИД СПЕРЕДИ 7 8 9ВИД СЗАДИ
text_image
Labeled diagram of a camera or radar device with numbered parts for identification
text_image
7 8 9 ВИД СЗАДИВИД СПЕРЕДИnatural_image
Line drawing of a handheld device with attached electrical outlet (no text or symbols)
NOTE: CHARGE THE PARENT UNIT COMPLETELY BEFORE FIRST USE.
natural_image
Technical line drawing of a mechanical component before and after assembly (no text or symbols)natural_image
Line drawing of a device with a power outlet connected to a base, showing wiring and components (no text or symbols)natural_image
Line drawing of a device with a power outlet connected to a motor (no text or symbols)natural_image
Illustration of a tablet device with a curved arrow indicating rotation (no text or symbols)ФУНКЦИИ МЕНЮ
text_image
VOX OFF Low
natural_image
Illustration of a tablet device displaying three calendar icons: calendar, clock, and alarm clock (no text or symbols)МЕНЮ >ЯЗЫК

text_image
Smartphone screen displaying a weather icon with battery and sound buttons, likely for app or notification.
text_image
ON 18 24 C°/F° C°МЕНЮ > ГРОМКОСТЬ

natural_image
Illustration of a tablet device displaying two icons: a warning sign and a bell, both on a blue screen (no text or symbols)
text_image
Reset to default? Yes NoСОПРЯЖЕНИЕ
natural_image
Diagram showing a connected power supply and a device with a cable, no text or symbols present2
text_image
Mobile app screenshot showing a baby image editing interface with icons for navigation, balance, and music.4
text_image
PWR RESETtext_image
RESET PAIR3
text_image
Baby room [offline] Current password is unsecure.Please change the password. OK + Add Device ↑ Reconnect
text_image
1. The password At least 6 characters. 2. The password contains at least one uppercase, one lowercase, one digit, and one special character. 3. Available special characters: ~ '!@#$%*'|.,=+|()?.? Old Old Password New New Password Confirm Confirm Password6
text_image
Baby room [Online] 85.4x690
text_image
Back Edit Device Baby room 9V7YGM2UVJH5ADYW111A Name Baby room ↑↓ Connection Status Online Advanced Setting Smart Link WiFi Settingtext_image
14:30 ADD DEVICE
text_image
Device Setting UID: SCAN SEARCH Name Password: OK CANCEL5
text_image
Modify Password Current password is unsecure, please change the password. OK RECONEE
text_image
Modify Password 1) The password At least 6 characters. 2) The password contains at least one uppercase, one lowercase, one digit, and one special character. 3) Available special characters: -1@#$%^#(-+40) ? Old: New: Confirm: OK Cancel RECONNECT6
text_image
KPN HL 11:42 62% Baby room [Online] 5.5x60 Add Device Request
text_image
Back Edit Device TDGE TDGEF7588DBUEAKZ111A Name TDGE Connection Status Online Advanced Setting > Smart Link > WiFi Setting > Firmware Update >2
text_image
Back Edit Device TDGE TDGEF7588DBJEAKZ111A Name TDGE There is a new version of firmware available for update, do you need to update now? cancel OK WiFi Setting Firmware Update
text_image
Stack Edit Device TDGE TDGEF7588DBUEAKZ111A Name TDGE 11 Connection Status Online Firmware update takes a while please start 5-6 minutes... Advanced Setting Smart Link WiFi Setting Firmware Update3
text_image
Back Edit Device TDGE TDGEFJ588DBJEAKZ111A Name TDGE ↑↓ Connection Status Connect Fail... File downloaded success! Advanced Setting Smart Link WiFi Setting Firmware Update
text_image
Back Edit Device TDGE TDGEF7588DBUEAKZ111A Name TDGE OTA update is over, please check if the device is functioning normally! OK WiFi Setting Firmware Updatetext_image
Edit Device P53P P53P285GLY27BVBZ11JA Name: P53P Warning There is a new version of firmware available for update, do you need to update now? CANCEL WIFI Setting fromware upgaser
text_image
Edit Device: PS3P PS3P/00SLX2TBW2111A Name: PS3P Processing Online Smart Link AVI Setting Farmsys Diagram3
text_image
Edit Device PS3P PSIPBSSX27BV8T11A Name: PS3P Firmware update takes a wide, please wait 5 minutes Smart Link WiFi Setting Firmware Upgrade
text_image
Edit Device PS3P PS3P285SLY2TBVB2111A Name: P53P connection status Offline Advanced Setting > Smart Link > WiFi Setting > Firmware Upgrade > OTA update is over, please check if the device is functioning normally!text_image
Back Edit Device Baby room 9V7YGM2UVJH5ADYW111A Name Baby room ↑↓ Connection Status Online Advanced Setting > Smart Link > WiFi Setting >This device is for indoor use only
Luvion Premium Babyproducts
Visit us at:
www.Luvion.com