
DLM330Z - Lawn mower MAKITA - Free user manual and instructions
Find the device manual for free DLM330Z MAKITA in PDF.
| Product type | Cordless lawn mower |
| Brand | Makita |
| Model | DLM330Z |
| Cutting width | 330 mm |
| No-load speed | 4 300 min⁻¹ |
| Cutting height range | 20 - 75 mm (8 positions) |
| Dimensions (L × W × H) in use | 1 285 - 1 350 × 375 × 935 - 975 mm |
| Dimensions (L × W × H) when stored (without grass bag) | 520 × 375 × 775 mm |
| Net weight | 11.6 - 12.5 kg (depending on battery) |
| Rated voltage | 18 V DC |
| Protection rating | IPX4 |
| Compatible batteries | BL1830B / BL1840B / BL1850B / BL1860B |
| Compatible chargers | DC18RC / DC18RD / DC18RE / DC18SD / DC18SE / DC18SF / DC18SH |
| Replacement blade | Ref. GB00000042 |
| Sound pressure level (LpA) | 82.4 dB(A), K=3 dB(A) |
| Sound power level (LwA) | 89.0 dB(A), K=3 dB(A) |
| Vibration (ah) | 2.5 m/s² or less, K=1.5 m/s² |
| Main functions | Mowing with grass bag, rear discharge, mulching (mulching insert) |
| Handle | Adjustable height (3 positions), foldable for storage |
| Grass level indicator | Floating indicator on the grass bag |
| Battery charge indicator | LED indicator on the machine |
| Maintenance and cleaning | Clean under the deck after use, regularly check fasteners |
| Safety devices | Safety key, automatic shutdown in case of overload/overheating |
| General information | Use only on lawn; do not use in rain |
Frequently Asked Questions - DLM330Z MAKITA
User questions about DLM330Z MAKITA
0 question about this device. Answer the ones you know or ask your own.
Ask a new question about this device
Download the instructions for your Lawn mower in PDF format for free! Find your manual DLM330Z - MAKITA and take your electronic device back in hand. On this page are published all the documents necessary for the use of your device. DLM330Z by MAKITA.
USER MANUAL DLM330Z MAKITA
| Model: DLM330 | ||
| Mowing width (blade diameter) 330 mm | ||
| No load speed 4,300 min | -1 | |
| Part number of replacement mower blade GB00000042 | ||
| Dimensions(L x W x H) | during operation L: 1,285 mm to 1,350 mmW: 375 mmH: 935 mm to 975 mm | |
| when stored(without grass basket) | 520 mm x 375 mm x 775 mm | |
| Rated voltage D.C. 18 V | ||
| Net weight 11.6 - 12.5 kg | ||
| Protection degree IPX4 | ||
Due to our continuing program of research and development, the specifications herein are subject to change without notice.
- Specifications may differ from country to country.
The weight may differ depending on the attachment(s), including the battery cartridge. The lightest and heaviest combination, according to EPTA-Procedure 01/2014, are shown in the table.
Applicable battery cartridge and charger
| Battery cartridge BL1830B / BL1840B / BL1850B / BL1860B | |
| Charger DC18RC / DC18RD / DC18RE / DC18SD / DC18SE / DC18 | 8SF / DC18SH |
Some of the battery cartridges and chargers listed above may not be available depending on your region of residence.

WARNING: Only use the battery cartridges and chargers listed above. Use of any other battery cartridges and chargers may cause injury and/or fire.

WARNING: Do not use a corded power supply such as battery adapter or portable power pack with this machine. The cable of such power supply may hinder the operation and result in personal injury.
Symbols
The followings show the symbols which may be used for the equipment. Be sure that you understand their meaning before use.

Take particular care and attention.

Read instruction manual.

Danger; be aware of thrown objects.

The distance between the tool and bystanders must be at least 15m

Never put your hands and feet near the blade under the mower. Blades continue to rotate after the motor is switched off.

Remove the lock key before inspecting, adjusting, cleaning, servicing, leaving and storing the mower.

Warning; Disconnect battery before maintenance.

Warning; activate the disabling device before maintenance.

Only for EU countries Due to the presence of hazardous components in the equipment, waste electrical and electronic equipment, accumulators and batteries may have a negative impact on the environment and human health. Do not dispose of electrical and electronic appliances or batteries with household waste! In accordance with the European Directive on waste electrical and electronic equipment and on accumulators and batteries and waste accumulators and batteries, as well as their adaptation to national law, waste electrical equipment, batteries and accumulators should be stored separately and delivered to a separate collection point for municipal waste, operating in accordance with the regulations on environmental protection. This is indicated by the symbol of the crossed-out wheeled bin placed on the equipment.


Guaranteed sound power level according to EU Outdoor Noise Directive.

Sound power level according to Australia NSW Noise Control Regulation.
Intended use
The machine is intended for lawn mowing.
Noise
The typical A-weighted noise level determined according to EN 60335-2-77, IEC 62841-4-3:
Sound pressure level (LpA):82.4dB(A) Sound power level (LWA):89.0dB(A) Uncertainty (K): 3 dB(A)
NOTE: The declared noise emission value(s) has been measured in accordance with a standard test method and may be used for comparing one tool with another.
NOTE: The declared noise emission value(s) may also be used in a preliminary assessment of exposure.
WARNING: Wear ear protection.
WARNING: The noise emission during actual use of the power tool can differ from the declared value(s) depending on the ways in which the tool is used especially what kind of workpiece is processed.
WARNING: Be sure to identify safety measures to protect the operator that are based on an estimation of exposure in the actual conditions of use (taking account of all parts of the operating cycle such as the times when the tool is switched off and when it is running idle in addition to the trigger time).
Vibration
The vibration total value (tri-axial vector sum) determined according to EN 60335-2-77, IEC 62841-4-3: Vibration emission (a_h):2.5m / s^2 or less Uncertainty (K):1.5m / s^2
NOTE: The declared vibration total value(s) has been measured in accordance with a standard test method and may be used for comparing one tool with another.
NOTE: The declared vibration total value(s) may also be used in a preliminary assessment of exposure.
WARNING: The vibration emission during actual use of the power tool can differ from the declared value(s) depending on the ways in which the tool is used especially what kind of workpiece is processed.
WARNING: Be sure to identify safety measures to protect the operator that are based on an estimation of exposure in the actual conditions of use (taking account of all parts of the operating cycle such as the times when the tool is switched off and when it is running idle in addition to the trigger time).
EC Declaration of Conformity
For European countries only
The EC declaration of conformity is included as Annex A to this instruction manual.
SAFETYWARNINGS
General power tool safety warnings
WARNING: Read all safety warnings, instructions, illustrations and specifications provided with this power tool. Failure to follow all instructions listed below may result in electric shock, fire and/or serious injury.
Save all warnings and instructions for future reference.
The term "power tool" in the warnings refers to your mains-operated (corded) power tool or battery-operated (cordless) power tool.
Work area safety
- Keep work area clean and well lit. Cluttered or dark areas invite accidents.
- Do not operate power tools in explosive atmospheres, such as in the presence of flammable liquids, gases or dust. Power tools create sparks which may ignite the dust or fumes.
- Keep children and bystanders away while operating a power tool. Distractions can cause you to lose control.
Electrical safety
- Power tool plugs must match the outlet. Never modify the plug in any way. Do not use any adapter plugs with earthed (grounded) power tools. Unmodified plugs and matching outlets will reduce risk of electric shock.
- Avoid body contact with earthed or grounded surfaces, such as pipes, radiators, ranges and refrigerators. There is an increased risk of electric shock if your body is earthed or grounded.
- Do not operate the lawnmower in rain or wet conditions. This may increase the risk of electric shock.
- Do not abuse the cord. Never use the cord for carrying, pulling or unplugging the power tool. Keep cord away from heat, oil, sharp edges or moving parts. Damaged or entangled cords increase the risk of electric shock.
- When operating a power tool outdoors, use an extension cord suitable for outdoor use. Use of a cord suitable for outdoor use reduces the risk of electric shock.
- If operating a power tool in a damp location is unavoidable, use a residual current device (RCD) protected supply. Use of an RCD reduces the risk of electric shock.
- Power tools can produce electromagnetic fields (EMF) that are not harmful to the user. However, users of pacemakers and other similar medical devices should contact the maker of their device and/or doctor for advice before operating this power tool.
Personal safety
-
Stay alert, watch what you are doing and use common sense when operating a power tool. Do not use a power tool while you are tired or under the influence of drugs, alcohol or medication. A moment of inattention while operating power tools may result in serious personal injury.
-
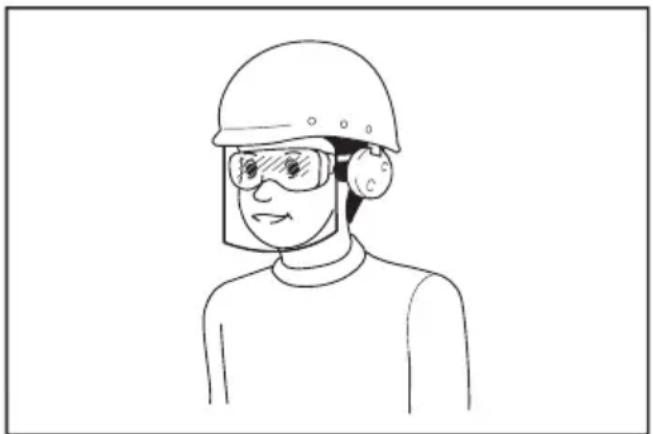
Use personal protective equipment. Always wear eye protection. Protective equipment such as a dust mask, non-skid safety shoes, hard hat or hearing protection used for appropriate conditions will reduce personal injuries.
- Prevent unintentional starting. Ensure the switch is in the off-position before connecting to power source and/or battery pack, picking up or carrying the tool. Carrying power tools with your finger on the switch or energising power tools that have the switch on invites accidents.
- Remove any adjusting key or wrench before turning the power tool on. A wrench or a key left attached to a rotating part of the power tool may result in personal injury.
- Do not overreach. Keep proper footing and balance at all times. This enables better control of the power tool in unexpected situations.
- Dress properly. Do not wear loose clothing or jewellery. Keep your hair and clothing away from moving parts. Loose clothes, jewellery or long hair can be caught in moving parts.
- If devices are provided for the connection of dust extraction and collection facilities, ensure these are connected and properly used. Use of dust collection can reduce dust-related hazards.
- Do not let familiarity gained from frequent use of tools allow you to become complacent and ignore tool safety principles. A careless action can cause severe injury within a fraction of a second.
- Always wear protective goggles to protect your eyes from injury when using power tools. The goggles must comply with ANSI Z87.1 in the USA, EN 166 in Europe, or AS/NZS 1336 in Australia/New Zealand. In Australia/New Zealand, it is legally required to wear a face shield to protect your face, too.
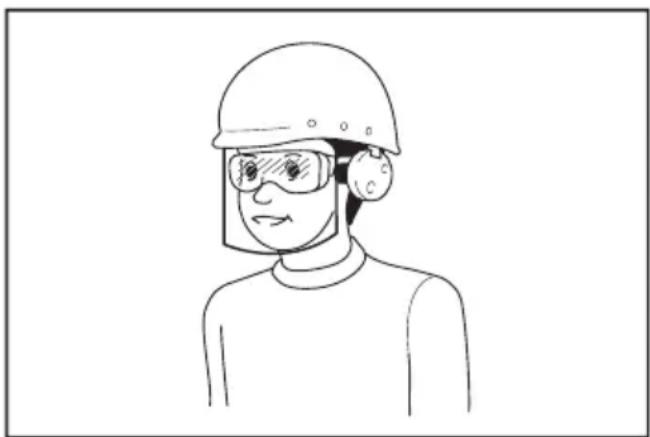
It is an employer's responsibility to enforce the use of appropriate safety protective equipments by the tool operators and by other persons in the immediate working area.
Power tool use and care
- Do not force the power tool. Use the correct power tool for your application. The correct power tool will do the job better and safer at the rate for which it was designed.
-
Do not use the power tool if the switch does not turn it on and off. Any power tool that cannot be controlled with the switch is dangerous and must be repaired.
-
Disconnect the plug from the power source and/or remove the battery pack, if detachable, from the power tool before making any adjustments, changing accessories, or storing power tools. Such preventive safety measures reduce the risk of starting the power tool accidentally.
- Store idle power tools out of the reach of children and do not allow persons unfamiliar with the power tool or these instructions to operate the power tool. Power tools are dangerous in the hands of untrained users.
- Maintain power tools and accessories. Check for misalignment or binding of moving parts, breakage of parts and any other condition that may affect the power tool's operation. If damaged, have the power tool repaired before use. Many accidents are caused by poorly maintained power tools.
- Keep cutting tools sharp and clean. Properly maintained cutting tools with sharp cutting edges are less likely to bind and are easier to control.
- Use the power tool, accessories and tool bits etc. in accordance with these instructions, taking into account the working conditions and the work to be performed. Use of the power tool for operations different from those intended could result in a hazardous situation.
- Keep handles and grasping surfaces dry, clean and free from oil and grease. Slippery handles and grasping surfaces do not allow for safe handling and control of the tool in unexpected situations.
- When using the tool, do not wear cloth work gloves which may be entangled. The entanglement of cloth work gloves in the moving parts may result in personal injury.
Battery tool use and care
- Recharge only with the charger specified by the manufacturer. A charger that is suitable for one type of battery pack may create a risk of fire when used with another battery pack.
- Use power tools only with specifically designated battery packs. Use of any other battery packs may create a risk of injury and fire.
- When battery pack is not in use, keep it away from other metal objects, like paper clips, coins, keys, nails, screws or other small metal objects, that can make a connection from one terminal to another. Shorting the battery terminals together may cause burns or a fire.
- Under abusive conditions, liquid may be ejected from the battery; avoid contact. If contact accidentally occurs, flush with water. If liquid contacts eyes, additionally seek medical help. Liquid ejected from the battery may cause irritation or burns.
- Do not use a battery pack or tool that is damaged or modified. Damaged or modified batteries may exhibit unpredictable behaviour resulting in fire, explosion or risk of injury.
- Do not expose a battery pack or tool to fire or excessive temperature. Exposure to fire or temperature above 130^ may cause explosion.
- Follow all charging instructions and do not charge the battery pack or tool outside the temperature range specified in the instructions. Charging improperly or at temperatures outside the specified range may damage the battery and increase the risk of fire.
Service
- Have your power tool serviced by a qualified repair person using only identical replacement parts. This will ensure that the safety of the power tool is maintained.
- Never service damaged battery packs. Service of battery packs should only be performed by the manufacturer or authorized service providers.
- Follow instruction for lubricating and changing accessories.
Cordless Lawn Mower Safety Warnings
- Do not use the lawnmower in bad weather conditions, especially when there is a risk of lightning. This decreases the risk of being struck by lightning.
- Thoroughly inspect the area for wildlife where the lawnmower is to be used. Wildlife may be injured by the lawnmower during operation.
- Thoroughly inspect the area where the lawnmower is to be used and remove all stones, sticks, wires, bones, and other foreign objects. Thrown objects can cause personal injury.
- Before using the lawnmower, always visually inspect to see that the blade and the blade assembly are not worn or damaged. Worn or damaged parts increase the risk of injury.
- Check the grass catcher frequently for wear or deterioration. A worn or damaged grass catcher may increase the risk of personal injury.
- Keep guards in place. Guards must be in working order and be properly mounted. A guard that is loose, damaged, or is not functioning correctly may result in personal injury.
- Keep all cooling air inlets clear of debris.
Blocked air inlets and debris may result in overheating or risk of fire. - While operating the lawnmower, always wear non-slip and protective footwear. Do not operate the lawnmower when barefoot or wearing open sandals. This reduces the chance of injury to the feet from contact with the moving blade.
- While operating the lawnmower, always wear long trousers. Exposed skin increases the likelihood of injury from thrown objects.
- Do not operate the lawnmower in wet grass. Walk, never run. This reduces the risk of slipping and falling which may result in personal injury.
- Do not operate the lawnmower on excessively steep slopes. This reduces the risk of loss of control, slipping and falling which may result in personal injury.
- When working on slopes, always be sure of your footing, always work across the face of slopes, never up or down and exercise extreme caution when changing direction. This reduces the risk of loss of control, slipping and falling which may result in personal injury.
-
Use extreme caution when reversing or pulling the lawnmower towards you. Always be aware of your surroundings. This reduces the risk of tripping during operation.
-
Do not touch blades and other hazardous moving parts while they are still in motion. This reduces the risk of injury from moving parts.
- When clearing jammed material or cleaning the lawnmower, make sure all power switches are off and the battery pack is disconnected. Unexpected operation of the lawnmower may result in serious personal injury.
SAVE THESE INSTRUCTIONS.
WARNING: DO NOT let comfort or familiarity with product (gained from repeated use) replace strict adherence to safety rules for the subject product.
MISUSE or failure to follow the safety rules stated in this instruction manual may cause serious personal injury.
IMPORTANT SAFETY INSTRUCTIONS
WARNING: Read all safety warnings and all instructions. Failure to follow the warnings and instructions may result in electric shock, fire and/or serious injury.
Save all warnings and instructions for future reference.
Training
- Read the instructions carefully. Be familiar with the controls and the proper use of the mower.
- Never allow children or people unfamiliar with these instructions to use the mower. Local regulations can restrict the age of the operator.
- Never operate the mower while people, especially children, or pets are nearby.
- Keep in mind that the operator or user is responsible for accidents or hazards occurring to other people or their property.
- Children should be supervised to ensure that they do not play with the mower.
- Physical condition - Do not operate mower while under the influence of drugs, alcohol, or any medication.
Preparation
- While operating the mower, always wear substantial footwear and long trousers. Do not operate the mower when barefoot or wearing open sandals. Avoid wearing clothing or jewelry that is loose fitting or that has hanging cords or ties. They can be caught in moving parts.
- Before use, always visually inspect the mower for damaged, missing or misplaced guards or shields.
- Be sure the area is clear of other people before mowing. Stop mower if anyone enters the area.
-
Do not insert the lock key into mower until it is ready to be used.
-
Always wear protective goggles to protect your eyes from injury when using power tools. The goggles must comply with ANSI Z87.1 in the USA, EN 166 in Europe, or AS/NZS 1336 in Australia/New Zealand. In Australia/New Zealand, it is legally required to wear a face shield to protect your face, too.
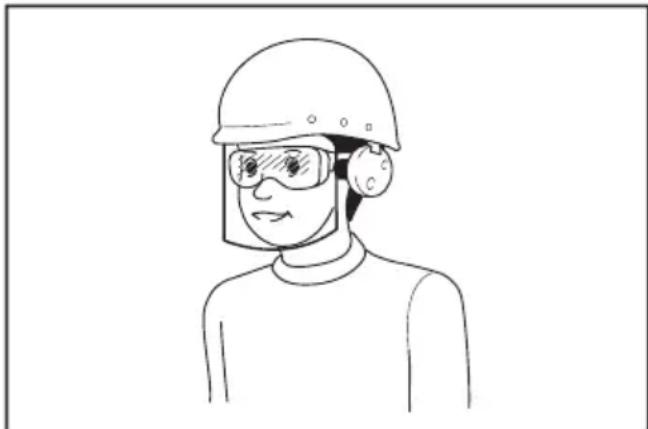
It is an employer's responsibility to enforce the use of appropriate safety protective equipments by the tool operators and by other persons in the immediate working area.
- Check the blades or blade bolts carefully for cracks or damage before operation. Replace cracked or damaged blades or blade bolts immediately.
- Remove foreign matters such as rocks, wire, bottles, bones and large sticks from the work area before mowing to prevent personal injury or damage to the mower.
- Objects struck by the mower blade can cause severe injuries to persons. The lawn should always be carefully examined and cleared of all objects prior to each mowing.
- Watch for holes, ruts, bumps, rocks, or other hidden objects. Uneven terrain could cause a slip and fall accident. Tall grass can hide obstacles.
- Use personal protective equipment. Always wear eye protection. Protective equipment such as a dust mask, non-skid safety shoes, hard hat or hearing protection used for appropriate conditions will reduce personal injuries.
Operation
- Do not overreach. Keep the balance at all times. Always be sure of the footing on slopes. Walk, never run.
-
Stop the mower and remove the lock key, and make sure that all moving parts have come to a complete stop:
-
whenever you leave the mower,
- before clearing blockages or unclogging chute,
- before checking, cleaning or working on the mower,
- after striking a foreign object. Inspect the mower for damage and make repairs before restarting and operating the mower,
-
whenever the mower starts vibrating abnormally.
-
Never operate the mower with defective guards or shields, or without safety devices, for example deflectors and/or grass basket, in place.
-
Avoid using the mower in bad weather conditions especially when there is a risk of lightning.
-
Wear eye protection and stout shoes at all times while operating the mower.
- Operate the mower only in daylight or in good artificial light.
- Switch on the mower carefully according to instructions and with feet well away from the blade(s).
- Take care against injury to feet and hands from the mower blades.
- Always ensure that the ventilation openings are kept clear of debris.
- Mow across the face of slopes, never up and down. Exercise extreme caution when changing direction on slopes. Do not mow excessively steep slopes.
- Use extreme caution when reversing or pulling the mower towards you.
- Stop the blade(s) if the mower has to be tilted for transportation when crossing surfaces other than grass, and when transporting the mower to and from the area to be used.
- Do not tilt the mower when switching on the motor, except if the mower has to be tilted for starting. In this case, do not tilt it more than absolutely necessary and lift only the part, which is away from the operator. Always ensure that both hands are in the operating position before returning the mower to the ground.
- Do not put hands or feet near or under rotating parts. Keep clear of the discharge opening at all times.
- Do not transport the mower while the mower is turned on.
- Avoid operating the mower in wet grass.
- Always keep a firm hold on the handle.
- Don't grasp the exposed cutting blades or cutting edges when picking up or holding the mower.
- Keep hands and feet away from rotating blades. Caution - Blades coast after the mower is switched off.
- Stop operation immediately if you notice anything unusual. Switch off the mower and remove the lock key. Then inspect the mower.
- Never attempt to make cutting height adjustments while mower is running if the mower has cutting height adjustment feature.
- Release switch lever and wait for blade rotation to stop before crossing driveways, walks, roads, and any gravel-covered areas. Also remove the lock key if you leave the mower, reach to pick up or remove something out of your way, or for any other reason that may distract you from what you are doing.
-
If the mower strikes a foreign object, follow these steps:
-
Stop the mower, release the switch lever and wait until the blade comes to a complete stop.
- Remove the lock key and the battery cartridge.
- Thoroughly inspect the mower for any damage.
-
Replace the blade if it is damaged in any way. Repair any damage before restarting and continuing to operate the mower.
-
Do not start the mower when standing in front of the discharge opening.
- If the mower starts to vibrate abnormally (check immediately)
-inspect for damage, - replace or repair any damaged parts,
- check for and tighten any loose parts.
- Never direct discharged material toward anyone. Avoid discharging material against a wall or obstruction. Material may ricochet back toward the operator. Stop the blade when crossing gravel surfaces.
- Do not pull the mower backwards unless absolutely necessary. When you are compelled to back the mower from a fence or other similar obstruction, look down and behind before and while moving backwards.
- Shut the motor off and wait until the blade comes to a complete stop before removing the grass catcher. Beware that the blades coast after turn off.
- When you use the machine on muddy ground, wet slope, or slippery place, pay attention to your footing.
- Do not submerge the machine into a puddle.
- When operating the machine, pay attention to piping and wiring.
Maintenance and storage
- Replace worn or damaged parts for safety. Use only genuine replacement parts and accessories.
- Inspect and maintain the mower regularly.
- When not in use, store the mower out of the reach of children.
- Keep all nuts, bolts, and screws tight to be sure the equipment is in safe working condition.
- Check the grass basket frequently for wear or deterioration. For storage, always make sure the grass basket is empty. Replace a worn grass basket with a new factory replacement for safety.
- Use only the manufacturer genuine blades specified in this manual.
- Be careful during adjustment of the mower to prevent entrapment of the fingers between moving blades and fixed parts of the mower.
- Check the blade mounting bolt at frequent intervals for proper tightness.
- Always allow the mower to cool down before storing.
- When servicing the blades be aware that, even though the power source is switched off, the blades can still be moved.
- Never remove or tamper with safety devices. Check their proper operation regularly. Never do anything to interfere with the intended function of a safety device or to reduce the protection provided by a safety device.
- Do not leave the machine unattended outdoors in the rain.
- When storing the machine, avoid direct sunlight and rain, and store it in a place where it does not get hot or humid.
Battery tool use and care
- Recharge only with the charger specified by the manufacturer. A charger that is suitable for one type of battery pack may create a risk of fire when used with another battery pack.
- Use power tools only with specifically designated battery packs. Use of any other battery packs may create a risk of injury and fire.
- When battery pack is not in use, keep it away from other metal objects, like paper clips, coins, keys, nails, screws or other small metal objects, that can make a connection from one terminal to another. Shorting the battery terminals together may cause burns or a fire.
- Under abusive conditions, liquid may be ejected from the battery; avoid contact. If contact accidentally occurs, flush with water. If liquid contacts eyes, additionally seek medical help. Liquid ejected from the battery may cause irritation or burns.
- Do not use a battery pack or tool that is damaged or modified. Damaged or modified batteries may exhibit unpredictable behaviour resulting in fire, explosion or risk of injury.
- Do not expose a battery pack or tool to fire or excessive temperature. Exposure to fire or temperature above 130^ may cause explosion.
- Follow all charging instructions and do not charge the battery pack or tool outside the temperature range specified in the instructions. Charging improperly or at temperatures outside the specified range may damage the battery and increase the risk of fire.
Electrical and battery safety
- Do not dispose of the battery(ies) in a fire. The cell may explode. Check with local codes for possible special disposal instructions.
- Do not open or mutilate the battery(ies). Released electrolyte is corrosive and may cause damage to the eyes or skin. It may be toxic if swallowed.
- Do not charge battery in rain, or in wet locations.
- Do not charge the battery outdoors.
- Do not handle charger, including charger plug, and charger terminals with wet hands.
- Do not replace the battery in the rain.
- Do not wet the terminal of battery with liquid such as water, or submerge the battery. Do not leave the battery in the rain, nor charge, use, or store the battery in a damp or wet place. If the terminal gets wet or liquid enters inside of battery, the battery may be short circuited and there is a risk of overheat, fire, or explosion.
- After removing the battery from the machine or charger, be sure to attach the battery cover to the battery and store it in a dry place.
- Do not replace the battery with wet hands.
- Avoid dangerous environment. Don't use the machine in dump or wet locations or expose it to rain. Water entering the machine will increase the risk of electric shock.
- If the battery cartridge gets wet, drain the water inside and then wipe it with a dry cloth. Dry the battery cartridge completely in a dry place before use.
Service
- Have your power tool serviced by a qualified repair person using only identical replacement parts. This will ensure that the safety of the power tool is maintained.
- Never service damaged battery packs. Service of battery packs should only be performed by the manufacturer or authorized service providers.
SAVE THESE INSTRUCTIONS.
WARNING: DO NOT let comfort or familiarity with product (gained from repeated use) replace strict adherence to safety rules for the subject product.
MISUSE or failure to follow the safety rules stated in this instruction manual may cause serious personal injury.
Important safety instructions for battery cartridge
- Before using battery cartridge, read all instructions and cautionary markings on (1) battery charger, (2) battery, and (3) product using battery.
- Do not disassemble or tamper with the battery cartridge. It may result in a fire, excessive heat, or explosion.
- If operating time has become excessively shorter, stop operating immediately. It may result in a risk of overheating, possible burns and even an explosion.
- If electrolyte gets into your eyes, rinse them out with clear water and seek medical attention right away. It may result in loss of your eyesight.
- Do not short the battery cartridge:
(1) Do not touch the terminals with any conductive material.
(2) Avoid storing battery cartridge in a container with other metal objects such as nails, coins, etc.
(3) Do not expose battery cartridge to water or rain. A battery short can cause a large current flow, overheating, possible burns and even a breakdown.
- Do not store and use the tool and battery cartridge in locations where the temperature may reach or exceed 50^ (122°F).
- Do not incinerate the battery cartridge even if it is severely damaged or is completely worn out. The battery cartridge can explode in a fire.
- Do not nail, cut, crush, throw, drop the battery cartridge, or hit against a hard object to the battery cartridge. Such conduct may result in a fire, excessive heat, or explosion.
- Do not use a damaged battery.
- The contained lithium-ion batteries are subject to the Dangerous Goods Legislation requirements.
For commercial transports e.g. by third parties, forwarding agents, special requirement on packaging and labeling must be observed.
For preparation of the item being shipped, consulting an expert for hazardous material is required. Please also observe possibly more detailed national regulations.
Tape or mask off open contacts and pack up the battery in such a manner that it cannot move around in the packaging.
- When disposing the battery cartridge, remove it from the tool and dispose of it in a safe place. Follow your local regulations relating to disposal of battery.
- Use the batteries only with the products specified by Makita. Installing the batteries to non-compliant products may result in a fire, excessive heat, explosion, or leak of electrolyte.
- If the tool is not used for a long period of time, the battery must be removed from the tool.
- During and after use, the battery cartridge may take on heat which can cause burns or low temperature burns. Pay attention to the handling of hot battery cartridges.
- Do not touch the terminal of the tool immediately after use as it may get hot enough to cause burns.
- Do not allow chips, dust, or soil stuck into the terminals, holes, and grooves of the battery cartridge. It may cause heating, catching fire, burst and malfunction of the tool or battery cartridge, resulting in burns or personal injury.
- Unless the tool supports the use near high-voltage electrical power lines, do not use the battery cartridge near high-voltage electrical power lines. It may result in a malfunction or breakdown of the tool or battery cartridge.
- Keep the battery away from children.
SAVE THESE INSTRUCTIONS.
CAUTION: Only use genuine Makita batteries. Use of non-genuine Makita batteries, or batteries that have been altered, may result in the battery bursting causing fires, personal injury and damage. It will also void the Makita warranty for the Makita tool and charger.
Tips for maintaining maximum battery life
- Charge the battery cartridge before completely discharged. Always stop tool operation and charge the battery cartridge when you notice less tool power.
- Never recharge a fully charged battery cartridge. Overcharging shortens the battery service life.
- Charge the battery cartridge with room temperature at 10^ - 40^ (50°F - 104°F). Let a hot battery cartridge cool down before charging it.
- When not using the battery cartridge, remove it from the tool or the charger.
- Charge the battery cartridge if you do not use it for a long period (more than six months).
ASSEMBLY
WARNING: Always be sure that the lock key and battery cartridge are removed before carrying out any work on the mower. Failure to remove the lock key and the battery cartridge may result in serious personal injury from accidental start-up.
WARNING: Never start the mower unless it is completely assembled. Operation of the machine in a partially assembled state may result in serious personal injury from accidental start-up.
Installing the handle
NOTICE: When installing handles, position the cord so that it is not caught by anything between the handles. If the cord is damaged, the mower switch may not work.
- Place the both ends of lower handle into the grooves of the mower body, then tighten the clamping levers, and then fold the clamping levers.
Fig.1: 1. Clamping lever 2. Lower handle
NOTE: Make sure that there is no gap between the lower handle and the mower body after the clamping levers are folded.
Fig.2
- Align the hole in the upper handle with the hole in the lower handle, then insert the bolt from outside, and then tighten the thumb nut from inside. Perform the same procedure on the other side.
▶ Fig.3: 1. Thumb nut 2. Bolt
NOTE: Hold the upper handle firmly so that it does not drop off your hand.
- Attach the holder to the handle. Position the cord as shown in the figure.
▶ Fig.4: 1. Holder
Removing the mulching plug
- Open the rear cover.
Fig.5: 1. Rear cover - Hold the mulching plug by the handle, and then pull it out from the mower body as shown in the figure.
▶ Fig.6: 1. Handle 2. Mulching plug
Installing or removing the grass basket
To install the grass basket, follow the steps below.
- Open the rear cover.
Fig.7: 1. Rear cover - Hold the handle of the grass basket, and then hook the grass basket on the rod of the mower body as shown in the figure.
▶ Fig.8: 1. Rod 2. Handle 3. Grass basket
To remove the grass basket, open the rear cover, and then remove the grass basket by holding the handle.
Attaching the mulching plug
-
Open the rear cover, and then remove the grass basket.
Fig.9: 1. Rear cover 2. Grass basket -
Hold the mulching plug by the handle, and then attach it to the mower body by pushing it as far as it will go as shown in the figure.
Fig.10: 1. Handle 2. Mulching plug
FUNCTIONAL DESCRIPTION
Installing or removing battery cartridge
CAUTION: Always switch off the machine before installing or removing of the battery cartridge.
CAUTION: Hold the machine and the battery cartridge firmly when installing or removing battery cartridge. Failure to hold the machine and the battery cartridge firmly may cause them to slip off your hands and result in damage to the machine and battery cartridge and a personal injury.
CAUTION: Make sure that you lock the battery cover before use. Otherwise, mud, dirt, or water may cause damage to the product or the battery cartridge.
CAUTION: Always install the battery cartridge fully until the red indicator cannot be seen. If not, it may accidentally fall out of the machine, causing injury to you or someone around you.
CAUTION: Do not install the battery cartridge forcibly. If the cartridge does not slide in easily, it is not being inserted correctly.
CAUTION: Hold the battery cover firmly when installing or removing the battery cartridge.
To install the battery cartridge;
- Open the battery cover while pressing the unlock button.
Fig.11: 1. Battery cover 2. Unlock button -
Align the tongue on the battery cartridge with the slot on the mower then slide the cartridge until it locks in place with a little click.
Fig.12: 1. Battery cartridge -
Insert the lock key in the place shown in the figure as far as it will go.
Fig.13: 1. Lock key -
Close the battery cover firmly.
To remove the battery cartridge from the mower;
- Open the battery cover while pressing the unlock button.
- Pull out the battery cartridge from the mower while sliding the button on the front of the cartridge.
- Pull out the lock key.
- Close the battery cover.
Machine / battery protection system
The machine is equipped with a machine/battery protection system. This system automatically cuts off power to the motor to extend machine and battery life. The machine will automatically stop during operation if the machine or battery is placed under one of the following conditions.
Overload protection
When the machine/battery is operated in a manner that causes it to draw an abnormally high current, the machine automatically stops and the indicator lamp lights up in red. In this situation, turn the machine off and stop the application that caused the machine to become overloaded. Then turn the machine on to restart.
Overheat protection
When the machine is overheated, the machine stops automatically and the indicator lamp lights up in red. Let the machine cool down before turning the machine on again.
Overdischarge protection
When the battery capacity becomes low, the machine stops automatically and the indicator lamp lights up in red. If the machine does not operate even when the switches are operated, remove the battery from the machine and charge the battery.
Protections against other causes
Protection system is also designed for other causes that could damage the machine and allows the machine to stop automatically. Take all the following steps to clear the causes, when the machine has been brought to a temporary halt or stop in operation.
- Turn the machine off, and then turn it on again to restart.
- Charge the battery(ies) or replace it/them with recharged battery(ies).
- Let the machine and battery(ies) cool down. If no improvement can be found by restoring protection system, then contact your local Makita Service Center.
NOTE: The timing, at which the lamp lights up, depends on the temperature at work place and the battery cartridge conditions.
Indicating the remaining battery capacity
Fig.14: 1. Indicator lamp
When the remaining battery capacity gets low, the indicator lamp blinks in red. By further use, the machine stops and the indicator lamp lights up in red. In this situation, charge the battery cartridge.
Indicating the remaining battery capacity
Only for battery cartridges with the indicator
Fig.15: 1. Indicator lamps 2. Check button
Press the check button on the battery cartridge to indicate the remaining battery capacity. The indicator lamps light up for a few seconds.
| Indicator lamps Remaining | capacity | ||
| Lighted Off | Blinking | ||
| 75% to 100% | |||
| 50% to 75% | |||
| 25% to 50% | |||
| 0% to 25% | |||
| Charge the battery. | |||
| The battery may have malfunctioned. | |||
NOTE: Depending on the conditions of use and the ambient temperature, the indication may differ slightly from the actual capacity.
NOTE: The first (far left) indicator lamp will blink when the battery protection system works.
Switch action
WARNING: Before installing the battery cartridge, always check to see that the switch lever actuates properly and returns to the original position when released. Operating a machine with a switch that does not actuate properly can lead to loss of control and serious personal injury.
NOTE: The mower does not start without pressing the switch button even the switch lever is pulled.
NOTE: Mower may not start due to the overload when you try to mow long or dense grass at a time. Increase the mowing height in this case.
This mower is equipped with the lock key and handle switch. If you notice anything unusual with either of these switches, stop operation immediately and have them checked by your nearest Makita Authorized Service Center.
- Install the battery cartridge. Insert the lock key, and then close the battery cover firmly.
Fig.16: 1. Battery cartridge 2. Lock key - Press the switch button and hold it.
- Hold the upper handle and pull the switch lever.
Fig.17: 1. Switch button 2. Switch lever - Release the switch button as soon as the motor starts running. The mower will continue to run until you release the switch lever.
- Release the switch lever to stop the motor.
Adjusting the mowing height
WARNING: Never put your hand or leg under the mower body when adjusting the mowing height.
WARNING: Always make sure that the lever fits in the groove properly before operation.
WARNING: Do not touch rotating blade.
The mowing height can be adjusted in the range of between 20mm and 75mm .
Remove the lock key, and then pull the mowing height adjusting lever outward of the mower body and move it to your desired mowing height.
Fig.18: 1. Mowing height adjusting lever
The table below shows the relationship between the number on the mower body and the approximate mowing height.
| Number Mowing height | |
| 1 20 mm | |
| 2 26 mm | |
| 3 33 mm | |
| 4 42 mm | |
| 5 52 mm | |
| 6 62 mm | |
| 7 71 mm | |
| 8 75 mm | |
NOTE: The mowing height figures should be used just as a guideline. Depending on the conditions of the lawn or the ground, the actual lawn height may become slightly different from the set height.
NOTE: Try a test mowing of grass in a less conspicuous place to get your desired height.
Grass level indicator
Fig.19: 1. Grass level indicator
Grass level indicator shows the volume of mowed grass.
- When the grass basket is not full, the indicator floats during mowing.
- When the grass basket is full, the indicator does not float during mowing. In this case, stop mowing immediately and empty the basket. After emptying the basket, clean it so that its meshwork vents the air.
NOTE: This indicator is a rough guide. Depending on the conditions of inside of the basket, this indicator may not work properly.
Adjusting the handle height
WARNING: Do not touch rotating blade.
CAUTION: Before removing the bolts, hold the upper handle firmly. Otherwise, the handle may fall and cause an injury.
The handle height can be adjusted in three levels.
- Loosen the thumb nuts of the handle, and then remove the bolts and thumb nuts.
Fig.20: 1. Thumb nut - Adjust the handle height.
- Insert the bolts from outside, and then tighten the thumb nuts from inside.
Using mulching plug
The mulching plug allows you to return the cut grass to the ground without gathering the cut grass in the grass basket. When you operate the machine with the mulching plug, be sure to remove the grass basket.
NOTICE: When using the machine with the mulching plug, make sure that the total length of grass after cutting is 30mm or more, and the cut length is 15mm or less.
Fig.21: (1) 30~mm or more (2) 15~mm or less
OPERATION
Mowing
WARNING: Before mowing, clear away sticks and stones from mowing area. Furthermore, clear away any weeds from mowing area in advance.
WARNING: Always wear the safety goggles or safety glasses with side shields when operating the mower.
CAUTION: If the cut grass or foreign object blocks up inside of the mower body, be sure to remove the lock key and battery cartridge and wear gloves before removing the grass or foreign object.
NOTICE: Use this machine for mowing lawn only. Do not mow weeds with this machine.
Fig.22
Firmly hold the handle with both hands when mowing. The mowing speed guideline is approximately 2 to 4 seconds per 1 meter.
Fig.23
The center lines of the front wheels are guidelines to mowing width. Using the center lines as guidelines, mow in strips. Overlap by one half to one third the previous strip to mow the lawn evenly.
Fig.24: 1. Mowing width 2. Overlapping area 3. Center line
Change the mowing direction each time to prevent the grass grain pattern from forming in just one direction.
Fig.25
Periodically check the grass basket for mowed grass. Empty the grass before it becomes full. Before every periodical check, be sure to stop the mower then remove the lock key and the battery cartridge.
NOTICE: Using the mower with the grass basket full prevents smooth blade rotation and places an extra load on the motor, which may cause breakdown.
Mowing a long-grass lawn
Do not try to cut long grass all in one go. Instead, mow the lawn in some steps. Leave a day or two between mows until the lawn becomes evenly short.
NOTE: Mowing long grass to a short length all in one go may cause the grass to die. The cut grass may also block up inside of the mower body.
Emptying the grass basket
WARNING: To reduce a risk of accident, regularly check the grass basket for any damage or weakened strength. Replace the grass basket if necessary.
- Release the switch lever.
- Remove the lock key.
- Open the rear cover and take out the grass basket by holding the handle.
Fig.26: 1. Rear cover 2. Handle
- Empty the grass basket.
MAINTENANCE
WARNING: Always be sure that the lock key and battery cartridge are removed from the mower before storing or carrying the mower or attempting to perform inspection or maintenance.
WARNING: Always remove the lock key when the mower is not in use. Store the lock key in a safe place out of reach of children.
WARNING: Wear gloves when performing inspection or maintenance.
WARNING: Always wear the safety goggles or safety glasses with side shields when performing inspection or maintenance.
NOTICE: Never use gasoline, benzine, thinner, alcohol or the like. Discoloration, deformation or cracks may result.
To maintain product SAFETY and RELIABILITY, repairs, any other maintenance or adjustment should be performed by Makita Authorized or Factory Service Centers, always using Makita replacement parts.
Maintenance
- Remove the lock key and battery cartridge, and then close the battery cover.
- Put the mower on its side. Clean grass clippings accumulated on the underside of mower deck.
- Pour water toward the bottom of the machine to which the blade is attached.
NOTICE: Do not wash the machine with high pressure water.
- Check all nuts, bolts, screws, etc. for tightness.
- Inspect moving parts for damage, breakage, and wear. Damaged or missing parts should be repaired or replaced.
- Store the mower in a safe place out of the reach of children.
Storage
CAUTION: When putting the machine in the upright position, place the machine on a flat and stable surface. If the machine is placed on an unstable surface, the machine may fall over and cause an injury.
Store mower indoors in a cool, dry and locked place. Don't store the mower and charger in locations where the temperature may reach or exceed 40^ .
- Remove the battery cartridge and lock key.
- Remove the grass basket.
- Unfold the clamping levers, then fold the handle, and then fold the clamping levers.
Fig.27: 1. Clamping lever
-
Loosen the thumb nuts of the handle, and then fold the upper handle.
Fig.28: 1. Thumb nut 2. Upper handle -
Place the machine in the upright position.
NOTE: When putting the mower in the upright position, do not hold the handle only, but hold the mower body and handle.
- Store the grass basket between the handle and the mower body.
Fig.29: 1. Grass basket
Carrying the mower
CAUTION: Before carrying the mower, make sure that the battery cartridge and lock key are removed.
When carrying the mower, hold the rear grip and the lower holding part at the front of the machine as shown in the figure.
Fig.30: 1. Lower holding part 2. Rear grip
Removing or installing the mower blade
WARNING: Always remove the lock key and battery cartridge when removing or installing the blade. Failure to remove the lock key and battery cartridge may cause a serious injury.
WARNING: The blade coasts for a few seconds after releasing the switch. Do not start any operation until the blade comes to a complete stop.
WARNING: Always wear gloves when handling the blade.
Removing the mower blade
- Put the mower on its side so that the mowing height adjusting lever comes to the upper side.
- To lock the blade rotation, insert a screwdriver or a similar tool into a hole on the mower body.
- Turn the bolt counterclockwise with the wrench.
Fig.31: 1.Mower blade 2.Wrench 3.Screwdriver 4.Hole
- Remove the bolt and blade in order.
Fig.32: 1. Blade support 2. Mower blade 3. Bolt
Installing the mower blade
To install the mower blade, take the removal procedure in reverse.
WARNING: Install the mower blade carefully. It has a top/bottom facing.
WARNING: Tighten the bolt clockwise firmly to secure the blade.
WARNING: Make sure that the mower blade and all the fixing parts are installed correctly and tightened securely.
WARNING: When you replace the blades, always follow the instructions provided in this manual.
TROUBLESHOOTING
Before asking for repairs, conduct your own inspection first. If you find a problem that is not explained in the manual, do not attempt to disassemble the machine. Instead, ask Makita Authorized Service Centers, always using Makita replacement parts for repairs.
| State of abnormality Probable cause | (malfunction) Remedy | |
| Mower does not start. | Battery cartridge is not installed. | Install charged battery cartridge. |
| Battery problem (under voltage) Recharge | the battery cartridge. If recharging is not effective, replace battery cartridge. | |
| The lock key is not inserted. Insert the lock key. | ||
| Motor stops running after a little use. | Battery's charge level is low. | Recharge the battery cartridge. If recharging is not effective, replace battery cartridge. |
| Cutting height is too low. Increase the cutting height. | ||
| Motor does not reach maximum RPM. | Battery cartridge is installed improperly. | nstall the battery cartridge as described in this manual. |
| Battery power is dropping. Recharge the battery | battery cartridge. If recharging is not effective, replace battery cartridge. | |
| The drive system does not work correctly. | Ask your local authorized service center for repair. | |
| Mower blade does not rotate: → stop the mower immediately! | Foreign object such as a branch is jammed near the blade. | Remove the foreign object. |
| The drive system does not work correctly. | Ask your local authorized service center for repair. | |
| Abnormal vibration: → stop the mower immediately! | Blade is imbalanced, excessively or unevenly worn. | Replace the blade. |
OPTIONAL ACCESSORIES
CAUTION: These accessories or attachments are recommended for use with your Makita machine specified in this manual. The use of any other accessories or attachments might present a risk of injury to persons. Only use accessory or attachment for its stated purpose.
If you need any assistance for more details regarding these accessories, ask your local Makita Service Center.
- Mower blade
- Makita genuine battery and charger
NOTE: Some items in the list may be included in the product package as standard accessories. They may differ from country to country.
SPECIFICATIONS
ACCESSIONS EN OPTION
VEILIGHEIDSWAARSCHUWINGEN
OPTIONELE ACCESSOIRES
Móvo yia xwpe ts Eupwnns
H oumuoppwos EK Tepiaubetaetai w
Papaptna A oTo TApov yExpiidio odnyiw.
IPOEIAOIOIHSEIEA ΣΦΑΛΕΙΑΣ
Evikc pOeioToiOneic aOaaleiayia To nEKTpiko epyaeeio
A NPOEIOONIH: AiaBaote oaes Tc Tpoei- 0toioeic aaoaieias, odnyies, EIKOVoypaohoeic KAI TPOBIApyaepcTou TApexovtai e auto to nEktpiko epyaio. H un tnpon oawv twv oywiW Tou avayapovtai katwetp wntopei va kataanhe i e nektpottnlaia, Tupkayia n/kai oobapo tpaumatio.
ΦuαTe oεc TIG PPOEIOIOn-σεi KAI TIG OByeC YIA μελIoVTIKn TapaTouπn.
Ttpoeiooioeic, o opoc K T P I K O p a y a I O avapeptai oE nektpiok epyaiaou tropoooteitai atn tvkupia npoxyn kektpikou peuatoC (m nektpiko kaawio) n 0e nektpikO epyaiaou tropoooteiata tto mtaupia (xwpi c nektpikok kaawio).
Aoalεia oTo xwpo epyaia
- Na diatnpieTe To xwpo epyaoc kaapo kai Kaia wtiouevo. akataotatouc n OKOTEVOUC Xwpouc Tpokaouvtai atuxnata.
- Mn θETETa nλEKPTIKA εpyαεia Ε ΛειToupyia ΕΕKPNKTIKΕς ΑμOσφαIpeς, ΟΤΟΙΣ ΠΑρουσία ευφλEKTVU yPων, αεριων ἡ σΚόνης. Ta nλEKPTIKA εpyαεia δημιούργουν στινθηρες ΠΟΥ μΤΟρειν τα προλεσουν ανάφλεηη Ις σΚόνης ἡ TWTV aTμων.
- Na aTnopakpuveTe Ta Tnaiia kai Touc m n exoVTEc epyaio otav xepiigeote eva nAekptiko epyaieio.Eav anooTnatoei n npooxnoac, mtopei va xaote tov eaeyxo.
Hεκτρικη ασφαλεια
- Ta φic Tou nλeKtpiKou εpyaIeu TpETe Iva TaipiaZouv σTnv Tpiα. Mny TpoTTOIEITE TOTTo Φic με OTIOVθnTote TpOTo. Mn xPoiuTOIeTE TPOAPUoyEIG ΕYEIωEv aλeKtpiKa εpyaIεia. Ta φic Tou δev exouv TpoTTOINθEi Kai oI Tpiεc Tou TaipiaZouv Ota φic μeIWvouv To Kivouvo TpokλnOng nλeKtpoTAnξiac.
- Anopeuyete Tny Etnaon Tou oWmuoc ME yeiw- meves ETTiaviecs, OTWC OWAHVEc, KALOPIepe, FOUPVouc kai yuyia. YIAPxEauNgevoC KIVU voTPOkAnan ng NektpoTnIgac eav to Owma oac evai yIomegavo.
- Mn θέτete η μnxavγκαόν σε λειουρία σε βροχερες ἡυρες συνθήκες. Autó μτιρείν αὐξησει τον κύνουν πρόκλησης λεκτροπληξίας.
- Mny kakouetaeipieote to nkeptko kaowio. Mn xpoaiotnoite TOTe TO nkeptko KAOWIO yia va metapepete n va tpaBnEte To nkeptko epyaia, aaaa oute ia vbaayalete To qic tou nkeptkoou epyaiaou ato tvnpia. Na dia-tnpite To nkeptko kaawio paia atro tn thepota Ta adia, ta aixnpa avtikeieva kai ta kivouveva np. Ta nkeptkka kalwia Tou exouv utootei baec kai ta pIayeva nekpiKaawia auavouv tokivuov tpokanng nekptoianjia
- Otav xeiipceote katoio nAektpiko epyaleio eEgwtepikouc xwpouc, va xpnoiopoTIOIEITE Tpoektaon nAektpikou kaawoiou (muAavTea) kataaan yia Ewotepikn xpno. Eav xpnoiopoTIOIETE nAektpiko kaawio kataaan yia ExwTe- pki npn, meiwetai o kivduvo c ia Tpokkno nAektpoTAAxiac.
- Eav ev iivai duvato va atoqexthetai n aeitoupvia evoc nektpikou epyaaleiou eepoc uypaoia, xpnoiomoinote nektpikn npoxnTOU pootateueta ooukeun npaevovtoCpupatc(RCD).Hxpnon RCDmuwvei Tov kivduvo nektpoattnngiac.
- Ta nλεκτρικα εργαλεία μπορουν va παράγουν nλεκτρομayvntikα πδία (EMF) ta oτοία δεν είαι βλαβερα γia to xρηστη. Ωοτόσο, σχρήσες βηματοδοτών και αλλων παρόροιων iατροεχνολογικων συακεύων θα πρέπειν αετικοινωνησουν με τον κATAOKEUAθηόν της συακεύng touc ἡ/Και τον γιατρο Touc γία συμβουλες, πριν θεσουν auto to nλεκτρικό εργαλείο σε λειουρία.
PpOoWnIKn aσφaλεια
- Otav xeipieote kantoio nAeKTPIO epyaleio, va eioaote OE ETOIOTNA, va TPOOExTe TI KAVETE KAI VA XPNOIOTIOIE TE KOIV NAOIK. Mn xeipieote katoio nAeKTPIO epyaleio otav eiaote Koupaoevoi OTE OTAV Bpiakeote UTO TNV EINpeia VAPKWIKW OOUwv, akkoan fapakwv. Mia otiyun atpooeeiac katn diapkeia xeipioou twv nAeKTPIKW epyaleiwu TPOPeVA TPOKAeoei oobapo TPOOWTIKO tpaumatioo.
- Na xpnoiouoie t aotuio eoonl o npo- staoia. Na qopate navta npoataia paivv. Eav xpooiotoeite to owto ppoateutiko eonlaio, otwos npoawtna kata tnC oKovns, avtioaiogntikaaatoutia aqaleiac, kpavoC n TPOOTATEUTKO akongc, avaloya meTIC ouvthkeG, 0e1w0e i kivuvoc tpoknons TpooWNIkwv Tpaumatouw.
- Na aTPOeuyETn vAeIaNtN eVeyoToiOnn Tou EpyaIou. BeaiwOeIte oI OiaKoTTnc Bpi- OKetai OTNV aVEePyN Teon nPiiv ouvEeTe Tnv NkEKTPIKn TApoxn n/Kai mTaPia, OKnWvete n MepepTe To epyaIeIO.Eav FepETe NkEKTPIKa EpyaIeia ME TO daxTuO aoc OTO diaKoTTn n EAV EVEpyOTIOeTE NkEKTPIKA EpyaIeia OTAV O diaKoTTnc Eivai OTNV eVeyn Teon, MTopei va TpokAn-Bouv atuxmuata.
- Na aTOnaKpUvETuXov puOmuOevo KLeiDi n yaAkko KLeiDITPIV θETETo NkEKTpiKO epyAλEIO e λEIToupyia. Ea KLeiDITou exei μeivei TPOOKoAImEvo OE KAITOIO TEPIATpeOeVO mepoc Tou NkEKTkoEpyAeiou μTOpEi va TPOKAeoi TPOOWTIKO Tpaumatioo.
- Mny TeVTWVEOT UEPBoIAKa. Na OTKEOTe TAVTote Otaepa kai IooppoTTneva. EToI, 0a ExETe KaLutepo EALeyxo Tou NkEKTPIKOU EpyAeiou SE aTPOOVEc KATAOTaeic.
- Na vtuveote kataaanla.Mn opate qapoiia pouxa n kounmuata.Kpatate ta maaiia kaia taoxa oacakpiia ato kivoumeva epn. Ytapxiei kivduvoa va eptakovu ta qapoiia pouxa, ta koumata na ta akpiia aalia o Kivoumeva epn.
- Eav TApexovTai OoKeues Yia Tn OuvDeon
diataeewv Eaywyns Kai oulloyns Okovns,va
Bepaiwveote otai autc eivai ouvdepeves Kai
XpoiopoiouVTai owta.H oulloyn okovns
muopei va meiwotov kivduvo Tou oxeticetai me
tn Okovn. - Mny aiaopoeite kai ayvoeite Tc apxcs aoaaleiaoc Tou epyaieiou loywn ts eoikewonctou atOKTnOate ano tn ouxn xpon twv epya- aeiv. Mia aippoektn evpeyia mtopei va tpokaaeoi oapop Taupatioe vtoC kaaumawevoc deutepoentou.
- Na φopáte πávτa προστateutiká yuaia yia va προστateuete ta maia αac atno tpaumatioó ortav xgnaiipotoiéite nkektpiä epyaεia. Ta προστateutiká yuaia πpêπei va oumuopwovtai μe to πpótuTO ANSI Z87.1 σTIC HNA, to πpótuTO EN 166 Θnv Eupωπnη to πpótuTO AS/NZS 1336 Θnv Auσtpalia/Nεa Znaλavδia. Σnv Auσtpalia/Nεa Znaλavδia, aattieitai atto To vómo va φopáte kai πpooωπiδa yia tnV πρoσtaia tou πpωπiouac.
O epyodotn cexi tnv euohvn va eTlalaae i tn xpno n kataaannau ppoateutikou eo- nioou aopaleiaac ato touc xepiotec tou epyaieiou kai ato aaataoqa trou piokovtai otnv aeon npioxnpyaoiac.
Xpnoi kaovtida nEeKtpiKo Epyaieiou
- Mny aokite TIEON OTO nAekptiko Epyaaleio. Na XpnoioutoieTe TO OWTO nAekptko Epyaaleio yia Tnv Eapuoyn oac. Me To OWTO nAekptko Epyaaleio 0a TpayatotoineTe TNV Epyoia Kautepa KAI aOaAaLeotepa, OTo Bao yia Tov Otto Exei Oxediaotei.
- Mn xpoioTOIE To nEeKPIKO epyaleo ev o diaKOTnC dev to EvepytoOEi kai dev to aTVEpyoIOei. KaTe nEeKPTIOKO epyaleo Tou dev μTIOpeTE va EeVETe μTo diaKOTTN AEIToupyiaç eivai ETIKIVUO KAI TTIPETTE VA ETIOKEuaOTEI.
- Na aTOoUVDEE To QIc aTn TnV TnYn TPOO- 00iac n/Kai va bYaZETe Tnv KaoTea mTa- pIWv, av Eivai OuvOeEeVn, aTto nAekptiko Epyaleio TPIV KAVETe OTIOEoBHTOTE puOeiC n AALayEc EApTnATWv KAI TPIV aTNOhKeUeTe Ta NAEKTPIKA Epyaleia. TeToia TPOAnTTIka METpa aQpaleiac meiwovu Tov kivduvo TuXaic Evepyo- Toinonc Tou NAEKPTIKOU Epyaleiou.
- Na aTOnθnKεUeTe Ta aBpav nλEKTPIKa εpyaλeia μakpiα aTó TAIδIa Kai va μην aΦηvete aTOμa Ttou δev yywpiζouv To nλEKTPIKo εpyaλeio Kai autεc TIG odnyies vα θεiPiζovTAl To nλEKTPIKo εpyaλeio. Ta nλEKTPIKa εpyaλeia aTtoteλoʊv kivδuvo στa xερia aveiδikeutωv εxipiotwv.
- Na ouvtneite Ta nkektpiKa epyaia Ka ta eap-tnata. Na eleyxete av eivai euyypaumuioeva ootata ta kivoueva hepn,av eptoietai n eeu-thepn kivon touc,av exouv onaei kaioia eapt-nata, aλka kalakeaan katotaon tou mtopei va etnpeaoei TLeitoupyia tou nkektipou epaλeiou. Av to nkektipko epyaieo utootei bαβn,va φpovtiete va etIOKEuaotei piv To xpnoiopoTOn-ETe. Naa atuxnata Tpokaovtai ano nkektipka epyaia Tou deev ouov ouvtnpoei owta.
- Na biTneite Ta konTiká epyaleia aixunpa kai kaopap. Ta konTiká epyaleia nou exouv ouvtnpnOe iomega tivai liyotepo tiavov eptakouv kai TIO EUKOVA EYxOuv.
-
Na xnpoiouoieTo nEeKpiko epyaleio, ta Egaptnata KaTicmuTEc Tou epyaleiou, KTA. uupwva e autcTG oynies, aaubavovtac UTOU Tc ouvOkec epyaiaC kTnv epyaia TOU PPETeI v EKTEAEOTei. EAV npoiouoieTe To nEeKpiko epyaleio yia aeitoupyie c diaqopetike C ATOautc yia Tc OTIOIE c TPOOpiCTAII, mTPOei va Tpokknei kantoia Etikivouv n kataoan.
-
Na biatnpieTis λαβεc kai TIS ETIipaveies xεipolaβωv OTeyves, kaθapeε, xwpic λabi kai ypaso. OI oiaθnpεs λαβεc kai ETIipaveies xεipolaβwv dev ETITpeTouv Tov aφaλn xεiipσo kai λeγxO Tou εpyaλeiou Ε avattavTEXEC kataotáεiC.
- Otav xpoiioeite To epyaieio, m npopate Tavaiva yavia epyaia c nou mtopei va ema-Kouv. H epiokn twv triivwv yaviw epyaia c eo a stkivoueva epn mtopei va exovw c anoteloeqa Tpaowniko Tpaupatmo.
Xpnoi kai povtida mataipiow
- Na επαναφορτιζετε TIC μπαταρες Μόνο με Φορτισή που καθοριζεται ΑΤΟΤΟΚΑΤΑΚΕΥΑστή. Evac φορτισής του εἰναι καταλληλος γία μια συγκερμένη μπαταρία μπορείν αδημιουργήσει κύνουν πιρκayίας ὄταν χρησιμοτοίειαι με μια αλλη μπαταρία.
- Na xpoiooieite nektpika epyaia mvo u Eioka kaopiopeves matapiec.Hxonn kaoe aanns mtatapiac mtopei va dnioupynoi kivduvo Tpaumatou n TUPKayiac.
- Otav dev xpoiooieitai n kaetamata piw, biatnpnoTe Tn paia aTTO aaMaetalakia avtkeiEvA, OTWc ouvdtpeC, Kepuata, kElaia, kappia, BiEg naaMikpaetalkkiaavtkeiEvA, TEa otioa mTOpei va dmoioupyn0e ioud0n an tov evav akpodektn oTov alov.To paxukkawma Twv akpodektw ng TITATAPIAc mTOpEVA TPOKAeEYkaumata n TUPKayia.
- YTOO uVOnkeC KATaXpOnC, MTOpEi va EaxTheta i UyPO aTTO TIV MTATApia. Na aTPOeUyET TNV ETTAPN. EAV OUIBEI EINAPN KAIAABoC, EKTLAUVETE ME VEPo. EAV TO UYPO EPeOI OE EINAPN ME TA MAtIA, AVZNTNOTE KAI IATPIK BONeA. To UyPO TIOEAYETAI ANTO IV MTATApia MTOpEi va TTPOKAeOEI EPEIOMO n EYKaUmaTa.
- Mn xnpoioptoiite mia kaoetamaatapiw n epyaieio tou exi kataotpapei npottointhetai. OI kateopapueves n tpoTTOINUEVSC TATAPIEC MTopeiv a TAPOUIAOUV aTPOBAEITN OUMTEPIOPa TIOU exe w c ATOTLEEAOMa TUPKAYI, EKPENn KIVDUVO Tpaumatou.
- Mny ektheta Tnv kaeta n To epyaiao e Tnpkayia n utepbOIA uynn Aepoukpaia. H ekean otnv npkayia n otn 0epuokpaa avw twv 130 ^ C mTpei va TpokaE- oEkpNn.
- Akolouθnote oles TIG odnyies φoptiong kai mny φoptiots TNV KAETA μTATAPIWv n To εpyaleio EKTOSU ΘεροκpaiaKOU εupous TOUT Kαθopiζeai OTIS odnyies. H λavthetaνη φoption n η φoption σE θεροκpaiec EKTOSU KAθopiosEvou εupous μTOpéi va Tpokaeei ζημia OTNV μTATAPIA KAI VA αuŋoetov KIVDUVO TUPKayiac.
Σερβις
| Batarya kartuș BL1830B / BL1840B / BL1850B / BL1860B | |
| Şarj aleti DC18RC / DC18RD / DC18RE / DC18SD / DC18SE / DC18SF / DC18SH |
| Anormal durum Olasi nedeni (ariza) | Çozümü | |
| Çim次会议 Makinesi ilemlamıyor. | BataryaXXXXXXXXXXXXXXXXXXXXXXXXXXXXXXXXXXXXXXXXXXXXXXXXXXXXXXXXXXXXXXXXXXXXXXXXXXXXXXXXXXXXXXXXXXXXXXXXXXXXXXXXXXXXXXXXXXXXXXXXXXXXXXXXXXXXXXXXXXXXXXXXXXXXXXXXXXXXXXXXXXXXXXXXXXXXXXXXXXXXXXXXXXXXXXXXXXXXXXXXXXXXXXXXXXXXXXXXXXXXXXXXXXXXXXXXXXXXXXXXXXXXXXXXXXXXXXXXXXXXXXXXXXXXXXXXXXXXXXXXXXXXXXXXXXXXXXXXXXXXXXXXXXXXXXXXXXXXXXXXXXXXXXXXXXXXXXXXXXXXXXXXXXXXXXXXXXXXXXXXXXXXXXXXXXXXXXXXXXXXXXXXXXXXXXXXXXXXXXXXXXXXXXXXXXXXXXXXXXXXXXXXXXXXXXXXXXXXXXXXXXXXXXXXXXXXXXXXXXXXXXXXXXXXXXXXXXXXXXXXXXXXXXXXXXXXXXXXXXXXXXXXXXXXXXXXXXXXXXXXXXXXXXXXXXXXXXXXXXXXXXXXXXXXXXXXXXXXXXXXXXXXXXXXXXXXXXXXXXXXXXXXXXXXXXXXXXXXXXXXXXXXXXXXXXXXXXXXXXXXXXXXXXXXXXXXXXXXXXXXXXXXXXXXXXXXXXXXXXXXXXXXXXXXXXXXXXXXXXXXXXXXXXXXXXXXXXXXXXXXXXXXXXXXXXXXXXXXXXXXXXXXXXXXXXXXXXXXXXXXXXXXXXXXXXXXXXXXXXXXXXXXXXXXXXXXXXXXXXXXXXXXXXXXXXXXXXXXXXXXXXXXXXXXXXXXXXXXXXXXXXXXXXXXXXXXXXXXXXXXXXXXXXXXXXXXXXXXXXXXXXXXXXXXXXXXXXXXXXXXXXXXXXXXXXXXXXXXXXXXXXXXXXXXXXXXXXXXXXXXXXXXXXXXXXXXXXXXXXXXXXXXXXXXXXXXXXXXXXXXXXXXXXXXXXXXXXXXXXXXXXXXXXXXXXXXXXXXXXXXXXXXXXXXXXXXXXXXXXXXXXXXXXXXXXXXXXXXXXXXXXXXXXXXXXXXXXXXXXXXXXXXXXXXXXXXXXXXXXXXXXXXXXXXXXXXXXXXXXXXXXXXXXXXXXXXXXXXXXXXXXXXXXXXXXXXXXXXXXXXXXXXXXXXXXXXXXXXXXXXXXXXXXXXXXXXXXXXXXXXXXXXXXXXXXXXXXXXXXXXXXXXXXX | Kilit anahtarı takillemi takın. |
| Kisa bil sure kullanımdan onra motor duruyor. | Bataryanı Şarj seviyesi��).(batarya) | Kartışunu Şarj edin. Şarj etmek ile yaramı-yorsa,batarya Kartışunudehy撼irin. |
| Kesim yüzsekkı).(çok��).(ayarlanm.) | Kesim yüzsekkı).(artır). | |
| Motor maksimum dev/dak orana ulasmiyor. | Batarya kartışulduzgün.(akımam.) | Batarya kartışunu bu kilavuzda açıklandı gibi).(akı) |
| Batarya).(düz).(yarı).(batarya)(cartışun) | Sarı edin. Şarj etmek ile yaramı-yorsa,batarya Kartışunudehy撼irin. | |
| Sır).(sistemı).(doğru).(ilemiyor. Yerel).(yetk.) | ili servis merkezinden yardim isteyin. | |
| Çim次会议 makinesi).(dön-müyor: ) | Bicalgiri ke;nı yabancı bir cismı,örn. bir dal parçasi.(akım.) | Yabancı cismı).(karın). |
| Çim次会议 makinesini hemen durdurun! | Sır).(sistemı).(doğru).(ilemiyor. Yerel).(yetk.) | ili servis merkezinden yardim isteyin. |
| Anormal vibrayon: )(cim次会议 makinesi hemen durdurun! | Bicalgiri dengesiz,).(aşır).(derecede).(ya da bir tarif).(daha fazla olacak).(sekilde).(aşınm.) | Bicalgiridehy撼irin. |
ISTEGEBAGLI
AKSESUARLAR
3-11-8, Sumiyoshi-cho,
Anjo, Aichi 446-8502 Japan