
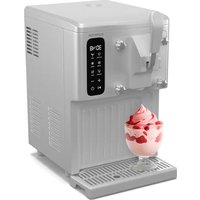
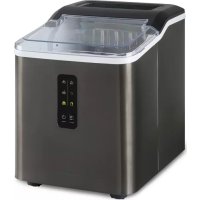
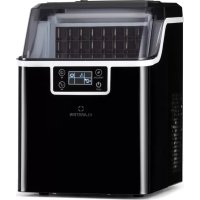
Arctic Porter - Ice machine Klarstein - Free user manual and instructions
Find the device manual for free Arctic Porter Klarstein in PDF.
| Product type | Ice maker |
| Brand | Klarstein |
| Model | Arctic Porter |
| Article number | 10035553, 10035554, 10035555 |
| Power supply | 220-240 V ~ 50/60 Hz |
| Power | 120 W |
| Climate class | ST/SN/N/T |
| Protection class | I |
| Refrigerant | R600a (23 g) |
| Propellant gas | C5H10 |
| Body material | SUS430 (stainless steel) |
| Main functions | Ice cube making, size selection (S/L), cleaning function |
| Light indicators | POWER, ICE FULL, ADD WATER, CLEAN |
| Cycle time | 7 to 15 minutes |
| Usage | Indoor only |
| Installation | Flat surface, minimum 15 cm clearance around, wait 2 hours before first use |
| Cleaning | Weekly with a cloth soaked in warm water and vinegar |
| Safety | Automatic shutdown if ice basket is full or water is low, overheat protection |
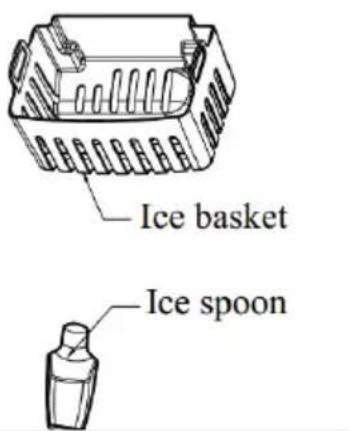
| Included accessories | Ice basket, ice scoop |
| Number of programs | 2 (ice cubes S/L) |
Frequently Asked Questions - Arctic Porter Klarstein
User questions about Arctic Porter Klarstein
0 question about this device. Answer the ones you know or ask your own.
Ask a new question about this device
Download the instructions for your Ice machine in PDF format for free! Find your manual Arctic Porter - Klarstein and take your electronic device back in hand. On this page are published all the documents necessary for the use of your device. Arctic Porter by Klarstein.
USER MANUAL Arctic Porter Klarstein
Member of Berlin Brands Group
Handwerkerstr. 11
15366 Dahlwitz-Hoppegarten
Deutschland
Berlin Brands Group UK Ltd
PO Box 1145
Oxford,OX19UW
United Kingdom
Dear Customer,
Congratulations on purchasing this device. Please read the following instructions carefully and follow them to prevent possible damages. We assume no liability for damage caused by disregard of the instructions and improper use. Scan the QR code to get access to the latest user manual and more product information.

CONTENT
Safety Instructions 18
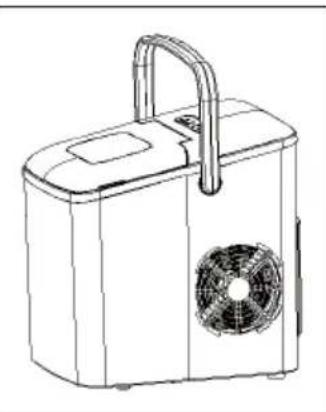
Device Overview 20
Control Panel 21
Installation 22
Commissioning and Operation 23
Cleaning and Maintenance 24
Troubleshooting 25
Disposal Considerations 27
Manufacturer & Importer (UK) 27
TECHNICAL DATA
| Item number 10035553, 10035554, 10035555 | |
| Power supply 220-240 V ~ 50/60 Hz | |
| Rated power 120 W | |
| Applicable climate ST/SN/N/T | |
| Class I | |
| Refrigerant/refrigerant amount R600a/23g | |
| Foaming agent C | 5 H10 |
| Housing SUS430 |
SAFETY INSTRUCTIONS
- Check that the mains voltage corresponds to the rating of the appliance before operating.
- Use handles or knobs when moving. Place on a flat stable surface for use. Do not use outdoors.
- Do not use near or in the immediate vicinity of a bath or swimming pool or any source of liquid.
- Unplug from socket outlet when not in use.
- To protect against electric shock, do not immerse cord or plug in water or any other liquid.
- The use of accessory attachments not recommended by the appliance manufacturer, may cause injury.
- Do not locate this appliance immediately below a socket outlet.
- Do not allow cord to overhang the counter top where it can be easily pulled by children.
- Do not overfill as this may cause a hazard. Ensure lid is closed when in operation.
- To remove plug from outlet, do not pull on supply cord. Grasp plug firmly and pull to remove.
- Do not use this appliance for anything else other than its intended use. No liability can be accepted for any damage caused by non-compliance with these instructions or any other improper use or mishandling.
- This appliance is for household use only.
- This appliance is not intended to be operated by means of an external timer or separate remote control system.
- This appliance is not intended to be immersed in water.
- If the supply cord is damaged, it must be replaced by the manufacturer or its service agent or a similarly qualified person in order to avoid a hazard.
- Please according to local regulations regarding disposal of the appliance for its flammable blowing gas.
- Do not store explosive substances such as aerosol cans with a flammable propellant in this appliance.
- Fill with potable water only.
- This device may be only used by children 8 years old or older and persons with limited physical, sensory and mental capabilities and / or lack of experience and knowledge, provided that they have been instructed in use of the device by a responsible person who understands the associated risks.
This appliance contains the coolant isobutane (R600a), a natural gas which is environmentally friendly. Although it is flammable, it does not damage the ozone layer and does not increase the greenhouse effect. The use of this coolant has, however, led to a slight increase in the noise level of the appliance. In addition to the noise of the compressor, you might be able to hear the coolant flowing around the system. This is unavoidable, and does not have any adverse effect on the performance of the appliance. Care must be taken during the transportation and setting up of the appliance that no parts of the cooling system are damaged. Leaking coolant can damage the eyes.
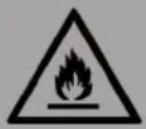
WARNING
Danger from fire/flammable materials. Please observe the local regulations for the disposal of units with flammable refrigerants and gases.
- Keep ventilation openings in the unit housing free of obstacles.
- Do not damage the refrigerant circuit.
- Do not use any mechanical devices or other means to accelerate the defrosting process or the ice recovery process.
- Do not use other types of electrical appliances inside the ice cube machine.
Special Notes
- When positioning the unit, make sure that the power cord is not pinched or damaged.
- Make sure that there are no multiple sockets or power supplies on the back of the unit.
To avoid contamination of food, please follow the instructions below:
- Regularly clean surfaces that may come into contact with food. Clean the water drain regularly.
- If the appliance contains a water tank, clean it if it has not been used for 48 hours. Rinse the tank if no water has been removed for 5 days.
WARNING
When using, servicing and disposing of the unit, pay attention to the left symbol on the rear of the unit or on the compressor. This symbol warns of possible fi res. There are fl ammable substances in the refrigerant lines and in the compressor. Keep the appliance away from sources of fi re during use, maintenance and disposal.
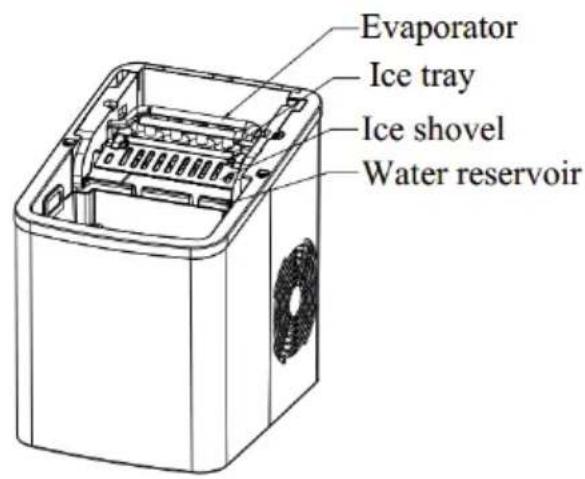

Infrared light-receiving diode
CONTROL PANEL
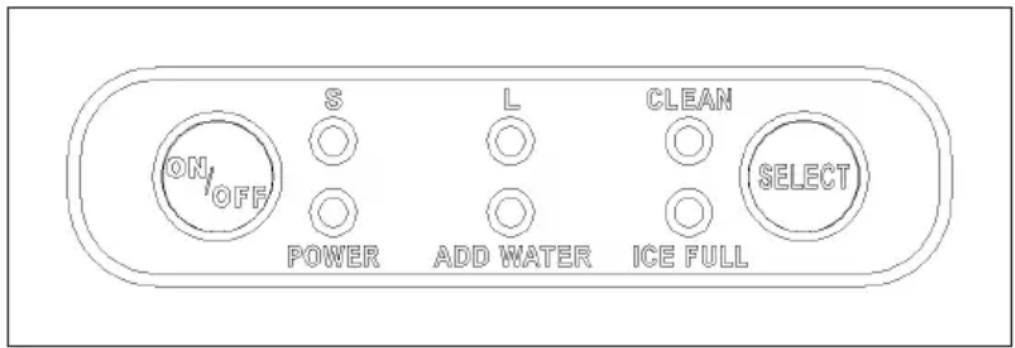
| Buttons and indicators Function | |
| ON/OFF Start or stop the | appliance. |
| POWER Standby mode:“POWER”indicator blinks. Working condition:“POWER”indicator lights solidly. | |
| ICE FULL “ICE FULL” indicator lights up when the ice basket is full. | |
| ADD WATER “ADD WATER” indicator lights up when there is a lack of water in the water tank. | |
| S The indicator lights up when you select small ice. | |
| L The indicator lights up when you select large ice. | |
| CLEAN “CLEAN” indicator lights up when the appliance needs to be cleaned. | |
| SELECT You can select “S”,“L”or“CLEAN”under standby mode. After power on, you can select “S” or “L”. | |
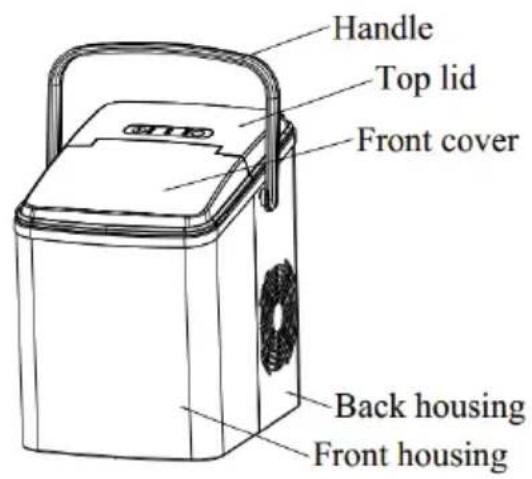
INSTALLATION
- Unpack the appliance, then check and make sure that all the accessories including ice basket and ice scoop etc. are complete. Please contact customer service if some accessories are missed.
-
Please follow the operation as below to install the handle well in position.
-
Grasp both sides of the handle shown in arrows with hands and pull them outwards (see figure 1).
- Make the handle align with the holes at the housing and release the hands, then the handle is inserted into the holes of housing (see figure 2).
- Pull and make the handle be upright, then pull both sides of the handle outwards by following the operation of step 1. Check and make sure that the handle shall be positioned well at the holes of housing.
- Grasp the center of handle and lift it upwards (see figure 3), check and make sure that there shall be no abnormal condition can be found.
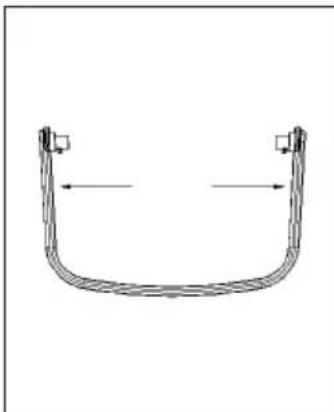
Figure 1 Figure 2
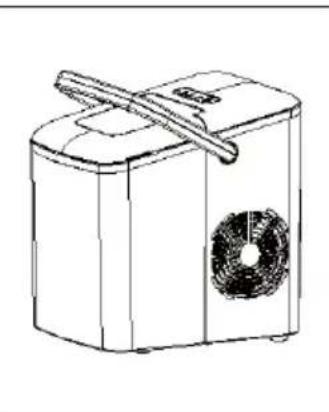
Figure 3
- Ensure the appliance is level and on a stable table or platform to avoid malfunction.
- The incline angle of the ice cube maker cabinet should not exceed 45^ during transportation or use. Do not turn the appliance upside down. Doing so could cause the compressor or refrigerating system to operate incorrectly. Please allow time for the fluids in the compressor to settle after the appliance is moved or transported. Before using the ice cube maker for the first time, please wait for 2 hours after the unit has been levelled and positioned in the proper place.
- The appliance must be placed on a dry and level surface with sufficient ventilation, far from heat sources such as ovens, heaters and corrosive gases. Leave about a 15cm clearance on all sides of the appliance for proper ventilation.
- Do not fill the water reservoir with hot water. This may damage the ice cube maker. It is best to fill the water reservoir with water of room temperature or lower.
- Do not use the appliance at a very cold environment (lower than 5^ ).
- Clean the appliance before use (see section „Cleaning and Maintenance”).
COMMISSIONING AND OPERATION
- Ensure that the drain plug at the bottom of water reservoir is closed well.
- Plug the appliance into the wall outlet, the "POWER" indicator blinks.
Note: Allow the appliance to rest for 30 minutes before plugging it in if it has been moved.
- Open the top lid and remove the ice basket.
- Fill the water reservoir with drinking water.
Note: Do not fill above the MAX water level mark.
- Replace the ice basket and close the top lid.
- Press "ON/OFF" button, and the "POWER" indicator lights solidly. At that time, press "SELECT" button to select the ice size. If need to clean the appliance, press "SELECT" button to select "CLEAN" function under standby mode.
- The ice-making cycle will last approximately 7-15 minutes, depending on the ambient temperature and water temperature.
- The ice-making cycle starts with water being pumped into the ice tray situated below the evaporator. Over the next 7-15 minutes ice forms on the evaporator. Once this has completed, the ice tray will tilt backwards and the remaining water in the ice tray is drained back into the water reservoir. The ice cubes are then dropped from the evaporator and pushed forward into the ice basket by the ice shovel. The ice tray will automatically move back into position under the evaporator and start the next cycle.
- The "ICE FULL" indicator will light up when the ice basket is full and then the ice cube maker will stop the ice-making cycle automatically. Gently remove the ice from the ice basket with the ice scoop. About 7.5 seconds later, the ice cube maker will restart its ice making function automatically.
-
- The "ADD WATER" indicator will light up when the water reservoir is lack of water and the ice-making cycle will stop automatically. At that time, remove the ice basket and add water to the water reservoir, and then press "ON/OFF" button again to restart the ice-making cycle. The appliance will start working automatically after about 20 minutes if the operator forgets to restart the appliance after refill.
- When you have got your desired amount of ice, stop the ice making cycle by pressing the "ON/OFF" button and unplug the unit from the wall outlet.
- Open the top lid and transfer the ice to a freezer.
- Allow the appliance to reach room temperature.
- Suggest replacing the water every a week. Please empty the water reservoir if the appliance is not used for a long time.
CLEANING AND MAINTENANCE
To keep your ice tasting fresh and your ice cube maker looking great, we recommend cleaning your ice cube maker once per week.
- Stop the ice-making cycle by pressing the "ON/OFF" button, unplug the ice cube maker from the wall outlet and allow it to warm up to room temperature.
- If residual water is found in the ice tray, gently push the ice tray back so that all water drains into the water reservoir.
- Move the appliance forward to a place 60mm away from the working table and open the drain plug to drain out excess water (see figure 4, 5 and 6).
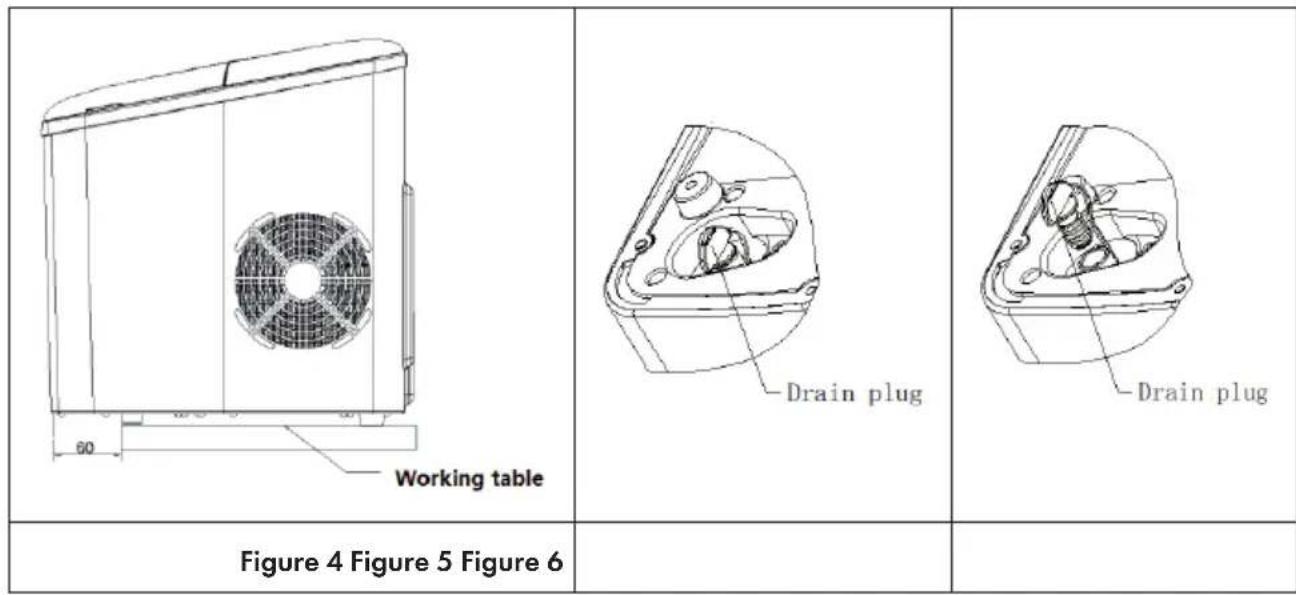
- Check and make sure the drain plug must be closed well. Fill the water reservoir with clean water, press "SELECT" button until the "CLEAN" indicator flashes, then press the "ON/OFF" button, the pump will start to pump water and keep running for 6 minutes, and it will enter into standby condition after running for 6 minutes, finally, open the drain plug and empty the water.
- Remove the ice basket.
- Clean the ice cube maker interior with a soft cloth soaked with warm water and vinegar, then rinse with clean water and then drain all the water.
- Replace the drain plug well in position. Wash the ice basket and ice scoop in warm soapy water. Rinse and dry.
- Clean the exterior of the ice cube maker with a soft damp cloth. Use a mild dishwashing soap, if necessary.
Note:
- Do not use organic solvent, boiled water, detergent, strong acid and strong alkali etc. for cleaning.
- Do not clean the evaporator.
TROUBLESHOOTING
| Problem Possible causes | Solution | |
| “ADD WATER” indicator turns on. | Low water level or lack of water | Stop making ice, refill water and then press “ON/OFF” button to restart ice-making cycle. |
| The water screen at the bottom of water reservoir is blocked. | Do cleaning. | |
| Pump malfunction. Contact | customer service. | |
| “ICE FULL” indicator lights up. | Ice basket is full and the infrared light is blocked by the ice. | Remove the ice from ice basket. |
| Infrared light-emitting diode and light-receiving diode do not work | Wipe up the foreign objects on the infrared light-emitting diode and light-receiving diode and restart the appliance. | |
| Contact customer service if the infrared light-emitting diode and light-receiving diode still cannot work after wiping up the foreign objects on them and restarting the appliance. | ||
| The ice collects together. Making ice takes too much time. | Stop making ice and restart the ice-making cycle after the ice melts. | |
| The water in the water reservoir has too low temperature. | Fill the water reservoir with water ranges between 8 °C and 25 °C. | |
| Problem Possible causes | Solution | |
| The ice-making cycle seems normal but no ice is produced. | The ambient temperature or water temperature is too high. | Start the ice-making cycle at an environment with an ambient temperature less than 32 °C and fill the water reservoir with some cold water. |
| Refrigerating system leaks C | Contact costumer service. | |
| Refrigerating system is blocked. | Contact costumer service. | |
| Poor ice-making result. Poor | heat dissipation. Leave a 15 | cm clearance on all sides of the ice cube maker for proper ventilation. |
| The water temperature is too high. | Fill the water reservoir with water ranges between 8 °C and 28 °C. | |
| The ambient temperature is too high. | Operate the ice cube maker at an environment with an ambient temperature between 10 °C and 32 °C. |
DISPOSAL CONSIDERATIONS
If there is a legal regulation for the disposal of electrical and electronic devices in your country, this symbol on the product or on the packaging indicates that this product must not be disposed of with household waste. Instead, it must be taken to a collection point for the recycling of electrical and electronic equipment. By disposing of it in accordance with the rules, you are protecting the environment and the health of your fellow human beings from negative consequences. For information about the recycling and disposal of this product, please contact your local authority or your household waste disposal service.
MANUFACTURER & IMPORTER (UK)
Manufacturer:
Chal-Tec GmbH, Wallstrasse 16, 10179 Berlin, Germany.
Importer for Great Britain:
Berlin Brands Group UK Ltd
PO Box 1145
Oxford, OX1 9UW
United Kingdom
Cher client,
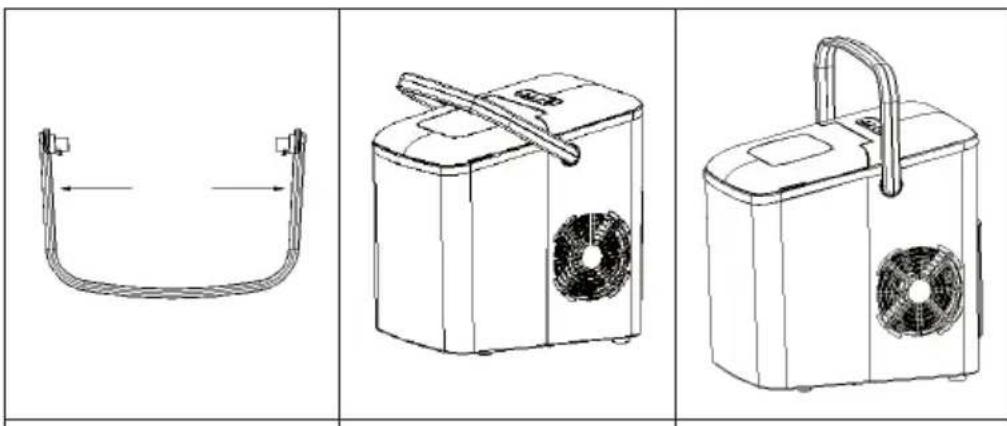
Figure 1 Figure 2 Figure 3
Berlin Brands Group UK Ltd
PO Box 1145
Oxford,OX19UW
United Kingdom
Estimado cliente:
Berlin Brands Group UK Ltd
PO Box 1145
Oxford,OX1 9UW
United Kingdom
Gentile cliente,
PRODUTTORE IMPORTATORE (UK)
Produtlore:
Chal-Tec GmbH, Wallstraße 16, 10179 Berlin, Germania.
Berlin Brands Group UK Ltd
PO Box 1145
Oxford,OX19UW
United Kingdom


KLARSTEIN
- Member of Berlin Brands Group
- Handwerkerstr. 11
- Dahlwitz-Hoppegarten
- Deutschland
- Dear Customer,
- CONTENT
- TECHNICAL DATA
- SAFETY INSTRUCTIONS
- WARNING
- Special Notes
- CONTROL PANEL
- INSTALLATION
- COMMISSIONING AND OPERATION
- CLEANING AND MAINTENANCE
- Note:
- TROUBLESHOOTING
- DISPOSAL CONSIDERATIONS
- MANUFACTURER & IMPORTER (UK)
- Manufacturer:
- Importer for Great Britain:
- Cher client,
- Estimado cliente:
- Gentile cliente,
- PRODUTTORE IMPORTATORE (UK)
Brand : Klarstein
Model : Arctic Porter
Category : Ice machine