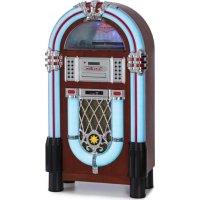
Graceland Touch - Jukebox Auna - Free user manual and instructions
Find the device manual for free Graceland Touch Auna in PDF.

User questions about Graceland Touch Auna
0 question about this device. Answer the ones you know or ask your own.
Ask a new question about this device
Download the instructions for your Jukebox in PDF format for free! Find your manual Graceland Touch - Auna and take your electronic device back in hand. On this page are published all the documents necessary for the use of your device. Graceland Touch by Auna.
USER MANUAL Graceland Touch Auna
text_image
QR code image containing encoded data, no visible human-readable textINHALTSVERZEICHNIS
Technische Daten 4
text_image
Settings Wireless & networks WiFi Bluetooth Ethernet Data usage More Display Sound & notification Apps Storage & USBtext_image
Internal storage 276 MB Mood of A 1Y GB Apps 100 MB Imagettext_image
Apps storage Internal storage Launcher3 4.04 MB Clock 3.55 MB VideoPlayer 2.07 MBtext_image
Storage VideoPlayer Storage Total App Data CLEAR DATA ina data platformtext_image
Delete app data? All this app's data will be deleted permanently. This includes all files, settings, accounts, databases, etc. CANCEL OKMember of Berlin Brands Group
Handwerkerstr. 11
15366 Dahlwitz-Hoppegarten
Deutschland
natural_image
Symbol of a trash bin crossed with a diagonal line, representing no waste or discharge (no text or labels)Congratulations on purchasing this device. Please read the following instructions carefully and follow them to prevent possible damages. We assume no liability for damage caused by disregard of the instructions and improper use. Scan the QR code to get access to the latest user manual and more product information.

text_image
QR code image containing encoded data, no visible human-readable textCONTENT
Technical Data 28
Safety Instructions 29
Product Overview 31
Control Panel and Remote Control 34
Commissioning 36
FM Radio 37
CD Mode 38
USB/SD Card 39
BT Mode 40
Using the Media Player 43
Important Notes on Operation 44
Clearing the Cache 45
Restoring the Factory Settings 46
Troubleshooting 47
Disposal Considerations 48
Declaration of Conformity 48
TECHNICAL DATA
| Item number 10034802 | |
| Frequency range FM 87,5 – 108 MHz | |
| Power adapter 100 – 240 V (AC) ~ 50 – 60 Hz | |
| Power consumption 65 W | |
| Dimensions (L x W x H) 30 x 57 x 105 cm | |
| Weight 19,5 kg | |
| Amplifier Output power 2.0 sound channel | |
| Screen size 12 inch | |
| USB 2.0 | |
| BT frequencyRadio-frequency power | 2402-2480 MHz4 dBm |
| WLAN standard | 802.11b/g/n |
| Video resolution 1080 P (1920 x 1080) | |
| Operating system Android 6.0.1 | |
| Playback modes Loop, timing, insert etc. | |
| Supported networks | Ethernet, WLAN, wireless peripheral expansion |
| Supported video formats | WMV, avi, FLV, rm, RMVB, mpeg, ts, h.265, mp4 |
| Supported image formats | BMP, JPEG, PNG, GIF etc.; RSS current events, Flash animations, dynamic websites |
| Supports playback of Office documents PPT, WORD, EXCEL and PDF documents | |
| Supports the playback of web pages | Web page playback, scrolling on web pages, zooming |
| Single Player playback | Supports single playback of imported programs on u disk |
| log management | Powerful logging function, can receive any instruction referring to the state |
| Split screen | Programs can be extended, dragged and dropped, with digital calendar, time mode, weather forecast module, program template library: Offers a thumbnail function |
SAFETY INSTRUCTIONS
General information
- Lightning - If you are not going to use the device for a long time or if there is a storm, disconnect the plug from the electrical outlet and disconnect the device from the antenna connector. This will avoid damage to the product that may be caused by lightning or overvoltage.
- Overload - Do not overload power outlets, extension cords, or built-in power outlets, as this may result in a fire or electric shock.
- Foreign objects and liquid - Never push objects of any kind through openings in the device as they may touch dangerous voltage points or short out parts, which could result in a fire or electric shock. Never spill liquids of any kind on the device.
- Repairs and maintenance - Do not attempt to service this product yourself, as opening or removing covers will expose you to dangerous voltages or other hazards. Leave all maintenance to qualified service personnel.
- Damage requiring service - Disconnect the power plug from the outlet and consult a qualified specialist if any of the following conditions occur:
a) If the power cord or plug is damaged.
b) If liquid has been spilled or objects have fallen onto the product.
c) If the product has been exposed to rain or water.
d) If the product has been dropped or damaged.
e) If the product has a markedly reduced performance.
- Replacement parts - When replacement parts are required, make sure that the service professional who replaces the parts only uses replacement parts that have been approved by the manufacturer or that have the same characteristics as the original part. Unauthorized replacement may result in fire, electric shock or other hazards.
- Heat - Do not place the unit near heat sources such as radiators, heaters, stoves or other products (including amplifiers).
Special Instructions
- This device may be only used by children 8 years old or older and persons with limited physical, sensory and mental capabilities and / or lack of experience and knowledge, provided that they have been instructed in use of the device by a responsible person who understands the associated risks.
- Children should be supervised to ensure that they do not play with the appliance.
- Ensure children and babies do not play with plastic bags or any packaging materials.
- Mains plug/Power adaptor is used as disconnect device and it should remain readily operable during intended use.
- In order to disconnect the apparatus from the mains completely, the main plug/power adaptor should be disconnected from the mains socket outlet completely.

WARNING
Keep batteries out of reach of children. Swallowing may lead to serious injury or death in as little as two hours due to internal burns. If swallowed, go straight. to a hospital emergency room. Dispose of used batteries immediately.
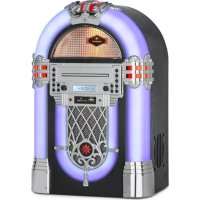
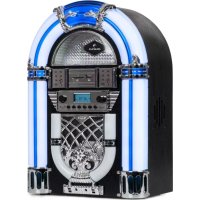
PRODUCT OVERVIEW
Device (front view)
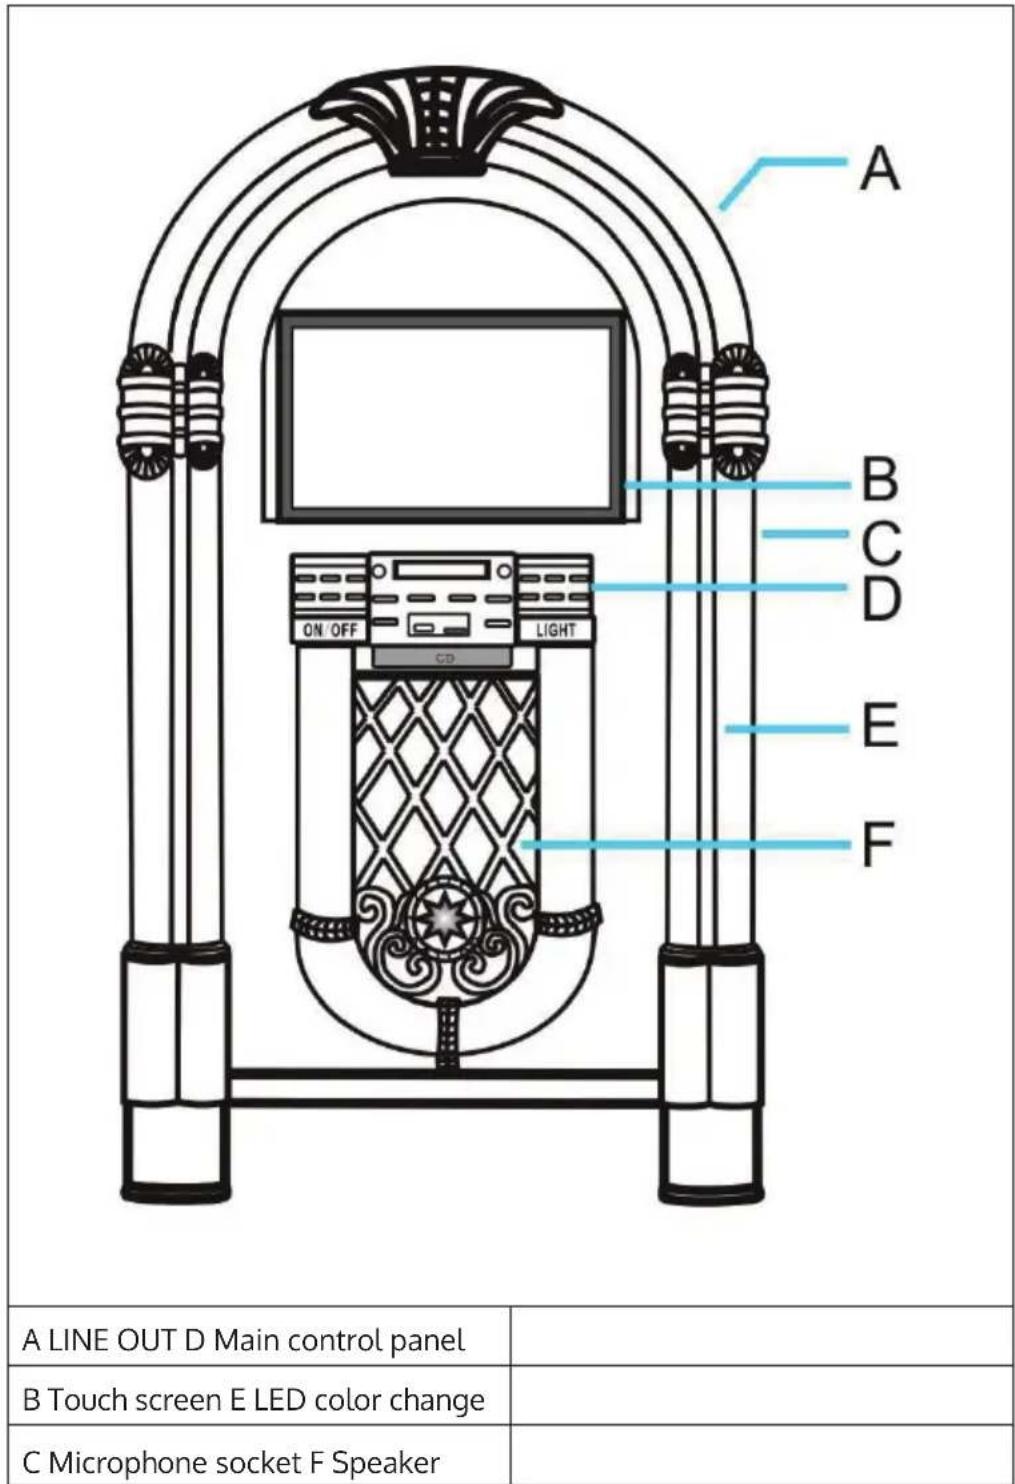
text_image
A B C D E F ON OFF LIGHT A LINE OUT D Main control panel B Touch screen E LED color change C Microphone socket F SpeakerDevice (rear view)
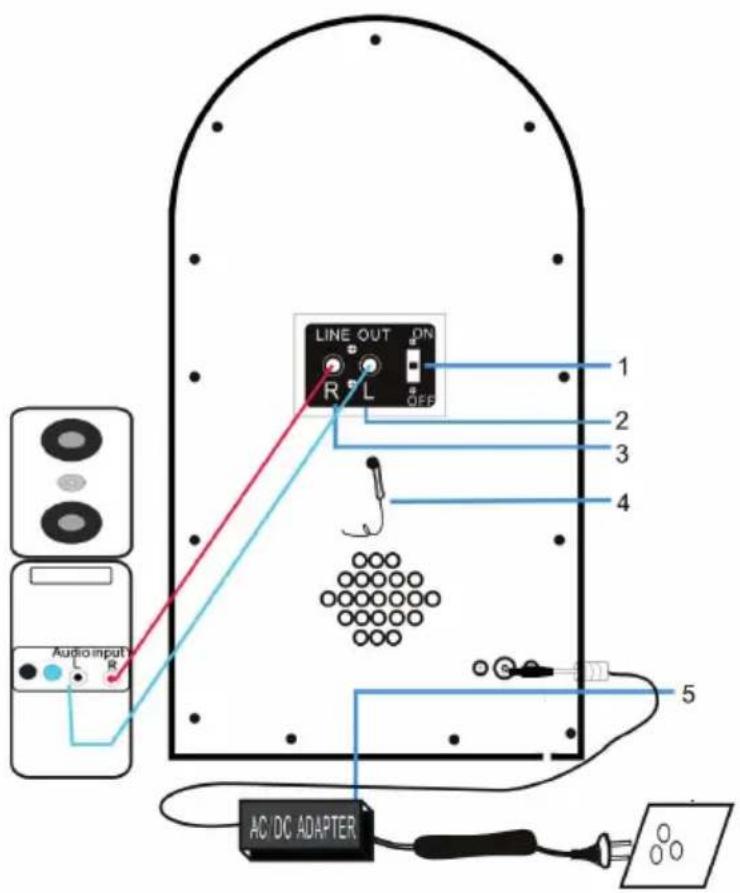
text_image
LINE OUT ON R L OFF 1 2 3 4 Audio input L R 5 AC DC ADAPTER| 1 line-out switch system 3 LINE OUT-R | |
| 2 LINE OUT-L 4 FM antenna | |
| 5 Power adapter input socket |
Microphone connection and operation
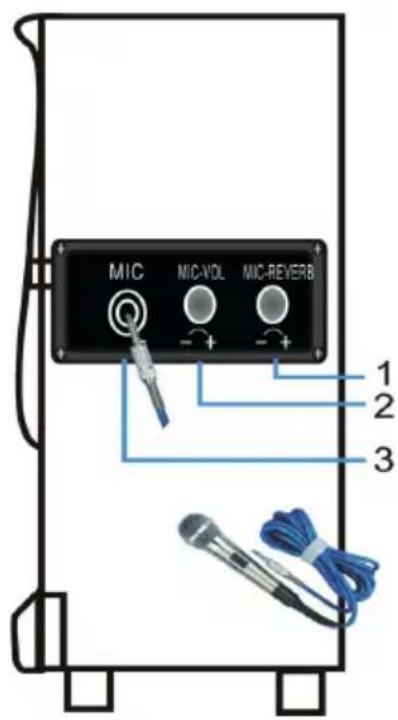
text_image
MIC MIC-VOL MIC-REVERB 1 2 3| 1 Adjust the reverb of the microphone. | 3 Cable jack of the microphone. |
| 2 Adjust the volume of the microphone. |
- There are suitable microphones available on the market.
- You can sing along to the music of the device or sing alone.
CONTROL PANEL AND REMOTE CONTROL

text_image
4 3 2 1 14 15 16 17 5 6 7 8 9 10 11 ON/OFF USB LIGHT 18 19 20 21 22 23 24 25 12 13| 1 Screen 14 Remote control receiver | ||
| 2 Increase volume 15 10 titles forward | ||
| 3 Next title/forward 16 Stereo/Mono | ||
| 4 Play/Pause 17 Folder+ | ||
| 5 Decrease volume 18 10 Title back | ||
| 6 Previous track/ rewind 19 | Automatic radio station search | |
| 7 Stop 20 Folder- | ||
| 8 Sound control 21 Repeat | ||
| 9 On/Off | 22 Save | |
| 10 Mode | 23 | CD door open/close |
| 11 Power switch | 24 | Light on/off |
| 12 USB connection | 25 | SD card connection |
| 13 CD door |
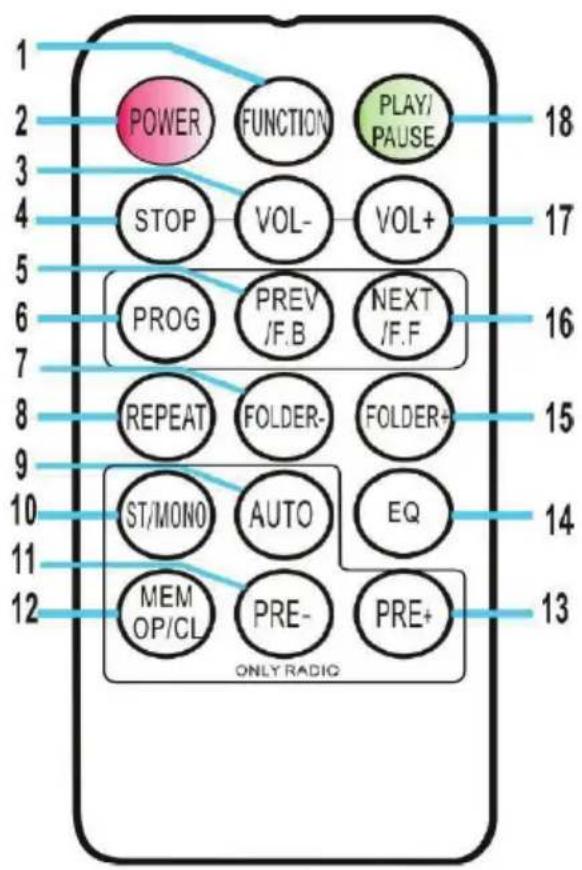
text_image
POWER FUNCTION PLAY/ PAUSE STOP VOL- VOL+ PROG PREV NEXT /F.B /F.F REPEAT FOLDER FOLDER+ ST/MONO AUTO EQ MEM PRE+ OP/CL OP/ ONLY RADIO 18 17 16 15 14 13WARNING
Keep batteries out of reach of children. Swallowing may lead to serious injury or death in as little as two hours due to internal burns. If swallowed, go straight. to a hospital emergency room. Dispose of used batteries immediately.
| 1 Mode selection 10 Selection Stereo/Mono | |||
| 2 Switch on/standby mode 11 | Playing previously saved radio stations | ||
| 3 Decrease volume 12 | Set the desired station. Up to 20 stations can be stored. | ||
| 4 Stop 13 Play the next preset radio station | |||
| 5 Previous title, rewind 14 Changing the Equalizer Setting | |||
| 6 Save to Playlist 15 Skip the first title of the folder | |||
| 7 | Jump to the first track in the folder | 16 Next title, fast forward | |
| 8 Repeat 17 Increase volume | |||
| 9 Automatic station search 18 Play/Pause | |||
Note: when programming to store radio stations, local radio programs must have a strong signal of 20 stations or more in order to store to 20 stations. Otherwise, only the number of stations that can be received can be stored.
COMMISSIONING
Time setting
American version:
When the unit is put into standby mode, the LCD screen lights up and displays the time „12:00“.
European version:
When the unit is put into standby mode, the LCD screen lights up and displays the time „00:00“.
Example:
- To set the time, press and hold the PROG button on the control panel or remote control for 3-5 seconds until „12“ is displayed on the screen („12“ means that the 12-hour format has been set).
- Press the NEXT or PREV button to select between 12-hour and 24-hour format. When „12-H“ is displayed on the screen, press the PROG button again. 00:00" will be displayed on the screen, but „12" will flash. To set the correct hour, use the NEXT and PREV buttons on the control panel or remote control (the time will be set in 12-hour format), then press the PROG button to confirm. To set the correct minute, use the NEXT and PREV buttons on the control panel or remote control (the time will be set in 12-hour format), and then press the PROG button to confirm.
Note: The time is stored in the unit only when it is in operation or standby mode. If you want to save the set time, do not press the POWER switch, just press the ON/OFF button to put the unit into standby mode. If you press the POWER switch, the time setting you have made will be cleared and you will have to set the correct time the next time you turn on the machine.
FM RADIO
Frequency range: 87.5 - 108 MHz
This device has a built-in FM radio. Up to 20 radio stations can be stored. When you use the unit for the first time, press the POWER button to put the unit into standby mode. Press the ON/OFF button on the control panel or the POWER button on the remote control to turn it on. The unit starts operating in FM mode. FM 87.5 MHz" is displayed on the screen and a hissing sound is heard from the speakers (unless there is a radio station on the 87.5 MHz frequency in your area). If the unit does not start in FM mode, press the MODE button on the unit or the FUNCTION button on the remote control repeatedly until the FM mode is displayed on the screen.
Automatic station search and saving of found stations
Press the AUTO button to start the automatic station search from frequency 87.5 MHz upwards. The first 20 stations found are automatically stored (designation P01 - P20). Press the PR- or PR+ buttons to view all stored stations in sequence.
Automatic station search without saving the found stations
Press and hold the ◀◀/▶button to search for a station with good signal reception with falling or rising frequency. This automatic search function does not save the found stations. The search will not continue after a station is found.
Note: If you press the ◀◀/▶▶ buttons briefly several times, the frequency range will be adjusted in 0.05 MHz steps.
Note: when programming to store radio stations, local radio programs must have a strong signal of 20 stations or more in order to store to 20 stations. Otherwise, only the number of stations that can be received can be stored.
Manual station storage
Press the 1/4 buttons to tune to your favourite station. Press the MEM button. P01" is displayed on the screen. If you press the PR- or PR+ button within 3 seconds, you can select the memory location. Press the MEM button within 3 seconds to save. You can store up to 20 radio stations.
In the American version of the FM frequency, the frequency changes in steps of 0.1 MHz, in the European version in steps of 0.5 MHz. Extend the antenna of the device completely to get the best possible reception (the FM antenna is located on the back of the device).
Note: If you want to save radio stations, the radio station you want to save must have good signal reception, otherwise it will not play even if the frequency is saved.
CD MODE
- Press the MODE button until the screen displays „----”. Then the screen displays the number of tracks on the CD and playback starts.
- Press the OPEN/CLOSE button on the control panel or the EJECT button on the remote control to open the CD tray.
- Insert a CD into the CD tray with the label side facing up and the face down.
- Press the OPEN/CLOSE button on the control panel or the EJECT button on the remote control again to close the CD tray.
- Press the button to select the desired track.
- Press the REP button once to repeat a track. The „REP“ indicator will flash in the upper left corner of the screen. If you press the REP button again, all the tracks on the CD will be repeated. The „REP“ indicator appears in the upper left corner of the screen. Pressing the REP button again will cancel the repeat function.
-
Press and hold the REP button until „RAN“ is displayed on the screen for random play.
-
To save songs in a playlist, first press the stop button. Press the PROG button to enter the save mode. The screen flashes and displays „P01“. Select the song you want to save in the playlist and press the PROG button again. Press the button to cancel saving to the playlist or to play the playlist of saved songs. You can save up to 20 songs in the playlist.
- To increase the volume, turn the volume control clockwise until the desired volume is reached.
- To decrease the volume, turn the volume control counterclockwise until the desired volume is reached.
USB/SD CARD
- Press the MODE button repeatedly until the screen displays „USB - - - -” is displayed. The screen will then display the number of folders and the number of songs and start playback.
- Press the /or F-10/ F-10 key to select the desired title.
- Press the REP button once to repeat a title. The REP indicator will blink in the upper left corner of the screen. If you press the REP key again, all titles in the selected folder will be displayed. The „REP“ indicator appears in the upper left corner of the screen. If you press the REP button again, all tracks will be repeated. Pressing the button again will cancel the repeat function.
- Press and hold the REP button until the screen displays „RAN“ for random playback.
- To save songs in a playlist, first press the stop button ■
BT MODE
- Press the MODE button repeatedly until the screen displays „BT“ and wait 3 seconds until the device can be found by other BT devices in the device list
- Turn on your BT-enabled mobile device and search for available BT devices in the device list.
- Select „IJKEBOX“ from the device list.
- Once the devices are successfully paired, the screen will display "connected". You can now play the songs on your mobile device. You can operate them from your mobile device, from your device itself or from the remote control of the device.
a) Playback from the device: Use the VOL+/VOL-, ▶ and / ◀◀◀ ▶◀◀ buttons to adjust the volume, pause or resume playback, or select the previous or next song.
b) You can also control playback from the unit's remote control.
c) Once the devices are paired, the mobile BT device will automatically start playing music.
d) Press VOL+/VOL- buttons to adjust the volume.
e) Press the 7 buttons to move to the previous or next song.
f) Press the button to resume playback.
g) Press MODE button to end pairing and select another mode or disable the BT function on your mobile device.
Tips for the BT connection
- If you want to pair your device with a BT mobile device, place the devices as close as possible to each other for connection.
- The BT connection may not work properly for the reasons listed below:
• There is an obstacle between the jukebox and the BT device.
- Another device, such as medical equipment, microwaves or other WLAN devices, is using the same frequency as the BT device.
- Only one mobile BT device can be connected to the jukebox at a time. A multiple coupling is not possible.
Storing songs in a playlist (in BT mode)
- During music playback, press the button.
- Press the PROG button. PROG" flashes in the upper left corner of the screen. A memory location number e.g. „P01" also flashes.
- Press the /buttons to select the song you want to store. Press the PROG button to store.
- Repeat steps 2-3 to save more songs.
- When you have saved all the songs you want, press the button to start playback.
- You can cancel the save operation at any time by pressing the button.
- When you have reached the maximum number of songs stored, the screen will display "FUL".
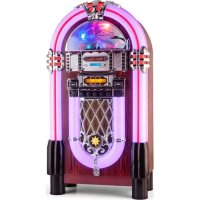
Activating the Light Effects
The device has several multi-coloured LED effects that can be adjusted via the LED control. The CD compartment, the USB/SD port and the bottom of the speakers can be illuminated. To activate the light effects, press the LIGHT button on the control panel. All light effects will light up.
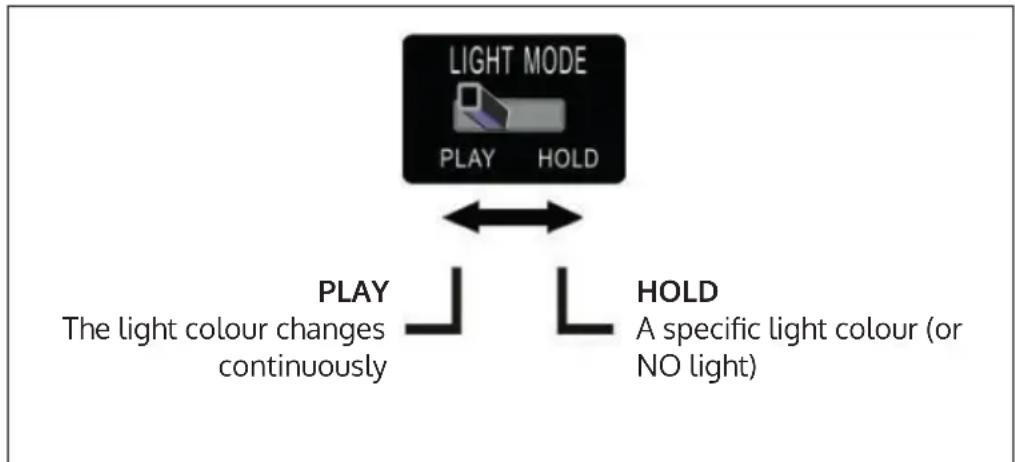
flowchart
graph TD
    A["LIGHT MODE PLAY HOLD"] <--> B["PLAY The light colour changes continuously"]
    A <--> C["HOLD A specific light colour (or NO light)"]
- The lighting effects work independently of the POWER switch. The light effects can be controlled from the back of the unit.
-
There is an LED light mode switch on the back of the unit. The multicolored LEDs light up in different colors.
-
When you set the „HOLD“ mode, the LEDs only light up in one color. When you switch to „PLAY“ mode, several colors are displayed in sequence.
- When you return to the HOLD mode, you can select any color to be displayed permanently (note that these colors must be set, so it may not be the same color that was displayed when the unit was put in the HOLD mode).
- If you want to turn off the light effects, press the LIGHT button again.
Note: In „HOLD“ mode, it may happen that no light is visible (in this case, the switch must be adjusted).
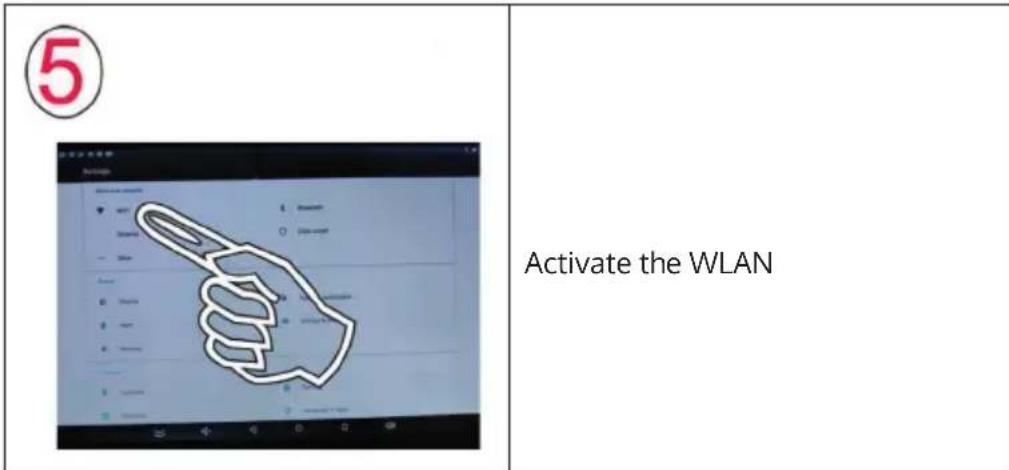
USING THE MEDIA PLAYER
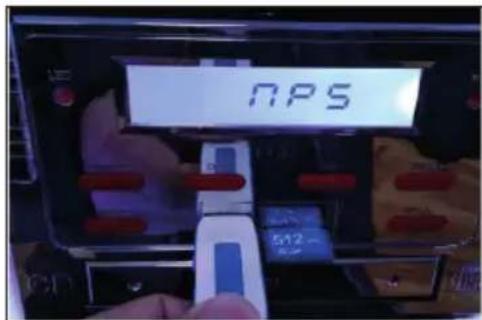
Press the MODE button until the screen displays „MP5“. Wait about 5 seconds until the unit has completely started.

flowchart
graph TD
    A["1"] --> B["2"]
    B --> C["3"]
    C --> D["4"]
    D --> E["Click on the displayed button."]
    D --> F["Click on „Settings”."]
    D --> G["Click on the displayed icon"]
    D --> H["Select the desired language and input"]
text_image
5 Activate the WLANa. Set the desired WLAN in „Settings“. You can adapt other projects to your needs.
b. When the network connection is successfully established, you can surf the Internet, use QQ chat or WeChat and send or receive emails with the device.
c. USB files can be read through the USB port on the side of the unit.
text_image
NPS 512~d. You can search for music, video files or pictures.
IMPORTANT NOTES ON OPERATION
- If you operate the unit in a hurry, a malfunction may occur. In this case, the unit must be restarted.
- If you do not know how to operate the device, learn how to use tablets.
- Do not let children use sharp objects on the product's screen, as this may scratch the screen.
CLEARING THE CACHE
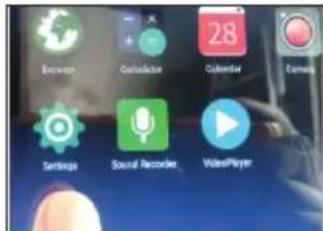
- Click the SETTINGS icon.
text_image
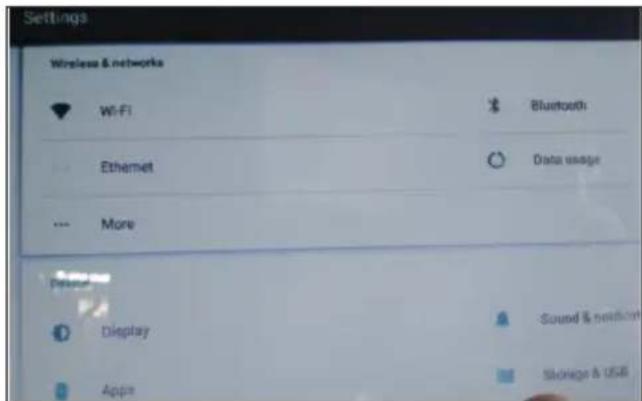
Brown Cineflox Calendar Elements Settings Sound Recorder VideoPlayer- In the settings, select the item Select STORAGE & USB.
text_image
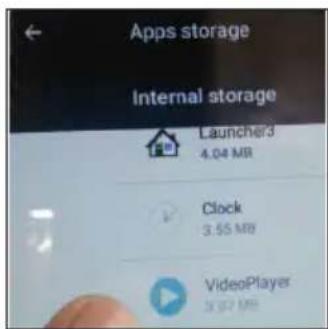
Settings Wireless & networks WiFi Bluetooth Ethernet Data usage More Display Sound & network Apps Storage & USB- Select internal storage and then select APPS.

text_image
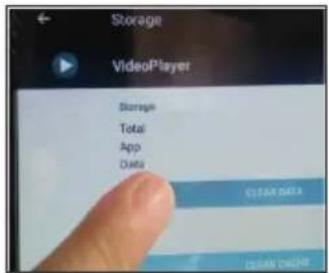
Internal storage 276 MB Used at 4.11 GB Apps 100 MB Images 5.4 GB- Then select the icon for VIDEO PLAYER or MUSIC.
text_image
Apps storage Internal storage Launcher3 4.04 MB Clock 3.55 MB VideoPlayer 3.55 MB- Under Storage, select CLEAR DATA.
text_image
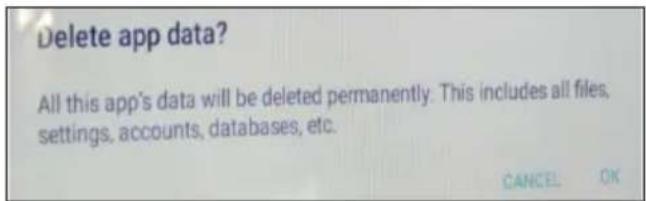
Storage VideoPlayer Storage Total App Data CLEAR DATA Update Data- Select OK to delete the relevant information remaining after playback.
text_image
Delete app data? All this app's data will be deleted permanently. This includes all files, settings, accounts, databases, etc. CANCEL OKRESTORING THE FACTORY SETTINGS
text_image
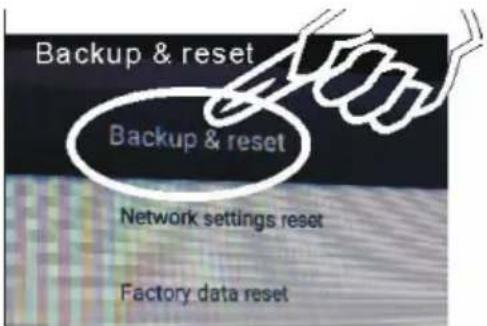
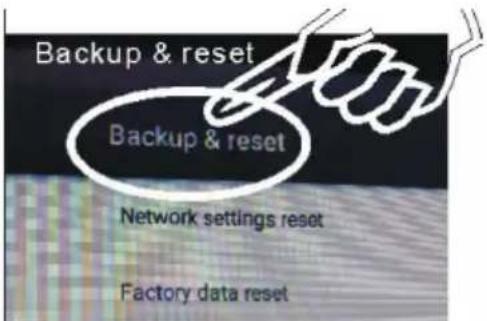
Backup & reset Backup & reset Network settings reset Factory data resetTo delete the remaining playlist contents and tracks and information about all other operations, click BACKUP AND RESET.

text_image
Backup & reset Network security reset Factory data reset Factory data reset Recovery modeThen click on the submenu item FACTORY DATA RESET. Then wait 1-3 minutes for the factory settings to be restored.
TROUBLESHOOTING
| Problem Possible cause and solution | |
| No radio reception in FM mode. The wrong mode was selected. Press the ◀◀◀/▶buttons to select a radio station. Move the Audio In connector to the "Off" position. Press the VOL+ button to increase the volume. | |
| The CD is not playing or the sound is interrupted. | Insert the CD into the CD tray with the label side facing up. |
| Clean the CD. | |
| The sound is interrupted in CD mode. | Place the unit on a flat surface. |
| Press the ON/OFF button. | |
| Songs stored in the playlist are not played in CD mode. | Press the ■ button and then store the desired CD tracks in the playlist. |
| The unit does not work. The power plug is not connected to the power outlet. | |
| No sound is output. Press the ON/OFF button. Increase the volume by pressing the VOL+ button. | |
| Loud buzzing or noise. The TV or VCR is too close to the unit. | |
| The screen does not display. Turn off and restart the unit. | |
DISPOSAL CONSIDERATIONS
natural_image
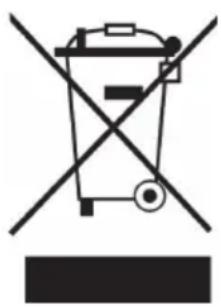
Symbol of a trash bin crossed with a diagonal line, representing no waste or discharge (no text or labels)If there is a legal regulation for the disposal of electrical and electronic devices in your country, this symbol on the product or on the packaging indicates that this product must not be disposed of with household waste. Instead, it must be taken to a collection point for the recycling of electrical and electronic equipment. By disposing of it in accordance with the rules, you are protecting the environment and the health of your fellow human beings from negative consequences. For information about the recycling and disposal of this product, please contact your local authority or your household waste disposal service.
This product contains batteries. If there is a legal regulation for the disposal of batteries in your country, the batteries must not be disposed of with household waste. Find out about local regulations for disposing of batteries. By disposing of them in accordance with the rules, you are protecting the environment and the health of your fellow human beings from negative consequences.
DECLARATION OF CONFORMITY

text_image
CE UK CAManufacturer:
Chal-Tec GmbH, Wallstrasse 16, 10179 Berlin, Germany.
Importer for Great Britain:
Berlin Brands Group UK Ltd
PO Box 1145
Oxford, OX1 9UW
United Kingdom
Hereby, Chal-Tec GmbH declares that the radio equipment type Graceland Touch is in compliance with Directive 2014/53/EU. The full text of the EU declaration of conformity is available at the following internet address: use.berlin/10034802
For Great Britain: Hereby, Chal-Tec GmbH declares that the radio equipment type Graceland Touch is in compliance with the relevant statutory requirements. The full text of the declaration of conformity is available at the following internet address: use.berlin/10034802
Estimado cliente:
text_image
QR code image containing encoded data, no visible human-readable textÍNDICE DE CONTENIDOS
Datos técnicos 50
text_image
Settings Wireless & networks WiFi Bluetooth Ethernet Data usage More Display Sound & notification Apps Storage & USBtext_image
Internal storage 276 MB Mood of A 1Y GB Apps 100 MB Imagettext_image
Apps storage Internal storage Launcher3 4.04 MB Clock 3.55 MB VideoPlayer 3.07 MBtext_image
Storage VideoPlayer Storage Total App Data CLEAR DATA ina data platformtext_image
Delete app data? All this app's data will be deleted permanently. This includes all files, settings, accounts, databases, etc. CANCEL OKRESTABLECIMIENTO DE LOS VALORES DE FÁBRICA
text_image
Backup & reset Backup & reset Network settings reset Factory data resetnatural_image
Symbol of a trash bin crossed out by a diagonal line, with no text or labels present.Berlin Brands Group UK Ltd
PO Box 1145
Oxford, OX1 9UW
United Kingdom
text_image
QR code image containing encoded data, no visible human-readable textSOMMAIRE
Fiche technique 72
EFFACEMENT DES DONNÉES TEMPORAIRES
text_image
Settings Wireless & networks WiFi Bluetooth Ethernet Data usage More Display Sound & notification Apps Storage & USBtext_image
Internal storage 276 MB Mood of A 1Y GB Apps 100 MB Imagettext_image
Apps storage Internal storage Launcher3 4.04 MB Clock 3.55 MB VideoPlayer 3.07 MBtext_image
Storage VideoPlayer Storage Total App Data CLEAR DATA on Call Numbertext_image
Delete app data? All this app's data will be deleted permanently. This includes all files, settings, accounts, databases, etc. CANCEL OKPARAMÈTRES D'USINE

text_image
Backup & reset Backup & reset Network settings reset Factory data resetnatural_image
Symbol of a trash bin crossed with a diagonal line, representing no waste or discharge (no text or labels)DÉCLARATION DE CONFORMITÉ

text_image
CE UK CAFabricant :
Chal-Tec GmbH, Wallstraße 16, 10179 Berlin, Allemagne.
Berlin Brands Group UK Ltd
PO Box 1145
Oxford, OX1 9UW
United Kingdom
text_image
QR code image containing encoded data, no visible human-readable textINDICE
Dati tecnici 94
text_image
Brown Galadiator Calendar Camera Settings Sound Recorder VideoPlayertext_image
Settings Wireless & networks WiFi Bluetooth Ethernet Data usage More Display Sound & notification Apps Storage & USBtext_image
Apps storage Internal storage Launcher3 4.04 MB Clock 3.55 MB VideoPlayer 3.87 MBtext_image
Storage VideoPlayer Storage Total App Data CLEAR DATA ina data platformtext_image
Delete app data? All this app's data will be deleted permanently. This includes all files, settings, accounts, databases, etc. CANCEL OKnatural_image
Symbol of a trash bin crossed out by a diagonal line, with no text or labels present.Berlin Brands Group UK Ltd
PO Box 1145
Oxford, OX1 9UW
United Kingdom