
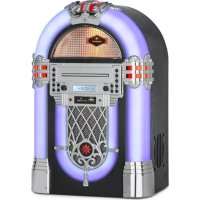
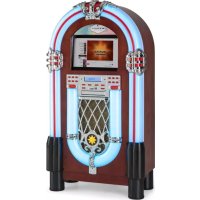
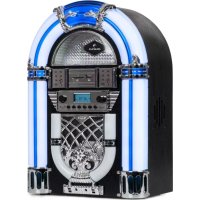
Graceland Mini - Juke box Auna - Free user manual and instructions
Find the device manual for free Graceland Mini Auna in PDF.

| Brand | Auna |
| Model | Graceland Mini |
| Product Type | Jukebox |
| Power Supply | AC/DC power adapter 100-240 V ~ 50/60 Hz, DC output 14 V 1.75 A |
| Power Consumption | 24.5 W |
| Output Power | 4 W + 4 W (2.0 channel) |
| Radio | FM (87.5 – 108 MHz) and DAB (174.928 – 239.200 MHz) |
| Bluetooth | Frequency band 2.4 – 2.480 GHz, max. transmission power 4 dBm |
| Supported Players | CD, USB (2.0/1.1), SD card, vinyl turntable (33/45/78 RPM) |
| Playable Audio Formats | MP3, WMA (FAT 16/32, max. 999 files, max. 99 folders) |
| Remote Control Battery | CR2025 3 V Lithium |
| LED Lighting | Yes, color-changing LED light tubes, switch at the back |
| Antenna | Built-in FM antenna, must be fully extended |
| Care and Cleaning | Clean with a soft, dry cloth. Do not use abrasive products or liquids. |
| Safety | Do not open the device. Risk of electric shock. Keep out of reach of children. Do not expose to moisture. |
| Spare Parts and Repairability | Replacement stylus available. Have repairs carried out by a qualified professional. |
| General Information | Manual available for download at notice-facile.com. Manufactured by Chal-Tec GmbH, Germany. |
Frequently Asked Questions - Graceland Mini Auna
User questions about Graceland Mini Auna
0 question about this device. Answer the ones you know or ask your own.
Ask a new question about this device
Download the instructions for your Juke box in PDF format for free! Find your manual Graceland Mini - Auna and take your electronic device back in hand. On this page are published all the documents necessary for the use of your device. Graceland Mini by Auna.
USER MANUAL Graceland Mini Auna
Member of Berlin Brands Group
Handwerkerstr. 11
15366 Dahlwitz-Hoppegarten
Deutschland
Berlin Brands Group UK Ltd
PO Box 1145
Oxford, OX1 9UW
United Kingdom
Congratulations on purchasing this device. Please read the following instructions carefully and follow them to prevent possible damages. We assume no liability for damage caused by disregard of the instructions and improper use. Scan the QR code to get access to the latest user manual and more product information.

CONTENTS
Technical Data 34
Safety Instructions 35
Device Overview 37
Remote Control 39
Commissioning and Settings 42
DAB Radio 44
FM Radio 45
CD46
USB/SD Playback 48
BT49
PROG (Create Memory List) 50
Record Player 51
Turning on the Lighting Effects 56
Troubleshooting 57
Disposal Considerations 59
Declaration of Conformity 59
TECHNICAL DATA
| Item number 10036452 | |
| Power supply (AC/DC power adapter) | 100-240 V ~ 50/60 Hz |
| Battery (remote control) CR2025 | 3 V Lithium battery |
| Output voltage DC 14 V 1,75 A | |
| Power consumption 24,5 W | |
| Power amplifier channel type 2.0 channel | |
| Output power 4 W + 4 W | |
| Radio (FM/DAB) | |
| Frequency range | FM 87.5 – 108 MHz DAB 174.928 – 239.200 MHz |
| BT | |
| BT frequency band 2.4 – 2.480 GHz | |
| BT sending power (max.) 4 dBm | |
| Compatible USB devices or SD cards | |
| USB flash drive supports USB 2.0 or USB 1.1. | |
| File system | FAT 16/32 (NTFS file system is not supported) |
| Maximum number of files < 999 | |
| External HDD, card readers and locked devices are not supported. | |
| Playable file requirements | |
| MP3/WMA music file requirements | |
| MP3/WMA file compatibility with this unit is limited as follows: | |
| Frequency within 32 to 48 kHz | |
| Bit rate within 32 to 320 kbps (MP3), 40 to 192 kbs (WMA) | |
| Maximum number of files < 999 | |
| Maximum number of folders < 9 | |
| File extensions .mp3 oder .wma | |
SAFETY INSTRUCTIONS
General information
- Lightning - If you are not going to use the device for a long time or if there is a storm, disconnect the plug from the electrical outlet and disconnect the device from the antenna connector. This will avoid damage to the product that may be caused by lightning or overvoltage.
- Overload - Do not overload power outlets, extension cords, or built-in power outlets, as this may result in a fire or electric shock.
- Foreign objects and liquid - Never push objects of any kind through openings in the device as they may touch dangerous voltage points or short out parts, which could result in a fire or electric shock. Never spill liquids of any kind on the device.
- Repairs and maintenance - Do not attempt to service this product yourself, as opening or removing covers will expose you to dangerous voltages or other hazards. Leave all maintenance to qualified service personnel.
- Damage requiring service - Disconnect the power plug from the outlet and consult a qualified specialist if any of the following conditions occur:
a) If the power cord or plug is damaged.
b) If liquid has been spilled or objects have fallen onto the product.
c) If the product has been exposed to rain or water.
d) If the product has been dropped or damaged.
e) If the product has a markedly reduced performance.
-
Replacement parts - When replacement parts are required, make sure that the service professional who replaces the parts only uses replacement parts that have been approved by the manufacturer or that have the same characteristics as the original part. Unauthorized replacement may result in fire, electric shock or other hazards.
-
Heat - Do not place the unit near heat sources such as radiators, heaters, stoves or other products (including amplifiers).
Special Instructions
- This device may be only used by children 8 years old or older and persons with limited physical, sensory and mental capabilities and/or lack of experience and knowledge, provided that they have been instructed in use of the device by a responsible person who understands the associated risks.
Children should be supervised to ensure that they do not play with the appliance. - Ensure children and babies do not play with plastic bags or any packaging materials.
- Mains plug/Power adaptor is used as disconnect device and it should remain readily operable during intended use.
- In order to disconnect the apparatus from the mains completely, the main plug/power adaptor should be disconnected from the mains socket outlet completely.

WARNING
Risk of injury! Keep batteries out of the reach of children. Swallowing can cause serious injury or death in as little as two hours due to internal burns. If batteries are swallowed, go straight to a hospital emergency room. Dispose of used batteries immediately.
Important safety instructions

Make sure that babies and small children do not pull out the mains plug!

Disassembly prohibited!


Do not handle the device with wet hands!


Front side
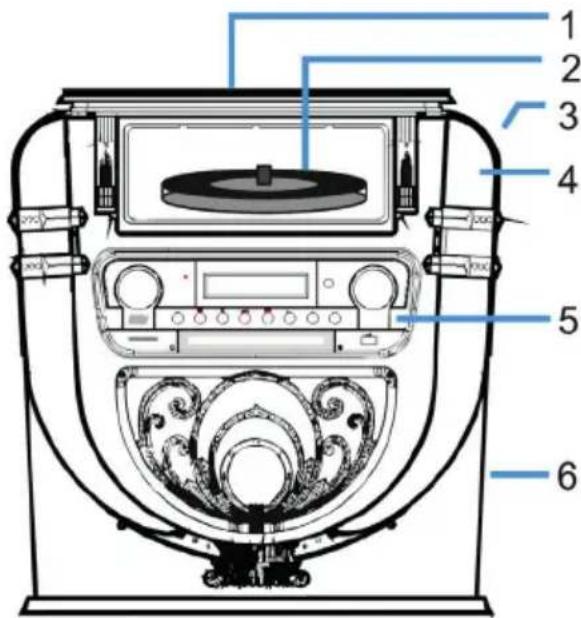
1 Vinyl turntable dust cover 14 Back/Fast rewind/PRE+
2 Vinyl turntable player 15 Remote control receiving window
3 LIGHT (Change color lamp control switch)
16 Tuning/EQ (voice patterns)
4 Position of discoloration lamp 17 Display
5 Function operation control panel 18 USB input socket
6 Tenor speaker 19 OPEN/CLOSE (CD door access control)
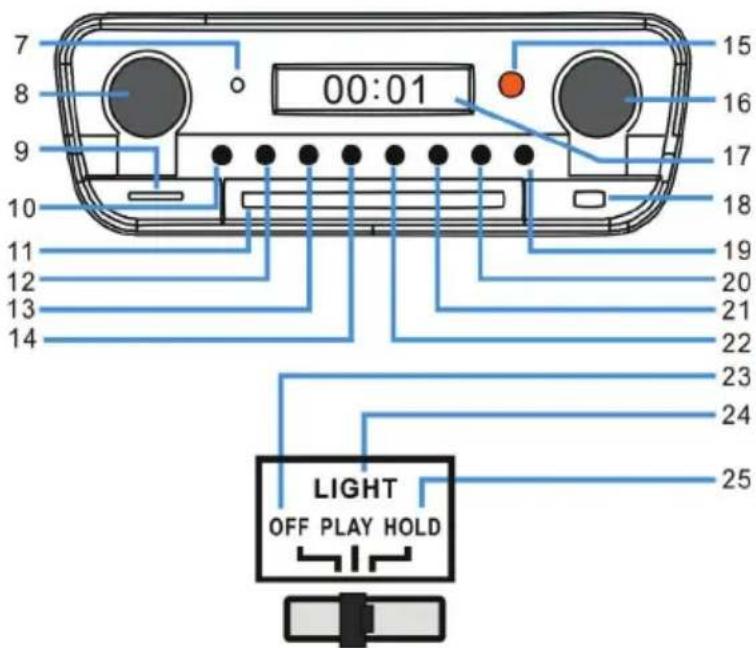
7 Power indicator light
20 P/R/MENU (Programming and menu)
8 Volume/Standby
21 REP/INFO (Repeats and info)
9 SD card input socket
22 Forward/Fast Forward/PRE+
10 MODE
23 OFF (Turn off lamp power.)
11 CD door
24 PLAY (The light color cycle changes.)
12 PLAY/PAUSE/SCAN
25 HOLD (Light color stops in a certain state.)
13 STOP/ENTER
Back side
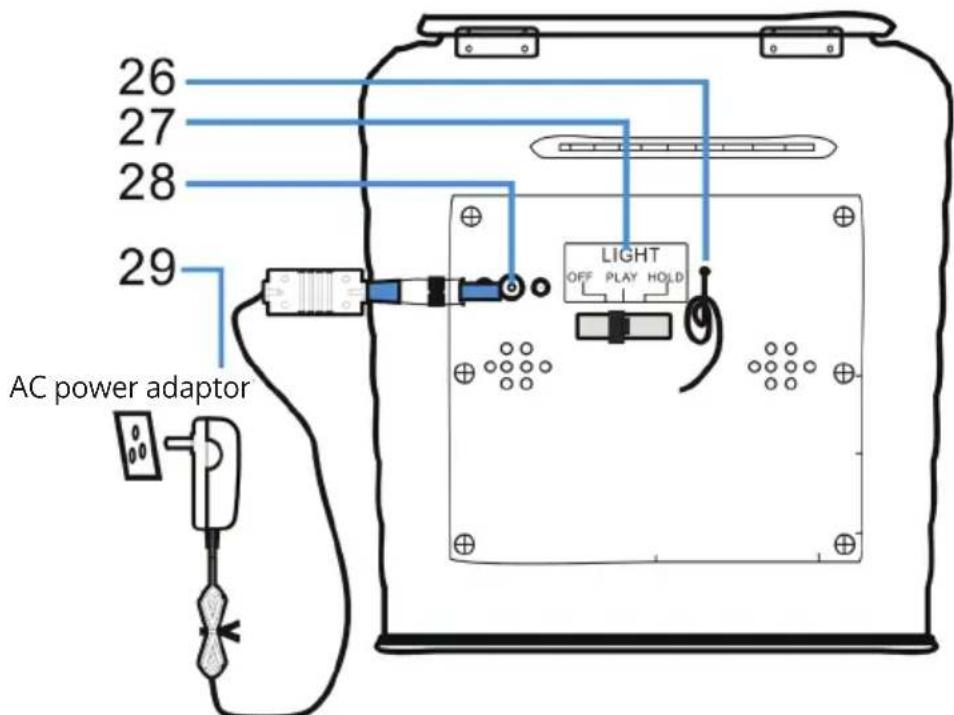
26 FM Antenna (Note: The FM antenna needs to be long and in the best position to receive the strongest stations).
27 Light mode switch (lighting effects)
28 DC power input socket
29 Power adapter
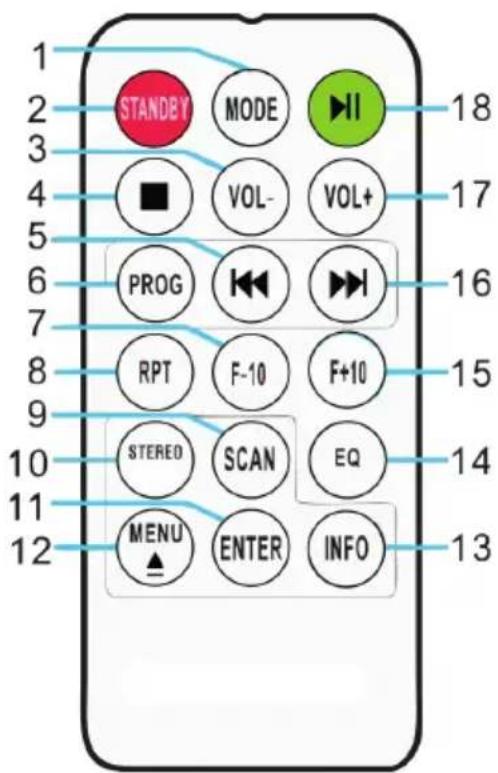
| 1 MODE | To select between the different functions such as the DAB/FM tuner, CD player, USB input, SD input, BT and turntable . | |
| 2 STANDBY | Press the POWER button on the remote control to exit standby mode and enter DAB radio mode. | |
| 3 VOL- | Reduce volume: Press the button repeatedly or press once and hold down until you reach the desired volume level. | |
| 4 STOP Press the button to stop a track. | ||
| 5 | PREV | Fast back: Press to go to the previous track or rewind back through a track. You can then press the play button to start playback. |
| 6 | PROG (Program) | Allows you to program only particular songs of your choice to playback from your music source. Further info on this function in section "PROG". |
| 7 F-10 | Skip the previous 10 tracks (skips 10 tracks each time). If the Jukebox is in random ("RAN") mode the folder skipping function will be disabled. | |
| 8 | RPT (Repeat) | Press to replay one particular track. Press the button once repeating ONE track only, press the button twice repeating ALL the tracks. Press the button three times repeated RANDOM play. |
| 9 SCAN Press to Radio Auto-search and save stations. | ||
| 10 STEREO Stereo/Mono selection in Radio (where available). | ||
| 11 ENTER Confirm save in various settings and storage. | ||
| 12 | MENU | Tune the FM radio or DAB radio status. You can find and select relevant settings in the menu..EJECT: If you press this button during CD playback, the CD tray opens. Press the button again to close the CD tray. |
| 13 INFO | If an FM radio or DAB station or file contains information, you can display it by pressing the button. | |
| 14 EQ | To change the equalizer setting, you can press this button. You can choose between JAZZ, FLAT, CLASSIC, ROCK and POP. | |
| 15 F+10 | Skip next 10 tracks (skips 10 tracks each time). If the Jukebox is in random ("RAN") mode the folder skipping function will be disabled . | |
| 16 | NEXT | Fast Forward: Press this button to go to the next track or fast forward through a track. You can then press the PLAY button to start playback. |
| 17 VOL+ | Increase volume: Press the button repeatedly or press once and hold down until you reach the desired volume level. | |
| 18 PLAY/PAUSE Press the button to play or pause a track. | ||

WARNING
Risk of injury! Keep batteries out of the reach of children. Swallowing can cause serious injury or death in as little as two hours due to internal burns. If batteries are swallowed, go straight to a hospital emergency room. Dispose of used batteries immediately.
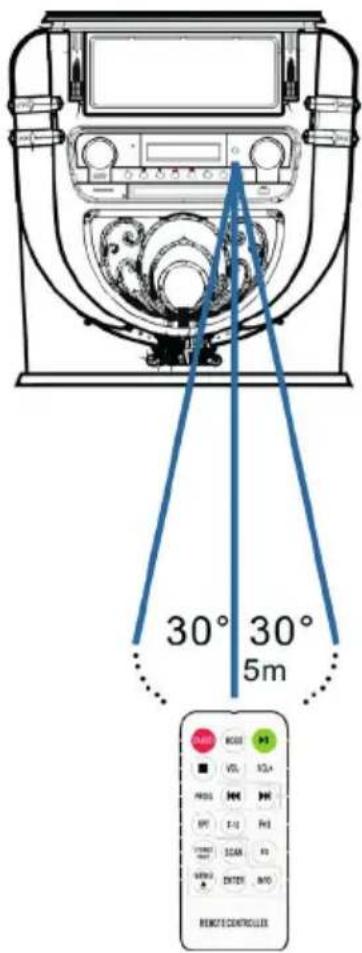
Note: The best transmission distance between the device and the remote control is achieved within 5 metres without a barrier (angle approx. 30^ ). If the battery of the remote control is almost empty, this means that the remote control cannot be used as usual. Insert a new battery.
COMMISSIONING AND SETTINGS
Setting the time
Connect the mains adapter to the device and insert the mains plug into the mains socket. The device is automatically set to standby mode and the time "00:00" or "12:00" is displayed on the LCD screen.
American version: 12 hour system
When the jukebox is put into standby mode, the LCD screen displays "12:00".
European version: 24 hour system
When the Jukebox is put into standby mode, the LCD screen displays "00:00".
Example: American operation version
To set the time, simply press the "P/R" button on the control panel (20) or the remote control (6) and hold it down for 3-5 seconds until "12-H" is displayed on the screen ("12-H" means that the time is set in 12-hour format). Then press the button to select the 12- or 24-hour format. As soon as "12-H" is displayed on the screen, press the "P/R" button again. The screen will then display "00:00" again with the first "00" flashing. Use the end buttons on the control panel (3) or the remote control (6) to select the correct hour setting (keep in mind that the time is set in 12-hour format) and then press the "P/R" button to confirm. The second "00" now flashes. Use the end buttons to select the correct minute setting, then press the "P/R" button to save this number.
NOTE: The time is only saved when the jukebox is in operating or standby mode. If you want to save the set time in the jukebox, simply press the STANDBY button (8) on the control panel to put the jukebox in standby mode. If you remove the power supply, the time setting will be erased and the above procedure must be repeated to set the correct time the next time the Jukebox is switched on. The American and European editions of the time setting are identical.
Adjusting the volume
- To increase the volume, turn the VOL+ knob repeatedly or press and hold the VOL+ button on the remote control once until you reach the desired volume level.
- To decrease the volume, turn the VOL- knob repeatedly or press the VOL- button on the remote control once and hold it down until you reach the desired volume level.
Note: Check the volume before playing music to prevent children, infirm persons or pregnant women from being frightened by the sudden and loud sound of the jukebox.
Note: Using the Jukebox at a high volume for an extended period of time may cause the Jukebox to overheat and damage the internal components. DO NOT use the Jukebox at a high volume for an extended period of time.
The volume settings are saved when the device is switched off. When the device is switched on again, the volume is set the same as when the device was last switched off.
Equalizer settings
- Set any audio mode:
The jukebox has several different audio playback functions. Follow the steps below to choose between DAB/FM, CD player, USB input, SD card input, analogue FM radio, BT audio streaming and turntable.
| Audio Mode | LCD Display |
| DAB | DAB |
| FM Radio | FM |
| CD | CD |
| USB | USB |
| SD | SD |
| Bluetooth® | BT |
| Turntable | Phono |
-
Press the EQ button until you reach the desired equalizer setting. The sound changes immediately when the respective equalizer setting is selected.
-
The jukebox has 5 selectable equalizer settings that allow you to adjust the sound level to enhance the type of music being played.
The preloaded equalizer settings on the jukebox are: JAZZ, FLAT, CLASSIC (Classical), ROCK and POP.
DAB RADIO
Frequency range: DAB 174.928-239.200 MHz
- Press the STANDBY button on the device (8) or on the remote control (2) to exit standby mode. The device is automatically set to DAB mode and automatically searches for DAB signals nearby.
- Rotate the tuning knob to find a DAB station with strong reception (rotate the tuning knob step by step).
- Press the button to go to subsequent stored radio stations.
- Press the button to previous stored radio stations.
- Press the SCAN button to automatically search for and store DAB stations (stations with the strongest current signal). Up to 20 stations can be stored.
- Press the INFO button to get the information about the station.
- When you press the MENU button, both the automatic station search menu (Autotune) and other menus appear. Rotate the Tuning knob to select the desired content. Then press the ENTER button to select the main menu of the desired content. Then rotate the Tuning knob to enter the submenu. Press the ENTER button to confirm.
- In the main menu, select "Language" and then one of the four available languages (German/French/Italian/English).
- If you want to clear the previous settings or memory, select "Yes" in the "Factory Reset" menu. The following menu options are available:
| MENU | |
| Main Menu | Sub Menu |
| Autotune | Full scan |
| Manual tune | Manual tune |
| Prune | Prune? <No>Yes |
| DRC | DRC Low DRC High DRC Off |
| SW Version | SW Version |
| Language | Deutsch Francais Italiano English |
| Factory Reset | Factory Reset? <No>Yes |
NOTES:
- Fully extend the antenna in DAB and FM mode. Place the device in a location with good reception. (The antenna is located on the back of the device).
- Stations with a weak signal can only be tuned in manually.
- A maximum of 20 stations can be stored. If there are less than 20 local strong signal stations available, only the strong signal stations are stored. (If there are no 20 stations with a strong signal, no 20 stations can be stored).
FM RADIO
Frequency range: FM 87.5 - 108 MHz
This device has a built-in FM function with automatic station search. Up to 20 stations can be stored.
When you use the device for the first time, if you have plugged the mains plug into the mains socket, the device will automatically go into standby mode (clock display). Press the STANDBY button on the device or the POWER button on the remote control to switch on the device. The first time the device is used, it is automatically set to DAB mode. Press the MODE button to enter FM mode. The LCD screen will then display FM 87.5 MHz (or other radio frequency) and the speakers will emit a diffuse noise (unless the 87.5 frequency contains a local radio station).
- Press the STANDBY button on the device (8) or the remote control (2) to wake the device from standby mode. The device is then automatically set to FM mode.
- Press and hold the button to search for recently stored stations (0.1 MHz or 0.05 MHz for each press). Rotate the frequency control to find a station with strong reception.
- Press the button (longer than 3 seconds), the FM radio automatically searches for stations (if a station with a strong signal is found, it is automatically played).
-
Auto search and save: When you press the AN) button, the device automatically starts searching for stations at the frequency 87.5 up. During the automatic station search, stations found are also stored. The device has 20 memory locations for your favourite stations, named "P01" to "P20" (programme 1 to programme 20). The first station found by the device is stored under "P01". The second station found at "P02" etc. The automatic station search continues until all stations with a strong signal have been found and stored. As soon as all 20 memory locations are occupied, the automatic station search is interrupted, even if more stations with a strong signal were available.
-
When you press the MENU button, the screen displays "Auto tune" and other menus. Use the knob to select the desired content. Then press the button ENTER to select the main menu. Then rotate the knob again to select the submenu. Then press the ENTER button for a final confirmation.
- In the main menu "Language" you can choose from four languages (German/French/Italian/English).
NOTES:
- The American version searches for stations in steps of 0.1MHz . The European version searches for stations in steps of 0.05MHz .
- Fully extend the FM antenna. Place the device in a location with good reception (the antenna is on the back of the device).
- Stations with a weak signal can only be tuned in manually.
- A maximum of 20 stations can be stored. If less than 20 local strong signal stations are available, only the strong signal stations are stored (if there are no 20 strong signal stations, no 20 stations can be stored).
- When the device is switched off, the device stores the current setting. When you subsequently switch the radio on again, the station or function last selected before switching off is restored.
CD
Note: CDs must be inserted into the CD tray with the labelled side facing up.
- Press the MODE button until "CD" is shown on the LCD display. The display then shows the number of tracks on the CD. Playback starts automatically.
- To open the CD tray, press the button on the control panel or the EJECT button on the remote control.
-
Insert the CD into the CD tray with the label side facing up and the shiny side facing down.
-
This device has been specially designed for sound reproduction from compact discs bearing the mark. No other discs can be used.
- To remove a disc from its storage case, press the centre of the case and lift the disc out, holding it gently by the edge.
- To close the CD tray, press the button in the control panel again or the EJECT button on the remote control.
- Use the button select the desired song. Press and hold the button to fast forward through a track. Press the (PLAY) button to start playback.
- Select the desired song with the button.
- Adjust the volume with the VOLUME + / - knob.
- Press the REP button once to repeat a song. "REP 1" then flashes in the upper left corner of the LCD display. If you press the REP button again, all the tracks on the CD are repeated. "REP A" then flashes in the upper left corner of the LCD display. Press the REP button again to cancel the repeat function.
- For random playback, press the REP button again until "Rand" is displayed on the bottom of the LCD display. Press the 14 buttons to select a random song.
- To create a memory list, first press the STOP button to stop playback. Press the P/R button to enter the memory mode. The LCD display flashes and then displays "P01". Select the track you want to save first, then press P/R again. To stop saving and start playing the saved tracks, press the button The LCD display will then show "PROG CD". The device can store up to 20 tracks. For more information, see the section "PROG (Create Memory List)".
Note: Do not close the CD tray by force as this may cause malfunctions.
USB/SD PLAYBACK
- Press the MODE button until the LCD display shows "USB or SD". The display first shows the number of folders and then the number of tracks. Playback starts automatically.
- Select the desired song with the button.
- Press the REP button once to repeat a song. "REP 1" then flashes in the upper left corner of the LCD display. If you press the REP button again, all songs are repeated. "REP A" then flashes in the upper left corner of the LCD display. Press the REP button again to cancel the repeat function.
- For random playback, press the REP button again until "Rand" is displayed on the bottom of the LCD display. Press the buttons to select a random song.
- To create a memory list, first press the STOP button to stop playback. Press the P/R button to enter the memory mode. The LCD display flashes and then shows "P01". Select the track you want to save first, then press P/R again. To stop saving and start playing the saved tracks, press the button the LCD display will show "PROG CD". The device can store up to 20 tracks. For more information, refer to the section "PROG (Create Memory List)".
- Press the MODE button to stop USB or SD playback. Do not disconnect the mains plug from the socket during USB or SD playback as this may cause malfunction.
NOTES:
- If the USB drive contains audio files that are not compatible with the Jukebox, the Jukebox will not be able to read them. These tracks will not be included in the total number of tracks displayed and will not be played.
- If the SD card contains audio files that are not compatible with the Jukebox, the Jukebox will not be able to read them. These tracks will not be included in the total number of tracks displayed and will not be played.
Note: For optimum performance it is recommended to only use a USB 2.0 flash drive (not a 3.0 version).
BT
To pair the jukebox with an external BT device:
- Press and hold the MODE button until "BT" is displayed on the LCD display.
- Switch on the external BT device and activate its BT function. Start the search for available BT devices.
- Select "Graceland Mini" from the device list of the external device.
- As soon as the two devices are paired, "connected" is shown on the display. You can now start track playback on your external BT device. Control playback via your external BT device, the jukebox or the jukebox remote control.
Operation via the BT device:
- Use the buttons on the display to select tracks, adjust the volume, start or pause playback and for the functions and.
Operation via the jukebox/remote control:
- Once the pairing is successful, playback via the BT device will start automatically.
- Rotate the VOLUME +/- knob to adjust the volume.
- Press the button to go to the previous/next track.
- To pause/resume playback, press the button.
- To stop pairing, press the MODE button to select another function or deactivate the BT connection of your external BT device.
Note: The optimum transmission distance for BT connection is achieved within 10 metres without a barrier. If the last connected BT device is within the range of the Jukebox, no new device can be connected to the Jukebox. The BT connection of the last connected device must be deactivated if you want to connect a new device to the jukebox.
PROG (CREATE MEMORY LIST)
- Press the STOP button during playback from a music source.
- Press the PROG button (6) on the remote control or the P/R button on the control panel to enter the memory mode. "PROG" then flashes in the lower left corner of the display. A position number also flashes on the display (e.g. P01).
- To select the track you want to save, press the button OK . Press the PROG button to save your selection.
- Repeat the above steps to save more tracks.
- Once you have saved all the tracks you want, you can start playback. You can do this at any time once you have saved the desired number of tracks.
- If you want to stop saving the tracks, press the STOP button.
- When the maximum number of tracks to be saved is reached, the display shows "FULL".
NOTE: If you have changed the playback mode or restarted the device, the memory list must be reprogrammed (repeat the steps above to do this).
RECORD PLAYER
- Press the MODE button until the LCD display shows "Phono".
- Insert a record on the turntable. Select a speed level. The speed levels 33/45/78 are available (factory setting is "33"). As soon as the needle is above the record, playback starts.
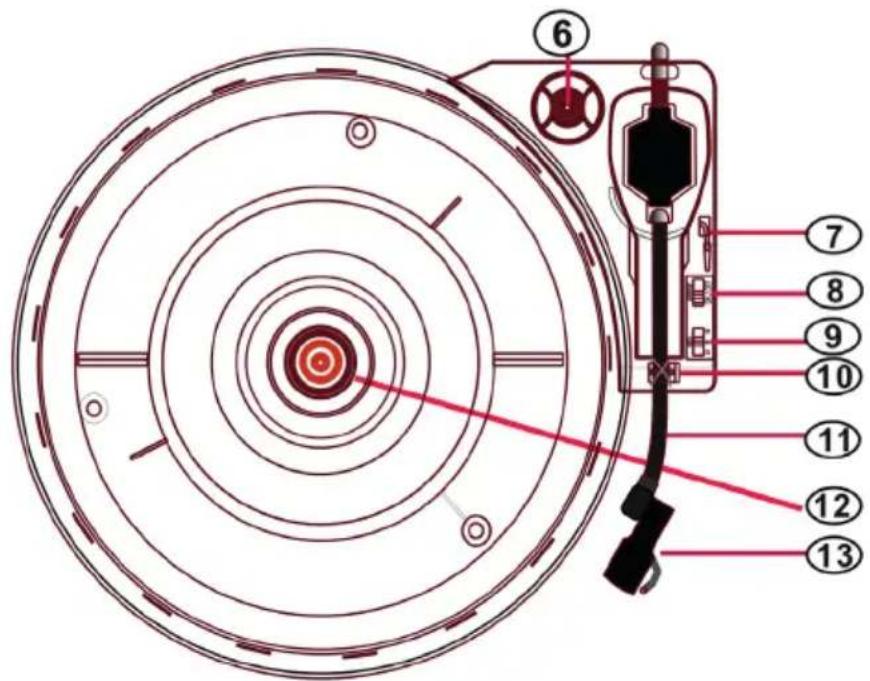
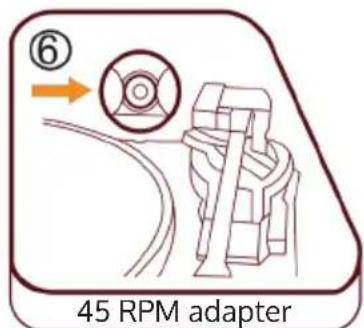
45 RPM adapter
Place a record on the turntable. When playing single records, use the 45 RPM adapter included in the delivery.
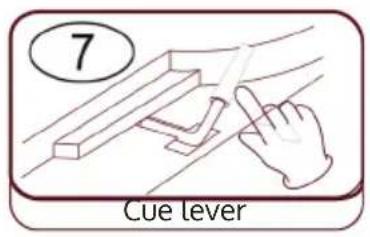
Raise/Lower lift lever
- Carefully raise the tone arm and move it over the desired position on the record.
- Lower the tone arm slowly and carefully.
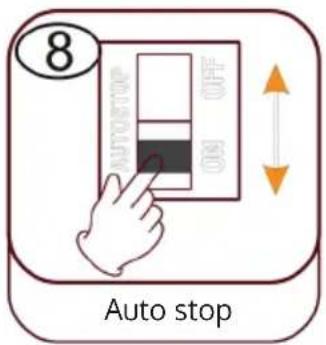
Automatic stop (Auto stop)
- Slide the control upwards: Music playback stops, the turntable continues to rotate.
- Slide the control down: Music playback ends, the turntable stops.
Note: After the end of playback, move the tone arm back to its rest position.
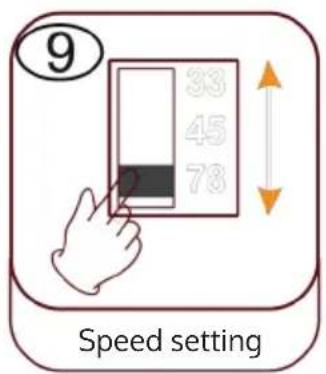
Speed setting
Three speed levels 33/45/78 are available.
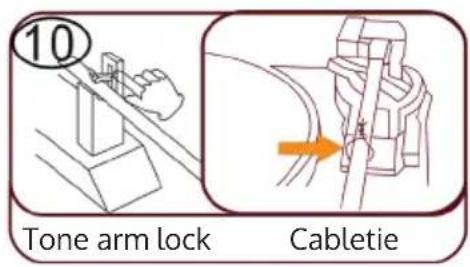
Tone arm lock
Release the tone arm lock before use.
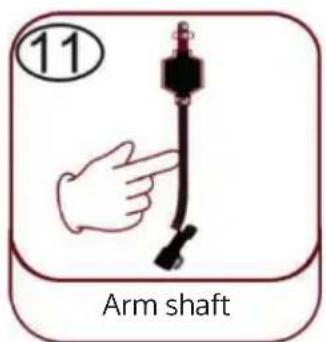
Pick-up arm (tone arm)
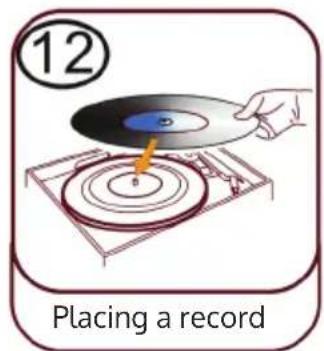
Placing a record
Place a suitable record on the turntable. Lift the tone arm and carefully place it on the record. You can now play tracks from the record.
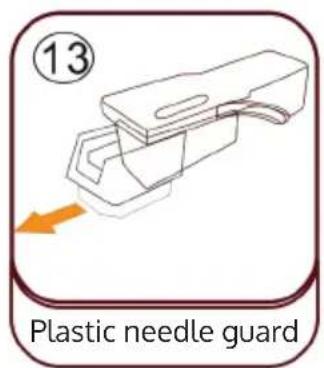
Plastic needle guard
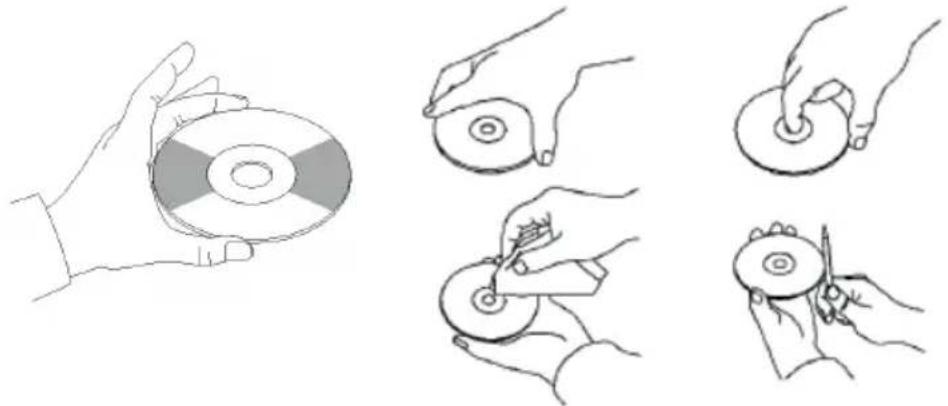
Remove the needle by pulling it straight down, in the opposite direction of the tone arm.
Needle maintenance
- Press the MODE button until the display shows "Phono". Remove the needle guard (see figure 1). Place a record on the turntable. Select a speed level 33/45/78. As soon as the needle is moved over the record, playback starts.
- It is recommended to replace the stylus as soon as you notice a change in the sound quality.
- Using a worn-out stylus can cause damage to the record. Wear on the stylus is accelerated when playing 78 RPM records.
| Figure 1 Figure 2 | |
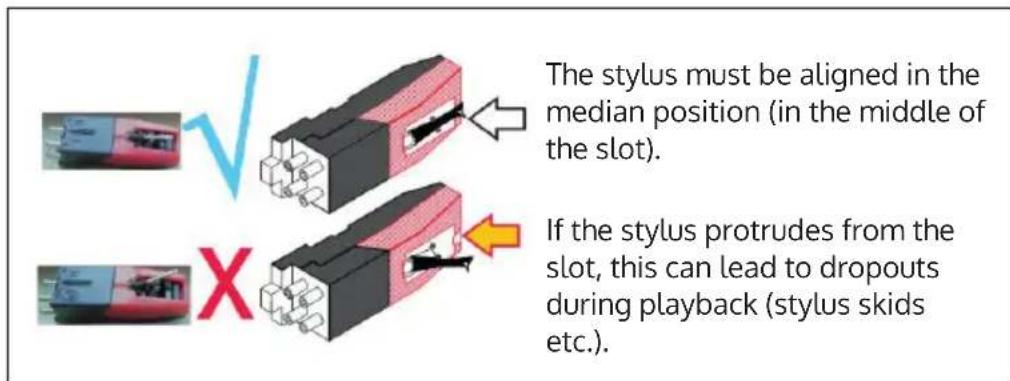
| Remove the stylus by pulling it straight down and out, in the opposite direction of the tone arm. | Replace the stylus with a compatible stylus. Attach the new stylus with the point facing downwards and press it back into place gently. |
NOTE: If purchasing the replacement stylus in a store, it will be helpful to bring the old stylus with you for your reference. Most good Electronic and Music stores will have replacement styluses.
Note: Always ensure that the tone arm is secured by the arm lock before transporting the Jukebox.
NOTE: At the end of the recording, the tone arm does not automatically return to the holder, but the turntable and the tone arm stop rotating (move the tone arm back to the bracket manually).
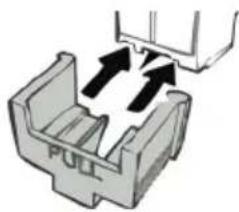
When not using the needle, put the needle protector back on.
Important notes on the use of the needle
- Do not bend the stylus.
- To avoid injury, do not touch the needle.
- Keep out of the reach of children!
Exercise caution as the stylus is very delicate. Using a bent or broken stylus can damage the record and cause it to malfunction. - Do not expose the stylus to intense heat.
- Consult a qualified technician if you have difficulty replacing the stylus.
TURNOING ON THE LIGHTING EFFECTS
The jukebox has 2 colour-changing LED light tubes that are displayed on the jukebox parts. There are also several other multi-colour LED lighting effects that can be seen in the CD player and USB/SD tray and on the base of the speaker panel.
The power switch for the lamp is located on the back of the device. When the switch is moved from the "OFF" position to the "PLAY" position, the lamp lights up.
NOTE: The LIGHT button controls the power supply to the lighting effects and is located on the back of the device.
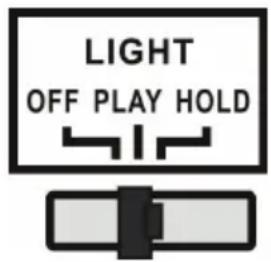
PLAY: The light colour cycle changes.
HOLD: The light colour is maintained in a certain state (includes invisible light).
OFF: The light is switched off and no longer illuminates.
There is an LED light mode switch (27) on the back of the jukebox (see section "Device overview - Back side"). When this is switched on, the LED light tubes change colour continuously. In HOLD mode, the LED light tubes only light up in one colour. When you switch to PLAY mode, the LED light tubes start to change through the colours. Switching back to HOLD mode allows you to select a different colour to display, which will be retained (please note that these colours are fixed and may not be exactly the same colour as the LED light tube was illuminated in when switching to HOLD mode).
The light is switched off when the switch is pushed to the "OFF" position.
NOTE: There may be no visible light in HOLD mode, this is normal (the switch must be reset).
TROUBLESHOOTING
The following checks will help troubleshoot most problems that may occur with your device. Before going through the following checklist, you should first check that the power supply unit has been connected correctly. If the problem persists after the checks listed below, contact the manufacturer, customer service or an authorised service centre for maintenance and repair.
| Problem Possible cause Solution | ||
| Radio reception | ||
| No radio reception | The mode selector has not been set to the correct position. | Set the desired volume with the VOLUME knob. |
| Rotate the Tuning knob to search for a radio station. | ||
| CD playback | ||
| CD does not play or sound skips. | The CD was inserted incorrectly. | Insert the CD into the CD tray with the labelled side facing up. |
| The CD is dirty. | Clean the CD. Restart the device. | |
| Sound skips | Change the installation location. | |
| Press the STANDBY button (restart the device). | ||
| The CD player is not working. | Press the STOP button and then save the desired tracks. | |
| General | ||
| The CD memory list cannot be played. | The mains plug is not inserted in the socket. | Insert the mains plug correctly into the socket. Press the STANDBY button (restart the device). |
| Problem Possible | cause Solution | |
| No sound output | The VOLUME knob is not set correctly. | Rotate the VOLUME knob clockwise. |
| Severe hum or noise. | The TV or VCR is too close to the stereo system. | Move the device to another location. |
| The display is garbled or does not work. | Switch off the device and restart it. | |
DISPOSAL CONSIDERATIONS

If there is a legal regulation for the disposal of electrical and electronic devices in your country, this symbol on the product or on the packaging indicates that this product must not be disposed of with household waste. Instead, it must be taken to a collection point for the recycling of electrical and electronic equipment. By disposing of it in accordance with the rules, you are protecting the environment and the health of your fellow human beings from negative consequences. For information about the recycling and disposal of this product, please contact your local authority or your household waste disposal service.
This product contains batteries. If there is a legal regulation for the disposal of batteries in your country, the batteries must not be disposed of with household waste. Find out about local regulations for disposing of batteries. By disposing of them in accordance with the rules, you are protecting the environment and the health of your fellow human beings from negative consequences.
DECLARATION OF CONFORMITY
CE UK CA
Manufacturer:
Chal-Tec GmbH, Wallstrasse 16, 10179 Berlin, Germany.
Importer for Great Britain:
Berlin Brands Group UK Ltd
PO Box 1145
Oxford, OX1 9UW
United Kingdom
Hereby, Chal-Tec GmbH declares that the radio equipment type Graceland Mini is in compliance with Directive 2014/53/EU. The full text of the EU declaration of conformity is available at the following internet address: use.berlin/10036452
For Great Britain: Hereby, Chal-Tec GmbH declares that the radio equipment type Graceland Mini is in compliance with the relevant statutory requirements. The full text of the declaration of conformity is available at the following internet address: use.berlin/10036452
Cher client, chere clientele,
Berlin Brands Group UK Ltd
PO Box 1145
Oxford, OX1 9UW
United Kingdom
Berlin Brands Group UK Ltd
PO Box 1145
Oxford, OX1 9UW
United Kingdom
PROG (creare una playlist) 135
Giradischi 136
Berlin Brands Group UK Ltd
PO Box 1145
Oxford, OX1 9UW
United Kingdom
- Member of Berlin Brands Group
- Handwerkerstr. 11
- Dahlwitz-Hoppegarten
- Deutschland
- CONTENTS
- SAFETY INSTRUCTIONS
- General information
- Special Instructions
- WARNING
- Important safety instructions
- Front side
- Back side
- COMMISSIONING AND SETTINGS
- Setting the time
- American version: 12 hour system
- European version: 24 hour system
- Example: American operation version
- Adjusting the volume
- Equalizer settings
- DAB RADIO
- NOTES:
- FM RADIO
- CD
- USB/SD PLAYBACK
- BT
- Operation via the BT device:
- Operation via the jukebox/remote control:
- PROG (CREATE MEMORY LIST)
- RECORD PLAYER
- RPM adapter
- Raise/Lower lift lever
- Automatic stop (Auto stop)
- Speed setting
- Tone arm lock
- Placing a record
- Plastic needle guard
- Needle maintenance
- Important notes on the use of the needle
- TURNOING ON THE LIGHTING EFFECTS
- TROUBLESHOOTING
- DISPOSAL CONSIDERATIONS
- DECLARATION OF CONFORMITY
- CE UK CA
- Manufacturer:
- Importer for Great Britain:
- Cher client, chere clientele,
Brand : Auna
Model : Graceland Mini
Category : Juke box