
Graceland DAB - Juke box Auna - Free user manual and instructions
Find the device manual for free Graceland DAB Auna in PDF.

| Product type | Jukebox |
| Brand | Auna |
| Model | Graceland DAB |
| Power supply (device) | 230 V ~ 50 Hz |
| Power supply (remote control) | 1 x CR2025 battery |
| Operating modes | FM, DAB+, CD, USB, SD, Bluetooth, Phono (turntable), AUX |
| Turntable | Belt drive, speeds 33/45/78 RPM |
| Connectivity | AUX input (3.5 mm jack), Line-out (RCA), power socket, FM antenna |
| Audio functions | Equalizer (EQ), stereo/mono, repeat (REP), program (PROG), random play (RAN) |
| Radio memory | 20 presets for FM, 20 for DAB+ |
| Display | LED display, 12h/24h time setting |
| Storage devices | USB port, SD/MMC slot |
| Bluetooth | Frequency 2402-2480 MHz, max power 4 dBm |
| Safety instructions | Disconnect during storms, do not overload outlets, avoid liquids and foreign objects, maintenance by qualified personnel |
| Maintenance and cleaning | Disconnect before cleaning, use a soft dry cloth, do not use abrasive products |
| Spare parts and repairability | Use only manufacturer-approved parts, entrust repairs to qualified personnel |
| Recycling | Do not dispose with household waste, take to WEEE collection point |
| Package contents | Jukebox, remote control, user manual |
Frequently Asked Questions - Graceland DAB Auna
User questions about Graceland DAB Auna
0 question about this device. Answer the ones you know or ask your own.
Ask a new question about this device
Download the instructions for your Juke box in PDF format for free! Find your manual Graceland DAB - Auna and take your electronic device back in hand. On this page are published all the documents necessary for the use of your device. Graceland DAB by Auna.
USER MANUAL Graceland DAB Auna
Graceland DAB Plattenspieter & Jukebox Turntable & Jukebox Tocadiscos & Jukebox Platine vinyle & Jukebox Giradischi & Jukebox 10033773
au
www.auna-multimedia.com

bar
| Category | Value | |---|---| | Category 1 | 100 | | Category 2 | 100 | | Category 3 | 100 | | Category 4 | 100 | | Category 5 | 100 | | Category 6 | 100 | | Category 7 | 100 | | Category 8 | 100 | | Category 9 | 100 | | Category 10 | 100 | | Category 11 | 100 | | Category 12 | 100 | | Category 13 | 100 | | Category 14 | 100 | | Category 15 | 100 | | Category 16 | 100 | | Category 17 | 100 | | Category 18 | 100 | | Category 19 | 100 | | Category 20 | 100 | | Category 21 | 100 | | Category 22 | 100 | | Category 23 | 100 | | Category 24 | 100 | | Category 25 | 100 | | Category 26 | 100 | | Category 27 | 100 | | Category 28 | 100 | | Category 29 | 100 | | Category 30 | 100 | | Category 31 | 100 | | Category 32 | 100 | | Category 33 | 100 | | Category 34 | 100 | | Category 35 | 100 | | Category 36 | 100 | | Category 37 | 100 | | Category 38 | 100 | | Category 39 | 100 | | Category 40 | 100 | | Category 41 | 100 | | Category 42 | 100 | | Category 43 | 100 | | Category 44 | 100 | | Category 45 | 100 | | Category 46 | 100 | | Category 47 | 100 | | Category 48 | 100 | | Category 49 | 100 | | Category 50 | 100 | | Category 51 | 100 | | Category 52 | 100 | | Category 53 | 100 | | Category 54 | 100 | | Category 55 | 100 | | Category 56 | 100 | | Category 57 | 100 | | Category 58 | 100 | | Category 59 | 100 | | Category 60 | 100 | | Category 61 | 100 | | Category 62 | 100 | | Category 63 | 100 | | Category 64 | 100 | | Category 65 | 100 | | Category 66 | 100 | | Category 67 | 100 | | Category 68 | 100 | | Category 69 | 100 | | Category 70 | 100 | | Category 71 | 100 | | Category 72 | 100 | | Category 73 | 100 | | Category 74 | 100 | | Category 75 | 100 | | Category 76 | 100 | | Category 77 | 100 | | Category 78 | 100 | | Category 79 | 100 | | Category 80 | 100 | | Category 81 | 100 | | Category 82 | 100 | | Category 83 | 100 | | Category 84 | 100 | | Category 85 | 100 | | Category 86 | 100 | | Category 87 | 100 | | Category 88 | 100 | | Category 89 | 100 | | Category 90 | 100 | | Category 91 | 100 | | Category 92 | 100 | | Category 93 | 100 | | Category 94 | 100 | | Category 95 | 100 | | Category 96 | 100 | | Category 97 | 100 | | Category 98 | 100 | | Category 99 | 100 | | Total (Total) |INHALTSVERZEICHNIS
natural_image
Technical diagram of a mechanical assembly with concentric circular components and a vertical support (no text or labels)natural_image
Symbol of a trash bin crossed with a diagonal line, no text or labels presentCongratulations on the purchase of your device. Please read the following instructions carefully and follow them to prevent potential damage. We accept no liability for damage caused by disregarding the instructions or improper use. Please scan the QR code to access the latest operating instructions and for further information about the product.

CONTENTS
Safety instructions 18
Device Overview 19
Connections 23
Operation 24
FM radio 24
DAB radio 25
CD mode 25
USB/SD mode 25
BT mode 26
Record player 26
AUX mode 26
Disposal Considerations 27
Declaration of conformity 27
TECHNICALDATA
| Item number 10033773 | |
| Power supply (power adapter) 230 V | ~ 50 Hz |
| Power supply (remote control) 1 x CR | 2025 battery |
| Drive Belt drive | |
| BT frequency 2402-2480 MHz | |
| BT transmission power (max.) 4 dBm | |
| Package contents Jukebox, remote control, operating instructions | |
SAFETY INSTRUCTIONS
General instructions
- Lightning - If you do not use the device for a long period of time or in the event of electrical storms, unplug the device from the power outlet or disconnect the device from the antenna connection. This prevents damage to the product due to lightning and overvoltage.
• Overloading - Do not overload electrical outlets, extension cords or integrated sockets as this may result in a fire or electric shock. - Foreign objects and liquid entry - Never push objects of any kind into the unit through openings as they may touch dangerous voltage points or short out parts that could cause a fire or electric shock. Never spill liquids of any kind on the unit.
- Repair and maintenance - Do not attempt to service this product yourself as opening or removing covers may expose you to dangerous voltages or other hazards. Leave all maintenance work to qualified service personnel.
- Damage requiring servicing - Unplug the appliance from the wall outlet and refer servicing to qualified service personnel when any of the following situations occur:
a) If the mains cable or plug is damaged.
b) If liquid has been spilled or objects have fallen onto the product.
c) If the product has been exposed to rain or water.
d) If the product has been dropped or damaged.
e) If the product has a significantly reduced performance.
- Spare parts - If spare parts are needed, make sure that the specialist company replacing the parts only uses spare parts that are approved by the manufacturer or have the same characteristics as the original part. Unauthorised substitutions may result in fire, electric shock or other hazards.
- Heat - Do not install near any heat sources such as radiators, heat registers, stoves, or other products (including amplifiers).
Special instructions
- Children from the age of 8 and physically, sensory and mentally impaired persons may only use the appliance if they have been familiarised by a responsible person with its functions and understand the safety precautions in place as well as any associated risks.
- Children should be supervised to ensure that they do not play with the device. Make sure that children and babies do not play with plastic bags or other packaging materials.
- Make sure that the mains adapter/mains plug always remains easily accessible so that the unit can be quickly disconnected from the mains in an emergency.
- When you are no longer using the device, switch it off and pull the plug out of the socket.
DEVICE OVERVIEW
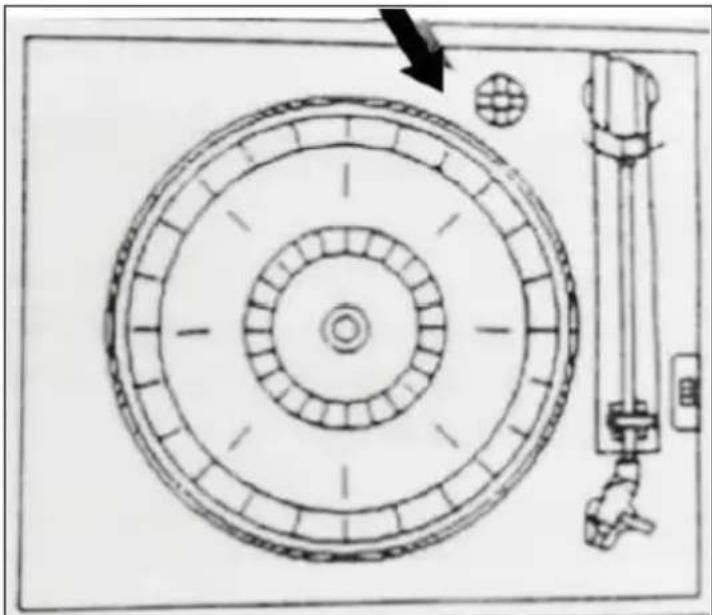
Record player
1 Turntable 3 Tone arm
2 Tone arm end 4
Speed control: 33/45/78
RPM (revolutions per minute)
Adjusting screw for the transport safety lock
natural_image
Technical diagram of a mechanical assembly with concentric circular components and a vertical support (no text or labels)Loosen the screw before using the turntable.
Tone arm safety lock

Jukebox, CD player and control panel
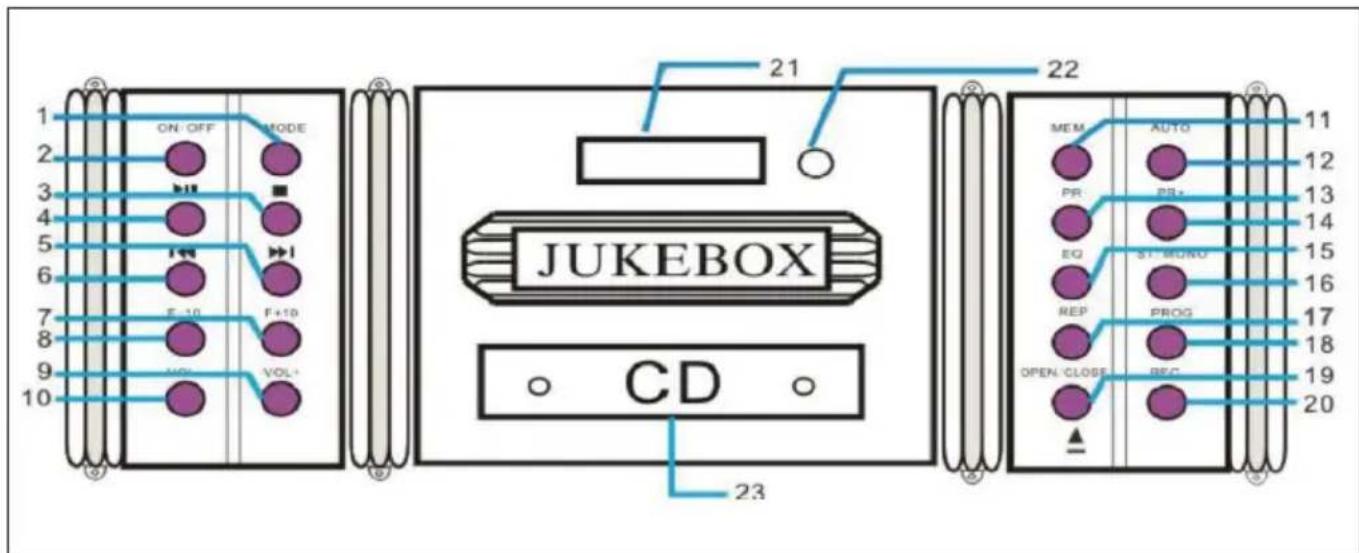
| 1 | MODE (select operating mode) | 13 PR- (previous channel) | |
| 2 ON/OFF 14 PR+ (next channel) | |||
| 3 STOP 15 EQ (equaliser) | |||
| 4 PLAY/PAUSE 16 | ST/MONO (stereo/mono reception switch) | ||
| 5 Previous / Fast forward 17 REP (repeat mode on/off) | |||
| 6 Back / Fast back 18 PROG (playlist programming) | |||
| 7 F+10 (10 tracks forward) 19 | OPEN/CLOSE (CD compartment open/close) | ||
| 8 F-10 (10 tracks back) 20 REC (record) | |||
| 9 VOL+ 21 Display | |||
| 10 VOL- 22 IR sensor | |||
| 11 | MEM (save current radio station) | 23 CD compartment | |
| 12 | AUTO (automatic station search) | Note: most functions can be controlled by remote control with a few exceptions (opening/closing the CD compartment). | |
Remote control
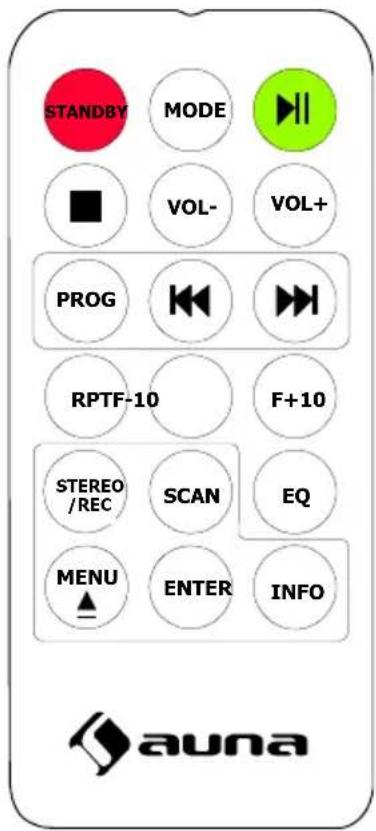
The buttons on the remote control have the same function as the buttons on the unit.
CONNECTIONS
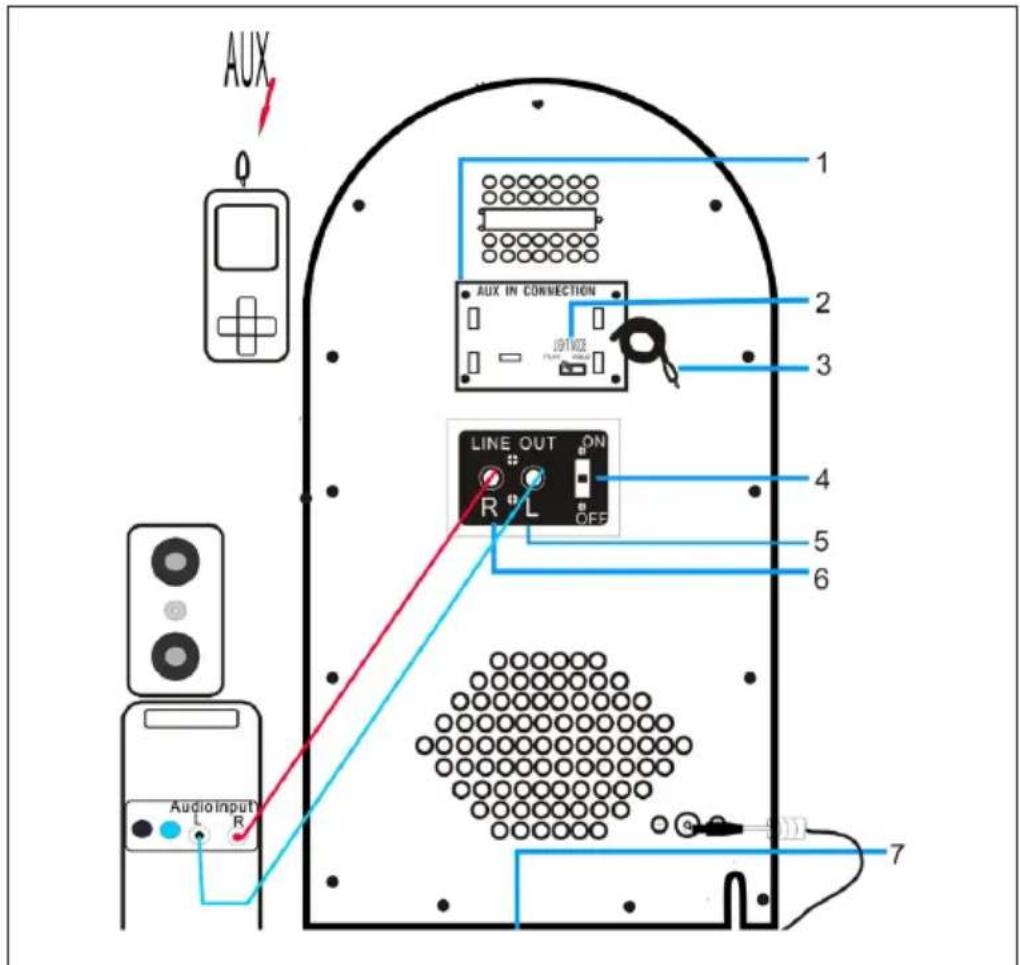
| 1 MP3 connections 5 | Line out (R/L): RCA stereo | |
| 2 Switch for the light effects 6 | ||
| 3 AUX cable 7 Power supply / connector | ||
| 4 Line out on/off switch |
OPERATION
Connection
Carefully unpack the unit and all accessories and remove the packing material. Connect the power cable to a normal household power socket. Press ON/OFF to turn the device on.
Basics
- Select mode: Press MODE or FUNCTION repeatedly to select between FM, DAB CD, USB, SD, BT and Phono modes.
• Volume: Adjust the output volume with the VOL+/- buttons. - Line out: If you have connected the unit to a stereo system/PA or other audio device via RCA cable, switch on the line out on/off switch on the back.
- Setting the time: After switching on, the display shows the time 00:00. Press and hold PROG for 3 - 5 seconds to select between the 12H or 24H display formats. Use the arrow keys to select, then press PROG to confirm. The hour digits now flash. Set the hour using the arrow keys and press PROG to confirm and continue. Repeat for the minutes. Please note: the time is not saved when the unit is disconnected from the mains.
FM RADIO
Roll out the antenna on the back of the unit completely. After switching on, select the radio mode (FM) with MODE. Use the arrow keys to set the desired reception frequency (shown on the display). To store the current station (20 memory locations are available), press PROG and then use the arrow keys to select the desired memory location. Press PROG again to confirm and continue.
DAB RADIO
Press the MODE button (1) until the unit is in DAB radio mode. The unit automatically starts searching for a DAB frequency. Use the buttons ◀◀◀ and ▶▶ scroll through the frequencies. Press SCAN to search for stored DAB stations (up to 20 presets). Press INFO to see station information.
CD MODE
Play: Insert CDs into the CD compartment with the printed side facing up (OPEN/CLOSE). Use the PLAY/PAUSE, CONTINUE/REVERSE and STOP buttons to control playback.
- Play mode: Press REP several times for play modes REP1 (current track is repeated),
- REP (all songs on the CD are repeated) and RAN (songs are played in random order).
- Playlist: In STOP mode, press PROG to generate a playlist. Use the arrow keys to select the first track and confirm with PROG. Then select the next title and so on. You can add up to 20 titles. Press PLAY/PAUSE for playback. Press STOP twice or open the CD compartment to delete the playlist.
USB/SD MODE
Insert USB or SD memory media into the ports provided. After MODE selection of USB/SD, the display shows the number of folders and files that are contained. Use the PLAY/PAUSE, CONTINUE/REVERSE, F+10/-10 and STOP buttons to control playback. The playback mode and playlist functions can be operated here in the same way as for CD playback.
BT MODE
Select the BT mode with MODE. Activate BT on your smartphone/tablet and open the list of BT devices found. Connect with JUKEBOX. Disconnect by switching (MODE) or from your smartphone/tablet.
RECORD PLAYER
- Set the AUX/PHONO selector switch on the rear panel to PHONO when you want to operate the turntable.
- Select the Phono mode with MODE. Set the rotation speed (switch next to the tone arm bracket).
- Place a record on the turntable. Use the spindle adapter ("puck") if necessary.
- Lift the tone arm from the tray and carefully move it to the position on the record you want to play. Then carefully lower the tone arm onto the record.
- Put the tone arm back on the holder after the record is finished.
Note: If the auto-stop range of the record is smaller than usual, please switch off the auto-stop function. Otherwise, the last track or tracks of the album may be interrupted because the tone arm moves back.
AUX MODE
Connect external media players (MP3 player, smartphone, laptop, etc.) to the AUX cable at the rear. Slide the AUX/PHONO switch to the AUX position. Use your external device to control playback.
DISPOSAL CONSIDERATIONS

natural_image
Symbol of a trash bin crossed with a diagonal line, no text or numbers presentIf there is a legal regulation in your country regarding the disposal of electrical and electronic equipment, this symbol on the product or on the packaging indicates that this product must not be disposed of with household waste. Instead, it must be taken to a collection point for the recycling of electrical and electronic equipment. By disposing of this product in accordance with the regulations, you protect the environment and the health of those around you from negative consequences. For information on recycling and disposal of this product, contact your local government or household waste disposal service.
This product contains batteries. If there is a legal regulation in your country regarding the disposal of batteries, the batteries must not be disposed of in household waste. Consult your local regulations for the disposal of batteries. By disposing of this product in accordance with the regulations, you are protecting the environment and the health of those around you from negative consequences.
DECLARATION OF CONFORMITY

Manufacturer:
Chal-Tec GmbH, Wallstraße 16, 10179 Berlin, Germany.
Importer for Great Britain:
Berlin Brands Group UK Ltd
PO Box 1145
Oxford, OX1 9UW
United Kingdom
Chal-Tec GmbH hereby declares that the radio equipment type Graceland DAB is in compliance with Directive 2014/53/EU. The full text of the EU declaration of conformity is available at the following internet address: use.berlin/10033773
Cher client, chère cliente,
SOMMAIRE
natural_image
Technical diagram of a mechanical assembly with concentric circular components and a vertical support (no text or labels)natural_image
Symbol of a trash bin crossed with a diagonal line, no text or numbers presentDÉCLARATION DE CONFORMITÉ

Fabricant :
Chal-Tec GmbH, Wallstraße 16, 10179 Berlin, Allemagne.
Berlin Brands Group UK Ltd
PO Box 1145
Oxford, OX1 9UW
United Kingdom
ÍNDICE
natural_image
Technical diagram of a mechanical assembly with concentric circular components and a vertical support (no text or labels)natural_image
Symbol of a trash bin crossed with a diagonal line, no text or numbers presentBerlin Brands Group UK Ltd
PO Box 1145
Oxford, OX1 9UW
Reino Unido
INDICE
natural_image
Technical diagram of a mechanical assembly with concentric circular components and a vertical support (no text or labels)natural_image
Symbol of a trash bin crossed with a diagonal line, no text or numbers presentBerlin Brands Group UK Ltd
PO Box 1145
Oxford, OX1 9UW
United Kingdom
natural_image
Abstract white logo design on dark background, resembling stylized letter 'S' or wave form (no text or symbols)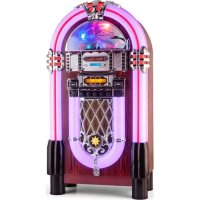
- INHALTSVERZEICHNIS
- CONTENTS
- TECHNICALDATA
- SAFETY INSTRUCTIONS
- General instructions
- Special instructions
- DEVICE OVERVIEW
- Adjusting screw for the transport safety lock
- Tone arm safety lock
- Remote control
- CONNECTIONS
- OPERATION
- Connection
- Basics
- FM RADIO
- DAB RADIO
- CD MODE
- USB/SD MODE
- BT MODE
- RECORD PLAYER
- AUX MODE
- DISPOSAL CONSIDERATIONS
- DECLARATION OF CONFORMITY
- Manufacturer:
- Importer for Great Britain:
- Cher client, chère cliente,
- SOMMAIRE
- DÉCLARATION DE CONFORMITÉ
- Fabricant :
- ÍNDICE
- INDICE
Brand : Auna
Model : Graceland DAB
Category : Juke box