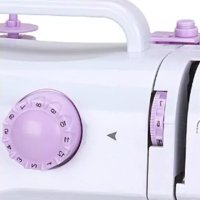
SEW121820 - Sewing machine Emerio - Free user manual and instructions
Find the device manual for free SEW121820 Emerio in PDF.



| Brand | Emerio |
| Model | SEW121820 |
| Product type | Portable sewing machine |
| Power supply | AC adapter 100-240 V AC, 50/60 Hz, output 6 V DC, 1.2 A; or 4 AA batteries |
| Power | 7.2 W (adapter) |
| Number of stitches | 12 sewing stitches |
| Main functions | Straight stitch, reverse stitch, manual buttonhole, bobbin winder, speed control (L/H), work lamp, thread cutter |
| Needle type | Universal needles 90/14 |
| Bobbin | Metal bobbins (lower bobbins) |
| Included presser foot | Overcast presser foot (for stitches 1-12) |
| Free arm | Yes, for sewing sleeves and narrow openings |
| Storage compartment | Built-in accessory drawer |
| Safety | Automatic stop when changing needle, bobbin, parts; unplug before maintenance; do not leave unattended |
| Maintenance and cleaning | Clean with a dry cloth; store in a dry, ventilated place |
| Spare parts and repairability | Replacement needles (90/14), metal bobbins; do not open the housing or repair yourself |
| Warranty | 2 years |
| Customer service | Emerio B.V., Netherlands; www.emerio.eu/service |
Frequently Asked Questions - SEW121820 Emerio
User questions about SEW121820 Emerio
0 question about this device. Answer the ones you know or ask your own.
Ask a new question about this device
Download the instructions for your Sewing machine in PDF format for free! Find your manual SEW121820 - Emerio and take your electronic device back in hand. On this page are published all the documents necessary for the use of your device. SEW121820 by Emerio.
USER MANUAL SEW121820 Emerio
Before use make sure to read all of the below instructions in order to avoid injury or damage, and to get the best results from the appliance. Make sure to keep this manual in a safe place. If you give or transfer this appliance to someone else make sure to also include this manual.
In case of damage caused by user failing to follow the instructions in this manual the warranty will be void. The manufacturer/importer accepts no liability for damages caused by failure to follow the manual, a negligent use or use not in accordance with the requirements of this manual.
- This appliance can be used by children aged from 8 years and above and persons with reduced physical, sensory or mental capabilities or lack of experience and knowledge if they have been given supervision or instruction concerning use of the appliance in a safe way and understand the hazards involved.
- Children shall not play with the appliance.
- Cleaning and user maintenance shall not be made by children without supervision.
- The appliance is only to be used with the power supply unit provided with the appliance.

- Always switch off the appliance, disconnect from the power supply and remove foot pedal when:
changing the needle;
threading the needle;
changing bottom bobbin;
changing any parts;
inserting or removing batteries;
cleaning the machine;
after each use.
- Never run the machine when there's thread in the needle, but no fabric on the machine. This could damage the machine.
- Always keep your hands away from the needle, hand wheel, upper thread tension dial and pattern selection dial when the appliance is running.
- Never attempt to open the housing of the appliance, or to repair the appliance yourself. This could cause electric shock.
- Never leave the appliance unattended during use.
- Switch off or unplug the appliance when leaving it unattended.
- Unplug the appliance before carrying out maintenance.
- This appliance is not designed for commercial use.
- Do not use the appliance outdoors.
- Do not use the appliance for other than intended use.
- Never use the appliance if damaged in anyway.
- Whenever the sewing machine is not in use make sure it is switched off and unplugged from the power supply and remove the foot pedal.
- Keep the machine in a dry and ventilated place.
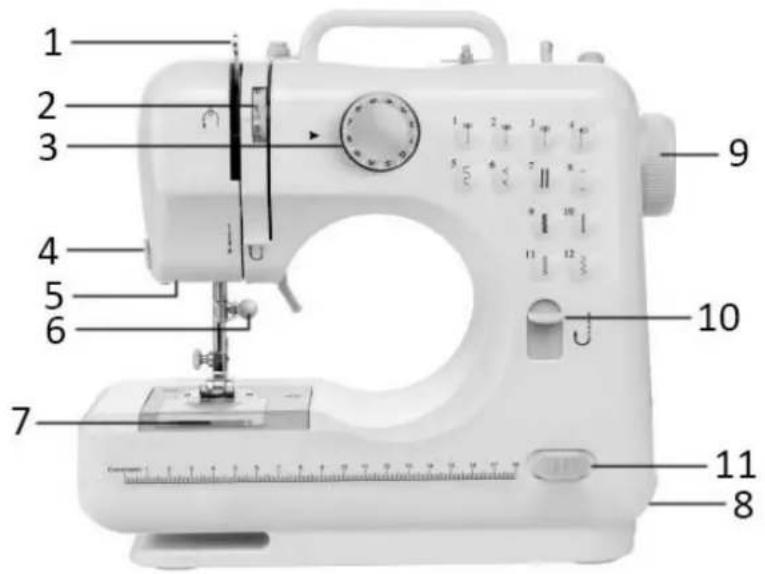
PARTS IDENTIFICATION
Front view
- Take-up lever
- Upper thread tension dial
- Pattern selection dial
- Thread cutter
- Light
- Needle clamp screw
- Bottom bobbin
- Drawer
- Hand wheel
- Reverse button
- Power & speed switch

Back view
- Bobbin winder pin
- Bobbin winder stop
- Foot pedal input
- Bobbin winder tension disk
- Presser foot lifter
- Presser foot
- DC input
- Battery compartment
- Spindle
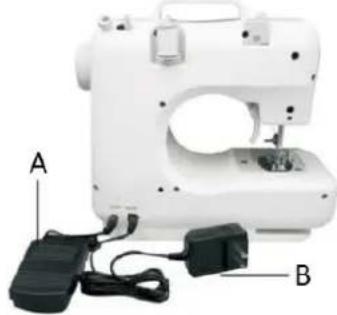
USING THE FOOT PEDAL (A) AND ADAPTOR (B)
- Connect the foot pedal by inserting the jack into the foot pedal input socket. Then you can use the foot pedal to turn on the machine instead of using the hand switch (Power & speed switch).
- Connect the adaptor's jack to the DC input socket on the back of the machine, and connect the plug to the main power supply.
Caution:
- Make sure the foot pedal is unplugged from the machine when you are not using it, so the sewing machine won't accidentally start up.
- The foot pedal cannot be used together with the power & speed switch. Make sure the switch is placed at the position "OFF".
- There is no speed selection when using foot pedal to control the machine.
INSTALLING THE BATTERIES
- Make sure the "Power & speed switch" is on the position "OFF".
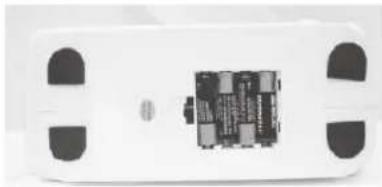
- Turn the sewing machine over on a flat surface and remove the battery compartment cover.
- Insert 4xAA batteries into the compartment and replace the battery cover.
Caution:
-
To prevent the accidental start-up of the sewing machine, always make sure that the "Power & speed switch" is on the position "OFF" when inserting or removing the batteries.
-
When using the adapter, remember to remove all batteries from the machine.
NEEDLE REPLACEMENT
If the needle breaks, or you need a different needle to sew a different kind of fabric, just follow these steps. If you need replacement needles please use universal needles of type 90/14.
Caution: To prevent injury from accidentally starting up the machine, make sure to turn off the switch, remove the foot pedal and the adaptor plug first.
- Turn the hand wheel to raise the needle to its highest position. Hold the old needle and loosen the needle clamp screw. Remove the old needle and discard it properly. (Fig.1)
- Insert the new needle into the clamp with the flat side toward the correct direction (to the back). Be sure to push the needle completely into the clamp before tightening the needle clamp screw.
- Tighten the needle clamp screw.
Caution: Needle direction must be correct, and be sure to tighten the thimble screw, to avoid needle falling by accident.
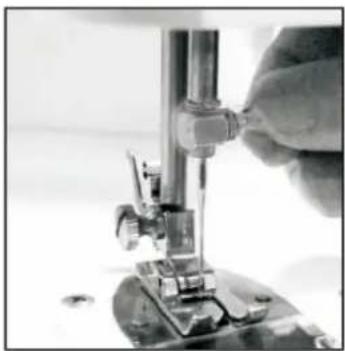
Fig.1
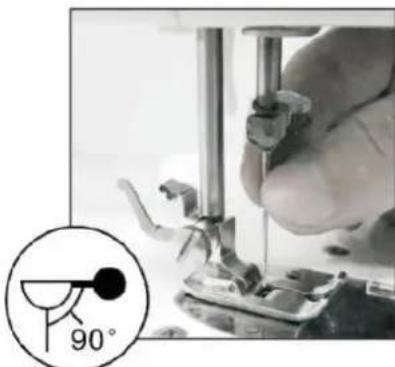
Fig.2
PRESSER FOOT REPLACEMENT
1. Removing the presser foot
Turn the hand wheel counterclockwise to raise the needle to its highest position. Raise the presser foot lifter, and press the presser foot locking lever. The presser foot will drop off automatically from the locking device. (Fig.3; Fig.4)
2. Installing the presser foot
Put the presser foot under the presser foot locking device, lower the presser foot lifter, press the presser foot locking device to reset the foot, and lift the presser foot lifter. (Fig.5; Fig.6)
Caution:
Always switch off the appliance, disconnect it from the power supply and remove the foot pedal when replacing the presser foot.
- When replacing the presser foot, please place the machine on a stable platform.
- When putting down the presser foot, please do not put your hand or finger under it to avoid injuring fingers.

Fig.3
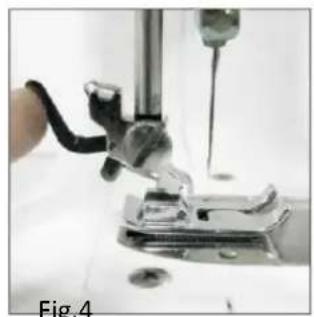
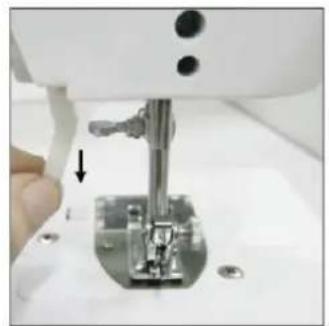
Fig.5

THREADING THE SEWING MACHINE
1. Threading upper thread
Caution: Always switch off the appliance, disconnect the appliance from the power supply and remove the foot pedal when threading the machine.
1) Turn the hand wheel to raise the needle to its highest position.
2) Put a spool on the thread spindle, put on the thread spindle cover and then pull out the thread.
3) Pull the thread and let it pass through the bobbin winder tension disk. (mark ① in the pic. below)
4) Guide the thread through the groove and pull it up towards the chromed take-up lever. (marks ② & ③ in the pic. below)
5) Feed the thread through the hole in the chromed lever and pull it straight down towards the needle. (marks 4 & 5 in the pic. below)
6) Feed the thread through the hole in the needle holder, then through the eye of the needle from the front side to the back and pull out 10cm to the back. (mark ⑥ in the pic. below)

2. Replacing the bottom bobbin
1) Slide the bobbin cover button to the right and remove the bobbin cover (Fig.7).
2) Put the new bobbin in the holder, with the thread going clockwise. Leave 10cm of thread hanging out (Fig.8).
3) Hold the end of the upper thread with one hand, and turn the hand wheel counterclockwise with the other hand, the needle thread will pick up the bobbin thread and pull it up through the hole under the needle (Fig.9).
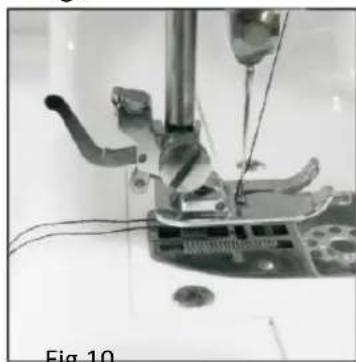
4) Replace the bobbin cover and separate the two threads and pull them to the back of the machine under the presser foot, leaving about 15cm hanging there. (Fig. 10)
Caution:
Always switch off the appliance, disconnect it from the power supply and remove the foot pedal when replacing the bottom bobbin.
- Please use metal bobbins, otherwise the magnetic holder cannot tense the bobbin thread and work rightly.
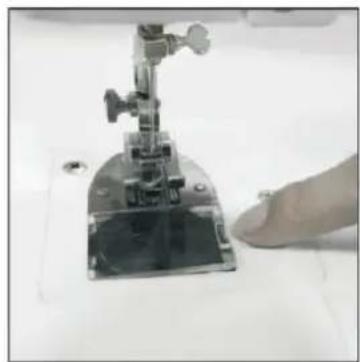
Fig.7
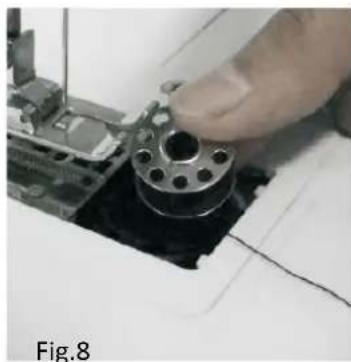
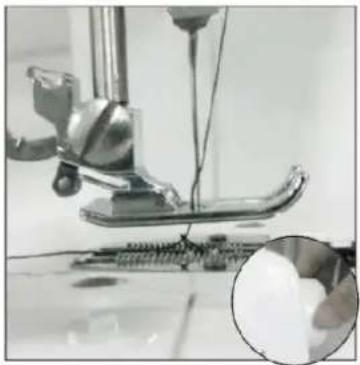
Fig.9
SEWING
- Turn the hand wheel counterclockwise to raise the needle to its highest position.
- Raise the presser foot lifter and place the fabric you want to sew under the presser foot (Fig.11).
- Lower the presser foot. (Fig.12).
- Rotate the pattern selection dial to select the stitch pattern you wanted.
Caution:
Before you change the stitch pattern, please turn off the switch and turn the hand wheel to raise the needle all the way up so it doesn't get stuck and bent.
- Changing the stitch pattern is not allowed when the machine is running, otherwise the needle and/or machine may damage.
5. Turn the hand wheel several times to make sure there is no jamming in the stitches.
6. Slide the power switch to the position "L" (meaning low speed) or "H" (meaning high speed), and the machine will automatically start sewing. We recommend the low speed for beginners (Fig.13).
7. When you finish the sewing, turn off the switch, unplug the adapter, turn the hand wheel to raise the needle all the way up, lift the presser foot, and then gently remove the fabric from the sewing machine, and cut the thread with the thread cutter (Fig.14).
Tips:
Please turn the hand wheel if it is difficult to remove the fabric, and then pull out the fabric gently.
- If the thread had tangled or jammed, please turn the hand wheel and simultaneously pull the thread slightly to release the thread. Bottom bobbin mechanism is a more precise part, inappropriate actions may damage it. Please to not push or pull it by finger or any tools.
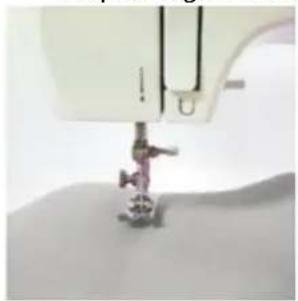
Fig.11
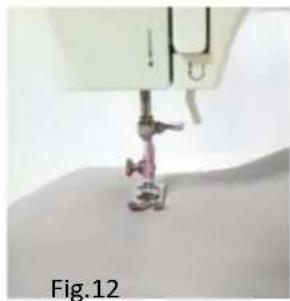
Fig.12

Fig.13

FEATURES
1. Selection of stitch pattern
Rotate the pattern selection dial to select one pattern you want from the 12 stitch patterns. There are pattern illustrations on the surface of machine body for your reference.
Caution:
Before you change the stitch pattern, please turn off the switch and turn the hand wheel to raise the needle all the way up so it doesn't get stuck and bent.
- Changing the stitch pattern is not allowed when the machine is running, otherwise the needle and/or machine may damage.
2. Reverse sewing
Reverse sewing (back stitching) is useful for reinforcing the beginning and end of seams. To use this function proceed as follows:
1) Sew forwards as normal, and then press and hold down the reverse stitch button on the front of the sewing machine to sew backwards.
2) To sew forwards again simply release the reverse stitch button.
Note: Reverse sewing is applicable only to stitch patterns 1 to 4.
3. Setting the sewing speed
Slide the power switch to "L" or "H" position. ("L" = low speed; "H" = High speed)
4. Working lamp
If additional light is needed, press the light switch to turn the light on. Press the switch again to turn it off. The working lamp cannot be replaced yourself.
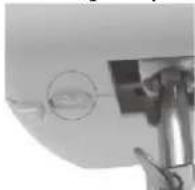
5. Thread cutter
The machine has a thread cutter on the central left side of the machine, it can cut off the thread after sewing or winding thread.
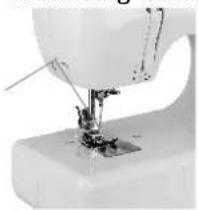
6. Sewing sleeves
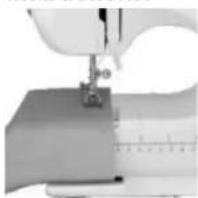
This sewing machine has been designed to sew sleeves or any narrow openings in garment. Lift the presser foot. Position the garment over the sewing arm. Lower the presser foot and follow the regular sewing instructions.
7. Manual buttonhole
1) Pull the cloth under the presser foot and lower the presser foot on the cloth where you need to sew buttonhole, then choose the 8^th stitch.
2) Turn on the switch and sew 5-6 stitches in low speed, then turn off the switch (Fig.15).
3) Choose the 7^th stitch, turn on switch and sew on the cloth in suitable length, then turn off switch. Note that try to keep sewed stitches in straight line (Fig.16).
4) Choose the 8^th stitch, then turn on switch and sew 5-6 stitches in low speed, then turn off switch (Fig.17).
5) Raise the presser foot, rotating the cloth for 180^ (Fig.18).
6) Choose the 7^th stitch, then turn on switch and sew till buttonhole is fully sewed (Fig.19).
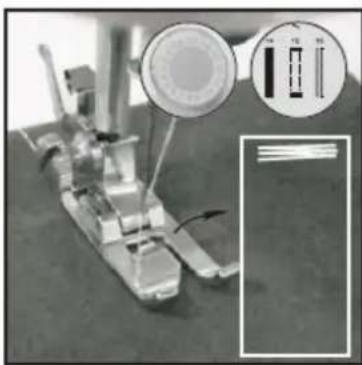
Fig.15
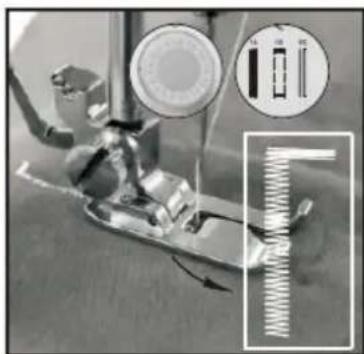
Fig.16
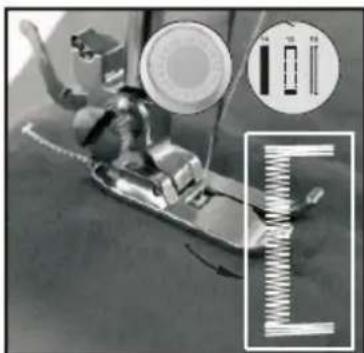
Fig.17
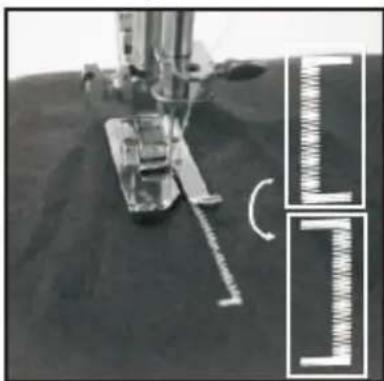
Fig.18
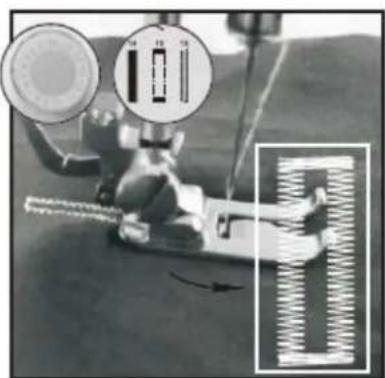
Fig.19
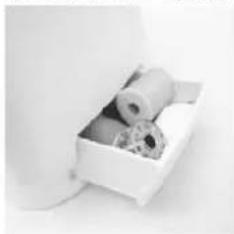
8. Drawer
This drawer is an accessory storage compartment, which can be slid out and you can store spare bobbins, needles, etc. in it. It is located at the bottom side below the hand wheel.
WINDING THE BOBBIN
- Put a spool of thread on spool pin. (Fig.20)
- Guide the thread through the bobbin winder tension disk on the upper side of the machine. (Fig.21)
- Put the bobbin on the bobbin winder pin, wind thread clockwise around bobbin several times. (Fig.22)
- Push bobbin to the left. (Fig.23)
- Switch on the machine to start winding. (Fig.24)
- Switch off the machine to stop winding after appropriate volume of thread you had been winded on bobbin.
- Push bobbin away from bobbin winder stop, take bobbin off the pin and cut the thread. (Fig.25)
Caution:
Before winding the bobbin, raise the presser foot, take out the bottom bobbin and the upper thread.
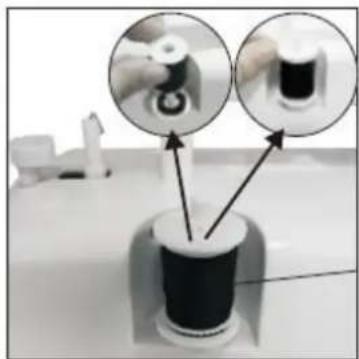
Fig.20

Fig.21
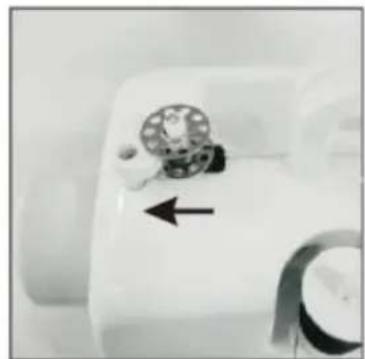
Fig.22
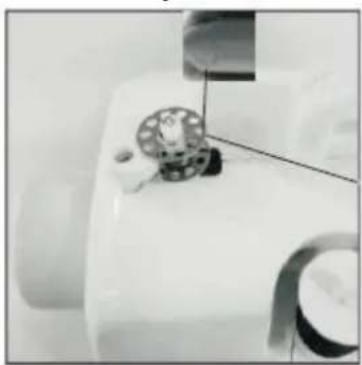
Fig.23
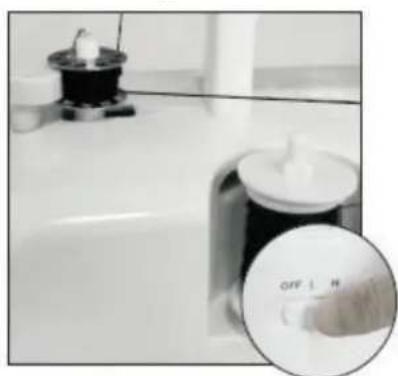
Fig.24
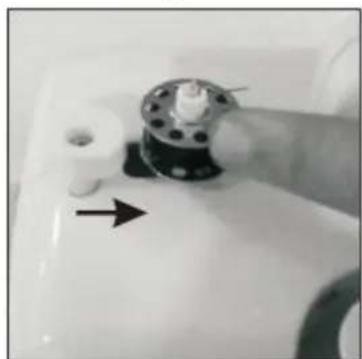
Fig.25
ADJUSTING STITCHING
- As shown in the Fig.A, normal stitching shall have top and bottom threading evenly, neither over tight nor loose. (① = Top thread; ② = Cloth; ③ = Bottom thread)

Fig.A
- If the bottom threading looks like a straight line (Fig.B), which indicates the top thread is too loose. Please
turn upper thread tension dial to direction with bigger number to increase pressure until the stitching returns to normal.

Fig.B
- If the top thread looks like a straight line (Fig.C), which indicates an over-tight top thread. Please turn the upper thread tension dial to the direction with smaller number to reduce pressure until the stitching back to normal.

Fig.C
APPLICABLE CLOTH FOR SEWING
| Sewing Cloth Presentation Fabric specification | Cotton/Linen | Silk/Wool | Polyester | Elastic |
| Regular | ✓ | × | ✓ | △ |
| Thick | ✓ | × | ✓ | △ |
| Thin | ✓ | × | × | × |
| Hard | ✓ | ✓ | ✓ | △ |
| Soft | × | × | × | × |
Sewing effective:
±bv : means easy to sew
x: means difficult to sew
: means not smooth to sew
Note:
- The definition of the fabric thickness:
Thin (fabric): two layers of the fabric thickness < 0.35mm
Thick (fabric): two layers of the fabric thickness >0.8mm
Regular (fabric): two layers of the fabric thickness ≥ 0.35mm and ≤ 0.8mm .
- The definition of elastic cloth:
If the cloth, which size is "100mm x 30mm", is extending to over 106mm under 0.5KG tension force, then the cloth is defined elastic, otherwise it is inelastic. - Hard fabric: such as Jeans, fine canvas, etc.
- Soft fabric: such as towel, duster, etc.
| Type of presser foot | Picture | Range of use | Function of this type of presser foot |
| Catcher presser | Pattern 1 to 12 | Sewing catcher stitches professionally, along the fabric cutting edge to stitch and sew the edges. Presser foot with guide plate is used to align the selvage and selvage maintains smooth. | |
| Patchwork presser | Pattern 1 to 3 | Keep the right position for the presser foot down to keep the needle in 0.6cm. You can easily sew a straight line at the fabric edge at 1/4 for professional quilting stitch. | |
| Blind hem presser | Pattern 1 to 12 | By blind hem foot adjustable guide, it can make blind hem in a variety of fabrics, such as trousers, skirt, curtains edge etc. | |
| Presser foot curling | Pattern 5 to 12 | Used to make a 5mm three-folded flat curling edge of the fabric, with the center of the straight stitch suture, for some fabric edging processing. | |
| Leather roller presser | Pattern 1 to 12 | Use the roller presser foot, evenly into the leather, synthetic leather, denim, very useful when sewing cloth coat and leather into cloth of difficulties. | |
| Nail withhold presser | Pattern 8 | Use to nail two or four buttons, it can suppress buttons smoothly, to avoid buttons moving around when sewing. |
Note: Please choose the applicable presser foot based on the practical sewing of fabric.
Caution: Do not use other presser foot except above mentioned ones.
MORE TIPS
- Make sure there is fabric under the needle when the machine is working and needle is moving, otherwise the machine will get stuck and the thread will be jammed.
- Turn the hand wheel for 2 to 3 circles by hand to test if it goes smoothly or not before starting the machine. Direction to turn the hand wheel should be the same as the arrow's direction on the hand wheel.
- Make sure the machine was threaded correctly (do not forget any step or have wrong threading).
- Do not sew the cloth with too much elasticity, neither too thin (like silk) nor too thick cloth, please follow the IM for the applicable cloth.
- If the machine gets stuck or jammed due to wrong operation, turn off the power & speed switch immediately.
- Before winding the bobbin, please take out the bottom bobbin and the upper thread.
TROUBLE SHOOTING
| Problem | Problem cause | Solution |
| No power or the machine runs slowly. | Batteries are installed incorrectly. | Reinstall the batteries in a correct way. |
| Batteries are low. | Use new batteries. | |
| Adaptor power is inadequate. | Use compatible adaptor. | |
| Skip stitches. | Needle eye is not in the middle. | Remove and re-insert the needle with the flat side of the needle to the back. |
| Needle is bent. | Remove and re-insert a new needle. | |
| Presser foot is too loose | Tighten the presser foot. | |
| Bobbin thread cannot be drawn up. | Lower thread has been used up. | Replace it with a new full bobbin. |
| Needle is threaded incorrectly. | Re-thread the needle, making sure it is threaded from the front to the back. | |
| Thread keeps breaking. | Needle is bent. | Remove and re-insert a new needle. |
| Needle shank is not properly seated. | Remove and re-insert a new needle. | |
| Thread tension dial, thread guide or thread pulling bar is too tight. | Loosen the thread tension between 3-5 number. | |
| Stitches are too loose or uneven. | Thread is blocked by upper bobbin. | Pull out the spool pin and make the bobbin or thread run smoothly. |
| Upper thread is too loose. | ||
| Needle breaks. | Needle is bent or deformed. | Remove and re-insert a new needle. |
TECHNICAL DATA:
Adapter input: 100-240 V AC, 50/60 Hz, 0,35 A Max
Adapter output: 6 V DC, 1200 mA, 7.2W
Sewing Machine: 6 V DC, 1200 mA
GUARANTEE AND CUSTOMER SERVICE
Before delivery our devices are subjected to rigorous quality control. If, despite all care, damage has occurred during production or transportation, please return the device to your dealer. In addition to statutory legal rights, the purchaser has an option to claim under the terms of the following guarantee:
For the purchased device we provide 2 years guarantee, commencing from the day of sale. If you have a defective product, you can directly go back to the point of purchase.
Defects which arise due to improper handling of the device and malfunctions due to interventions and repairs by third parties or the fitting of non-original parts are not covered by this guarantee. Always keep your receipt, without the receipt you can't claim any form of warranty. Damage caused by not following the instruction manual, will lead to a void of warranty, if this results in consequential damages then we will not be liable.
Neither can we hold responsible for material damage or personal injury caused by improper use if the instruction manual is not properly executed. Damage to accessories does not mean free replacement of the whole appliance. In such case please contact our service department. Broken glass or breakage of plastic parts is always subject to a charge. Defects to consumables or parts subjected to wearing, as well as cleaning, maintenance or the replacement of said parts are not covered by the warranty and are to be paid.
ENVIRONMENT FRIENDLY DISPOSAL
Recycling - European Directive 2012/19/EU
This marking indicates that this product should not be disposed with other household wastes. To prevent possible harm to the environment or human health from uncontrolled waste disposal, recycle it responsibly to promote the sustainable reuse of material resources. To return your used device, please use the return and collection systems or contact the retailer where the product was purchased. They can take this product for environmental safe recycling.
Emerio B.V.
Oudeweg 115
2031 CC Haarlem
The Netherlands
Customer service:
T: +31 (0) 23 3034369
www.emerio.eu/service
Kundeninformation:
T: +49 (0) 3222 1097 600
www.emerio.eu/service
Klantenservice:
T: +31 (0) 23 3034369
www.emerio.eu/service
Looking for spare parts? Have a look at www.spareparts.emerio.eu
Looking for spare parts? Have a look at www.spareparts.emerio.eu
Looking for spare parts? Have a look at www.spareparts.emerio.eu
ATT ANVANDA FOTPEDAL (A) OCH ADAPTER (B)
Looking for spare parts? Have a look at www.spareparts.emerio.eu
GEPASTE KLEDING OM TE NAAIEN
Looking for spare parts? Have a look at www.spareparts.emerio.eu
Looking for spare parts? Have a look at www.spareparts.emerio.eu
RESOLUCI O N DE PROBLEMAS
Looking for spare parts? Have a look at www.spareparts.emerio.eu
- PARTS IDENTIFICATION
- Front view
- Back view
- USING THE FOOT PEDAL (A) AND ADAPTOR (B)
- Caution:
- INSTALLING THE BATTERIES
- NEEDLE REPLACEMENT
- PRESSER FOOT REPLACEMENT
- Removing the presser foot
- Installing the presser foot
- THREADING THE SEWING MACHINE
- Threading upper thread
- Replacing the bottom bobbin
- SEWING
- Tips:
- FEATURES
- Selection of stitch pattern
- Reverse sewing
- Setting the sewing speed
- Working lamp
- Thread cutter
- Sewing sleeves
- Manual buttonhole
- Drawer
- WINDING THE BOBBIN
- ADJUSTING STITCHING
- Sewing effective:
- Note:
- MORE TIPS
- TECHNICAL DATA:
- GUARANTEE AND CUSTOMER SERVICE
- ENVIRONMENT FRIENDLY DISPOSAL
- ATT ANVANDA FOTPEDAL (A) OCH ADAPTER (B)
Brand : Emerio
Model : SEW121820
Category : Sewing machine