
SEW122275 - Sewing machine Emerio - Free user manual and instructions
Find the device manual for free SEW122275 Emerio in PDF.
| Product type | Portable sewing machine |
| Brand | Emerio |
| Model | SEW122275 |
| Power supply | 4 AA batteries or AC adapter (input 100-240 V~ 50/60 Hz, output 6 V DC 800 mA) |
| Sewing speed | Adjustable (slow/fast) via button |
| Work light | Yes, with independent on/off button |
| Pedal | Included, allows speed control |
| Bobbin winder | Integrated in the handwheel, retractable |
| Sleeve arm | Yes, to facilitate sleeve sewing |
| Needle | Universal 90/14 (supplied and replaceable) |
| Bobbin | Not supplied, use standard bobbins (pre-installed lower bobbin) |
| Bobbins provided | 4 metal bobbins |
| Needle threader | Included |
| AC adapter | Included |
| Suitable fabrics | Cotton, linen, silk, wool, polyester; avoid very thick or stretchy fabrics |
| Warranty | 2 years |
| Customer service | Emerio Deutschland GmbH, +49 (0) 3222 1097 600, info.de@emerio.eu |
| Safety instructions | Turn off and unplug before maintenance; do not use without fabric; do not immerse |
| Maintenance and cleaning | Clean with a dry cloth; do not use abrasive products |
| Country of origin | Germany (brand) |
Frequently Asked Questions - SEW122275 Emerio
User questions about SEW122275 Emerio
0 question about this device. Answer the ones you know or ask your own.
Ask a new question about this device
Download the instructions for your Sewing machine in PDF format for free! Find your manual SEW122275 - Emerio and take your electronic device back in hand. On this page are published all the documents necessary for the use of your device. SEW122275 by Emerio.
USER MANUAL SEW122275 Emerio
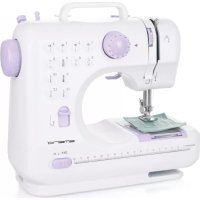
natural_image
White sewing machine with purple buttons and a brand logo (no visible text or symbols on the device body)Sewing Machine (EN)
Nähmaschine (DE)
Instruction manual – English ...... - 2 -
Before use make sure to read all of the below instructions in order to avoid injury or damage, and to get the best results from the appliance. Make sure to keep this manual in a safe place. If you give or transfer this appliance to someone else make sure to also include this manual.
In case of damage caused by user failing to follow the instructions in this manual the warranty will be void. The manufacturer/importer accepts no liability for damages caused by failure to follow the manual, a negligent use or use not in accordance with the requirements of this manual.
-
This appliance can be used by children aged from 8 years and above and persons with reduced physical, sensory or mental capabilities or lack of experience and knowledge if they have been given supervision or instruction concerning use of the appliance in a safe way and understand the hazards involved.
-
Children shall not play with the appliance.
-
Cleaning and user maintenance shall not be made by children without supervision.
-
The appliance is only to be used with the power supply unit provided with the appliance.
-
Always switch off the appliance, disconnect from the power supply and remove foot pedal when: changing the needle; threading the needle; changing bottom bobbin; changing any parts; inserting or removing batteries; cleaning the machine; after each use.
-
Never run the machine when there's thread in the needle, but no fabric on the machine. This could damage the machine.
-
Never attempt to open the housing of the appliance, or to repair the appliance yourself. This could cause electric shock.
- Unplug the appliance before carrying out maintenance.
- This appliance is not designed for commercial use.
- Do not use the appliance outdoors.
- Do not use the appliance for other than intended use.
- Never use the appliance if damaged in anyway.
- Do not pull on fabric while sewing. Pulling could break the needle and result in damage to the appliance.
- Remove batteries when the appliance is not in use for long periods. This saves battery life and protects the appliance. New and used batteries are not to be mixed.
- Keep away from children. This appliance is not a toy and not meant to be used by or near children.
- Do not submerge the unit or any other parts in water. Do not operate the appliance with wet hands, without shoes, or while standing in the water or on a wet surface when using the adapter.
- Never use the appliance with a damaged power cord or plug.
- Keep the power cord away from heated surface.
- To remove the plug from the plug socket, pull the plug. Do not pull the power cord.
- Use only the power adapter recommended by the manufacturer. Any other adapter may cause injury or damage to the appliance.
- Switch off or unplug the appliance when leaving it unattended.
- Make sure there is fabric under the needle when the appliance is working and the needle is moving. Otherwise the appliance will get stuck and the thread will be jammed.
- If the appliance get stuck or jammed due to wrong operation, turn off the power on/off switch immediately.
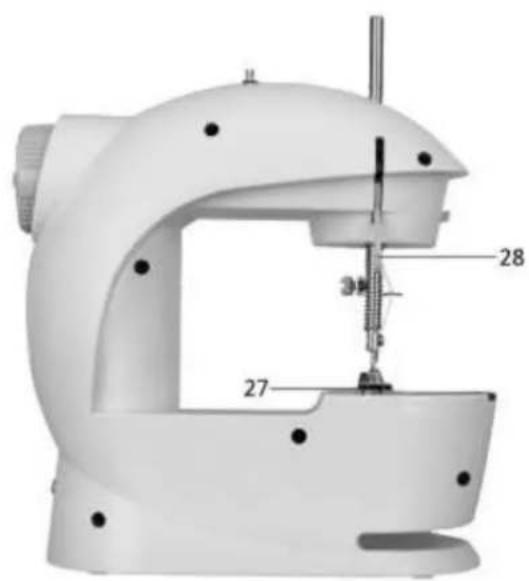
PARTS DESCRIPTION
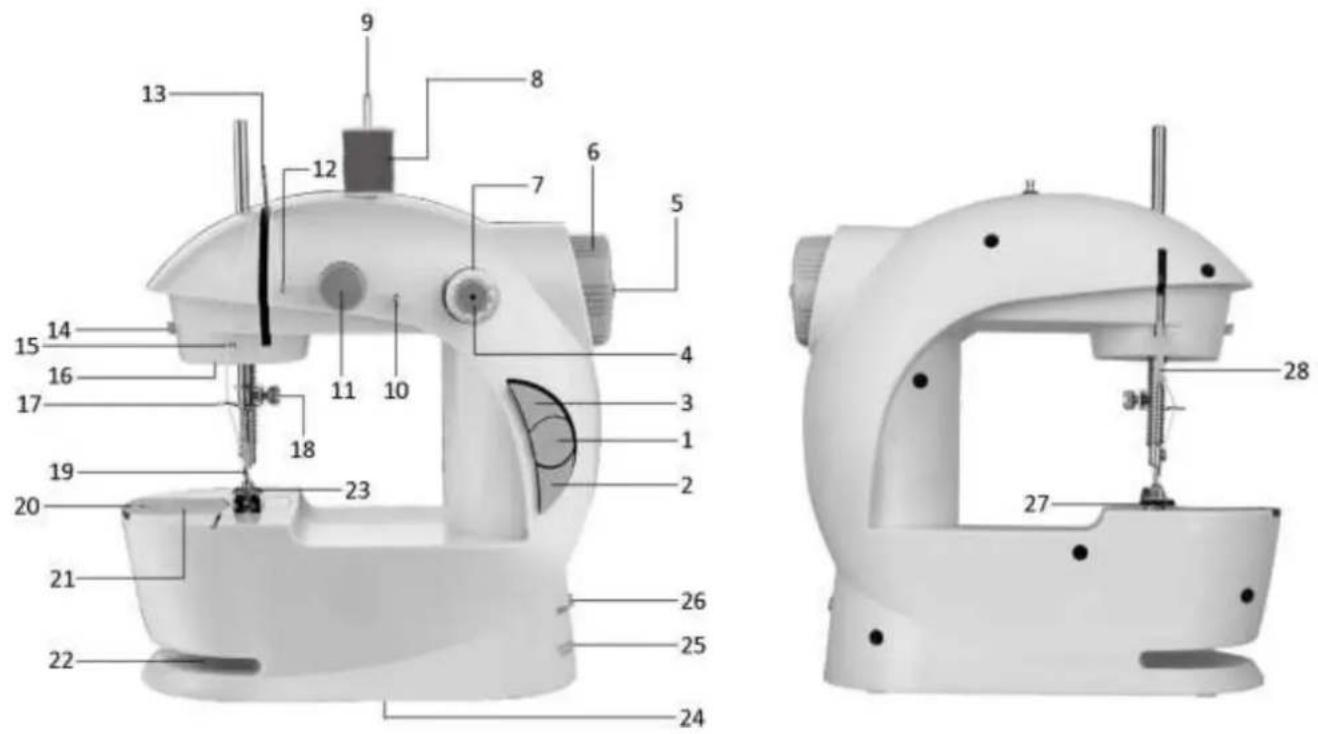
- Power on/off switch
- Speed switch
- Light on/off switch
- Bobbin spindle
- Bobbin winder bar (can be pressed out)
- Hand wheel
- Side bobbin
- Thread spool (not included)
- Thread spindle
-
Thread guide ring
-
Tension adjusting screw
- Thread guide ring
- Take-up lever
- Thread cutter
- Thread guide ring
- Light
- Needle clamp
- Needle clamp screw
- Needle
- Bobbin compartment cap
-
Bottom bobbin (inside)
-
Sleeves sewing slot
- Presser foot
- Battery compartment (underneath)
- DC Jack for adapter
- Foot pedal jack
- Thread gap (gap between the presser foot and the sewing deck)
- Presser foot lever
Accessories
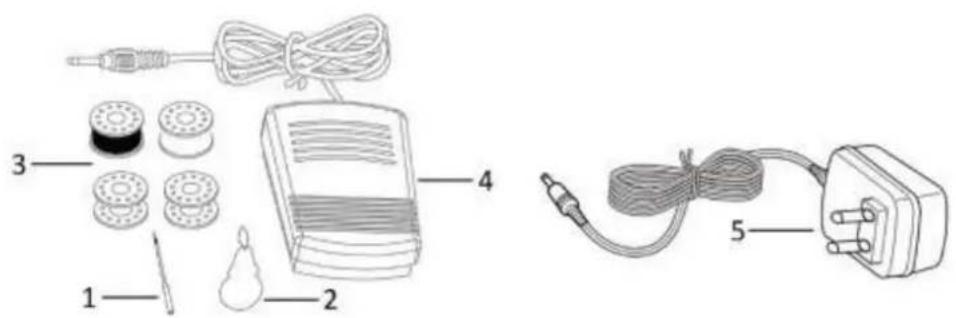
- Needle
- Needle threader
- Four metal bobbins
- Foot pedal
- Adapter
After removing the appliance from the packaging box:
- Make sure the power on/off switch is in off position before inserting batteries.
- Put 4 AA batteries into the battery compartment.
-
Warning! When using the adapter, remove all batteries from the appliance.
-
Press the power on/off switch to turn on the appliance. The unit will start sewing immediately. Be sure the appliance is properly threaded and the fabric is positioned for sewing before you turn on the unit.
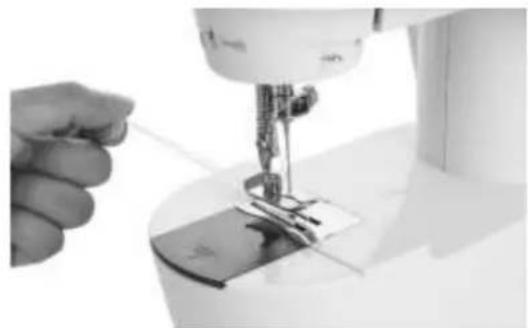
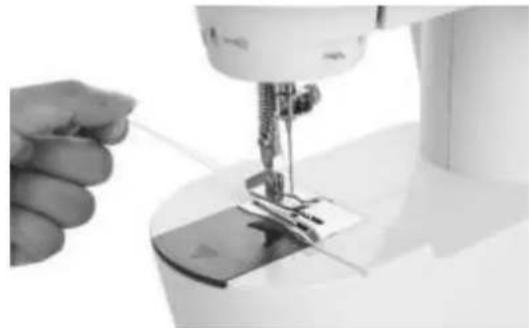
THREADING THE APPLIANCE
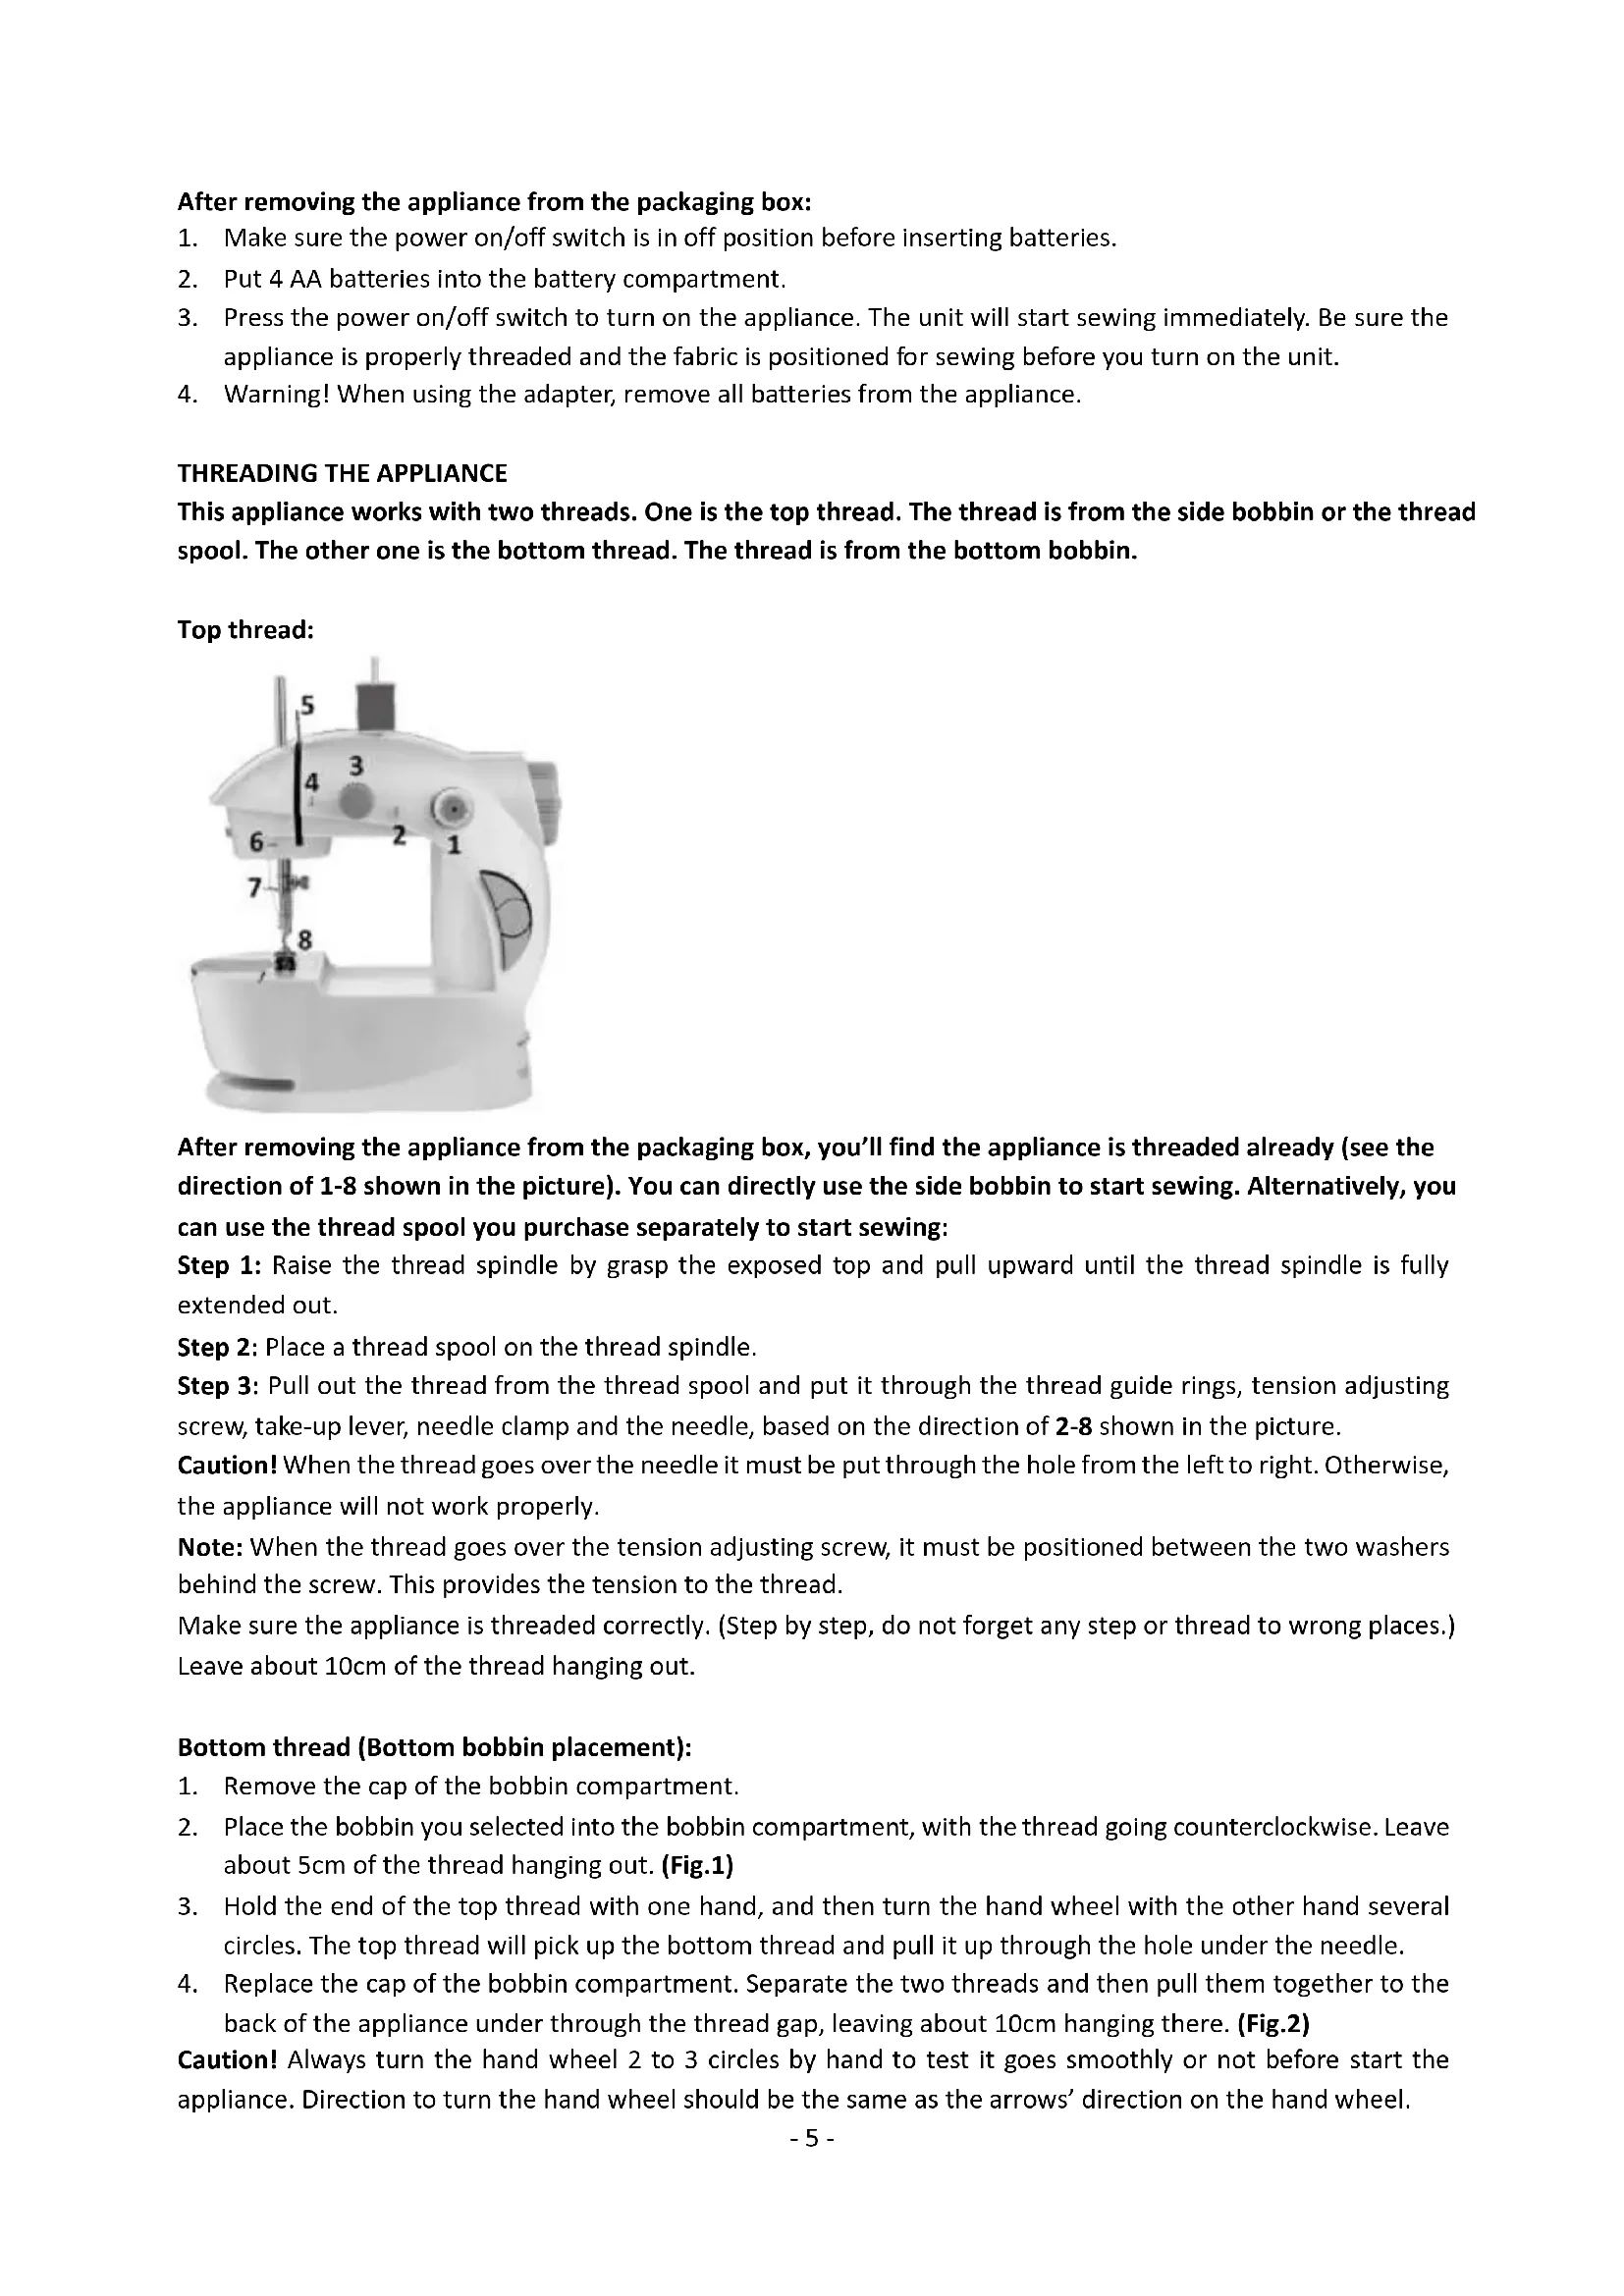
This appliance works with two threads. One is the top thread. The thread is from the side bobbin or the thread spool. The other one is the bottom thread. The thread is from the bottom bobbin.
Top thread:
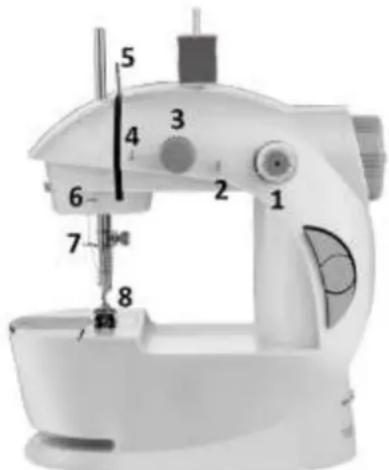
After removing the appliance from the packaging box, you'll find the appliance is threaded already (see the direction of 1-8 shown in the picture). You can directly use the side bobbin to start sewing. Alternatively, you can use the thread spool you purchase separately to start sewing:
Step 1: Raise the thread spindle by grasp the exposed top and pull upward until the thread spindle is fully extended out.
Step 2: Place a thread spool on the thread spindle.
Step 3: Pull out the thread from the thread spool and put it through the thread guide rings, tension adjusting screw, take-up lever, needle clamp and the needle, based on the direction of 2-8 shown in the picture.
Caution! When the thread goes over the needle it must be put through the hole from the left to right. Otherwise, the appliance will not work properly.
Note: When the thread goes over the tension adjusting screw, it must be positioned between the two washers behind the screw. This provides the tension to the thread.
Make sure the appliance is threaded correctly. (Step by step, do not forget any step or thread to wrong places.) Leave about 10cm of the thread hanging out.
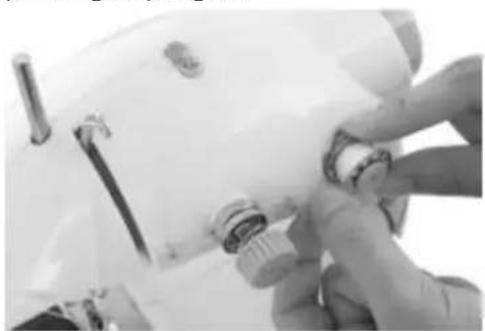
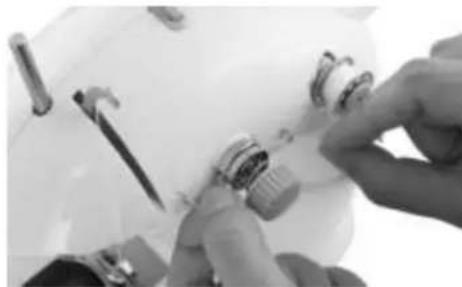
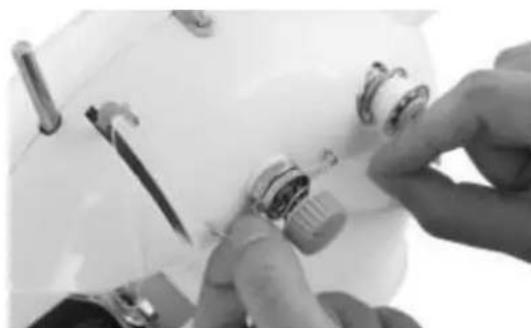
Bottom thread (Bottom bobbin placement):
- Remove the cap of the bobbin compartment.
- Place the bobbin you selected into the bobbin compartment, with the thread going counterclockwise. Leave about 5cm of the thread hanging out. (Fig.1)
- Hold the end of the top thread with one hand, and then turn the hand wheel with the other hand several circles. The top thread will pick up the bottom thread and pull it up through the hole under the needle.
- Replace the cap of the bobbin compartment. Separate the two threads and then pull them together to the back of the appliance under through the thread gap, leaving about 10cm hanging there. (Fig.2)
Caution! Always turn the hand wheel 2 to 3 circles by hand to test it goes smoothly or not before start the appliance. Direction to turn the hand wheel should be the same as the arrows' direction on the hand wheel.

natural_image
Close-up of a mechanical component with a circular dial and metallic parts (no visible text or symbols)Fig.1

natural_image
Close-up of a hand operating a sewing machine needle on a fabric (no visible text or symbols)Fig.2
Important! Check and make sure the top and bottom threads go correctly. Test one piece of old fabric before beginning to sew. Improper threading will damage the lockstitch.
The appliance may have been pre-threaded from the factory. Look at this threading carefully before removing it to replace the thread or bobbin with different thread.
OPERATING THE APPLIANCE (without the foot pedal)
Caution! Always turn the hand wheel 2 to 3 circles by hand to test it goes smoothly or not before start the appliance. Direction to turn the hand wheel should be the same as the arrows' direction on the hand wheel.
-
Lift the needle above the presser foot by turning the hand wheel slightly.
-
Raise the presser foot by lifting up the presser foot lever.
-
Place the fabric to be sewn under the presser foot.
-
Lower the presser foot by releasing the presser foot lever downward.
-
Rotate the hand wheel 2 to 3 circles.
-
Press the speed switch to choose your desired speed. The button is pressed-in when selecting the low speed; the button is released-out when selecting the high speed. Use low speed for intricate work which requires a lot of stopping, starting and turning. Use high speed for long uninterrupted seams.
-
Now press the power on/off switch to on position with the button pressed in. Gently guide the fabric to keep the stitching straight by pressing lightly down with your fingertips on both sides as it feeds through the presser foot.
-
When the seam is finished, press the power on/off switch to off position with the button released out.
-
Raise the needle above the fabric by turning the hand wheel slightly.
-
Raise the presser foot by lifting the presser foot lever.
-
Turn the hand wheel back and forth, the thread will be released easily. Pull the fabric toward you leaving about 10cm of the threads between the fabric and the appliance. If the fabric is difficult to pull out, release the top thread a little bit by loosening the thread from the right side of the take-up lever manually. (Fig.3&4)
-
Cut the threads close to the fabric. Put the threads to the back of the appliance under through the thread gap, leaving about 10cm hanging there. Begin the next seam in the same manner as above by following these operating steps again.
natural_image
Close-up of a hand operating a sewing machine with tools (no visible text or symbols)Fig.3

natural_image
Close-up of hands using a tool to adjust or install a mechanical component (no visible text or symbols)Fig.4
To use the foot pedal
- Make sure the appliance is in off position.
-
Plug the foot pedal into the appliance.
-
Turn on the appliance by pressing the foot pedal. Press gently on the foot pedal to run the unit.
Caution! The foot pedal and the power on/off switch cannot be used at the same time. When the foot pedal is being used, please press the power on/off switch to off position on the appliance. The foot pedal is used to control the power on/off. It is not the power source. Therefore, please do not forget to connect the adapter or insert batteries while using the foot pedal.
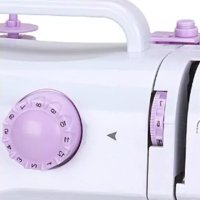
Adjusting the tension
- The normal stitching shall have top and bottom threading evenly, neither over tight nor loose. You shall not adjust the tension, as the tension for maximum performance has been set and adjusted from the factory. However, if you find that the stitches are too loose or too tight when sewing different fabrics, you can adjust the tension. (A= Top thread; B= Cloth; C= Bottom thread.)

- If the bottom thread looks like a straight line, which indicates the top thread is too loose. Please turn the tension adjusting screw neither too tight nor too loose clockwise to increase the pressure until the stitching returns to normal.

- However, when the top thread looks like a straight line indicating an over-tight top thread, slowly turn the tension adjusting screw counterclockwise to reduce the pressure until the stitching returns to normal.

Caution! When the thread goes over the tension adjusting screw it must be positioned between the two washers behind the screw. Otherwise, the appliance will not work properly.
Changing the needle
If the needle breaks, or you need a different needle to sew a different kind of fabric, please replace the needle. If you need replacement needles please use universal needles of type 90/14.
- Remove the batteries / adapter to make sure the appliance is totally powered off.
- Turn the hand wheel to raise the needle to its highest position.
- Loosen the needle clamp screw by a short slotted screwdriver.
- Remove the needle by pulling it down away from the needle clamp.
- Place a new needle with the flat side facing against the needle clamp. Push it gently as up as it will go.
- Tighten the needle clamp screw while holding the needle in place.
Caution! When the thread goes over the needle it must be put through the hole from the left to right. Otherwise, the appliance will not work properly.
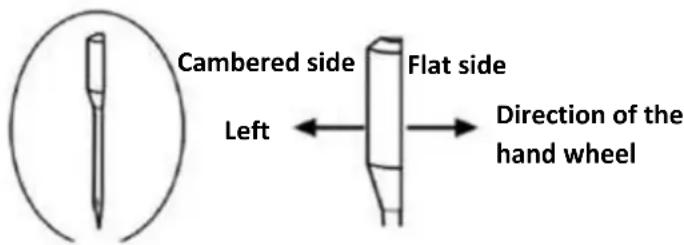
Caution! When install the needle please turn the flat side of the needle to the right (direction of the hand wheel) and the cambered side to the left. Otherwise, the appliance will not work.
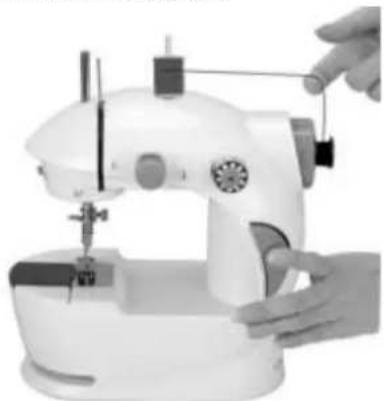
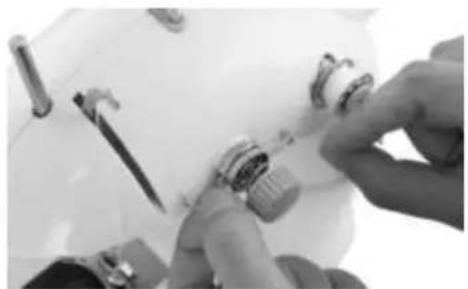
Winding the bobbin
natural_image
Close-up of a sewing machine with a hand operating it (no visible text or symbols)The bobbin winder bar is used to wind your own bobbins from the thread spools you purchase separately. Normally, the bar is hidden in the hand wheel. When you need to wind a bobbin:
- Press and hold on the bar.
- Turn the bar counterclockwise; the bar will pop out.
- Attach the empty bobbin onto the bar firmly and wind the thread on it clockwise for 4 to 5 circles.
- Press the on/off switch to turn on the appliance. The thread will be winded automatically. Hold the thread lightly and guide it gently through your finger. See reference picture as above. Do not wind the thread over the rim of the bobbin.
- Press the on/off switch to turn off the appliance when finished. Cut the thread and take off the bobbin.
- Press the bobbin winder bar into the hand wheel and turn it clockwise to hide it back.
Caution! Before winding the bobbin, please take out the bottom bobbin and remove the top thread completely.
Replacement of the side bobbin
- Pull the bobbin spindle out from the bobbin holder.
- Take off the bobbin and replace with a new one.
- Push the spindle with the new bobbin back to the bobbin holder.
How to use the needle threader
- Insert the needle threader into the hole of the needle from the right to left.
- Insert the thread into the needle threader at the left side of the needle and then pull the needle threader out to the right side.
Sewing sleeves

natural_image
Close-up of a sewing machine needle stitching a striped fabric (no text or symbols visible)The appliance is designed to allow you to sew sleeves easier with the sleeves sewing slot. Follow the operating steps to sew the sleeves.
Working lamp
If additional light is needed, press the light switch to turn the light on. Press the switch again to turn it off.
Tips:
- The appliance will be damaged if it works without fabric in place.
- Turn off the appliance immediately once finished sewing.
- During sewing, if the thread is broken or came out from the hole of the needle, turn off the appliance immediately. Otherwise, the thread may be tangled into the inside of the appliance and cause damages.
APPLICABLE CLOTH FOR SEWING
| Sewing Cloth PresentationFabric specification | Cotton/Linen | Silk/Wool | Polyester | Elastic |
| Regular | √ | × | √ | △ |
| Thick | √ | × | √ | △ |
| Thin | √ | × | × | × |
| Hard | √ | √ | √ | △ |
| Soft | × | × | × | × |
| Sewing effective:√: means easy to sew×: means difficult to sew△: means not smooth to sewNote:1. The definition of the fabric thickness:Thin (fabric): two layers of the fabric thickness < 0.35mm;Thick (fabric): two layers of the fabric thickness > 0.8mm;Regular (fabric): two layers of the fabric thickness ≥ 0.35mm and ≤ 0.8mm.2. The definition of elastic cloth:If the cloth, which size is “100mm x 30mm”, is extending to or over 106mm under 0.5KG tension force, the the cloth is defined elastic, otherwise it is inelastic.3. Hard fabric: such as Jeans, fine canvas, etc.4. Soft fabric: such as towel, duster, etc. | ||||
TECHNICAL DATA
Adapter input: 100-240V\~ 50/60Hz, 0.2A
Adapter output: 6V DC, 800mA, 4.8W
Sewing machine: 6V DC, 800mA
GUARANTEE AND CUSTOMER SERVICE
Before delivery our devices are subjected to rigorous quality control. If, despite all care, damage has occurred during production or transportation, please return the device to your dealer. In addition to statutory legal rights, the purchaser has an option to claim under the terms of the following guarantee:
For the purchased device we provide 2 years guarantee, commencing from the day of sale. If you have a defective product, you can directly go back to the point of purchase.
Defects which arise due to improper handling of the device and malfunctions due to interventions and repairs by third parties or the fitting of non-original parts are not covered by this guarantee. Always keep your receipt, without the receipt you can't claim any form of warranty. Damage caused by not following the instruction manual, will lead to a void of warranty, if this results in consequential damages then we will not be liable. Neither can we hold responsible for material damage or personal injury caused by improper use if the instruction manual is not properly executed. Damage to accessories does not mean free replacement of the whole appliance. In such case please contact our service department. Broken glass or breakage of plastic parts is always subject to a charge.
Defects to consumables or parts subjected to wearing, as well as cleaning, maintenance or the replacement of said parts are not covered by the warranty and are to be paid.
ENVIRONMENT FRIENDLY DISPOSAL
Recycling – European Directive 2012/19/EU
This marking indicates that this product should not be disposed with other household wastes. To prevent possible harm to the environment or human health from uncontrolled waste disposal, recycle it responsibly to promote the sustainable reuse of material resources. To return your used device,
please use the return and collection systems or contact the retailer where the product was purchased. They can take this product for environmental safe recycling.

BATTERY MUST BE RECYCLED OR DISPOSED OF PROPERLY. DO NOT OPEN. DO NOT DISPOSE OR IN FIRE OR SHORT CIRCUIT.
Emerio Deutschland GmbH (no service address)
Lerchenweg 3
40789 Monheim am Rhein
Deutschland
Customer service:
T: +49 (0) 3222 1097 600
E: info.de@emerio.eu
SICHERHEITSHINWEISE

- Nadel
- Nadeleinfädler
- Vier Metallspulen
- Fußpedal
- Adapter
natural_image
Close-up of a sewing machine needle and wheel assembly (no visible text or symbols)Abb.1

natural_image
Close-up of a hand operating a sewing machine needle on a workbench (no visible text or symbols)Abb. 2
natural_image
Close-up of a hand using a sewing machine to adjust or install a small component (no visible text or symbols)Abb. 3
natural_image
Close-up of hands using a tool to adjust or install a mechanical component (no visible text or symbols)Abb. 4
natural_image
Close-up of a hand operating a sewing machine with needle and handle (no visible text or symbols)natural_image
Close-up of a sewing machine needle stitching a plaid blanket (no visible text or symbols)
natural_image
Close-up of a sewing machine needle and wheel assembly (no visible text or symbols)Fig.1
natural_image
Close-up of a hand using a sewing machine to cut fabric (no visible text or symbols)Fig.2
natural_image
Close-up of a hand using a handheld device to adjust or install a white mechanical component (no visible text or symbols)Fig.3

natural_image
Close-up of hands assembling a mechanical component with a tool (no visible text or symbols)Fig.4
natural_image
Close-up of a hand operating a sewing machine with a needle inserted (no visible text or symbols)natural_image
Close-up of a sewing machine stitching a striped fabric (no text or symbols visible)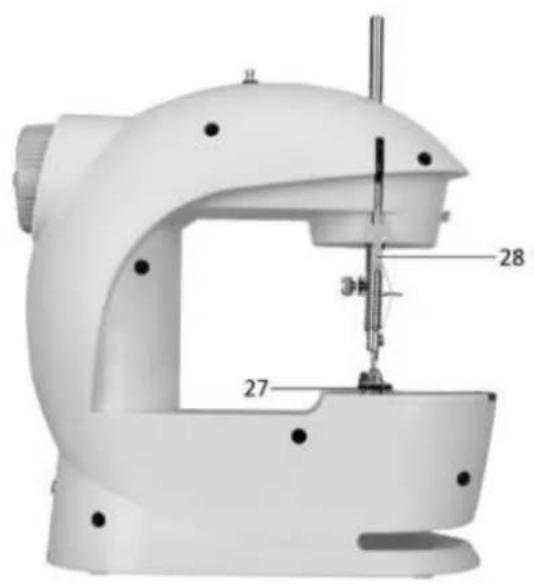
natural_image
Close-up of a sewing machine needle and wheel assembly (no visible text or symbols)Bild 1

natural_image
Close-up of a hand operating a sewing machine needle on a small electronic device (no visible text or symbols)Bild 2
natural_image
Close-up of a hand using a sewing machine to adjust or install a small component (no visible text or symbols)Bild 3

natural_image
Close-up of hands assembling or adjusting a mechanical component with tools (no visible text or symbols)Bild 4
Sy med fotpedalen
natural_image
Close-up of a hand operating a sewing machine with a needle inserted (no visible text or symbols)natural_image
Close-up of a sewing machine needle stitching a striped fabric (no text or symbols visible)DE NAALD INRIJGEN IN HET APPARAAT
natural_image
Close-up of a sewing machine's inner gear and wheel assembly (no visible text or symbols)Afb.1

natural_image
Close-up of a hand operating a sewing machine needle, no visible text or symbolsAfb.2
natural_image
Close-up of a hand operating a white mechanical device with adjustment knobs (no visible text or symbols)Afb.3
natural_image
Close-up of hands using a tool to adjust or install a mechanical component (no visible text or symbols)Afb.4
natural_image
Close-up of a hand operating a sewing machine with a black handle (no visible text or symbols)natural_image
Close-up of a sewing machine needle stitching a striped fabric (no text or symbols visible)GEPASTE KLEDING OM TE NAAIEN
natural_image
Close-up of a sewing machine needle and wheel assembly (no visible text or symbols)rys. 1

natural_image
Close-up of a hand operating a sewing machine needle on a small electronic device (no visible text or symbols)rys. 2
natural_image
Close-up of a hand adjusting a white mechanical component with a tool (no visible text or symbols)rys. 3

natural_image
Close-up of hands installing or adjusting a mechanical component on a white surface (no visible text or symbols)rys. 4
Używanie pedału
natural_image
Close-up of a hand operating a sewing machine with a needle inserted (no visible text or symbols)natural_image
Close-up of a sewing machine needle stitching a striped fabric (no text or symbols visible)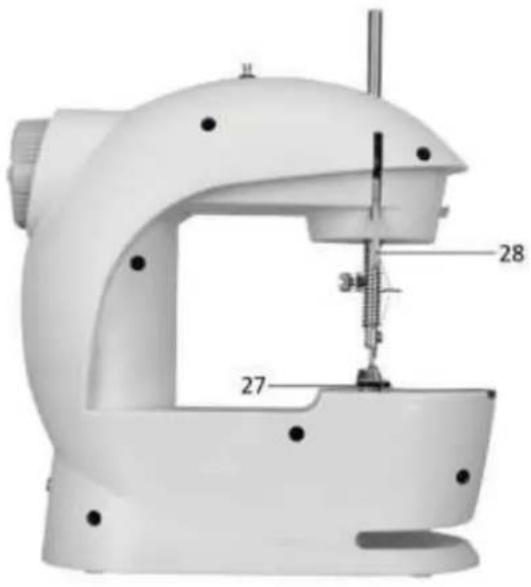
natural_image
Mechanical device with numbered parts, no visible text or symbolsnatural_image
Close-up of a sewing machine needle and wheel assembly (no visible text or symbols)Рисунок 1
natural_image
Close-up of a hand using a sewing machine to cut fabric (no visible text or symbols)Рисунок 2
natural_image
Close-up of a hand operating a sewing machine with a tool, no visible text or symbolsРисунок3
natural_image
Close-up of hands adjusting a mechanical component with a tool and screwdriver (no visible text or symbols)Рисунок 4
natural_image
Close-up of a hand operating a sewing machine with a handle and spool (no visible text or symbols)natural_image
Black and white photo of a striped fabric with a vertical pole, no visible text or symbols
- After removing the appliance from the packaging box:
- THREADING THE APPLIANCE
- Bottom thread (Bottom bobbin placement):
- OPERATING THE APPLIANCE (without the foot pedal)
- To use the foot pedal
- Adjusting the tension
- Changing the needle
- Winding the bobbin
- Replacement of the side bobbin
- How to use the needle threader
- Sewing sleeves
- Working lamp
- Tips:
- TECHNICAL DATA
- GUARANTEE AND CUSTOMER SERVICE
- ENVIRONMENT FRIENDLY DISPOSAL
- Customer service:
- SICHERHEITSHINWEISE
- Sy med fotpedalen
- DE NAALD INRIJGEN IN HET APPARAAT
- Używanie pedału
Brand : Emerio
Model : SEW122275
Category : Sewing machine