
FN114509 - Fan Emerio - Free user manual and instructions
Find the device manual for free FN114509 Emerio in PDF.
| Product type | Pedestal fan |
| Model | FN114509 |
| Brand | Emerio |
| Power consumption | 60 W |
| Supply voltage | 220-240 V ~ 50/60 Hz |
| Number of speeds | 3 (low, medium, high) |
| Oscillation function | Yes, push button |
| Tilt adjustment | Yes, by loosening the black knobs |
| Adjustable height | Yes, via adjustment tube and fixing knob |
| Maximum airflow | 95.23 m³/min |
| Acoustic power level | 67.87 dB(A) |
| Maximum air velocity | 3.69 m/s |
| Main material | Plastic and metal |
| Protective grilles | Yes, front and rear |
| Assembly required | Yes, tripod, motor, blades and grilles |
| Maintenance and cleaning | Unplug, clean with a damp cloth and vacuum the grilles |
| Safety | Do not immerse, keep out of reach of children < 8 years, do not insert objects |
| Measurement standard | IEC 60879: 1986 |
| Ecodesign compliance | EU Regulation No 206/2012 and 2016/2282 |
| Recycling | Do not dispose with household waste, follow local recycling channels |
Frequently Asked Questions - FN114509 Emerio
User questions about FN114509 Emerio
0 question about this device. Answer the ones you know or ask your own.
Ask a new question about this device
Download the instructions for your Fan in PDF format for free! Find your manual FN114509 - Emerio and take your electronic device back in hand. On this page are published all the documents necessary for the use of your device. FN114509 by Emerio.
USER MANUAL FN114509 Emerio
Please read these Operating Instructions through carefully before connecting your appliance to the mains, in order to avoid damage due to incorrect use. Please pay particular attention to the safety information. If you pass the appliance on to a third party, these Operating Instructions must also be handed over.
WARNING - When using electrical appliance, basic safety precautions should always be followed to reduce the risk of fire, electrical shock and personal injury.
SAFETY INFORMATION
- Read and save these instructions. Attention: pictures in the IM are for reference only.
- This appliance can be used by children aged from 8 years and above and persons with reduced physical, sensory or mental capabilities or lack of experience and knowledge if they have been given supervision or instruction concerning use of the appliance in a safe way and understand the hazards involved.
- Children shall not play with the appliance.
- Cleaning and user maintenance shall not be made by children without supervision.
- If the supply cord is damaged, it must be replaced by the manufacturer, its service agent or similarly qualified persons in order to avoid a hazard.
- This appliance is intended to be used in household and similar applications.
- Incorrect operation and improper handling can lead to faults on the appliance and injuries to the user.
- In the event of improper use or incorrect handling, no liability can be accepted for any damage that may occur.
- Do not immerse the unit or mains plug in water or other liquids. There is danger to life due to electric shock! However,
if this occurs, remove the mains plug immediately and then have the unit checked by an expert before using it again.
- Do not operate the appliance if the mains cable or the mains plug show signs of damage, if the appliance has fallen on the floor or has been otherwise damaged. In such cases take the appliance to a specialist for checking and repair if necessary.
- Never remove the mains plug from the socket by pulling on the mains cable, or with wet hands.
- Ensure that the mains cable does not hang over sharp edges or allow it to become trapped.
- Keep the appliance away from damp, and protect from splashes.
- Keep the appliance away from hot objects (e.g. hotplates) and open flames.
- Keep the appliance and its cord out of reach of children less than 8 years.
- Use the appliance on a flat, dry and heat resistance surface.
- Never leave the appliance unattended during use.
- Do not store or operate the appliance in the open air.
- Keep the appliance in a dry place, inaccessible to children (in its packaging).
- Never put fingers or any other objects through the grilles (fan guards) when the fan is running.
- Never operate the product without the fan guards in place, as serious personal injury may result.
- The appliance must be assembled completely before use.
- Watch out for long hair! It can be caught in the fan owing to the air turbulence.
- Do not point the air flow to the people for a long time.
- Ensure that the fan is switched off from the supply mains before removing the guard.
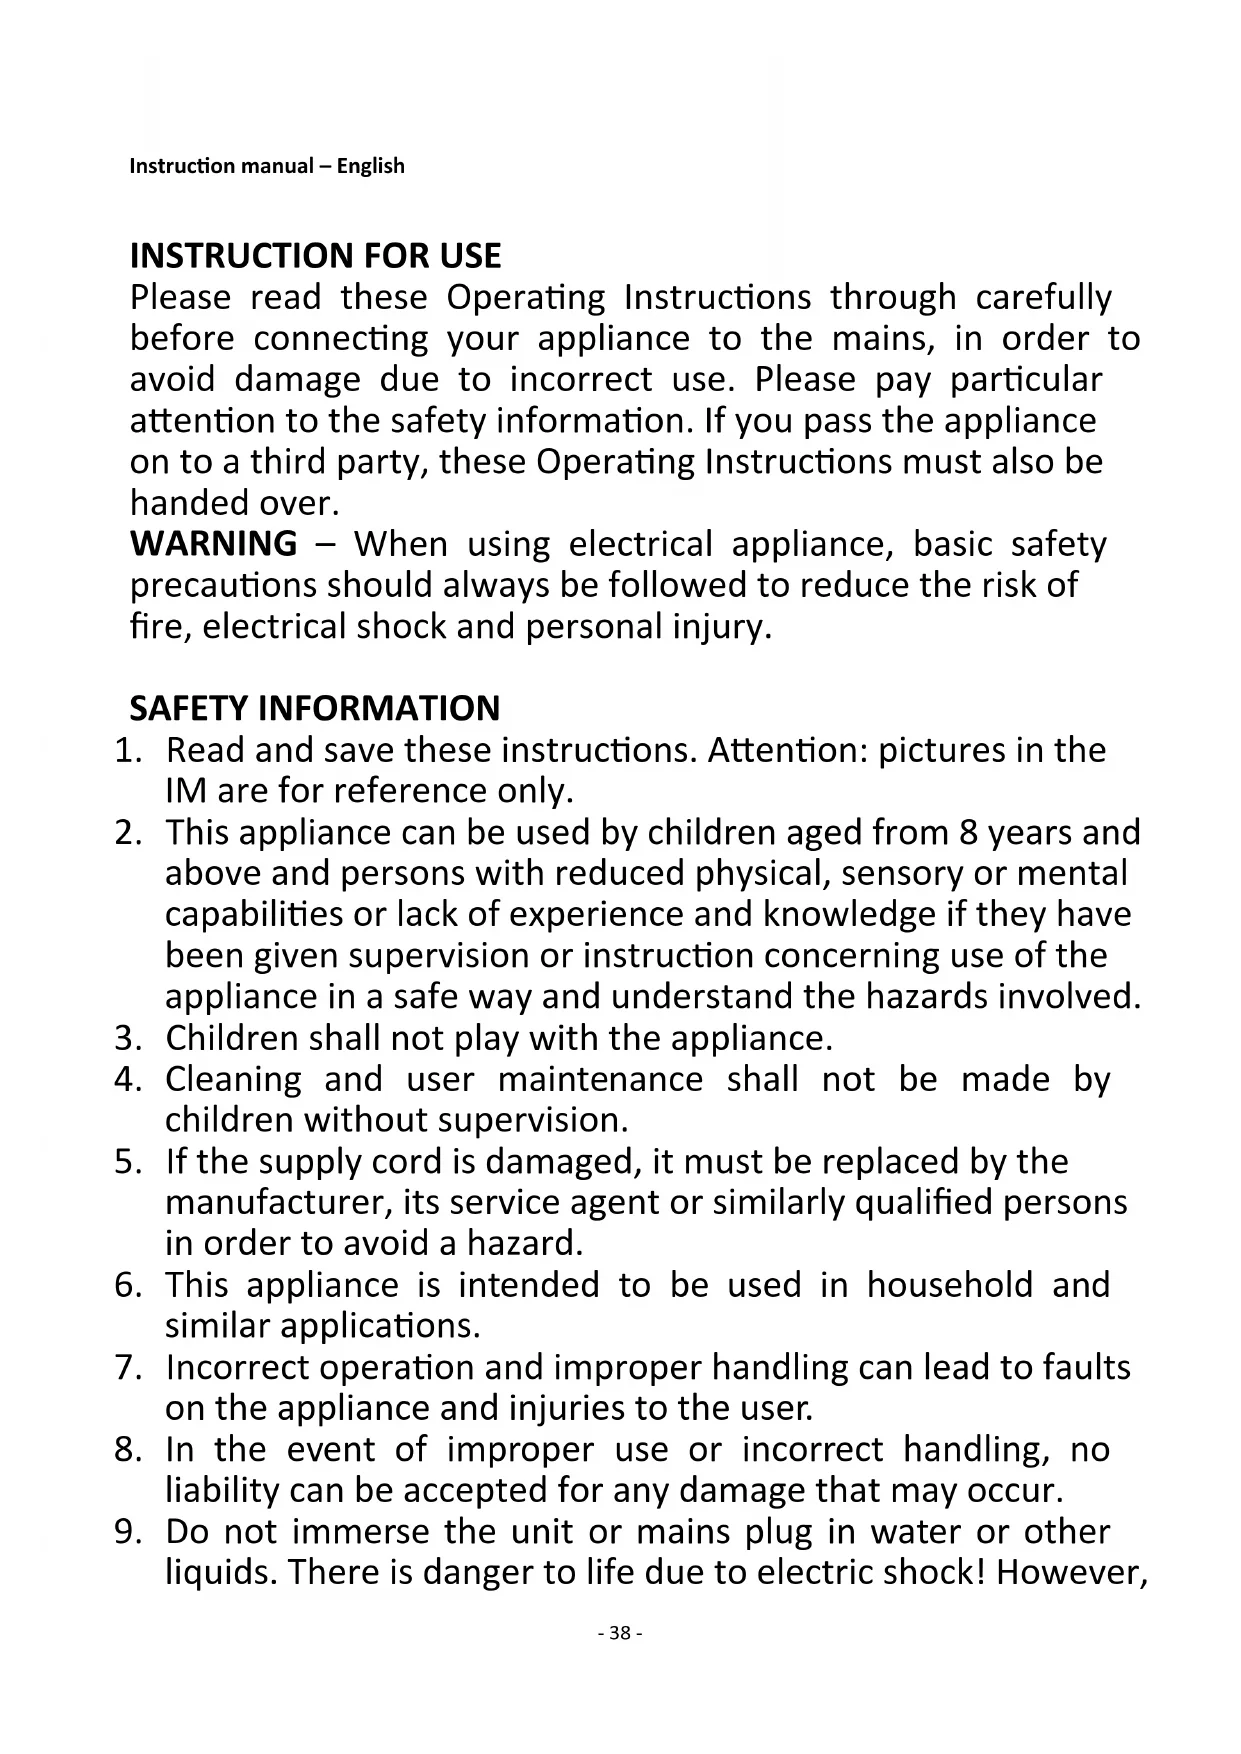
PARTS DESCRIPTION
- Front guard
- Locking clip
- Fan blade
- Blade fastening screw
- Rear guard fastening screw
- Rear guard
- Motor spindle
- Speed switch
- Oscillation knob
- Motor housing
- Motor bracket
- Height adjustment pipe
- Tripod hub
- Fastening knob
- Tripod leg
ASSEMBLING INSTRUCTIONS
** Please assemble correctly by the following orders when using.
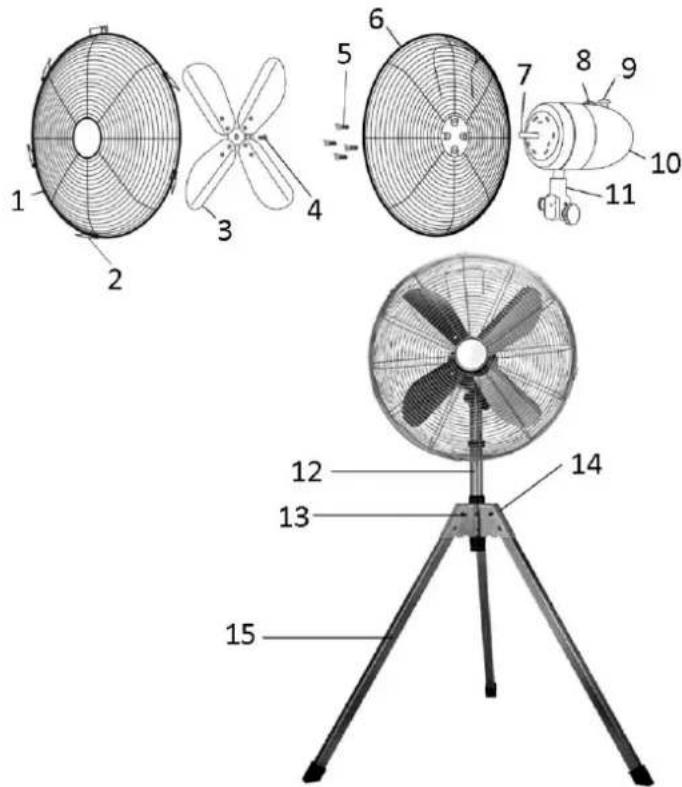
- Tripod leg assembly
1) First, lay the tripod hub on the floor. (fig. 1)
2) Remove the three nut and bolts. (fig. 2)
3) Take one of the legs and slide it into the tripod hub. Take note of the orientation of the leg end. The chamfered edge must be on top as shown. (fig. 3)
4) Line up the holes and fit the bolt all the way through. (fig. 4)
5) Fit the nut to the protruding end of the bolt and using a spanner and a screw driver, tighten the nut. (fig. 5)
6) Repeat for the other two legs.
7) To open out the legs, grasp a leg whilst holding the hub firmly and swing the leg out until it locks in place. (fig. 6)
8) Adjust the height adjustment pipe to your desired height and tighten the fastening knob. (fig. 7)
CAUTION: Take care not to pinch your hand or any other object in the hinged components.
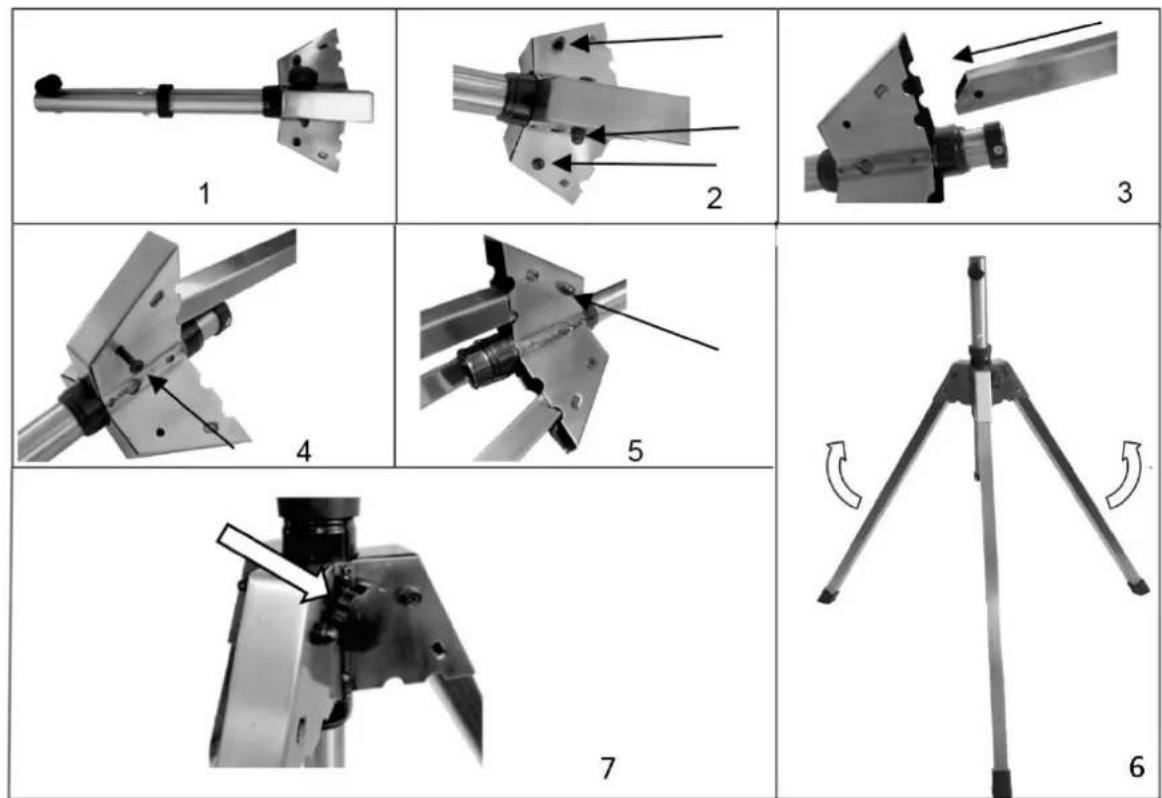
- Motor housing assembly
1) Stand the Tripod on the floor.
2) Remove the big black knob and mounting bolt from the top of the adjustment pipe. Unscrew the knob and pull the bolt straight out. (fig. 8)
3) Loosen the small screw from the bracket on the motor housing. (fig. 9)
4) Find the hole in the adjustment pipe which is pointed out by the arrow. (fig. 10)
5) Sit Motor housing on top of the adjustment pipe ensuring the small screw on the motor bracket lines up with the hole in the pipe, then tighten the screw all the way in. (fig. 11)
6) Insert the mounting bolt through the bracket and the pipe. Note: the Square section under the head of the bolt must be aligned with the square hole in the bracket (fig. 12)
7) Refit the big black knob to the mounting bolt. (fig. 13)
8) Screw in the small black knob but do not tighten. (fig. 14)
9) Adjust the tilt angle of the fan head to your desired position and then fully tighten both the small and big black knobs.
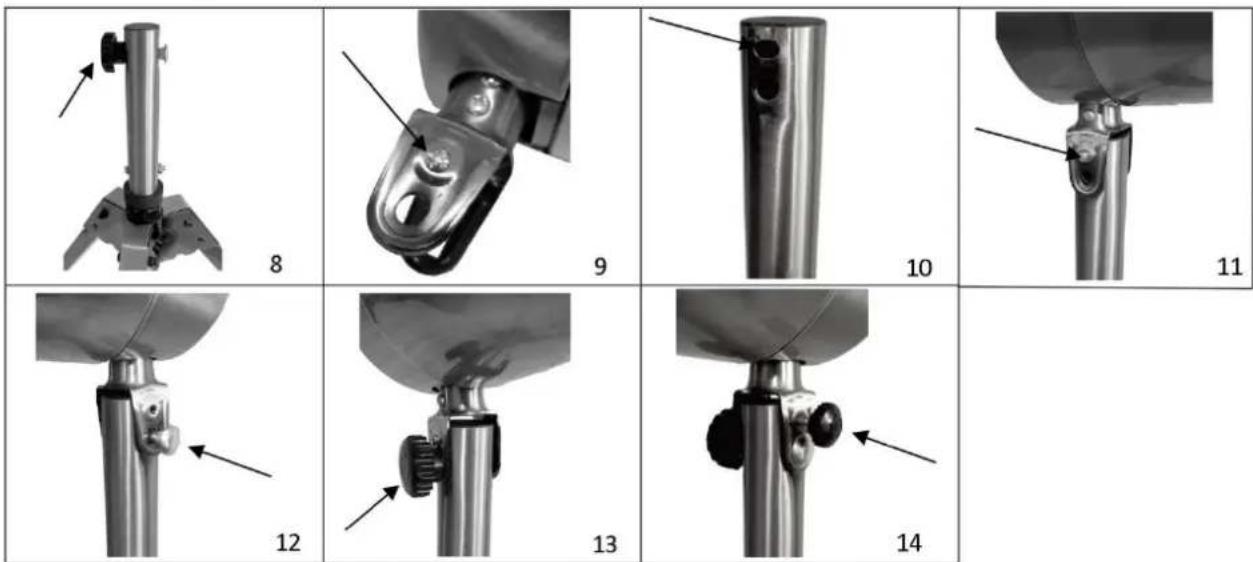
- Fan guards and blade assembly
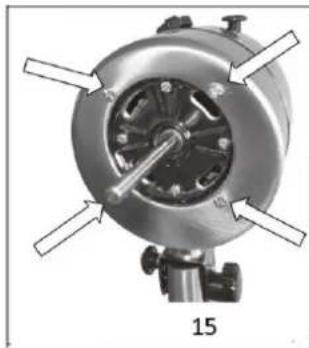
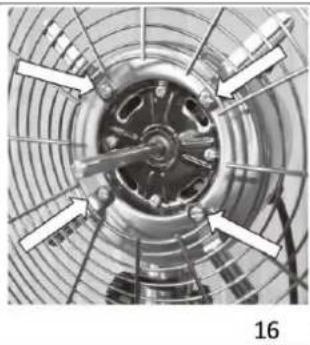
1) To assemble the fan guards and blade, first remove the 4 rear guard fastening screws from the motor. (fig. 15)
2) Fit the rear guard into position (with the handle on the back of the guard at the top) and refit the 4 screws and tighten. (fig. 16)
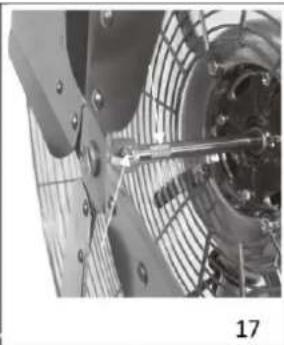
3) Remove the protective plastic sleeve from the motor spindle shaft and discard.
4) Next, rotate the motor spindle until the area with the "flat" surface is facing up.
5) Slide the fan blade onto the spindle ensuring the screw is lined up with the "flat" surface on the spindle as shown. (fig. 17)
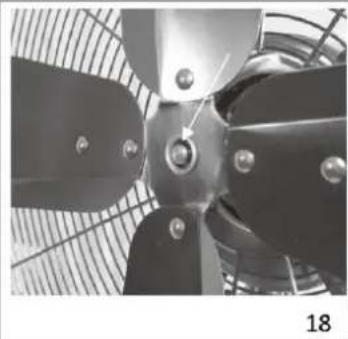
6) Push on until the end of the spindle is flush with the end of the fan blade hole, then tighten the screw. (fig 18)
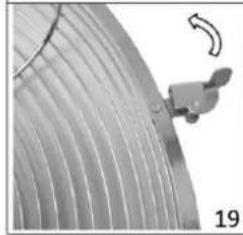


7) Open up all locking clips on the sides of the front guard. (fig. 19)
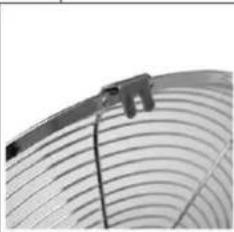
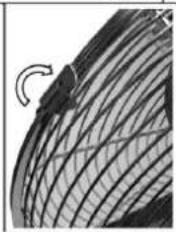
8) Place the front guard into position by lining up the location plate over the top of the rear guard as shown and push down. (fig. 20)
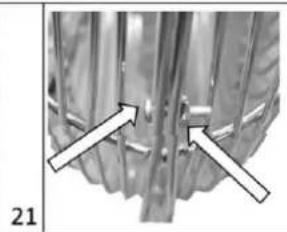
9) Secure the two guards by closing the clips over the outer rim. (fig. 21)
10) Then using the small nut and bolt, fasten the two guards together at the bottom of the guards. (fig. 22)
OPERATING INSTRUCTIONS
- Plug the power cord into a suitable socket.
- Switch on the fan by using the speed switch on the motor housing. "0" = off, "1" = low speed, "2" = medium speed, "3" = high speed.
- Tilting angles: You can loosen the big and small black knobs on the motor bracket to adjust the fan to your preferred elevation. Then fasten the elevation by tightening the knobs.
- Oscillation: to make the fan head oscillate, push down the oscillation knob on the top of the motor. To stop the fan head from oscillating, pull up the oscillation knob.
CLEANING
- Before servicing the fan and after each occasion of use, switch off the appliance and unplug the mains cable from the socket.
- Never immerse the appliance in water (danger of short-circuit). To clean the appliance, only wipe it down with a damp cloth and dry it carefully. Always take out the mains plug first.
- Take care that excessive dust does not build up in the air-intake and air-outlet grille, and clean it occasionally using a dry brush or vacuum cleaner.
TECHNICAL DATA
Operating voltage: 220-240V ~ 50/60Hz
Power consumption: 60W
Recycling - European Directive 2012/19/EU
This marking indicates that this product should not be disposed with other household wastes. To prevent possible harm to the environment or human health from uncontrolled waste disposal, recycle it responsibly to promote the sustainable reuse of material resources. To return your used device,
please use the return and collection systems or contact the retailer where the product was purchased. They can take this product for environmental safe recycling.
ERP information (GBR)
Supplier: BAHAG AG
Gutenbergstr. 21
68167 Mannheim
Germany
Declare that the product detailed below:
Information requirements
| Information to identify the FN-114509.1 & FN-114509.2 to which the information relates to [Stand fan] | |||
| Description | Symbol | Value | Unit |
| Maximum fan flow rate | F | 95,23 | m³/min |
| Fan power input | P | 53,30 | W |
| Service value | SV | 1,79 | (m³/min)/W |
| Standby power consumption | PSB | — | W |
| Fan sound power level | LWA | 67,87 | dB(A) |
| Maximum air velocity | c | 3,69 | meters/sec |
| Measurement standard for service value | IEC 60879: 1986 (corr. 1992) | ||
| Contact details for obtaining more information | BAHAG AGGutenbergstr. 2168167 MannheimGermany | ||
Satisfies the requirement of the Council Directives:
COMMISSION REGULATION (EU) No 206/2012 of 6 March 2012 and Amending COMMISSION REGULATION (EU) 2016/2282 implementing Directive 2009/125/EC of the European Parliament and of the Council with regard to ecodesign requirements for air conditioners and comfort fans
Regarding information for consumers on how to install, use and maintain the product, WEEE information, please check the instruction manual provided with packaging.
UPUTE ZA UPOTREBU
SIGURNOSNE INFORMACije

Brand : Emerio
Model : FN114509
Category : Fan