
XBASE - Car seat Foppapedretti - Free user manual and instructions
Find the device manual for free XBASE Foppapedretti in PDF.
| Product Type | Car seat Group 0+ with ISOFIX base |
| Brand | Foppapedretti |
| Model | XBASE (ISOFIX Base FB308) |
| Safety Standard | ECE R44/04 |
| Weight Group | 0+ (0-13 kg) |
| ISOFIX Size Class | E |
| Usage Type | Semi-universal (check list of compatible vehicles) |
| Installation Position | Rear-facing only |
| Vehicle Attachment | ISOFIX + support leg + anti-rebound bar |
| Locking Indicators | Yes (change from red to green) |
| Anti-rebound Bar | Yes, adjustable and lockable |
| Support Leg | Yes, adjustable with floor contact indicator |
| ISOFIX Connectors | 2 retractable connectors with red guides |
| Removable Car Seat | Yes, clips onto the base (models FB806/FB806PH) |
| Airbag Compatibility | Do not use on seat with active frontal airbag |
| Maintenance | Clean plastic parts with water and soap |
| Prohibited Products | Do not use aggressive detergents or solvents |
| Warranty | 12 months from date of purchase |
| Package Contents | ISOFIX base, 2 connector guides, instruction manual |
| Base Weight | Approximately 4.5 kg (estimate) |
| Base Dimensions (LxWxH) | 65 x 35 x 20 cm (estimate) |
Frequently Asked Questions - XBASE Foppapedretti
User questions about XBASE Foppapedretti
0 question about this device. Answer the ones you know or ask your own.
Ask a new question about this device
Download the instructions for your Car seat in PDF format for free! Find your manual XBASE - Foppapedretti and take your electronic device back in hand. On this page are published all the documents necessary for the use of your device. XBASE by Foppapedretti.
USER MANUAL XBASE Foppapedretti
Installation instructions - For children up to 13kg - conforms to regulation ECE R44-04
F BASE (type FB 308) POUR SIÉGE-AUTO GROUP 0+ (type FB 806 / FB 806 PH)
READ THE INSTRUCTIONS CAREFULLY AND KEEP FOR FUTURE REFERENCE
F. IMPORTANT!
LIRE ATTENTIVEMENT ET CONSERVER SOIGNEUSMENT A PORTEE DE MAIN POUR UNE UTILISATION ULTERIEURE
D. WICHTIG!
AUFMERKSAM LESEN UND FÜR ZUKUNFTIGE REFERENZEN AUFBEWAHREN
E. IMPORTANTE!
LEER ATENTAMENTE Y CONSERVAR
Possible seating positions 26
Use in the car 27
Attaching the car seat onto the base 32
Removing the car seat from the isofix base 34
Maintenance/Warning 36
1. Notice
- This is an ISOFIX child restraint device. It is approved to ECE R44/04 Standards for general use in vehicles equipped with ISOFIX safety anchorage systems.
-
To use the SEMI-UNIVERSAL ISOFIX system, it is necessary to read the instructions in the vehicle handbook before installing the child car seat inside the car. The vehicle manual will indicate the seats compatible with the class and age group of the child car seat.
-
The child mass group and ISOFIX size class for which the child restraint may be used are: GROUP 0+ (0-13+), Class E.
-
It is a classified as a "Semi-Universal" device which is compatible for use in the vehicles indicated in the relative "List of approved vehicles" list.
- If in doubt, consult either the child restraint device manufacturer or your retailer.
| Car seat model | Conforms to regulation ECE R 44/04 | ||
| Child weightGroup | |||
| FB806 / FB806 PH + FB308 Base ISOFIX | 0+ | 0 - 13 kg | Semi-universal |
| FB806 / FB806 PH | 0 - 13 kg0+ | Universal | |
Note: About the car seat installation instructions, please refer to the car seats 0+ "Type FB-806/Type FB-806PH" installation manual.
WARNING: Read these instructions carefully before use and keep this manual for future reference. Failure to comply with these instructions may put your child's safety at risk.
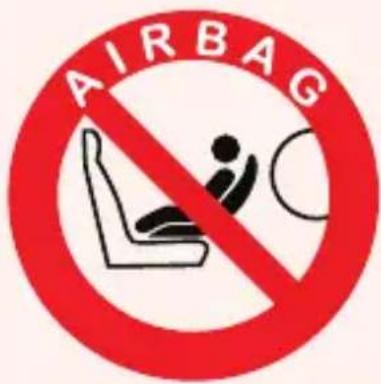
NEVER use the Car Seat on a passenger seat fitted with a front air bag. IT IS VERY DANGEROUS.
- The "base isofix X-BASE- type FB 308" is standard approved according to the regulation ECE R44/04, the European regulation concerning the safety of infant car seats and it must only be used together with the infant car seat Group 0+ (type FB 806 o type FB 806 PH). The model of the infant car seat is stated on the label fitted on the product.
- This approval will be invalidated if you make any modification or alteration to the base of the infant carrier. Any modification can be only be made by the manufacturer.
- Make sure that your vehicle/s is listed in the vehicle application list which is provided with this base.
- Read the whole instruction guide and make sure that you fully understand how to install and use the "base isofix X-BASE- type FB 308" correctly.
- The car seat must only be installed in a rear-facing position.
- Never use the child restraint without first having attached it to the car as described in these instructions.
- To install the car seat and use it properly, carefully follow the user manual supplied with the car seat.
- Do not place anything such as a towel or cushion under the "base isofix X-BASE-type FB 308". This could affect the performance of the base in an accident. Never buy a second hand base.
- Always replace a "base isofix X-BASE- type FB 308" after an accident. It may have unseen damage.
- Always secure the "base isofix X-BASE- type FB 308" on the vehicles ISOFIX points. All occupants in the vehicle must be correctly restrained complying with the current law.
- Do not place any objects in the foot well in front of the "base isofix X-BASE-type FB 308".
- Do not make unauthorized modifications or alterations to the "base isofix X-BASE-type FB 308".
WARNING
- Do not allow children to play with or adjust the "base isofix X-BASE- type FB 308".
- Do not leave children alone in the vehicle.
- Never leave your child unattended in the car seat.
- Do not place the "base isofix X-BASE- type FB 308" on a table or work top, always use the floor.
- Make sure your "base isofix X-BASE- type FB 308" does not become trapped in the door of the vehicle or by a folding seat.
- Make sure that all folding vehicle seats are securely latched.
- Do not fix the "base isofix X-BASE- type FB 308" on a side or rear facing vehicle seat.
- Always store the "base isofix X-BASE- type FB 308" in a safe, dry place when it is not being used.
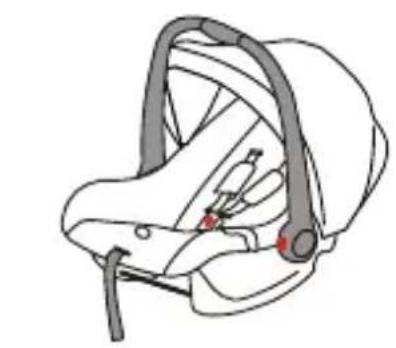
COMPONENT LIST
CAR SEAT
ISOFIX CLASS E
DANGER!!
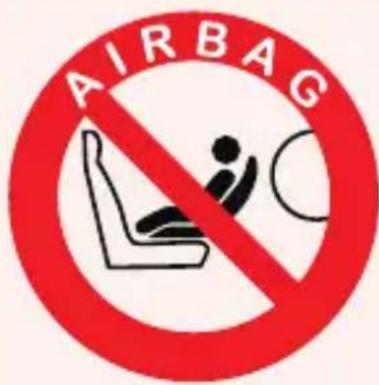
DO NOT USE THE CAR SEAT POSITIONED ON A PASSENGER SEAT WHICH IS Fitted WITH AN AIRBAG.
The opening of the airbag against the car seat can cause serious, if not fatal, injury to the child. Consult the vehicle instruction manual with regard to the use of car seats.
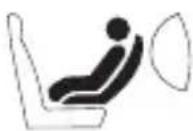
POSSIBLE SEATING POSITIONS
- Before installation, check that the car is fitted with Isofix anchorage points, which will be found between the backrest and seat of the car.
- The "base isofix X-BASE - type FB 308" is approved to "Semi-Universal" standards which means it is not compatible for use on all car models, but only those indicated in the "List of vehicles" booklet attached.
For advice as to the suitability of this "base isofix X-BASE - type FB 308" please consult the vehicle application list before you purchase and install the base to make sure that the make, model and year of your vehicle/s is suitable.
Please consult the vehicle handbook to locate the vehicle ISOFIX points.
Never use the "base isofix X-BASE - type FB 308" on a passenger seat fitted with a front airbag, It is very dangerous.
USE IN THE CAR
For the safety of your child
- Never leave your child unattended while in the car seat.
- Do not leave objects in the footwell in front of the ISOFIX.
For the safety of the passengers
In the event of sudden braking or in an accident, people or objects which are not secured or which are placed in an unsafe way could result in injury to the other passengers.
Always ensure that:
- the seatbacks are locked (e.g. the folding rear seats are clicked into place);
- all heavy or sharp objects inside the passenger compartment (e.g. on the parcel shelf) are positioned securely;
- all passengers in the car are wearing seat belts;
- the child car seat is always securely hooked on the passenger seat, even when not in use.
INSTALLING THE ISOFIX BASE
Before installing the ISOFIX base on the passenger seat.


Step 1. Pull out the "red stationary stabiliser" until you hear a "CLICK" sound, indicating that it has been successfully released.
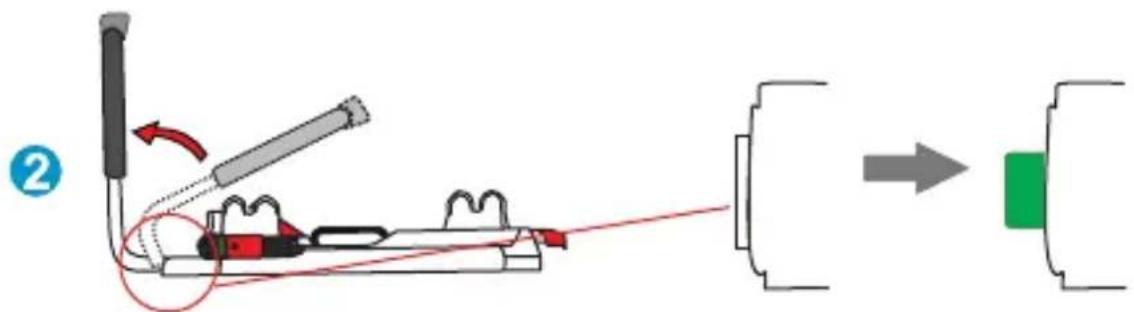
Step 2. Lift up the "anti-rebound bar" to a vertical position until you hear a "CLICK" sound, indicating that it is correctly positioned. The green button protrudes outwards. Make sure that the anti-rebound bar is locked in the vertical position.
Step 3. Fold the "support leg" downwards until it stops.
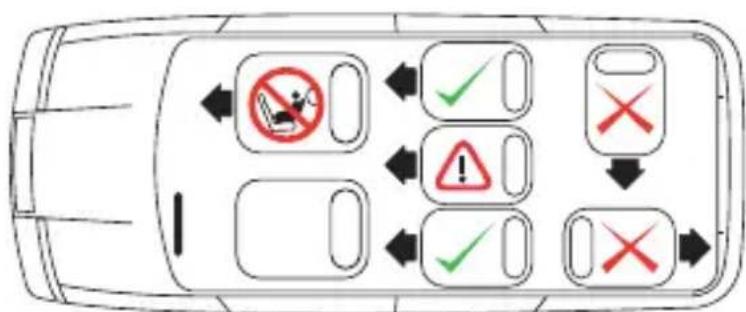
BASE IN A CAR EQUIPPED WITH THE ISOFIX SYSTEM
| ISOFIX CLASS E | Installed on passenger seats fitted with Isofix anchoring points (positioned between the seat and the backrest of the passenger seat) and which have sufficient space for the support leg. | YES | |
| Isofix label | green | ||
| Front airbag Side airbag | NO YES |
. ENGLISH .
INSTALLING THE ISOFIX BASE IN A CAR EQUIPPED WITH THE ISOFIX SYSTEM
Make sure that your vehicle has ISOFIX anchor points and is approved in the vehicle application list which is supplied with the base.
Locate the vehicle ISOFIX points. if any problem please consult the vehicle manual. They are usually between the vehicle seat base and back.
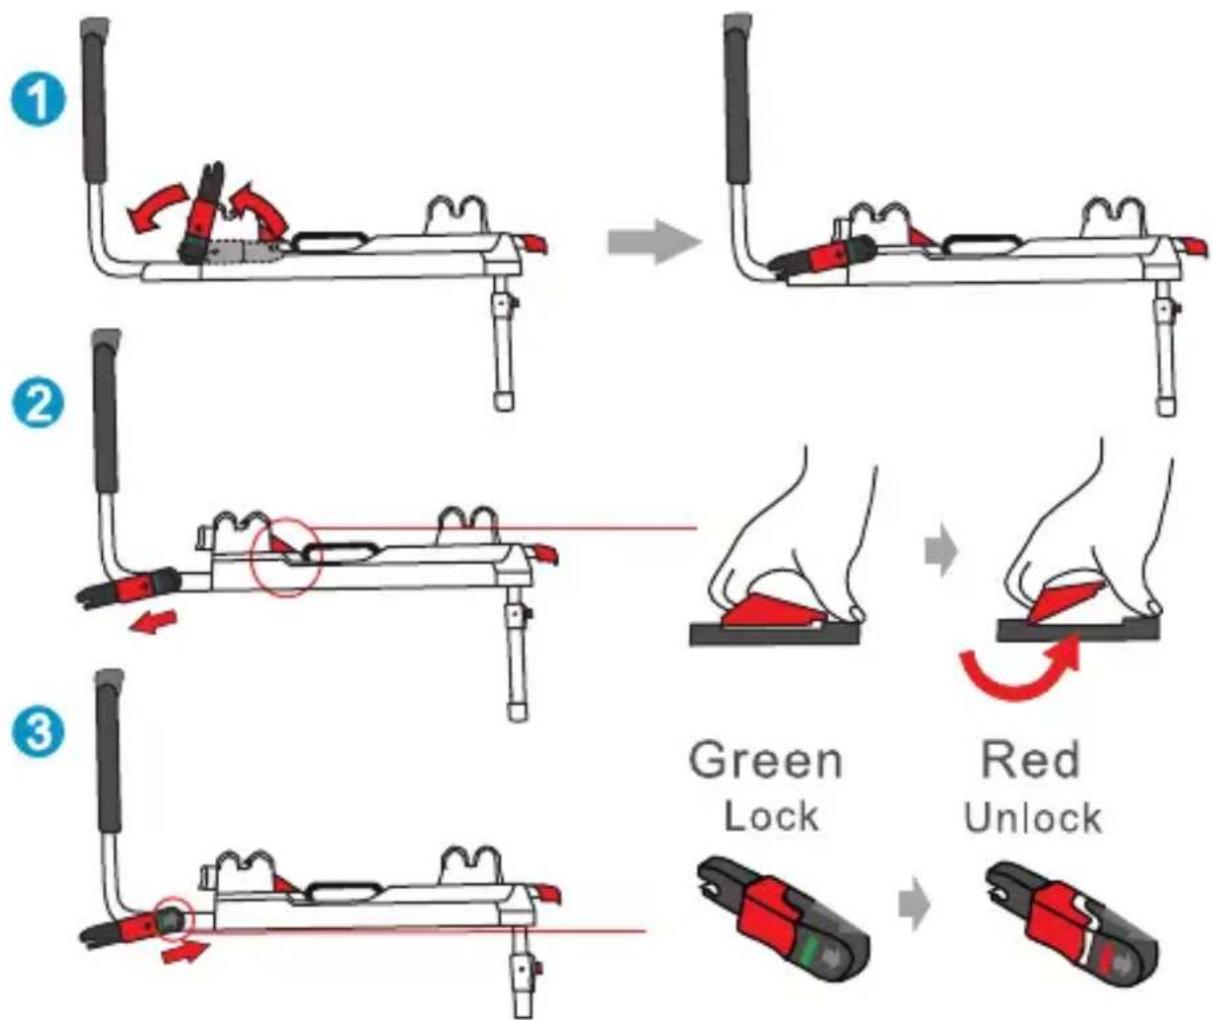
Step 1. Rotate the Isofix connectors outwards until you hear a "CLICK" sound. Make sure that the Isofix connectors are locked at a 15^ angle. Refer to the diagrams (1).
Step 2. Pull the red button located on the Isofix base upwards to extend the connectors outwards as far as possible. Refer to the diagrams (2).
Step 3. Pull the plastic casing of the Isofix connectors until their indicators move onto the red. Refer to the diagrams (3).
INSTALLING THE ISOFIX BASE IN A CAR EQUIPPED WITH THE ISOFIX SYSTEM

Step 4. Insert the two red plastic guides for the ISOFIX connectors and attach them to the ISOFIX points in the vehicle. The plastic guides help to identify the ISOFIX points on the vehicle, making installation easier. They also protect the vehicle passenger seats.
Step 5. Position the Isofix base on the car seat, making sure that the Isofix connectors are perfectly aligned with the guides that you have just attached.
Step 6. Insert the two ISOFIX connectors into the red-coloured guides, and push to attach the two connectors to the ISOFIX hooks in the vehicle. You will hear a click once they have attached. Check that the indicators are green on both sides.
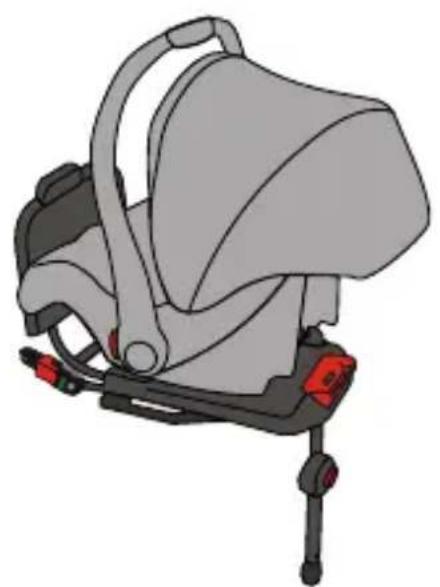
ATTACHING THE CAR SEAT ONTO THE BASE
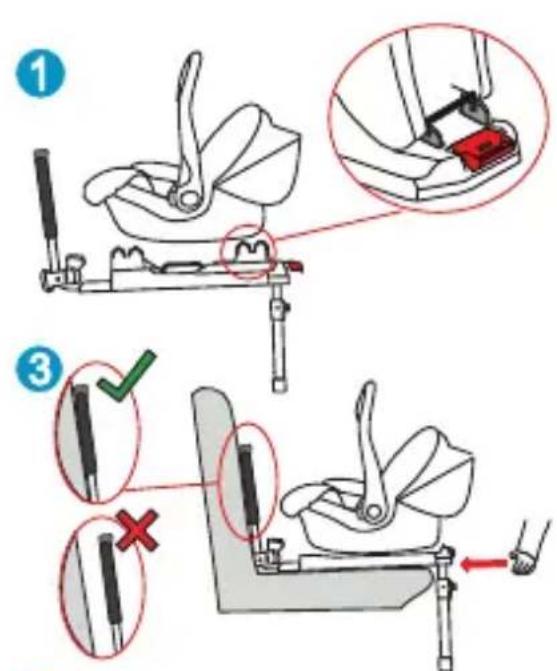
Step 1. Place the car seat onto the ISOFIX base in a rear-facing position.
Step 2. Press the car seat downwards, attaching the two metal brackets to the base. You will hear a click when it has attached.
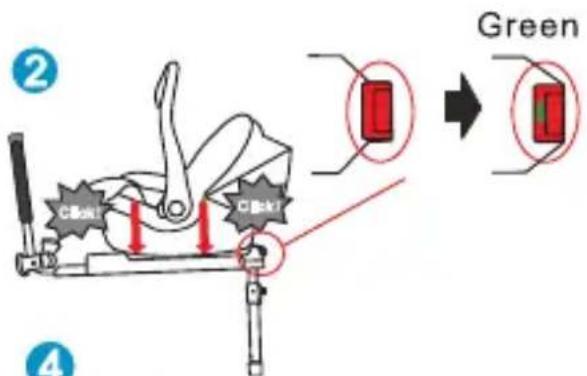
IMPORTANT: After having attached the seat to the base, lift up the car seat to make sure that it has clicked into place correctly. Check that the indicators have moved from red to green.
Step 3. Push the car seat, which is attached to the base, against the backrest of the passenger seat so that the anti-rebound bar adheres perfectly to the backrest.
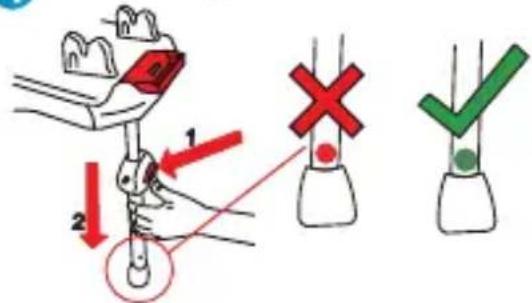
Step 4. Press the red button to adjust the support leg and lower it down so that it correctly touches the vehicle floor. The control device located at the base of the support leg should move from red to green, indicating that the leg has been placed correctly. Check that the support leg is positioned and adjusted correctly.
Make sure that the support leg does not raise the base from the surface of the
. ENGLISH .
vehicle seat. Do not place the front support leg on a floor storage compartment lid. The front support leg MUST make full and firm contact with the vehicle floor.
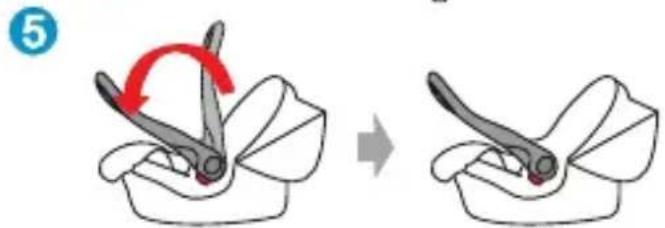
Step 5. Adjust the car seat carrying handle against the passenger seat backrest, referring to the car seat manual for how to recline the handle. At this point you can place the child in the car seat, referring to the car seat user manual for the correct usage.
REMOVING THE CAR SEAT FROM THE ISOFIX BASE

removing the car seat.
Removing the car seat
To remove the car seat from the Isofix base, move the carrying handle into a vertical position, pull the red-coloured stationary stabiliser placed on the front of the Isofix base, and then lift up the car seat.
TIP! When used on a daily basis you can leave the ISOFIX base mounted on board the car, simply
REMOVING THE ISOFIX BASE
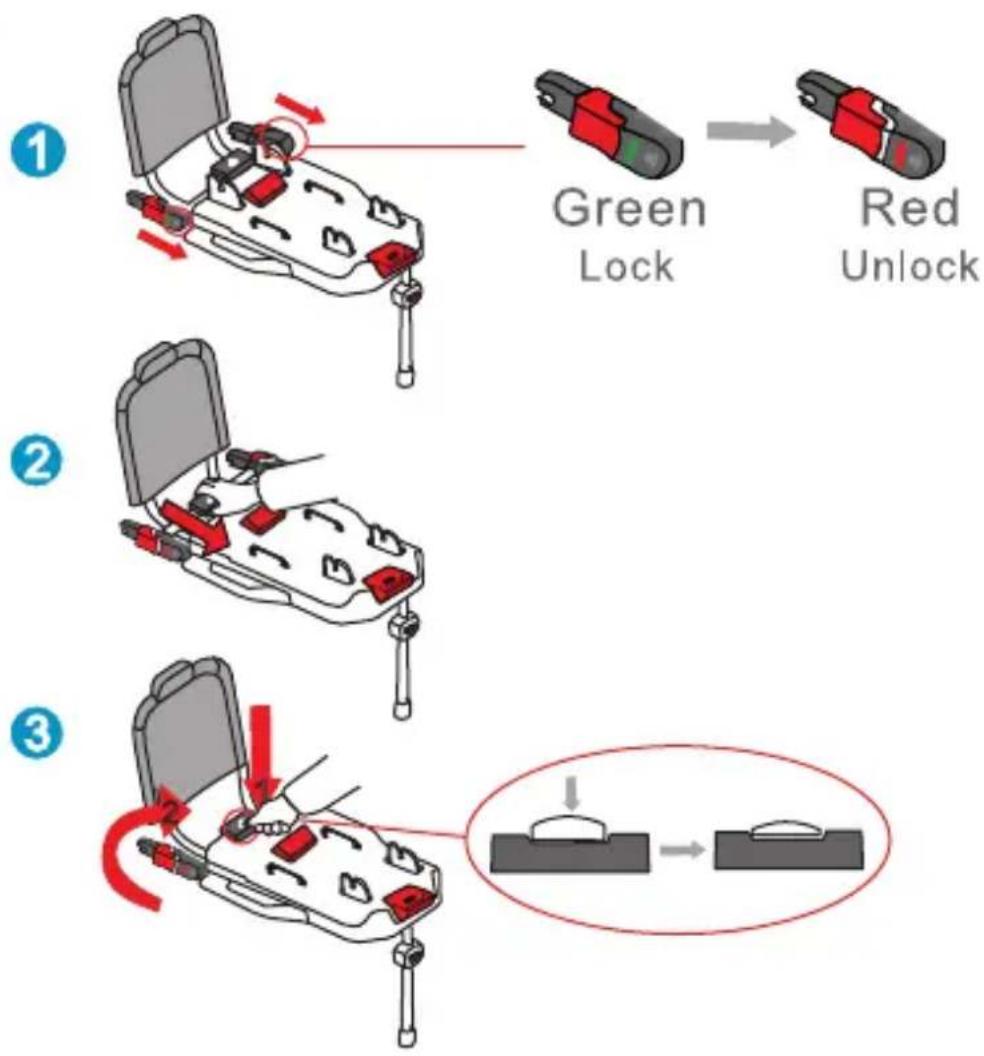
Step 1. Pull the plastic casing of the Isofix connectors until their indicators click onto the red. At this point the Isofix base is no longer attached to the Isofix anchoring points in the car.
Step 2. Pull the bar and push the connectors back inside the base.
Step 3. Press the small white button on the stabiliser stop, which is located on the rear of the Isofix base, to rotate the connectors in the direction of the Isofix base. Remove the ISOFIX base from the seat.
CLOSING THE ISOFIX BASE
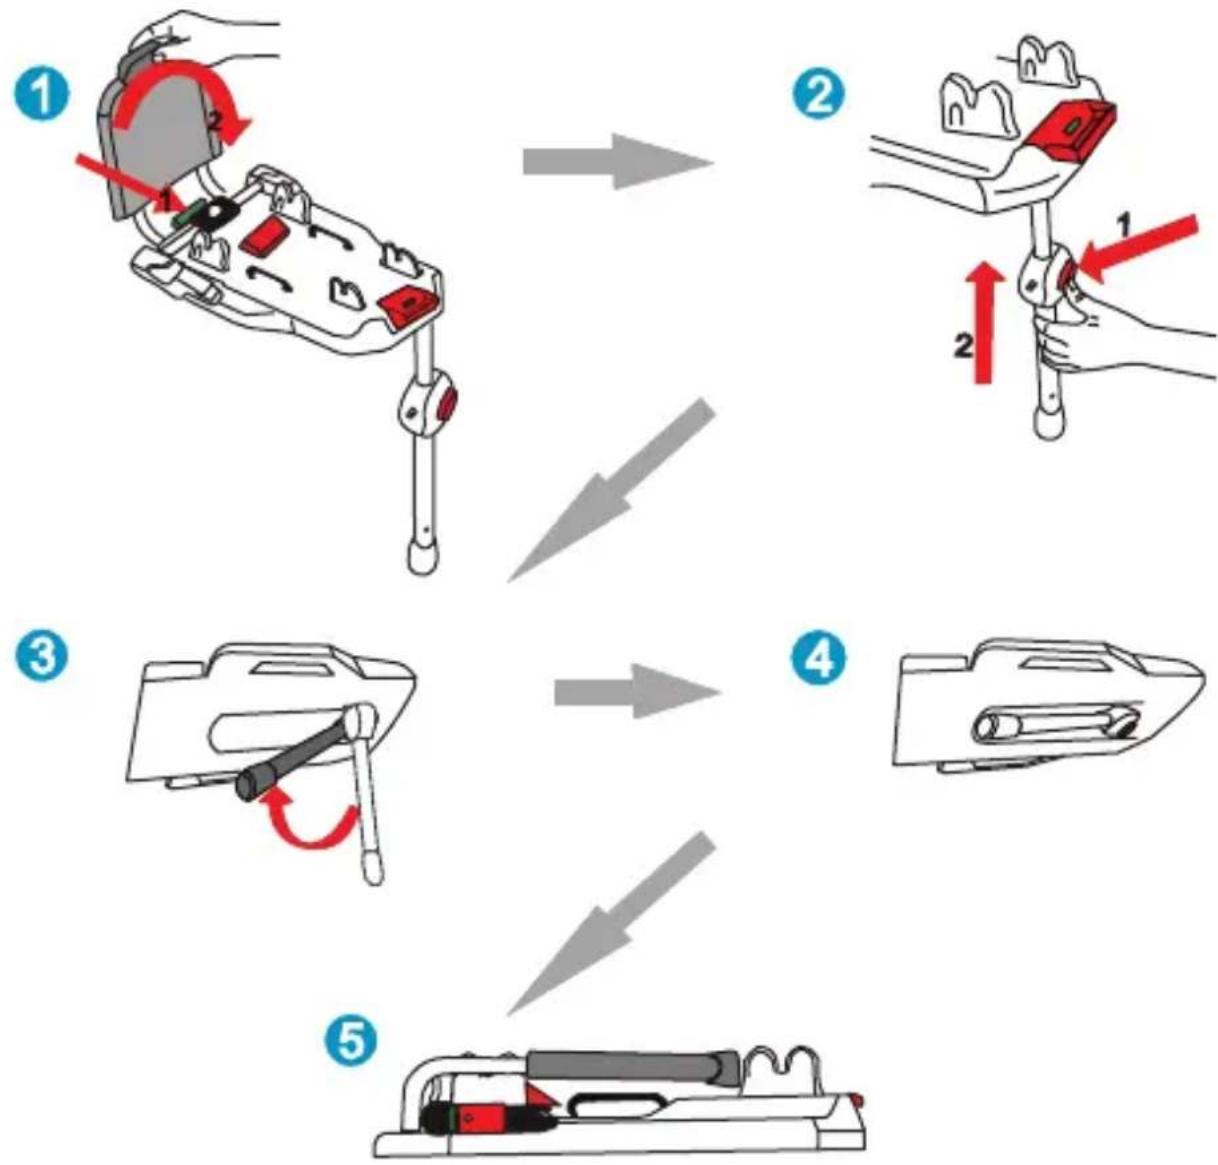
Step 1. Press the green button on the rear of the Isofix base, and fold down the anti-rebound bar on the base.
Step 2. Press the red button and lift up the support leg up to retract it.
Step 3. Fold up the retracted support leg, as in the diagram.
Step 4 and 5. Fold up the support leg into the housing on the Isofix base.
MAINTENANCE
The plastic parts may be cleaned with water and soap. DO NOT use harsh detergents (such as solvents).
DANGER! An accident causes strong stress to be applied. Due to this, it is strictly forbidden to hold your child on your lap, even if they are protected by your seat belt.
Always secure your child in the carseat before any journey!
The car seat must only be installed in a rear-
facing position.
Danger! The opening of the airbag against the child car seat may cause serious, if not lethal, injury to the child.
DO NOT use the child car seat on passenger seats with an active front airbag!
Follow the instructions shown in the user manual for information on using the car seat on passenger seats fitted with a side airbag.
The contents of this document as stated below will come into effect as from 01.01.2005 and replace, on every account and in full, any previous message referring to the guarantee provided by Foppa Pedretti S.p.A.
FORMAL GUARANTEE
Foppa Pedretti S.p.A. the head office of which is located at n. 11 Via Volta, Grumello del Monte (Italy), guarantees directly to the Consumer that this brand new product is free of faults with regard to the materials, design and manufacture and that it complies with the characteristics as declared by the manufacturer.
This formal guarantee is valid in all Member Countries of the European Union and it neither excludes nor limits the Consumer's rights in accordance with mandatory measures provided for by the law with regard to the Retailer of the Product.
To take advantage of this formal guarantee, the Consumer must return the faulty product to the Retailer, presenting to the same the proof of purchase of the Product which must clearly show the Retailer's address, the date of purchase of the Product with the Retailer's stamp and signature and an indication of the Product itself or, alternatively, the receipt which must not have been altered and which must clearly show the same information as that referred to above.
The manufacturer's formal guarantee is valid for twelve (12) months from the date of purchase of the Product. During this period, Foppa Pedretti S.p.A. will repair or replace the faulty product, at its own discretion.
The formal guarantee is granted to the end buyer of the Product (Consumer) and it neither excludes nor limits the mandatory rights of the Consumer as provided for by the law and/or the rights that the Consumer may have with regard to the Dealer/Retailer of the Product.
EXCLUSIONS TO THE FORMAL GUARANTEE.
The formal guarantee is excluded in the case of damage caused to the Product for the following reasons: if the product is used in a way that does not comply with the information contained in the use and assembly instruction sheet, if the product is knocked or dropped, if the Product is exposed to humidity or extreme heat or environmental conditions, or to sudden changes in the same, corrosion, oxidization, unauthorized alterations or repairs to the Product, repairs using unauthorised spare parts, improper use, improper maintenance or failure to carry out the same, improper maintenance compared to the information given on the use and assembly instruction sheet, incorrect assembly, accidents, damage caused by food or drink, damage caused by chemical products, cases of force majeure.
In any case, Foppa Pedretti S.p.A. declines all responsibility for damage caused to persons or to property, other than the Product, when such damage is caused by a failure to comply with the instructions/advice/warnings cont a ined in the manua I or, alternatively, in the use and assembly instruction sheet provided with each Product for the owner/user. (Purely as an example, in the case of a cot : "Check your baby constantly. Make sure that the sheets and blankets do not cover the baby's head...").
Furthermore, Foppa Pedretti S.p.A. declines all responsibility for damage to persons and to property when the breakage of its products is due to a deterioration in the components of the Product that are subject to wear. All the components of the Product made of plastic are considered to be components subject to wear.
TABLE DES MATIÈRES
Advertisement 39
Listedescomposants 42
Positionsassises possibles 43
POSITIONS ASSISES POSSIBLES
EXCLUSIONS DE LA GARANTIE CONVENTIONNELLE.
3APPEUaETcNcNoIb3OBATb ABTOKPECIO, YCTAHOBJIeHHOE HA NACCAJNpCKOE CnDEHBe C NOyUKoB E3OpAChOCTu
PackpbITne noDyukn 6e3oNacHocTn pIaOM c aBTOKpeCtOM MOKeT npuHHTb pe6eHky TJxKeJIbIe TpaBMbl, BnIOb Do JetaHoro nCxOda. Co6JIouaIte npaBnla nCNoIb3OBaHnA aBTOKpeCJa, npNBedeHHbIe B
pykoBODCTBe no 3KcPnyatauHn ABTomO6nIa.
BO3MOXHbIE NOCADOCHbIE MECTA
TAPAHNTINHbIE O8a3ATEJIbCTBA
Hnkeyka3aHHbIe noIOXeHNy BcTynaIoT B DeiCTBnE c 01.01.2005 r. n NoJIHOCTbIO 3aMeHЯOT IIO6yIO dpyrYo INΦopMaciHo, yTO Kacaetcra rapaHTnn, npedocTabJeMoKOMpaHneFoppa Pedretti S.p.A., ABJRAcb.
TAPAHINHbIE O83ATEJIbCTBA KOMnHn Foppa Pedretti S.p.A.
OfHnuaJIbHo 3apeHnCTpnpOBaHHo No aDpeCy: Grumello del Monte (Italia) Via Volta 11, KOTopar rapaHTnpyET HEnocpeIcTBeHHo NTope6nteIIO, UTO DaHHoe I3dEJIne, TOJbKO YTO BbInyUeHHOE C fApBnKHe IMeET DePeKToB HN MaTePnaIOB, HN IpOeKTIpOBaHHa, HN PON3BOIDCTBEHHbIX, IN COOTBeTCTByET 3aABJIeHHbIM XapakTepNCtIKam. HAcToaJra paoHTnJeICTBnTeJIbHa BO BCex cTpaHax- YIeHax E3C n He NCKJIIOuAet n He OrpaHnUBAe T npaba POnb3ObaTeJIa, B COOTBeTCTBnC 3aKOHODaTENbCTBOM, perIJaMeHTnpYIOzM B3aIMMOOTHOWeHnC POn3BOIDTeJIem I3dEJIIN.
UTo6bI BOCNoB3OBAtbcra DaHHoR rapaHTnei, IOTpe6ntJIb DoJxHe npHecTn DeΦeKTHoe N3dEInne PpOaBuY, PpeOCTaNB DOkymeHT, yDcOToBepaHUsn O npNo6peTeHNu3dEInna, C neaTbIO n NOINscBIO PpOaBuA u Yka3aHHeM Ha3BaHnI N3dEInna NN, KaK aJIbTePHaTNaBa, fNCKaJIbHbIK KaccOBbI YeK, 6e3 KaKnx-Jn60 N3MeHEnn, N3 KOTOPOrO YETKO BnDa HBCyka3aHHa DTO TOTO INΦopMaunr. RaapHTnI NMeet cPoK DeIcTBnI DBeHaAduTaB (12) MecaueB C DaTbI npNo6peTeHNu3dEInna.
B TeueHne Bblweyka3aHHoro cpoKa
KOMnHa Foppa Pedretti S.p.A. 6b3yeTcra
OTpeMOHTnpOBaTb Ⅲn 3aMeHNTb, Ha CBOI
Bb16op, DeΦeKTHOe Ⅰ3dEJIe. TapaHTna
IpeoCTabNReTcra KOHeuHOMy IokynaTeJIIO
U3dEJIra (Ponb3ObaTeJIIO) n He NckIIOuaET n
He orpaHnUBAet npab DaHHoro POnb3ObaTeJIa,
IpeDyCMOTpeHHbIX DeiCTByIOzIM
3aKOHOdaTeNbCTBOM n/Ⅱn IpaBaMn
IoiB3OBaTeJIa,Ha npEiBbIeHne CBOx npaB B aDpeC DnIepa/IpOaBaUa N3dJIy.
HE NOKPbIBAiotcraIAPAHTnei.
TapaHTne He NOKpbBaetc yUepe6,CBraHHbICnOJb3OBaHHeM H3deJIIny,BO3HKnShINo CNeDyUOuM npuHAm: HePpaBnIbHoe
IcnoJb3OBaHne, He COOTBeTCTByIOUeeyka3aHnM, CoedePkaUIMcR BO BkJaDbIe C HnCTpyKzIyMaN IO MOHTaXy I 3KcPnyaTaUIN, ydapbl N paDeHnraN 3deJIy, N3dEIne POnDBepraNoCb BO3DeIcTBnO BLnaxHOCTNI NN 3KCTpeMaIbHbIM TempepaTypam N He6laRaONpIraTHbIM YcNOBnM OKpyKaIOUe Cpebl C NOCToAHHO CMeHO 3Tnx YcNOBn, Kopp03N IN OKscIeHIO, a TaKKe HecaHKZIOHnpOBaHHOMy peMOHTy NlmoNΦnKaUIN, N3dEJIne NCNoJb3OBaJIoCb He Nn Ha3NaYeHIO NLI He npaBnIbHO, 6e3 CO6JIIOHeHn YAka3AHN B INHCTpyKUx N O MoHTaXy N 3KcPnyaTaUIN, PnPi NLOXOM YxoJe Nn OTCyTCTBn TakoBOrO, peMOHTe C NcNoJb3OBaHnEM HeOpuRHaJIbHbIX 3aNuaCTeN, Nn PrnHHe HnPaBnIbHO c6OpKn, abApN, BO3DeIcTBn NII Nn HAnITKOB, XmNUeCKNX BeueCTB, a TaKKe BCNeIDCTBne Upe3BbIaHbIX O6CToTeJIbCTB.
B JIO6OM cIyuae, KOMnHnN Foppa Pedretti S.p.A. He HecET HnKaKoN OTBeTCTBeHHocTH 3a yIep6, PnPunHHeHHbI JIOdAm NJIu npedMetam,OTnUChbIM OT N3deJnna,
no npunHe HecO6JIoDeHnYka3AHn / npedncaHn / npedynpeXJeHN,
codepxauXcB B DaHHOM pyKOBOdCTBe
HJN, KaK aIbTePHaTnBa, B "INHcTpkyCnn
No MOHTaxy N 3KcNpyaTaun",
coNPoBQJaHOSei Kaxdoe N3dEInne
H npedHa3NaueHHOe DnA BnAdelbua/
NoIb3OBaTeJIa. (HaNPmEp, YnCTO B KaYeCTBe
npimepa, B cIyuae DeTcKoN KPOBaTK: "HnkOrda
He OCTabJrTe 6e3 npncMOtpa pe6EHka.
KoHTpOnIpuYte, UTo6bl roJ0Ba pe6EHka
He OKa3aJAcb NOKpbITOn IpoCTbIHEO NJIi ODEJOM...").
Kompania Foppa Pedretti S.p.A., Kpome npoery, He Hecet HnkaKoI OTBETCTBEHHOCTn 3a yuep6, npuHHbI JIOdAm NIn mMyueCTBy, ecnn noJOMka eE npOdyKcUn CBra3aHa c pa3pyuWeHem KOMNoHETOB N3denn, nOdBepraEmbIX HopMaJIbHOMy n3Hocy. KomnoHentamN, nOdBepraUOnmncr HOpMaJIbHOMy n3HOCy, CHTaOTcR BCE nlaCTMaCCOBbie KOMNoHEtBi N3denn.
VEHICLE APPLICATION LIST
X-BASE can only be installed on seats in vehicles indicated on this list. Please note that this list undergoes ongoing revision procedures, with changes and additions of vehicles accordingly. The up to date list can be consulted on our web site: www.foppapedretti.it
Semi-Universal approved to ECE-R44.04 for use in the vehicles listed in the vehicle application list.
INFORMATION
- Do not place the front support leg on a floor storage compartment lid, the floor storage compartment lid support leg make a full&firm contact with the vehicle chassis.
- Please consult with the vehicle manufacturer regarding access to ISOFIX points.
- Because of the vehicle seat position care must be taken to correctly attach the child restraint system to the ISOFIX points.
- Vehicle seat (mid row) must be adjusted forward.
- Adjust the vehicle seat so that the base front support leg does not make contact
with the floor storage compartment.
- Vehicle seat has to be fully adjusted to the rear most position.
DO NOT USE ON A PASSENGER SEAT WITH A FRONT AIRBAG
CHECK
WARNING: before purchasing, consult the vehicle Use and Maintenance Guide to ensure the ISOFIX anchor is present, as this could be an optional.
- IMPORTANT!
- WICHTIG!
- Notice
- NEVER use the Car Seat on a passenger seat fitted with a front air bag. IT IS VERY DANGEROUS.
- WARNING
- COMPONENT LIST
- DANGER!!
- POSSIBLE SEATING POSITIONS
- USE IN THE CAR
- For the safety of your child
- For the safety of the passengers
- Always ensure that:
- INSTALLING THE ISOFIX BASE
- BASE IN A CAR EQUIPPED WITH THE ISOFIX SYSTEM
- ENGLISH .
- INSTALLING THE ISOFIX BASE IN A CAR EQUIPPED WITH THE ISOFIX SYSTEM
- ATTACHING THE CAR SEAT ONTO THE BASE
- REMOVING THE CAR SEAT FROM THE ISOFIX BASE
- Removing the car seat
- REMOVING THE ISOFIX BASE
- CLOSING THE ISOFIX BASE
- MAINTENANCE
- FORMAL GUARANTEE
- EXCLUSIONS TO THE FORMAL GUARANTEE.
- TABLE DES MATIÈRES
- POSITIONS ASSISES POSSIBLES
- EXCLUSIONS DE LA GARANTIE CONVENTIONNELLE.
- BO3MOXHbIE NOCADOCHbIE MECTA
- TAPAHNTINHbIE O8a3ATEJIbCTBA
- TAPAHINHbIE O83ATEJIbCTBA KOMnHn Foppa Pedretti S.p.A.
- HE NOKPbIBAiotcraIAPAHTnei.
- VEHICLE APPLICATION LIST
- INFORMATION
- CHECK
Brand : Foppapedretti
Model : XBASE
Category : Car seat