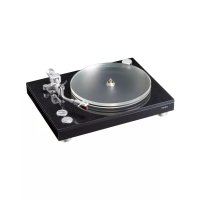
TN5BB - Turntable TEAC - Free user manual and instructions
Find the device manual for free TN5BB TEAC in PDF.



| Product type | Analog belt-drive turntable |
| Brand | TEAC |
| Model | TN5BB |
| Dimensions (cover closed) | 450 x 148 x 351 mm |
| Dimensions (cover open) | 450 x 420 x 410 mm |
| Weight | 10.5 kg |
| Power supply | AC adapter 100-240 V AC, 50/60 Hz, output 17 V DC, 1.0 A |
| Power consumption (operating) | 20 W max. |
| Power consumption (standby) | 0.3 W or less |
| Rotation speeds | 33 1/3, 45, 78 rpm |
| Wow and flutter | 0.1% or less |
| Drive type | Belt drive, DC motor |
| Supplied cartridge | Ortofon 2M Red (MM type), pre-installed |
| Cartridge output voltage | 5.5 mV (1 kHz, 5 cm/s) |
| Recommended tracking force | 1.8 g |
| Cartridge weight | 7.2 g |
| Effective tonearm length | 221 mm |
| Headshell | Universal (standard 1/2 inch) |
| Audio outputs | 1 pair XLR (L/R), 1 pair RCA (L/R) |
| Ground terminal | Yes, for connection to amplifier |
| Supplied accessories | 45 rpm adapter, counterweight, belt, pulley cover, hex keys (1.5 and 2.5 mm), RCA audio cable, ground wire |
Frequently Asked Questions - TN5BB TEAC
User questions about TN5BB TEAC
0 question about this device. Answer the ones you know or ask your own.
Ask a new question about this device
Download the instructions for your Turntable in PDF format for free! Find your manual TN5BB - TEAC and take your electronic device back in hand. On this page are published all the documents necessary for the use of your device. TN5BB by TEAC.
USER MANUAL TN5BB TEAC
IMPORTANT SAFETY INSTRUCTIONS

CAUTION TO REDUCE THE RISK OF ELECTRIC SHOCK,DO NOT RELIVE COVER (OR BACK)NO USER SLIP CLALLB PARTS INSIDEL. RETUR SCOVING TO QUALLED SURVIAL PERSONNEL

The lightning Tens with arrowhead in an equilateral triangle is intended to alert the user to the presence of unsolicited "dangerous voltage" within the products enclosure that could be of sufficient magnitude to constitute a risk of electric shock to persons.

The exciamation point in an equilateral triangle is intended to alert the user to the presence of important operating and maintenance (servicing) instructions in the literature accompanying the appliance.
WARNING: TO PREVENT FIRE OR SHOCK HAZARD,DO NOT EXPOSE THIS APPLIANCE TO RAIN OR MOISTURE.
CAUTION
DO NOT REMOVE THE EXTERNAL CASES OR CABINETS TO EXPOS THE FOLLOWING CASES. NO USE IS DISHPLIED BY PAIN 5 ANTI-SPINE.
YOU ARE LXYE,LENGING PROS.LMS WITH THIS PRODUCE,CONNECTION,STOCH.WHOH.YOU PURCHASED THE UNITFOR A SERVICE.30142 DO NOT USE THE PRODUCTON THE HAS SHAPE PAPERED.
USE OF CONTROLS OR ADJUSTMENTS OR PERFORMANCE OF PROCEDURES OR OTHER THAN THESE SPECIFIED LEGEND MAY RESULT IN HAZARDOUS RADIATION LIXOSUEIL
1 Read these instructions.
2) Keep these instructions.
3) Head all warnings.
4) Follow instructions.
5Do not use this appargurers
C)Cleanonlywithcrycloth.
7) Do not book any ventilation openings. Install in accordance with the manufacturer's instructions.
3) Do not insta: near any heat sources such as radiators, heat registers, stoves, or other apparatus (including amplifiers) that produce heat.
(1) Do not defeat the safety purpose of the polarized or grounding-type plug. A polarized plug has two phases with one wider than the other. A grounding-type plug has two blades and a third grounding plug. The wide blade or the thin plug are provided "for your baby." If the provided plug does not fit into your outlet, consult an electrician for replacement of the obsolete outlet.
10) Protect the power cord from being walked on or pinched particularly at plugs, convenience receptacles, and the point where they exit from the copatatus.
11) Only use attachments/accessories specified by the manufacturer.
1.1) Use only with the cart, stand, tripod, bracket, or table specified by the manufacturer, or sold with the apparatus. When a cart is used, use caution when moving the cart/apparatus combination to avoid injury from tip over.

1.0. Uncoping this apparent: during lightning storms or when unused for long periods of time.
14) Refer all revoking to qualified service personnel. Sentencing is required when the apparatus has been damaged in any way, such as power supply cord or plug; damaged, quid has been applied or objects have fallen into the apparatus; the apparatus has been exposed to rain or moisture, does not contiate normally, or has been dropped.
The apparatus draws nominal non-operating power from the AC outlet with its POWER or STANDBY/ON switch not in the ON position.
- The main pins are used as the disconnect device, the disconnect device small remain steadily operable.
Caution should be taken when using earphones or headphones with the product because excessive sound pressure (volume) from earphones or head phones can cause hearing loss.
CAUTION
Do not expose this apparatus to drugs or weapons. Do not place any objects filled with liquids such as vases on the apparatus.
- Do not install this coprocessor in a confined space such as a book case or similar unit.
The apparatus should be located close enough to the AC outlet so that you can easily reach the power rod plug at any time.
IN USA/CANADA, USE ONLY ON 120V SUPPLY.
Model for USA
Supplier's Declaration of Conformity Model number:N-588
Trade name: ILAC
responsible party
Pierce & Onkyo U.S.A. Corporation
Address: 22828 Lockness Avenue, Torrence, CA 90591 U.S.A. Telephone number: 1-201-785-2600
This device comollics with Part. 15 of the FCC Rules. Operation is subject to the following two conditions: (1) this device may not cause harmful interference, and (2) this device must accept any interference received, including interference that may cause undissigned operation.
Information
This equipment has been tested and found to comply with the limits for a Class B digital device, pursuant to Part 10 of the FCC Rules. These limits are designed to provide reasonable protection against harmful interference in a residential installation. This equipment generates, uses, and can radiate radio frequency energy end. ① no. installed and used in accordance with the instructions, may cause harmful interference to radio communications. However, there is no guarantee that interference will not occur in a particular installation. ② this equipment does cause harmful interference to radio or television reception, which can be determined by turning the equipment off and on; the user is encouraged to try to correct the interference by one or more of the following measures:
- recipient or relocate the equipment and/or the receiving amounts.
- Increase the separation between the equipment and receiver.
Connect the equipment into an outlet on a circuit different from that to which the receiver is connected. - Consult the dealer or an experienced radio/TV technician for help.
CAUTION
Changes or modifications not expressly approved by the party responsible for compliance could void the user's authority to approve the equipment.
Model for Canada
Industry Canada's Compliance Statement: This class is original apparatus component with Canadian ICP-MS.

Model for Europe

This product complies with the European Directives requests, and the other Commission Regulations.
For European Customers
Disposal of electrical and electronic equipment and batteries and/or accumulator
a), A. Electric/electronic equipment and waste batteries/ accumulations should be disposed of separately from the municipal waste stream via collection facilities designated by the government or local authorities.
3) By disposing of electrical/electronic equipment and waste premises/accumulators correctly, you will help save valuable resources and prevent any potential negative effects on human health and the environment.
of improper disposal of waste, electrical/electronic equipment, and biocatalytic/accumulation can have serious effects on the environment and human health because of the presence of hazardous substances in the environment.
d. The Webb Electrical and Electronic Equipment (WEEE) symbols, which show wheeled bins that have been crossed out, indicate that elecrtically electronic equipment and batteries/accumulators must be collected and disposed of separately from household waste.
if a battery or accumulator contains more than the specified value of lead (Hg), mercury (Hg), and/or cadmium (Cd) as defined in the Battery Directive (PDC/66/FG, 2013/56/FU), then the chemical symbols for those elements will be listed in the Supplement to WEEE symbol.
e) Return and collection systems are available to end users. For more detailed information about the disposal of old electrical/electronic equipment, and waste bioreceptors, please contact your city office, waste disposal service or the shop where you purchased the equipment.
Table of contents
Thank you for choosing it AC.
Read this manual carefully to get the best performance from this unit.
After reading it, keep it in a safe place for future reference.
IMPORTANT SAFETY INSTRUCTION 2
Bare use 3
Handling records 3
Preparing the record player. 4
Connections 6
Names and functions of parts 6
Basic operation. 7
Bust over 8
Notes about record styluses 8
Changing the carjage 8
Cartridge alignment (overhang adjustment) 9
Adjusting the creamer. 10
Troubeshocting 10
Specifications 1
Company names, product names and logos in this document are the trademarks or registered trademarks of their respective owners.
Before use
Included accessories
Check to be sure the box includes a - the supplied accessories shown below. Please contact the store where you purchased this unit if any of these accessories are missing or have been damaged during transportation.
Precautions for use
do not place anything on the dust cover. Objects on the cover might cause noise due to vibrations or fall off, especially during playaoke.
- Avoid placing the unit in direct sunlight, close to a source of heat or in other similar conditions. Do not place the unit on top of an amplifier or other equipment that might generate heat that exceeds the operating temperature range of this unit. Doing so could cause discoloration, deformation or malfunction.
- As the unit could become warm during operation, always leave sufficient space around it for ventilation. When installing this unit, leave a safe space (at least 20 cm) away from other devices and walls to allow good ice clearance. When placing it in a rack, for example, leave at least 35 cm (13/34") open above it and 10 cm (4") open behind it. Failure to provide these gaps could cause heat to build up inside and result in fire.
- DO NOT MOVE THE UNIT DURING PLAYBACK. During playback, the record rotates. Do not lift or move the unit during playback. Doing so may damage the record, the stylus, the cartridge or the unit.
Always remove the record before relocating or moving two units. Moving the unit with a record on the sumtable (plated) could damage the record, the style and the cartridge or could cause a malfunction.
The voltage supplied to the unit should match the voltage at prined on the rear panel. If you are in any doubts regarding this matter, consult an权威ian.
Maintenance
If the surface of the unit gets dirty, wipe it with a soft cloth or use diluted mild liquor soap. Allow the surface of the unit to dry completely before using it.
- Do not use chemical cleaning clothes, thinner or similar substances as they could damage the surface of the unit.
CAUTION
For safety, discontinues the power cord from the species before cleaning.
Using the TEAC Global Site
You can download updates for this unit from the PEAC Global Site:http://teac-global.com/
In the TFAC Downloads section, click the detailed language to open the Downloads website page for that language.
Handling records
Holding records
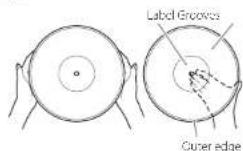
When holding a record or removing it from its sleeve, avoid touching the grooves by holding the record by its label and edge with one hand or by holding it by its edge with both hands.
Cleaning
- Inorganic and dust, on a record can cause noise and the sound to stop, as well as damage the record itself and the style. Use a commercially-available record cleaner to clean records. Do not use thinner or anything other than a record cleaner. Such chemicals could harm the surface of the record.
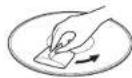
- When using a record cleaner, write the surface of the record in a circular meter; following the grooves.
Precautions
Do not lower records in places that are exposed to direct sunlight or are very hot or very humid. Leaving a record in such a condition for a long time could result in warping, mole growth or other damage.
- Do not slack multiple records or place heavy objects on top of them. Do not leave records at an angle for long amounts of time either. Doing so could result in warping or other damage.
Do no, allow her head express to directly touch the audio grooves. Doing so could cause eartriches.
After you first paying a record, always put it back into its sleeve for storage. (Leaving a record unprotected could result in warping or scratching).
Do not use cached records.
Preparing the record player
Keep the unit in stancy while setting it up (D on page 6).
Cushions are attached to the tonearm for use during transportation. Remove them in the directions of the arrows.
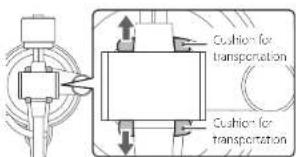
Place the unit on a flat surface.
Place it on a fat surface so that the record can be accurately recorded.
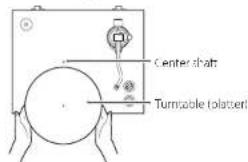
Install the turntable (platter).
Align the waffle plateer with the center shaft and install it.
Place the large side of the hole down.
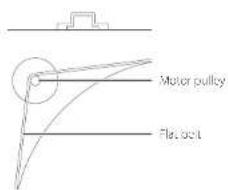
4 Loop the belt around the motor pulley.
Loop the included first belt around the outside of the turntable to make it. And then loop the belt around the motor pulley.
Be careful not to let the rubber become wasted.
- Rotate the curvilinear (leuko) several times to make sure that the flat belt is secure.
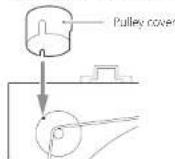
Install the pulley cover.
Align the small cutout in the pulley cover with the small protobutler on the pulley, as shown in the illustration below if there are not aligned, the pulley cover will stand
6 Install the counterweight.
Place the countercross weight over the end of the tonearm, and press it gently as you turn it right to attach it.
When the counterweight can be moved toward the bearing, installation is complete.
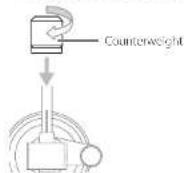
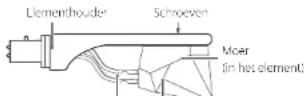
7 Install the headshell.
Insert the headshot on the one end of the concern and turn the nut to secure it in place.
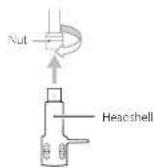
Confirming levelness and fine-tuning
In order to confirm the level placement of the turntable, we recommend using, for example, a commercially-available turntable leveling device, if the turntable is not level, follow the procedures below to adjust the heights of the feet to level the unit.
of the sants is too great, the following method might not be able to correct it.
Turn the foot on the low side counterclockwise to remove it.
2 Attach one of the included washers.
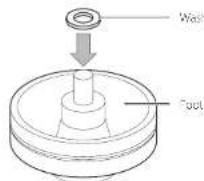
3 Reattach the foot in its original position.
Press down on the four corners of the unit to confirm that the weight is distributed evenly on the four feet.
If one of the feet is wobbly, attach a whiter to it as explained above and adjust its height.
Balancing the tonearm and adjusting the tracking force
Press the STANDBY/ON button on the back of the unit to turn it on.
The tenearmfier will not function if the power is STANDBY.
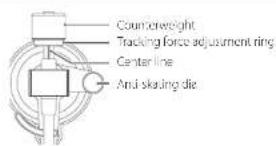
2 Set the anti-skating dial to zero.
Press the ARM LIFT button to raise the tonearm lifter. Then, shift the tonearm to the left slightly.
When the long-term lift is raised, the indicator in the ARM LIFT button will light.
Press the ARM LIFT button to lower the tonearm lifter.
Turn the counterweight and adjust so that the tonearm is level.
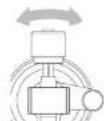
- the careful not to let the cartridge sputx touch the unit.
Remove the protective cover from the carriage before adjusting.
6 Return the tonearm to its original position, and place it on the tonearm holder.
7 Turn the tracking force adjustment ring so that the center line aligns with 0 on the scale.
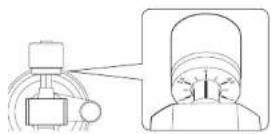
Only turn the ring. Be careful, not to let the counter- weight in turn.
Turn the counterweight so that the tracking force adjustment ring scale matches the tracking force specified for the cartridge.
The tracing force of the included cartridge is 1.8 g, so turn it to 1.8 on the countertenweight scale when using the included cartridge.
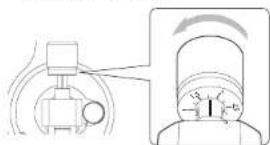
turn right from C in the direction of 0.5 and 1.0
9 Adjust the anti-skating dial.
Star, with it set up the same value as the tracking force and adjust it during record playback (page 71 to the position where the b1 and right volumes are a good in the illustration below, the tracking force is 1.8 g).
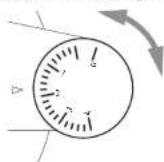
ATTENTION
Depending on the condition of a record, the left-right volume balance could become uneven and skipping could occur.
In such cases, try making the following adjustments.
If the sound jumps backward (stylus skips backward) slightly lower the anti-skiing dial setting.
If the sound jumps forward (stylus skips forward) slightly increase the anti-skating oil setting.
Adjusting the tonearm height
Follow the procedures below to adjust the concern height if it is not level during record playback after changing the cartridge or headshell.
Place a record on the turntable (platter), and put the record stylus on the edge of the record.
Do not let the turntable (platter) turn.
2 Insert the included 2.5mm hex wrench into the height adjustment screw hole and turn it counterclockwise to unlock the tonearm base.
Hold the tonearm base, and adjust the height to make the tonearm level.
bullet carefully not to let the tonearm move right or left when adjusting the heights.
4 Turn the hex wrench clockwise to lock the tonearm base.
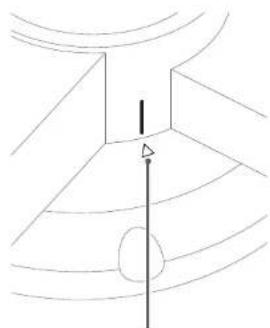
Alignment position
That tonearmasse con meve le's and right relative to thepedestal. Align the guideline (whitel on thetonearm baseto the mark on the peatcalf before locking it.
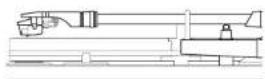
5 Play the record and confirm that the tonearm is now level.
Connections
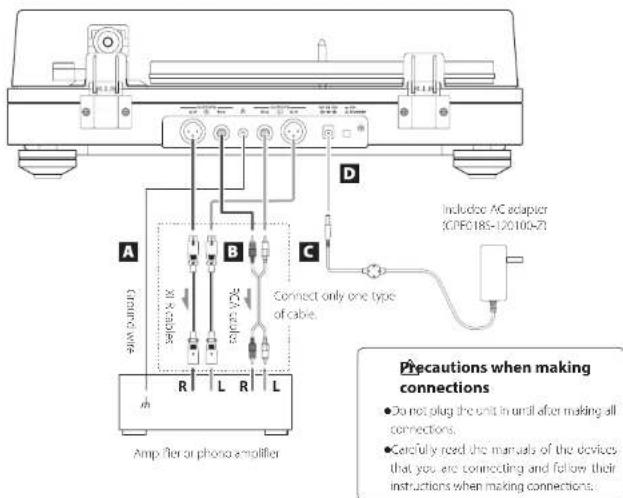
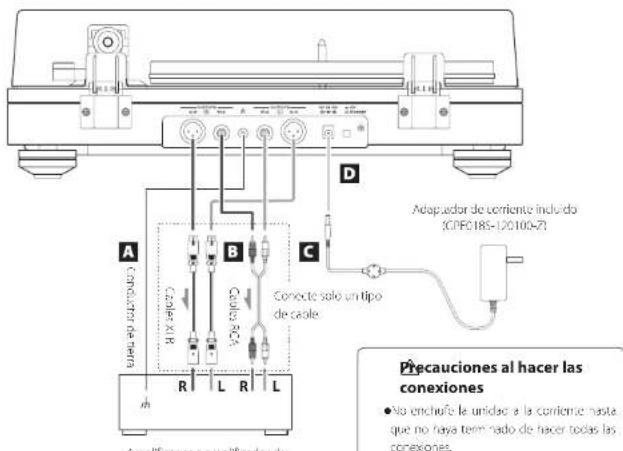
A Grounding terminal
Use the included ground wire to connect this grounding terminal to the grounding terminal at the amplifier, for example.
This is NOT an electrical safety ground.
If noise from speakers is conspicuous
If a ground wire is connected to the grounding terminal of this unit, disconnecting it could reduce noise. Use the method (connected/disconnected) that has the least noise.
B Analog audio output connectors (L/R)
The certificate signal is output directly through the analog audio output connectors (L2).
Use these when connecting to an amplifier or other equipment that has PHONO input connectors. Connect to the appropriate PHONO input connector according to the type of installed cartridge (KM or MC). The PHONO input connectors of some equipment might be suitable for use with SINO-MR or MC type input.
For details, refer to the operation manual of this equipment.
Use the following types of cables for connections.
X.RX R1 cables (solid separately); RCA: RCA cables;
DC input connector
After completing all other connections, connect the included AC adapter to this connector.
Confirm that the power plug of the AC adeptre is plugged into a power outlet.
Do no. use any AC acceptor other than the one indicated.
sure to connect the power cord to an AC outlet that supplies the correct voltage. Connection to an outlet that supplies incorrect voltage could cause fire or electric shock.
Hold the power plug when plugging it into an outlet or unplugging it. Never pull or yank on the power cord.
Unplug the power cord from the outlet when you are not planning to use the unit for an extended period of time.
D STANDBY/ON button
Press the STANDBYON button to turn the unit on or pull it in standby.
Names and functions of parts
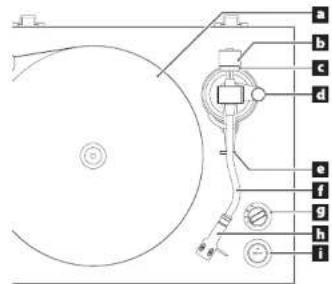
Turntable (platter)
Place record centered on the turntable (patter).
Counterweight
Tracking force adjustment ring
Anti-skating dial
e Tonearm holder
This stand holds the tonearm in place.
Tonearm
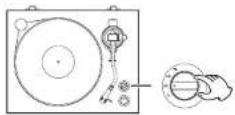
Rotation speed setting knob
Select the rotation speed indicated on the record to be paid.
Rotation will stop when this is set to 0.
h Headshell
This is a universal type that allows the command to be changed easily.
1 ARM LIFT button
Use to raise and lower the toncarm Press this button to raise the tonearm filter, lighting the incisor in the button. Press this again to lower the toncarm filter, causing the indicator to become unit. We recommend using the toncarm filter to avoid damaging records and styluses, because it is safer and more certain than using a finger to do so.
Basic operation
Playing records
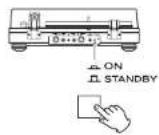
Press the STANDBY/ON button on the back of the unit to turn it on.
Open the dust cover slowly.
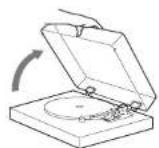
careful not to pinch your hand, for example, when opening and closing the dust cover.
Place a record on the turntable (platter).
When paying 4.45 RPM large-hose single record, use the Included Adoptee.
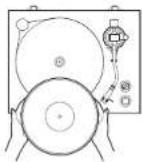
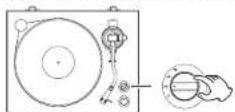
4 Select the rotation speed indicated on the record.
The roteion space can be set to 33/3,45 or 78 RPM
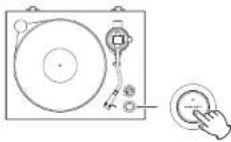
Press the ARM LIFT button to raise the tonearm lifter.
When the tonearm filter is operating, the indicator will blink.
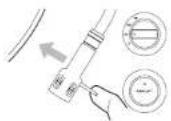
You can also manually move the tanarm to above the record without raising the tonearm after and then slowly lower the tonearm to start dryback.
6 Move the tonearm to the track where you want to start playback.
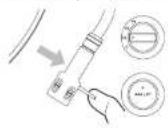
7 Press the ARM LIFT button to lower the tonearm lifter.
The semicarp lowers slowly until the xylus touches the record and playback begins.
Close the cust cover curing record playback. Since doing this prevents shipping caused by unintended contact and blocks external sound pressure it makes noise less likely to occur.
not place anything on top of the dust cover.
ATTENTION
During playase, do not touch the tonearm or the record. Doing so could damage the stylus tip and cause scratches on the record:
Do not tambyly stn turntable (platted) rotaran curing playback. Since this product is not a turnable disgnose for Ds (direct drive), doing something like this could cause malfunction.
During recore playbask, feedback could occur if the volume is too loud. If this happens, lower the volume of the amplifier.
When playback finishes
1 When the stylus reaches the lock groove of the record, the tonearm lifter will rise and the turntable (platter) will stop automatically.
The indicator in the ARM LIFT button will light.
2 Return the tonearm to its original position.
The turntable (platten) will start turning.
Turn the rotation speed setting knob to 0 to stop the turntable (platter).

Automatic tonearm ladder
When the space now from the factory, the automatic concern filter, which raises the concern when the stylus reaches the back groove of the record, is enabled.
Disabling the automatic tonearm lifter
Press the ARM Lift button for five seconds until the indicator in the button blinks twice.
- Press the ARM LIFT button for five seconds again to enable the function.
- Disable the automatic tonearmiter if a 7-inch FP or other record is not played until its end.
Dust cover
Attaching the dust cover
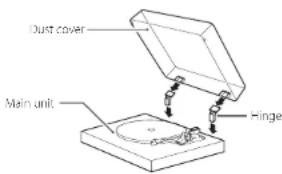
Insert the hinges completely into the hinge holders at the left and right ends of the back of the main unit.
Align the tops of the hinges with the dust cover hinge holders and insert them.
close the trust cover during playback. Since doing this prevents shipping caused by unintended contact and blocks external sound pressure, it means noise is less likely to occur.
Do not, or close or close, when a record is playing. Doing so could, for example, cause the stylist to skip.
Keep it closed whenever possible to keep dust out.
Removing the dust cover
Hold both edges of the dust cover and lift it slowly to remove it along with the hinges from the unit. Then, remove the hinges from the dust cover.
Opening and closing the dust cover
Opening
I hold the front cage of the dust cover and gently lift it down completely until it stops.
The dust cover will stay open in this position.
Closing
Genty lower the dust cover until it is closed.
careful not to pinch your fingers, for example, when opening and closing the dust cover.
Notes about record styluses
- the stylus becomes bent (damaged), it will no longer be able to accurately trace the groove, since a bent stylus could also damage records and cause malfunction, handle styluses carefully.
Always use a commercially available styls cleaner to clean a styls. Use of anything other than a styls cleaner could damage the styls.
Replacing the stylus
If the tip of the stylus becomes worn, not only will it worsen the sound quality, it could also damage records. After about 1000 hours of playback time, replace the stylus with one that we specify.
The cartridge installed in the product is an Orofen 2M Red MWA type cartridge.
When used normally, the 2M Bed Stylos should be replaced about every 1000 hours. Please purchase a commercially-available 2M Bed replacement stylos.
- Follow the replacement instructions in the manual of the replacement, stylus.
ATTENTION
Since loud noises could suddenly occur, put the unit into standby before changing the systol.
Be careful not to hurt, your hand or the equipment.
- Be careful not to allow small children to accidentally swallow styloses.
- The aware that bent styluses, for example, that result from insufficient customer caution or an outside cause are not covered by the warranty.
Changing the cartridge
In change the cartridge, first remove the headshell from the tonearm.
The carbide installed in the product is an Ottofin 2MK Rod R/M type-cartridge.
- We recommend that you a.sach the proactive cover to the car't-edge before proceeding.
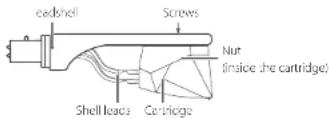
1 Disconnect the shell lead terminals from the cartridge.
2 Loosen the screws and remove the cartridge.
3 Attach the new cartridge and tighten the screws.
Use screws that are suitable for the cartilage. See the illustration below for the position of the screws when attached.
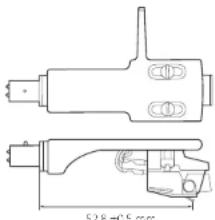
NOTE
To adjust the cartridge attachment position more accurately, follow the procedures in the following "Cartridge alignment (overhang adjustment)" section.
4 Connect the shell lead terminals to the cartridge.
- The signals and colors of the shell leads are shown below.
| Signal Color | |
| Left channel + White | |
| Left channel - Blue | |
| Right channel + Red | |
| Right channel - Green |
Balance the tonearm and adjust the tracking force.
I follow the procedures in Balancing the tonearm and adjusting the tracking force" on page 4.
Cartridge alignment (overhang adjustment)
When rotating a new cartridge or headshell on the Nails, use the Cartridge Alignment Gauge to adjust the cartridge attachment position so that tracking error is minimized.
Cartridge Alignment Gauge overview
Use the template included with this product, or download the PDI from our website (https://ecg.jointproduct.com/sbdl/) and print at actual size.
After priming, carefully open a hole for the spindle, or use a utility knife to cut a cross into the spindle hole on the template.
ATTENTION
In order to prevent the stylus from becoming caught and causing damage, print on photo paper, glossy paper or other paper with a smooth surface.
After printing the PDF confirm that the distance between the center of the spindle hole and B is exactly 50 mm. If this distance is incorrect, printing was not as actual size, so this cannot be used to attach the cartridge at the correct position.
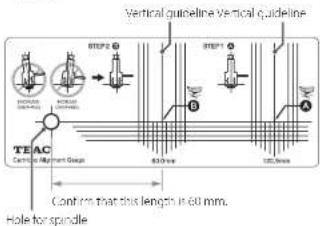
NOTE
The vertical and horizontal lines are guidelines.
The distance from the scene arm rotation central axis (轮廓 pivot) to the center of the record is called the "pivot to spin a distance". The distance from the torso pivot to the cartridge spindle tip is called the "effective length". The difference between the two is the average length. Only this average length is adjusted with basic cartridge adjustment. Using this adjustment too, however, the cartridge attachment position and angle can be adjusted more precisely, ceiling a setup that suppresses tracking error even more.
Cartridge attachment explanation
Temporally fix the cartridge in position as explained in the previous "changing the cartridge" section. When adjusting the cartridge position, move the cartridge along the screw holes in alignment with the central axis of the cantilever and headshell. See the illustration below.
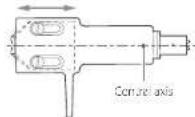
outward inward
The slices of the cartilage and the cantilever might not be parallel due to individual differences. This might be a slight inclination, but it cannot be ignored when making this adjustment, so align the central axis to that of the cantilever.
To create precise adjustment, of the centrifuge position, partially tighten the screws used to attach the centrifuge to the head-shelf to hold it in place temporarily. Tightening the screws too much will prevent adjustment of the centrifuge position.
1 Place the Cartridge Alignment Gauge on the turntable so that the spindle goes through its spindle hole.

Move the Cartridge Alignment Gauge and the tonearm to find the position where the vertical line that passes through point A and the central axis of the headshell match.
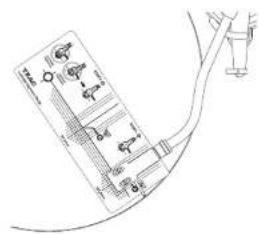
Make precise adjustments to the cartridge attachment position so that the stylus tip and point A are at the same position.
Refer to "Cartridge attachment explanation" for the relationship between the positions of the cartridge and the headstock.
4 Move the Cartridge Alignment Gauge and the tonearm to move the stylus tip to the point B position.
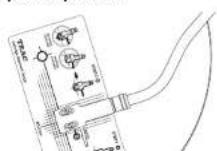
5 If the headshell is parallel to the guideline, proceed to the next step. If it is not parallel, refer to the illustration below and repeat adjustments from step 2.
The overhang is too large. Move the cartridge inward.
The overhang is too small. Move the cartridge outward.
Adjusting the tonearm lifter
The height of the snowmelt litter on this unit is calibrated for the included materials.
If the carnage is replaced with another, the atiy might not touch the record when this totemarm filter is lowered on the sylvestr might rise far enough from the record when the totemarm filter is raised. In such cases, adjust the height of the totemarm filter.
Checking the tonearm lifter height
Check the following conditions at the inner and outer edges of the record.
Space occurs between the tonearm and the tonearm lifter when the tonearm ladder is lowered.
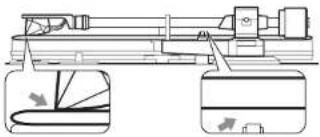
- the tonearm contacts the tonearm ladder, lower the height of the tonearm ladder.
The stylus tip is separated from the record when the tonearm ladder is raised.
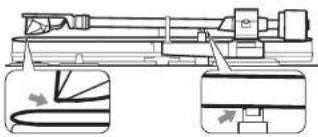
- the cartridge stylus contacts the record, raise the height of the tonebar lid.
Changing the height of the tonearm ladder
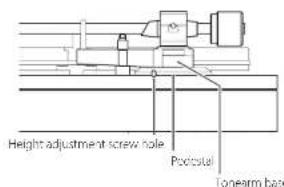
The heights of the consorm offset is fixed using the screw at the position shown in the illustration below.
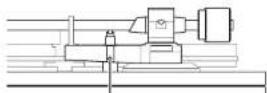
Height adjustment screw hole
Insert the included 1.5mm hex wrench into the height adjustment screw hole and turn it counterclockwise to loosen the screw.
After adjusting the height of the tonearm ladder, insert the hex wrench into the height adjustment screw hole and turn it clockwise to secure the position of the tonearm ladder.
The vertical movement range of the tonearmitter cannot be asciuee.
After adjusting the height of the tonearm lifter, follow the previous instructions to check the height again.
Troubleshooting
2 you experience a problem with this unit, please check the following items before requesting service. Something other than this unit could also be the cause of the problem. Please also check that the connected devices are also being used properly. "It still does not operate correctly, contact us tomorrow where you purchased the unit.
The unit does not turn on.
Confirm that the AC adapter is plugged into an outlet. Then, press the STANDRYON button to turn the unit on (page 6).
Volume is low.
Confirm the connections (page 8). Connect to the appropriate PHONO Input connectors according to the type of installed cartilage (MIM or MC), the PHONO input connectors of some equipment might be settable for use with either MIM or MC type input. For details, refer to the opera.com manual of this equipment.
Playback is not possible; there is noise.
Remove the protective cover from the cartridge
Clean the stylos (sagc 8)
If the stylus is worn out, replace it.
Place the unit at far away or possible from. Vs, microwave ovens and other devices that emit electromagnetic waves.
Noise occurs when a record is playing.
- Noboe could occur if the tracking force is higher than cartilage's specified value. Readjust the tracking force so that it is the specified value (page 4).
The pitch is wrong.
Set the rotation speed (PPM) to match the record (page 2).
The sound is skipping.
vibrations will cause slipping. Place this unit in a stable location.
If the record is dirty, wipe it clean.
Do not use scratched records.
Balance the toner and readjust the tracking force (page 4). If the tracking force is lower than the value designated by the cartride, skipping is more likely to occur.
一 Confirm that the nonarm is not contacting the nonarm. liter/(page 10).
Specifications
Turntable (platter)
Drive system
Rotation detection type high-precision control bolt drive
Motor 100 motor
Rotation speed: 31/7rpm,45 rpm/80rpm
Wound end flutter . 0.1% or less
Turntable to patient.. Acrylic,30cm(12) diameter
Cartridge
Type
E 16n
carriage weight 72g
Included headshell weight: 10 g (including screws, nuts and wire).
The lifespan of a virus depends on the use conditions but is usually about 1000 hours.
Replacement record styloos model: Otofof 2M Red
Tonearm
Tonearm type.. Static balanced S shaped tonearm
Effective tonearm length 223 mm
16-23c
with the included headshell
Overhang 18mm
Tcncarm heightadjustment range about 6 mm
Analog audio outputs
Connectors X.R connector ( L/R pair)
RCA connectors (L/R pair)
General
AC adapter power
Input AC100-240V,50-6012
Output. 10070104120Wmax
Power consumption
Standby 0.3W or ess
On (33.45,78) 2.0W or less
Weight 10.3 kg (23/415)
0
Dimensions × × 3 (incuding protrusions)
When the dust cover is closed
When the dust cover is open
When the most cover is removed
(when tneam at hiignt position)
Performance date is specified at 20°C
Included accessories
45.2Macaperrx
Counterweight × 1
Headshell X
Ortofien 2M Red (MW type) preinstalled
Turntable (platter) x 1
atbctx
Pulley cover × 1
Cust cover × 1
HincsX2
Foot height adjustment washerx4
onearm height adjustment hex wrench (0.5 mm) x 1
Tonearm lher height adjustment hex wrench 1.5 mm x 1
A. a, b,c
Ground wire × 1
ACadaptor(GPEC185-20100Z)×1
Carridge Alignment Gage X1
Owner's manual (this document, including warranty) x 1
For information about the warning users living in the USA and Canada should see page 82 and the back cover (twarranty document). Users living in Europe and other regions should see page 83.
Specifications and appearance are subject to change without
no
Weight and dimensions are approximate.
- Illustrations in this owner's manual might differ slightly from production models.
INSTRUCTIONS DE SECURITE IMPORTANTES

ATTENTION: POUR REDURRE LE RISQUE D'ELLETRICUTION, NL RILILLI PAS LL CAPOIT OU L'ARRIDIL AUCUNIEL PIECE INQUIRANALYSIS PARABAIL PAUTINULSUION CONL CEN TUIL REPARATION AUN SERVICE APRESENTE QUALIRE.

6 Installélez contrepoids.
Poids aves portecellue 10g (vis, erous et his compris)
Covencle and pssors x 1
Champleres X 2
AdaptatpurseGUPU120X
Bakte dajnmeep de cie (Cngg Aannn G
×1
Mode demolice document y compns la garantie) x
Amplifier (amulator and amplifier di-pheno) (special care gecareco)
Conle tapa quita 40x135x35mm
- As expected, currency exchange rates reflect the scenario in previous year.
Verification to subsequent conditions at bordi intermo ed esccimo ed clinica.
Colleges at connection of ingresio PHONO appropriate in
bareaipocdiacuad installation (Mio. N.C.)
- lot element data in hot product is gmRetailleco is em Orofoa 201 Red MVA element.
We edebrion oromic besochernikap op his element to pleat son alvocrs door to gsen.
Houdereansluitingen Element
As Hot Rod 2 needs hot correct, we thank them for contact up to meet de-lerencea whu a hot opeaat helfe gotkoo.
Geluidsvolume is laag.
Netcapacter(0-1018-120100x1
LemmentuijraalocCarridge AlignmentGauge × 1
Gebrukerhandelng (dtdocument) x 1
Rotationshedging.com (anilles in p33173,45 cter 78TPM)
Armymen often wear short sleeves and pajama suits, pajets, and boots.

Skruhhal for hojdatering
Overhang 18 mm
Jupiter agintenvalvally as armhoojee. see §-
Analoga ljudutgangar
AnlithingcrXLR-konsaker(1 par/15) RCA-kohtaker (1 par/18)
Allmänt
Stg 100-243V,50-6012
Ungang DC17.0V,1.0A,12.0W max
Hefeibruking Wiclge 0.3W eiffer minde P9(33,45,78) 2.0W eiffer minde wik . 10.5 kg
Difluoromucorumred 535°C Mrt (B× X× D , inclusive uskurzunde delir)
Med dammskycet stingt. 450 mm x 148 mm x 351 mm Med dammskycet oppen. 450 mm x 420 mm x 410 mm Med dammskycet oort. 450 mm x 35 mm x 351 mm (har tonarm air (Hogsta)lege)
Brickcr for Bturtmas hddjusturing X
Insinyckel for tonarmara hddjusting (2.5 mm) X
Insinyckel for anlytics hddjusting (1.5 mm) X
BCA-lipidlabelx1
lndialabelx1
Nadadter (KPL185-120103-X) X1 Dusteringsmall for patton (Carriage Alignment Gauge) X1 Brukkaneing (Idetra disectrix) X1
the side for information on gerantine.
- Specifizatiorer och usteende kon linchas utar fregbendemeldedde.
Vikt cinn mtt ar ungetarig. - Bilder den Anwendungszusatz can skills at site finanzprovisionsmodellerna.
1 右一丁LJJJJJIJJJJJJJJJJJJJJJJJJJJJJJJJJJJJJJJJJJJJJJJJJJJJJJJJJJJJJ J
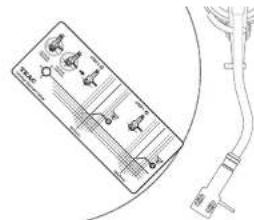
Warranty provisions (United States and Canada only)
Length of Warranty
The parts and labor warranty will be effective for one (1) year from the date of the original purchase for products not used for commercial purposes. For products used commercially, the warranty is niney (90) days for magnetic heads and optic pickups, one (1) year for all other parts and ninety (90) days for aboven.
Who Is Covered Under This Warranty
This warranty is valid only in the United States or Canada, depends upon the country in which original purchase was made, and is therefore only by the origin, purchaser within the country in which the purchase was made.
This warranty is not valid if the product was purchased through an unauthorized dealer.
What Is Not Covered Under This Warranty
- Darnage to erceiorlation of the external cabinet
- Damage resulting from accident, misuse, abuse or neglect.
- Damage resulting from failure to follow instructions contained in the products owner's manual or otherwise provided with the product.
Damage occurring during shipment of the product (claim) must be reported to the seller. -
Damage resulting from the repair or attempted repair by emergency other than TEAC or an authorized TEAC service station.
Damage resulting from motion correction or attempted modification of product not authorized by TEAC. -
Damage resulting from causes other than product defects, including lack of technical skills, competence, or experience of the user.
- Damage to any unit that has been allowed or which the serial number has not yet defined, modified or removed.
What TEAC Will Pay For
ILAC will pay all labor and material expenses for items covered by the warranty. Payment of shipping charges is covered in the next section.
How To Obtain Warranty Service
Your unit must be serviced by an authorized TEAC service station within the country in which the product was purchased. If you are unable to locate an authorized service station in your area, please contact IAC at the applicable address shown at the end of this warranty statement. PLEASE DO NOT RETURN YOUR UNIT TO TEAC WITHOUT OUR PRIOR AUTHORIZATION. You must pay shipping charges if it is necessary to ship this product for service. However, if the necessary repairs are covered by warranty, we will pay the return shipping charges to any destination within the country in which the product was purchased. Whenever warranty service is required, you must present the original dated sales receipt, or other proof indicating the purchase place and date, as proof of warranty coverage.
LIMITATION OF IMPLIED WARRANTYIS
ALL IMPLIED WARRANTYIS, INCLUDING WARRANTY US OF MERCHANTIAB IT AND FITNESS FOR A PARTICULAR PURPOSE, ALL IMPLIED IN DURATION TO THE LINGOTHED WARRANTY.
EXCLUSION OF DAMAGES
TEAC LIABILITY FOR ANY DEFECTIVE PRODUCT IS LIMITED TO REPAIR OR REPLACEMENT (II) PRODUCTION AT LACKS OF IGN. TEAC SHALL NOT BE LIABLE FOR DAMAGE BASED UPON INCOME, LOSS OR COST (III) PRODUCTION INJURY/PROLATION, OPERATIONS, COMMERCIAL LOSS OR LOSS PROFITS, OR ANY OTHER DAMAGE, WHETHER INCIDENTAL, CONSEQUENTAL, PUNITIVE OR OTHERWISE.
SOME STATES OR PROVINCE DO NOT ALLOW LIMITATIONS ON HOW LONG AN IMPLIED WARRANTY LATES AND/OR DO NOT ALLOW THE EXCLUSION OR LIMITATION OF INCIDENTAL OR CONS-QUINITAL DAMAGES, SO THE ABOVE LIMITATIONS AND EXCLUSIONS MAY NOT APPLY TO YOU.
THIS WARRANTY GINS YOU SPECIFIC RIGHTS, AND MAY VARY FROM SOME OF THE RIGHTS PROVIDED BY LAW. THESE RIGHTS MAY YARISH BOTH OF US. AIE OR PREVALENCE TO PROVINCE.
This product is subject to the legal warranty regulations of the country of purchase. In case of a defect or a problem, please contact the dealer where you bought the product.
In countries/regions other than the USA, Canada, Europe and Japan
This warranty gives you specific legal rights, and you may also have other rights that vary by country, state or province. If you have a warranty claim or request, please contact the dealer where you bought the product.
This product has a serial number located on the rear panel. Please write it here and retain this for your records.
Model name: TN-5BB Serial number
0620MA3068A
- IMPORTANT SAFETY INSTRUCTIONS
- CAUTION
- Model for USA
- Information
- Model for Canada
- Model for Europe
- For European Customers
- Table of contents
- Before use
- Included accessories
- Precautions for use
- Maintenance
- Using the TEAC Global Site
- Handling records
- Holding records
- Cleaning
- Precautions
- Preparing the record player
- Confirming levelness and fine-tuning
- ATTENTION
- Adjusting the tonearm height
- Connections
- A Grounding terminal
- If noise from speakers is conspicuous
- B Analog audio output connectors (L/R)
- Use the following types of cables for connections.
- DC input connector
- D STANDBY/ON button
- Names and functions of parts
- Turntable (platter)
- Counterweight
- Tracking force adjustment ring
- Anti-skating dial
- e Tonearm holder
- Tonearm
- Rotation speed setting knob
- h Headshell
- ARM LIFT button
- Basic operation
- Playing records
- When playback finishes
- Automatic tonearm ladder
- Disabling the automatic tonearm lifter
- Dust cover
- Attaching the dust cover
- Removing the dust cover
- Opening and closing the dust cover
- Opening
- Closing
- Notes about record styluses
- Replacing the stylus
- Changing the cartridge
- NOTE
- Cartridge alignment (overhang adjustment)
- Cartridge Alignment Gauge overview
- Cartridge attachment explanation
- Adjusting the tonearm lifter
- Checking the tonearm lifter height
- Changing the height of the tonearm ladder
- Troubleshooting
- The unit does not turn on.
- Volume is low.
- Playback is not possible; there is noise.
- Noise occurs when a record is playing.
- The pitch is wrong.
- The sound is skipping.
- Specifications
- Cartridge
- Analog audio outputs
- General
- INSTRUCTIONS DE SECURITE IMPORTANTES
- Analoga ljudutgangar
- Allmänt
- Warranty provisions (United States and Canada only)
- Length of Warranty
- Who Is Covered Under This Warranty
- What Is Not Covered Under This Warranty
- What TEAC Will Pay For
- How To Obtain Warranty Service
- LIMITATION OF IMPLIED WARRANTYIS
- EXCLUSION OF DAMAGES
- In countries/regions other than the USA, Canada, Europe and Japan
Brand : TEAC
Model : TN5BB
Category : Turntable