TN-400BT-X - Turntable TEAC - Free user manual and instructions
Find the device manual for free TN-400BT-X TEAC in PDF.

User questions about TN-400BT-X TEAC
0 question about this device. Answer the ones you know or ask your own.
Ask a new question about this device
Download the instructions for your Turntable in PDF format for free! Find your manual TN-400BT-X - TEAC and take your electronic device back in hand. On this page are published all the documents necessary for the use of your device. TN-400BT-X by TEAC.
USER MANUAL TN-400BT-X TEAC
natural_image
Technical line drawing of a circular object with a separate mechanical device labeled 'TEAC' (no text or symbols on the diagram itself)アナログターンテーブル
ANALOG TURNTABLE
取扱説明書
OWNER'S MANUAL
MODE D'EMPLOI
MANUAL DEL USUARIO
BEDIENUNGSANLEITUNG
The Bluetooth® word mark and logos are registered trademarks owned by Bluetooth SIG, Inc. and any use of such marks by IFAC CORPORATION is under license.
Qualcomm apX is a product of Qualcomm Technologies, Inc. and/or its subsidiaries.
Qualcomm is a trademark of Qualcomm Incorporated, registered in the United States and other countries. aptX is a trademark of Qualcomm Technologies International, Ltd., registered in the United States and other countries.
https://teac.jp/jp/signup
レコードの取り扱い
レコードの持ち方
text_image
Diagram showing a mechanical device with a rotating dial and directional arrow, likely illustrating a motion or positioning concept.text_image
52.8 ± 0.5mmIMPORTANT SAFETY INSTRUCTIONS


CAUTION: TO REDUCE THE RISK OF ELECTRIC STOCK, DO NOT REMOVE COVER (OR BACK). NO USER SERVICEABLE PARTS INSULD, IT RELISERVING TO QUALIFIED SERVICE PERSONNEL.

The lightning flash with arrowhead in an coulateral triangle is intended to alert the user to the presence of uninsulated 'dangerous voltage' within the product's enclosure that could be of sufficient magnitude to constitute a risk of electric shock to persons.

The exclamation point in an eculateral triangle is intended to alert the user to the presence of important operating and maintenance (servicing) instructions in the literature accompanying the appliance.
WARNING: TO PREVENT FIRE OR SHOCK HAZARD, DO NOT EXPOSE THIS APPLIANCE TO RAIN OR MOISTURE.
CAUTION
●DO NOT REMOVE THE EXTERNAL CASES OR CABINETS TO EXPOSE THE ELECTRONICS, NO USFS SERVICE PARTS ARE INSIDE.
- IF YOU ARE EXPERIENCING PROBIFMS WITH THIS PRODUCT, CONTACT THE STORE WHERE YOU PURCHASED THE UNIT FOR A SERVICE RETERRAL. DO NOT USE THE PRODUCT UNILITIAS OBLIN REPAIRLD.
●USL OF CONTROLS OR ADJUST MEINS OF PERFORMANCE
OF PROCEDURE S OIL LIF IIAN THOSL SPLOCHILD LIF IN
MAY RESULT IN HAZARDOUS RADIATION EXPOSURE
1) Read these instructions.
2) Keep these instructions.
3) Heed all warnings.
4) Follow all instructions.
5) Do not use this apparaue near water.
(3) Clean only with dry cloth.
7) Do not block any ventilation openings. Install in accordance with the manufacturer's instructions.
8) Do not install near any heat sources such as radiators, heat registers, stoves, or other apparatus (including amplifiers) that produce heat.
(9) Do not defeat the safety purpose of the polarized or grounding-type plug. A polarized plug has two blades with one wider than the other. A grounding type plug has two blades and a third grounding wrong. The wide blade on the third prong are provided for your safety. If the provided plug does no, it into your outlet, consult an electrician for replacement of the obsolete outlet.
10) Protect the power cord from being walked on or pinched particularly at plugs, convenience receptacles, and the point where they exit from the coparatus.
11) Only use attachments/accessories specified by the manufacture.
1.2) Use only with the cart, stand, tripod, bracket, or table specified by the manufacturer, or sold with the apparatus. When a cart is used, use caution when moving the cart/separatus combination to avoid injury from tip over.
13) Unplug this appearance during lightning storms or when unused for long periods of time.
(14) Refer all servicing to qualified service personnel. Servicing is required when the apparatus has been damaged in any way, such as power supply cord or plug's damaged, liquid has been spliced or objects have fallen into the apparatus, the apparatus has been exposed to rain or moisture, does not operate normally, or has been dropped.
●The apparatus draws nominal non-operating power from the AC outlet with its POWER or STANDRY/ON switch not in the ON position.
●The mains plug is used as the disconnect device, the disconnect device shall remain readily operable.
- Caution should be taken when using earphones or headphones with the product because excessive sound pressure (volume) from earphones or headphones can cause hearing loss.
IN USA/CANADA, USE ONLY ON 120V SUPPLY.
CAUTION
- Do not expose this apparatus to drips or spasces.
- Do not place any objects filled with liquids, such as vases, on the apparatus.
- Do not install this apparatus in a confined space such as a book case or similar unit.
- The apparatus should be located close enough to the AC outlet so that you can easily reach the power cord plug at any time.
Model for USA
Declaration of Conformity
trade name: ILAC

responsible party: 11 trading Company, LLC
Address: 3507 Woodview Trace J/CO Inc. anapolis, N 16768 U.S.A.
URL: https://11tradingcompany.com/contact-us/ Telephone number: 1 201 785 2600
This device complies with Part 15 of the TCC Rules. Operation is subject to the following two conditions: (1) this device may not cause harmful interference, and (2) this device must accept any interference received. Including interference that may cause undesired operation.
Information
This equipment has been tested and found to comply with the limits for a Class B digital device, pursuant to Part 1b of the ICC Rules. These limits are designed to provide reasonable protection against harmful interference in a residential installation. This equipment generates, uses, and can radiate radio frequency energy and, if not installed are used in accordance with the instructions, may cause harmful interference to radio communications. However, there is no guarantee that interference will not occur in a particle, air installation. If this equipment does cause harmful interference to radio or television reception, which can be determined by turning the equipment off and on, the user is encouraged to try to correct the interference by one or more of the following resources.
- Reorient or relocate the equipment and/or the receiving antenna.
- Increase the separation between the equipment and receiver.
- Connect the equipment into an outlet on a circuit different from that to which the receiver is connected.
- Consult the dealer or an experienced ratio of V technician for help.
CAUTION
Changes or modifications not expressly approved by the party responsible for compliance could void the user's authority to operate the equipment.
Model for Canada
Innovation, Science and Economic Development Canada's Compliance Statement
This Class 3 digital apparatus compties with Canadian ICLS-503
Model for Europe
For European Customers
Disposal of electrical and electronic equipment and batteries and/or accumulators
a). A electrical/electronic equipment and waste batteries/accumulators should be disposed of separately from the municipal waste stream via collection facilities designated by the government or local authorities.
5: By disposing of electrical/electronic equipment and waste batteries/accumulators correctly, you will help save valuable resources and prevent any potential negative effects on human health and the environment.
cl. Improper disposal of waste electrical/electronic equipment and batteries/accumulators can have serious effects on the environment and human health because of the presence of hazardous substances in the equipment.
d) The Waste Electrical and Electronic Equipment (WTH) symbols, which show wheeled bins that have been crossed out, indicates that electrical/electronic equipment and batteries/accelulators must be collected and disposed of separately from household waste.
If a battery or accumulator contains more than the specified values of lead (Pb), mercury (Hg), and/or cadmium (Cd) as defined in the Battery Directive (2006/66/EC, 2013/56/EU), then the chemical symbols for those elements will be induced beneath the WIL symbol.
e) Return and collection systems are available to end users or more detailed information about the disposal of old electrical/electronic equipment and waste batteries/accumulators, please contact your city office, waste disposal service or the shop where you purchased the equipment.
Compliance of radio transmitter and interference
This product has the function of broadband transmitter using 2.4GHz Band.
Use frequency range: 2402 MHz 2490 MHz
Maximum output power: Bluetooth® Class 2 (less than 2.5 mW)
Please use only in the country where you purchased the product. Depending on the country, restrictions on the use of bluetooth wireless technology might exist.
Model for USA
Labeling of authorization
FCC D: XEG-TN4008T-X
Model for Canada
Compliance of radio transmitter
This device contains licence-exempt transmitter(s)/receivers(s) that comply with Innovation, Science and Economic Development Canada's licence exempt RSS(s). Operation is subject to the following two conditions:
1) This device may not cause interference.
2) This device must accept any interference, including interference that may cause undesired operation of the device.
Labeling of authorization
K: 1559C-IN/DOX
Model for EEA (European Economic Area)
CE Hereby, TFAC Corporation declares that the radio equipment type is in compliance with Directive 2014/53/EU, and the other Directives, and Commission Regulations.
Model for UK
Hereby, TEAC CORPORATION declares that, the radio equipment type is in compliance with UK Radio Equipment Regulations.
UK CA
The full text of the EU or UK declaration of conformity is available at the following internet address. Please contact us by e-mail.
https://teacsupport.eqipa.com/
TEAC Corporation
1-47 Ochia, Tama-shi, Tokyo, 206-8530, Japan
Radiation Exposure requirements
This equipment meets the regulation, which is recognized internationally, for the case of human exposure to radio waves generated by the transmitter.
Statement of compliance
Model for USA/Canada
This equipment complies with FCC/C radiation exposure limits set forth for an uncontrolled environment and meets the FCC radio frequency (RF) Exposure guide lines and RSS-102 of the ICC radio frequency (RF) Exposure levels. This equipment has very low levels of RF energy that it deemed to comply without maximum permissive exposure evaluation (MFEL). But it is desirable that it should see installed and operated keeping the radiator at least 20 cm or more away from person's body (excluding extremities, nanos, wrists, feet and feet).
Model for EEA and UK
This equipment complies with LN.62479: Assessment of electronic and electrical equipment related to human exposure restrictions for electromagnetic fields.
The Bluetooth* word mark and logos are registered trademarks owned by Bluetooth SIG, nc. and any use of such marks by I. AC CORPORATION is under license.
Qualcomm aptX is a product of Qualcomm Technologies, Inc. and/or its subsidiaries.
Qualcomm is a trademark of Qualcomm Incorporated, registered in the United States and other countries. aptX is a trademark of Qualcomm Technologies International, Ltd., registered in the United States and other countries.
Other company names, product names and logos in this document are the trademarks or registered trademarks of their respective owners.
Table of contents
Thank you for choosing IT AC
lead this manual carefully to get the best performance from this unit.
After reading it, keep it in a safe place for future reference.
IMPORTANT SAFETY INSTRUCTIONS....12
Before use....14
Hancing records....14
Preparing the record player....15
Dust cover 15
Notes about record styluses....17
Changing the cartridge....17
Names and functions of parts 17
Connections....15
Basic operation....9
Listening with Bluetooth® speakers....20
Troubleshooting 20
Specifications....21
Before use
Included items
Check to be sure the box includes all the supplied accessories shown below. Please contact the store where you purchased this unit if any of these accessories are missing or have been damaged during transportation.
Fell mal × 1
45 RPM acquisition × 1
Counterweight × 1
Headshell ×
Audio-Technica VM Type (dual magnet) stereo cartridge (AT95E) preinstalled
Platter x
Dust cover × 1
Dust cover hinges x 2
RCA audio cable with grounding terminal x 1
AC adapter(GIF053A-V17C05C)×1
wert's manual (this document, including warranty) ×
- For information about the warranty, users living in the USA and Canada should see page 82 and the back cover (warranty document). Users living in Europe and other regions should see page 83.
Using the TEAC International Site
You can download updates for this unit from the TFAC International Site:
Click Language at the too right of the page and select the desired country or region to access a page in the corresponding language.
Precautions for use
- Place the unit on a flat surface.
- Do not place anything on the dust cover. Objects on the cover might cause noise due to vibrations or fall off, especially during playback.
●Avoid placing the unit in direct sunlight, close to a source of heat or in other similar conditions. Do not place the unit on top of an amplifier or other equipment that might generate heat that exceeds the operating temperature range of this unit. Doing so could cause discoloration, deformation or malfunction. - As the unit could become warm during operation, always leave sufficient space around it for ventilation. When installing the unit, leave a little space (at least 20 cm (8°)) between it and other devices and walls to allow good heat dissipation.
When placing it in a rack, for example, leave at least 35 cm (13.3/1") open above it and 10 cm (2/1") open behind it. Failure to provide there gaps could cause heat to build up inside and result in fire. - DO NOT MOVE THE UNIT DURING PLAYBACK. During play-back, the record rotates. Do not lift or move the unit during playback. Doing so may damage the record, the sign is, the cartridge or the unit.
●A ways remove the record before relocating or moving this unit. Moving the unit with a record on the turntable could damage the record, the stylus and the cartridge or could cause a malfunction. - The voltage supplied to the unit should match the voltage as printed on the rear panel. If you are in any doubt regarding this matter, consult an electrician.
Maintenance
"the surface of the unit gets dirty, wipe it with a soft cloth or use diluted mild liquid soap. Allow the surface of the unit to dry completely before using.
- Do not use chemical clearing cloths, thinner or similar substances as they could damage the surface of the unit
CAUTION
or safety, disconnect the power cord from the socket before cleaning.
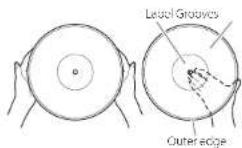
Handling records
Holding records
When holding a record or removing it from its sleeve, avoid touching the grooves by holding the record by its label and edge with one hand or by holding it by its edge with both hands.
Cleaning
- Igerprints and dust on a record can cause noise and the sound to slip, as well as damage the record itself and the stylus. Use a commercially available record cleaner to clean records. Do not use thinner or anything other than a record cleaner. Such chemicals could harm the surface of the record.
- When using a record cleaner, wipe the surface of the record in a circular motion, following the grooves.

Precautions for use
- Do not leave records in places that are exposed to direct sunlight or are very hot or very humid. Leaving a record in such a condition for a long time could result in warping, mole growth or other damage.
- Do not slack multiple records or place heavy objects on top of them. Do not leave records at an angle for long amounts of time either. Doing so could result in warning or other damage.
- Do not allow hard objects to directly touch the audio grooves. Doing so could cause scratches.
- After you finish opleying a record, always put it back into its sleeve for storage. Leaving a record unprotected could result in warping or scratching.
- Do not use cracked records.
Keep the unit in standby while setting it up: E on page 18;
1 Place it on a flat surface.
Place it on a flat surface so that the record can be accurately traced.
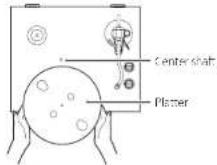
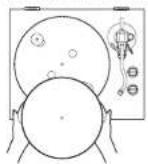
2 Install the platter.
Align the platter with the center shelf, and install it.
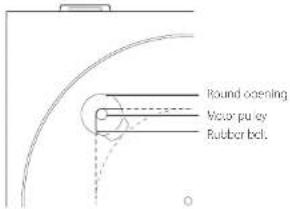
3 Loop the belt around the motor pulley.
The rubber belt is wrapped around the sub platter. Use a finger to pull the rubber belt through the round opening.
- Be careful not to let the rubber become twisted.
- Rotate the platter several times to make sure that the rubber belt is secure:
text_image
Round opening vise pyay Rubber belt.Preparing the record player
4 Place the felt mat on the platter.
Place the included felt met on the pattern before use.
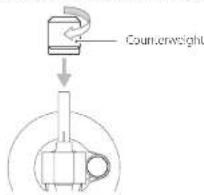
5 Install the counterweight.
Place the counterweight over the end of the tonearm, and press it gently as you turn right to attach it.
text_image
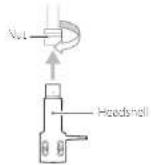
Counterweight6 Install the headshell.
Insert the headshell on the end of the tonearm and turn the nut to secure it in place.
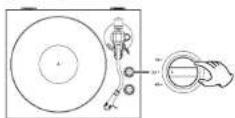
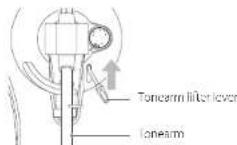
Balancing the tonearm and adjusting the tracking force
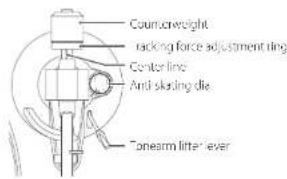
text_image
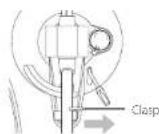
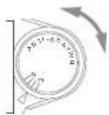
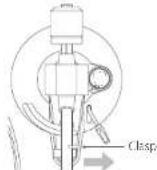
Counterweight racking force adjustment ting Center line Anti skating die Tonearm lifter/ever1 Set the anti-skating dial to zero.
2 Move the tonearm clasp to the right to remove it.
3 Raise the tonearm lifter lever and shift the tonearm to the left slightly.
4 Lower the tonearm lifter lever.
Preparing the record player (continued)
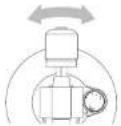
5 Turn the counterweight and adjust so that the tonearm is level.
- Remove the protective cap from the cartridge style before adjusting.
- Be careful not to let the cartridge stylus touch the unit.
6 Return the tonearm to its original position, and use the clasp to lock it.
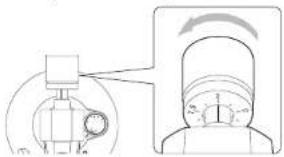
7 Turn the tracking force adjustment ring so that the center line aligns with 0 on the scale.
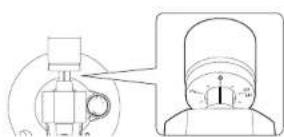
- Only turn the ring. Be careful not to let the counter-weight turn.
8 Turn the counterweight so that the tracking force adjustment ring scale matches the tracking force specified for the cartridge.
- The tracking force of the included cartridge is 20 g. So, turn 1 to 2 on the counterweight, scale when using the included cartridge
text_image
Technical diagram showing a mechanical device with a rotating component and its cross-sectional view.●Turn it in the direction of the arrow in the illustration above so that the value changes from 0 to 1 to 2.
9 Adjust the anti-skating dial.
Start with it set at 2 and adjust it during record playback (page 19) to the position where the left and right volumes are balanced.
Dust cover
Attaching the dust cover
text_image
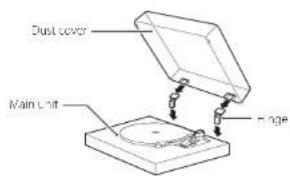
Dust cover Main unit Hinge1 Insert the hinges completely into the hinge holders at the left and right ends of the back of the main unit.
2 Align the tops of the hinges with the dust cover hinge holders and insert them.
- Close the cus. cover during playback. Since doing his prevents skipping caused by unintended contact and blocks external sound pressure, it makes noise less likely to occur.
- Do not open or close it when a record is playing. Doing so could, for example, cause the stylus to stop.
- Keep it closed whenever possible to keep dust out.
Removing the dust cover
-old both edges of the dust cover and lift it slowly to remove it along with the hinges from the unit. Then, remove the hinges from the dust cover.
Opening and closing the dust cover
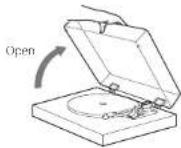
Opening
Iolo the front edge of the dust cover and gently lift it open completely until it stops
The dust cover will stay open in this position.
Closing
Gently lower the dust cover until it is closed.
Be careful not to pinch your finger, for example, when opening and closing the dust cover.
Notes about record styluses
- If the stylus becomes bent (damaged), it will no longer be able to accurately trace the groove. Since a bent stylus could also damage records and cause malfunction, handle styluses carefully.
●Always use a commercially available stylus cleaner to clean a stylus. Use of anything other than a stylus cleaner could damage the stylus.
Replacing the stylus
If the tip of the stylus becomes worn, not only will it worsen the sound quality, it could also damage records. After about 300 hours of playback time, replace the stylus with one that we specify.
Please use an Audio Technica ATN95C replacement, stylus.
●An Audio Technica AT95C VM Type carriage is installed in this unit
NOTE
VM type cartridges have the same characteristics as MM type cartridges.
- Follow the replacement instructions in the manual of the replacement, stylus.
CAUTION
- Since loud noises could suddenly occur, put the unit into standby before changing the stylus.
- Be careful not to hurt your hand or the equipment.
- Be careful not to allow small children to accidentally swallow styluses.
- Be aware that bent styluses, for example, that result from insufficient customer caution or an outside cause are not covered by the warranty.
Changing the cartridge
To charge the cartridge, first remove the headshell from the tonearm.
●An Audio-Technica AT95F VM Type cartridge is installed in d's un L
NOTE
VM type cartridges have the same characteristics as MM type cartridges.
- We recommend that you attach the protective cap to the cartridge stylus before doing this task.
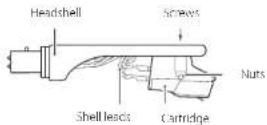
1 Disconnect the shell lead terminals from the cartridge.
2 Loosen the screws and remove the cartridge.
3 Attach the new cartridge and tighten the screws.
See the illustration below for the position of the screws when attached.
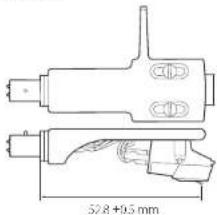
text_image
32.8+0.5 mm4 Connect the shell lead terminals to the cartridge.
● The signals and colors of the shell leads are shown below.
| Signal Color | |
| Left channel + White | |
| Left channel - Blue | |
| Right channel + Red | |
| Right channel - Green |
5 Balance the tonearm and adjust the tracking force.
Follow the procedures in "Balancing the tonearm and adjusting the tracking force" or page 15.
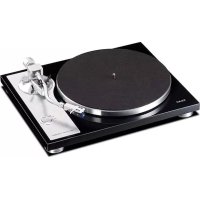
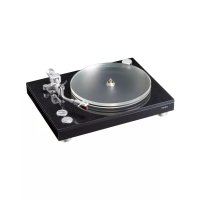
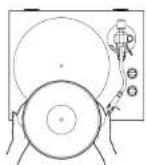
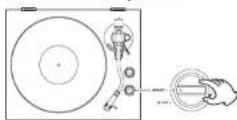
Names and functions of parts
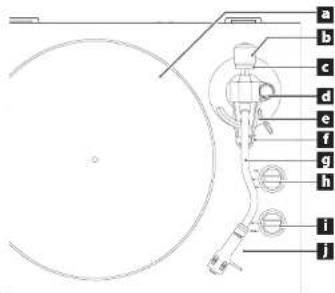
text_image
a b c d e f g h i ja Platter
Place records centered on the platter.
b Counterweight
Tracking force adjustment ring
d Anti-skating dial
e Tonearm lifter lever
Use to raise and lower the tonearm.
We recommend using the tone-arm lifter lever to avoid damaging records and stylures, because it is safer and more certain than using a finger to do so.
Tonearm holder
This is a rest for the toneam. Move the clasp to the right to release the toneam before playing a record.
g Tonearm
h Rotation speed setting knob
Select the rotation speed indicated on the record to be played.
i START/STOP rotation knob
j Headshell
This is a universal type that allows the cartridge to be changed easily.
Connections
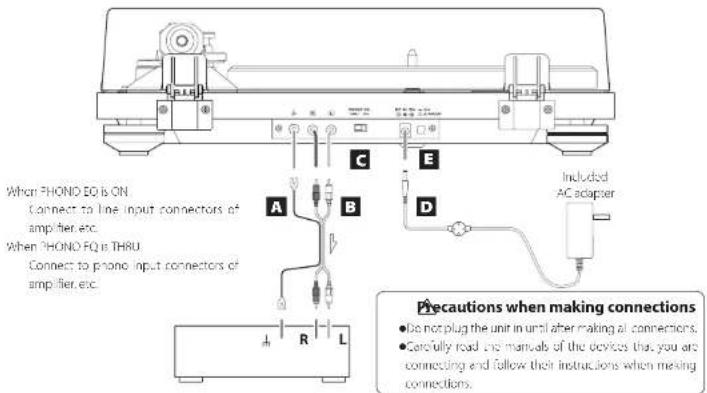
text_image
When PHONO EQ is ON Connect to line input connectors of amplifier, etc. When PHONO EQ is THRU Connect to phone input connectors of amplifier, etc. A B C D E Included AC adapter Precautions when making connections • Be not plug the unit in until after making all connections. • Carefully read the manuals of the devices that you are connecting and follow their instructions when mixing connections.A Grounding terminal ( )
Use the grounding wire of the included RCA audio cable to connect this connector to the grounding terminal of the amplifier, for example.
- This is NOT an electrical safety ground.
If noise from speakers is conspicuous
If connecting the grounding wire of the audio cable to the grounding terminal of this unit does not reduce noise, disconnect the grounding wire and check the sound again. Use the method (connected) connected that has the least noise.
B Analog audio output connectors (L/R)
These output analog audio signals.
The PHONO EQ switch setting changes the type of output signal.
Use the included audio cable (or commercially available ones) to connect other equipment to the output connectors at this unit.
C PHONO EQ (audio output setting) switch
ON
Signals that have been amplified by the built-in equalizer emp arc output. From the analog audio out our connectors (A).
THRU
The MC or MW cartridge signal is output directly through the analog audio output connectors II /R. Connect to a device with phone inputs, such as a micro equalization preamplifier or an amplifier with phone input connectors.
- When shipped new from the factory, this is set to ON.
CAUTION
When set to ON, if connected to the PHONO inputs of an amplifier, for example, the output from speakers and headphones will be very loud, which could damage equipment or harm hearing.
D DC input connector
After completing all other connections, connect the included AC adapter to this connector.
Confirm that the power plug of the AC adapter is plugged into a power outlet.
- Do not use any AC adapter other than the one included.
●The included AC adapter has plans that can be
changed. Attach the plug that suits the region where it is being used.
sure to connect the power cord to an AC outlet that supplies the correct voltage. Connection to an outlet that supplies incorrect voltage could cause fire or electric shock.
Hold the power plug when plugging it into an outlet or unplugging it. Never pull or yank on the power cord.
Unplug the power cord from the outlet when you are not planning to use the unit for an extended period of time.
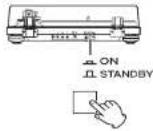
E STANDBY/ON button
Press the STANDSYY/ON button to turn the unit on or put it in standby.
Basic operation
Playing records
1 Press the STANDBY/ON button on the back of the unit to turn it on.
2 Open the dust cover slowly.
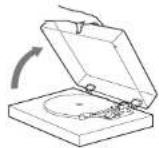
careful not to pinch your hand, for example, when opening and closing the dust cover.
3 Place a record on the platter.
When playing a 45 RPM large-hole single record, use the included adapter.
4 Select the rotation speed indicated on the record.
be rotation speed can be set to 33.1/3,45 o/78 RPM
5 Turn the START/STOP rotation knob to START to start the platter.
- When the START/STOP rotation knob is set to START, the pleter will start rotating and the blue START lamp will light
6 Slide the tonearm clasp to the right to remove it.
7 Raise the tonearm lifter lever.
- You can also move the tonearm to above the record without raising the tonearm litter lever and then slowly lower the tonearm to start playback.
8 Move the tonearm to the track where you want to start playback.
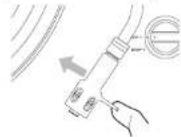
9 Use the tonearm lifter lever to lower the tonearm.
The forearm lowers slowly until the stylus touches the record and playback begins.
- Close the dust cover during playback. Doing so reduces the occurrence of noise by preventing skipping caused by unintended contact and blocking external sound pressure.
do not place anything on the dust cover.
ATTENTION
- During playback, do not touch the tonearm or the record. Doing so could damage the stylus tip and cause scratches on the record.
- Do not forcibly stop platter rotation during playback. Since this product is not a turntable designed for IJs (direct drive), doing something like this could cause malfunction.
During record playback, feedback could occur if the volume is too loud. If this happens, lower the volume of the amplifier.
When playback finishes
1 Raise the tonearm lifter lever to separate the stylus from the record, and return the tonearm to its original position.
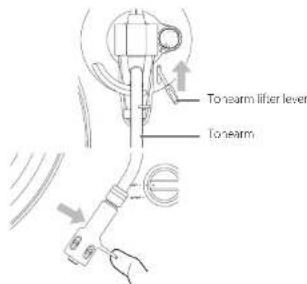
text_image
Tonearm lifter lever Tonearm2 Turn the START/STOP rotation knob to STOP to stop the platter.
- The blue 5W11 lamp will become unit and the platter will stop.
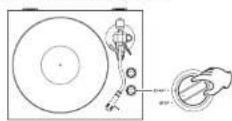
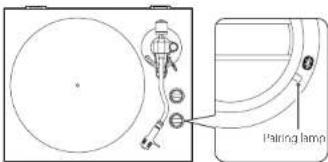
Listening with Bluetooth® speakers
This unit has a Bluetooth transmitter that can send sound to Bluetooth speakers wirelessly.
1 Press the STANDBY/ON button on the back of the unit to turn it on.

2 Pair and connect the Bluetooth speakers.
PAIRING
PAIRING button
text_image
Parring lampPairing Bluetooth speakers
Pairing this unit with another Bluetooth device is necessary the first time you connect with that Bluetooth device.
Press the PAIRING button on this unit to activate pairing mode. If another Bluetooth device has already been paired with this unit, connection mode will be activated. Press the PAIRING button again for at least two seconds to activate pairing mode.
Put the Bluetooth speaker into pairing mode.
When this unit and the Bluetooth speaker are connected, the pairing lamp will stay lit without allinking.
■Refer to the operation manual of the Bluetooth speaker for information about how to use it.
- Pairing might take some time depending on the connected device.
- This unit will concert to the closest Bluetooth speaker. It is a Bluetooth speaker, it found for five minutes, Bluetooth standby mode will begin and the pairing lamp will become until.
Pairing light meaning
| State Meaning | |
| Lit Connected | |
| Blinking slowly Connection mode | |
| Blinking rigidly Pairing mode | |
| Unit Standby mode | |
Connecting already paired Bluetooth speakers
Press the PARING button on this unit to activate connection mode, enabling connection with Bluetooth speakers that have already been positive.
If no Bluetooth speakers have already been paired, this will activate pairing mode.
When this unit and the Bluetooth speaker are connected, the pairing amp will stay lit without blinking.
- When connecting to a Bluetooth speaker, move other Bluetooth speakers and receiving devices at least 10 meters (32 fL) away from this unit or turn from off.
3 Play a record.
- Bluetooth connection is also possible while a record is paying.
- Adjust the Bluetooth speaker volume if necessary.
●This unit cannot be used to adjust the volume
- To end a connection, press the PAIRING button on this unit for at least six seconds to enter Bluetooth standby mode or turn this unit off.
- Pressing the PAIRING button for 10 or more seconds will cause the pairing lamp to blink and clear all existing pairings with other devices.
Troubleshooting
you experience a problem with this unit, please check the following items before requesting service. Something other than this unit could also be the cause of the problem. Please also check that the connected devices are also being used properly. It still does not operate correctly, contact the retailer where you purchased the unit.
No power.
→ Confirm that the AC adapter is plugged into an output. Then press the STANDBYON button to turn the unit, on (page 18).
There is no sound.
When connecting this unit's analog audio output connectors to the audio input connectors of an amplifier or other equipment, set the PHONO EQ (audio output setting) switch to ON (page 18).
Playback is not possible; there is noise.
→Remove the protective cap.
→ Fingerprints and dust on a record can cause noise and the sound to skip. Use a commercially available record cleaner to clean records (page 14).
→Clean the stylus (page 17).
If the stylus is worn-out, replace it (page 17). The lifespan of a stylus depends on the use conditions, but it is usually about 300 hours.
→ Place the unit as far away as possible from TVs, microwave ovens and other devices that emit electromagnet c waves.
Noise occurs when a record is playing.
→Noise could occur if the tracking force is higher than camdcge's specified value. Headjust the tracking force so that it is the specified value (page 15).
The pitch is wrong.
→Select the rotation speed indicated on the record (page 19).
The sound is skipping.
→ vibrations will cause skipping. Place this unit in a stable location.
→ Clean the record.
→Do not use scratched records.
Balance the tonearm and readjust the tracking force (page 15). The stylus and sound might skip if the tracking force is lower than the cartridge's specified value.
Connection is not possible with the Bluetooth speaker I want to connect.
→ turn both this unit and the Bluetooth device off once. Turn them both on and try passing again.
→ Turn of the power of other Bluetooth speakers within 10 meters (33 ft). The closest Bluetooth speaker will be paired.
Connection with the Bluetooth speaker succeeded, but I cannot hear any playback sound.
→ Check the volume of the Bluetooth speaker.
→ Press the PMIRING button on this unit for at least six seconds to disconnect the Bluetooth speaker once. Then, try pairing age 1.
→Turn this unit off and then on again. Then, press the PARING button to try pairing again.
Connection with the smartphone is not possible.
This unit functions as a Bluetooth transmitter, and it can send sound to Bluetooth speakers.
Since it does not function as a Bluetooth receiver, it cannot be connected to a smartphone.
Specifications
Platter
Drive system.... Belt drive
Motor DC motor
Rotation speed.... 33 1/3 rpm, 45 rpm, 76 rpm
Rotation speed variation 12%
Wow and flutter 0.2% or less
5% ratio 57 dB or higher (A-weighted, 20 kHz L-1)
Platter....Aluminum c-e-cast
30cm (12" diameter
Tonearm
tonearm type....Static-balanced S-shaped tonearm
Effective tonearm length 273 mm
Tracking force variation range 0-5 g
Acceptable cartridge weight 4.0-8.0 g
Cartridge
Type...VII (equivent to MM)
Output voltage. 3.5 mV (1 kHz, 5 cm/s)
tracking force 20_0.5 g
Cartridge weight 5.7 ±0.5 g
Included headshell weight
10 g (including screws, nuts and wires)
●The lifespan of a stylus depends on the use conditions but is usually about 300 hours.
●An Audio-Technica AT95F VMI Type cartridge is installed in this unit.
Note: VM type cartridges have the same characteristics as MV type cartridges.
●Replacement stylus model: Audio Technic A7N952
Output voltage
PHONE EQ THRU....3.5 mV [1 kHz, 5 cm/s]
PHONE EQ ON.... 155 mW ( \~6 dBV)
Output connectors.... RCA
Bluetooth function
Bluetooth version 5.2 (DUAL MOD)
Supported profile....AZDP
Codes .... SBC
Qualcomm® apX™,
Maximum number of stored pairings....8 devices
General
AC adapter power
Input..... AC 100 V AC 240 V, 50/60 Hz
Output DC 12V,500 mA
Power consumption
Stancoy....C5W or less
On (5 Al).... 1.5 W or less
Weight....4.5 kg (10 7/8 lb)
Operating temperature range
Dimensions: W × H × D (including protrusions)
When the dust cover is closed
470×117×356 mm (16.5/8"×15/8"×141/8")
When the dust cover is open
420×381×422 mm (16.5/8"×15"×15.7/8")
When the dust cover is removed
420×102×356mm(16.5/8"×4 1/8"×14 1/8")
●Performance data is specified at 20°C
Included items
Felt mat x
45 RPM acupcr ×
Counterweight × 1
Headshell ×
Audio-technica VMI type (dual magnet) stereo cartridge
(A195) are installed
Platter x 1
Dust cover × 1
Dust cover hinges × 2
RCA audio cable with grounding terminal x 1
AC adapter (GPF053A-V) (COSO) ×
Owner's manual (this document, including warranty) ×
- For information about the warranty, users living in the USA and Canada should see page 82 and the back cover (warranty document). Users living in Europe and other regions should see page 83.
- specifications and appearance are subject to change without notice.
●Weight and dimensions are approximate.
- Illustrations in this owner's manual might differ slightly from production models.
INSTRUCTIONS DE SÉCURITÉ IMPORTANTES

CAUTION
RISK OF ELECTRIC SHOCK DO NOT OPEN

ATTENTION : POURI RÉ D'OUIR LE RSOLÉ D'ÉLECTROCUATION, NE RETIREZ PAS LE CAPOT (OU L'ARRIERE), AUCUNE PIÈCE INTERNE N'EST REPARABLE PAR L'UTILISATEUR. CONFIEZ TOUTE REPARATION À UN SERVICE APRES VENTE QUALIFIÉ.

https://ecsupport.eqipe.com/
TEAC Corporation
1-4/ Ochia,ama-shi, Tokyo, 206-8530, Japon
The Bluetooth* word mark and logos are registered trademarks owned by Bluetooth SIG, nc and any use of such marks by I. AC CORPORATION is under license.
Qualcomm aptX is a product of Qualcomm Technologies, Inc. and/or its subsidiaries.
Qualcomm is a trademark of Qualcomm Incorporated, registered in the United States and other countries. aptX is a trademark of Qualcomm Technologies International, Ltd., registered in the United States and other countries.
5 Installez le contrepoids.
text_image
Diagram showing a device with a magnified view of its internal structure, possibly for technical or medical reference.text_image
Technical diagram showing a mechanical device with a rotating component and directional arrow indicating rotation or movement.text_image
52.8 ± 0.5 mmDimensions: L × + × P) (saillies incluses)
Parte responsible: 11 Trading Company, J.C.
Dirección: 3502 Woodview Trace #200 Indianapolis, IN 4S268 USA. URL: https://11tradingcompany.com/contact-us/
https://teacsupport.sqipa.com/
TEAC Corporation
1-17 Ochia,ama-shi, Tokyo,206-8530,Japan
The Bluetooth* word mark and logos are registered trademarks owned by Bluetooth SIG, nc. and any use of such marks by I. AC CORPORATION is under license.
Qualcomm aptX is a product of Qualcomm Technologies, Inc. and/or its subsidiaries.
Qualcomm is a trademark of Qualcomm incorporated, registered in the United States and other countries. aptX is a trademark of Qualcomm Technologies International, Ltd, registered in the United States and other countries.
natural_image
Diagram showing a device connected to a helmet with a magnified view of its head (no text or symbols present)natural_image
Technical diagram showing a mechanical device with a dial indicator and a close-up view of its internal components (no text or labels)natural_image
Technical line drawing of a mechanical component with no visible text or symbols528-C4 mm
The Bluetooth* word mark and logos are registered trademarks owned by Bluetooth SIG, nc. and any use of such marks by I. AC CORPORATION is under license.
Qualcomm aptX is a product of Qualcomm Technologies, Inc. and/or its subsidiaries.
Qualcomm is a trademark of Qualcomm Incorporated, registered in the United States and other countries. aptX is a trademark of Qualcomm Technologies International, Ltd., registered in the United States and other countries.
text_image
Technical diagram showing a mechanical component with an arrow pointing to a circular component, alongside a close-up of a circular dial with pointer and scale.natural_image
Technical diagram showing a mechanical device with a rotating knob and a close-up view of its internal components (no text or symbols)text_image
Technical diagram of a mechanical device with labeled ports and connection pointstext_image
Lithebel Tonarmhttps://caesupport.acipa.com/
TEAC Corporation
1-47 Ochie, Tame shi, Tokyo, 206-8530. Japan
The Bluetooth* word mark and logos are registered trademarks owned by bluetooth SIG, nc and any use of such marks by TEAC CORPORATION is under license.
Qualcomm aptX is a product of Qualcomm Technologies, Inc. and/or its subsidiaries.
Qualcomm is a trademark of Qualcomm Incorporated, registered in the United States and other countries. aptX is a trademark of Qualcomm Technologies International, Ltd., registered in the United States and other countries.
natural_image
Technical diagram showing a mechanical device with a close-up view of its internal components (no text or symbols present)text_image
Spia PairingWow & flutter 0.2% o meno
Rapporto SN. 6/ dl c superiore (pesato A, 20 kHz I-1)
Dimensioni (L × A × P) (incluse le part sporgent)
https://cecsupport.eqipe.com/
TEAC Corporation
1-17 Ochiai, Tama-shi, Tokyo, 206-8530, Japan
The Bluetooth* word mark and logos are registered trademarks owned by Bluetooth SIG, nc and any use of such marks by I. AC CORPORATION is under license.
Qualcomm aptX is a product of Qualcomm Technologies, Inc. and/or its subsidiaries.
Qualcomm is a trademark of Qualcomm Incorporated, registered in the United States and other countries. aptX is a trademark of Qualcomm Technologies International, Ltd., registered in the United States and other countries.
Netacapter (C) = D3A-V12050, × 1
text_image
Technical diagram showing a mechanical device with a rotating dial and an arrow indicating rotation direction.The Bluetooth* word mark and logos are registered trademarks owned by Bluetooth SIG, nc. and any use of such marks by I. AC CORPORATION is under license.
Qualcomm aptX is a product of Qualcomm Technologies, Inc. and/or its subsidiaries.
Qualcomm is a trademark of Qualcomm Incorporated, registered in the United States and other countries. aptX is a trademark of Qualcomm Technologies International, Ltd., registered in the United States and other countries.
For installation Audio-Technica VR-screepatron AT95E
(dubel magnet)
Skytallink
Dormskydd x
text_image
Round Stoping Viscosensitive Gummibatictext_image
Technical diagram showing a mechanical component with an arrow pointing to a circular component, alongside a close-up view of the internal structure.text_image
Technical diagram showing a mechanical device with a rotating component and an arrow indicating rotation direction.text_image
ParingdampaPara Bluetooth-högtalare
Warranty provisions (United States and Canada only)
Length of Warranty
The parts and labor warranty will be effective for one (1) year from the date of the original purchase for products not used for commercial purposes. For products used commercially, the warranty is ninety (90) days for magnetic heads and optic pickups, one (1) year for all other parts and ninety (90) days for labor.
Who Is Covered Under This Warranty
This warranty is valid only in the United States or Canada, dependent upon the country in which original purchase was made, and enforceable only by the origin purchaser within the country in which the purchase was made. This warranty is not valid if the product was purchased through an unauthorized dealer.
What Is Not Covered Under This Warranty
●Damage to or depreciation of the external cabinet.
- Damage resulting from accident, misuse, abuse, or neglect
- Damage resulting from failure to follow instructions contained in the products owners' manual or otherwise provided with the product.
●Damage occurring during shipment of the product (Claims must be present to the carrier).
●Damage resulting from the repair or attempted repair by anyone other than TEAC or an authorized TEAC service station.
- Damage resulting from modification or attempted modification of product not authorized by TEAC
●Damage resulting from causes other than product defects, including lack of technical skills, competence, or experience of the user.
- Damage to any unit that has been altered or which the serial number has been defaced, modified or removed.
What TEAC Will Pay For
TEAC will pay all labor and material expenses for items covered by the warranty. Payment of shipping charges is covered in the next section.
How To Obtain Warranty Service
Your unit must be serviced by an authorized TAC service station within the country in which the product was purchased. If you are unable to locate an authorized service station in your area, please contact TAC at the applicable address shown at the end of this warranty statement. PLEASE DO NOT RETURN YOUR UNIT TO TEAC WITHOUT OUR PRIOR AUTHORIZATION. You must pay shipping charges if it is necessary to ship a product for service. However, if the necessary repairs are covered by warranty, we will pay the return shipping charges to any destination within the country in which the product was purchased. Whenever warranty service is required, you must present the original dated series receipt, or other proof indicating the purchase place and date, as proof of warranty coverage.
LIMITATION OF IMPLIED WARRANTIES
ALL IMPLIED WARRANTIES, INCLUDING WARRANTIES OF MERCHANTABILITY AND FITNESS FOR A PARTICULAR PURPOSE, ARL LIMITED IN DURATION TO THE LENG HO THIS WARRANTY.
EXCLUSION OF DAMAGES
TEACS LIABILITY FOR ANY DEFECTIVE PRODUCT IS LIMITED TO REPAIR OR PLACMLINI ON THE PRODUCTION ILACS OF ION TEAC SHALL NOT BE LIABLE FOR DAMAGE BASED UPON INCOME NILCE, LOSS OF USL OF THE PRODUCT, INTEGRATED OPERATION, COMMERCIAL JOSS OR LOST PROFITS, OR ANY OTHER DAMAGES, WHETHER INCIDENTAL, CONSEQUENTIAL, PUNTIVE OR OTHERWISE.
SOME STATES OR PROVINCES DO NOT ALLOW LIMITATIONS ON HOW LONG AN IMPLIED WARRANTY LASTS AND/OR DO NOT ALLOW THE EXCLUSION OR LIMITATION OF INCIDENTAL OR CONSULENTIAL DAMAGES, SO THE ABOVE LIMITATIONS AND EXCLUSIONS MAY NOT APPLY TO YOU.
THIS WARRANTY GIVES YOU SPECIFIC RIGHTS, AND MAY VARY FROM SOME OF THE RIGHTS PROVIDED BY LAW. THESE RIGHTS MAY VARY FROM STATE TO SALE OR PROVINCE TO PROVINCE.
This product is subject to the legal warranty regulations of the country of purchase. In case of a defect or a problem, please contact the dealer where you bought the product.
In countries/regions other than the USA, Canada, Europe and Japan
This warranty gives you specific legal rights, and you may also have other rights that vary by country, state or province. If you have a warranty claim or request, please contact the dealer where you bought the product.
ModelMode: TN-400BT-X

This product has a serial number located on the rear panel. Please write it here and retain this for your records.
Model name: TN-400BT-X Serial number
0223 MA 3586B