
Groowy - Car seat JANE - Free user manual and instructions
Find the device manual for free Groowy JANE in PDF.
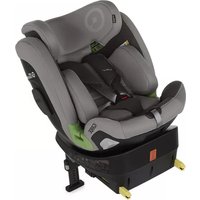
| Product type | Multifunctional car seat |
| Brand | JANE |
| Model | Groowy |
| Child height | 40 to 150 cm (rear-facing 40-105 cm, booster 100-150 cm) |
| Max child weight | 18 kg (Nest carrier 13 kg) |
| Safety standard | i-Size (ECE R129/03) |
| Use configuration | Rear-facing (40-105 cm), forward-facing (100-150 cm) with booster |
| Vehicle attachments | ISOFIX + anti-rotation foot in rear-facing, optional ISOFIX in booster, vehicle 3-point belt |
| Integrated restraint system | 5-point harness (car seat), 3-point harness (Nest carrier), vehicle belt (booster) |
| Adjustments | Headrest and shoulder belt height, backrest inclination 5 positions |
| Included accessories | Nest carrier (for 40-65 cm), reducer cushion (60-75 cm), ISOFIX guides, manual |
| Stroller compatibility | Pro-fix attachment on JANÉ strollers |
| Materials | Plastic, removable and washable cover, shock-absorbing material |
| Maintenance | Cover washable at 30°C, plastic parts clean with warm soapy water |
| Warranty | According to law 23/2003, subject to registration on janeworld.com |
| Spare parts and repairability | Use only JANÉ approved accessories, do not modify. In case of accident, replace or send to manufacturer |
Frequently Asked Questions - Groowy JANE
User questions about Groowy JANE
0 question about this device. Answer the ones you know or ask your own.
Ask a new question about this device
Download the instructions for your Car seat in PDF format for free! Find your manual Groowy - JANE and take your electronic device back in hand. On this page are published all the documents necessary for the use of your device. Groowy by JANE.
USER MANUAL Groowy JANE
natural_image
Red and black baby car seat with safety tag (no visible text or symbols)Keep the manual and store it in the compartment inside the seat. Consult the manual if in doubt.
FR
natural_image
Illustration of a car comfort seat with red arrows indicating upward and downward motion, accompanied by an open book (no text or symbols)ESPAÑOL 18
ENGLISH 34
FRANÇAIS 50
DEUTSCH 66
ITALIANO 82
PORTUGUÊS 98
GROOWY
is25
FIGURES
natural_image
3D rendering of a car seat with mesh grille and red buttons (no text or symbols)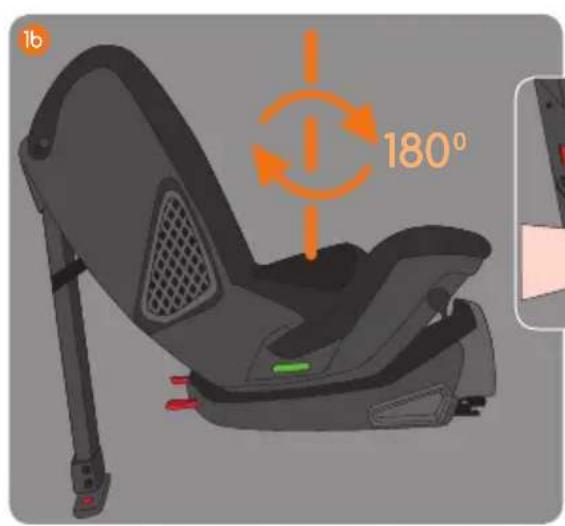

GROOWY
isec
natural_image
3D illustration of a car seat assembly with orange arrows indicating motion or force (no text or symbols)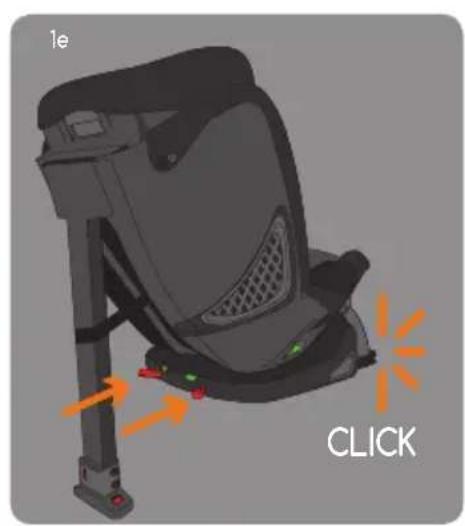
natural_image
3D illustration of a car seat with orange arrows indicating motion, labeled 'CLICK' (no text or symbols on the diagram itself)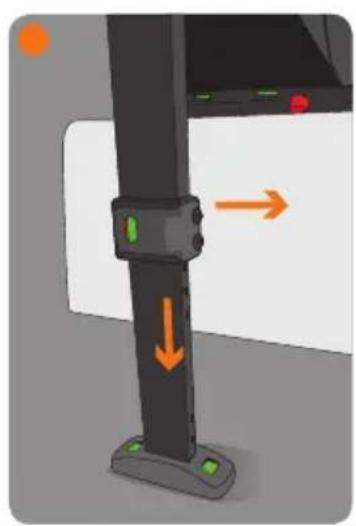
natural_image
Close-up of a black mechanical buckle with orange arrows indicating downward motion, no text or symbols present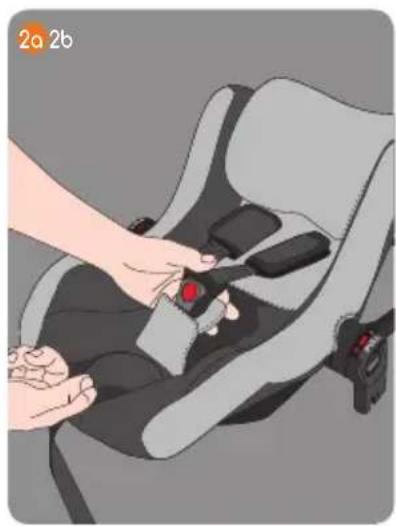
natural_image
Illustration of a hand adjusting a seatbelt inside a car seat (no text or symbols visible)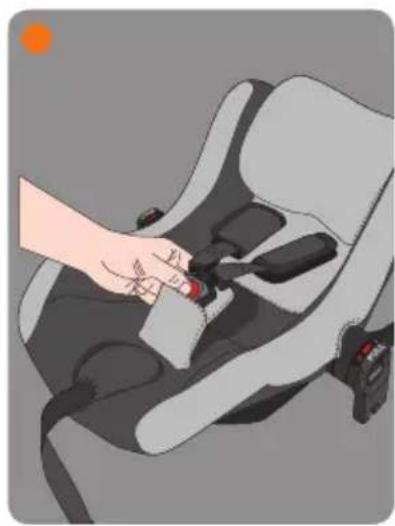
natural_image
Illustration of a hand adjusting a car seatbelt switch (no text or symbols visible)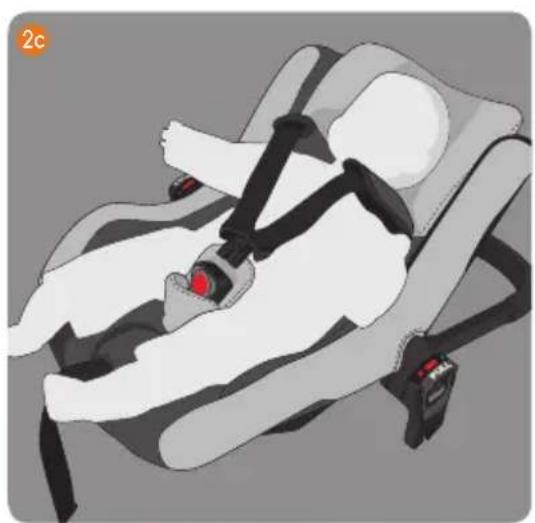
natural_image
Illustration of a person in a car seatbelt using a black seatbelt device (no text or symbols visible)GROOWY isze

natural_image
Illustration of a car seatbelt with a hand adjusting the seatbelt (no text or symbols present)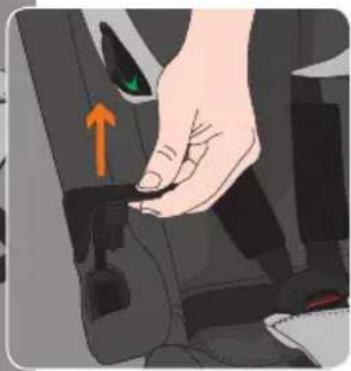
natural_image
Hand pressing a button on a vehicle's side panel, showing a green valve and orange arrow (no text or symbols)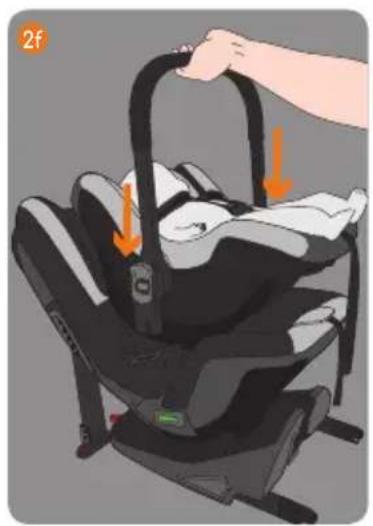
natural_image
Illustration of a baby car seat with hand and orange arrows indicating movement or change (no text or symbols)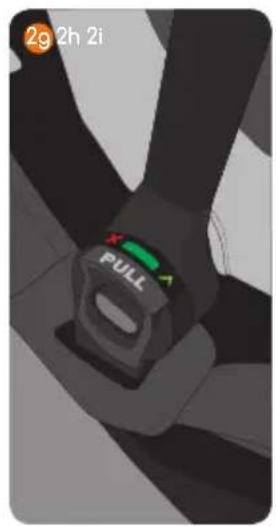
natural_image
Close-up of a car seatbelt with a pull button and orange indicator lights (no readable text or symbols)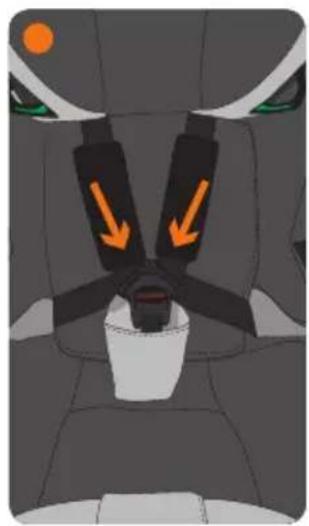
natural_image
Interior view of a car seatbelt with orange arrows indicating pressure points (no text or symbols)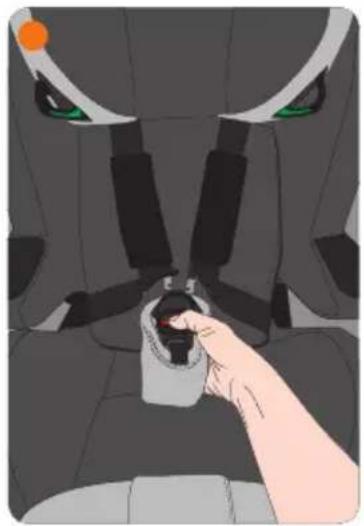
natural_image
Illustration of a person inserting a small object into a car seat (no text or symbols visible)GROOWY isze

natural_image
Illustration of a car seat with black and white panels, showing seatbelt and seatbelt (no text or symbols)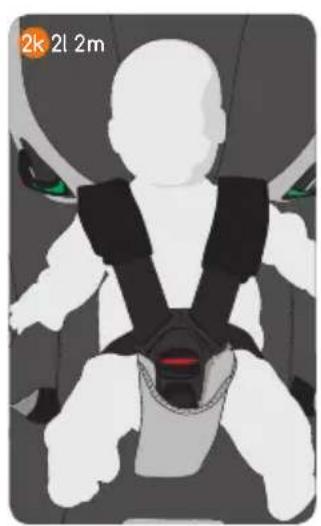
natural_image
Illustration of a humanoid robot wearing a black and white harness with green eyes (no text or symbols)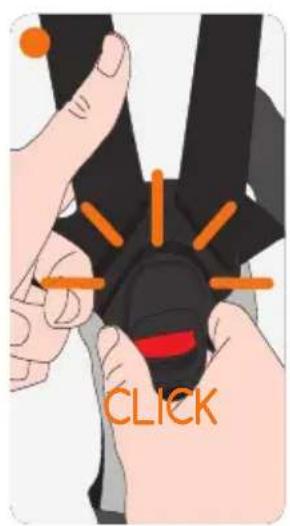
natural_image
Illustration of a person using a medical device to adjust or install a seatbelt (no text or symbols visible)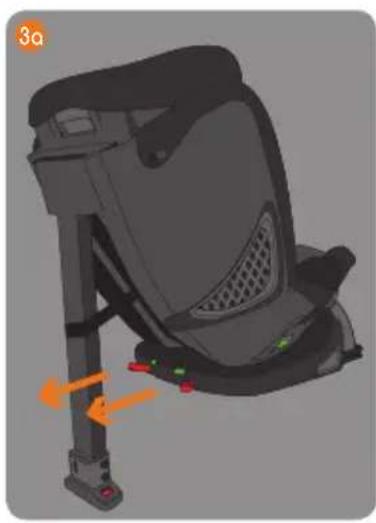
natural_image
3D rendering of a car seat assembly with orange arrows indicating motion or movement (no text or symbols)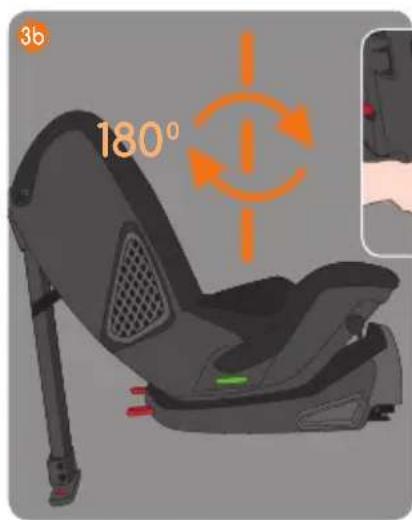
natural_image
Hand holding a black mechanical component with a red indicator light (no text or symbols visible)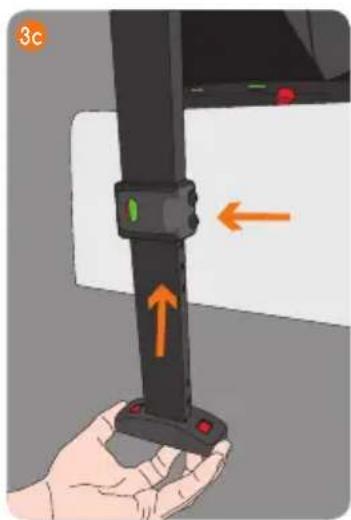
natural_image
Hand holding a black belt buckle with orange arrows indicating movement or force (no text or symbols)GROOWY
isze
natural_image
Illustration of a person using a cable to lift a seatbelt, showing orange motion arrows (no text or symbols)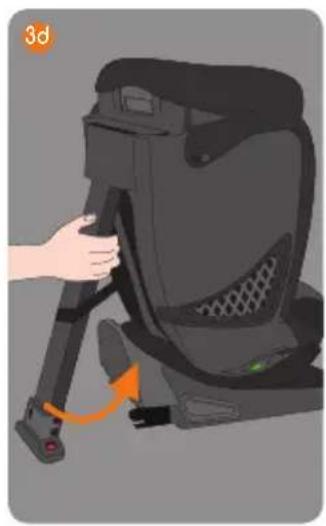
natural_image
Illustration of a hand adjusting a 3d car seat with an orange arrow indicating motion (no text or symbols)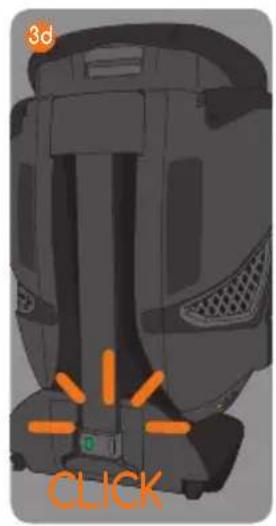
natural_image
3D rendered image of a mechanical device with orange arrows and 'CLICK' text overlay (no readable document text or symbols)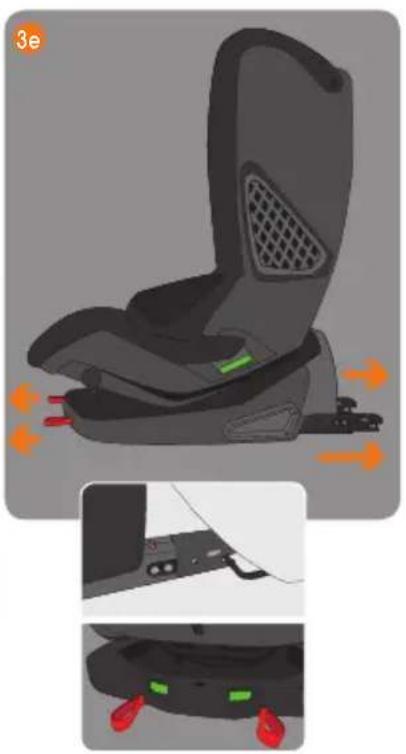
natural_image
Illustration of a car seat with highlighted seating areas and directional arrows indicating motion (no text or symbols)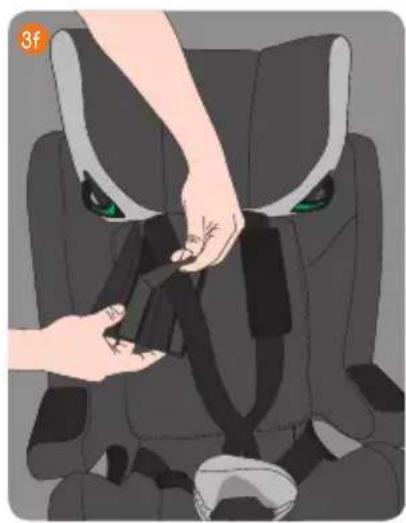
natural_image
Illustration of a person adjusting a seatbelt with green eyes (no text or symbols)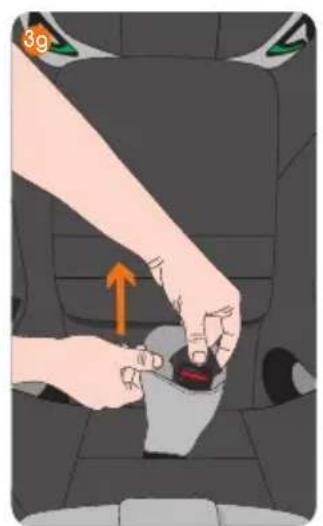
natural_image
Illustration of a car seatbelt buckle being adjusted, showing hand placement and orange arrow (no text or symbols)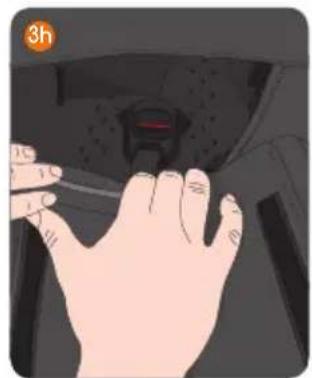
natural_image
Illustration of a hand pressing down the dashboard of a car (no text or symbols visible)GROOWY
isze
natural_image
Illustration of a person's seatbelt being adjusted for a keyway, showing hand placement and angle (no text or symbols)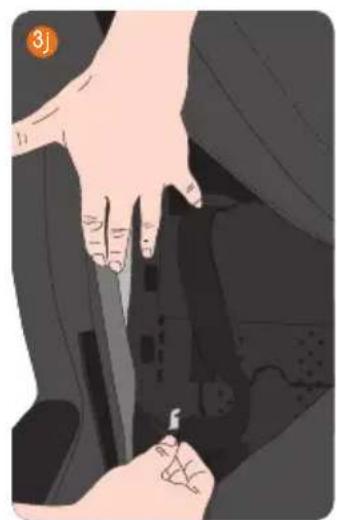
natural_image
Illustration of hands inserting a small object into a device (no text or symbols visible)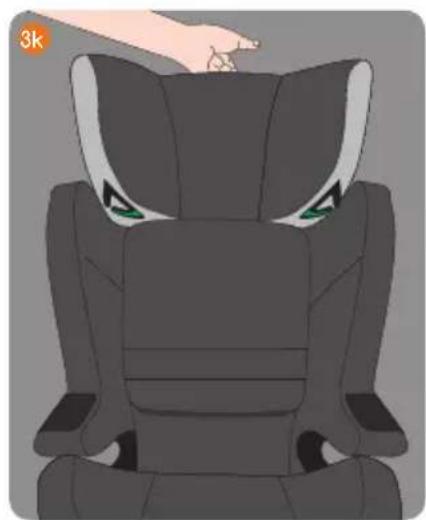
natural_image
Illustration of a car seat with green eyes and black stripes, no text or symbols present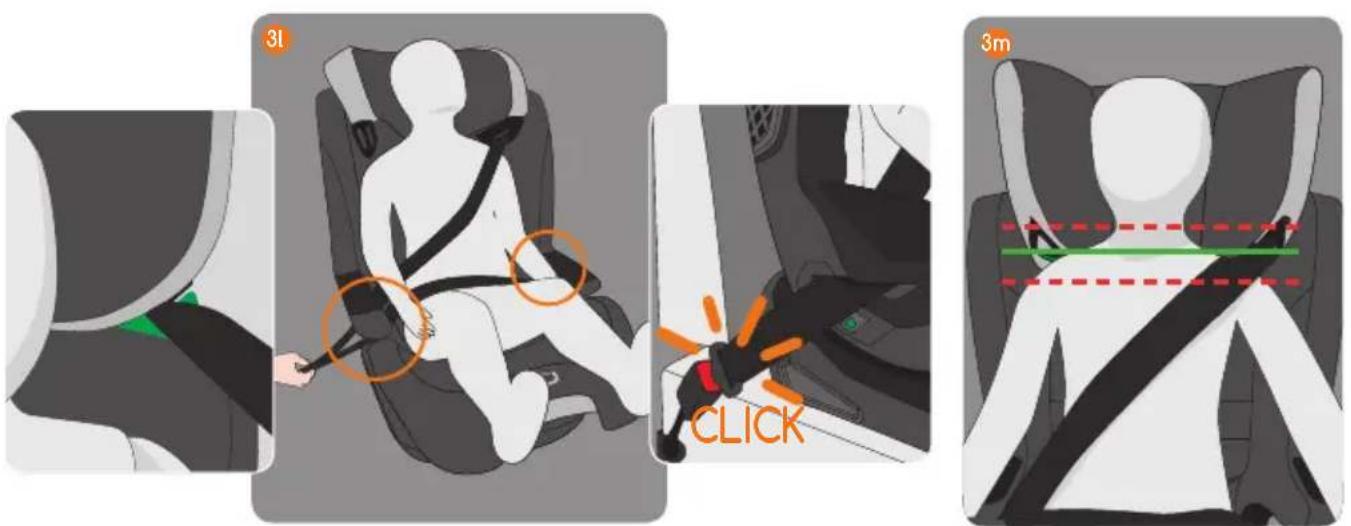
GROOWY
isze

natural_image
Illustration of a hand adjusting a car seatbelt with orange rotation arrows (no text or symbols)GROOWY
isize

natural_image
Black baby car seat with adjustable arm and seatbelt (no visible text or symbols)Contramarcha.
natural_image
Black baby car seat with attached seatbelt and logo (no visible text or symbols)Contramarcha.
natural_image
Interior view of a car comfort seat with gray and red seats (no text or symbols visible)Cara a la marcha.
de 100 a 150 cm

B. LISTADO DE PIEZAS PORTABEBÉS NEST

natural_image
Simple diagram with a green checkmark and orange shape, no text or symbols present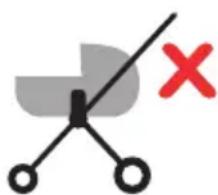
natural_image
Simple diagram with a diagonal line crossing a shaded region and a red 'X' mark (no text or symbols)


GROOWY from JANÉ is a Safety Seat designed to protect the child in the car from birth up to 150 cm in height. The seat has passed the rigorous safety tests of European directive ECE R129/03 also known as "i-size".
The GROOWY safety seat has been approved as i-size up to 130 cm in height. Therefore, up to this height it is completely compatible with the seats in the car that the vehicle manufacturer defines as "i-size". Consult your vehicle manual.
For vehicles that do not have i-size seats, or cars that do have them but the child is taller than 130 cm, it is very likely that the GROOWY safety seat can be installed on some of the seats. You will find a compatibility list for the GROOWY seat, in the "car fitting" section of the following website: www.janeworld.com A high percentage of safety seat users do not install them correctly. Understanding the instruction manuals and following them correctly, is as important for safety as the actual seat. Therefore:
- Read these instructions carefully before using the GROOWY safety seat for the first time.
•Make sure that everyone who is going to use the seat at any time is also familiar with the correct procedure for installation and use.
- Keep the instructions in the compartment inside the seat, and consult them if you have any questions. You can also find the instructions on our website: www.janeworld.com or you can check them from a Smartphone by scanning the QR code found on the base.
CONTENTS
A. CONFIGURATIONS FOR USE 37
B. PARTS LIST / NEST BABY CARRIER PARTS LIST 38
C. GENERAL INSTRUCTIONS 40
D. WARNINGS 41
E. FEATURES OF YOUR GROOWY SEAT 43
USE FOR CHILDREN FROM 40 TO 105 CM 44
F. SETTING THE GROOWY UP FOR REAR FACING INSTALLATION 44
G. INSTALLATION OF THE SAFETY SEAT IN THE CAR 44
H. FASTENING THE CHILD IN THE SEAT 44
I. ADJUSTING THE HEIGHT OF THE INTEGRAL SEAT BELTS 45
USE FOR CHILDREN FROM 100 TO 150 CM 46
J. TURNING THE SAFETY SEAT INTO A BOOSTER SEAT WITH BACKREST 46
K. CONCEALING THE INTEGRAL SEAT BELTS 46
L. INSTALLATION OF THE BOOSTER SEAT WITH BACKREST WITHOUT ISOFIX ANCHORS 46
M. INSTALLATION OF THE BOOSTER SEAT WITH BACKREST WITH ISOFIX ANCHORS 47
N. RECLINING THE SEAT 48
O. ATTACHING THE NEST BABY CARRIER TO YOUR JANE PUSHCHAIR 48
P. RECOMMENDATIONS 48
Q. MAINTENANCE 48
R. GUARANTEE INFORMATION 49


bar
| Category | Value | |---|---| | Category 1 | 100 | | Category 2 | 100 | | Category 3 | 100 | | Category 4 | 100 | | Category 5 | 100 | | Category 6 | 100 | | Category 7 | 100 | | Category 8 | 100 | | Category 9 | 100 | | Category 10 | 100 | | Category 11 | 100 | | Category 12 | 100 | | Category 13 | 100 | | Category 14 | 100 | | Category 15 | 100 | | Category 16 | 100 | | Category 17 | 100 | | Category 18 | 100 | | Category 19 | 100 | | Category 20 | 100 | | Category 21 | 100 | | Category 22 | 100 | | Category 23 | 100 | | Category 24 | 100 | | Category 25 | 100 | | Category 26 | 100 | | Category 27 | 100 | | Category 28 | 100 | | Category 29 | 100 | | Category 30 | 100 | | Category 31 | 100 | | Category 32 | 100 | | Category 33 | 100 | | Category 34 | 100 | | Category 35 | 100 | | Category 36 | 100 | | Category 37 | 100 | | Category 38 | 100 | | Category 39 | 100 | | Category 40 | 100 | | Category 41 | 100 | | Category 42 | 100 | | Category 43 | 100 | | Category 44 | 100 | | Category 45 | 100 | | Category 46 | 100 | | Category 47 | 100 | | Category 48 | 100 | | Category 49 | 100 | | Category 50 | 100 | | Category 51 | 100 | | Category 52 | 100 | | Category 53 | 100 | | Category 54 | 100 | | Category 55 | 100 | | Category 56 | 100 | | Category 57 | 100 | | Category 58 | 100 | | Category 59 | 100 | | Category 60 | 100 | | Category 61 | 100 | | Category 62 | 100 | | Category 63 | 100 | | Category 64 | 100 | | Category 65 | 100 | | Category 66 | 100 | | Category 67 | 100 | | Category 68 | 100 | | Category 69 | 100 | | Category 70 | 100 | | Category 71 | 100 | | Category 72 | 100 | | Category 73 | 100 | | Category 74 | 100 | | Category 75 | 100 | | Category 76 | 100 | | Category 77 | 100 | | Category 78 | 100 | | Category 79 | 100 | | Category 80 | 100 | | Category 81 | 100 | | Category 82 | 100 | | Category 83 | 100 | | Category 84 | 100 | | Category 85 | 100 | | Category 86 | 100 | | Category 87 | 100 | | Category 88 | 100 | | Category 89 | 100 | | Category 90 | 100 | | Category 91 | 100 | | Category 92 | 100 | | Category 93 | 100 | | Category 94 | 100 | | Category 95 | 100 | | Category 96 | 100 | | Category 97 | 100 | | Category 98 | 100 | | Category 99 |A. CONFIGURATIONS FOR USE
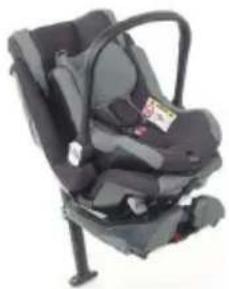
GROOWY with the NEST baby carrier module
natural_image
Black and gray baby car seat with adjustable armrest (no visible text or symbols)Rear facing.
from 40 to 65 cm and maximum weight of 13 kg.
Installation of the NEST baby carrier module on the GROOWY seat with ISOFIX anchors and anti-rotation leg.
The child is held secure with the 3-point seat belt fitted in the baby carrier module
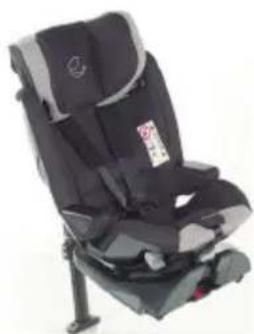
safety seat GROOWY
natural_image
Black and white baby car seat with attached seatbelt, no visible text or symbolsRear facing.
from 60 to 105 cm and a maximum weight of 18 kg.
Installation of the GROOWY seat with ISOFIX anchors and anti-rotation leg.
The child is held secure with a 5-point seat belt fitted in the safety seat.
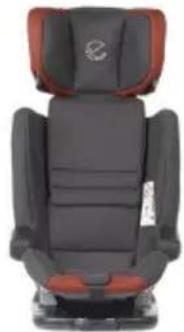
GROOWY booster seat with backrest
natural_image
Back view of a dark gray and red baby car seat with a logo on the front (no visible text or symbols)Forward facing.
from 100 to 150 cm
Simply with the vehicle seat belt and the seat can optionally be fastened with ISOFIX anchors.
The child is held secure with the vehicle 3-point seat belt.
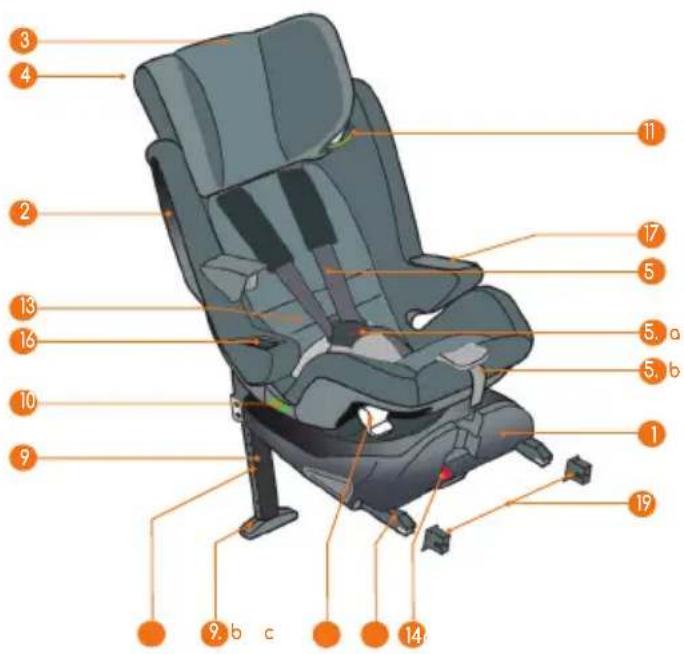
B. PARTS LIST
- Base
- Seat with backrest
- Headrest
- Headrest height adjustment button
- Integral 5-point seat belt
5a. Buckle
5b. Strap tightener
6.ISOFIX anchors
7.ISOFIX release straps
8.ISOFIX status indicator - Anti-rotation leg
9a. Position release button
9b. Leg in contact with floor indicator - Vehicle lap belt guide
- Shoulder belt guide
- Reclining adjustment lever.
- Instruction manual compartment.
- Anti-rotation leg lock release
- Cushion insert (60 to 75 cm)
- Pro-fix slot
- Pro-fix slot cover
- Instruction manual
- ISOFIX guides

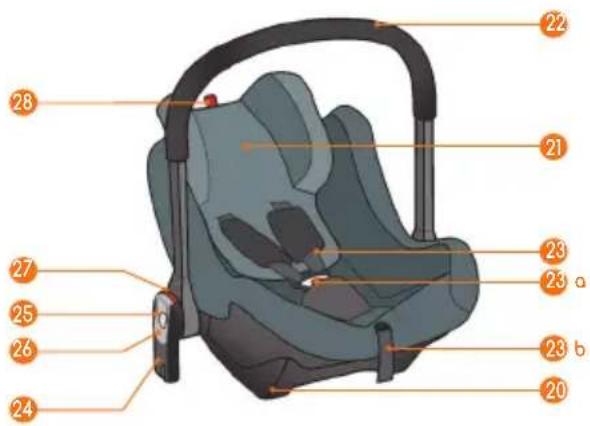
B. NEST BABY CARRIER PARTS LIST
- Frame
- Headrest
- Carry handle
- Integral 3-point seat belt
23a. Buckle
23b. Strap tightener - Pro-fix anchors.
- Handle position button
- Pro-fix release button
- Pro-fix status indicator
- Headrest height adjustment button

C. GENERAL INSTRUCTIONS
- It is only suitable for use in vehicles fitted with automatic 3-point seat belts and ISOFIX anchoring systems, approved under Standard ECE R16 and ECE R14 or other equivalent standards.
- Your GROOWY seat can be installed on the front seat or the back seat of the vehicle. However, we recommend that you install the safety seat on the back seat.
- Not all safety systems are exactly the same, therefore we advise you to test your GROOWY in the vehicle in which it is going to be installed.
- It is very important not to use second hand products, because JANÉ can only guarantee complete safety for articles used by the original buyer.
- JANÉ recommends you replace your GROOWY safety seat with a new one if it has been involved in an accident.
- Check that all the straps of the safety seat are in the correct position and properly fitted to your GROOWY.
• Make sure that none of the straps are twisted.
• Make sure the child understands that he must never tamper with the belts or the fastenings. - Do not install the safety seat on side seats or rear facing seats, this would be very dangerous.
- In some cars the seat belt buckle strap is quite far forward, so it may come into contact with the edge of the booster seat, which is not safe. In this case, try moving the vehicle seat
forward or install the safety seat on another seat in the vehicle.
• GROOWY has been designed for use in the car, it must not be used out of the vehicle
- This is an "i-size" Child Safety Seat. It is approved under UN Standard No. 129, for use on vehicle seats with "i-size compatibility", as stated by the vehicle manufacturer in the vehicle instruction manual.
- If in any doubt, consult the Restraint System manufacturer or dealer.
- IMPORTANT: DO NOT USE IN THE FORWARD FACING POSITION UNTIL THE CHILD REACHES THE HEIGHT OF 100 CM (See instructions).
- For more information on the use and installation of the GROOWY consult our web page www.janeworld.com
D. WARNINGS
- Never leave the baby unattended.
- Never leave the child in the safety device unsupervised.
- Sometimes children carry objects (for example toys) in their trouser or jacket pockets or their clothes can include rigid parts (for example buckles). Make sure that these objects are not held between the child and the seat belt, because in the event of an accident they could cause unnecessary injuries. These risks also apply to adults!
- Children are naturally very active sometimes. Therefore, you need to explain to children how important it is that they are always fastened in their seats. Then it will be clear that they must not play with the belt guides or unfasten the buckle.
- Your child's safety is guaranteed as far as possible only when the safety device is correctly installed and used.
- Not all safety systems are exactly the same, therefore we advise you to test your GROOWY in the vehicle in which it is going to be installed.
- This is an i-size approved child restraint system. To locate the seats in your vehicle compatible with i-size configuration, please consult the vehicle manual provided by the manufacturer.
- Any alteration or addition made to the device without explicit authorisation from JANÉ may seriously affect the safety of the restraint system.
- Read these instructions carefully before use and keep them for future reference. The child's safety may be affected if you do not follow these instructions. For the child to travel safely in the car you also need to check the relevant points of the vehicle instruction manual.
- This safety device must not be used without its cover, and the cover must not be replaced with one that is not the original, as it is an integral part of the system's safety features.

- Never add a mattress, pillow or extra padding to make the child more comfortable as this would alter the safety features of the system.
- The straps of the safety seat should be fitted snugly, with being twisted and should be protected from damage.
- Always remember to fasten the baby in securely with the safety harness correctly fastened. The straps should be fitted snugly, and not twisted, making sure that they go correctly over the child's pelvis (lap belt) and over the child's shoulders (body belt).
- Do not make any changes to the fastening system; this could put the child's safety at risk.
- The fastening system must not be damaged and must not get trapped by any mobile parts inside the vehicle or by the car doors.
-
Protect the uncovered parts of the restraint system from direct sunlight so that the baby's skin does not come into contact with very hot parts.
-
It is very important not to use second hand products, because JANÉ can only guarantee complete safety for articles used by the original buyer.
- These instructions must be followed carefully for the correct use of the restraint system; failure to do so may put the child's safety at risk.
- Make sure any companions also know how to get the child out in the event of an accident.
- Secure any luggage or other objects to reduce the risk of injuries in the event of an accident.
- The instruction manual should always be kept with the safety seat.
- The use of accessories or replacement parts is not permitted and will cancel the guarantee and any liability claims. Only accessories approved by JANE are excluded from this.
- Your safety seat should be replaced by a new one whenever it has been involved in an accident, or sent to the manufacturer with a report
of the accident for it to be checked.
- WARNING: Make sure you are aware of the road traffic legislation of the country in which you are driving. The use of your child restraint system may be restricted.
- For car seats used together with a chassis, this article does not replace a cot or a bed. If the child needs to sleep, he should be placed in a suitable carrycot, cot or bed.
E. FEATURES OF YOUR GROOWY SEAT
The GROOWY safety seat has been designed using the latest advances in safety and comfort:
- GROOWY should be installed in the rear facing position with ISO-FIX anchors until the child reaches 105 cm in height. It is fitted with a support leg as an anti-rotation system.
- The height of the shoulder straps is adjusted with having to remove the straps. This action is linked to the headrest that protects the child better in the event of a side impact while supporting the head.
- When changing the Safety Seat to a booster seat with backrest, it is not necessary to remove the integral seat belts, they can simply be concealed. This prevents any assembly errors that could affect safety.
- The inside of the seat is covered with shock absorbing material.
- It is fitted with a cushion insert for smaller children (from 60 to 75 cm).
• The seat has ventilation windows.
• The seat can be reclined.
USE FOR CHILDREN FROM 40 TO 105 CM
F. SETTING THE GROOWY UP FOR REAR FACING INSTALLATION
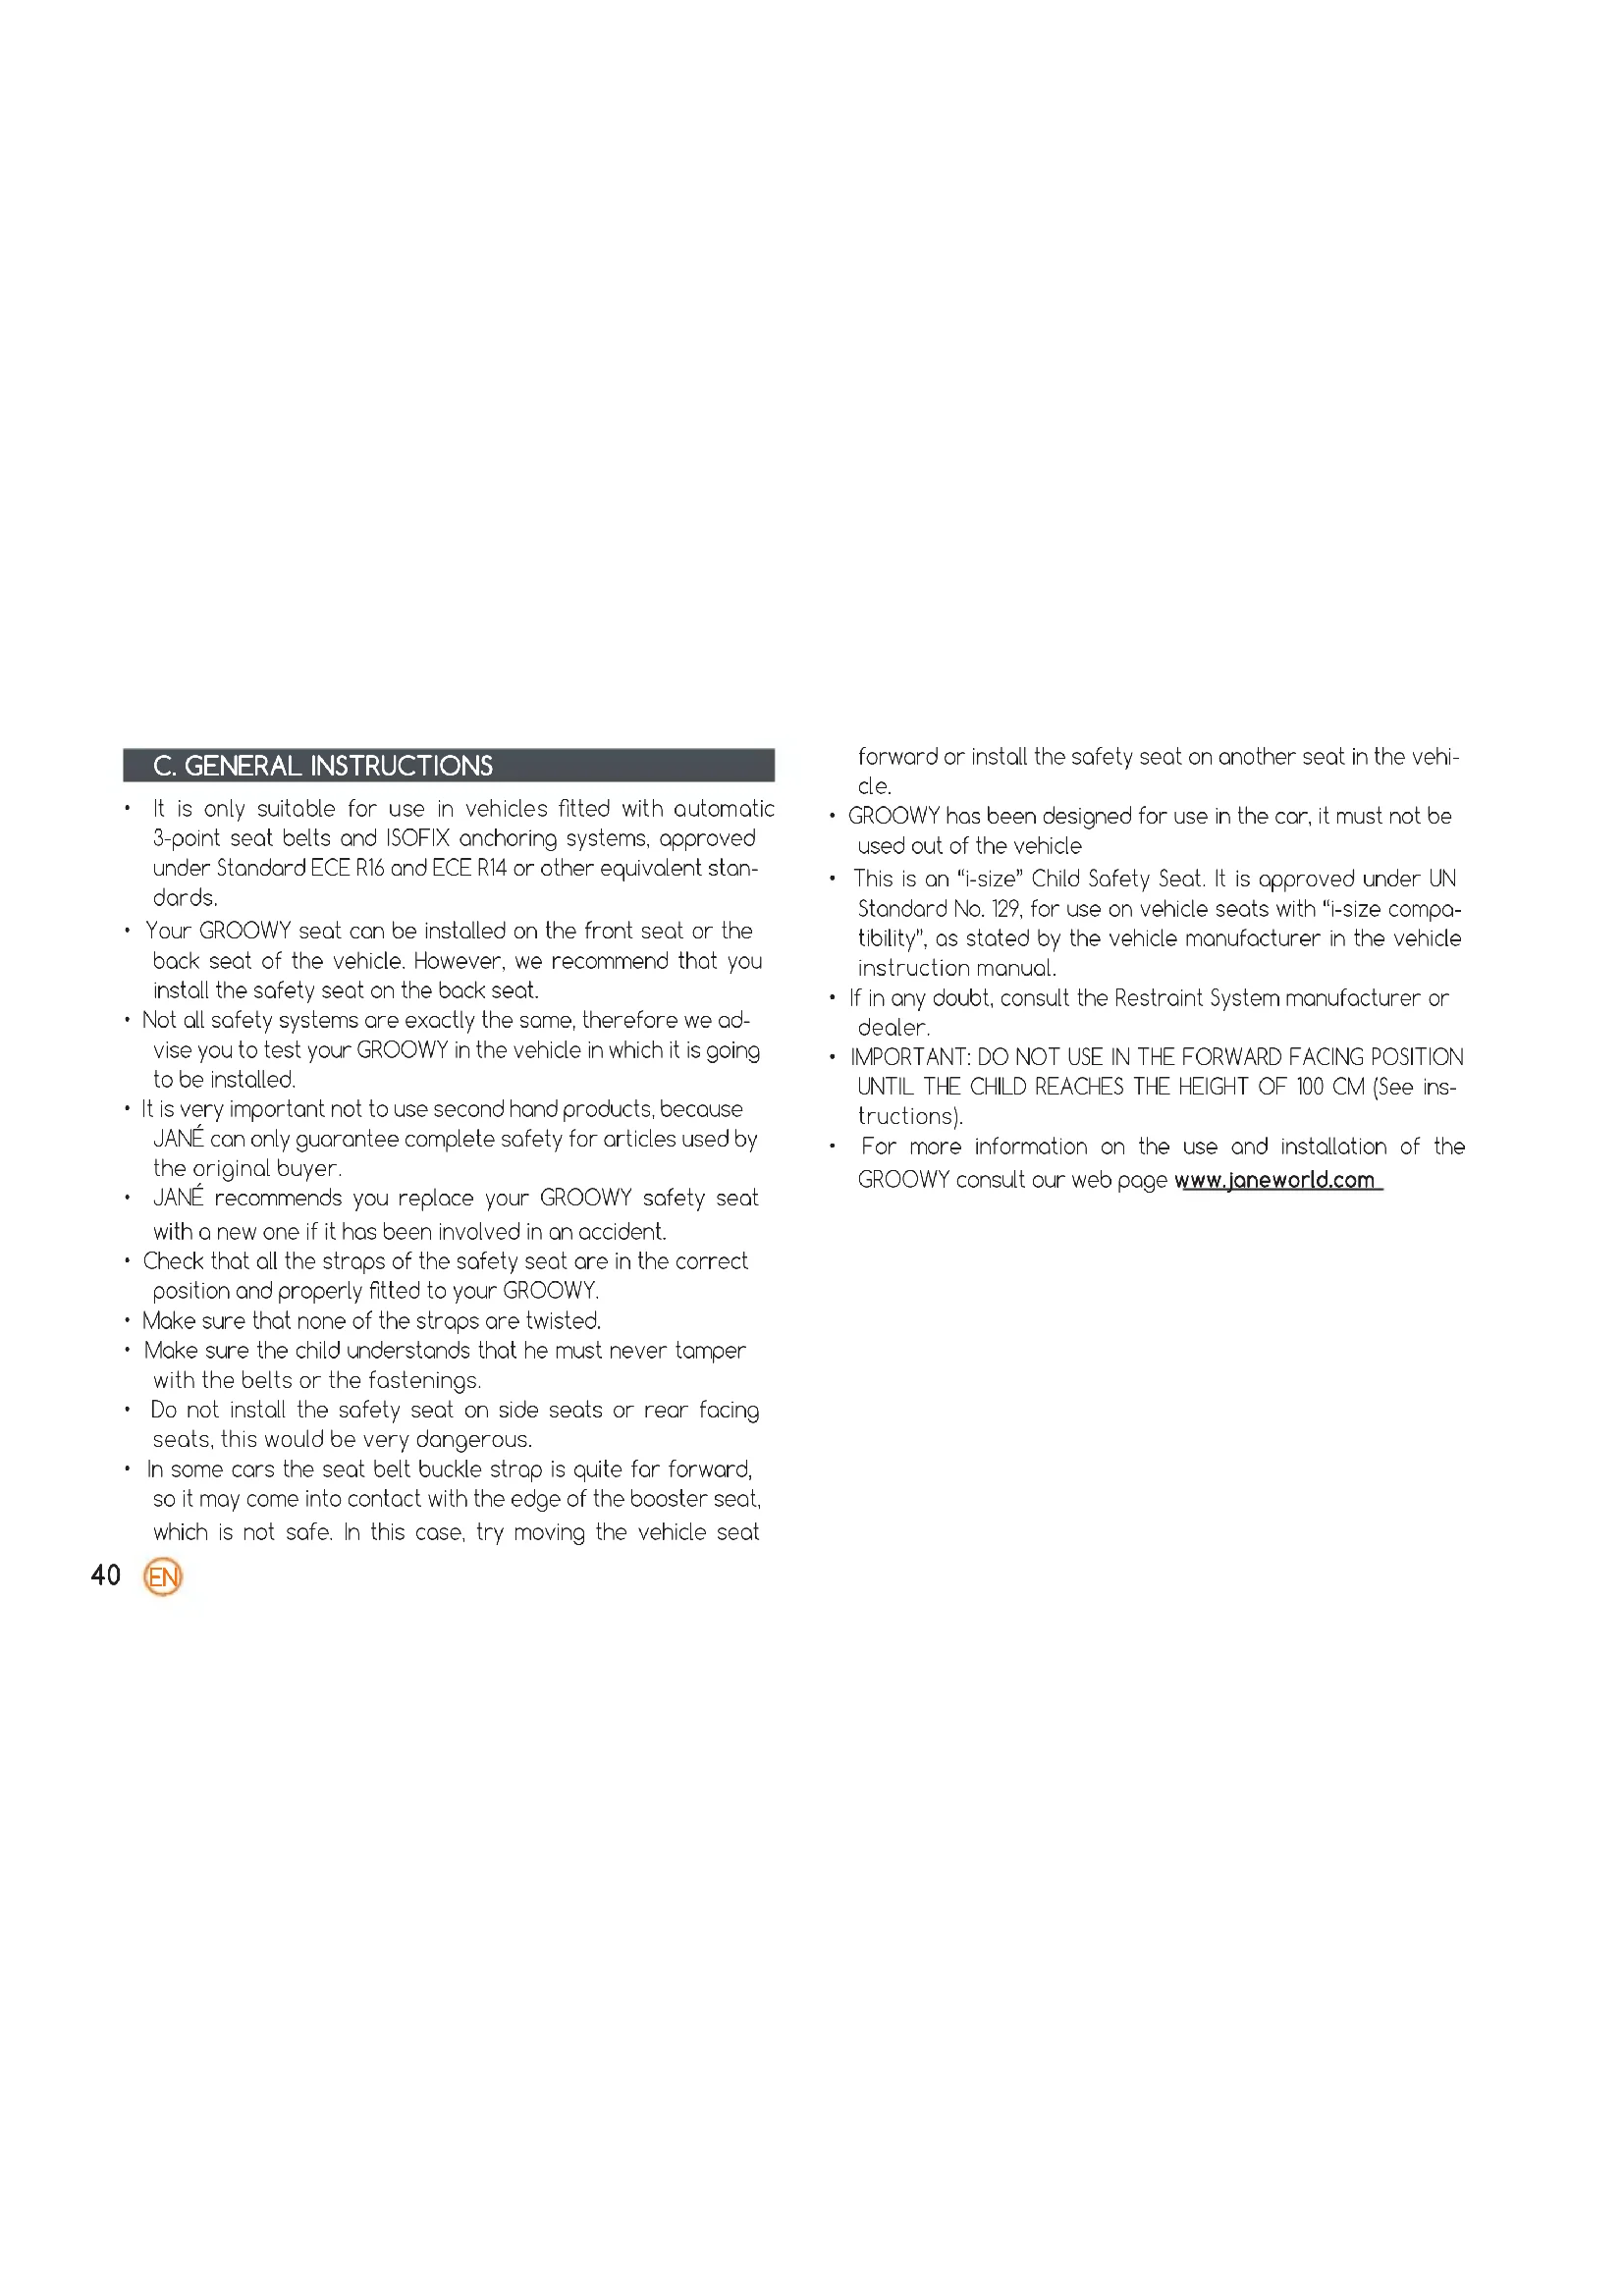
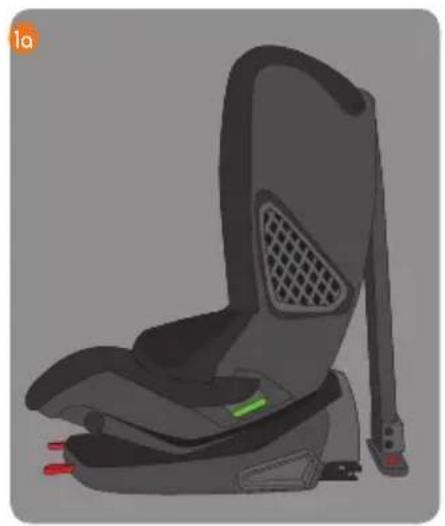
- To save space, in its original packaging the GROOWY seat is set up for forward facing installation. The seat needs to be rotated 180 degrees on its base before installing it in the vehicle.
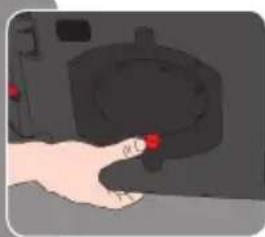
- On the bottom of the base there is a red lever that releases the rotation mechanism of the seat. Press it and turn the seat to the next locking position. 1.b
- Unfold the leg fully.
G. INSTALLATION OF THE SAFETY SEAT IN THE CAR
- The ISOFIX anchors (6) are automatically extracted by firmly pulling both the red rings (9) found on the front of the base.
- In some vehicles, the ISOFIX anchors are difficult to access or they are hidden between the foam sections of the vehicle seat. With the seat we have provided some guides (19) making it easier to locate them, insert them before the following step.
- Guide the anchors towards the axles in your vehicle and press until both sides are locked into place. Two green signals on the front of the base (8) will show that they are securely anchored.

If one or both of the signals are red, try again. 1.d
- Press the base (1) against the backrest of the vehicle.
- Release the lock for the leg by sliding the button (9a) to the right. Extend the leg until it touches the floor of the vehicle. Lift the seat until the button (9a) locks again and the green signal is shown in the window of the button (9a) and on the base of the leg (9b).
- When using the NEST baby carrier in the vehicle it must always be attached to the GROOWY safety seat in the rear facing position using the exclusive JANÉ Pro-fix anchors.
H. FASTENING THE CHILD IN THE SEAT
WITH THE NEST BABY CARRIER (FROM 40 TO 65 CM)
- Loosen the integral seat belts by pulling the straps (23) above the buckle while pressing the strap tightening button (23b).
- Unfasten the buckle (23a).
- Place the baby in the baby carrier making sure that he is sitting as far back as possible. Bring the upper ends of the buckle together. ②c
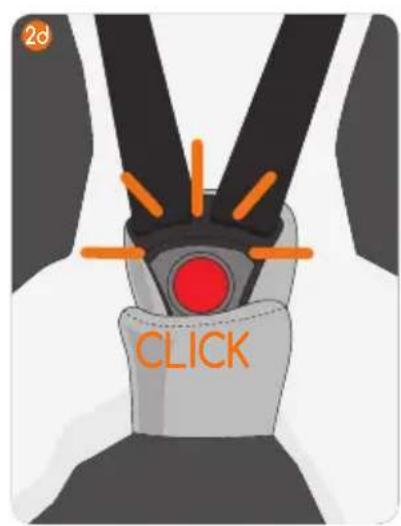
- Insert them into the fastener and press until you hear them click locked. 2.d
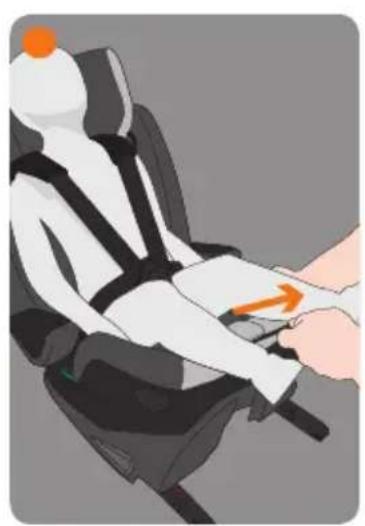
- Pull the tightening strap (23b). The correct strap tension is very important for the child's safety, do not leave the straps too loose.
- Position the baby carrier on the safety seat lining up the Pro-
fix anchors (24) with the slots in the armrests of the seat (16).
- Press both sides of the handle to make sure that the anchors have locked into place. The two Pro-fix indicators (27) should be green. ②g
- There is a cushion insert (15) for use with smaller children (from 60 to 75 cm).
• The seat has ventilation windows.
• The seat can be reclined.
IN THE SAFETY SEAT (FROM 60 TO 105 CM)
• Fit the cushion insert (15) if necessary (from 60 to 75 cm).
- Loosen the integral seat belts by pulling the straps (5) above the buckle while pressing the strap tightening button (5b).
• Unfasten the buckle (50). 2.i
- Place the child in the seat making sure that he is sitting as far back as possible and with his back upright. Bring the upper ends of the buckle together. 2.k
- Insert them into the fastener and press until you hear them click locked. 2.1
- Pull the tightening strap (5b). The correct strap tension is very important for the child's safety, do not leave the straps too loose. 2.m
I. ADJUSTING THE HEIGHT OF THE INTEGRAL SEAT BELTS
The height of the shoulder straps should be adjusted as the child grows. While the child is sitting in the seat, check that the shoulder straps are in the right position. They should be slightly above the child's shoulders. GROOWY, in this configuration, has 4 seat belt positions, as the strap height is adjusted the headrest will move.
To adjust the height follow the steps below:
- Pull the lever found on the back of the headrest (4), this will unlock the headrest position.
- Move the headrest (3) to the right position for the child and release the lever. Move the headrest until you hear it click as it locks into place. Pull the headrest to make sure that it is securely locked in place.

IMPORTANT: Adjust this height as the child grows
Removing the seat when it is installed with ISOFIX:
- Release the ISOFIX anchors by pulling both release straps (7). The signals on the front of the base (8) will turn red.
- Remove the seat. Press the ISOFIX anchors (6) to store them inside the base.

USE FOR CHILDREN FROM 100 TO 150 CM WITH VEHICLE SEAT BELT
J. TURNING THE SAFETY SEAT INTO A BOOS-TER SEAT WITH BACKREST
• To turn the GROOWY safety seat into a booster seat with backrest you need to rotate the seat 180 degrees on the base. To do this step you need to uninstall the seat.
• Pull the straps (7) to release the ISOFIX anchor. (9)
- On the bottom of the base there is a red lever that unlocks the seat rotation system. Press it and turn the seat to the next locking position. 3 b
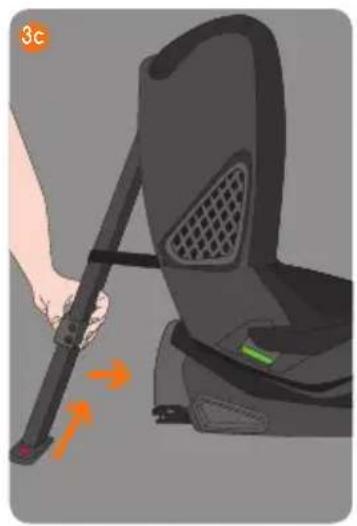
- Adjust the length of the leg to the shortest position, to do this release the locking system of the leg by sliding the button (9a) to the right. 3.c
- Insert the leg into the slot in the base. There is a lock to hold it in place.

IMPORTANT: To ensure that you do not use the integral seat belt for any longer than necessary, GROOWY has a safety mechanism that prevents the headrest from being moved higher than a certain point if the integral seat belts have not been concealed first
K. CONCEALING THE INTEGRAL SEAT BELTS
• The headrest (3) should be set to its highest position.
• Take the pads off the shoulder belts and keep them safe.
• Take the upholstery off the seat from the flap that goes over the backrest until the buckle compartment is uncovered.
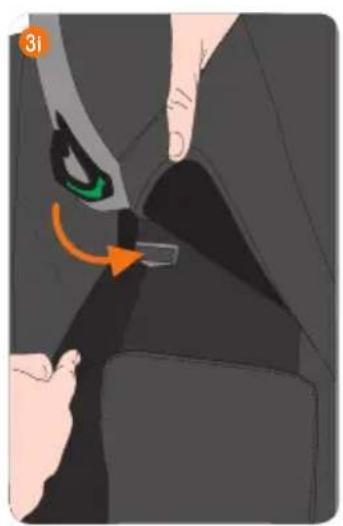
- Pass the buckle through the buttonhole in the upholstery, and put it in the compartment. 3.h
- Slide the shoulder straps behind the flap over the headrest. NOTE: To prevent the incorrect use of the safety seat, it will not be possible to move the headrest up any higher until this step has been completed. First remove the padding from the shoulders.
• Pass both straps behind the flap of the headrest.
- The upper parts of the buckle can be concealed in the gaps in the interior sides of the seat. 3 j


L. INSTALLATION OF THE BOOSTER SEAT WITH BACKREST WITHOUT ISOFIX ANCHORS
- If you decide to install the GROOWY booster seat with backrest without the ISOFIX anchors, you should just place it on the vehicle seat and pass the seat belt through the belt guides under the armrest and on one side of the headrest. These steps will be indicated with a green signal. 3.1

M. INSTALLATION OF THE BOOSTER SEAT WITH BACKREST WITH ISOFIX ANCHORS
The booster seat with backrest can be installed with the ISOFIX anchors, this gives the seat more lateral stability.
To install it follow the steps below:
- The ISOFIX anchors (6) are automatically extracted by firmly pulling both the red rings (9) found on the front of the base.
- In some vehicles, the ISOFIX anchors are difficult to access or they are hidden between the foam sections of the vehicle seat. With the seat we have provided some guides (19) making it easier to locate them, insert them before the following step.
- Guide the anchors towards the axles in your vehicle and press until both sides are locked into place. Two green signals on the front of the base (8) will show that they are securely anchored. If one or both of the signals are red, try again. 3.e
- Lastly, press the base (1) against the backrest of the vehicle.
Adjusting the height of the headrest
- The height of the headrest is adjusted using the handle found on the top part of the headrest at the back. To release the lock pull the button upwards, when you release the button the headrest will lock into the nearest position. 3.k
- Pass the lower lap part or the shoulder part of the vehicle seat belt through the belt guide at the side of the headrest (11).
- Position the child in the booster seat, and adjust the height of the headrest using the button (4). The seat belt should be slightly above the child's shoulder. 3.m

IMPORTANT: Adjust this height as the child grows
Placing the child in the seat
- Position the child in the booster seat and pass the vehicle shoulder seat belt through guide at the side of the headrest (11).
• Pass the seat belt over the child and fasten the buckle
• Lastly, pass the belts under both armrests (10).
When you get the child out of the booster seat it is not necessary to take the seat belt out of the guide at the side of the headrest (11), this makes it easier to fasten the child in the next time the booster seat is used.

IMPORTANT: Even when the booster seat is not in use it should be secured with the seat belt; in the event of an accident or sudden braking it could get flung about and injure the other occupants of the vehicle.
Removing the seat:
- Release the ISOFIX anchors by pulling both the release straps (7). The signals on the front (8) will turn red.
- Remove the seat. Press the ISOFIX anchors (6) to store them inside the base.

N. RECLINING THE SEAT
The GROOWY seat is reclined using a lever found on the sides of the seat (12). It has 5 positions. This action, when the seat is used as a booster seat with backrest, requires the vehicle 3-point seat belt to be adjusted, in this case it should be carried out while the vehicle is stationary.
- To recline the seat, turn the lever forwards and slide the seat to the required position.
O. ATTACHING THE NEST BABY CARRIER TO YOUR JANE PUSHCHAIR
- Your NEST can be attached to any JANÉ pushchair fitted with Pro-fix connectors (always check the pushchair instructions before attaching the baby carrier).
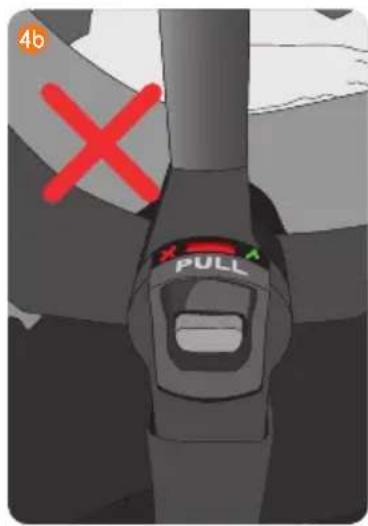
• To fit the baby carrier onto a chassis, insert it into the Pro-fix slots on the chassis and press. 4.a Your NEST will be securely attached when you hear it click into place and a green band appears in the top part of the Pro-fix handles (found above the pivot section of the handle). 4.b

natural_image
Simple orange checkmark and black line diagram with circles at endpoints (no text or symbols)
natural_image
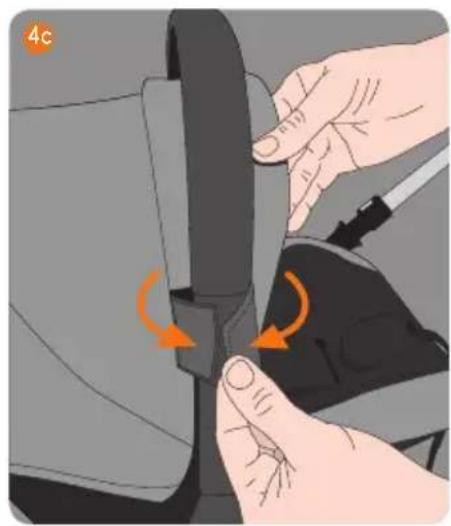
Simple diagram with a diagonal line crossing a shaded region and a red 'X' mark (no text or symbols)• To release the NEST from the chassis, simultaneously pull the release handles upwards found on the upper part of both Pro-fix anchors and remove the baby carrier. 4.c
ATTENTION: The NEST should always be fitted on the push-chair so the baby is facing to the adult.
- The hood of the NEST is detachable. Simply undo the fastenings from the sides of the handle and remove the upholstery. To fit the hood again, follow the steps in reverse order.
P. RECOMMENDATIONS
- Keep this instruction book for future reference. Always keep it in the compartment in the safety seat (13).
- Make sure that any luggage is safely stored or secured in the vehicle as well as any other objects that could cause injury in the event of an accident.
- Whenever the GROOWY safety seat is in the vehicle, even if the child is not using it, is should be secured with the seat belt and/or the ISOFIX, because in the event of an accident it could get flung about and injure other occupants of the vehicle.
Q. MAINTENANCE
- Do not expose the upholstery to the sun for prolonged periods, when the safety seat is not in use cover it up or store it in the boat of the car.

- Clean the plastic parts with soap and warm water, and then dry all the parts thoroughly.
The upholstery can be taken off for washing. Follow the instructions below:
Headrest: Take the upholstery off the top part of the headrest. Then take the upholstery off the lower part of the headrest.
Shoulder and crotch strap pads: Unfasten the Velcro on the shoulder pads and take them off the belt. The pad on the crotch strap should be taken off above the buckle.
Seat upholstery: Remove the upholstery from the whole frame of the seat. - Wash at a maximum temperature of 30^ .
• To put the upholstery back on, follow the same steps in reverse.
R. GUARANTEE INFORMATION
This article is guaranteed in accordance with the provisions of Law 23 / 2003 of 10 July. Keep your receipt as proof of purchase, it will need to be shown at the shop where you bought the product to certify the validity in the event of a complaint. This guarantee does not include any defects or breakages caused by misuse of the article or by not following the safety and maintenance instructions listed on the instruction sheets and on the care labels, as well as any wear and tear issues through normal use and daily handling.
The label displaying the chassis number of your model should not be removed under any circumstances, it contains important information.
IMPORTANT: To get maximum safety and care from your new JANÉ, it is very important that you complete the registration card found on the web page www.janeworld.com. This registration means we can inform you, if necessary, about the development and maintenance of your product. If you would like, we can also inform you of any new models or news that we think may be of interest to you.
IMPORTANT: Your safety seat should be replaced by a new one whenever it has been involved in an accident, or sent to the manufacturer with a report of the accident for it to be checked. If your seat needs to be replaced, Jané will replace it with a new one if it meets the conditions found on www.janeworld.com or at the address of the following QR.


natural_image
Black and gray baby car seat with adjustable armrest (no visible text or symbols)natural_image
Black and white baby car seat with attached seatbelt, no visible text or symbolsnatural_image
Back view of a black and red baby car seat with matching logo (no text or symbols visible)Face à la marche.
de 100 à 150 cm

B. LISTE DES PIÈCES COQUES NEST
C. INSTRUCTIONS GÉNÉRALES
natural_image
Simple diagram with a green checkmark and orange shape, no text or symbols present
natural_image
Simple diagram with a diagonal line crossing a shaded region and a red 'X' symbol (no text or labels)R. INFORMATIONS SUR LA GARANTIE


natural_image
Black and gray baby car seat with adjustable armrest (no visible text or symbols)natural_image
Black and white baby car seat with attached seatbelt, no visible text or symbolsnatural_image
Back view of a dark gray and red baby car seat with a logo on the front (no visible text or symbols)B. TEILELISTE BABYTRAGE NEST

natural_image
Simple orange checkmark and black line diagram with circles at endpoints (no text or symbols)
natural_image
Simple diagram with a diagonal line crossing a shaded region and a red 'X' symbol (no text or labels)
natural_image
Product photo of a baby car seat with adjustable arm and seatbelt (no visible text or symbols)natural_image
Black and gray baby car seat with seatbelt, no visible text or symbolsnatural_image
Top-down view of a car comfort seat with black and red seats (no text or symbols visible)
B. ELENCO COMPONENTI OVETTO NEST


natural_image
Black and gray baby car seat with adjustable armrest (no visible text or symbols)natural_image
Black and white baby car seat with attached seatbelt, no visible text or symbolsnatural_image
Back view of a dark gray and red baby car seat with a logo on the front (no visible text or symbols)
B. LISTAGEM DE PEÇAS PORTA-BEBÉS NEST

C. INSTRUÇÕES GERAIS
natural_image
Simple orange checkmark and black line diagram with circles at endpoints (no text or symbols)
natural_image
Simple diagram with a diagonal line crossing a shaded region and a red 'X' symbol (no text or labels)
GROOWY
isize


JANE
JANÉ, S.A. - Pol. Industrial Riera de Caldes
C/Mercaders, 34 - 08184 Palau Solità i Plegamans (BARCELONA) SPAIN
Telf. +34 93 703 18 00 - Fax: +34 93 703 18 04
email: Info@jane.es
www.janeworld.com
IM 2111,00

- FR
- FIGURES
- LISTADO DE PIEZAS PORTABEBÉS NEST
- CONTENTS
- CONFIGURATIONS FOR USE
- PARTS LIST
- NEST BABY CARRIER PARTS LIST
- GENERAL INSTRUCTIONS
- WARNINGS
- FEATURES OF YOUR GROOWY SEAT
- USE FOR CHILDREN FROM 40 TO 105 CM
- SETTING THE GROOWY UP FOR REAR FACING INSTALLATION
- INSTALLATION OF THE SAFETY SEAT IN THE CAR
- FASTENING THE CHILD IN THE SEAT
- WITH THE NEST BABY CARRIER (FROM 40 TO 65 CM)
- IN THE SAFETY SEAT (FROM 60 TO 105 CM)
- ADJUSTING THE HEIGHT OF THE INTEGRAL SEAT BELTS
- To adjust the height follow the steps below:
- Removing the seat when it is installed with ISOFIX:
- USE FOR CHILDREN FROM 100 TO 150 CM WITH VEHICLE SEAT BELT
- TURNING THE SAFETY SEAT INTO A BOOS-TER SEAT WITH BACKREST
- CONCEALING THE INTEGRAL SEAT BELTS
- INSTALLATION OF THE BOOSTER SEAT WITH BACKREST WITHOUT ISOFIX ANCHORS
- INSTALLATION OF THE BOOSTER SEAT WITH BACKREST WITH ISOFIX ANCHORS
- To install it follow the steps below:
- Adjusting the height of the headrest
- Placing the child in the seat
- Removing the seat:
- RECLINING THE SEAT
- ATTACHING THE NEST BABY CARRIER TO YOUR JANE PUSHCHAIR
- RECOMMENDATIONS
- MAINTENANCE
- GUARANTEE INFORMATION
- LISTE DES PIÈCES COQUES NEST
- INSTRUCTIONS GÉNÉRALES
- INFORMATIONS SUR LA GARANTIE
- TEILELISTE BABYTRAGE NEST
- ELENCO COMPONENTI OVETTO NEST
- LISTAGEM DE PEÇAS PORTA-BEBÉS NEST
- INSTRUÇÕES GERAIS
- GROOWY
Brand : JANE
Model : Groowy
Category : Car seat