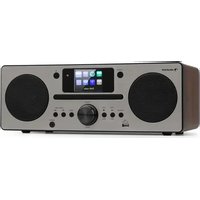
Moving 80.2 - Hi-fi system Auna - Free user manual and instructions
Find the device manual for free Moving 80.2 Auna in PDF.
User questions about Moving 80.2 Auna
0 question about this device. Answer the ones you know or ask your own.
Ask a new question about this device
Download the instructions for your Hi-fi system in PDF format for free! Find your manual Moving 80.2 - Auna and take your electronic device back in hand. On this page are published all the documents necessary for the use of your device. Moving 80.2 by Auna.
USER MANUAL Moving 80.2 Auna
text_image
QR code image containing encoded data, no visible human-readable textINHALT
Technische Daten 4
natural_image
Technical diagram showing a device rear panel with a 15-pin connector and a plug inserted into a socket (no text or symbols present)Rückansicht
Bedienfeld

text_image
CHANNEL 1 CHANNEL 2 TONES MASTER BATTERY 0 10 0 15-10 +10 -10 -10 MICROPHONE VOLUME AUX IN TREBLE BASS VOLUME 6 ON 38:8:2 METER 10 12 13 14 PREVIOUS PAUSE NEXT MODE REFLECTRAT FLASH USB SETTMIC CARD auna 1 23 4 5 78 9Bedienelemene
Member of Berlin Brands Group
Handwerkerstr. 11
15366 Dahlwitz-Hoppegarten
Deutschland
natural_image
Symbol of a trash bin crossed with a diagonal line, no text or numbers presentCongratulations on purchasing this equipment. Please read this manual carefully and take care of the following hints to avoid damages. Any failure caused by ignoring the mentioned items and cautions mentioned in the instruction manual are not covered by our warranty and any liability. Scan the QR code to get access to the latest user manual and other information about the product.

text_image
QR code image containing encoded data, no visible human-readable textCONTENTS
Technical Data 17
Safety Instructions 18
Device Description 20
Getting Started 24
BT Connection 25
Troubleshooting 25
Disposal Considerations 26
Declaration of Conformity 26
TECHNCAL DATA
| Net adapter | 100-240 V~ | 50/60 Hz |
| Built-in battery | 12 V === 5 A | |
| RMS power 35 W | ||
| Max power output 100 W |
Connections
| AUX-IN | 3.5 mm |
| Microphone input | 6.3 mm |
| USB | 5 V; 1 A |
UHF microphone
Frequency 863.1 MHz
BT
Operation range up to 10 metres
Compatible BT profile A2DP
SAFETY INSTRUCTIONS
- Read the manual prior to using the product. Take all precautions to avoid fire and/or electrical shock. Repairs must only be carried out by a qualified technician in order to avoid electrical shock. Keep the manual for future reference.
- Prior to using the product, please ask advice from a specialist. When the product is switched on for the first time, some smell may occur. This is normal and will disappear after a while.
- The product contains voltage carrying parts. Therefore do NOT open the housing.
- Do not place metal objects or pour liquids into the product. This may cause electrical shock and malfunction.
- Do not place the product near heat sources such as radiators, etc.
- Do not place the product on a vibrating surface. Do not cover the ventilation holes.
- The product is not suitable for continuous use.
- Be careful with the mains lead and do not damage it. A faulty or damaged mains lead can cause electrical shock and malfunction.
- When unplugging the product from a mains outlet, always pull the plug, never the lead.
- Do not plug or unplug the product with wet hands.
- If the plug and/or the mains lead are damaged, they need to be replaced by a qualified technician.
- If the product is damaged to such an extent that internal parts are visible, do NOT plug the product into a mains outlet and DO NOT switch the unit on. Contact your dealer. Do NOT connect the product to a rheostat or dimmer.
- To avoid fire and shock hazard, do not expose the product to rain and moisture.
- All repairs should be carried out by a qualified technician only.
- Connect the product to an earthed mains outlet (220-240 V AC/50 Hz) protected by a 10-16 A fuse.
- During a thunderstorm or if the product will not be used for a longer period of time, unplug it from the mains. The rule is: Unplug it from the mains when not in use.
- If the product has not been used for a longer period of time, condensation may occur. Let the unit reach room temperature before you switch it on. Never use the product in humid rooms or outdoors.
- To prevent accidents in companies, you must follow the applicable guide lines and follow the instructions.
- Do not repeatedly switch the product on and off. This shortens the life time.
- Keep the product out of the reach of children. Do not leave the product unattended.
- Do not use cleaning sprays to clean switches. The residues of these sprays cause deposits of dust and grease. In case of malfunction,
always seek advice from a specialist.
- Do not force the controls.
- If this product is with speaker inside which can cause magnetic field.
- Keep the product at least 60 cm away from computer or TV.
- If the product has built-in lead-acid rechargeable battery. Please recharge the battery every 3 months if you are not going to use the unit for a long period of time. Or the battery may be damaged.
- If the battery is damaged please replace with same specifications battery. And dispose the damaged battery environment friendly.
- If the product has fallen, always have it checked by a qualified technician before you switch the product on again.
- Do not use chemicals to clean the unit. They damage the varnish. Only clean the product with a dry cloth.
- Keep away from electronic equipment that may cause interference.
- Only use original spares for repairs, otherwise serious damage and/or dangerous radiation may occur.
- Switch the product off prior to unplugging it from the mains and/or other equipment. Unplug all leads and cables prior to moving the product.
- Make sure that the mains lead cannot be damaged when people walk on it. Check the mains lead before every use for damages and faults!
- The mains voltage is 220-240 V AC/50 Hz. Check if power outlet match.
- If you travel, make sure that the mains voltage of the country is suitable for this product.
- Keep the original packing material so that you can transport the product in safe conditions.
Designated use
- This device is for the transmission of speech and singing. It is solely designed and may only be used for this purpose. It may only be used in the manner described in this manual.
- This appliance is not intended for use by persons (including children) with reduced physical, sensory or mental capabilities, or lack of experience and knowledge, unless they have been given supervision or instruction concerning use of the appliance by a person responsible for their safety.
- The microphone system includes microphones with an integrated transmitter, which serve wireless transmission to the receiving unit. The systems operate within the UHF range (863.1 MHz & 864.5 MHz). The transmission range is 50 m and depends on the local conditions. The appliance are designed for indoor use only.
DEVICEDESCRIPTION
Connections

text_image
* not included BTFront panel

natural_image
Diagram showing a device rear panel with an electrical socket connected to a plug, and its wiring diagram on the right (no text or symbols present)Rear panel
Front Panel

text_image
CHANNEL 1 CHANNEL 2 TONE5 MASTER BATTERY ON 6 38:83 METER 10 12 13 14 PREVIOUS FAUTE NEXT MODE REFAT/LAY auna MICROPHONE VOLUME AUX IN TREBLE BASS VOLUME FLASH USB SD/AMC CARD 1 23 4 5 78 9Controls
| 1 Microphone input with volume control: This mono input accepts a 1/4" (6.35 mm) input such as a microphone, guitar, or other musical instrument. (Such as the use wireless microphones, just turn on the wireless microphone power switch, then adjust the microphone volume can be. The frequency of the wireless microphone is 795.85MHz.). |
| 2 AUX input: This stereo 1/8" (3.5 mm) input can be used to connect a CD player, MP3 player, or other audio source. |
| 3 TREBLE CONTROL: This adjusts the treble frequencies, Use this control to attain a bright and lively sound for your instrument. |
| 4 BASS CONTROL: This adjusts the bass frequencies, Use this control to get the best sounding bass response for your instrument. |
| 5 MASTER CONTROL: This adjusts the unit's main mix volume, which includes the Microphone input, Auxiliary input, MP3 and the audio of a paired BT device. |
| 6 BATTERY LEVEL: While the unit is powered ON, that Blue light is lit. the Red lights indicate the power in the low-battery that need to charge. when Green light is lit, that unit is plugged in and charge the battery. |
| 7 FLASH: Press this button to cycle through different screen effects.Moving transverse lights (non-reactive to music)Square lights wipe (non-reactive to music)Transverse lights wipe (non-reactive to music)Diagonal Light wipe (non-reactive to music)Wavy Line (non-reactive to music)Shimmering lights (non-reactive to music)Pulsating bars (reactive to music)Off (no lights) |
| 8 USB INTERFACE:Use this socket to connect your pen drive or external disk to the unit using USB interface.(Note: Mobile disk memory must be less than 64GB.)Connect your device's charge cable here to charge it. USB charging only functions when the unit power is turned on. |
| 9 SD CARD READER: Use this socket to connect your memory card to the unit by SD card.(Note: SD card memory must be less than 64GB.) |
| 10 PREVIOUS BUTTON: Press to move the input to the previous track in MP3 & BT mode, hold for a few seconds to search backwards within the current track ( not included BT mode). |
| 11 PLAY/PAUSE BUTTON: Press once to begin playing, Press again to pause. (USB priority) |
| 12 NEXT BUTTON: Press to move the input to the next track in MP3 & BT mode. hold for a few seconds to search forwards within the current track( not included BT mode). |
| 13 MODE BUTTON: Press once to change the current access device of the unit.(USB interface - SD card reader - BLUE TOOTH) the unit priority read USB interface, SD card reader |
| 14 REPEAT BUTTON: There are 2 preset repeat modes. Press once to repeat single, that "REP." will be lit at bottom right corner of the screen. Press it again and unit will be on repeat all, that "REP." will be put out. |
| 15 POWER SWITCHNote: that while the unit is connected to a power source, it does not need to be powered on to charge the battery. If the battery cannot be continue to use, please contact Supplier open the hatch for changing battery. Battery specifications for 12VDC 5.0AH. |
| 16 POWER CABLE INPUT (IEC): Insert the included power cable here to charge the unit. that the unit can run off the power adapter while it simultaneously charges the battery. The charge indicator is lit when the battery is charging. |
| 17 FUSE FOR AC POWER: Use this fuse to protect the unit & EXT. power supply. |
GETTING STARTED
Battery charging
This device is equipped with a with a rechargeable battery. The batty will be charged automatically as soon as the device is connected to power. After recharging, the device switches to trickle charging. However, do not leave the device constantly connected to a socket. Turning off the device via remote control switches it to standby mode, which consumes more power than switching it completely off at the panel of the appliance.
ATTENTION: Before first use, fully charge the battery for at least 8 hours. Only after having charged the battery for 3 times, the battery reaches its full capacity.
Charge the battery before and after each usage for a lasting battery performance.
When the unit is turned off using the remote control, it is still in standby mode and consumes more power than when turned off completely. Be sure to fully charge the unit's internal battery before using it for the first time on the move (without AC power).
Connect the device to an ordinary wall socket via power adapter. The charging time is about 5.8 hours. The state of charge is indicated by the LED on the back. The LED will got out when the batty is fully charged.
Microphone Use
Unscrew the battery cover on the lower part of the microphone. Insert 2 batteries and mind the polarity.
Set the volume to the minimum. Power the system on so that the power LED lights up. Switch the microphone on and set the volume control to the desired position.
Check for microphone feedback (howling). Reduce the treble signal. If the problem still occurs, reduce the speakers or move the audio system. Do not hold the microphone near the speakers.
BT CONNECTION
- Turn on your BT device.
- Power on the unit. If you have previously connected to another BT device, the unit will reconnect.
- Navigate to your BT device's setup screen, find "Moving-80.2" speaker" and connect.
(Note: If your BT device prompts for a pairing code, enter "0000".) - To disconnect pairing while the BT icon is lit solid, press the mode button.
- To connect to another BT device, repeat step 3.
TROUBLESHOOTING
| Problem Solution | |
| Distorted sound Try lowering the volume control of your sound source, musical instrument, or microphone. Also, try to reduce the overall volume of the unit using the Master Volume knob. | |
| Too much bass Try adjusting the tone or EQ control on your sound source to lower the bass level. This will allow you to play the music louder before clipping distortion occurs. | |
| High-pitched whistling nose when using the microphone. | This is probably feedback. Point the microphone away from the speaker. |
DISPOSALCONSIDERATIONS

natural_image
Symbol of a trash bin crossed with a diagonal line, representing no waste or discharge (no text or labels)If there is a legal regulation for the disposal of electrical and electronic devices in your country, this symbol on the product or on the packaging indicates that this product must not be disposed of with household waste. Instead, it must be taken to a collection point for the recycling of electrical and electronic equipment. By disposing of it in accordance with the rules, you are protecting the environment and the health of your fellow human beings from negative consequences. For information about the recycling and disposal of this product, please contact your local authority or your household waste disposal service.
This product contains batteries. If there is a legal regulation for the disposal of batteries in your country, the batteries must not be disposed of with household waste. Find out about local regulations for disposing of batteries. By disposing of them in accordance with the rules, you are protecting the environment and the health of your fellow human beings from negative consequences.
DECLARATION OF CONFORMITY

text_image
CE UK CAManufacturer:
Chal-Tec GmbH, Wallstrasse 16, 10179 Berlin, Germany.
Importer for Great Britain:
Berlin Brands Group UK Ltd PO Box 1145
Oxford, OX1 9UW
United Kingdom
Hereby, Chal-Tec GmbH declares that the radio equipment type Moving 80.2 is in compliance with Directive 2014/53/EU. The full text of the EU declaration of conformity is available at the following internet address: use.berlin/10033254
For Great Britain: Hereby, Chal-Tec GmbH declares that the radio equipment type Moving 80.2 is in compliance with the relevant statutory requirements. The full text of the declaration of conformity is available at the following internet address: use.berlin/10033254
Chère cliente, cher client,
text_image
QR code image containing encoded data, no visible human-readable textSOMMAIRE
Fiche technique 28
natural_image
Diagram showing a device rear panel with a 15-pin socket and connected to a plug terminal (no text or symbols present)Vue de dos
Panneau de commande

text_image
CHANNEL 1 CHANNEL 2 TONES MASTER BATTERY 0 10 0 15-10 +10 -10 -10 MICROPHONE VOLUME AUX IN TREBLE BASS VOLUME 6 ON 38:8:7 METER 10 12 13 14 PREVIOUS PAUSE NEXT MODE REFLECTRAT FLASH USB SETTMIC CARD auna 1 2 3 4 5 7 8 9natural_image
Symbol of a trash bin crossed with a diagonal line, no text or numbers presentDÉCLARATION DE CONFORMITÉ

text_image
CE UK CAFabricant :
Chal-Tec GmbH, Wallstraße 16, 10179 Berlin, Allemagne.
Berlin Brands Group UK Ltd
PO Box 1145
Oxford, OX1 9UW
United Kingdom
text_image
QR code image containing encoded data, no visible human-readable textÍNDICE
Datos técnicos 39
natural_image
Diagram showing a device rear panel with a 15-pin socket and a connected electrical plug (no text or symbols present)Parte posterior
Panel de control

text_image
CHANNEL 1 CHANNEL 2 TONES MASTER BATTERY 0 10-0 10-10 +10-10 -10 MICROPHONE VOLUME AUX IN TREBLE BASS VOLUME 6 ON 10 12 13 14 PREVIOUS PAUNE NEXT MORE REFREAT/PLAY FLASH USB SN/WWC QUID 1 23 4 5 78 9Elementos de control
natural_image
Symbol of a trash bin crossed out by a diagonal line, with no text or labels present.text_image
QR code image containing encoded data, no visible human-readable textINDICE
Dati tecnici 50
natural_image
Diagram showing a device rear panel with a 15-pin socket and connected to a plug terminal (no text or symbols present)Parte posteriore
natural_image
Symbol of a trash bin crossed with a diagonal line, no text or labels presentBerlin Brands Group UK Ltd
PO Box 1145
Oxford, OX1 9UW
United Kingdom