
GrandChef - Oven Klarstein - Free user manual and instructions
Find the device manual for free GrandChef Klarstein in PDF.
| Product type | Built-in electric oven |
| Brand | Klarstein |
| Model | GrandChef |
| Capacity | 72 L |
| Total power | 2880 W |
| Power supply | 220-240 V ~ 50/60 Hz |
| Appliance dimensions (W x H x D) | 596 x 595 x 575 mm (approx.) |
| Weight | Approximately 35 kg |
| Cooking modes | Top and bottom heat, hot air, grill, double grill, double grill + convection, pizza, bottom heat, defrost, fermentation |
| Microwave function | Yes (microwave alone and combined with hot air, double grill + convection, pizza) |
| Maximum microwave power | 800 W |
| Automatic recipes | 10 preset programs (defrost, popcorn, gratin, cakes, pizza, etc.) |
| Temperature range | 30 °C to 250 °C (depending on mode) |
| Timer | Yes, with automatic shut-off |
| Child lock | Yes |
| Interior light | Yes, with replaceable bulb |
| Number of rack levels | 5 |
| Included accessories | Oven rack, baking tray |
| Cleaning and maintenance | Manual cleaning with soapy water; avoid harsh cleaners and steam |
| Safety | Automatic shut-off when door opens, child lock, fan cooling |
| Installation | Built-in, requires a qualified electrician; recess dimensions: 560x460 mm (approx.) |
| Repairability | Spare parts available via after-sales service; power cord replacement by a professional |
| Article number | 10035473 |
Frequently Asked Questions - GrandChef Klarstein
User questions about GrandChef Klarstein
0 question about this device. Answer the ones you know or ask your own.
Ask a new question about this device
Download the instructions for your Oven in PDF format for free! Find your manual GrandChef - Klarstein and take your electronic device back in hand. On this page are published all the documents necessary for the use of your device. GrandChef by Klarstein.
USER MANUAL GrandChef Klarstein
Built-in Electric Oven
INHALTSVERZEICHNIS
Installation
Zubehör
Sicherungsfunktion
natural_image
Symbol of a trash bin crossed with no visible text or labelsCongratulations on purchasing this device. Please read the following instructions carefully and follow them to prevent possible damages. We assume no liability for damage caused by disregard of the instructions and improper use. Scan the QR code to get access to the latest user manual and more product information.

CONTENT
Safety Instructions 34
Installation 37
Device Overview and Keys 45
Commissioning 46
Operation 47
Automatic Recipes 52
Energy Saving Tips 53
Health Advice 53
Baking Tips 54
Cleaning and Care 57
Hints on Disposal 62
Producer 62
TECHNICAL DATA
| Item number 10035473 | |
| Power supply 220-240 V ~ 50–60 Hz | |
| Total output 2880 W | |
| Cooking chamber volume 72 L |
SAFETY INSTRUCTIONS
CAUTION
Risk of burns. This device and the accessible parts of the device become very hot during use. Use extreme care and caution and never touch the heating elements.
- Keep children under 8 years away from the device.
- This device may be only used by children 8 years old or older and persons with limited physical, sensory and mental capabilities and / or lack of experience and knowledge, provided that they have been instructed in use of the device by a responsible person who understands the associated risks.
• The device is not a toy. - Do not use a steam cleaner to clean the unit.
- The accessible parts of the device may become very hot during use. Keep small children away from the device while it is in operation.
- Do not use aggressive or abrasive cleaners or metal scrapers to clean the oven door, as this will scratch the glass surface and shatter the oven door or otherwise cause damage to the appliance.
- Do not install the device behind a decorative door - this would create an overheating hazard.
- Only use accessories that are suitable for use in ovens.
- Never allow liquids or other foodstuffs to be heated in sealed containers, as this may cause a risk of explosion.
- Make sure that paper kitchen towels and cloths do not come into contact with the heating elements of the stove - risk of fire.
- Make sure that there are no harsh chemicals, fl ammable vapours or foreign bodies near the oven or in the oven. This device is only suitable for heating and food preparation.
- If any foodstuffs inside the oven catch fire, keep the oven door closed to choke the flames. Turn off the oven and unplug the power cord from the wall outlet.
- Be careful when opening the oven door. Stand sideways beside the oven and slowly open the oven to allow the hot air / steam to escape. Keep your face away from the oven and make sure there are no children or pets nearby before opening the oven door. After the hot air has escaped, you can continue with preparation. Keep the oven door closed at all times except for necessary cooking and cleaning work.
- Keep accessories and electrical cables away from the hot parts of the equipment.
- Never move the baking trays or baking grates while they are hot, but rather allow them to cool down first.
- Before cleaning and maintenance, always switch off the appliance and unplug the appliance from the mains socket.
- This appliance is designed for household use and can be installed in standard kitchens or residential units.
- All surfaces or furniture surrounding the oven and all materials used for installation must withstand at least 85^ while the appliance is in use.
- Some vinyl and laminate types are particularly prone to heat damage and high temperature decolourisation. Before installing the device, check which surfaces are present.
- The user is responsible for any damage caused by the installation of the device in the vicinity of non-heat-resistant materials or due to insufficient distance to furniture.
- Only install and follow the device in accordance with the requirements listed in this manual.
- The installation must be carried out by a qualified person or a qualified electrician.
- Dispose of the packaging material in a timely manner and ensure that it does not get into the hands of children as this may cause suffocation.
- Do not place heavy objects on the oven door and do not lean against them while the door is open, as this could damage the hinges.
- Do not place containers containing hot oil or grease in unattended areas, as these may give rise to a fire hazard.
- Do not place pans, baking trays or aluminium foil directly on the bottom of the oven as this could lead to heat build-up and damage the enamel.
- Be sure to select the appropriate temperature and function for all foods so food and liquids do not overflow or burn.
- Make sure the food is prepared in sufficiently large containers and that you use a drip tray where necessary.
- Do not install the device next to curtains or soft furniture.
- Never attempt to lift the unit by the oven door or handles, as this may damage the unit or cause personal injury.
- If the power cord is damaged, it must be replaced by the manufacturer, after-sales service or similarly qualified person to avoid danger.
• Install the device so that the socket used for the plug is easily accessible at all times.
- Before connecting the plug of the device to the socket, check that the voltage of the socket corresponds to the voltage indicated on the type plate of the device.

CAUTION
Risk of electric shock! Do not attempt to repair a damaged device yourself and stop using it. Turn off the power, unplug the appliance and contact your service representative.
- To prevent damage, do not allow the power cord to run over sharp edges and do not bend or fold it. Keep it away from hot surfaces and open flames.
- Lay the power cord so that it will not become a trip hazard.
- Under no circumstances should you open the oven cabinet. Do not put foreign objects inside the cabinet.
- Only use accessories recommended by the manufacturer, as non-recommended accessories pose a safety hazard to the user and could damage the device.
- Only use the device on level, stable, clean and dry surfaces.
- Protect the device from heat, dust, direct sunlight, moisture and dripping or splashing water.
- Do not place objects with open flames, such as candles, on or beside the appliance.
- The fixed wiring of the device must be equipped with an all-pole disconnecting device.
• Always wear gloves when handling glass objects. - For your safety, the oven door is made of safety glass. This type of glass is very resistant, but has the property of storing vibrations. Therefore, be very careful with the unit to avoid shocks, especially during installation, and install the unit only in low-vibration areas.
- Do not place film on the glass surface as it could break into large pieces that could be dangerous.
- All electrical installations must be carried out by qualified personnel.
- This appliance must be earthed. Contact an electrician if no grounding line is available.
- The socket used must be accessible even if your oven is in its housing, so that the appliance can be disconnected from the mains at any time.
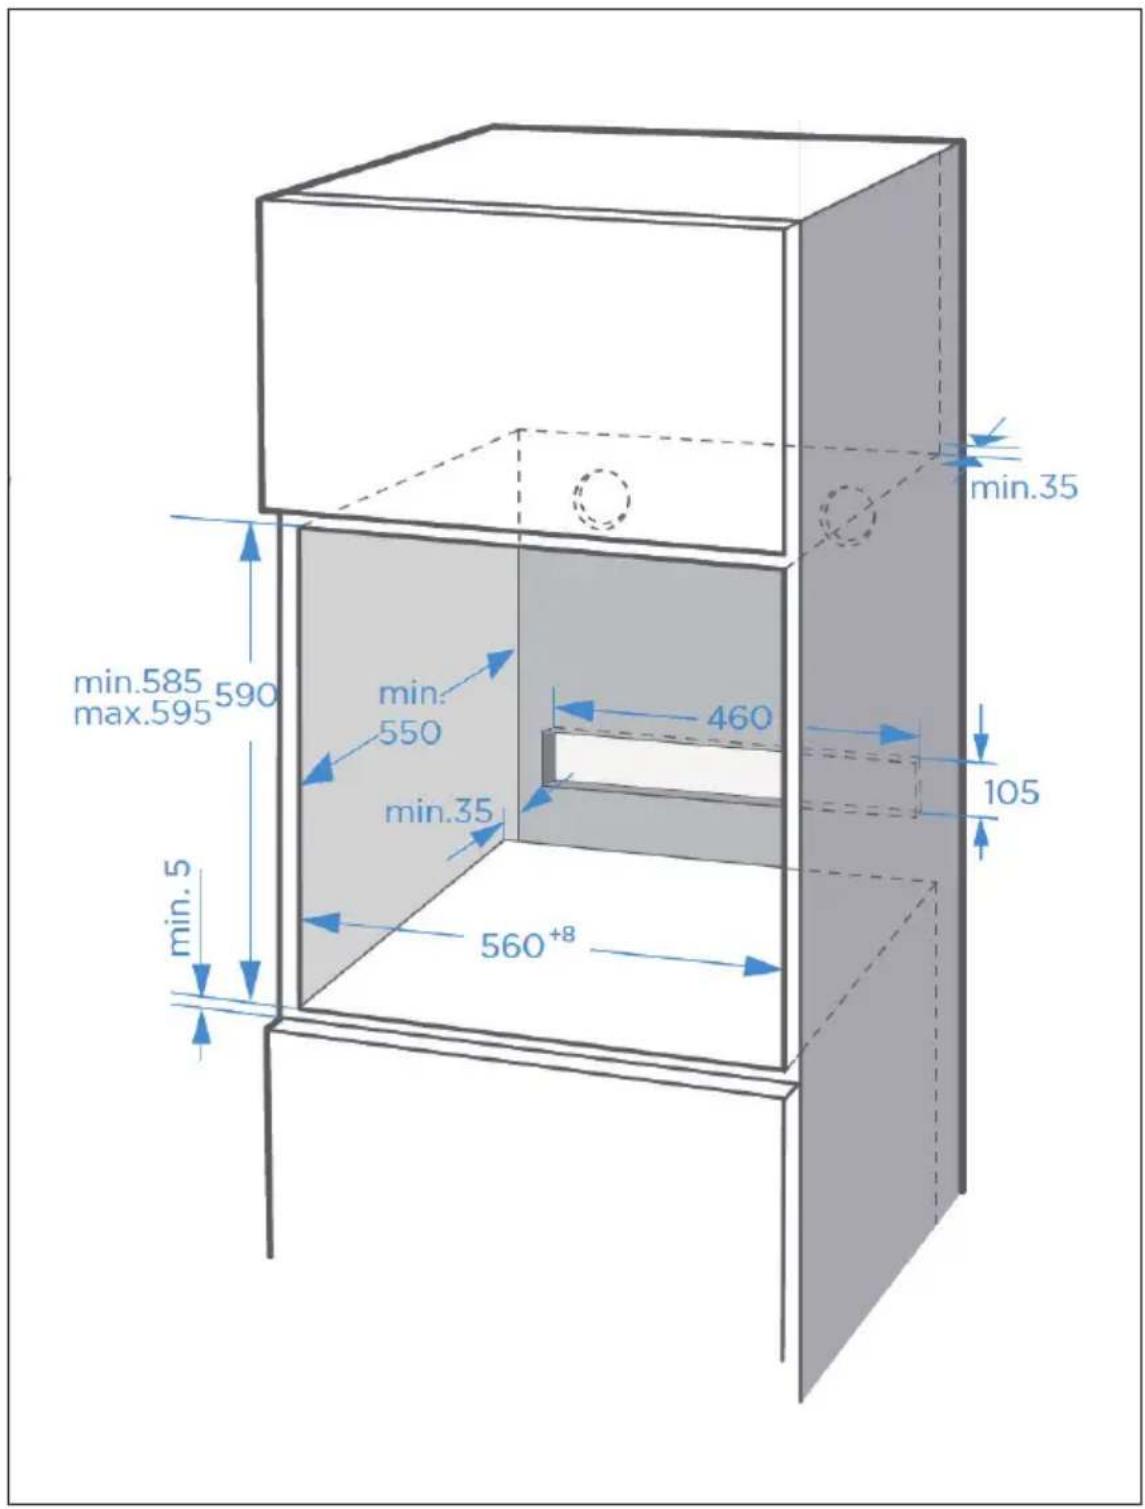
INSTALLATION

CAUTION
Risk of injury! Always have the installation carried out by trained specialist personnel to avoid electric shocks, personal injury and damage to the device.
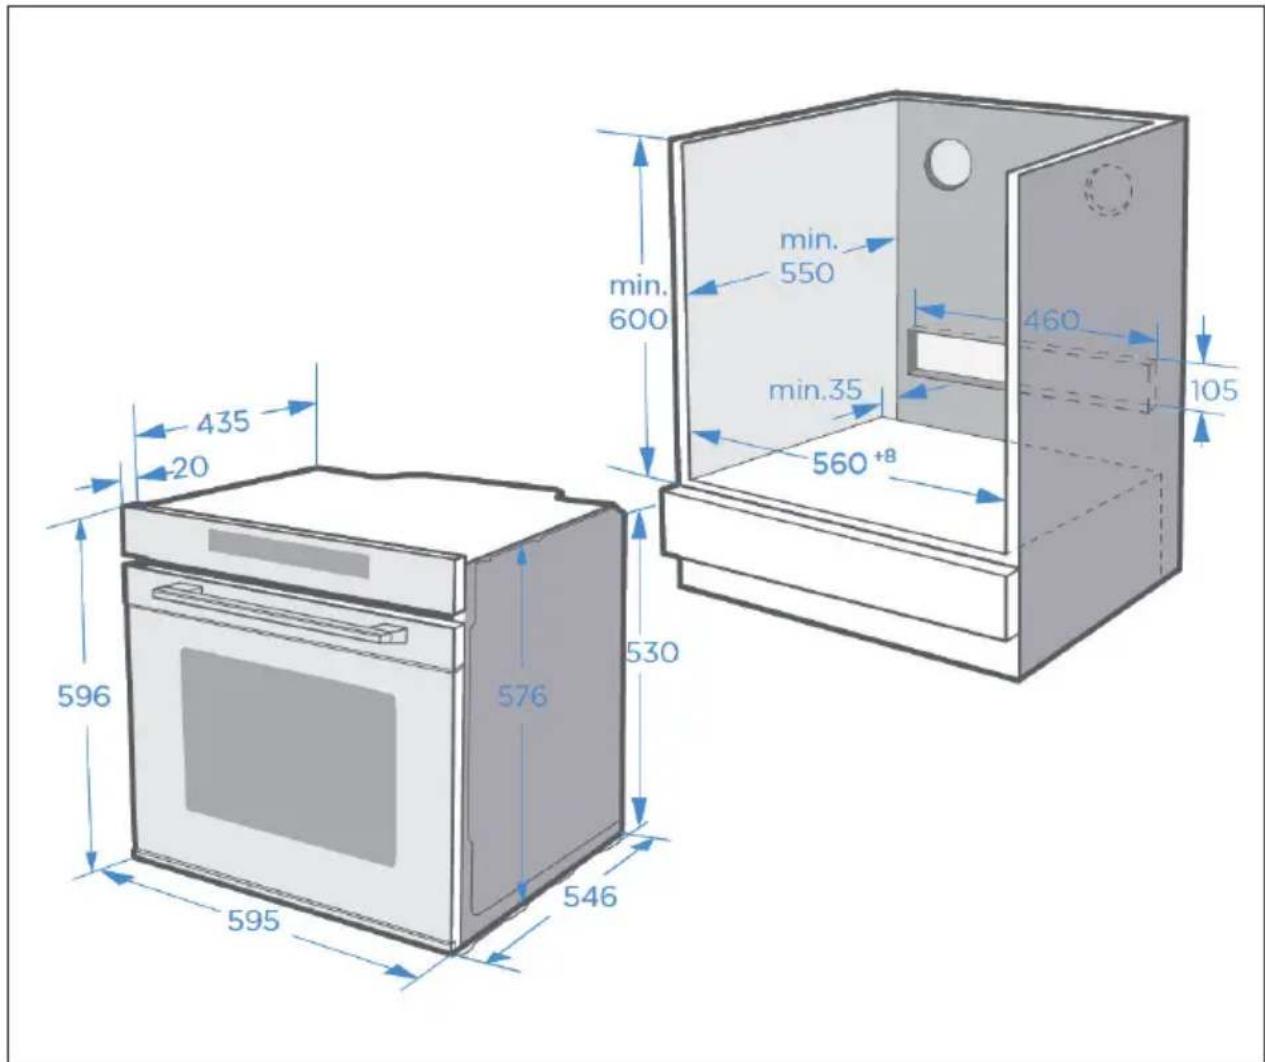
Note on Fitting the Oven into the Kitchen Unit
Fit the oven into the space provided in the kitchen unit; it may be fitted underneath a work top or into an upright cupboard. Fix the oven in position by screwing into place, using the two fixing holes in the frame. To locate the fixing holes, open the oven door and look inside. To allow adequate ventilation, the measurements and distances adhered to when fixing the oven.
- If the oven is to work properly, the kitchen housing must be suitable.
- The panels of the kitchen unit that are next to the oven must be made of a heat resistant material.
- Ensure that the glues of units that are made of veneered wood can withstand temperatures of at least 120 °C.
- Plastics or glues that cannot withstand such temperatures will melt and deform the unit, once the oven has been lodged inside the units, electrical parts must be completely insulated. This is a legal safety requirement.
- All guards must be firmly fixed into place so that it is impossible to remove them without using special tools.
- Remove the back of the kitchen unit to ensure an adequate current of air circulates around the oven.
• The hob must have a rear gap of at least 45 mm.
Notes on electrical connection
- The device is designed for fixed installation with a three-pole mains cable and may only be connected by an authorised specialist in accordance with the wiring diagram.
- Only a qualified electrician who complies with the relevant regulations may replace the mains cable.
- Do not use multiple plugs, socket strips or extensions, as overloading can lead to a fire hazard.
- If the connection is no longer accessible after installation, an all-pole disconnector with a contact opening of at least 3 mm is required.
Basic installation instructions
- Observe the specified installation dimensions exactly.
- To achieve optimum integration into the kitchen unit, install the oven in a standard 600 mm wide cabinet so that it is flush with the front of the cabinet.
- Do not hold the stove by the stove door when installing.
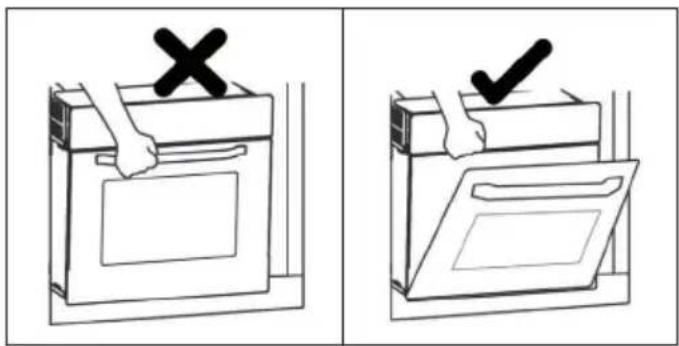
Installation
- To ensure safe operation of this unit, make sure that it has been installed properly and in accordance with the operating instructions. Damage caused by incorrect installation is not covered under the warranty.
- Wear protective gloves during installation to prevent cuts from sharp edges.
- Check the unit for damage before installation and do not connect the unit if it is damaged.
- Remove all packing material and adhesive film from the unit before turning on the power.
• The dimensions are given in mm. - Before installation, make sure it is the correct model. The model number can be displayed on the control panel.
- The mains plug must either be easily accessible or an isolating switch must be installed in the fixed wiring so that the unit can be disconnected from the mains if necessary after installation.
- The unit must not be installed behind a decorative door to avoid overheating.
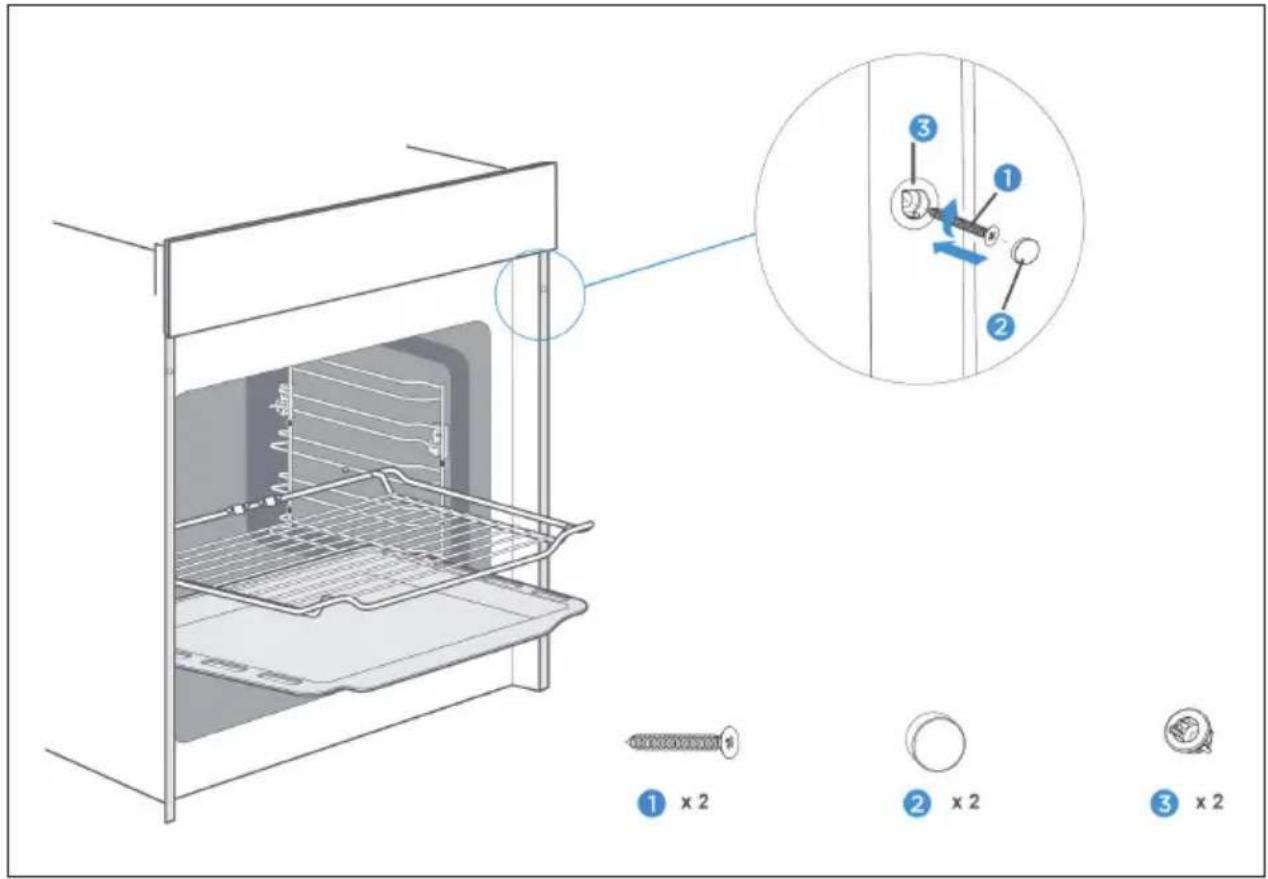
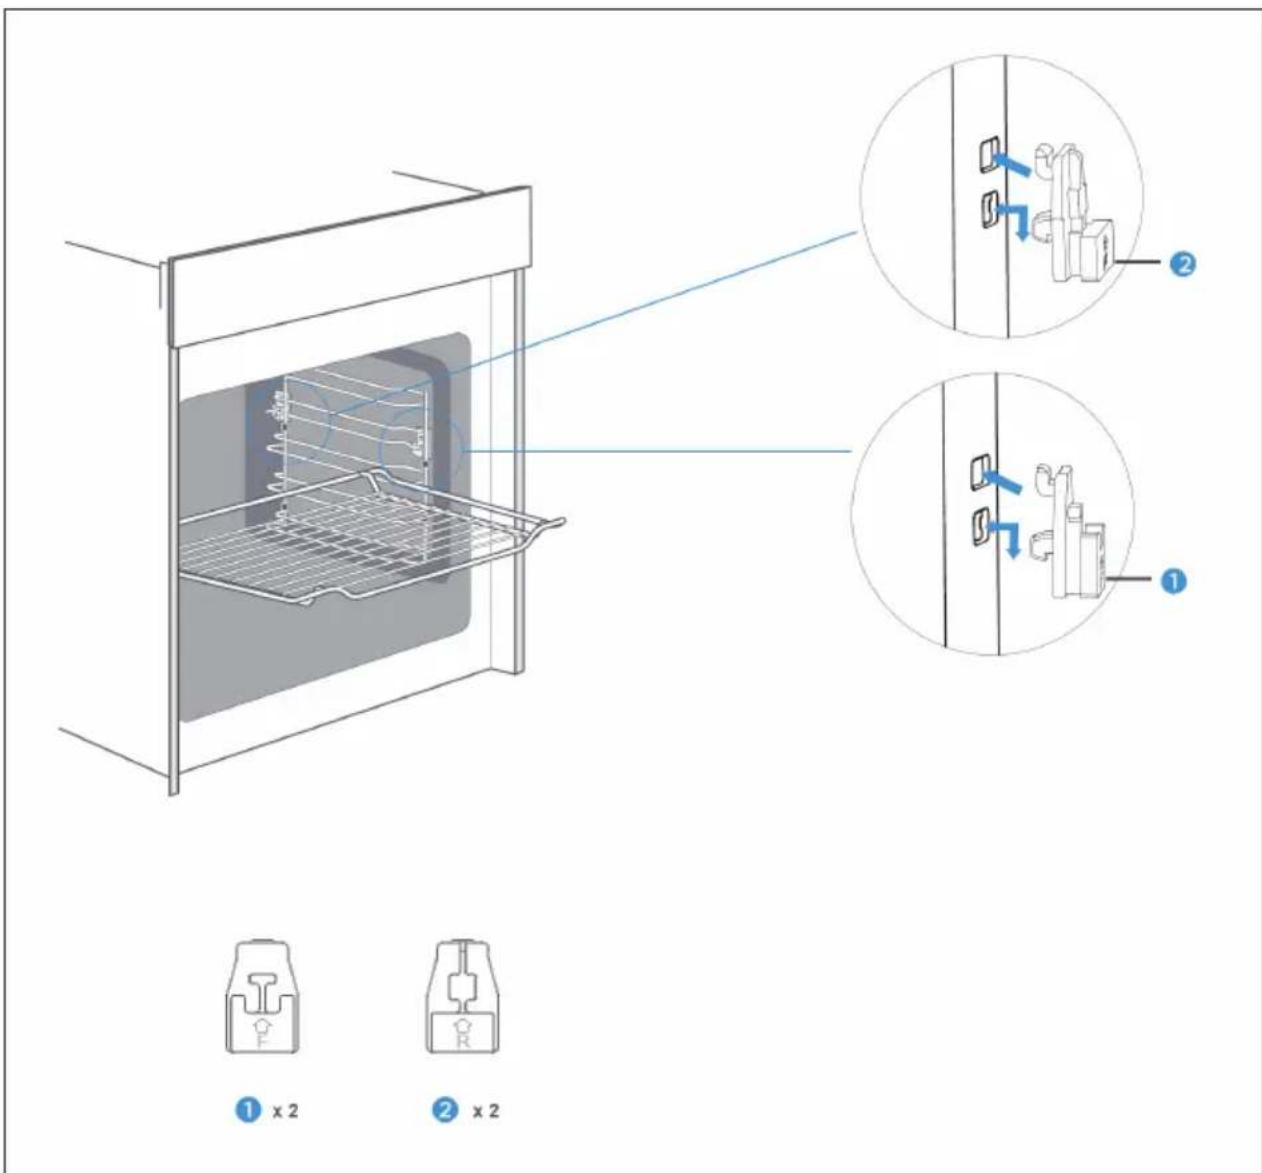
Once the oven is in place, secure it with the accessories (1), (2) and (3) shown below.
Note: Do not overtighten the screws (1) to prevent damage to the furnace or the furnace housing. Only use a screwdriver to tighten the screws.
Accessories
A selection of accessories is included in the scope of delivery of the device. Below you will find an overview of the accessories and information on their correct use.
Accessories included in the scope of delivery
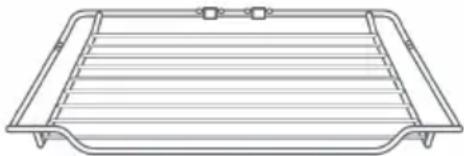 | 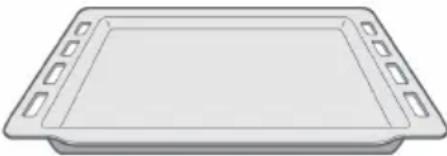 |
| Baking grid Baking tray | |
| For storing ovenware, cake tins and casserole dishes. For roasts and grilled dishes. | For the preparation of sheet cakes and small baked goods. |
• The baking tray can also be used for liquids or juicy food.
- Only use original accessories, as these were specially made for this appliance.
- Contact customer service when you want to reorder original accessories.
Note on accessories
- It is possible that the accessory may deform slightly if it becomes very hot. This is normal and does not affect its function. Once the accessory has cooled down, it will return to its original shape.
- The baking grid can be used not only for the grill function but also for the microwave function. The baking tray must not be used for the microwave function.
- The use of the second level is best suited for the microwave function.
- Only use the microwave function when there is food in the appliance.
Attaching accessories
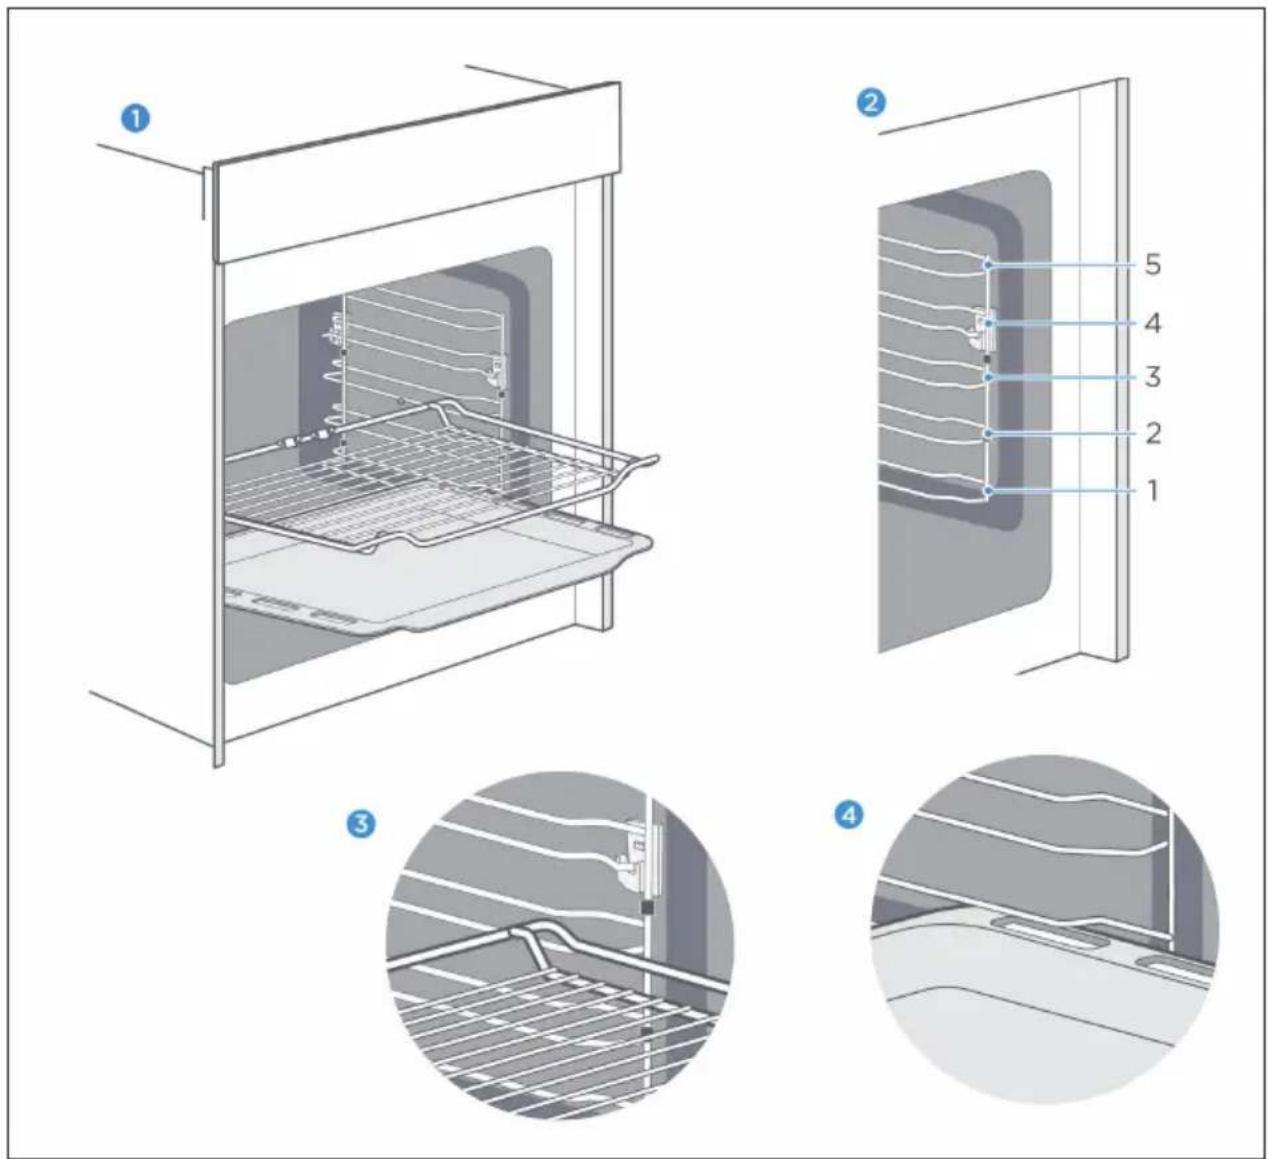
There are five slots in the cooking chamber for accessories. The slots are counted from bottom to top. The accessories can be pulled out about halfway without tilting.
- Make sure that you place the accessories the right way round in the corresponding slot in the oven compartment (see illustration below).
- Always push the accessory fully into the oven cavity so that it does not touch the oven door.
Backup function
The accessory can be pulled out about halfway before it snaps into place. The safety function prevents the accessories and the food on/inside them from falling down due to gravity when pulled out. Accessories should therefore be inserted correctly into the slots in the cooking chamber so that the safety function can engage. Make sure that you insert the baking grid and the baking tray in the correct direction as shown in the left-hand illustration.
Ceramic clips
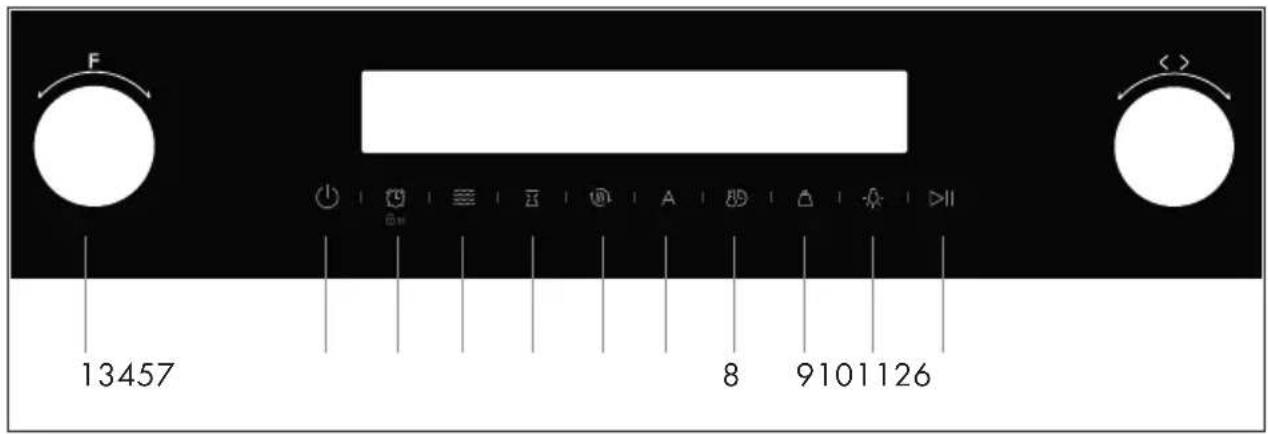
DEVICE OVERVIEW AND KEYS
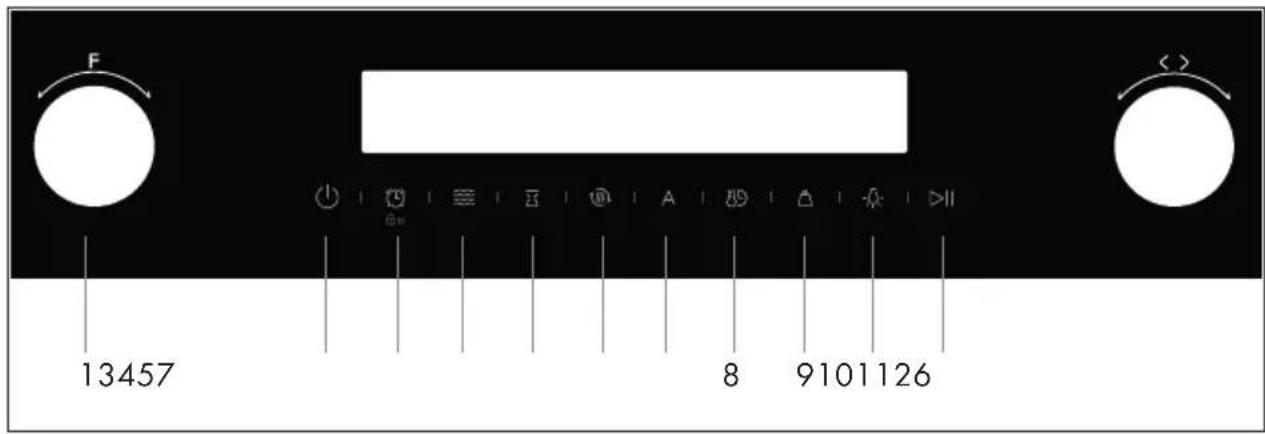
| Key Description | ||
| [W5BW] | 1. Function setting Changing | the heating mode |
 | 2. On/Off Switching the oven | on and off |
 | 3. Timer/ Parental lock | Press the timer function/child lock for 3s |
 | 4. Microwave | Use of the microwave and microwave combination function |
 | 5. End Time | Set end time |
 | 6. Fast preheat | Use this function for fast preheating |
 | 7. Automatic recipes | Automatic recipe function |
 | 8. Time/Time setting / Temperature setting | Set the time in standby mode/switch between time and temperature setting |
 | ||
 | 9. Weight | Setting the Weight when Using the "Automatic Recipes" Function |
 | 10. Lamp | Switching the lamp on and off |
 | 11. Start/Pause | Start/pause the cooking process |
COMMISSIONING
Before the first use
Before using the device for the first time, the interior of the device and the accessories must be cleaned.
- Remove all stickers, protective foils and transport protection.
- Remove all accessories and side rails from the interior of the appliance.
- Clean the accessories and side rails carefully with soapy water and a sponge or soft brush.
- Make sure that there are no packaging materials such as polystyrene granules inside the unit, as this could cause a fire hazard.
- Wipe the smooth surfaces of the interior and the door with a soft, damp cloth.
- Heat the product while the oven door is closed and while the product is empty, so that the smell of new product evaporates.
- Ensure that the kitchen is sufficiently well ventilated when the appliance is heated for the first time. Keep children and pets away from the appliance during this time. Close the doors to adjacent rooms.
Adjust the settings as follows:
| Heating mode | Top and bottom heat |
| Temperature 250 °C | |
| Time 1 h | |
After the device has cooled down:
- Clean the smooth surfaces and the oven door with soapy water and a sponge.
- Dry all surfaces.
- Insert the side rails.
Time setting
Set the time before using the machine.
- Press the TIME button after plugging in the oven power plug. Turn the right-hand dial to set the current hour.
- Touch the TIME button again and turn the right-hand dial to set the current minute.
- Touch the TIME button again to complete the setting.
Note: The time is displayed in 24-hour format.
OPERATION
Heating modes
The unit has a variety of heating modes. The following table shows the main differences and recommendations for use for each mode.
| Heating mode Temperature Usage | |||
 | Top and bottom heat 30 ~250 °C Traditional baking and cooking on one level. Especially suitable for cakes with a moist top layer. | ||
 | Hot air 50 ~250 °C Baking and cooking on several levels. The heat is evenly distributed through the ring surrounding the fan. | ||
 | Top and bottom heat + circulating air | 50 ~250 °C Baking and cooking on several levels. The fan distributes the heat emitted by the heating elements evenly throughout the cooking chamber. | |
| Heating mode Temperature Usage | |||
 | Grill 150 ~250 °C Grilling and roasting small quantities. Place the food centrally under the grill element. | ||
 | Double grill + circulating air | 50 ~250 °C Grilling flat foods and roasting.The fan distributes the heat evenly in the oven cavity. | |
 | Double grill 150 ~250 °C Grilling flat foods and roasting. | ||
 | Pizza function 50 ~250 °C Pizza and dishes that require a lot of heat from below. Underheat and hot air function are active. | ||
 | Lower heat 30 ~220 °C Additional browning of the underside of pizzas, pies and cakes. The heat is released from below. | ||
 | Defrost function - Gentle thawing of frozen food. | ||
 | Fermentation 30 ~ 45 °C Fermentation of yeast and sour doughs and cultivation of yoghurt. | ||
Important notes
- If you want to defrost large portions, it is possible to remove the side rails from the appliance and place the container on the bottom of the cooking chamber.
- The „double grill + circulating air“ and „hot air“ modes, each at 50 °C, are suitable for warming up plates. Use the „Double Grill + Circulating Air“ mode if more than half of the oven floor is covered with plates.
- To ensure that the heat is distributed as evenly as possible throughout the cooking chamber during preparation, the fan operates at certain times during the hot air function to guarantee the best possible performance.
- If you open the oven door during operation, operation is paused. Take special care, as there is a risk of burns.
- Never cover the ventilation openings. Doing so may cause the product to overheat. To cool down the product faster, the cooling fan continues to run for some time after the product is used.
- The cooling fan turns on and off as needed. The hot air is discharged above the oven door.
Using the device
- After connecting the appliance to the power outlet, turn the function dial to set the desired function. Turn the adjustment knob to set the operating temperature.
- When you touch the START/PAUSE button, the unit starts operating. If you do not touch this icon, the unit will return to standby mode after 5 minutes and the time will be displayed on the screen.
- During preparation, you can press the ON/OFF key to cancel or the START/PAUSE key to pause.
Note: Once you have set the temperature, press the Time setting key. You can now set the desired preparation time by turning the adjustment knob.
Fast preheating
This function can be used to shorten the preheating process. Select a function and touch the FAST PREHEAT key. The corresponding symbol lights up on the screen.
Note: The function can be used in all modes except defrost, fermentation and auto recipes. If the function is not available, this will be indicated by a beep from the unit when the key is pressed.
Setting the end time
- Make sure that the current time is set
- Touch the END TIME button and set the hour with the right-hand dial. Press END TIME again to set the minutes.
- Press END TIME again to confirm.
Note: For example, if you have selected 10:00 for the end time and set the preparation time to one hour, the appliance will automatically turn on at 09:00 and turn off at 10:00. This function cannot be used in the Defrost, Automatic Recipes, Microwave Combination, Microwave and Fermentation modes.
Adaptation during preparation
It is possible to adjust the heating mode and temperature setting during operation by turning the function control or the adjustment control. If no other button is pressed within 6 seconds of the adjustment, this setting is saved.
If you want to adjust the preparation time, press the TIME SETTING button and adjust the preparation time with the right adjustment knob. If no other button is pressed within 6 seconds after the adjustment, this setting will be saved. If you have already set an end time, no changes can be made during preparation. If you want to cancel the preparation, press the ON/OFF button.
Note: If you change mode/temperature/preparation time during preparation, this may have a negative effect on the food to be prepared. It is therefore recommended that you only do this if you are already familiar with the procedure.
Microwave and microwave combination function
The device has 4 microwave functions, including the simple microwave function and the microwave combination function.
| Heating mode Voreingestellte Leistung | Voreingestellte Temperatur | Temperatur-bereich | Zeit | ||
 | Microwave 800 W / / 00:10 – 30:00 min | ||||
 |  | Microwave + hot air | 320 W 160 °C 50 ~ 250 °C 00:01 – 01:30 h | ||
 |  | microwave + double grill + circulating air | 320 W 180 °C 50 ~ 250 °C 00:01 – 01:30 h | ||
 |  | microwave + pizza mode | 320 W 180 °C 50 ~ 250 °C 00:01-01:30 h | ||
- In standby mode, press the MICROWAVE button to use the microwave function. The microwave icon button is displayed on the screen. The preset time is one minute and the preset power is 800W. Touch the MICROWAVE button and adjust the power with the right-hand dial. Touch the TIME SETTING button and adjust the time with the right-hand dial.
- In standby mode, press the MICROWAVE button to use the microwave function. Turn the left-hand dial to set the microwave combination function. There are three available combination modes. Turn the right-hand dial to set the temperature. Touch the Time Setting button and adjust the time with the right-hand dial. Touch the MICROWAVE button to set the microwave power.
- As a combination function, you can select the heating modes top and bottom heat, double grill + convection and pizza mode. If you select another heating mode and press the MICROWAVE button, the appliance will beep to indicate an error.
- You can cancel the combination function by pressing and holding the MICROWAVE button for three seconds.
Note: The baking grid can be used for both the grill function and the microwave function. The baking tray must not be used for the microwave function. The second level is suitable for using the microwave function. Never use the microwave function if there is no food inside the appliance.
Timer
- By pressing the TIMER button, the timer function can be used. When the time you set has elapsed, the unit will beep.
- After pressing the TIMER button for the first time, set the hour, press the button again and set the minute.
- Finally, confirm your setting by pressing the TIMER button again. You can set the timer before and during preparation. If you select a function and the temperature, the timer function is not available.
Parental lock
The device is equipped with a parental lock, which prevents accidental activation or modification of the settings already made. If you press the PARENTAL LOCK button for 3 seconds, the parental lock is activated. If you press the PARENTAL LOCK button again for 3 seconds, the parental lock will be deactivated. The child lock can be activated both when the appliance is in the operating mode and when it is switched off. Once the child lock is activated, a lock symbol is displayed on the screen. When the child lock is activated, the microwave function cannot be cancelled.
AUTOMATIC RECIPES
Your appliance has a large number of automatic programmes to make your preparation easier. Select the appropriate program for the food you are using and follow the instructions on the screen.
| Recipe Micro Preheat | (min) | Preset time Weight | |||
| d01 Defrosting (meat) | YES NO | 08:00 min 0.2 kg 0.1 kg – | 1.5 kg | ||
| d02 Defrosting (poultry) | YES NO | 04:48 min 0.2 kg 0.1 kg – | 1.5 kg | ||
| d03 Defrosting (fish) YES | NO 04:00 | min 0.2 kg 0.1 kg – | 1.0 kg | ||
| A01 Popcorn YES NO 03 | 05 min 0.1 kg | ||||
| A02 Potato and cheese gratin | YES NO | 00:35 h | 0.5 kg | ||
| A03 Cheesecake | NO | NO | 01:16 h | / | |
| A04 Quiche Loraine | NO | 10 | 00:40 h (after preheating) | / | |
| A05 Meatloaf | NO | NO | 01:15 h (default)00:30 h | 1.0 kg | 1 kg0.5 kg |
| A06 Marble cake | NO | NO | 01:20 h | / | |
| A07 Flat bread | NO | 8 | 00:35 h (after preheating) | / | |
| A08 Apple pie | NO | 7 | 01:00 h (after preheating) | / | |
| A09 Fresh pizza on a tray | NO | 8 | 00:35 (after preheating) | / | |
| A10 Apple pie with crumbles | NO NO | 01:00 h | / | ||
Note: When using recipes d01, d02, d03, A01 and A02, do not use a baking tray.
ENERGY SAVING TIPS
- Remove all accessories that are not required during the cooking and baking process.
- If possible, do not open the oven door during cooking and baking.
- If you open the oven door during cooking and baking, switch the mode to „Lamp“ (without changing the temperature setting).
- Reduce the temperature setting in the non-ventilated modes to 50 °C 5 to 10 minutes before the end of the cooking and baking time. This allows you to use the residual heat remaining in the oven to complete the preparation.
- Use „hot air“ whenever possible. You can reduce the temperature by 20°C to 30°C.
- You can use "hot air" to cook and bake on more than one level simultaneously.
- If it is not possible to cook and bake different dishes at the same time, you can reheat them one after the other and use the preheating function of the oven.
- Do not preheat the empty oven if this is not necessary. If possible, place the food in the oven immediately after it has reached the temperature that is displayed when the control lamp is first switched on.
- Do not use reflective foil such as aluminum foil to cover the bottom of the oven.
- Use the timer and/or a temperature sensor whenever possible.
- Use dark matt and light baking tins and containers. Try not to use heavy accessories with shiny surfaces, such as stainless steel or aluminium.
- Only use the microwave function when there is food inside the appliance.
HEALTH ADVICE
When heating starchy foods (e.g. potatoes, French fries, bread) from very hot temperatures, acrylamide can be formed.
• Use short preparation times.
• Take the food out of the oven as soon as it is golden brown and do not let it become dark brown or burn.
• Larger portions contain less acrylamide.
- If possible, use the „circulating air“ heating mode.
- Pommer: Use more than 450 g per tray. Spread the chips evenly on the baking tray and turn them over from time to time. If available, follow the preparation instructions on the packaging to obtain the best possible result.
BAKING TIPS
| You want to prepare your own recipe. First | try to find similar recipes and optimize the preparation process depending on the result. |
| Is the cake ready baked? Insert a wooden | stick into the cake about 10 minutes before the baking time indicated in the recipe is reached. If no raw dough sticks to it, the cake is ready. |
| After baking, the cake loses a lot of volume when cooling down. | Next time, try lowering the temperature by 10^ and check again how the dough is handled as indicated in the recipe. |
| The cake is much higher in the middle than on the outer ring. | Next time, do not grease the outer edge of the springform pan. |
| The cake is too brown at the top. Next time | move the tray/grill to a lower level or lower the temperature (this can lead to longer baking times). |
| The cake is too dry. Set the temperature 10^ higher (this can lead to shorter baking times). | |
| The food looks good but is too moist inside. | Reduce the temperature setting by 10^ (this may result in longer preparation time) and check the recipe used again. |
| The browning is uneven. Reduce the temper | ature setting by 10^ (this may result in a longer preparation time). Use the heating mode "top and bottom heat" on one level. |
| The cake is less browned on the underside. | Place the tray/grid one level down. |
| When baking on several levels at the same time: one sheet is darker than the other. | Use fan-assisted mode for baking on more than one level and remove the trays one by one when they are ready. It is not essential that all the trays are ready at the same time. |
| Condensation water during baking. Steam | is part of the baking and cooking process and normally moves along with the cold air flow from the oven. This steam can condense on various surfaces on or near the oven and form water droplets. This is a physical process and cannot be completely avoided. |
| Which baking utensils can be used? Any heat-resistant baking utensils can be used. It is recommended not to bring aluminium into direct contact with food, especially if it is acidic. | |
| How is the grill function used? Preheat the oven for 5 minutes and place the food in the level indicated in these instructions. | |
| How can the oven be kept clean during grilling? | Use the baking tray filled with 2 litres of water at level 1. Almost all liquids dripping from the food placed on the grid will be collected by the baking tray. |
| The heating elements turn on and off over time in all grilling modes. | This is a normal process and depends on the temperature setting. |
| How can you estimate the oven settings if the weight of a roast is not specified in the recipe? | Select the settings next to the roast weight and change the time slightly. |
| If possible, use a meat probe to measure the temperature in the meat. | |
| Carefully insert the head of the meat probe into the meat, following the manufacturer's instructions. | |
| Make sure that the probe head is in the middle of the thickest part of the meat and not near a bone or hole. | |
| What happens if liquid is poured onto the food during baking or the preparation process? | The liquid boils and steam is generated as a normal physical process. |
| Use caution because the vapor is hot. See also "Condensation during baking" for more information. | |
| If the liquid contains alcohol, the boiling process is faster and may cause flames in the cavity. Make sure that the oven door is closed during such processes. Check the baking or cooking process carefully. Open the door very carefully and only if necessary. | |
CLEANING AND CARE
Regular cleaning will ensure that your device retains its appearance and will function fully for a long time. The following explains how to clean your machine. Depending on the model you have purchased, not all of the above areas may be included in your model.
Do not use any:
- Aggressive cleaning agents;
• Cleaning agents with a high alcohol content;
• scouring pads or sponges;
• High pressure or steam cleaners - Special cleaning agents that must be used when the device is still hot.
Note: Wash new sponges thoroughly before using them for the first time.
| Area Cleaning | |
| Stainless steel front (outside) Hot soapy water | |
| Plastic Hot soapy water | |
| Painted surfaces Hot soapy water | |
| Control panel Hot soapy water | |
| Clean the control panel with a damp cloth and then wipe it dry with a dry cloth. Do not use a glass cleaner or glass scraper. | |
| Door panel Hot soapy water | |
| Clean door panel with a damp cloth and then wipe it dry with a dry cloth. Do not use a glass scraper or scouring pad. | |
| Door handle Hot soapy water | |
| Clean the door handle with a damp cloth and then wipe it dry with a dry cloth. Do not use a glass scraper or scouring pad. | |
| Enamelled and self-cleaning surfaces | See notes according to the table |
| Glass cover for the interior lighting | Hot soapy water |
| Clean the cover with a damp cloth and then wipe it dry with a dry cloth. Use an oven cleaner if the cooking chamber is heavily soiled. | |
| Door seal (do not remove!) Hot | soapy water |
| Clean the door seal with a damp cloth. Never use abrasive cleaners for this. | |
| Stainless steel door cover Stainless steel cleaner | |
| Please follow the manufacturer's instructions. Use stainless steel cleaners. Remove the door cover for cleaning. | |
| Accessories Hot soapy water | |
| Soak the accessories in hot soapy water and clean them with a soft cloth or brush. Use a scouring sponge for heavy soiling. | |
| Guide rails Hot soapy water | |
| Soak the guide rails in hot soapy water and clean them with a soft cloth or brush. | |
| Extendable slide-in modules Hot soapy water | |
| meat thermometer Hot soapy water | |
Notes on cleaning
- Slight colour differences on the front of the device are caused by the use of different materials such as glass, plastic and metal.
- The shadows in the door panel, which look like stripes, are caused by reflections caused by the interior lighting.
- Enamel is produced at very hot temperatures. This can lead to a slight colour variation. This is normal and has no effect on the function. The edges of the thin inserts cannot be fully enamelled, which can make them rough. This has no influence on the anti-corrosion protection.
- Keep the appliance clean at all times and remove dirt immediately so that no stubborn dirt can form.
Cleaning tips
- Clean the cooking chamber after each use. This prevents dirt from settling.
- Remove stains caused by lime, grease, starch and albumin (protein) immediately.
- Remove stains caused by food with a high sugar content immediately.
• Always use suitable cookware for the preparation of different dishes.
TROUBLESHOOTING
| Problem Solution approach | |
| The device does not work The fuse may be faulty. Check the fuse switch in the fuse box. | |
| The rotary knobs have fallen out of the holder on the control panel | The knobs were accidentally loosened. They can be removed from the unit. Simply reinsert them into their holder on the control panel and push them in far enough to ensure that they are securely seated and can be used again. |
| The knobs are no longer easy to turn. | There is dirt under the knobs. Remove the knobs and clean them carefully with a damp cloth. Dry them with a dry cloth. Do not use abrasive or aggressive cleaning agents for cleaning. Do not soak the knobs in water and never put them in the dishwasher. Do not remove the knobs from the holder too often, so that they remain stable. |
| In hot air mode the fan does not run permanently | This is normal. The appliance works in such a way that the heat is distributed as evenly as possible inside the oven. |
| After baking, a loud noise can be heard and an air flow can be observed near the control panel | This is normal. The noise is the cooling fan, which is automatically activated after the oven has been used and cools down the cooking chamber faster. The cooling fan switches off automatically after a while. |
| Food was not ready in the preparation time indicated in the recipe | A different temperature than that specified in the recipe has been used. After setting the temperature, make sure that it is the correct temperature. |
| The amount of food used is different from that specified in the recipe. Check the recipe again. | |
| Uneven browning of food The temperature setting is too high or another level could be used. Check whether your settings match the specifications in the recipe. | The surface finish or the color or material of the baking utensils used was not the best choice for the oven function you selected. For example, use matt, dark and lightweight ovenware for the "top and bottom heat" heating mode. |
| The lamp does not turn on The lamp must be replaced. | |
HINTS ON DISPOSAL
natural_image
Symbol of a trash bin crossed with no visible text or labelsAccording to the European waste regulation 2012/19/EU this symbol on the product or on its packaging indicates that this product may not be treated as household waste. Instead it should be taken to the appropriate collection point for the recycling of electrical and electronic equipment. By ensuring this product is disposed of correctly, you will help prevent potential negative consequences for the environment and human health, which could otherwise be caused by inappropriate waste handling of this product. For more detailed information about recycling of this product, please contact your local council or your household waste disposal service.
PRODUCER
Chal-Tec GmbH, Wallstraße 16, 10179 Berlin, Germany.
Estimado cliente:
ÍNDICE DE CONTENIDOS
Instalación
Accesorios
VISTA GENERAL DEL APARATO Y TECLAS

natural_image
Symbol of a trash bin crossed with a diagonal line, no text or numbers presentSOMMAIRE
Installation
Accessoires
APERÇU DE L'APPAREIL ET TOUCHES
natural_image
Symbol of a trash bin crossed with a diagonal line, no text or numbers presentINDICE
Installazione
Accessori
DESCRIZIONE DEL DISPOSITIVO E TASTI

natural_image
Symbol of a trash bin crossed with a diagonal line, no text or numbers present

- INHALTSVERZEICHNIS
- Installation
- Zubehör
- Sicherungsfunktion
- CONTENT
- SAFETY INSTRUCTIONS
- CAUTION
- Note on Fitting the Oven into the Kitchen Unit
- Notes on electrical connection
- Basic installation instructions
- Accessories
- Accessories included in the scope of delivery
- Note on accessories
- Attaching accessories
- Backup function
- Ceramic clips
- DEVICE OVERVIEW AND KEYS
- COMMISSIONING
- Before the first use
- Time setting
- OPERATION
- Heating modes
- Important notes
- Using the device
- Fast preheating
- Setting the end time
- Adaptation during preparation
- Microwave and microwave combination function
- Timer
- Parental lock
- AUTOMATIC RECIPES
- ENERGY SAVING TIPS
- HEALTH ADVICE
- BAKING TIPS
- CLEANING AND CARE
- Notes on cleaning
- Cleaning tips
- TROUBLESHOOTING
- HINTS ON DISPOSAL
- PRODUCER
- Estimado cliente:
- ÍNDICE DE CONTENIDOS
- Instalación
- Accesorios
- VISTA GENERAL DEL APARATO Y TECLAS
- SOMMAIRE
- Accessoires
- APERÇU DE L'APPAREIL ET TOUCHES
- INDICE
- Installazione
- Accessori
- DESCRIZIONE DEL DISPOSITIVO E TASTI
Brand : Klarstein
Model : GrandChef
Category : Oven