iTuner 320 ME - Receiver Auna - Free user manual and instructions
Find the device manual for free iTuner 320 ME Auna in PDF.
User questions about iTuner 320 ME Auna
0 question about this device. Answer the ones you know or ask your own.
Ask a new question about this device
Download the instructions for your Receiver in PDF format for free! Find your manual iTuner 320 ME - Auna and take your electronic device back in hand. On this page are published all the documents necessary for the use of your device. iTuner 320 ME by Auna.
USER MANUAL iTuner 320 ME Auna
| 123 | ||
| 02:18 | 02:18 | 02:18 |
| ● English | ||
| Deutsch | Enable 'Check Network when Power On'? | Would you like to configure Network now? |
| François | ||
| magyar | ||
| 1/8 | YES NO | YES Yes(WPS) NO |
https://www.spotify.com/connect/third-party-licenses
Berlin Brands Group UK Ltd
PO Box 1145
Oxford, OX1 9UW
United Kingdom
Congratulations on purchasing this device. Please read the following instructions carefully and follow them to prevent possible damages. We assume no liability for damage caused by disregard of the instructions and improper use. Scan the QR code to get access to the latest user manual and more product information.
CONTENT
Technical Data 48
Scope of Delivery 48
Safety Instructions 49
Device Overview and Buttons 50
Screen Icons 52
Remote Control Functions 53
Analog Audio Connection 54
Digital Audio Connection 55
Installation 56
Commissioning and Operation 57
Information About Streaming Music 61
UPnP61
DLNA Function 62
Main Menu 66
Settings 66
My mediaU 77
Internet Radio 77
Media Center 80
Information Center 81
FM Radio 83
DAB Radio 83
BT Connection 84
Remote Control via AirMusic 85
Spotify Connect 86
Disposal Considerations 87
Declaration of Conformity 87
TECHNICAL DATA
| Item number 10035110 | |
| Power supply (input) 100-240 V ~ 50/ | 60 Hz max. 0,5 A |
| Power supply (power supply output) | 5 V / 1,5 A |
| WiFi standard | 802.11 b/g/n |
| WiFi frequency | 2.4 GHz |
| WiFi transmit power (max.) | 14-20 dBm |
| BT frequency | 2.4 GHz |
| BT transmit power (max.) | 10 dBm |
SCOPE OF DELIVERY
Main unit
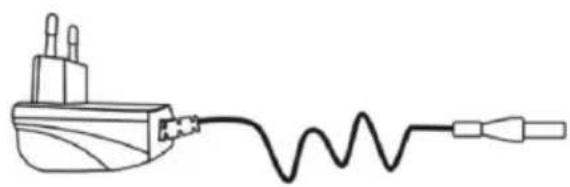
Adapter
Remote Control Manual

W-LAN Antenna
DAB/FM Antenna
SAFETY INSTRUCTIONS
General information
- Lightning - If you are not going to use the device for a long time or if there is a storm, disconnect the plug from the electrical outlet and disconnect the device from the antenna connector. This will avoid damage to the product that may be caused by lightning or overvoltage.
- Overload - Do not overload power outlets, extension cords, or built-in power outlets, as this may result in a fire or electric shock.
- Foreign objects and liquid - Never push objects of any kind through openings in the device as they may touch dangerous voltage points or short out parts, which could result in a fire or electric shock. Never spill liquids of any kind on the device.
- Repairs and maintenance - Do not attempt to service this product yourself, as opening or removing covers will expose you to dangerous voltages or other hazards. Leave all maintenance to qualified service personnel.
- Damage requiring service - Disconnect the power plug from the outlet and consult a qualified specialist if any of the following conditions occur:
a) If the power cord or plug is damaged.
b) If liquid has been spilled or objects have fallen onto the product.
c) If the product has been exposed to rain or water.
d) If the product has been dropped or damaged.
e) If the product has a markedly reduced performance.
-
Replacement parts - When replacement parts are required, make sure that the service professional who replaces the parts only uses replacement parts that have been approved by the manufacturer or that have the same characteristics as the original part. Unauthorized replacement may result in fire, electric shock or other hazards.
-
Heat - Do not place the unit near heat sources such as radiators, heaters, stoves or other products (including amplifiers).
Special Instructions
- This device may be only used by children 8 years old or older and persons with limited physical, sensory and mental capabilities and / or lack of experience and knowledge, provided that they have been instructed in use of the device by a responsible person who understands the associated risks.
- Children should be supervised to ensure that they do not play with the appliance.
- Ensure children and babies do not play with plastic bags or any packaging materials.
- Mains plug/Power adaptor is used as disconnect device and it should remain readily operable during intended use.
- In order to disconnect the apparatus from the mains completely, the main plug/power adaptor should be disconnected from the mains socket outlet completely.
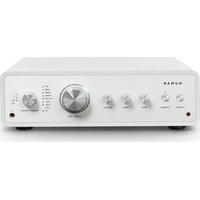
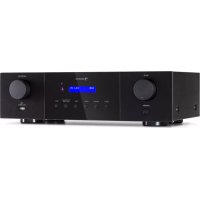
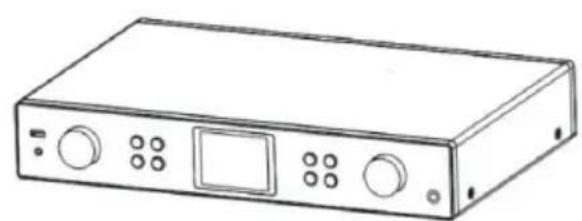
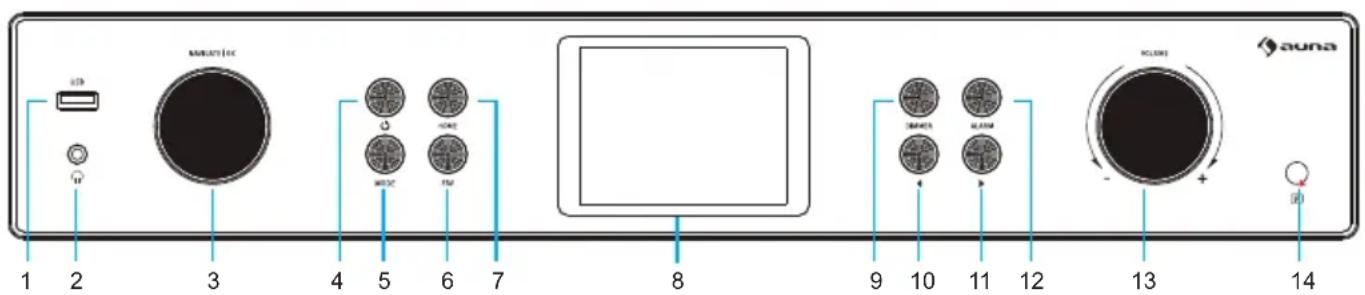
DEVICE OVERVIEW AND BUTTONS
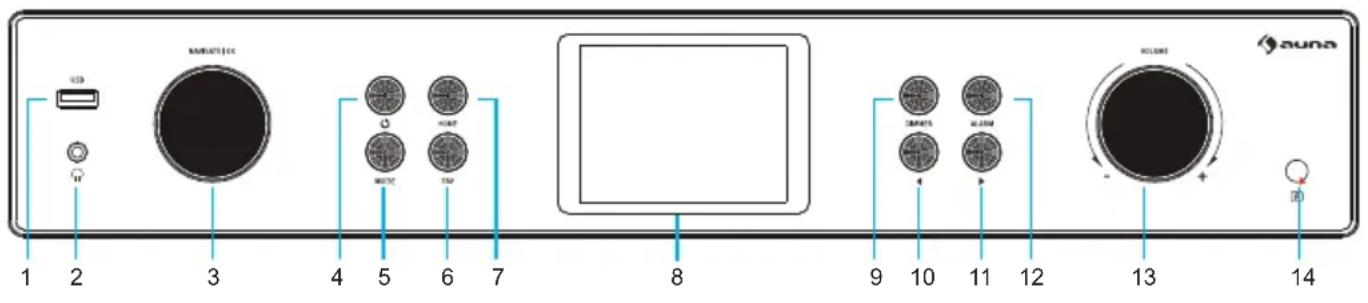
Front view
| 1 USB connection 8 LCD screen (3.2 | TFTLCD) | |
| 2 Headphone jack 9 Dimmer | ||
| 3 OK/ Navigation knob 10 To the left/ previous title | ||
| 4 Standby button 11 To the right/ next title | ||
| 5 Mode button 12 Alarm button | ||
| 6 Favorites 13 Volume key | ||
| 7 Home button 14 Remote Sensor | ||
Rear view
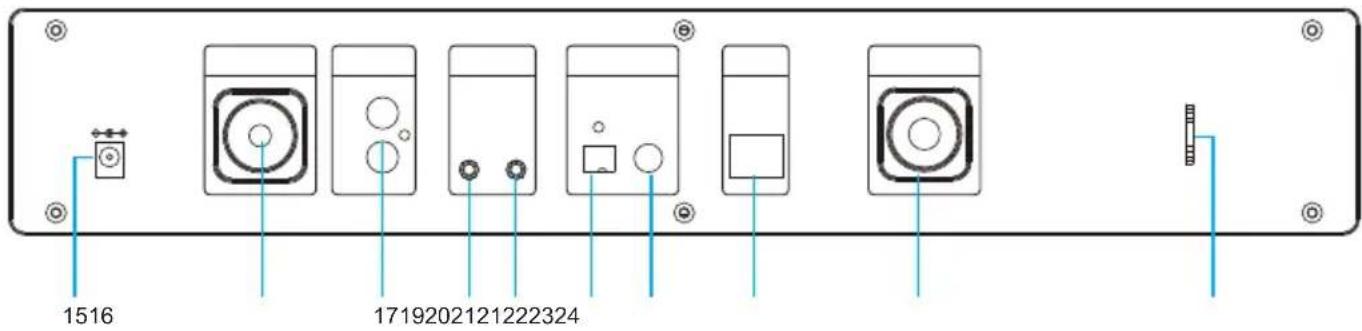
| 15 DC IN connector 20 Digital optical audio output |
| 16 WLAN antenna 21 Digital coaxial audio output |
| 17 Analog audio connection R/L 22 LAN input |
| 18 Analog audio input 23 Antenna connection |
| 19 Analogue audio output 24 Antenna holder |
SCREEN ICONS
| Connection is established, the device is working | |
| No connection to the wireless network | |
| Wireless connection established | |
| VHF reception: Mono | |
| VHF radio reception: Stereo | |
| VHF radio function selection | |
| AUX function selection | |
| Speaker off | |
| Search | |
| Alarm on | |
| Internet radio stations saved as favourites | |
| Stored FM stations |
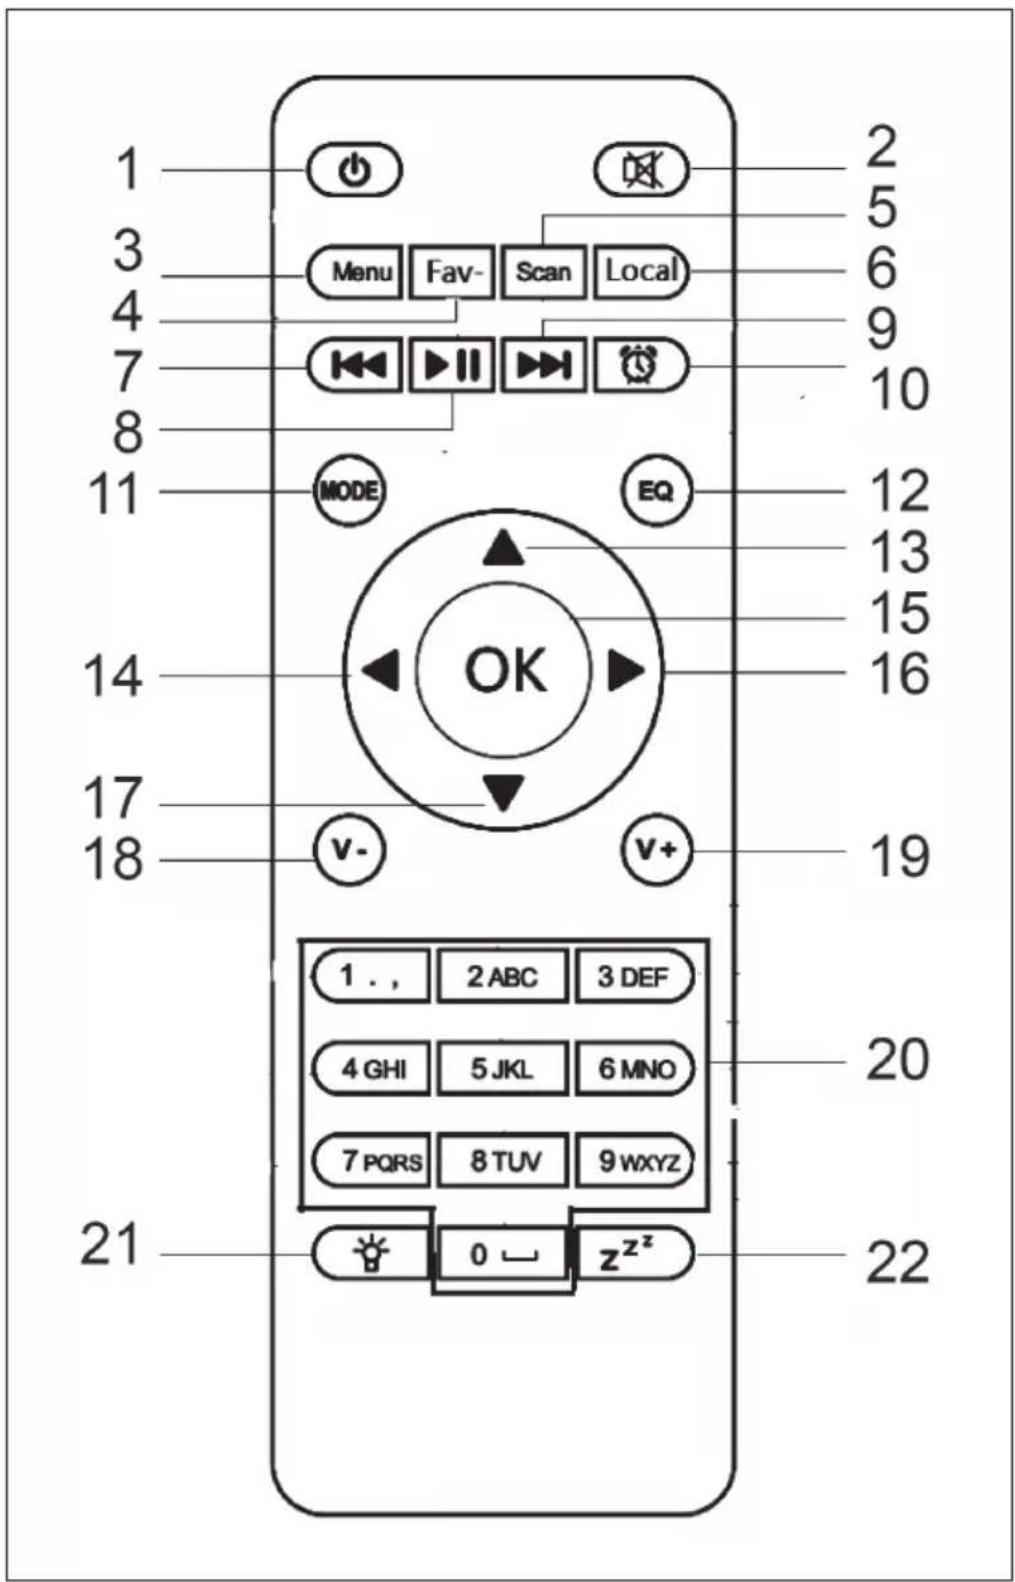
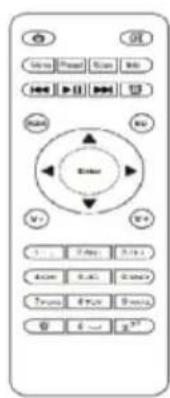
1 Standby button
2 Mute button
3 Main menu
4 Saved stations, favourites, etc.
5 DAB/FM search
6 Local stations
7 Mediacenter, previous title
8 Media centre, play/pause
9 Mediacenter, next title
10 Alarm button
11 Mode selection
12 Equalizer setting
13 To the top
14 To the left
15 Confirmation key
16 To the right
17 Down
18 Decrease volume
19 Increase volume
20 Number keys, call up favourites; enter numbers and letters
21 Dimmer
22 Snooze button
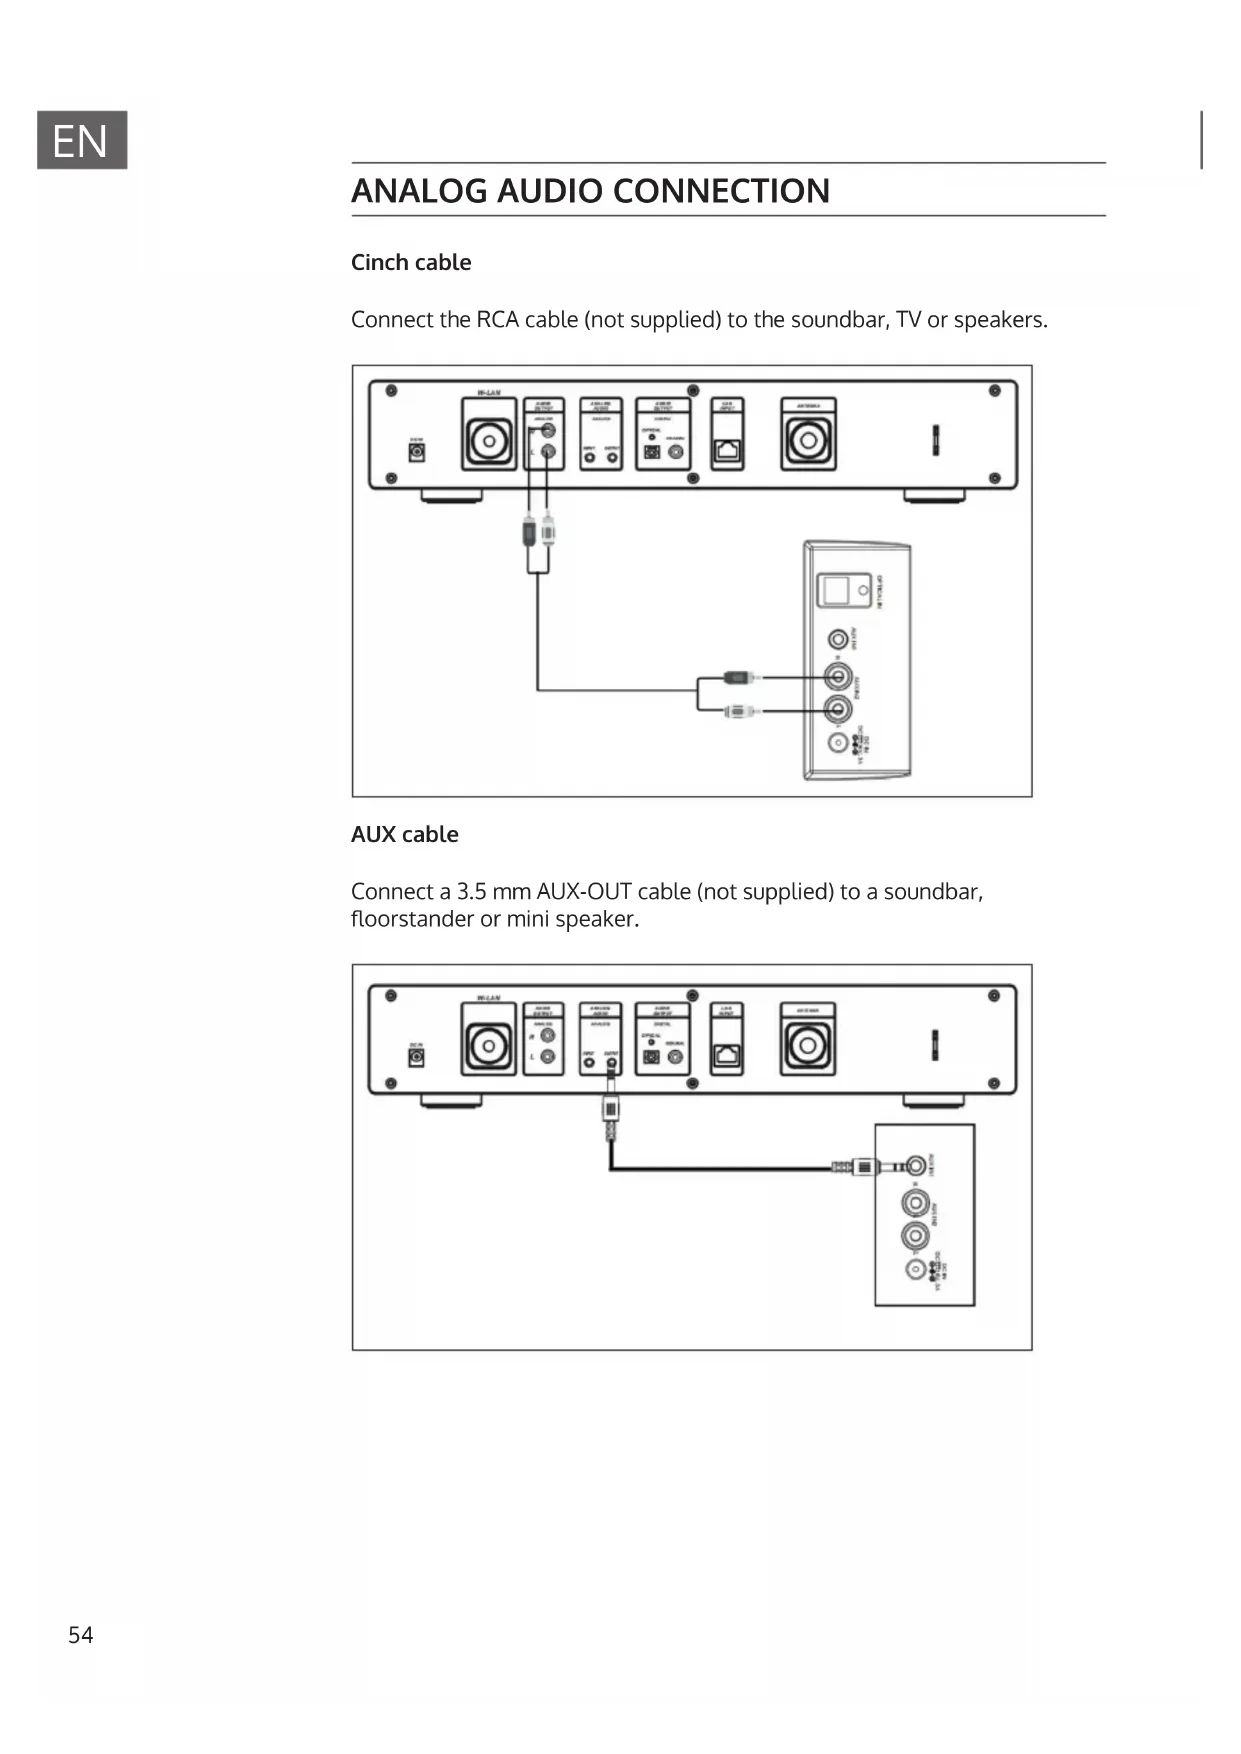
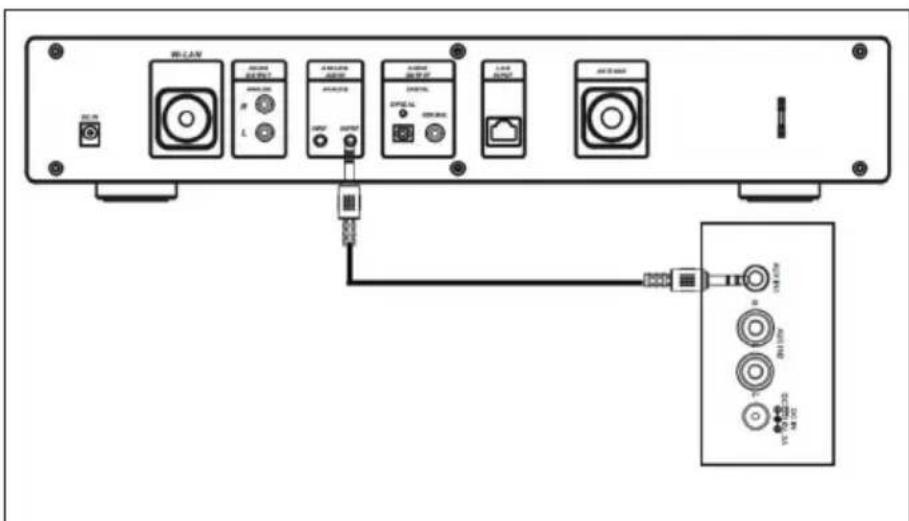
ANALOG AUDIO CONNECTION
Cinch cable
Connect the RCA cable (not supplied) to the soundbar, TV or speakers.
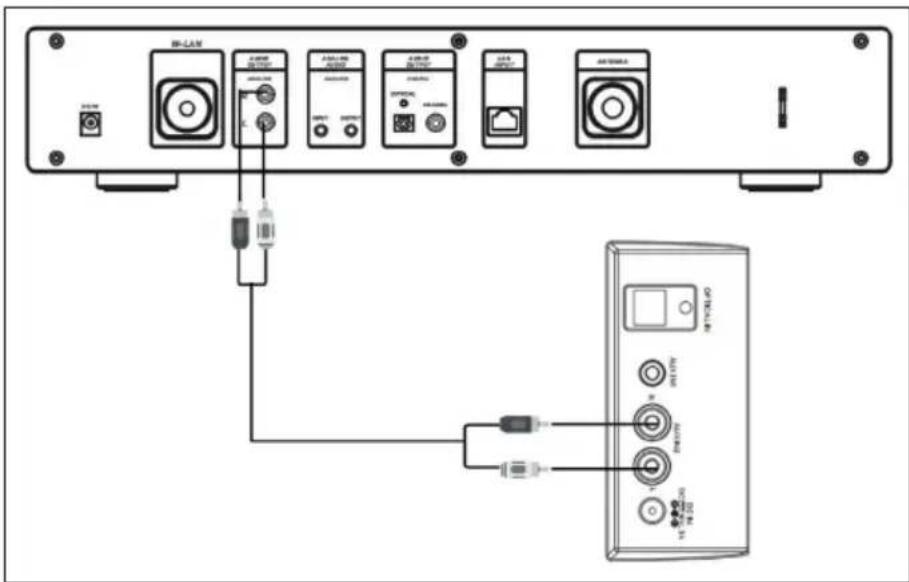
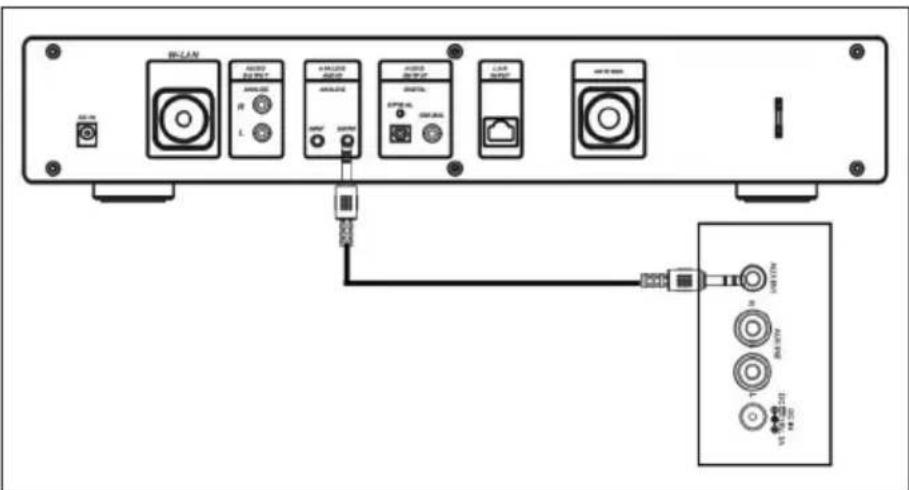
AUX cable
Connect a 3.5 mm AUX-OUT cable (not supplied) to a soundbar, floorstander or mini speaker.
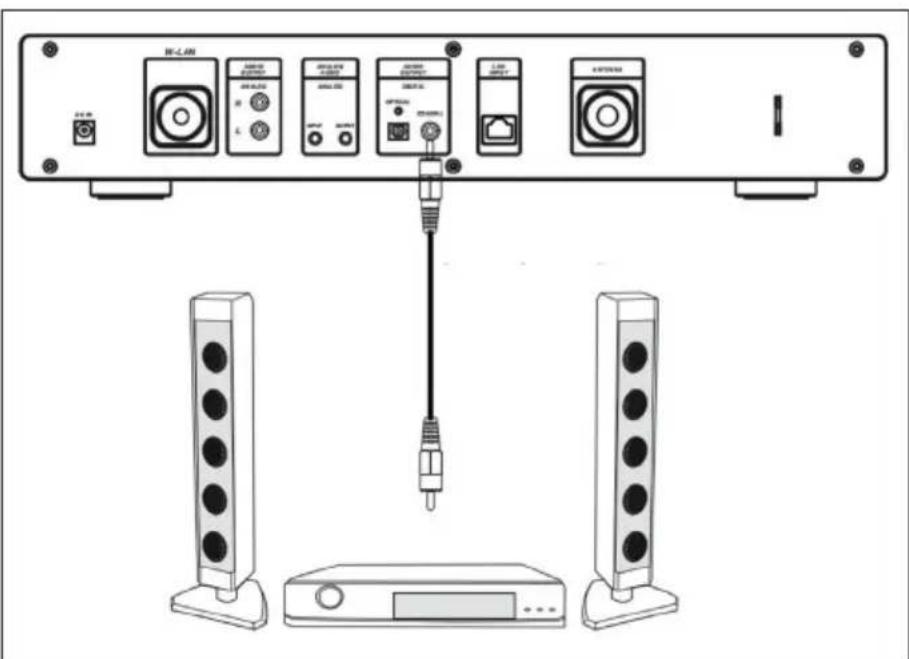
DIGITAL AUDIO CONNECTION
Optical cable
Connect an optical cable (not supplied) to the soundbar, TV or speakers.
Coax cable
Connect a coaxial cable (not supplied) to the coaxial input of external amplifiers with built-in decoder.
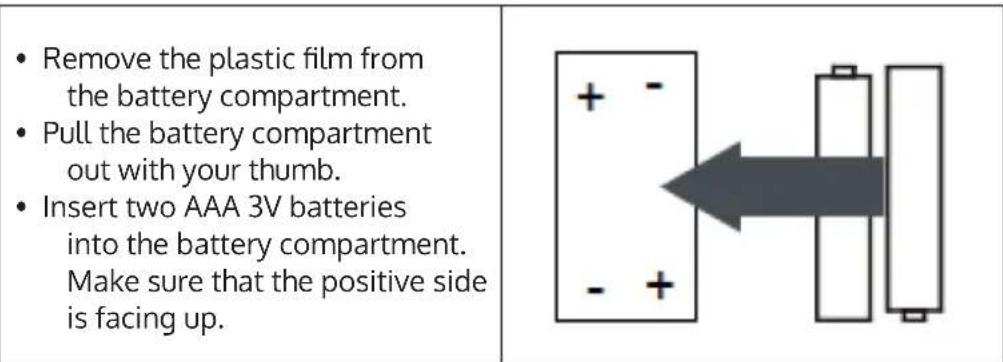
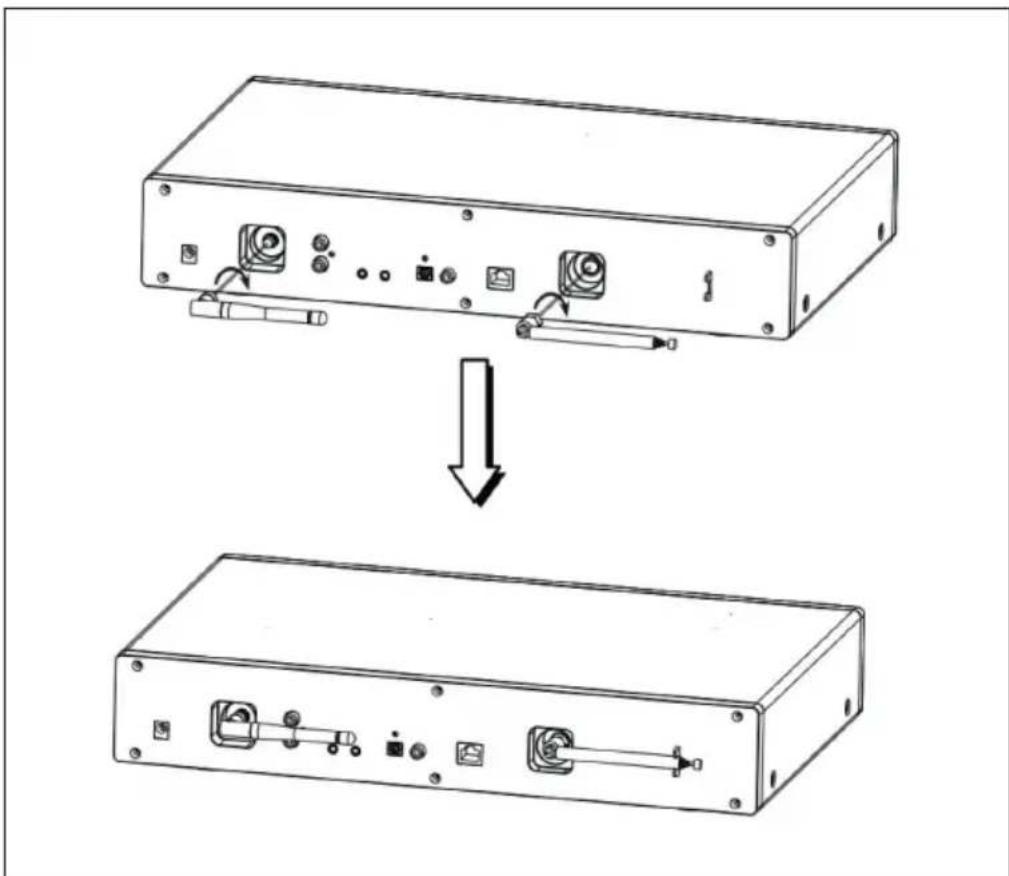
INSTALLATION
Inserting the battery in the remote control
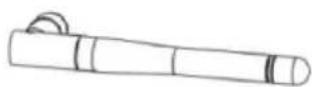
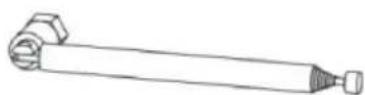
Attaching the Antenna
Insert the antenna into the opening provided and turn it clockwise using a suitable tool.
COMMISSIONING AND OPERATION
Network requirements
- Broadband connection in combination with a cabled/wireless access point, router or similar network device.
- The network device must support the wireless network connection
WLAN (802.11b/q/n) - A PC/ smartphone connected to the network. The devices must be on the same network as the radio.
Establishing a network connection
- Make sure that the WLAN light on the cable-connected/wireless access point or router is lit. Refer to the respective user manual.
Note: WLAN allows data to be transferred over short distances of less than 20 meters without the need to connect the devices with a cable. The strength of the WLAN connection may be affected by walls or ceilings. Therefore, make sure that your device is placed so that there are no obstacles between the access point and the radio.
- Plug the AC adapter into the DC IN connector on the back of the unit and insert the power plug into a wall outlet.
- When you use the unit for the first time, language and network settings must be made.
| 123 | ||
| 02:18 | 02:18 | 02:18 |
| • English | ||
| Deutsch | Enable 'Check Network when Power On'? | Would you like to configure Network now? |
| Français | ||
| magyar | ||
| 1/8 | YES NO | YES Yes(WPS) NO |
- Select "Yes" to establish the network connection.
- If you have a WPS router, select Yes (WPS). Press the WPS button on your router.
- If you select "Yes" (yes), the device will search for available wireless networks and list them on the screen a short time later.
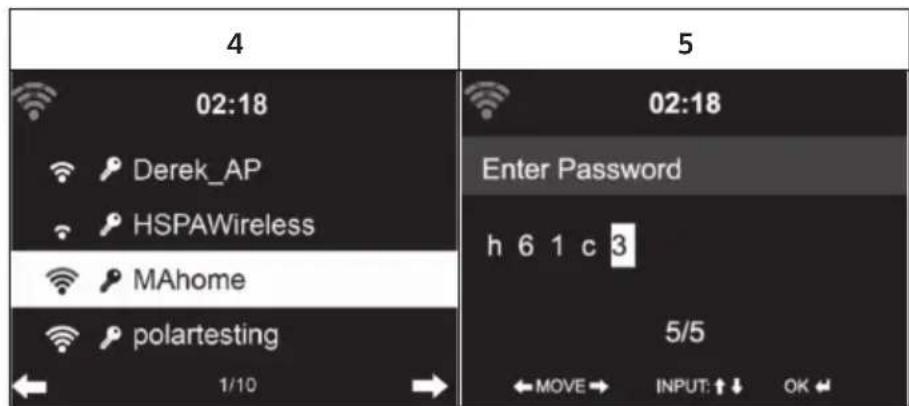
- The number of bars of the WLAN icon in front of the network name (SSID) indicates the relative connection strength of the network.
- The key symbol means that the respective network is password protected.
- If the device cannot find a wireless network, "No wireless networks found" is displayed on the screen. Change the location of the machine or check the wireless router.
- You can view the SSID of the access point in the access point (router) settings.
- Select the desired network and confirm with OK.
- If the selected network is password protected, you will be prompted to enter the password.
- When entering the password, pay attention to upper and lower case.
Option 1: Enter the password using the rotary control:
You can turn the control dial to enter the password. If you made an incorrect entry, press the key to correct it. To move to the next entry, press the key
Option 2: Entering the password by remote control
Enter the password using the numbers and letters on the remote control. The cursor indicates the current input field. Press the corresponding numb button repeatedly to display the following characters:
| 0 Delete entry |
| 1 (Space) @ !" # $ % & ( ) * ' + - { \ | }< >?...... |
| 2 2 A B C a b c |
| 3 3 D E F d e f |
| 4 4 G H l g h i |
| 5 5 J K L j k l |
| 6 6 M N O m n o |
| 7 7 P Q R S p q r s |
| 8 8 T U V t u v |
| 9 9 W X Y Z w x y z |
| Select previous input field, the input can be overwritten |
| Next input field, the last entry is saved |
| Selecting a number or letter |
| 6 | 7 |
| 02:18 Connecting to network ... ... ... | 02:18 My mediaU |
| Press OK to confirm the ente- red password. | It may take a few seconds to establish the network connec- tion. |
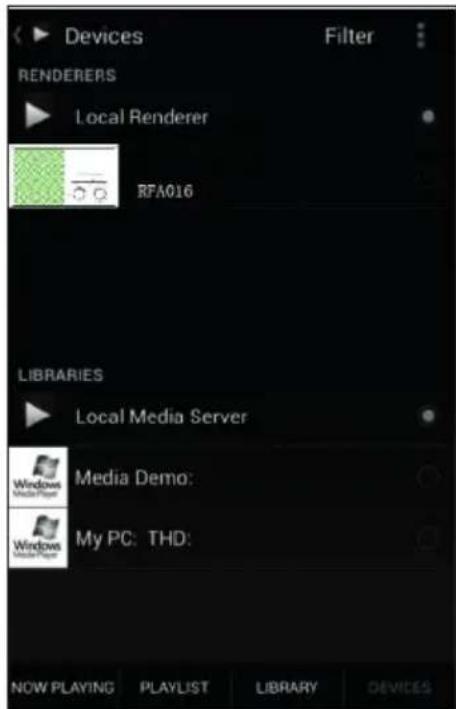
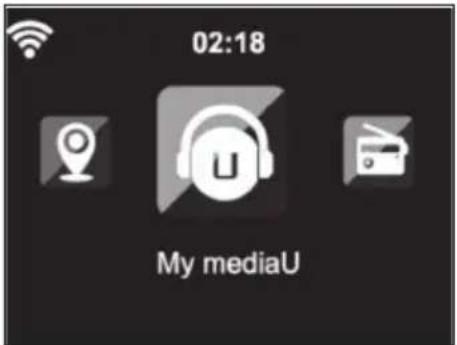
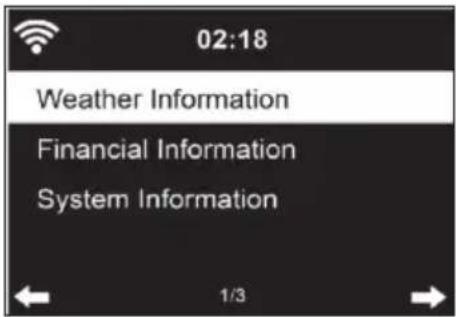
As soon as the connection is established, the main menu with the most important submenu items appears:
- Internet radio: Access to radio stations worldwide
Media Center: Access to your UPnP devices via software with streaming capability
Information center: Access to weather, financial and system information - Settings: Multiple System Settings
- Local radio stations: Access to radio stations in a certain region (e.g. only German stations)
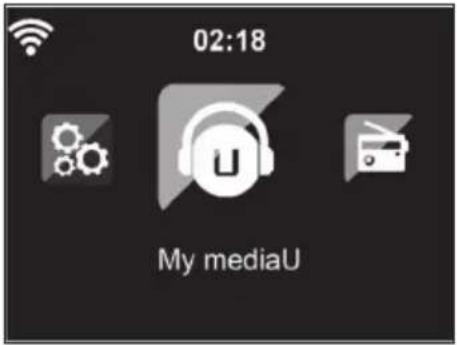
- My mediaU: Access to an online media library. This icon only appears if this function has already been activated under "Configuration".
Press the standby key to enter standby mode. The time, date and all active alarms are displayed on the screen.
- When you successfully connect to the network and use the machine again with the network, the machine automatically connects to the network. If you want to change the network, connect to the network in Configuration.
- Turn the circular volume control to enter the numbers/letters. When you reach the letter you want to enter, press the button and continue entering the next letters. When you have finished entering, press the OK button to confirm. You can press the key move to the previous entry.
- Turn the volume control on the unit or press the V-/V+ buttons on the remote control to adjust the volume. If you want to mute the unit, you can press the Mute button directly.
INFORMATION ABOUT STREAMING MUSIC
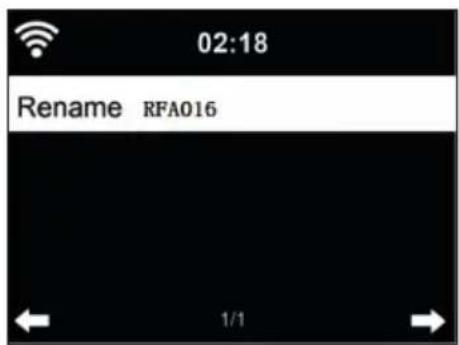
- The default device name is: iTunes 320 ME. You can rename the device as desired.
- The following information is an introduction to setting up streaming music from your computer and other media.
Note that any apps you use to stream music have their own instructions.
Make sure that the media files to be streamed with your device are in MP3, WMA, WAV or AAC format. - For details about media playback via streaming, refer to the "Media Center" section.
UPNP
To stream music from the computer, the following steps must be performed on the computer:
- Connect the computer to the network.
- Make sure your device is turned on and connected to the same network as your computer.
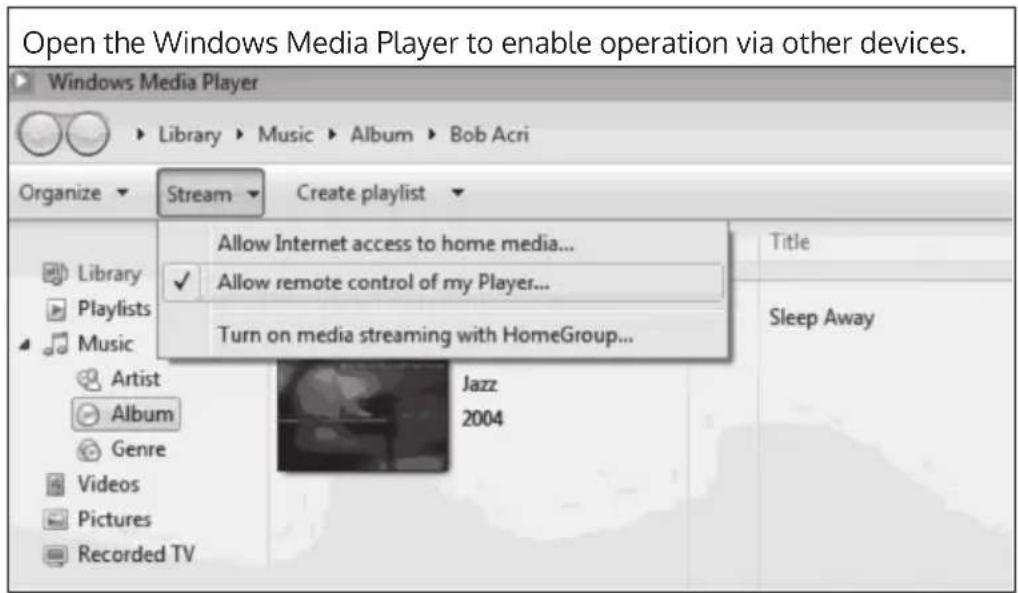
- Open the UPnP platform Windows Media Player (11 or later). Alternatively, you can use other platforms or servers, such as Windows Media Connection.
Example for Windows XP with Windows Media Player Version 11
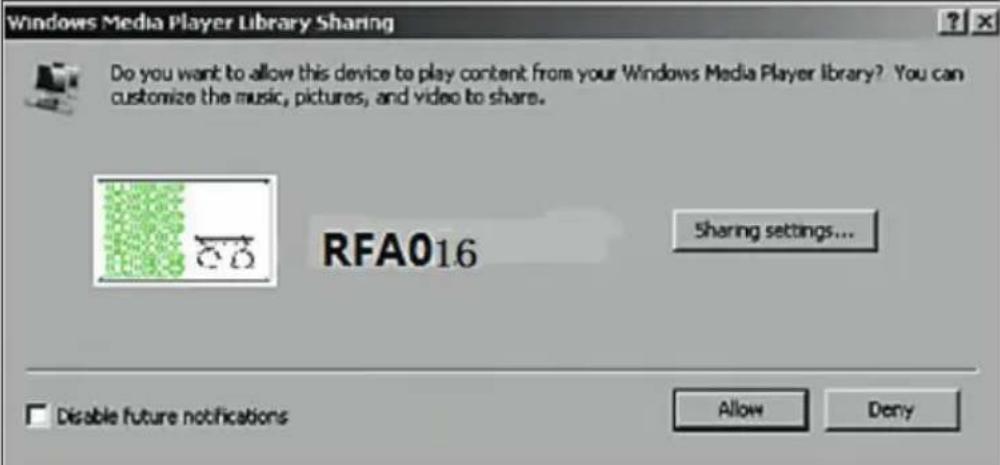
Add the audio files and folders that you want to share with your device to the Media Library. You can also stream music from other music servers, such as your phone (Android):
- Connect your phone to the network.
- Search Google Play for music sharing apps and install them on your phone.
- Add the media files on your phone that you want to share.
Now select the music you want to play on your device in the app and adjust the volume on your device.
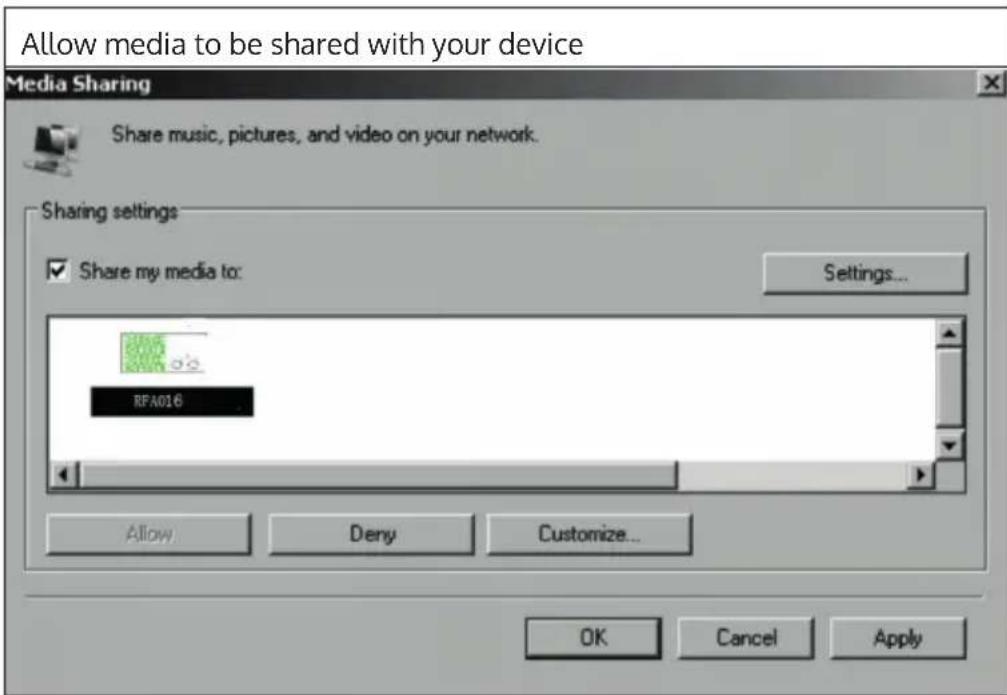
DLNA FUNCTION
- Apart from UPnP, your device supports the DLNA function. This means that you can share music files from PC or Android smartphones with your device and control playback from your PC, Android smartphone or iPhone/ iPad (it is not necessary to customize every playback on your device).
- The system requirements for DLNA on the PC are at least Windows 7 and at least Windows Media Player 12. The settings are made as follows:
First share the media on your PC with your device:
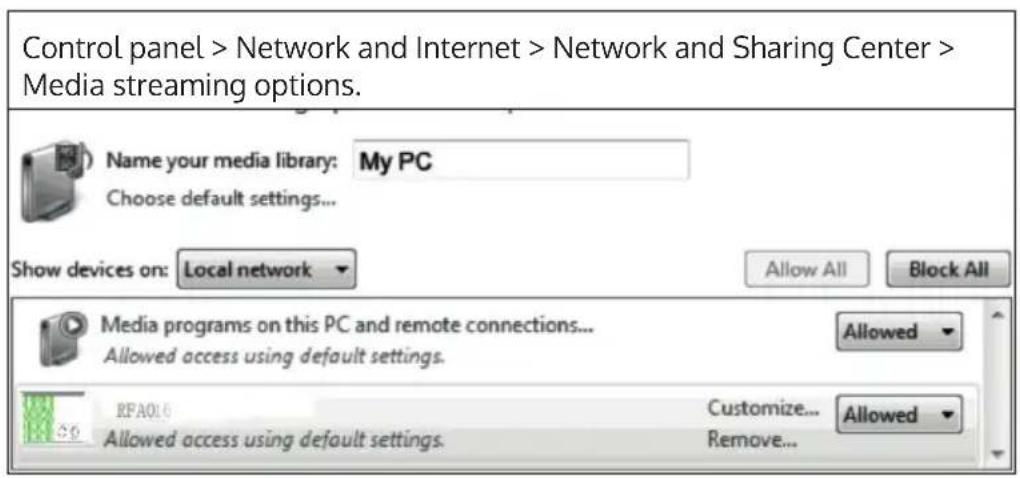

A control window for music playback is displayed on your device.
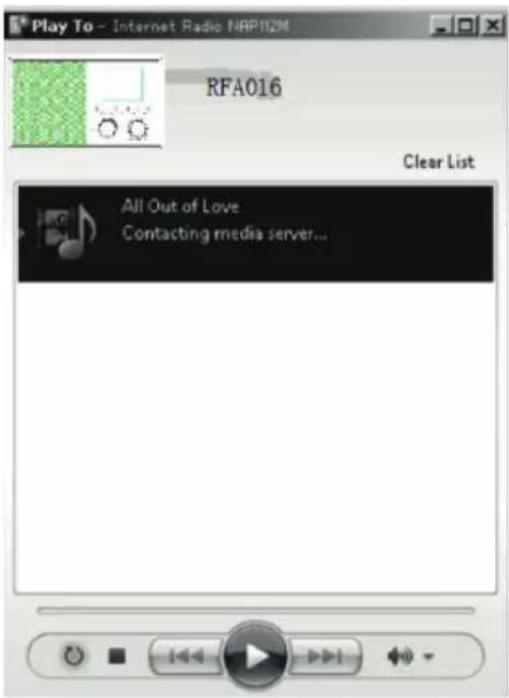
You can search for any free or paid DLNA app in Google Play or the Apple Store if you use a smartphone, tablet, iPhone or iPad. The use of Bubble UPnP is recommended.
Some apps may not support streaming from iPhone and iPod, but iPhone and iPod can still be used to control music playback from other servers.
To play music from the app, follow these steps:
- Select your device as playback medium. Some apps allow music playback from multiple media at the same time.
- Select the music server and choose the music. Some apps allow you to create a playlist.
- If you select the DLNA music stream function on "Music Link", you can only adjust the volume and standby mode from your device.
- If you interrupt DLNA on your PC, Smartphone or Tablet, everything can be adjusted using Music Link.
Server selection and music selection
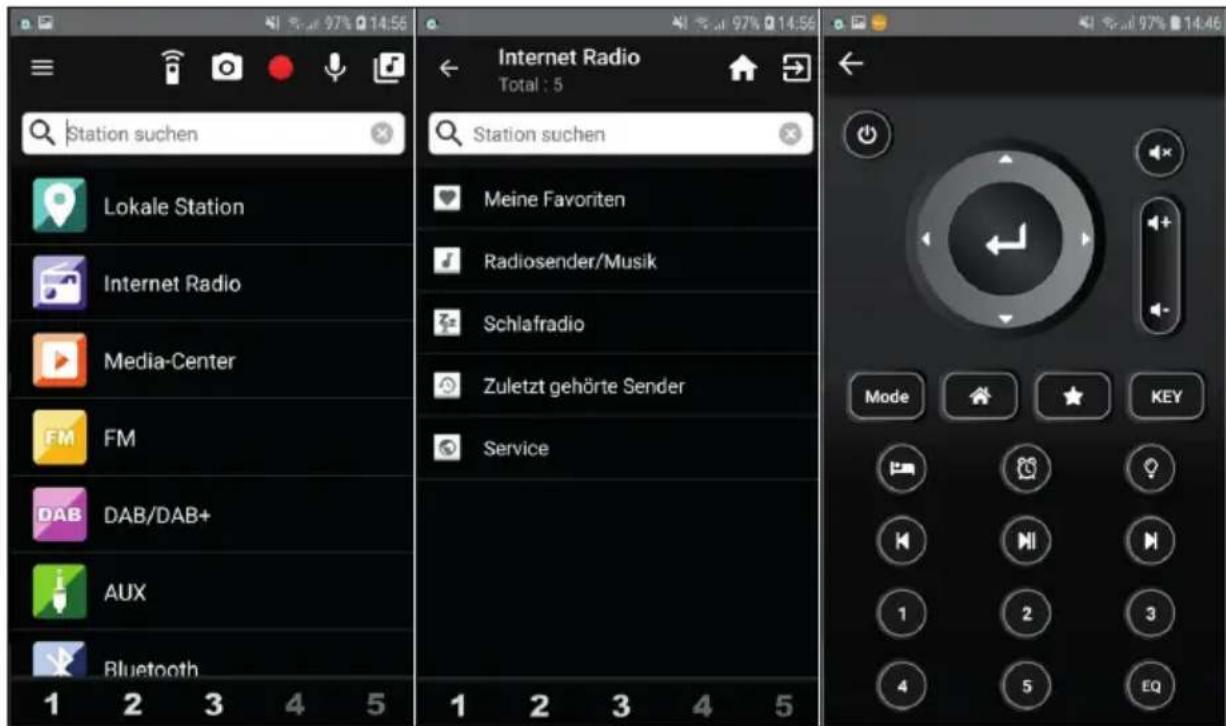
MAIN MENU
The following modes can be selected in the main menu: My media U, DAB Radio, FM Radio, AUX in, USB Play, Spotify, Internet Radio, Local Radio Stations, Settings, Information Center, Media Center.
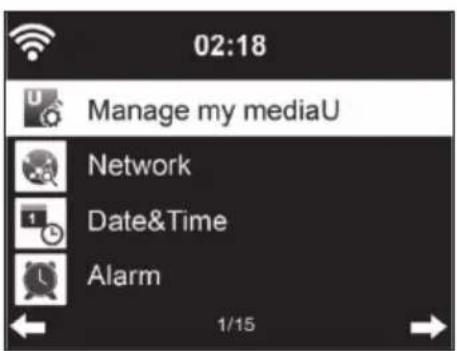
SETTINGS
My mediaU Library - manage radio stations via the Internet
To have access to your favorite radio stations around the world at any time, if you have a mobile device with streaming capability, you can create a free access to the Media Library at www.mediaU.net and add as many devices as you want to your account. Choose a username and password of your choice.

You also need to know the MAC address of your device (called serial number on MediaU) to register your device under "Personalize Your Internet Radio".
This can be accessed under Information Center > System information > Wireless Info > MAC Address.
After registration, this feature must be enabled under Information Center > System information > Wireless Info > MAC Address to allow Internet radio to access the media library.
The device will automatically connect to your account and display what has been stored there:
Favourite station
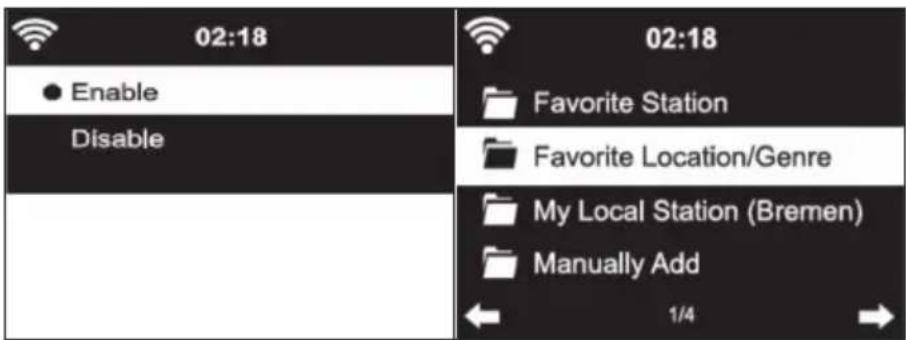
- Favourite location/ genre
My local stations
- Adding Manually
- Depending on your personal My mediaU settings, the appearance of the screen of your device may vary.
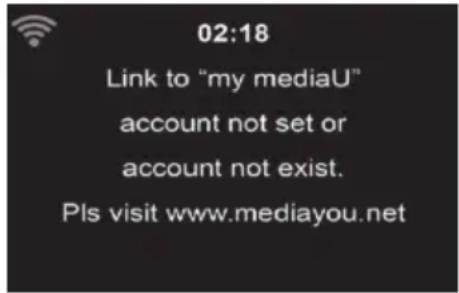
If your device has not yet been registered with MediaU, a message will appear when you try to activate My mediaU. - If you have registered your device to multiple accounts, they will all be displayed after activation so that you can select the account you want to use. It is not necessary to enter a password.
The My mediaU icon also appears in the main menu. The following submenus are available:
- Favourite channel
- Favourite place/genre
My local stations - Adding Manually
These sub-items are also displayed in the Media Library, where you can arrange and manage the radio stations accordingly.
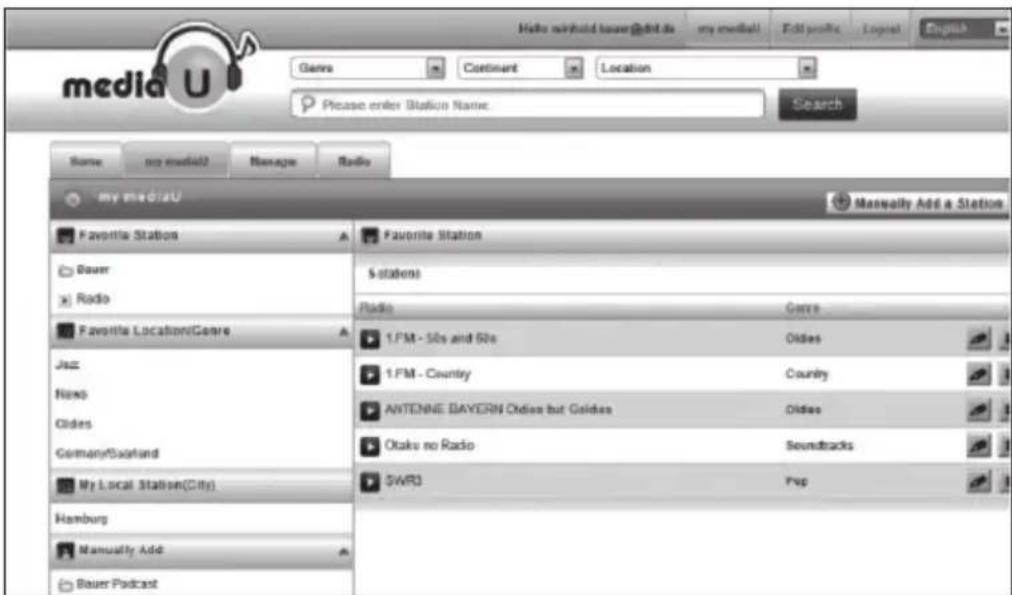
For example, if you want to add a podcast manually, you need to know its URL. To do this, follow these steps:
- Fill in the marked fields under "add manually" in your mediau account
- Go to configuration > manage my mediau in the stream and enable it again by pressing ok.
- Go to my mediau > manually add to view all manually added folders and addresses and select the podcast.
The following podcast formats are supported:
asx
m3u
- pls
- pure streaming with HTTP, RTSP, MMS protocol
Network
| Wireless network configuration: | Wireless network (WPS/PBC): |
| 02:18 | 02:18 |
| Wireless Network Configuration | |
| Wireless Network (WPS PBC) Manual Configuration | Connecting to network ... |
| Check Network when Power On | |
| 1/4 | |
| Activate/deactivate the WLAN network. As soon as you activate the WLAN, the device automatically connects to your selected router. | If you are using a router with WPS/QSS button, you can easily set up the network connection via WPS function. Open the function and press the WPS/QSS button within 120 seconds. The connection between the router and your device will then be automatically configured. |
Manual configuration:
You can select DHPC (the IP address is assigned automatically) or enter the IP address for the wireless network connection manually. If you select the manual setting for a wired connection, the following information must be entered:
SSID (name of the access point)
- IP address
- Subnet mask
- Default gateway
- Preferred DNS server
Alternate DNS server
If there is more than one network connection within the area, you can select a specific network.
Check the network while the machine is on:
- Enable/disable wireless network
- When you activate the wireless network, the device automatically searches for available networks. Select the desired wireless network.
- Enter the WEP or WPA password to establish the wireless connection.
- If there is no connection to the network or the connection could not be established, the icon in the upper left corner is crossed out.
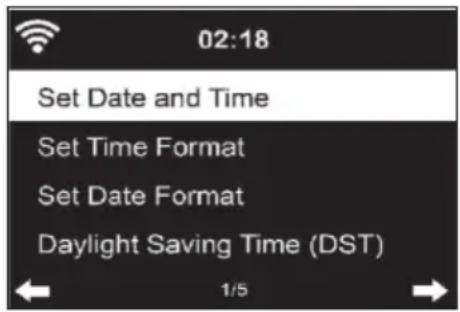
Date and time
- The date and time settings can only be made if your device is connected to a wireless network.
- The device automatically sets the time and date once a network connection is established and obtains its data from a central server.
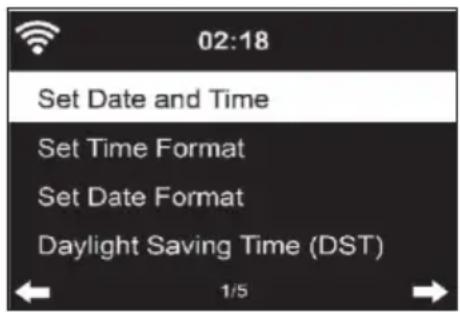
- The changeover from summer to winter time must be carried out manually.
- You can choose between the 12-hour and 24-hour format.
- The date YY (year), MM (month) and DD (day) can be set in the formats YY/MM/DD, DD/MM/YYY or MM/DD/YYY.
- Enable or disable daylight saving time (DST).
- Confirm your entry by pressing the OK button or by pressing the volume control.
- If the unit is connected to a wireless network, GMT (+01:00) is the reference setting. Note that you may need to reduce or add hours for your time zone.
Alarm (Alarm Clock)
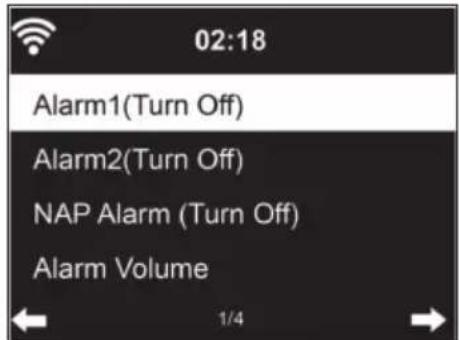
There are three independent alarms. 2 alarms for absolute time setting (Alarm 1 and Alarm 2) and one alarm for relative time setting (NAP alarm). Select "Alarm" from the menu.
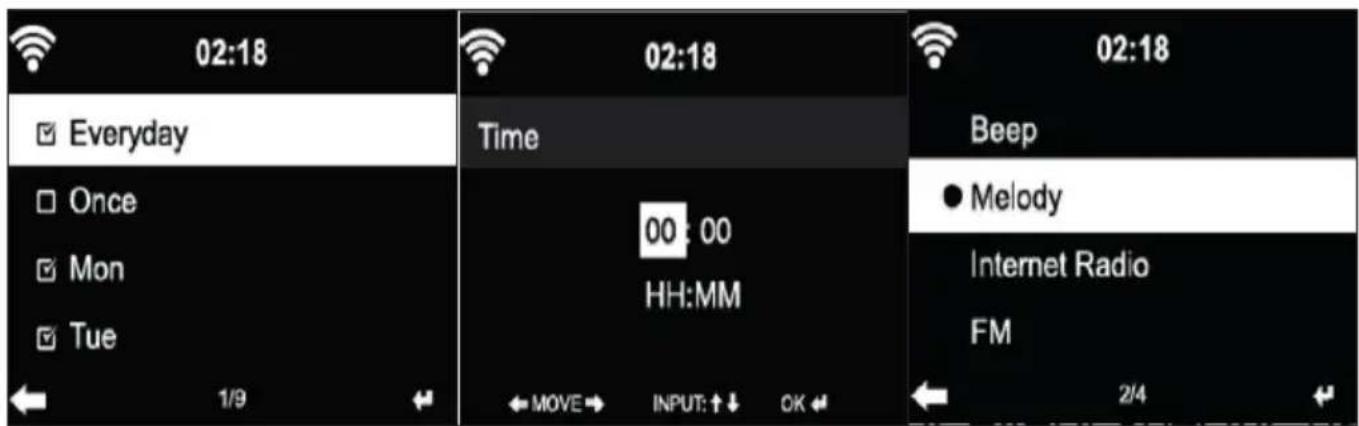
- The first two alarms are similar to the normal alarm. Turn the power on, set the current time, and then set how often the alarm should ring. You can choose between "daily", "once" and "on specific weekdays".
- Set the corresponding values by turning the volume control or pressing the buttons on the remote control. Press the button, to move to the next input field. Press the OK button on the remote control or the volume control to confirm.
- Set the desired alarm tone. You can choose between beep, melody and Internet radio (DAB/ FM/ USB).
- Once an alarm is set, the icon appears on the screen next to the current time.
Note: If you have selected "Internet Radio" (DAB/ FM/ USB) as the alarm tone, a favourite stored station will be played. Only the same station can be set for Alarm 1 and Alarm 2. Once the set alarm time is reached and the alarm tone is "Internet Radio", the unit will connect to the Internet if the network is available. Therefore there may be a short delay between the set alarm time and the actual playing of the radio station. If no network connection is available at that time, the unit will automatically switch to "Melody". If you have activated the NAP alarm, the alarm will ring every 5/10/20/30/60/90/120 minutes, depending on your setting.
- To adjust the alarm volume, select "Alarm Volume".
- Once the alarm(s) has/have been set, the alarm icon will be displayed at the bottom of the screen. The alarm icon with time display is also displayed on the screen in standby mode.
- To stop the alarm, press the standby button. To activate the snooze mode, press the SLEEP button on the unit or the button z^z^2 on the remote control. The alarm will sound again after only 5 minutes.
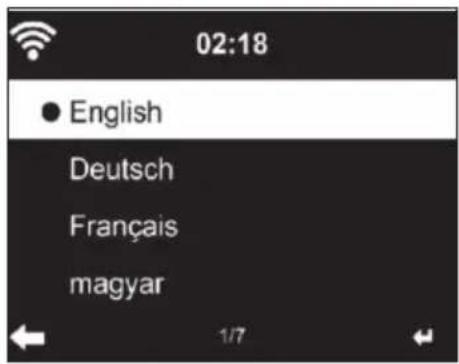
Language
Select the desired language: English/ German/ French/ Hungarian/ Czech/ Slovak/ Polish/ Turkish.
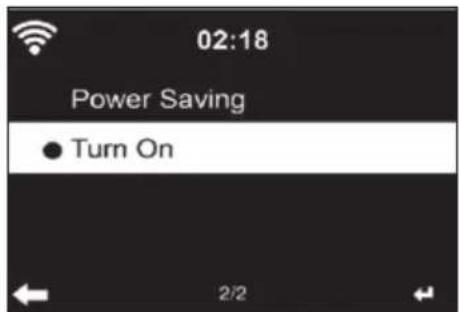
Adjusting the background lighting (dimmer)
- You can adjust the brightness of the backlight.
- Select "Power Saving" to adjust the brightness of the backlight in standby mode and select "Turn On" to activate.
- You can adjust how long the radio screen remains lit when you are not operating it.
Screen
You can set the screen to color or black and white.
Power Management
- You can set the unit to automatically enter standby mode in the main menu or when there is no wireless connection.
- Set the power management timer (5/15/30 minutes) so that the unit automatically enters standby mode when you are not operating it.
- To ignore power management, press "Turn Off" to turn off the unit.
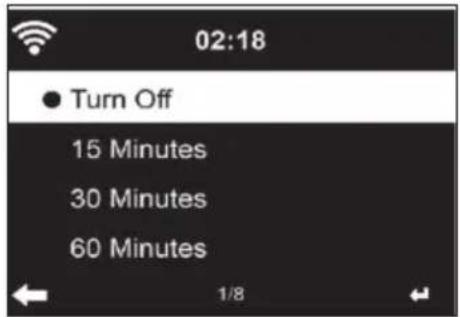
Sleep Timer (time until the unit turns off automatically)
- Switch off the unit directly or set the time until it switches off automatically. You can choose between 15/30/60/90/120/150/180 minutes.
- Once you have set the time until automatic switch-off, a bed symbol with the remaining time is displayed in the upper right corner.
- Once the time has elapsed, your machine will go into standby mode.
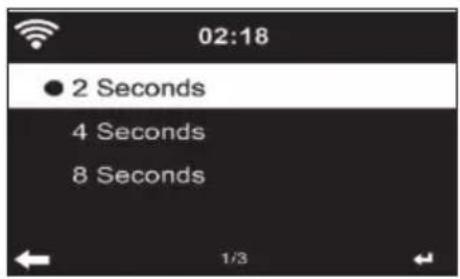
Buffer
You can set the music playback buffer time to 2/4/8 seconds.
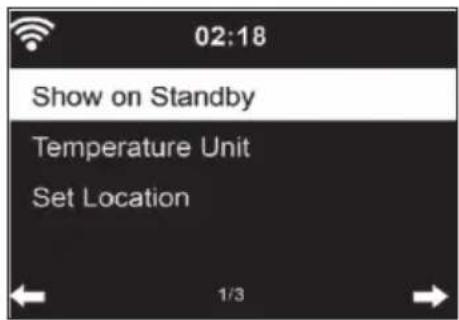
Weather
- Your device can display the current weather data in standby mode.
- In standby mode, activate the screen and set the temperature unit (°C or °F) to display the weather in standby mode.
- When the device is on, the current time and the current weather are displayed alternately for 10 seconds.
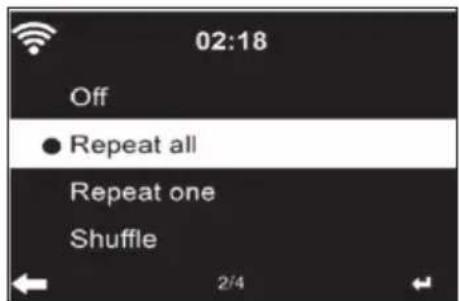
Playback setting
Select the desired playback mode in the Media Center. You can choose from Off (no repeat or shuffle), Repeat all, Repeat one, or Shuffle.
DLNA Setting
The default device name for DLNA is: iTuner 320 ME.
- The device name can be changed on the PC or Smartphone in the DLNA settings.
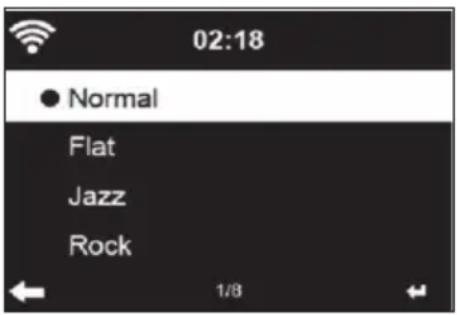
Equalizer
- The default equalizer mode is "Normal".
- You can select from "Normal", "Flat", "Jazz", "Rock", "Soundtrack", "Classical", "Pop" or "News".
- Press the EQ button on the remote control to switch between each mode.
Resume playback when power is turned on
- The unit is set so that the unit resumes playback of the last setting when it is turned on again.
- If this function is enabled and the unit is in Internet Radio mode at the time of power off, Internet Radio will resume when the unit is turned on again.
Software Update
If a new software version is available on the server, the device will inform you of this as soon as you enter the main menu.
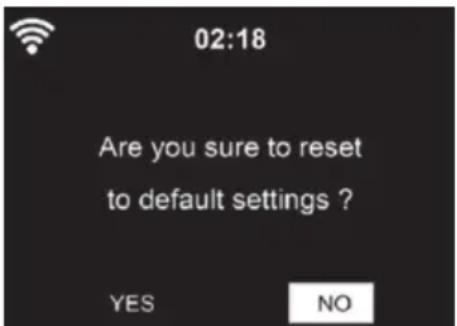
Reset
The device is reset to factory settings. After your device has been reset to the factory setting, the device automatically calls up the language setting. Once the desired language has been selected, the unit switches to the network setting.
FM setting
During radio playback, select MONO or STEREO.
MY MEDIAU
Display and play back your mediaU channel list on the mediaU server. First create your account (see section Customizing My mediaU).
INTERNET RADIO
After the connection to a station is successfully established, the bit rate and station format are displayed on the screen.
My Favourites
- You can create and save a list of your favourite channels.
- You can save up to 250 favourites, including channels and folders.
- During playback, press and hold the Fav• button to save a station to Favorites.
- You can replace a previously saved station with a new one.
- During the save process, the save icon appears at the top of the screen.
- You can also press a number (1, 2, 3) on the remote control to store a station in memory location #1, #2 or #3.
- If a station is stored in one preset, the same station cannot be stored in another preset.
- The preset stations are displayed in this menu. You can also press the Fav• button to display the saved station list.
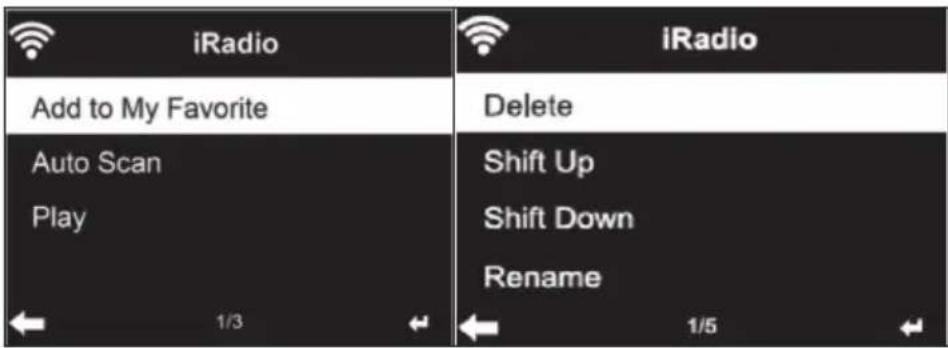
- When you have opened the saved channel list, select a station and press OK to start playback.
- If you have highlighted a station, press the button to enter the submenu. There you can delete a station (a station is removed from the Favourites list), scroll up and down the list, rename (you can name a radio station as you like), play the station, or use the station as an alarm sound (if you select "Internet radio" as the alarm setting.
- To access a preset station, first press the Fav• button and select a preset station by turning the volume knob or pressing the buttons
Radio stations / Music
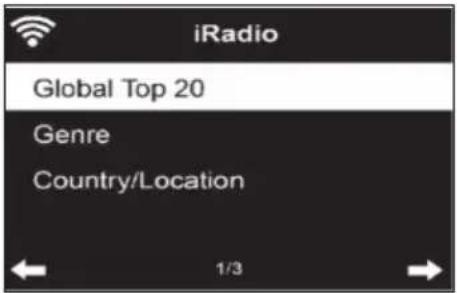
- The stations are categorized according to "Global Top 20", "Genre", "Country/Location" and "Highlight".
- Press the OK button to enter the submenu and select a station to play music.
- For direct playback, after selecting a station, press the OK button.
-
Press the button to enter the submenu. You can add the station to the Favourites, start the automatic station search, play a station or set a station as an alarm tone (if you selected "Internet Radio" in the alarm settings.
-
If you select "Auto Scan", each channel of the submenu will be played for 30 seconds until all channels are selected or you press OK to interrupt.
- Press the Info button to display the respective channel information.
History
- A list of the last stations you listened to. Up to 10 stations can be stored in the history.
- For direct playback, after selecting a station, press OK.
- Press the button to enter the submenu. You can add the station to the Favourites, start the automatic station search, play a station or set a station as an alarm tone (if you selected "Internet Radio" in the alarm settings.
- If you select "Auto Scan", each station in the submenu is played for 30 seconds until all stations are selected or you press OK to pause.
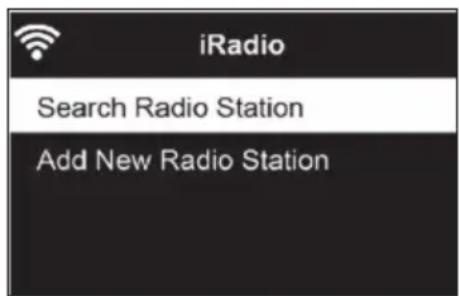
Channel Search
- To search for channels, enter keywords in the list.
- Newly added channels are saved under your Favourites.
- Remember that the name of the station can have a maximum of 250 characters.
Local radio stations
- The Internet radio menu has a link to local radio stations, so you can easily listen to stations from your region.
- Your device can determine your current location by its IP address and create a station list based on this.
- If you want, you can also specify a different country as your location to play stations from that country.
MEDIA CENTER
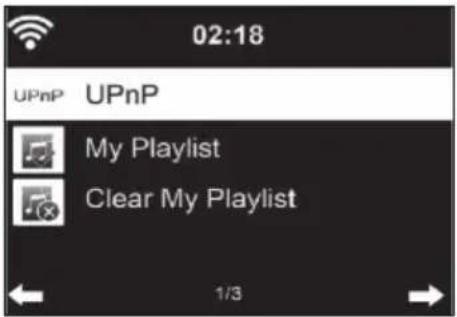
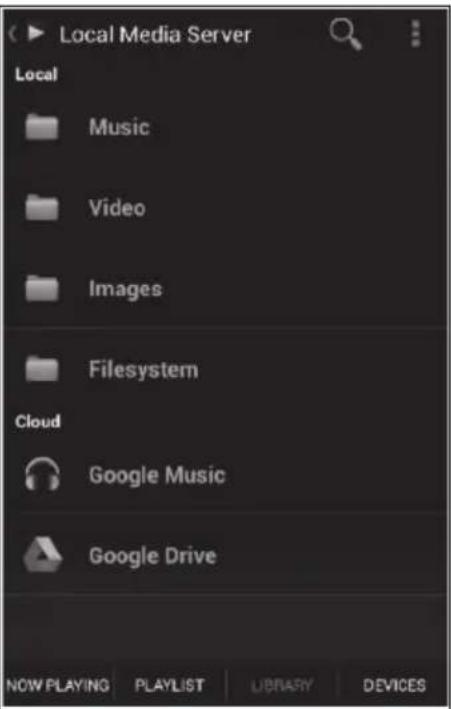
UPnP
- If you have set up "shared media", you can display it via UPnP.
- If more than one device is available for media sharing, the alternatives will be listed.
- Select the media from which you want to play music on the device.
- Press the Menu button to display playback information for the current track on the screen.
Note: The device can only read tracks with a name of less than 40 characters. The characters should be in European language. If the unit cannot play a title in UPnP mode, you should first try to rename the title. If the title still cannot be played, you can try to convert it to another format.
My Playlist
- You can create a list of your favorite songs in UPnP mode.
- Press and hold the OK button when a song is playing to save it in "My Playlist".
Delete My Playlist
You can delete all songs stored in your My Playlist playlist.
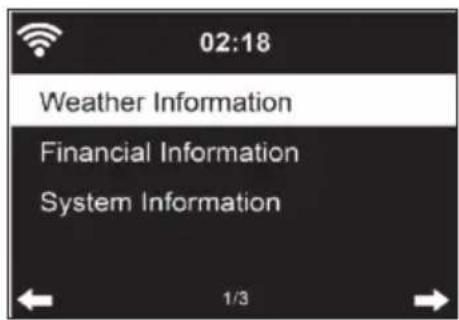
INFORMATION CENTER
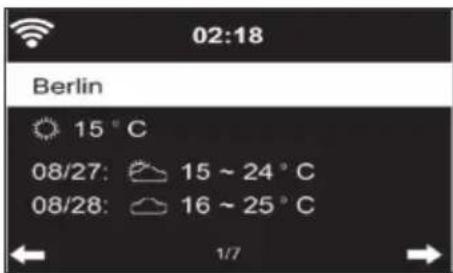
Weather information
- Weather information and weather forecasts are available for 2000 cities.
- Select the country and city for accurate weather information.
- The weather information can also be displayed in standby mode.
- On the weather information page, press the button. "Add to Standby" is then displayed.
- If you want the weather for the city you have selected to be displayed in standby mode, press the OK button.
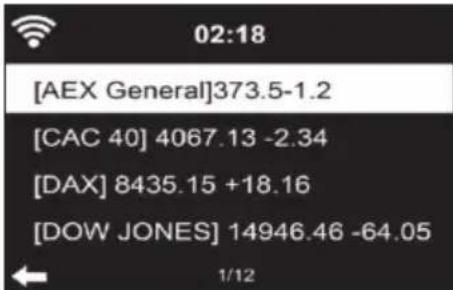
Financial sector information
Display the worldwide stock index.
Device information
- The current system version and network connection details are displayed.
- The information includes the MAC address, which is required for registration with my mediaU.
USBPlayback
- After selecting "USB Playback", insert the USB stick into the USB port on the front of your device.
- To continue, select "YES", go back to the music playback page and select "USB Playback" again.
- Now turn the volume control on the device or press the buttons on the remote control to select a folder on the USB device.
- To confirm the folder selection, press OK and then select the desired playback title.
During playback:
- Press the INFO button repeatedly to display the playback information
- Press the button to pause/play back.
To skip tracks, press and hold / - Press and hold the / lʊtɪrəti to rewind and fast forward.
- Press the button to move to the previous playlist.
- When "Repeat" is selected, the unit repeats the selected tracks in a continuous loop
- When "Shuffle" is selected, the tracks are played back in random order
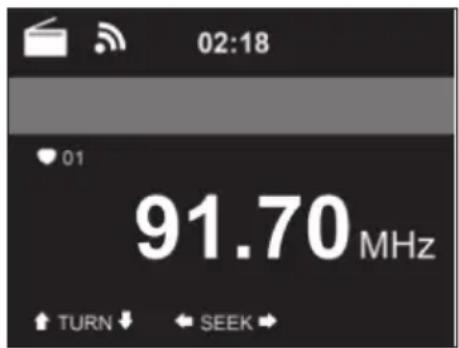
FM RADIO
- In FM radio mode, analogue broadband radio is received.
- Press the / buttons on the unit or remote control to start FM station search.
The frequency display will go up while searching. - As soon as a station is received, the station search stops.
- Press the buttons to start manual station search. The manual search is performed in steps of 0.05 MHz.
- Press and hold the Fav· button to store a station.
- You can store up to 20 FM stations.
- To recall a stored station, press the Fav button on the unit or the buttons on the remote control.
- Alternatively, you can start the automatic station search of all stations by pressing the OK button. The radio stations found are then automatically stored in the station list.
DAB RADIO
- In FM mode, press the MENU button to switch to DAB mode.
- The screen displays "DAB Radio".
- Use the / button on the unit or the / buttons on the remote control to select a preset DAB station.
- Start playing the selected station by pressing the OK button.
DAB station search
- Press the button on the unit or the SCAN button on the remote control to start the channel search. The progress of the search is indicated by a bar on the screen.
- As soon as the station search is finished, the radio selects the first alphanumeric station it finds and starts playing.
Calling up stored stations
- Press and hold the Fav- key to save a station.
- You can store up to 20 stations.
- To recall a stored station, press the Fav- button on the unit or press the Fav- and remote control buttons.
BT CONNECTION
- Select an audio source
- Press the OK button until "BT" is displayed on the screen.
- Make sure that no other BT device is connected to your device.
- "No Connection" is displayed on the screen.
- Enable "BT" on your external device.
- Search for your radio in the external device's device list.
- Select your device from the device list. If a password is required, enter "0000" (four zeros).
- Some devices may require additional confirmation of the connection.
- Once the connection is successfully established, "Connected" will be displayed on the screen of your device.
- Start BT playback on your external device.
- You can control BT playback from your external device or from your device. The volume can be adjusted on both devices.
- The BT connection can be interrupted by pressing OK for three seconds. The message "No Connection" is displayed on the screen.
REMOTE CONTROL VIA AIRMUSIC
You can search for any free or paid apps in Google Play or the Apple Store if you use a smartphone, tablet, iPhone or iPad. We recommend AirMusic.
The AirMusic Control App lets you remote control the radio using your smartphone. On Android devices, you can also play the music files stored on your phone directly on the radio.
You can find the app in both the Google Play Store and Apple's App Store. Use your phone to scan the following QR code to get to the app you want:

SPOTIFY CONNECT
Your new device has Spotify Connect built in
Use your phone, tablet or computer as a remote control for Spotify. Go to Spotify.com/connect to learn how.

Licenses
The Spotify Software is subject to third party licenses found here:
https://www.spotify.com/connect/third-party-licenses
All listed brands are trademarks of their companies. Errors and omissions excepted, and subject to technical change. Our general terms of delivery and payment are applied.
DISPOSAL CONSIDERATIONS

If there is a legal regulation for the disposal of electrical and electronic devices in your country, this symbol on the product or on the packaging indicates that this product must not be disposed of with household waste. Instead, it must be taken to a collection point for the recycling of electrical and electronic equipment. By disposing of it in accordance with the rules, you are protecting the environment and the health of your fellow human beings from negative consequences. For information about the recycling and disposal of this product, please contact your local authority or your household waste disposal service.
This product contains batteries. If there is a legal regulation for the disposal of batteries in your country, the batteries must not be disposed of with household waste. Find out about local regulations for disposing of batteries. By disposing of them in accordance with the rules, you are protecting the environment and the health of your fellow human beings from negative consequences.
DECLARATION OF CONFORMITY

Manufacturer:
Chal-Tec GmbH, Wallstrasse 16, 10179 Berlin, Germany.
Importer for Great Britain:
Berlin Brands Group UK Ltd
PO Box 1145
Oxford, OX1 9UW
United Kingdom
Hereby, Chal-Tec GmbH declares that the radio equipment type iTuner 320 ME is in compliance with Directive 2014/53/EU. The full text of the EU declaration of conformity is available at the following internet address: use.berlin/10035110
For Great Britain: Hereby, Chal-Tec GmbH declares that the radio equipment type iTuner 320 ME is in compliance with the relevant statutory requirements. The full text of the declaration of conformity is available at the following internet address: use.berlin/10035110
Estimado cliente:
| 123 | ||
| 02:18 | 02:18 | 02:18 |
| ● English | ||
| Deutsch | Enable 'Check Network when Power On'? | Would you like to configure Network now? |
| François magyar | ||
| 1/8 | YES NO | YES Yes(WPS) NO |
https://www.spotify.com/connect/third-party-licenses
Berlin Brands Group UK Ltd
PO Box 1145
Oxford, OX1 9UW
United Kingdom
| 123 | ||
| 02:18 | 02:18 | 02:18 |
| ● English | ||
| Deutsch | Enable 'Check Network when Power On'? | Would you like to configure Network now? |
| François | ||
| magyar | ||
| 1/8 | YES NO | YES Yes(WPS) NO |
CENTRE D'INFORMATIONS
Informations météo
https://www.spotify.com/connect/third-party-licenses
Berlin Brands Group UK Ltd
PO Box 1145
Oxford, OX1 9UW
United Kingdom
SIMPOLI SULLO SCHERMO
| 123 | ||
| 02:18 | 02:18 | 02:18 |
| • English | ||
| Deutsch | Enable 'Check Network when Power On'? | Would you like to configure Network now? |
| Français | ||
| magyar | ||
| 1/8 | YES NO | YES Yes(WPS) NO |
https://www.spotify.com/connect/third-party-licenses
Berlin Brands Group UK Ltd
PO Box 1145
Oxford, OX1 9UW
United Kingdom
OVERZICT APPARAAT EN TOETSEN
Vooranzicht
https://www.spotify.com/connect/third-party-licenses