M1380 DBTW - Speaker MUSE - Free user manual and instructions
Find the device manual for free M1380 DBTW MUSE in PDF.
| Product type | Audio speaker with DAB+/FM radio, CD player, USB port, Bluetooth |
| Power supply | AC 100-240 V, 50/60 Hz |
| Power consumption | 60 W |
| Bluetooth version | V5.0 |
| Bluetooth frequency band | 2.402 - 2.480 GHz |
| Bluetooth range | Up to 10 m (open space) |
| FM radio | 87.5 - 108 MHz |
| DAB/DAB+ radio | 174 - 240 MHz |
| Main functions | DAB+/FM radio, Bluetooth, CD player, USB MP3, AUX 3.5 mm input, RCA input, NFC, wireless stereo pairing |
| Audio settings | Preset EQ (Rock, Classic, Jazz, Pop), bass/treble, bass boost (Loudness) |
| Display | Color TFT display with adjustable brightness |
| Alarms and sleep | 2 alarms (DAB, FM, buzzer), sleep function (15/30/45/60/90/120 min) |
| Radio presets | 20 FM stations + 20 DAB/DAB+ stations |
| CD/USB play modes | Repeat (track, folder, disc), random, program (32 CD tracks, 99 MP3) |
| Maintenance and cleaning | Unplug before cleaning. Use a soft, dry cloth. Do not use solvents. |
| Safety | Do not expose to rain or moisture. Use in a temperate climate. Do not place objects filled with liquids on the device. |
| Spare parts and repairability | No user-serviceable parts. Contact qualified personnel for any repairs. |
| General information | Brand: Muse, Model: M1380 DBTW, Manufactured by NEW ONE S.A.S., France |
Frequently Asked Questions - M1380 DBTW MUSE
User questions about M1380 DBTW MUSE
0 question about this device. Answer the ones you know or ask your own.
Ask a new question about this device
Download the instructions for your Speaker in PDF format for free! Find your manual M1380 DBTW - MUSE and take your electronic device back in hand. On this page are published all the documents necessary for the use of your device. M1380 DBTW by MUSE.
USER MANUAL M1380 DBTW MUSE
natural_image
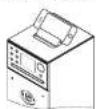
Black cylindrical electronic device with control panel and display screen (no visible text or symbols)FR Manuel de l'utilisateur
GB User Manual
PT Manual do Utilizador
DE Benutzerhandbuch
ES Manual de instrucciones
IT Manuale dell'utente
NL Gebruikershandleiding
Lire attentivement les instructions avant de faire fonctionner l'apparell.
Please read the instructions carefully before operating the unit.
Leia este manual com atenção antes de qualquer utilização.
Bitte lesen dieses Handbuch vor dem Gebrauch des Geräts aufmerksam durch.
Antes de utilizar este aparato, lea atentamente las siguientes Instrucciones.
Leggere attentamente le istruzioni prima di utilizzare l'apparecchio.
Gelieve voor gebruik deze handleiding aandachtig te lezen.


ENCEINTE BLUETOOTH AVEC RADIO DAB+/FM, CD ET PORT USBFR
CONTENU DE LA BOÎTE
P1 Touring Walls / March
R2. Touring Automation (distracivation du euro
- Fats, 2016, 18: 19:30, 19:40, 19:50, and 19:60.
Technique: C1: Chemical GROE 12 Analysis, Gasification, Chemicals, Biopharmaceuticals, Biochemicals, Biomarkers, Solar Energy Solutions, Microelectronics
3 - Annulation of alarme
- Due my sales at a prior payment request, recipients disposables must be taken
Das kindles satens peauen leven dispareris avai to campa.
In fact that the following is a frequent event, but the event just is an interest for a certain as a frequent event.
Ordres des stations
DEC Fabie compression monitor
DRC Haule: compression maxima
CLASS 1 LASER PRODUCT PRODUCTO LASER CLASE 1 PRODUIT LASER DE CLASSE 1
IMPORTANT
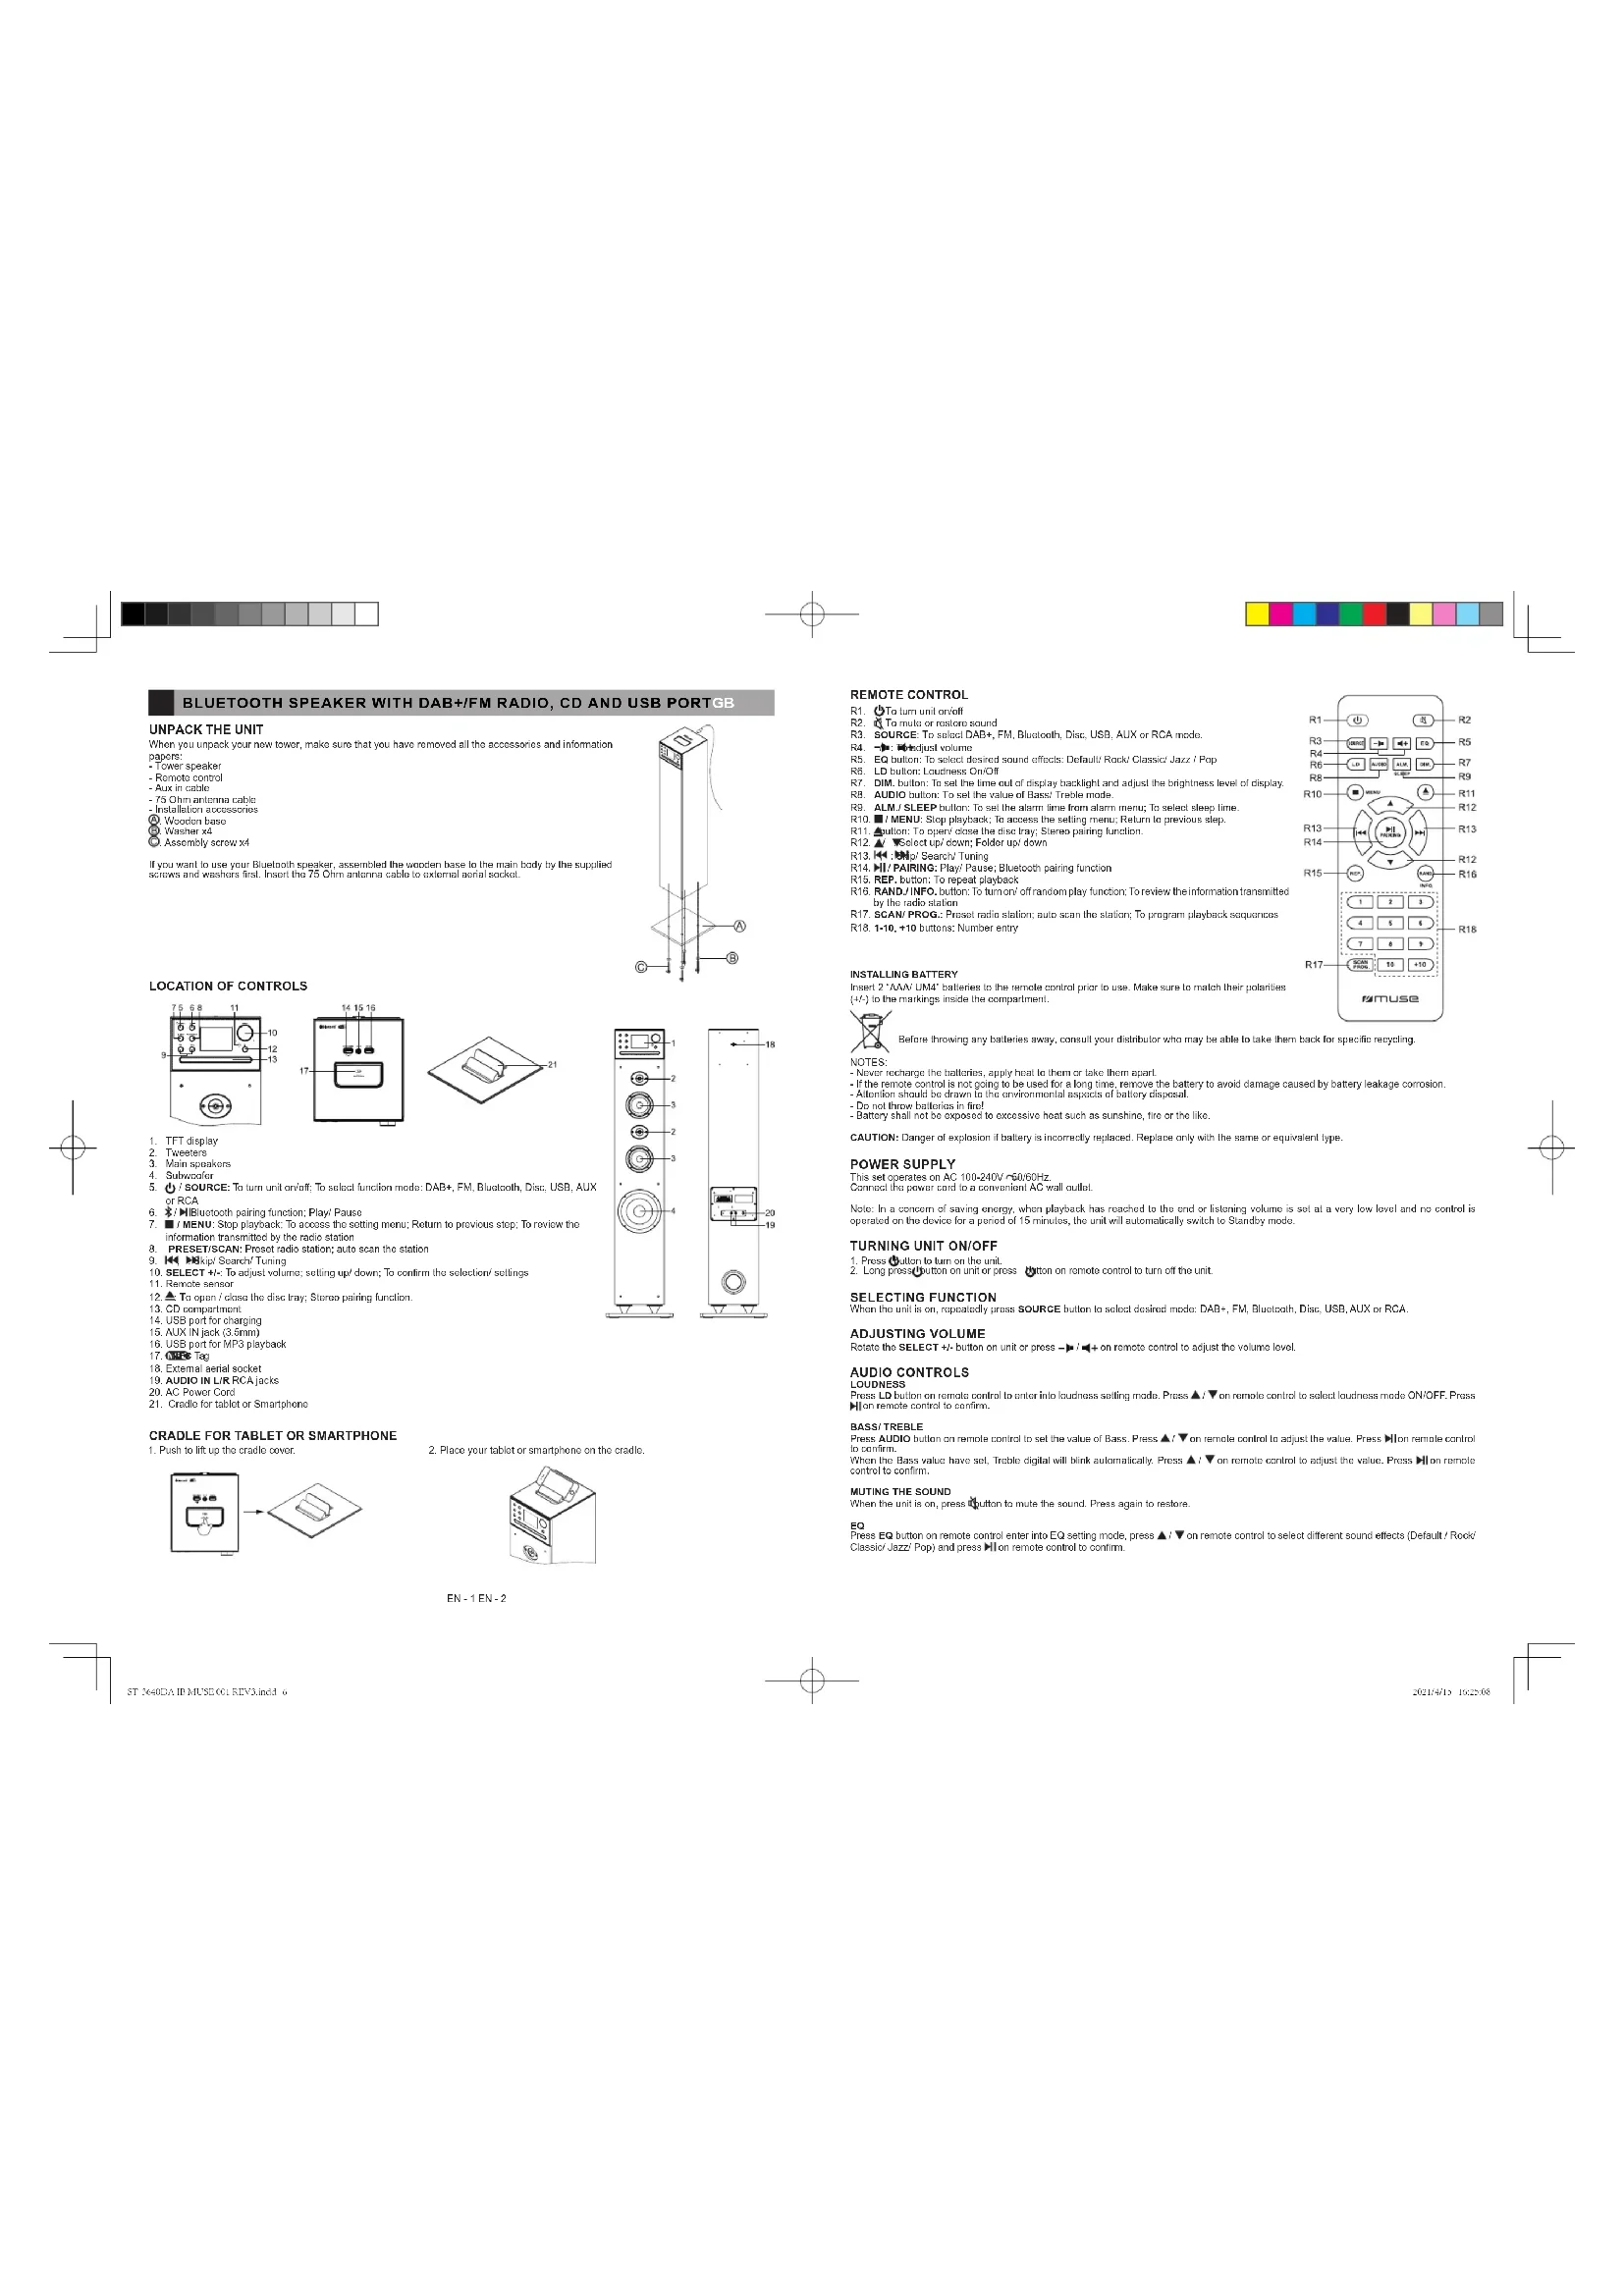
When you unpack your new tower, make sure that you have removed all the accessories and information.
Papars
- TOWER SPEAKER
- Remote com Aux la cebis
- Aux in cable 75 Chve estoureable
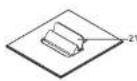
- Installating accessories
A H/pc
③ Wooden Darin
Assembly screw x4
If you want to use your Bluetooth speaker, assembled the wooden base to the main body by the supplied screws and washers first. Insert the 75 Chm antenna cable to external serial socket.
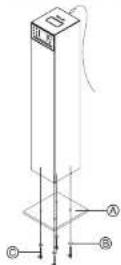
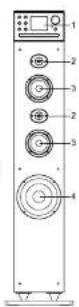
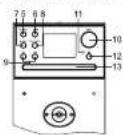
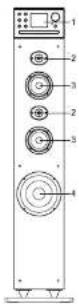
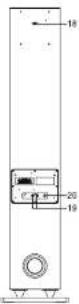
LOCATION OF CONTROLS
-
TFT display
-
Tweeters
-
Main speakers
-
Subwoofer
-
SOURCE: To turn unit an/oll; To select function mode: DAB+, FM, Bluetooth, Disc, USB, AUX
or RCA
-
*/Bluetooth pairing function; Play/Pause
-
■ / MENU: Stop playback: To access the setting menu; Return to previous step; To review the
information transmitted by the radio station
-
PRESET/SCAN: Preset radio station; auto scan the station
-
🖱️ 🔍 🔍 🔍 🔍 🔍 🔍 🔍 🔍 🔍 🔍 🔍 🔍 🔍 🔍 🔍 🔍 🔍 🔍 🔍 🔍 🔍 🔍 🔍 🔍 🔍 🔍 🔍 🔍 🔍 🔍 🔍 🔍 🔍 🔍 🔍 🔍 🔍 🔍 🔍 🔍 🔍 🔍 🔍 🔍 🔍 🔍 🔍 🔍 🔍 🔍 🔉
-
SELECT +/- To adjust volume: selling unit price: To confirm the selection's sellings
-
Remote sensor
12 ▲ To case I cross the disk tree Shaox nation function
-
CD consumption
-
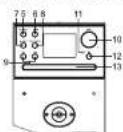
USB port for capr
-
ALIX, Nuck (3.5mm)
-
USB port for MB3 playback
-
600 m
-
14
-
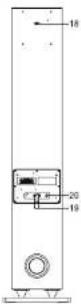
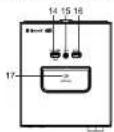
External aerial sensor
-
AUDIO IN LTR RCA JAMES
-
AC Power Card
-
Crude for tablet or smartphone
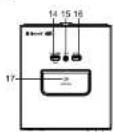
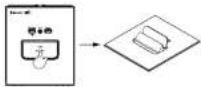
CRADLE FOR TABLET OR SMARTPHONE
- Push to lift up the crack cover
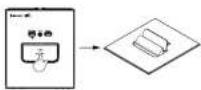
- Place your tablet or smartphone on the cradle.
EN-1 EN-2
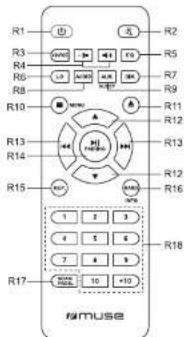
REMOTE CONTROL
B1. ①Tetum unit poloff
B2. To rule or restore sound
B3. SOURCE: To select DAP+, EN, Bluetooth, Disc, USB, AUX or RCA mode.
R4. →: Optical volume
RS. EQ button: To select desired sound effects: Default Rock Classic Jazz / Poo
RE. LD buller Loudness OnOff
R7. DIM, button: To set the time out of display backlight and adjust the brightness level of display
R6. AUDIO button: To set the value of Bass/ Treble mode.
B9. ALM./SLEEP button. To set the alarm time from alarm menu. To select sleep time.
B10. ■/MENU Stop playback. To access the selling menu, Return to previous step
R11. A solution. To open's cross the disc, how Steen asiring function
R12 ▲ Select up' down: Folder up' down
B12. Mal Secret Tuning
R13.44.00px Search Turning R14. NLPARING: Rlowi Rayee: Bluetooth, adding function
R.M. PH PAIRING. Play Pauso, Elie B15. BER buttons: To repeat playground
R15. REP, button. To repeat playback.
R 10. RANDS INFO. button. to turn from off-and-off play function. To review this information, generated by the radio station.
R17. SCAN PROG.: Preset radio station: auto-scan the station; To program playback sequences
R18. 1-10. +10 buttons: Number entry
INSTALLING BATTERY
Insen: 2 "AAA/UM4" batteries to the remote control prior to use. Make sure to match their polarities
(+/-) to the markings inside the compartment.

Before throwing any batteries away, consult your distributor who may be able to take them back for specific recycling.
NOTES:
Never recharge the batteries, apply heat to them or take them apart.
- If the remote control is not going to be used for a long time, remove the battery to avoid damage caused by battery leakage corrosion.
- Attention should be drawn to the environmental aspects of battery disposal
- Do not throw batteries in fire!
- Battery shall not be exposed to excessive heat, such as sunshine, fire or the life.
CAUTION: Danger of explosion if battery is incorrectly replaced. Replace only with the same or equivalent type.
POWER SUPPLY
This set operates on AC 100-240V\~60/50Hz
Connect the power cord to a convenient AC wall outlet.
Note: In a concern of saving energy, when playback has reached to the end or listening volume is set at a very low level and no control is operated on the device for a period of 15 minutes, the unit will automatically switch to Standby mode.
TURNING UNIT ON/OFF
-
Press Equation to turn on the unit
-
Long press button on unit or press button on remote control to turn off the unit.
SELECTING FUNCTION
When the unit is on, repeatedly press SOURCE button to select desired mode. DAB+, FM, Bluetooth, Disc, USB, AUX or RCA.
ADJUSTING VOLUME
Rotate the SELECT +/- button on unit or press → / ≈ on remote control to adjust the volume level.
AUDIO CONTROLS
LOUDNESS
Press LD button on remote control to enter into loudness setting mode. Press ▲! ▼ on remote control to select loudness mode ON/OFF. Press ▶ion remote control to confirm
BASS TREBLE
Press AUDIO button on remote control to set the value of Bass. Press ▲/▼ on remote control to adjust the value. Press || on remote control to confirm.
When the Bass value have set, Trobio digital will blink automatically. Press ▲! ▼ on remote control to adjust the value. Press ▶on remote control is confirm.
MUTING THE SOUND
When the unit is on, press button to mute the sound. Press again to restore
EQ
Press EQ button on remote control enter into EQ setting mode, press ▲ (▼ on remote control to select different sound effects (Default: Rock' Classio' Jazz/ Pop) and press ▶ on remote control to confirm.


SETTING THE TIME AND DATE
-
In standby mode, press and hold MENU button to access main menu
-
Rotata SELECT knob to select "Time setup", press SELECT knob to enter into time setting menu.
-
Rotate SELECT knob to select
, then press SELECT knob to confirm. -
Use SELECT knob to set the date (DOMMYYYY) and time (HHMM). (Rotate SELECT knob to adjust the setting, then press SELECT knob to confirm.)
MAD to Laminin,
b. Rotate SELECT knot to select
- Rotate SELECT knob to select "24" or "12", then press SELECT to confirm the clock format.
SETTING THE ALARM
In standby mode, press ALM button on remote control to access alarm setting mode. Rotate SELECT knob to select an option and/or adjust
the selling, then press SELECT knot to confirm.
Select "Alarm 1" or "Alarm 2", then press SELECT to return.
- Enabling: Off, Daily, Once, Weekdays, Weekends
“Off. The alarm is off
**Daily: The alarm will sound every day.
"Open. The slum will surge one lime only."
*** Weekday: The alarm will sound on weekday only. (Monday to Friday)
**Weekends: The alarm will sound on weekend cry. (Schukey, one Super)
- Weekends: This shall not be sold on weekends only. (2) - Time: To set the alarm time
Monday To visit the website www.dap.163.com
MODE: TO SET VIE WARE UP SOURCE, DVD, FM OF BUCKER. Record: Select the last-labeled media platform or desired next media platform. This online is only available when the new source is DAP or EM.
• Press. Select or last-mistered ta. Volume: To set the alarm volume
- Save: Select this route and remove SELECT in confirm all above settings. "Sound" will appear for a few seconds and the alarm indicator will
The following table provides the results of the 2016 Annual Report on the Consolidated Financial Statements and the 2017 Annual Report on the Consolidated Financial Statements.
is displayed.
The alarm indicator will blink when the alarm time is reached.
Note: In 12 hour clock format, be sure to observe the AM/PM indicator to set the alarm time correctly.
Stopping the Alarm
1 - Alarm repetition Bags any business agent filed. Mings in order into survey music
Press any dollars except and \$100 to offer into smaller markets. The display will show "Ensign" and the remaining agencies like "Ensign" or "SELECT" link on unit or all options on available platforms to set
The display will show "Snoozz" and the remaining shot remaining source line: 04.59 < 09.59 < 14.59 < 23.59
Following 31/2025, 4:15, 64.99 - 66.99 - 74.99 - 79.99. The warm indicator and area or indicators will block in space on the
2 - Alarm stop
Press the stop the alarm.
Note
- When 'Daily' is set, the alarm will sound again the next day at the same time.
- When "Once" is set, the alarm will not sound again. The alarm indicator will joint off
- When "Weskiss" set the island will soon return on next verekiss/Mountise (to Frickay) at the same time
- When "Wankards" is set, the alarm will guard again (the following Saturday or Sunday at the game line
3 - Alarm Cancellation
Press ALM. to access alarm setting menu. Rotate SELECT knob to select "Alarm 1" or "Alarm 2", then press SELECT to confirm. Rotate
SELECT knot to select
SLEEP FUNCTION
When the unit is ON, one press SLEEP button on remote control to enter to sleep setting mode. press ▲ / ▼ button on remote control to select "05-30-45-60-90-120" minutes of listening, press to confirm. Sleep icon with remaining time will show on the display. The unit will automatically turn off after the specified time. To cancel the sleep function, press ▲! ▼ button on remote control to select "Sleep off", and
press▶b confi
DIMMER
Press DIM. button on remote control to enter into display backlight setting. Press ▲ / ▼ button on remote control to select your desired option,
press Hon remote control to confirm.
- Timeout Always On > 10s > 20s > 30s > 45s > 60s > 80s > 120s > 180s
- Level: To select the brightness level of display from level 1 to level 8
LISTENING TO DAB/DAB+ RADIO
Connect an external antenna (supplied) to external serial socket on back of unit before playing DAB function.
When the unit is ON, repeatedly press SOURCE button to select DAS mode, then displayed.
The first time you use the unit, or if the station list is empty, the unit automatically performs a full scan to see what stations are available. The
display will change to "Scanning.....". A progress bar will show the progress of the scan and the number of stations found during the scan will also be displayed. Stations are listed in numerical and then alphabetical order by default.
You may also need to start a scan manually to update the list of stations for one of the following reasons:
- New stations may become available from time to time.
- Stations close re ran on learner he received in the station list, invalid stations see interested with a student mark in front of their room.
- If resentient was not need for the arbitrary search (for assuming the strings was not until this may result in an article or immediate list of available
If reception was not good for the original court (yet shall be the existing free not up), this may result in a simply or incomplete net of available stations.
- If you have poor retention of some stations causing the audio to break up, you may wish to list only stations with good signal strength.
To do a full scan, press and hold MENU button to enter into setting menu, rotate SELECT knob to select
start a scan.
Once the scan is complete, the radio returns to play the previously selected station or first station on the station list
Select a station with 📄, 📄, then press SELECT on unit or 📄 on remote control to confirm.
Note:
- If no broadcasts are found by DAB/DAB+ scan, "No station found" appears in the display, then display will switch to DAB menu for the setting.
Then display will switch to DAB menu for the setting.
- For a better reception, extend the external antenna or do the full seen again in another place.
- During the search operation, the sound level is automatically muted.
- When do the setting in the menu, press the ■ button to return to previous step.
LISTENING TO FM RADIO
When the unit is ON, repeatedly press SOURCE button to select FM mode, icon and FM frequency with program type correlative
information will be displayed.
Tupa to a desired radio station with 🖼️ 🖼️
Automatic search
Long press ◄◆◆◆ The automatic search locates strong stallions.
Automatic storage
Press and hold SCAN button an unit or an remote control for few seconds and the unit will automatically save the first 20 FM stations.
When it stores on a channel already been preset, the previous station will automatically be cleared and replaced by the new station.
Note: For a better reception, insert the antenna cable into the external aerial socket and extend it.
PRESET STATIONS
This unit one store 30 FM and 35 DARDARL stations
-
Reportedly area SOURCE button to select EM or DAB mode.
-
In FM mode, how to a certain origin place will be
-
In FAL fields, while to a desired radio station KLMN 10000.
In DAR model, there in a decouvert radio station with LAD / LAD busbus, or any REFECT busbus record re charge Mll busbus on nameled creator by
11 SMD mode, time to a complete date 52
-
Cross RESET/SCAN on well or SCAN/PROC, on remote control to order into project store mode.
-
IT855 PRESENTATION ON MILL OF GAVENFRY, OIL FINGUS CONDU TO SHEET THE PRESS, SIDE HOUS.
-
Debita SELEPT book on unit or issue ▲ I ▼ Inning on currency created in sale at a renewal journal than course not hold DEEET on unit or
-
Rotate SELECT 1 min of unit of press ▲. ▼ Section of functions control is set to a preset channel, then press and hold FREELY on unit of SCANIDDQ. On remote request to confirm
Note: If you choose a station that hasn't been directed, "Farnt," will be disordered. If the station has been inverted before, the FM transmission
Note: If you choose a station list isn't been disclosed, Empty will be displayed. If this station has been announced before, the FW frequently or UAB station name will be disclosed.
- Percent step 2.4 to stem outer station
Quick Preset
You can use the number buttons to access quick preset. Select a radio station, then press and hold the number button to store the station in
preset channel respectively.
- 2017年1月1日
If you want to save the number of preset stations bigger than 10, please use *10. 1-10 button
Example 1. In case the 14th press station, firstly press +10 then press and hold 4. (10+4=14)
Example 2, to save the 20th preset station, firstly press +10 then press and hold 10. (10+10=20)
Listen to the radio presets.
Preset station list
Press PRESET button on unit or SCANPROG. button on remote control once. Preset station list will be displayed. Rotate SELECT button on
unit or ▲ / ▼ button on remote control to select your desire preset station. press SELECT button on unit or □ on remote control to confirm
- 2017年1月1日
Number button
Press (1-10, +10) number buttons on remote control to recall the station in preset channel.
BLUETOOTH FUNCTION
The Bluetooth® word mark and Inns are registered trademarks owned by Bluetooth SIC, Inc. and any use of such marks by New One S.A.S is
under license. Other trademarks and trade names are those of their respective owners.
Pairing a Bluetooth Device
- When the unit is on, repeatedly press SOURCE button to select Buelcoth icon A. The display will show "Connecting..." to indicate that it
is in reina moda.
- On the Bluetooth device, enable Bluetooth and select "M-13000RT" from the Device List. (Refer to the user manual of the device to be
annotated for detailed versions (i) the Diastatic devices update for a more code, now 1000. Some Diastatic devices will solve to
correlated for distance operations.) If the Bidobatian device prompts for a pass code, ask 'box', Same Bidobatian devices except the connection. If the unit are raised property, you will hear the indication sound. The disney will show *Connected
Note:
+ if you want to connect your Bluetooth speaker to another Bluetooth audio device, long press ⚠/ ⚠/ to disconnect current device first and follow
the steps above to make a new
- On some devices such as computers, once ordered you must select the unit from the Bluetooth menu and choose *Use as Audio Device
(stegan) or similar.
+ Pairing remains intact when the unit and/or your Bluetooth device is taken out of communication range. An active connection will be re-
established when your Buyworth devine returns within range
- When the unit is burned on again, it will automatically try to reconnect with the most recently paired Bluetooth device.
Using a Bluetooth Device
-
With a unit paired (see previous section), operate your Bluetooth device and its sound will be heard through the M-1380 DBT's speakers.
-
Press the Mutton to pause his back. Press Contin to resume his back
-
Select desired stock with
-
Adjust the volume using the -1+Volume buttons. You can also adjust the volume on the device to which you are required.
Using a NEC Device
NFC (Near Field Communication) is a technology that enables short-range wireless communication between NFC-enabled devices, such as
mobile phones
- When the unit is on, mounted or press SOURCE button to select Bluetooth icon A. The riscals will show "Connecting..." to indicate that it
is in training mode.
in the way of


- Enable NFC and Bluetooth on your Bluetooth device (see the user manual of your device for details, tap the NFC device on the NFC tag NFC)
an unit until you hear an indication voice]. The display will show "Connected". NFC device is connected to this unit via Bluetooth.
- To break the connection, lap the NFC device with the NFC tag NFC on this unit again.
Note: The operational range between the main unit and a NFC device is approximately 10 meters.
STEREO PAIRING
This function makes it possible for you to get stereo surround sound quality. It
requires two Bluetooth speakers M-1380 DBT to realize the real Bluetooth radio channel wireless separation, therefore, you've got to purchase two M-1380 DBT.
Tips: it is suggested that the distance between the main speaker and secondary
speaker is within 4 meter
-
Turn on two Bluetooth speakers M-1380 DBT
-
When both speakers are in pairing mode, press button or one Bluetooth speaker which will become the main speaker (left channel) until you hear the indication voice "Searching", then it will search and connect to the secondary speaker (right channel). They will recognize the left and right channel automatically. You will hear the indication voice "Stereo Pairing" when the two speakers are connected successfully.
-
Connect your main speaker to Bluetooth enabled device (e.g. smart phone).
-
Play your song and listen to the sound in stereo.
-
Press Button on either speaker to pause playback. Press again to resume playback.
- Press and hold Button on the main speaker to disconnect the stereo pairing.
Hereby, NEW ONE S.A.S. declares that the MUSE M-1380 DBT/M-1380 DBTW is in compliance with the essential requirements and other relevant provisions of Directive 201453/EU. The declaration of conformity may be consulted at www.muse-europe.com
LISTENING TO DISC
-
When the unit is ON, repeatedly press SOURCE button to select Disc icon set. The display will show "Reading...". Press ▲ to open the disc tray insert a disc with label side facing up. Press ▲ again to close the disc tray. (Note: if there is no disc inserted, the display will show NO DISC."
-
After a few seconds, the total number of tracks will appear on display for a few seconds and preback starts automatically
LECTURE USB
-
Connect an USB device to the USB MP3 port on unit.
-
Repeatedly press SOURCE button to select USD icon 📄. The display will show "Reading...". It will start to playback automatically after few seconds.
-
Select desired track with
Notes:
- The total number of MP3 tiles on the USB device should not exceed 999.
- The device may not contain more than 99 directories.
- The reading time takes about a few seconds or more depending on the amount of MP3 files and folders on USB device.
- Do not put anything other than a USB device to the port of this unit. Other objects may damage the USB mechanism. - The USB socket trans, but he properled in the computer directly, for that may damage the unit.
- There are many USB devices in the market. We cannot guarantee to support all different models. Please try another USB device if your device is not supported.
PLAY MODES (CD/MP3)
Repeat playback
Press REP, button on remote control repeatedly to select a play mode, repeat indicator will lights up.
- Repeat One: display shows
- Repeat folder: display shows * (MP3 only)
(1) 2017年1月1日
- Repeat All: display shows To close repeat playback press RER, button repeatedly until repeat indicator disapers
Random playback
Press RAND, button on remote control. Random indicator * lights up. It will play all tracks in random order. Press RAND, button again to cancel this function. Random indicator lights off.
Program playback
-
In stop mode (press ■ button once), press PROG, button on remote control. The display will show ★01° and 01xx (box is total number of
-
Select the desired track with 📄 (i) then cross PROG button to confirm.
-
Repeat above steps to program up to 32 tracks for CD and RF tracks for MP3.
-
Press ▶b start program playback
-
Press ■ button on remote control once to stop the program playback. Press ■ twice to cancel this function.
Select a folder (mp3 only)
- Press ▲ on remote control to select the first track of next folder or your current disc or USB.
- Please ▼ On remote check to select the first back of previous reader at your current date or date.
EN-5
By number buttons 1-10
Use the number buttons to input the track number, and it will start playback from the selected track automatically. If you want to input the track number home team 2, use the 4.10 button.
If you want to impact the block forward digital filter 5, use the 1-to-block. Example 1 to select the 30th track, firstly press 1 then press 10 (1+10=10).
Example 1, to select the 14th track, firstly press 1 then press 4 (1+4=14) Example 2, to select the 14th track, firstly press 1 then press 4 (1+4=14)
Example 3, to select the 40th track, firstly press 4 then press 10 (4+10=40)
Example 4, to select the 305th back, firstly press 3 then press 10, and press 5 [3+10+5=305]
CONNECTING AUXILIARY SOURCE
To AUDID IN RCA jacks
-
Connect your auxiliary source (e.g. DVD player) to the AUDIO IN LIR jacks on back of until with RCA audio cable (cable not included).
-
Press SOURCE button repeatedly to select RCA icon. The display will show
-
Start playback from your auditory source.
-
Adjust the volume to desired level
-
To stop playback, disconnect your auxiliary source from the AUDIO IN LIR jacks.
To 3.5mm AUX IN jack
-
Connect your auxiliary source (e.g. mp3 player) to the AUX IN jack of unit (cable included).
-
Press SOURCE button repeatedly to select AUX icon. The display will show
-
Start paybacks from your auxiliary salaries.
-
Adjust the volume to desired level.
-
To stop playback, disconnect your auxiliary source from the AUX IN jack.
SETTING MENU
When the unit is on, press and hold MENU button to access setting menu. Rotate SELECT knob to select an option and/or adjust the setting, then press SELECT to confirm.
Note:
- The * will be displayed next to the current setting.
- When do the setting in the menu, press the MENU button to return back to previous step.
DAB setting menu
Station List
Show a full list of DAS stations available.
Full Scan
This function allows you to automatically scan and create a list of receivable DAB broadcasts.
Manual tune
This function can be used to assist the positioning of antenna or the unit, to enhance specific channel or frequency reception ability.
Rotate SELECT knob to select
Station order
Multiplex: Stations are listed in numerical and then alphabetical order.
Apharumeric Stations are listed in alphabetical order.
Active stations are listed according to the signal strength of stations.
DRC (Dynamic range compression)
DRC can make quieter sounds easier to hear when the unit is used in a noisy environment.
Rotate SELECT knob to select "Off", "Low" or "High", then press SELECT to confirm.
DRC off - no compression. This is the default setting.
DRC low - medium compression.
BRC High - Maximum Compression
Note: DRC is effective only in dynamic range compression broadcast.
Prune station
Remove stations that are listed but unavailable.
The display will show "This will remove all invalid stations, continue?"
Right SELECT TO select "Yes" and press SELECT to confirm.
Main men
* Time setup
"Set time
Set date (DD/MM/YYYY) and time. Refer to the operations in section "SETTING THE TIME AND DATE".
"Clock format
Set time format: 12/24 hour clock display.
** Auto update
No update, show the time from system setting.
From radio: time update from FM or DAB/DAB1
*Alarms
Set the alarms. Refer to the operations in section "SETTING THE ALARM".
'EQ
Select the desired sound effect: Default, Rock, Classic, Jazz, Pop.
EN-6


• Sleep
Set the sleep time. Refer to the operations in section "Sleep function".
\* Backlight
Set the backlight time out / level. Refer to the operations in section "Dimmer".
Language
To select the desired language of the unit's menu, English, Français, Deutsch, Netherlands.
\* Factory Reset
To restore to factory default settings.
\* SW version (Software version)
To review the current software version
FM setting menu
Audio setting
To select between "Stereo or mono" and "Mono only" for the FM radio.
Main menu
Refer to the operations in section "DAB setting menu Main menu"
Note: In Bueltzoh, Disc, USB. AUX or RCA mode, press and hold MENU button to enter "Main menu" for setting. Refer to the operations in section "DAB selling menu" Main menu".
MAINTENANCE
Cleaning
WARNING: Disconnect the unit from the mains supply before cleaning.
- Use a soft, dry, clean cloth. Regularly dust the vents at the back or sides.
- Using solvents, abrasive or alcohol-based products risks damaging the appliance
- If an object or liquid enters inside the exolence, unplug it immediately and have it checked by an authorized engineer.
Notes on disc
* Do not use irregular shape CDs (example: heart-shaped, octagonal one). It may result in malfunctions.
* Do not place more than one disc in the disc compartment
* Do not try to open the disc compartment during playing.
* Do not touch the lens. Using so may cause malfunction.
- If there is a scratch, dirt or finger prints on the disc, it may cause tracking error. Before playing, clean the disc with a cleaning cloth. Wps the disc from the center out. Don't store discs in places with high temperatures or high humidity, they can become warped. After playing, store the disc in its case.
Important Note
- Before transporting the unit, remove the disc from the disc compartment.
NOW PLAYING INFORMATION
While a station is playing, the display shows its name and DLS (Dynamic Label Segment) information transmitted by the radio station such as program name, track title and contact details. When you short press MENU button on unit or INFO, button on remote control each time, the next set of information is displayed, cycling through:
DAS made
Program type: ensemble name. DAB variant channel number, region, data channel number, frequency, bit rate, coded signal error rate, signal strength Radio led
FM mode
Radio Text/PTY (Program Type), signal strength, date
ERROR MESSAGES
'Not available': No DAD reception
'No LAB station': The listed station cannot be found.
(No name): The current station does not broadcast an identity name.
No station found: No DAB stations are available, check/move the site
No Radio Text: No RDS text information is available on the station.
No Program Type: No RDS program type information is available.
TECHNICAL SPECIFICATION
GENERAL
POWER SUPPLY: AC 100-240V\~50/60Hz
Consumption: 60W
BLUETOOTH
Bluetooth Version: V5.0
Bluetooth: 2.402-2.48GHz
RF Output Power: -3.905dBm
Working Distance: Up to 10 meters measured in open space (wall and structures may affect range of device)
RADIO
FM: 87.5-108MHz
DARIDAS+: 174.928-239.200 MHz
Specifications are subject to change without notice.
EN-7EN-0
TROUBLESHOOTING GUIDE
Should this unit exhibit a problem, check the following before seeking service
No Power
• Make sure unit is connected to AC power.
No Sound - General
+ External device's volume is set to minimum raise volume.
+ The M-1380 DBT's volume is set to minimum; raise volume.
The Bluetooth device cannot pair or connect with the unit.
+ You have not activated the Bluetooth function of your device. Refer to the user manual of your device to activate Bluetooth function.
- The unit is not in pairing Hidce. Press and hold the 3.7% button until the Bluetooth indicator \$ink last. - The unit is already connected with another Bluetooth device, disconnected that device and then to again
The units already certificate information.
SAFETY INSTRUCTIONS
CAUTION: To reduce the risk of electric shock, do not open the device, there is no party inside for the user. Refer all servicing to qualified personnel.

The lightning with the arrow symbol in the triangle is a warning sign alerting the user to "dangerous voltage" inside the unit.

The exclamation point in the triangle is a warning sign alerting the user of important instructions accompanying the product.
The Caution mark is located at the back of the device.
WARNING: TO PREVENT FIRE OR SHOCK HAZARD, DO NOT EXPOSE THIS APPLIANCE TO RAIN OR MOISTURE.
CAUTION: Invisible laser radiation when open and interlocks defeated. Avoid exposure to beam.
This compact disc player is classified as a CLASS 1 LASER product. The CLASS 1 LASER PRODUCT marking is located on the back cabinet.

IMPORTANT
- The use of apparatus in moderate climates
- The Marking plate is located at the back of the device.
- Make sure to have a minimum distance of 5 cm around the unit for sufficient ventilation.
- Ensure that the ventilation openings is not covered with items such as newspapers, tables, oths, curtains, etc.
- Do not place based name sources, such as lighted canoes on the apparatus
-13. For exposure of the impact of bleeding of Sparring, Meles
- But not place objects met with liquids, such as grass, rose on the bed.
Do not know batteries into the Respect. He environment when disposing of used batteries.
- The power plug is used as a disconnect device and must be easily accessible. To be completely disconnected from the power, the plug of
The serolense shrub in the rickettual exemplable. The serolat must red be ribelous root seed shrub in the aceto serracebria stratum interveted one
- Under the influence of fast transient and/or electrostatic electric phenomena, this model more realisation and thus more true reflectors
power reset of the device
- The normal function of the product may be disturbed by strong Electro-Magnetic Interference. If so, simply reset the product to resume normal operation by following the instruction manual. In case the function could not resume, please use the product in other locations.

If in the future, you need to get rid of this product, please note that Waste electrical products should not be disposed of with household waste. Recycling facilities exist. Check with your municipality or ask your dealer for advice. (Directive for Waste Electrical and Electronic Equipment)
NEW ONE S.A.S
- Rue de la Mission, 25480 Ecole Valentin, Franco


CAIXA DE SOM BLUETOOTH COM RÁDIO DAB+/FM, CD E CONEXÃO USB
RETIRE O APARELHO DA EMBALAGEM
Jazzì Pop D%: Datta i Dublotype Designers (the
(3) Sanilo Balm. A key benefit of the impact of the 125 mZ scan area.
Timeout (tempo limite): Always On (sumpre ligado) > 10s > 20s > 30s > 45s > 60s > 90s > 120s > 180s
Full scan (Sintonia Complets)
DRC law (BSX) - means compression. DRC hix (alt) - mixing compression
DKC high (auto) - maxima compressa
Prune station (Remover)
CLASS 1 LASER PRODUCT
PRODUCTO LASER CLASE
PRODUIT LASER DE CLAS8
ATENOL
- Utilize este ansuelho puro clima temperado
R.4. PAPAKING (Widergabs) Pass, bluecool-Repping
R15. T### REP. WEDENHIE A EUGGAGE
R15.1.10 +10.75mmol/min
(10. 1-16, +16 English)
EINLEGEN DER BATTERIEN
- Financial Data Review/adjusted was principal
Vatwander since Rhodarth Capital
Also instructively, an existing print
3. 2017, 2018, 12, 2019, 2020, 2021
EINSTELLUNGSMENU
[Unreadable due to severe distortion and noise]
DO NOT OPEN

CLASS 1 LASER PRODUCT PRODUCTO LASER CLASE 1 PRODUIT LASER DE CLASSE 1
ACHTUNG
- March 18th Cable Ave. n
No. 5319-008021 - did 3/1/2016
R4. Balanes - Amina del voluman
Classic (dieselco)' Jazz' Pop
Rs. Bolón LD: Sonarod activada/ desactivada
Intra SEI EOT non antitumor. Cine is mononitis. SEI EOT has a valencealve. Cine has a total normal ventricle. Cine SEI EOT has a valencealve.
PARK-DELEUT part of similar. OR ISHUNTIC. DELEUT has a solution
«» y poseira para cancelar
SLEEP (APAGADO AUTOMÁTICO)
The following table provides the information in English:
FUMA O GHAU LUNN, UTRI E MINGO A BIBIHLE JIMI NIGEAT 12.0.14.15.16.17.18.19.20.21.22.23.24.25.26.27.28.29.30.31.32.33.34.35.36.37.38.39.40.41.42.43.44.45.46.47.48.49.50.51.52.53.54.55.56.57.58.59.60.61.62.63.64.65.66.67.68.69.70.71.72.73.74.75.76.77.78.79.80.81.82.83.84.85.86.87.88.89.90.91.92.93.94.95.96.97.98.99.100
BURELLAND • More is realized with more details, with conditions and the BURELLAND was repositionals (BAS) 2.1 computed
The following summary
The following table is provided in the image.
* Or in the case of the time that we have been done by us to provide our best results with a result of
- Reputan 1, is pertisha imobsiva
- Repotir carpeta, la pantalla muestra (MP3 only)
"No station found" (no se concentraron amiscras
"No Program Type" (no hay PTY)
SUPPORTO PER TABLET O SMARTPHONE
1. Premere per sollevare i supporto
- Timeout (Durata): Always On (Sempre attiva) > 10s > 20s > 30s > 45s > 60s > 90s > 120s > 180s.
m = 311
Station List (Elenco Stazion
Full scan (Ricerca complete)
CLASS 1 LASER PRODUCT PRODUCTO LASER CLASE 1 PRODUIT LASER DE CLASSE 1
ATTENZIONE
UW APPARAAT UIT DE VERPAKKING HALEN

- Workday now hat places, part of the
is ingesteld on DAB of FM.
- Timeout: always on (selfid san) > 10s > 20s > 30s > 45s > 60s > 90s > 120s > 180s
WEERGAVE VAN EEN USB-APPARAAT
WEERGAVEMODI (CD/MP3)
Herhalen
en 01:xx (xx is not total annual tracks)
Nov 2 From AUX INGANG
DRC (Dynamic range compression)
CLASS 1 LASER PRODUCT PRODUCTO LASER CLASE 1 PRODUIT LASER DE CLASSE 1