
M-098 - Car Radio MUSE - Free user manual and instructions
Find the device manual for free M-098 MUSE in PDF.


| Product Type | Car Radio |
| Brand | Muse |
| Model | M-098 |
| Power Supply | 12V DC (11-16V allowable) |
| Max Power Output | 50W x 4 (estimated) |
| Load Impedance | 4Ω |
| Dimensions (W x D x H) | 192 x 134 x 58 mm |
| Mounting Dimensions (W x D x H) | 169 x 52 x 55 mm |
| Weight | 382 g |
| FM Tuning Range | 87.5 – 108 MHz |
| FM Signal-to-Noise Ratio | 60 dB (typical) |
| FM Stereo Separation | 26 dB |
| USB/SD Playback | Supports MP3 files, USB and SD/MMC cards |
| AUX Input | 3.5mm front AUX jack |
| RDS Features | AF, TA, PTY, REG, EON |
| Equalizer Presets | Flat, Pop, Rock, Classic |
| Loudness Function | Yes (BAND/LOUD button) |
| Detachable Front Panel | Yes |
| Fuse Rating | 10A (typical, same amperage as original) |
| Frequency Response (USB) | 20 – 20,000 Hz |
Frequently Asked Questions - M-098 MUSE
User questions about M-098 MUSE
0 question about this device. Answer the ones you know or ask your own.
Ask a new question about this device
Download the instructions for your Car Radio in PDF format for free! Find your manual M-098 - MUSE and take your electronic device back in hand. On this page are published all the documents necessary for the use of your device. M-098 by MUSE.
USER MANUAL M-098 MUSE
CAR RADIO WITH USB & SD/MMC
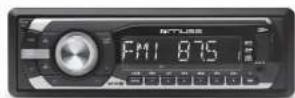
Please read the instruction carefully before
operating the unit

Install the front panel
For, notch A. Shown as pictured onto shell B. And then slightly press into the right side.

Detach the Front Panel
Press ▲ button in the upper left corner, and then the front panel will be loaded down. When the front panel was turned down to the angle of 45°, hold and push the front panel to left, and then pull it out.

Note: Never put any objects into the front panel.
Detach the Unit
- Detach the front panel (Please refer to upper part)
- Uses up a color limit zone.

3E+GB-5
96.22.15 10-101 10013 1448
PRECAUTIONS
- Do not attempt to modify the unit, modifying the unit may cause an accident.
- Installation or servicing of the unit by persons without training and experiences in electronic equipment and automotive accessories may be dangerous and could expose you to the risk of electric shock or other hazards.
- Stop the vehicle before carrying out any operation that could interfere with your
- Keep the volume at a level which you make beer sounds from tobacco the volume
- Do not work in extremely high or low temperature. Be sure the temperature inside the vehicle is between +60°C and -10°C before turning on your unit.
- When replacing the fuse(s), the replacement must be of the same amporego as a great as the fuse padar.
- On one back ends or receiver panels. Backing them will cause best to build up
- Using this unit without ninning the engine can result in battery drainage
- Use only in cans with a 12 vol negative ground.
- After resolution the installation and beginning to play the initiative or minute
After containing the instruction and calling to buy the first button, adjusting the battery, please remove the front panel at first, and then press RESET button on the base with polished object (such as ball-point pon) to set the unit to initial status. Reset
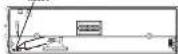
UNPACK YOUR UNIT
When you unpack your new car radio, make sure that you have removed all the accessories and information papers.
Men and with connector
User Handa Астанотек

- Board the keys supplied to the unit at the both sides of the unit (also as first loaded) until they click. Pulling the keys and makes them to remove the unit from the cashboard.

LOCATION OF CONTROLS
- [measures:
- PWR (Power buffer)
- SHIM button (56p forward)
- 7-MOD button
C. SEL/VOL inch (Audio/Volume) Front panel
n. AMS-SCH button Automatic star- inc) 12 3 = 5 6 7 8 9 - TA button (Traffic alarm)
- LCD display
- USB port
10 ALX in jax - 0DSP function (Display time)
- 0DBA input (Display time)
- S-DIR-Button (Directory dirn): 22:20:50 40 18:17:18 15:24:19 15:31:19
- 3-RPT button (Repeat)
16.2INT button (lum) - T-PAU button (Pseudo)
- BANDLOUD is like
- PTY button (Program type select)
(10) 20. EQUITY (in € million) - 3-4 (see backward)
22 AF button (gamma frequency) 23 Green filter - SDMMG 801
CONNECTION INSTALL AND DETACH THE UNIT

C. 4
- Make sure to connect the color-correct books supporting to the dispersion. Incorrect connections may cause the unit to malfunction or damage the worker's electrical system. - Make sure to connect the speaker (.) leads to the speaker (-) terminal. Never correct the left and right channel speaker cycles reach other or to the vehicle body. - Make sure all the connections are completely correct before turning on your unit.
Do not earn the light or wine (red) and the battery wine (yellow). I may cause a small circuit over most 1 Ltr.
CB-2
BASIC OPERATION
Turning on/off the unit
Press PWR button (2) to turn on the unit. Press PWR button again to turn at the unit.
Selecting the mode
After the unit is on, press MOD (4) button to select different sourcing mode: Radio →
USB → SDMMC
Time displaying
Press DSP button (1) to show the current time on display
Adjust time: Long press DSP (11) until clock time with bearing hour digits appears. Then Press >> and >> button to adjust the hour value and press DSP (11) to confirm. Then minute digits last. Press >> and >> button to adjust the minute value and press DSP (11) to confirm.
information display
- In case of receiving a RDS station.
The display will also: CT → FREO → PTY → PS
(1) 本报告书的摘要、修订稿和补充
In case of not receiving a ROS station
the display was the 0.1 × RSD × RCPTT × RCP3
Note: It will return to normal play mode if no key is pressed within 5 seconds.
Stand the unit
Operating the unit for the last time or after replacing the car battery, you must read the unit. To set the unit to initial status, press RESET button (25) located on the base with a pointed object. When some errors occur in colour, you can also read the unit, but I will press the clock setting and some memorized functions.
GB-9

Install the unit
Medloc 1 DIN FrontMount
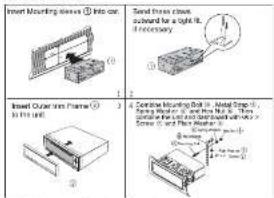
- Machine 2 (IN Rosersome) (For Japanese car)
- Remove the outer trim frame

- Select a position where the screw holes of the mounting bracket supplied with the car and the screw holes of the man unit become altered (are fixed).

- Tighten the screws. And then fasten them to the car
05.9
SOUND FEATURES
Volume adjusting:
To increase or decrease the audio level, make SELVOL knob (5) excelsers of self-cathode.
2.代入题
Selling the Sound Characteristics:
Revisibly press SEL/ VOL KNO [5] to select the crested mode in its following mode: BAS (base) → "TRE" (theory) → "QAL" (solvent) → "FAD" (super) → "TA VOL" (TA volume) → "RED" (REQ ON OFF) → "LOC" (LOC ON OFF) → "STEREO" (MOND) → VOL (Volume). After selecting the crested mode, you can adjust the current level by making the SEL/ VOL kno [5].
Note: -The unit will return to the previous mode if no spacing within 5 seconds.
Refer to radio sector for REG, LOC and STEREO/MCNO.
Preset equalizer
When you are listening to popular music, does more or rock music, using EQ function to select relative status can adjust the sound quality perfectly. Recently press EQ [20] to select different equalizer mode in following order: FLAT->POP->ROCK->CLASS->EQ off.
1. 2. 3. 4. 5. 6. 7. 8. 9. 10. 11. 12. 13. 14. 15. 16. 17. 18. 19. 20. 21. 22. 23. 24. 25. 26. 27. 28. 29. 30. 31. 32. 33. 34. 35. 36. 37. 38. 39. 40. 41. 42. 43. 44. 45. 46. 47. 48. 49. 50. 51. 52. 53. 54. 55. 56. 57. 58. 59. 60. 61. 62. 63. 64. 65. 66. 67. 68. 69. 70. 71. 72. 73. 74. 75. 76. 77. 78. 79. 80. 81. 82. 83. 84. 85. 86. 87. 88. 89. 90. 91. 92. 93. 94. 95. 96. 97. 98. 99.
Press and hold BAND/LOUD button (15) until "LOUD ON" shows on display to excise LOUD function. By the function, you can increase the low frequency, which can improve sound sensitivity. Press and hold this button again until "LOUD OFF" has cancel LOUD function.
Selection band
in luner mode, repeatedly press BAND/LOUD button (10) to select bands in
following order: FM1-0FM2-0
Manual automatic tuning
Press are hold button or (321) and "MANUAL" shows an display then press button or (321) continuously to select a station downward or upward. Press and hold button or (321) so the station with a faster speed.
Automatic Tuning
Press 🐎 or 🐎 (3/21) write, the radio automatically searches a station upward or downward respectively and stays when I finds a station. Press 🐎 or 🐎 (3/21) once to stop scanning.
GB-9
35-7
30-14 12-56
Scanning/memortizing stations automatically
During turn mode, press and hold AMS/BCH (6) button for 3 seconds to start automatic scanning the stations and store them into number buttons 1-8. Press AMS/BCH button (6) to broadcast each station which stores in the 1-6 number buttons. After scanning, you can press AMS/BCH (C) corresponding number button 1-5 (12-17) to start praying that station.
- By number button 1-6 (12-17)
-
Tune to a station by 📋 or 📋 (321).
-
Press and held one of the 1-6 Number buttons (12:17) for 2 seconds until LCD shows the corresponding number, which indicates that station is already stored in the corresponding number button.
-
Under radio mode, press 1-6 Number buttons (12-17) to listen to stored stations.
- When you are listening to a station stored in a number button, press and hand another number button for more than 2 seconds can store the station into another number button.
Note: The unit can be stored up to 6 stations for each band.
-LOC ON: OFF: Repeatedly press SELVOL knob (5) to select "LOC" mode, when selected ON, the strong signal local stations can be received, when selected OFF, the week signal out-of-town gaillers may be received.
-STEREO / MONO: Reportedly press SEL/VOL knob (S) to select to "STEREO/MONO" mode. FM listening is generally cone in Stereo mode. However, if the signal is weak or reception is not as good as you would like, switching to Mare mode usually improve the overall sound quality.
-- BOS (Radio Data System) Operations -
This unit has a bulk-in-RDS decoder asylum fan supports broadcast stations transmitting RDS debt. This system can display the terms of the first published station, being received and can automatically switch to the broadcast station with the best reception as you move long distance (AF switching). Also, if a traffic announcement or programmes type is broadcast from an IDD studio, no matter what looks you see it, the broadcast is received. Additionally, if EON information is received, this information enables us to provide stations on the same network, and interruption of the station being received with traffic information from other stations. This function is not available in any purpose.
Alternative frequency selecting (AF)
The AF function switches to a different frequency on the same network in order to maintain maximum reception. During FM mode, press AF button (22), certain program will be successfully searched and recovered. If the reception of the current broadcast station deliberates, "AF" appears in the display and the radio searches for the same program on another frequency. Press AF button (22) again to cancel this function. When reception is bad, the AF level will be
Press and hard AF button (22) for 6 seconds, the unit will be under "RED ON" or "RED OFF" mode.
REG ON: I should be selected to the local broadcast of the current station, even if there is a relnal broadcast of the station.
REG OFF: it should be selected to listen to the national broadcast of the current station.
Traffic alarm (TA)
In the TA standby mode, when a traffic announcement broadcast starts, the traffic announcement broadcast is received as top priority regardless of the function mode so you can listen to it. Traffic programme (TF) automatic tuning is slow possible.
Press TA button (7), when LCD shows "TA", traffic program will be automatically searched and saved, when LCD shows "TP", this means that the RDS broadcast station being received here toll a reimbursement programme.
If you press TA button (7) while a traffic announcement broadcast is being received, the traffic announcement broadcast reception is cancelled and the unit goes into the TA standby mode.
If a TP station is not received, the unit continues searching.
Press TA button (7) again to stop searching, "TA" goes off.
61.589
"ALARM" will be displayed when an emergency broadcasting is received, meanwhile sound output level will be adjusted for the power input level automatically when the volume range is set at minimum.
Program time selecting /RTX
When PTY is selected, the radio starts to search corresponding PTY information, and scope if the conservative PTY information is deleted.
If corresponding PTY information is not existed any more, PTY engaging is automatically exit to normal mode.
Notes:
When PYY mode is engaged, the PYY switch is shared as follows:

According to above 2 allotted groups, the preset number is used for PTY selection as follows:
MUSIC REVIEW
-
POP M. ROCK M
-
EASY M. LIGHT M
-
CLASSICS, OTHER M
-
JAZZ COUNTRY
-
NATION M. OLDIES
B. FOLK M
SPEECH group
-
NEWS AFFAIRS INFO
-
SPORT EDUCATE DRAMA
-
CULTURE SCIENCE VARI
-
WEATHER FINANCE CHILDREN
-
SOCIAL RELIGION PHONE IN
-
TRAVEL LEISUSE DOCUMENT
-
THAEE, ELEGO, DOGEMEN
LISTENING TO USB DEVICE OR SD/MMC CARD
To insert a USB devices (not included).
Open the plastic cover, caused your USB device to the USB slot (8), it will switch to "USB" mode automatically. If USB has been inserted, press MOD button (4) to switch in USB mode.
To insert an SDMMC card (not included)
Press button [1] to hold down the front panel first, take out the front panel. Insert your SDMMC card in card receptacle (24). Install and close the front panel then it will automatically start playing. If SDMMC card has been inserted, press MOD button (4) to switch to card mode.
Basic player functions
Playpause: press 1.PAU (17) to suspend momentarily the playing track. Press (17) took again to escape playing.
Skip/tract search: press buffer 30 to skip forward to next track and 21 to skip backward to previous track. Press and hold or 3/21 to search quickly within a track
Intro scan: press 2INT button (16) when it show "INT ON", then the player will play the first 10 seconds of each track in the disc press again to cancel this function when it shows "INT OFF".
Repeat: Press RPT button (15) once to repeat your desired track. Press again to repeat your desired directory. Press three times to repeat all.
Random playing: Press RDM button (14), all tracks will play randomly
SELECTING DIRECTORY UP/DOWN: Press DIR-button (13) or DIR + button (12) to select directory downward or upward. If the MP3 contents does not have any directory, DIR-button (13) or DIR + button (12) are inactive.
Searching a track in MP3-USB-SD
-
Press AMS/BCH button (6) once, press the keys standing for corresponding numbers.
-
After select your desired track number, the selected track number will show an
display. 1. Press SEL (VOL, inch /s) in start playing
- PICS SEE VOL MBD
Exit USB/USD card mode 1. To exit USB mode, disconnect your USB device with the unit, it will switch to lacer
mode directly. To set SP nodes, each line SP and then bits out now SP and/without a bit
- To reach the mode, push the suit arm, then take the year suit branch from the door, I will switch to tuner mode directly.
......
* There are many USB devices or SD/MMC card in the market. We cannot guarantee to support all different modes. Please try another USB device or SD/MMC card if your device is not supported.
* The null might not support all the multimedra files stored in SDAMC card or USB because it includes some special playbacks procedure which might not be compatible with the procedure of this unit.
LISTENING TO AUXILIARY SOURCE
-
Connect your auxiliary source (e.g. mpa player to the AUX (N lack 10))
-
Press P/B (2) balloon to 1 am the unit on
-
Press MOD (4) to select AUX mode.
-
Start playback from your auxiliary source.
-
Adjust the volume (5) is deared level.
- Disconnect your auditory source from the Aux In Jack (10), press MOO button (4) to
select other sources as your desired.
GB-110B-1C0B-6GB-8
MAINTENANCE
Presudien
- Clean the front panel with a soft cloth, or damp chamicle leather. Never use schvents.
- Funding for Defectable Front Panel
Lia nai, metzom (so teng cun)
do not drop or supply blocks.
- Make all the, you keep your set snap for The use of a central in moderate climator.
- Do not be exposed to driping or splashing, and that no object filled with liquids, such
as vases, shall be placed on the ascarsius.
- No naked fame sources such as lighted candies should be placed on the apparatus.
Clearing the Connector
If the connector between the main unit and the front panel is dirty, it may result in the unit in abnormal working condition. To avoid such problems happening, please detach the front panel, and clean the connector with an alcohol swash. Gently clean and avoid damaging the connector.

Notes:
For the sake of safety, always shut down the generator and take out the key from the ignition before cleaning. Never keep your finger or any metal device touch the connector directly.
Replacing the Fura
Make sure the ampereage matches the specified value when replacing the fuses. If the fuse is blown, checks the power connection and replace with a new one. If the same problem occurs, it would be subjected to the malfunction in-house. In such cases, please consult the nearest service dealer.
TROUBLE SHOOTING GUIDE
| Symptom | Cause Solution | |
| Iain power | The air injection switch is not on. | If the power uses a be connected to the air monitoring circuit, but the way is not moving, which the air is being in "AVCC". |
| the time is still. | Implied to be used. | |
| Iain sound | We start at room time | Adjusted noise to a measured event. |
| thinking in the property connected | Check using connection. | |
| The operation: Royal history work | The unit is outside our and working properly about its role. | Works the first 1st edition should send a new proprie for the first part place. |
| The necessary needs and Works: The main screen provides adjustable devices about real work. | The airless stable to not connected. | Iram, the airless stable family. |
| The grade are less weak. | Is able to maintain memory. |
SPECIFICATIONS
| Gencing | |
| Power Requirement | 12V DC (11-HV allowable) |
| Load Impedance | 40 dB |
| Max Power Input | 500 V/4 |
| Tone Controls | ± 10 dB |
| Basis of 100 Hz | |
| Twinia at 10 Hz | |
| Dimensions | Approx. 192 × 134 X8 mm width |
| Mounting Dimensions | Approx. 169 × 52 X55 mm (slightly) |
| Weight | Approx. 382 kg |
| FM Section | |
| Timing Range | 87-198 MHz |
| IF Range | 1.0 × 10^6 |
| Uniform Security Ratio | 1:1 × 10^-6 |
| Signal-to-Noise Ratio | 1:1 × 10^-6 |
| Same Separation | 26 dB |
| USB player Section | |
| Signal-to-Noise Ratio | 60 dB |
| Separation | 40 dB |
| Duration | 30% |
| Frequency Response | 20-20000 Hz |
Note:
Due to continuous product improvement, specifications and design are subject to changes without prior notices.
CAUTION! The unit conforms to the International safety specifications and to guide lines of the European community and also complies with current standards concerning electrical safety and electromagnetic compatibility EMC.
WARNINGS
CAUTION RISK OF ELECTRIC SHOCK POMEER NAME ATTENTION: To reduce the risk of electric shock, do not remove the cover. There are no user serviceable parts inside the unit. Refor a servicing to qualified personnel
The lightning flash with arrowhead symbol within the triangle is a warning sign starting the user of "dangerous voltage" inside the unit.
The exclamation point within the Triangle is a warning sign alerting the user of important instructions accompanying the product.
WARNING - To reduce the risk of fire or electric shock, do not expose this appliance to a much measure.
If at any time in the future you should need to dispose of this product please note that Waste Electrical products should not be disposed of with household tools. Please recycle where facilities said. Check with your Local Authority or retailer for recycling advice.(Waste Electrical and Electronic Equipment Directive)
GB·4GB·180B·12
GB-15
Brand : MUSE
Model : M-098
Category : Car Radio