Blackstar Amp - Hi-fi system Auna - Free user manual and instructions
Find the device manual for free Blackstar Amp Auna in PDF.
User questions about Blackstar Amp Auna
0 question about this device. Answer the ones you know or ask your own.
Ask a new question about this device
Download the instructions for your Hi-fi system in PDF format for free! Find your manual Blackstar Amp - Auna and take your electronic device back in hand. On this page are published all the documents necessary for the use of your device. Blackstar Amp by Auna.
USER MANUAL Blackstar Amp Auna
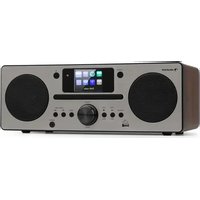
Black Star & Silver Star CD HiFi-Receiver CD HiFi Receiver CD récepteur HiFi CD Receptor HiFi CD Ricevitore Hi-Fi CD hifi receiver 10036445 10036446
www.auna-multimedia.com
364

bar
| Category | Value | |---|---| | Category 1 | 100 | | Category 2 | 100 | | Category 3 | 100 | | Category 4 | 100 | | Category 5 | 100 | | Category 6 | 100 | | Category 7 | 100 | | Category 8 | 100 | | Category 9 | 100 | | Category 10 | 100 | | Category 11 | 100 | | Category 12 | 100 | | Category 13 | 100 | | Category 14 | 100 | | Category 15 | 100 | | Category 16 | 100 | | Category 17 | 100 | | Category 18 | 100 | | Category 19 | 100 | | Category 20 | 100 | | Category 21 | 100 | | Category 22 | 100 | | Category 23 | 100 | | Category 24 | 100 | | Category 25 | 100 | | Category 26 | 100 | | Category 27 | 100 | | Category 28 | 100 | | Category 29 | 100 | | Category 30 | 100 | | Category 31 | 100 | | Category 32 | 100 | | Category 33 | 100 | | Category 34 | 100 | | Category 35 | 100 | | Category 36 | 100 | | Category 37 | 100 | | Category 38 | 100 | | Category 39 | 100 | | Category 40 | 100 | | Category 41 | 100 | | Category 42 | 100 | | Category 43 | 100 | | Category 44 | 100 | | Category 45 | 100 | | Category 46 | 100 | | Category 47 | 100 | | Category 48 | 100 | | Category 49 | 100 | | Category 50 | 100 | | Category 51 | 100 | | Category 52 | 100 | | Category 53 | 100 | | Category 54 | 100 | | Category 55 | 100 | | Category 56 | 100 | | Category 57 | 100 | | Category 58 | 100 | | Category 59 | 100 | | Category 60 | 100 | | Category 61 | 100 | | Category 62 | 100 | | Category 63 | 100 | | Category 64 | 100 | | Category 65 | 100 | | Category 66 | 100 | | Category 67 | 100 | | Category 68 | 100 | | Category 69 | 100 | | Category 70 | 100 | | Category 71 | 100 | | Category 72 | 100 | | Category 73 | 100 | | Category 74 | 100 | | Category 75 | 100 | | Category 76 | 100 | | Category 77 | 100 | | Category 78 | 100 | | Category 79 | 100 | | Category 80 | 100 | | Category 81 | 100 | | Category 82 | 100 | | Category 83 | 100 | | Category 84 | 100 | | Category 85 | 100 | | Category 86 | 100 | | Category 87 | 100 | | Category 88 | 100 | | Category 89 | 100 | | Category 90 | 100 | | Category 91 | 100 | | Category 92 | 100 | | Category 93 | 100 | | Category 94 | 100 | | Category 95 | 100 | | Category 96 | 100 | | Category 97 | 100 | | Category 98 | 100 | | Category 99 | 100 | | Total (Total) |text_image
QR code image containing encoded data, no visible human-readable textINHALT
Technische Daten 4
https://www.spotify.com/connect/third-party-licenses
Member of Berlin Brands Group
Handwerkerstr. 11
15366 Dahlwitz-Hoppegarten
Deutschland
natural_image
Symbol of a trash bin crossed with a diagonal line, representing no waste or discharge (no text or labels)Congratulations on purchasing this device. Please read the following instructions carefully and follow them to prevent possible damages. We assume no liability for damage caused by disregard of the instructions and improper use. Scan the QR code to get access to the latest user manual and more product information.

text_image
QR code image containing encoded data, no visible human-readable textCONTENTS
Technical Specifications 36
Safety Instructions 37
Features and Controls 38
Initial Use 41
Operation 41
Settings 43
Internet Radio 47
Podcasts 49
Spotify Connect 50
DAB Radio 51
FM Radio 53
CD 55
USB Mode 56
Aux in Mode 57
BT 57
Optical 58
Coaxial 58
Alarms and Sleep 58
Disposal Considerations 60
Declaration of Conformity 60
TECHNICAL SPECIFICATIONS
| Item number 10036445, 10036446 | |
| Power supply 220-240 V~ 50/60 Hz | |
| Power consumption max. 70 W | |
| Power consumption standby < 1 W | |
| Output 15 V/4 A | |
| RMS power 2 x 30 W RMS | |
| DAB+ frequency 174-239 MHz | |
| FM frequency 87.5-108 MHz | |
| WiFi frequency 2.4 GHz / 5 GHz | |
| BT frequency 2.4 GHz | |
| BT radio-frequency power (max.) 9 dBm | |
| Connections AUX-IN L and R binding port, 3.5mm headphone, USB, Binding Port for speakers, Line out binding port, Optical in connector, Coaxial in connectors, Wifi antenna, DAB /FM antenna | |
| Dimensions (WxDxH) 430 x 270 x 65 mm | |
| Weight 3.2 kg | |
SAFETY INSTRUCTIONS
Explanation of the symbols on the appliance
 | CAUTION |  |
| RISK OF ELECTRIC SHOCKDO NOT OPEN | ||
| WARNING: TO REDUCE THE RISK OF ELECTRIC SHOCK; DO NOT REMOVE THE COVER OR BACK. NO USER-SERVICEABLE PARTS INSIDE: REFER SERVICING TO QUALIFIED PERSONNEL. | ||
 | The lightning symbol is intended to alert you to the presence of uninsulated, dangerous voltage within this product's enclosure that might be of sufficient magnitude to constitute a risk of electric shock. Do not open the product case. |
 | The exclamation symbol is intended to inform you that important operating and maintenance instructions are included in the literature accompanying this product. |
Children over the age of 8 and persons with reduced physical, sensory or mental capabilities or those with a lack of experience and knowledge may only use the device if they are instructed on how to do so by a person responsible for their safety, or if they are supervised and understand the hazards associated with the use of the device.
Care
- Keep the amplifier dry. If it gets wet, wipe immediately.
- Use the amplifier only in well-ventilated installations.
- Handle the amplifier away from dust and dirt.
- Wipe occasionally with a damp cloth to keep it looking new.
- Do not use harsh chemical, solvents or detergents
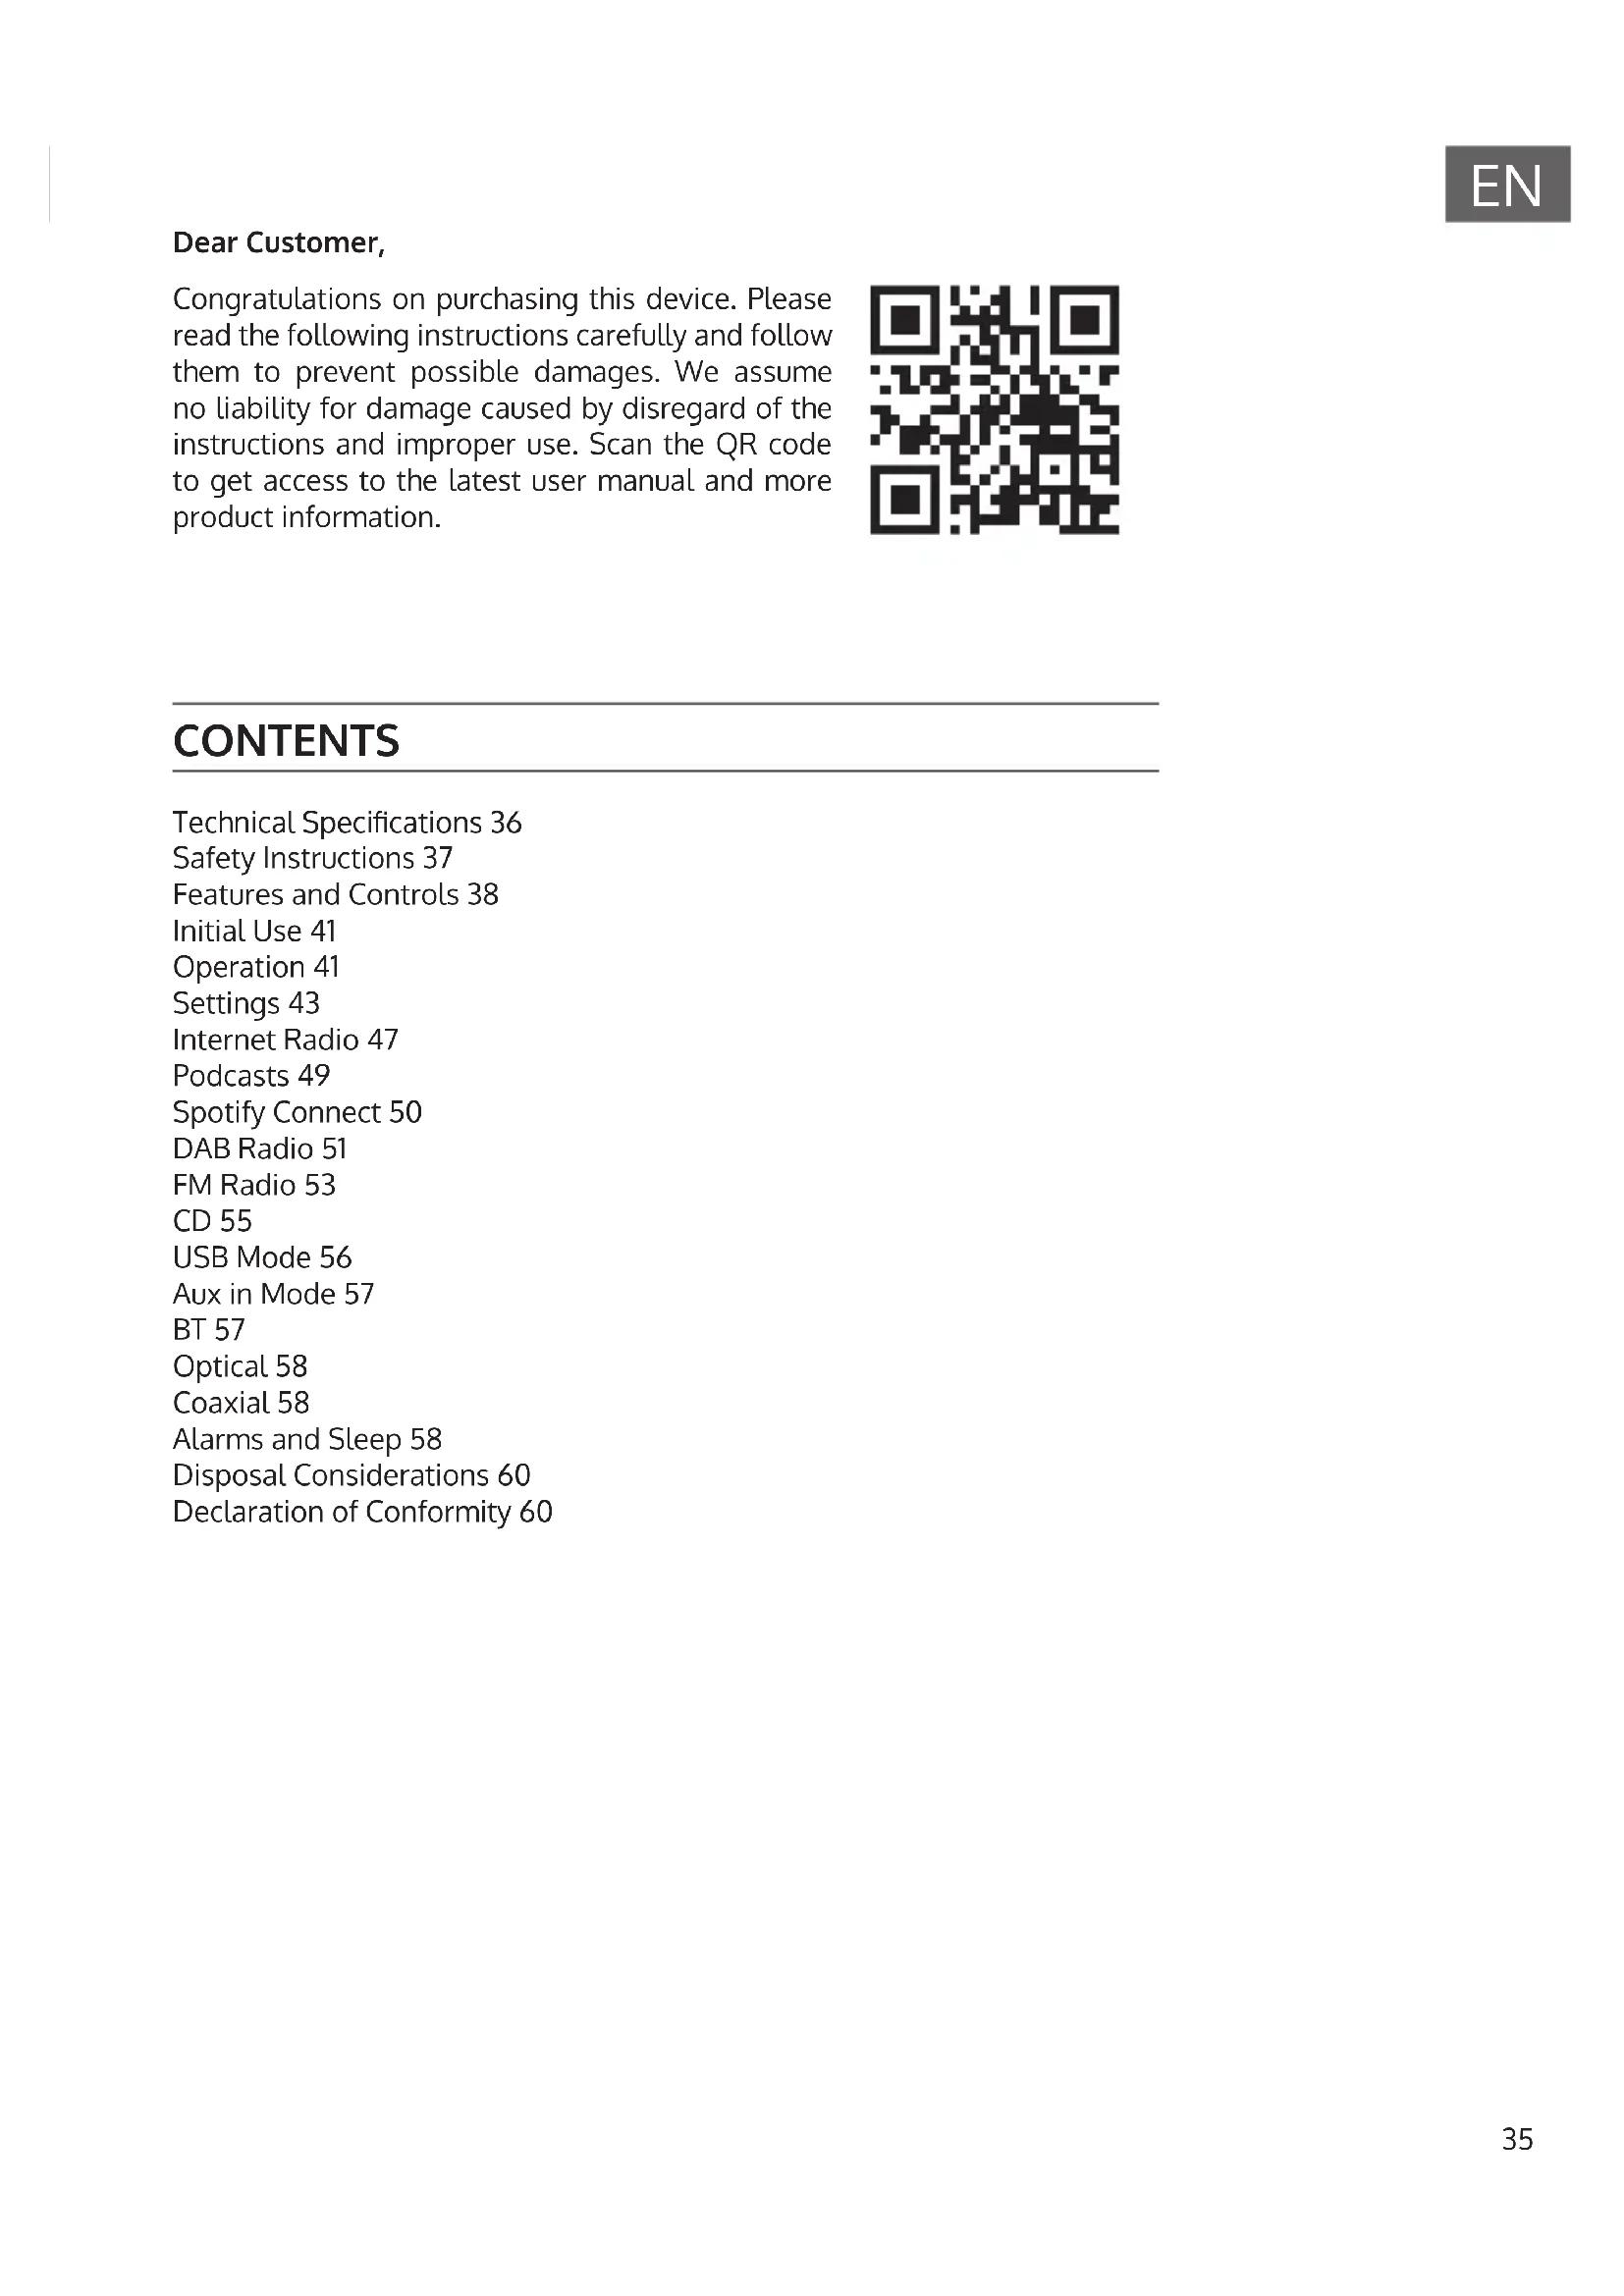
FEATURES AND CONTROLS
Front view
text_image
Val Navigation Back Fev 1 2 3 4 5 6 7 8 9 10 11 12 13 14 auna1 Vol/ Stop
2 Ok / Navigation
3 Back
4 Head phone (3.5mm)
5 USB
6 Favorite
7 Display
8 Standby
9 Mode
10 Menu /Info
11 Backward/previous track
12 Play /Pause
13 Forward/next track
14 Ejection- press for CD ejection
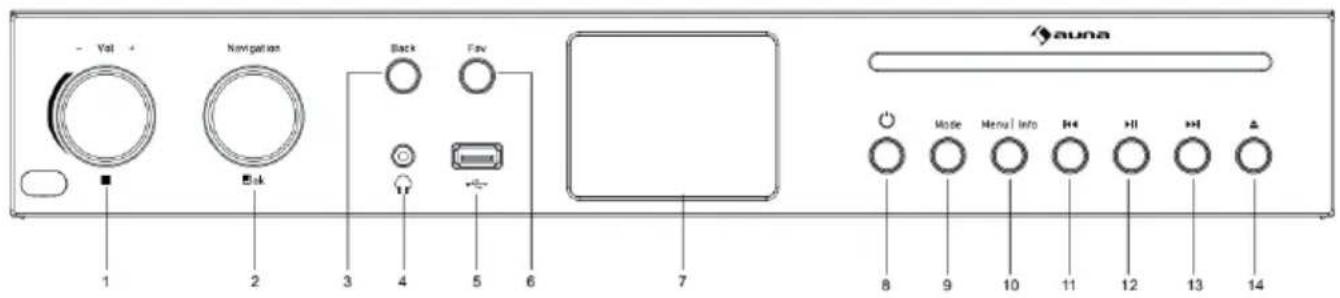
Rear view
text_image
OFF AC MAINS 220-840V 60460Hz 70W ON CE 15 16 17 18 19 20 21 22 VIFI ANTENNA AVANTUMS Reversal/ultronic Rally solid lines CAUTION AIR OF MAX.100, MAX.100, MAX.100, MAX.100, MAX.100 ATTENTION MAX.100, MAX.100, MAX.100, MAX.100, MAX.100 DAB/FM ANTENNA15 ON/OFF
16 AC mains
17 WIFI Antenna
18 Speaker binding ports
19 AUX IN, PRE OUT
20 OPTICAL IN
21 COAXIAL IN
22 DAB /FM antenna connector
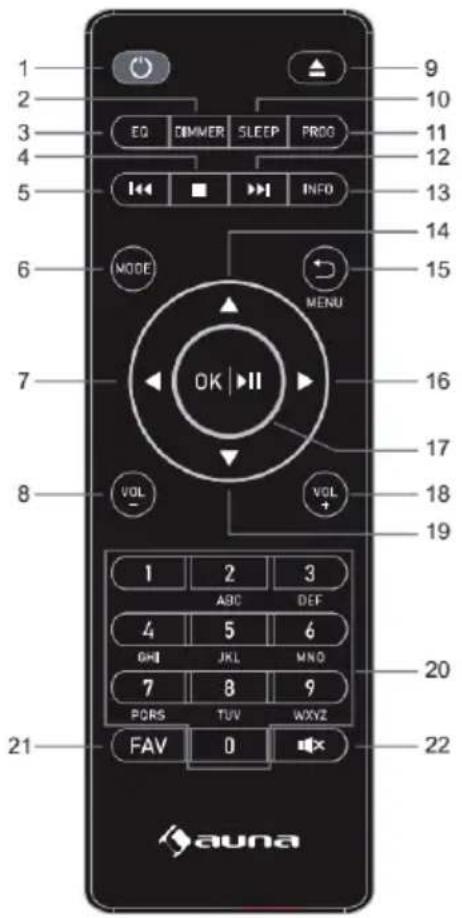
Remote control
text_image
1 2 3 4 5 6 7 8 9 10 11 12 13 14 15 16 17 18 19 1 2 3 ABC DEF 4 5 6 GHI JKL MNO 7 8 9 PCRS TUV WXYZ FAV 0 20 21 22 auna1 Standby button
2 Dimmer
3 EQ set tone
4 Stop button
5 Backward/previous track
6 Mode button
7 Left cursor button
8 VOL - button
9 Ejection- press for CD ejection
10 Sleep button
11 Program button
12 Forward/next track
13 Info button
14 Up Cursor button
15 Menu / Back button
16 Right cursor button
17 OK and play/pause button
18 Vol+ button
19 Down cursor button
20 Input letters and numbers
21 Fav button
22 Mute button
INITIAL USE
Before operation, please make sure that the VOLTAGE mentioned on the power supply is same as the voltage of your local area. Use the supplied mains VDE plug to connect the device to a household mains socket. When it is the first time running the device, the setup wizard is launched automatically.
Before initial use, you just need to install the antennas we provide, and connect your speakers, and then, enjoy it.
Press Standby button when unit is power on, unit will go to standby mode. Press again will make it on again.
Setup wizard
When radio is started for the first time, it runs through a setup wizard to configure settings for date/time and network. Once this has finished, the system is ready to use in most modes.
Note: To change these settings later, select Menu>System settings>and select the required settings options. To run the setup wizard again, select Menu>System settings>Setup wizard.
The Setup wizard guides you through the basic setup parameters for Time/Date and Network connection. To change any settings later all setting functions are accessible from the Settings Menu.
OPERATION
After the initial setup, radio is ready for operating in most Modes.
Mode selection
From the Main Menu select a mode and press OK. Alternatively use Navigation knob to switch to different mode. After a brief moment radio switches to that mode. The last station or track previously used in that mode is selected. If this is not possible, radio scans for relevant stations, networks, or prompts the user for appropriate input.
Audio playback
The common local controls for audio playback are available in all listening modes:
The volume rotary control is turned to increase or decrease the sound volume. The general track controls are Play/Pause to start and stop tracks and the Next and Previous buttons to skip to the next or previous track in the current playlist.
Menu navigation
The primary control for moving through menus and options is the knob control. Rotate the control to move up or down a menu. Once the required option or value is highlighted press the knob control. All menus and lists act as loops such that turning the control to go beyond the first or last entry in a menu or list takes you to the opposite end of the menu or list. So going up from first entry in a menu will take you to the last option in the menu, etc.
To enter the menu tree in a particular mode press long press "Menu". To move back a menu level press Back.
Each mode has a Mode menu, with options specific to that mode. For example, the FM mode menu has two mode specific options: Scan setting and Audio setting. In addition, each mode menu has one final option: Main menu>. The '>' indicates options leading to further menus.
The main menu presents an alternative method for selecting listening modes plus sleeps and alarm functions and one final option: System setting > The '>' indicates options leading to further menus.
The System setting menu presents system setting functions to allow the user to setup how the unit behaves. This includes network, time, language and software parameters.
Text Entry
To enter search requests or passwords, etc. The data entry screen presents all available characters and command functions in a continuous loop. Rotate the knob control to scroll back and forth through the loop as required. Press OK to select the currently highlighted character. If you make a mistake select the BKSP (backspace) option to remove the last character. When you have finished the words, select OK to enter the search words or password. Select CANCEL to quit the entry screen.
To enter a string of characters, select each character in turn. As each character is selected, the key is built up and displayed in the field at the top of the display. The three options – Backspace, OK and Cancel are included in the selection loop. These can be accessed just using the knob control, or, a short cut is available, press the Info key, to jump to the BKSP (backspace) option.
Presets
In each of DAB, FM and Internet radio, up to 40 preset stations can be stored and recalled.
To store the current station as a preset, press and hold FAV until the display shows the Save to Preset screen to save the stations. Select one of the 40 presets to save the currently playing station and press OK to confirm. To select a preset, press FAV briefly, then select one of the listed preset stations. When a preset station is playing, its preset store number Star icon +Number is shown in the bottom of the screen.
SETTINGS
All the settings parameters for radio are available on the System settings menu.
System settings menu options:
• Equaliser
- Network
- Time/Date
- Language
- Factory reset
- Software update
- Setup wizard
- Info
- Privacy policy
- Back light
- Line output setup
Equaliser
Several predefined EQ settings are available; also a user-defined setting (My EQ). To choose an EQ setting, select Menu > System settings > Equaliser. You can then choose from a variety of predefined settings and My EQ. The last option 'My EQ profile setup' allows you to define your own settings for the 'My EQ' option, with custom bass and treble settings.
Network
- Network wizard
- PBC Wlan setup
- View settings
- Manual settings
- NetRemote PIN setup
- Network profile
- Clear network settings
- Keep network connected
Network wizard
This guides you through the necessary steps to join a network. This is also automatically run as part of the Setup wizard. The screens and options presented will depend on the type of network and network protection used.
Selecting a network
When the Network wizard is chosen radio automatically scans for available wireless networks and presents a list of SSID's (Service Set Identifier) for the networks. Radio remembers login details for the last four wireless networks it has connected to and will automatically connect to them when they are available. If connection to a network is temporarily lost, radio will automatically reconnect.
Wi-Fi network (SSID), select a network from the list or WIRED (connect network cable to Lan connector).
Open network
If the network is open (non-encrypted), radio connects and no further details are required.
Standard encrypted network
If the wireless network is protected the next screen presents options to enter the network key or passphrase.
Note: The default passphrase for most wireless routers is printed on a label on the router.
On completion
Radio connects to the selected network. If connecting fails, radio returns to a previous screen to try again. To exit the process uses the Back/Menu button. If the network connection is lost, radio automatically reconnects.
PBC Wlan setup (Wi-Fi Protected Setup)
Radio prompts you to press the connect button on the router and then press the select control. For more information on setting up a PBC Wlan encrypted network, see your PBC Wlan router's instructions.
View settings
Displays the settings details for the current network setup, including:
• Active connections
- MAC address
- Wlan region
- DHCP
- SSID
- IP Address
- Subnet mask
- Gateway address
- Primary DNS
- Secondary DNS
Manual settings
Choose DHCP enable/disable
NetRemote PIN setup
Allows you to define a PIN number to be entered before being able to connect to radio remotely over a network
Network profile
This displays a list of the networks remembered by radio (up to a maximum of 4). You can see the list of registered networks through Menu > System settings > Network > Network profile>. From here you can delete unwanted networks by turning and press OK then confirming delete Yes.
Clear network settings
This option will clear current network settings, to allow you to join an alternative network more easily.
Keep network connected
Choose Yes or no to keep network connected or not.
Time/Date
- Set Time/Date
- Auto Update
- Set Format
Set Time/Date
The date and time are displayed as dd-mm-yyyy with the first value, dd, active (flashing). Adjust each value with the knob control. As each value is set by pressing the knob control, the next value becomes active ready for adjustment.
Auto-update (from DAB, FM or Network
Auto-update works with data sent over DAB, FM or the Internet. The clock is only updated when in a corresponding mode, so it is best to select a mode you use regularly. DAB and FM use time signals broadcast with radio transmissions. Network uses a time signal sent from the internet radio portal when in any network-connected mode.
- Select Update from DAB, update from FM, update from Network or No update.
-
If you are updating from the network, set your time zone.
-
If your country uses a daylight saving, the automatically updated time from the network may be wrong by one hour. When daylight saving adjustments is in effect, such as British Summer Time (BST), turn on the Daylight savings option to rectify this.
Note that if you are updating the time from DAB or FM, the Daylight savings option has no effect on the clock's time. Radio will auto-update from the selected source when time information is available.
Set format
Allows you to change between 12 and 24 hour display.
Language
The default language is English. TO change, selec Menu > System settings > Languages > the select your language
Factory reset
A factory reset resets al user settings to default values, so time/date, network configuration and presets are lost. However, the radio's current software version is maintained.
To perform a factory reset, select Menu > System settings > Factory reset Proceed > Yes.
Software update
From time to time, solution provider may make software upgrades available with bug fixes and/or additional features. You can either check manually, or set radio to check periodically automatically (this is default). If radio detects that newer software is available, it asks if you want to ahead with an update. If you agree, the new software is then downloaded and installed. After a software upgrade, all user settings are maintained.
CAUTION: Before starting a software upgrade, ensure that radio is plugged into a stable mains power connection. Disconnecting power during software update may permanently damage the unit.
Setup wizard
This allows you to run the Setup wizard at any time. The wizard guides you through the essential settings in the following order:
- Date/Time – Set format
- Auto update- select clock update source or No Update
- Set Time/Date ( this step is only needed if the 'No Update' option is selected in Auto update)
- Set TimeZone
-
Daylight savings
-
Network wizard automatically runs (see section 5.2.1 Network)
- Once you are connected to a network the wizard is completed.
Info
Shows details of the current system including:
- SW version: software version number
- Radio ID: Unique code used to identify this particular radio device
- Friendly name: name by which the radio is identified on a network
Privacy Policy
Displays a privacy notice guiding you to our website for full details of the Frontier Smart Technologies Privacy policy:
Please visit the following page on a PC or mobile device.
www.Frontiersmart.com/privacy
Backlight
The radio display can be set to dim, when in Standby, after a Timeout period. This option allows you to set the timeout operation and the brightness settings before (On level) and after (Dim level) the time period.
For the On level, High, Medium, Low are available.
For the Dim level, High, Medium, Low and OFF are available.
Line output setup
For Line output, choose yes or no to confirm let Line output or not.
For Local speaker, choose yes or no to turn on or off the sound or not.
INTERNET RADIO
Radio can play thousands of radio stations and podcasts from around the world through a broadband internet connection. When you select Internet radio mode, radio contacts the solution provider Internet radio portal to get a list of stations, organized into different categories like Country, and Popular. Once you select a station, radio connects directly to that station. To enter Internet Radio mode, either press mode and rotate the knob to cycle through the listening modes until Internet Radio is displayed, or select Mode > Internet Radio. The common local controls for sound volume, mute, play/stop and Presets are available.
Note: The station list menu is provided from the Internet radio portal, so it is only accessible when radio is connected to the Internet. Station lists and submenus will change from time to time.
The station list is organized into various categories and search facilities:
- Local radio
- Last listened
- Search
- Location
- Popular
- Discover
Local radio
Presents a sub-menu to search for stations using a variety of categories, for example, local stations, BBC stations, Genres or stations from a specific city. Choose the required category and either a further list of sub categories is shown, or (if there is no further sub-categories) the available stations for the chosen category are listed.
Last listed
When Internet radio mode restarts, the last-listened station is selected. To select another recently used station, then select the station on last listed list. Most recent stations appear at the top of the list.
Search
You can also search through Internet broadcasts for stations with particular keywords in their title. To search, select Menu > Station list > Search. Enter a keyword by selecting characters in turn, then enter. The search entry screens are similar in operation to the Wi-Fi passphrase entry screen. Select a broadcast from the list.
Location
To select an Internet broadcast from a particular location, select Menu > Station list > Location >. Select a continent from the menu and a list of countries available is presented, select a country and the available internet radio stations are presented. Choose a radio station from the list to tune to that station.
Popular
Presents a list of the most popular internet stations from around the world.
Discover
Allows you to select from a list of stations defined by either their origin (Country), Genre (style of music) or language. Navigate through the category options; once you have made your selection a screen confirms your selected category and the number stations within that category. To see the list, select the option showing the number of available stations.
Now playing information
While the stream is playing, the screen shows its name and description. If artist and track information is available, this is also shown. To view further information, press Info. Each time you press Info, another set of information is displayed, cycling through the following details:
- Slogan (default; where available)
- Language/Location
• Codec and sampling rate - Playback buffer
- Today's Date
PODCASTS
Radio can play thousands of podcasts from around the world through a broadband internet connection. When you select Podcast mode, radio contacts the solution provider portal to get a list of available podcasts. Once you select a podcast, radio connects directly to that podcast source. To enter Podcast mode, either press mode and rotate the knob to cycle through the listening modes until Podcasts is displayed, or select Mode >Podcasts. The common local controls for sound volume, mute, play/pause and Presets are available.
Note: The Podcast menu is provided from the Podcast portal, so it is only accessible when radio is connected to the Internet. Podcast lists and submenus will change from time to time.
- Local radio
- Search
- Location
- Discover
Local radio
Presents a sub-menu to search for podcasts using a variety of categories, for example, comedy of the week, popular, etc. Choose the required category and either a further list of sub categories is shown, or (if there is no further sub-categories) the available podcasts for the chosen category are listed.
Search
You can also search through podcasts with particular keywords in their title. To search, select Menu > Podcast list > Search. Enter a keyword by selecting characters in turn, then enter. The search entry screens are similar in operation to the Wi-Fi passphrase entry screen.
Select a broadcast from the list.
Location
To select a Pocast from a particular location, select Menu > Podcast list > Location >. Select a continent from the menu and a list of countries available is presented, select a country and the available podcasts are presented. Choose a podcast from the list to tune to that podcast.
Discover
Allows you to select from a list of podcasts defined by either their origin (Country), Genre (style of music) or language. Navigate through the category options; once you have made your selection a screen confirms your selected category and the number podcasts within that category. To see the list, select the option showing the number of available podcasts.
SPOTIFY CONNECT
Your new device has Spotify Connect built in
Use your phone, tablet or computer as a remote control for Spotify.
Listen out loud with Spotify Connect.
- Connect your device to your WiFi network.
- Open up the Spotify app on your phone, tablet or laptop using the same WiFi network.
- Play a song and select Devices Available.
- Select your device and start listening
Go to spotify.com/connect to learn how.

text_image
Spotify®Licenses
The Spotify Software is subject to third party licenses found here:
https://www.spotify.com/connect/third-party-licenses
All listed brands are trademarks of their companies. Errors and omissions excepted, and subject to technical change. Our general terms of delivery and payment are applied.
DAB RADIO
DAB radio mode receives DAB/DAB+ digital radio and displays information about the station, stream and track playing. To enter DAB mode, either press mode and rotate the knob to cycle through the listening modes until DAB Radio is displayed, or select Menu > Main menu > DAB. The DAB radio mode menu offers the following options:
- Station list
- Scan
- Manual tune
- Prune invalid
• DRC - Station order
- Main Menu
Station List
The first time you select DAB radio mode, or if the station list is empty, radio automatically performs a full scan to see what stations are available. You may also need to start a scan manually to update the list of stations for one of the following reasons:
• Available stations change from time to time
- If reception was not good for the original scan (for example the antenna was not up), this may result in an empty or incomplete list of available stations.
- If you have poor reception of some stations (burbling), you may wish to list only stations with good signal strength.
A question mark before a station in a list indicates that station is currently unavailable. Depending on the cause of the loss of signal this may be only temporary. Stations that unlikely to be available again (for example you have moved out of the broadcast range of a station), can be removed from the station list.
Scan for stations
To start a scan manually, select Menu > Scan. Once the scan is complete, the radio shows a list of available stations. The manual tune menu option allows the user to select a particular channel and display the signal strength for that channel.
Remove stations from list
To remove stations that a listed but unavailable, select Menu > Prune invalid.
Selecting stations
To listen to or change a station, select Menu > Station List and press OK knob. Scroll knob control to select station you want to listen to. Stations listed with a '?' question mark in front of them are not available. Once selected, the station plays and the screen shows 'playing' information about the station, track or show broadcast by the station. Alternatively, pressing either the ◀◀ and ▶▶ keys, jumps to the next station up or down in the station list. Preset stations can be stored and recalled.
Now playing information
While the stream is playing, the screen shows its name and DLS (Dynamic Label segment) information broadcast by the station giving real-time information such as programme name, track title and contact details. Stereo broadcasts are indicated with an icon at the top of the screen. To view further information, press Info. Each time you press Info, another set of information is displayed, cycling through DLS text, programme type, ensemble name/frequency, signal strength/error rate, bit rate/codec/channels, today's date and DL Plus (if available).
Slideshow
When slideshow is available (dependent on the broadcasted signal), the images are displayed on the left side of the screen. To cycle through the different display options (thumbnail, slide with DLS text and full screen slide) press the knob control.
Settings
Dynamic range compression (DRC)
Some DAB broadcasts offer dynamic range compression (DRC). This feature allows radios to compress the dynamic range of the output audio stream, so that the volume of quite sounds is increased, and the volume of loud sounds is reduced. This can be useful if you are listening to music with a high dynamic range in a noisy environment (for example, classical music while co-entering). To change the DRC setting for radio, select Menu > DRC, and then DRC high, DRC low or DRC off.
Note: Radio DRC setting does not have any effect if DRC data is not included in the broadcast.
Station order
You can choose the order of DAB station list to be either Alphanumeric, or Ensemble, Ensemble lists groups of stations that are broadcast together on the same ensemble, for example BBC or South Wales local. Valid lists valid stations first, alphanumerically, then off-air stations. To change station order, select Menu > Station order > then Alphanumeric or Ensemble
FM RADIO
FM radio mode receives analogue radio from the FM band and displays RDS (Radio Data System) information about the station and show (where broadcast). To enter FM Radio mode, either press mode and rotate the knob to cycle through the listening modes until FM Radio is displayed, or select Menu > Main menu > FM.
Manual search
To search manually, first short press the stations button and then turn the OK knob right to scan upwards or turn the ok knob left to scan downwards.
Auto search
To initiate auto search, press and hold the ok knob. The radio starts to scan the frequency band. It will stop automatically when a station has been found.
If you want the radio to auto search downwards or upwards then you have to do a manual search downwards or upwards prior to long pressing the ok button.
The FM radio mode menu offers the following options:
- Scan Settings
- Audio Settings
- Main Menu
- Manual search
To search manually, first short press the stations button and then turn the ok knob right to scan upwards or turn the ok knob left to scan downwards. - Auto search
To initiate auto search, press and hold the OK knob. The radio starts to scan the frequency band. It will stop automatically when a station has been found.
If you want the radio to auto search downwards or upwards then you have to do a manual search downwards or upwards prior to long pressing the OK button.
Selecting stations
To find a station, press OK. The frequency display starts to run up as radio scans the FM band. Alternatively, you can scan up or down by pressing and holding left or right buttons or tune manually with quick presses.
Note: Scanning can be set to search for strong signals only. Preset stations can be stored and recalled as described in Presets.
Now playing information
While a FM station is playing, the screen shows one of the two following sets data:
- If RDS information is available, by default the service name (i.e. station name) is displayed. You can cycle through further RDS information by pressing Info. Each time you press Info, another set of information is displayed, cycling through RDS radio text, RDS programme type, frequency and today's date.
- If no RDS information is available, the currently tuned frequency is shown.
Settings
Scan settings
By default, FM scans stop at any available station. This may result in a poor signal-to-noise ratio (hiss) from weak stations. To change the scan setting to stop only at stations with good signal strength, select Menu > Scan setting > Strong stations only? > Yes
Audio Settings
By default, all stereo stations are reproduced in stereo. For weak stations, this may result in a poor signal-to-noise ratio (hiss). To play weak stations in mono, select Menu > Audio setting > FM weak reception: Listen in mono only > Yes.
CD
To enter CD mode, either press mode and rotate the knob to cycle through the listening modes until CD is displayed, or select Menu > Main menu > CD. The CD menu offers the following options:
- Shuffle (Off /on)
- Repeat (Off / Repeat one / Repeat all)
- Main Menu
The display screen for the CD function will show "Loading..." followed by "Reading", "No Disc".
Select the Open/Close CD function on the radio or the remote. Insert your CD slightly and drive will take CD into the system to play.
The first song on the CD will now begin to play, and show the playing time. Press info button at remote repeatedly or OK button in the main unit, if the format with ID3, it will show the info(Today's date, File, Folder, Album, Artist, Title).
CD functions
To skip between songs, use the previous or next buttons on the radio or the remote. Pause/Play using the button on the radio or remote to play or pause.
To skip rewind/forward through a song playing, hold down the 'previous or next buttons on remote control and release when you wish to stop skipping.
To put the CD into the device, just slightly push the CD and the drive will take the CD in. To eject the CD, press Eject key on the radio or on the remote, as per the guidance to enter the CD.
Arrange a CD song program
When the CD is playing, press 'Stop' button, you can program the CD player to play songs in a particular order. Simply follow by pressing "Program" button on the remote to step into the state of programming. The star icon is shown.
Once in program settings, the display will show T001 to display the first song on the CD as P01. You can now choose what song you would like as program number P01 by using the ‘<<’ and ‘>>’ buttons to scroll through to the song you would like to choose. Once on the chosen song for P01, press the ‘Program’ and be taken to choose your next programmed song.
For the next song, the display will show T002 to show the program 2. Now use the ‘<<’ and ‘>>’ buttons to scroll through to the song you would like to choose. Once on the chosen for program 2, press the ‘Program’ and be taken to choose your next programmed song.
After you have finished program song selection, press the Play/'Pause' button to play the songs which have been programmed.
When the program playback is activated, press twice on Stop button, then it will exit the program playback mode, back to CD playing.
USB MODE
USB mode plays audio from an external source such as an MP3 player. To enter USB mode, either press mode and rotate the knob to cycle through the listening modes until USB is displayed, or select Menu > Main menu > USB.
The USB Audio menu offers the following options:
- Shuffle (Off /on)
- Repeat (Off / Repeat one / Repeat all)
- Main Menu
To skip between songs, use the previous or next buttons on the radio or the remote. Pause/Play using the button on the radio or remote to play or pause.
To skip rewind/forward through a song playing, hold down the 'previous or next buttons on remote control and release when you wish to stop skipping.
Arrange a USB song program
- When the USB is playing, press 'Stop' button, you can program the USB to play songs in a particular order.
- Simply follow by pressing "Program" button on the remote to step into the state of programming. The star icon is showed.
- Once in program settings, the display will show T001 to display the first song on the USB as P01. You can now choose what song you would like as program number P01 by using the '<<' and '>>' buttons to scroll through to the song you would like to choose. Once on the chosen song for P01, press the 'Program' and be taken to choose your next programmed song.
-
For the next song, the display will show T002 to show the program 2. Now use the ‘<<’ and ‘>>’ buttons to scroll through to the song you would like to choose. Once on the chosen for program 2, press the ‘Program’ and be taken to choose your next programmed song.
-
After you have finished program song selection, press the Play/'Pause' button to play the songs which have been programmed.
- When the program playback is activated, press twice on Stop button, then it will exit the program playback mode, back to USB playing.
AUX IN MODE
Aux in mode plays audio from an external source such as an MP3 player.
To play audio with Aux in mode
- To avoid sudden loud volume, turn the volume low on both radio and, if adjustable, the audio source device.
- Connect the external audio source to the Aux in L and R binding port.
- To enter Aux in mode, either press mode and rotate the knob to cycle through the listening modes until Aux in is displayed, or select Menu > Main menu > Aux in.
- Adjust the volume of radio (and, if necessary, the audio source device) as required.
BT
BT mode allows BT devices to pair with the radio, stream music. To enter BT Audio mode, either press mode and rotate the knob to cycle through the listening modes until BT Audio is displayed, or select Menu > Main menu > BT.
To pair a BT device with the radio
In BT mode, on your radio press Menu > BT, this puts the radio into discoverable mode. The BT name of the radio is "auna-bs-amp-359". On your BT smart device, make sure your BT is on and scan for device select the radio from the list of available BT devices.
Control from radio
While in BT mode you can pause, play, jump to next track and jump to previous track (in the playlist on the controlling BT device) using the buttons available on the radio.
OPTICAL
Optical mode plays audio from an external source such as an MP3 player. To play audio with Optical mode.
- To avoid sudden loud volume, turn the volume low on both radio and, if adjustable, the audio source device.
- Connect the external audio source to the Optical connector
- To enter Optical mode, either press mode and rotate the knob to cycle through the listening modes until Optical is displayed, or select Menu > Main menu > Optical.
- Adjust the volume of radio (and, if necessary, the audio source device) as required.
COAXIAL
Coaxial mode plays audio from an external source such as an MP3 player.
To play audio with Coaxial mode,
To avoid sudden loud volume, turn the volume low on both radio and, if adjustable, the audio source device.
Connect the external audio source to the Coaxial connector
To enter Coaxial mode, either press mode and rotate the knob to cycle through the listening modes until Coaxial is displayed, or select Menu > Main menu > Coaxial.
Adjust the volume of radio (and, if necessary, the audio source device) as required.
ALARMS AND SLEEP
As well as clock/calendar, there are two versatile wake-up alarms with snooze facility, and a sleep function to turn the system off after a set period. Each alarm can be set to start in a particular mode.
Sleep
To set the sleep timer, press the Sleep key on remote control repeatedly to cycle through the sleep time options: Sleep OFF, 15 Mins, 30 Mins, 45 Mins, 60 Mins, 90Mins or 120Mins. Stop when the required time is displayed, after a brief moment the screen returns to the screen being used before the sleep function was selected. On the now playing screens the remaining sleep
time is displayed at the bottom of the screen. Alternatively select Menu > Main menu > Sleep and select from the sleep time options. Once you select a sleep period, the system returns to the main menu. Press and hold the Menu to return to the now playing screen. To cancel a sleep time, select Sleep OFF from the sleep options using either of the above methods.
Note: A sleep time is automatically cancelled if radio put into Standby.
Alarms
To set or change an alarm, select Menu > Main menu > Alarms.
Select the alarm number (1 or 2) then configure the following parameters:
- Enable: Off, Daily, Once, Weekends or Weekdays
• Time: 12:00 AM (adjust as necessary) - Date: (adjust as necessary – this option is usually hidden and only required if 'Once' is selected in the Enable field).
• Mode: Buzz, Internet radio, DAB or FM - Preset: Last listened or 1-40
• Volume: 0-32 - To save these settings and set the alarm, scroll down and select save.
Notes
- If you press Back or Menu to exit the Alarm settings without saving, a dialogue screen is displayed asking if you wish to save the changes or not.
- The now playing, screen shows active set alarms with an icon at the bottom left. The standby screen shows active set alarms with an icon. At the set time, the alarm will sound. To temporarily silence it, press OK knob.
- Pressing the OK knob repeatedly cycles through the available snooze periods: 5 Mins, 10 Mins, 15 Mins, and 30 Mins. The radio returns to standby for the set period, with the silenced alarm icon flashing and a countdown of the remaining snooze period. After the set snooze time the alarm will sound again.
- During a snooze period, to change the snooze time, press OK knob to select a new snooze time. Any remaining snooze time is reset to the selected time period.
- To cancel a sounding alarm, or an alarm in snooze, press Standby.
DISPOSAL CONSIDERATIONS

natural_image
Symbol of a trash bin crossed with a diagonal line, representing no waste or discharge (no text or labels)If there is a legal regulation for the disposal of electrical and electronic devices in your country, this symbol on the product or on the packaging indicates that this product must not be disposed of with household waste. Instead, it must be taken to a collection point for the recycling of electrical and electronic equipment. By disposing of it in accordance with the rules, you are protecting the environment and the health of your fellow human beings from negative consequences. For information about the recycling and disposal of this product, please contact your local authority or your household waste disposal service.
This product contains batteries. If there is a legal regulation for the disposal of batteries in your country, the batteries must not be disposed of with household waste. Find out about local regulations for disposing of batteries. By disposing of them in accordance with the rules, you are protecting the environment and the health of your fellow human beings from negative consequences.
DECLARATION OF CONFORMITY

text_image
CE UK CAManufacturer:
Chal-Tec GmbH, Wallstrasse 16, 10179 Berlin, Germany.
Importer for Great Britain:
Berlin Brands Group UK Ltd
PO Box 1145
Oxford, OX1 9UW
United Kingdom
Hereby, Chal-Tec GmbH declares that the radio equipment type Black Star (10036445) and Silver Star (10036446) is in compliance with Directive 2014/53/EU. The full text of the EU declaration of conformity is available at the following internet address: use.berlin/10036445
For Great Britain: Hereby, Chal-Tec GmbH declares that the radio equipment type Black Star (10036445) and Silver Star (10036446) is in compliance with the relevant statutory requirements. The full text of the declaration of conformity is available at the following internet address: use.berlin/10036445
Cher client, chère cliente,
text_image
QR code image containing encoded data, no visible human-readable textSOMMAIRE
Fiche technique 62
https://www.spotify.com/connect/third-party-licenses
natural_image
Symbol of a trash bin crossed with a diagonal line, representing no waste or discharge (no text or labels)DÉCLARATION DE CONFORMITÉ

text_image
CE UK CAFabricant :
Chal-Tec GmbH, Wallstraße 16, 10179 Berlin, Allemagne.
Berlin Brands Group UK Ltd
PO Box 1145
Oxford, OX1 9UW
United Kingdom
text_image
QR code image containing encoded data, no visible human-readable textCONTENIDO
Datos técnicos 92
text_image
OFF AC MAINS 220-840V 50/60Hz 70/W ON CE 15 16 17 18 19 20 21 22 WIFI ANTENNA AVOCATION AIR CAN CNT OUT AVOCATION AVOCATION AVOCATION AVOCATION AVOCATION AVOCATION AVOCATION AVOCATION AVOCATION AVOCATION AVOCATION AVOCATION AVOCATION AVOCATION AVOCATION AVOCATION AVOCATION AVOCATION AVOCATION AVOCATION AVOCATION AVOCATION AVOCATION AVOCATION AVOCATION AVOCUTION AVOCUTION AVOCUTION AVOCUTION AVOCUTION AVOCUTION AVOCUTION AVOCUTION AVOCUTION AVOCUTION AVOCUTION AVOCUTION AVOCUTION AVOCUTION AVOCUTION AVOCUTION AVOCUTION AVOCUTION AVOCUTION AVOCUTION AVOCUTION AVOCUTION AVOCUTION AVOCUTION AVOCUTION AVOCUT RIN AVOCUT RIN AVOCUT RIN AVOCUT RIN AVOCUT RIN AVOCUT RIN AVOCUT RIN AVOCUT RIN AVOCUT RIN AVOCUT RIN AVOCUT RIN AVOCUT RIN AVOCUT RIN AVOCUT RIN AVOCUT RIN AVOCUT RIN AVOCUT RIN AVOCU TIN AVOCU TIN AVOCU TIN AVOCU TIN AVOCU TIN AVOCU TIN AVOCU TIN AVOCU TIN AVOCU TIN AVOCU TIN AVOCU TIN AVOCU TIN AVOCU TIN AVOCU TIN AVOCU TIN AVOCU TIN AVOCU TIN AVOCTR IN AVOCTR IN AVOCTR IN AVOCTR IN AVOCTR IN AVOCTR IN AVOCTR IN AVOCTR IN AVOCTR IN AVOCTR IN AVOCTR IN AVOCTR IN AVOCTR IN AVOCTR IN AVOCTR INhttps://www.spotify.com/connect/third-party-licenses
natural_image
Symbol of a trash bin crossed out by a diagonal line, with no text or labels present.Berlin Brands Group UK Ltd
PO Box 1145
Oxford, OX1 9UW
United Kingdom
text_image
QR code image containing encoded data, no visible human-readable textINDICE
Dati tecnici 122
https://www.spotify.com/connect/third-party-licenses
natural_image
Symbol of a trash bin crossed out by a diagonal line, with no text or labels present.Berlin Brands Group UK Ltd
PO Box 1145
Oxford, OX1 9UW
United Kingdom
text_image
QR code image containing encoded data, no visible human-readable textINHOUD
https://www.spotify.com/connect/third-party-licenses
Dynamic Range Compression (DRC)
WEKKER EN SLEEPFUNCTIE
INSTRUCTIES VOOR AFVOER

natural_image
Symbol of a trash bin crossed with a diagonal line, representing no waste or discharge (no text or labels)Berlin Brands Group UK Ltd
PO Box 1145
Oxford, OX1 9UW
United Kingdom