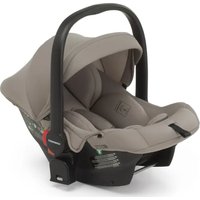
Express - Car seat Foppapedretti - Free user manual and instructions
Find the device manual for free Express Foppapedretti in PDF.
User questions about Express Foppapedretti
0 question about this device. Answer the ones you know or ask your own.
Ask a new question about this device
Download the instructions for your Car seat in PDF format for free! Find your manual Express - Foppapedretti and take your electronic device back in hand. On this page are published all the documents necessary for the use of your device. Express by Foppapedretti.
USER MANUAL Express Foppapedretti
natural_image
Black and gray compact car seat with white trim, no visible text or symbolsIT SEGGIOLINO AUTO - Istruzioni di montaggio
EN CAR SEAT - Assembly instructions
FR SIÈGE-AUTO - Notice d'utilisation
DE KINDERAUTOSITZ - Montageanweisungen
ES SILLA DE COCHE - Manual de instrucciones
EL ΠΑΙΔΙΚΟ ΚΑΘΙΣΜΑ ΑΥΤΟΚΙΝΗΤΟΥ - Οδηγίες χρήσης
PT CADEIRA AUTO - Manual de instruções
HR AUTOSJEDALICA - Upute za montažu
ECE R44-04
IT. IMPORTANTE! LEGGERE ATTENTAMENTE E CONSERVARE PER FUTURE REFERENZE
EN. IMPORTANT! READ THE INSTRUCTIONS CAREFULLY AND KEEP FOR FUTURE REFERENCE
FR. IMPORTANT! LIRE ATTENTIVEMENT ET CONSERVER SOIGNEUSEMENT A PORTEE DE MAIN POUR UNE UTILISATION ULTERIEURE
natural_image
Illustration of a child wearing a seatbelt using a car seatbelt device, shown from two different angles (no text or symbols present)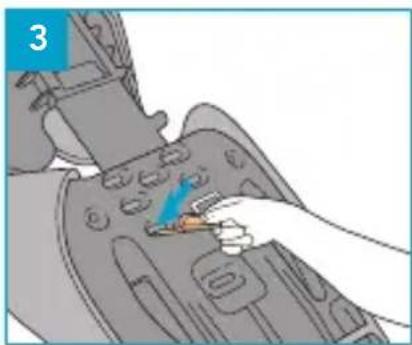
natural_image
Illustration of a hand using a tool to adjust or install a mechanical component (no text or symbols visible)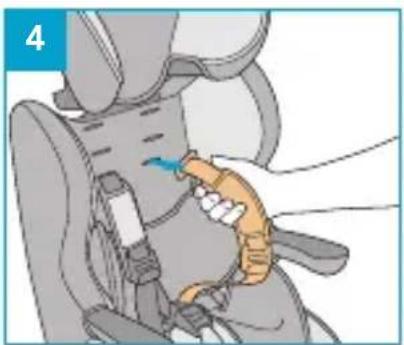
natural_image
Illustration of a hand using a tool to adjust or install a component on a car seat (no text or symbols visible)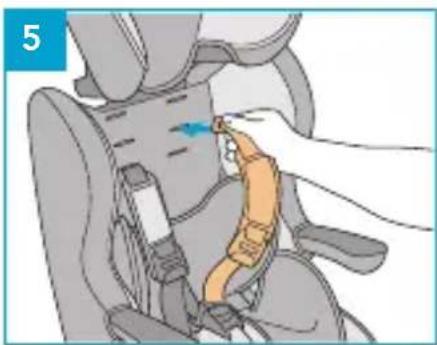
natural_image
Illustration of a hand adjusting a car seatbelt component (no text or symbols visible)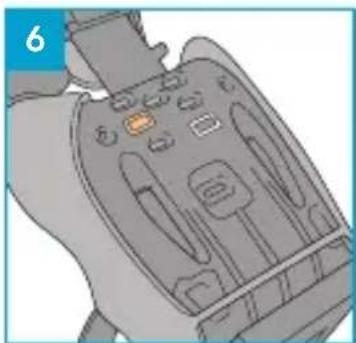
natural_image
Illustration of a car interior with hand and seat compartments (no text or symbols)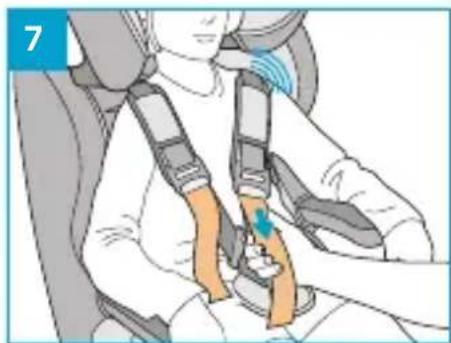
natural_image
Illustration of a person wearing a car seatbelt with a hand adjusting the seatbelt (no text or symbols present)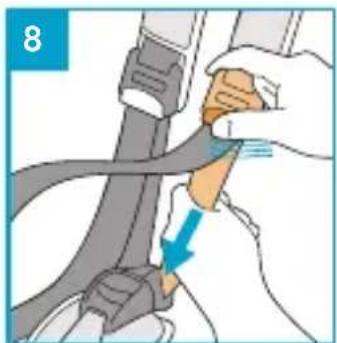
natural_image
Illustration of a hand adjusting a cable with a blue arrow indicating a downward motion (no text or symbols present)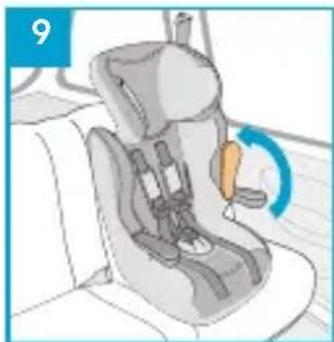
natural_image
Illustration of a car seat with a highlighted orange belt and blue circular motion indicator (no text or symbols)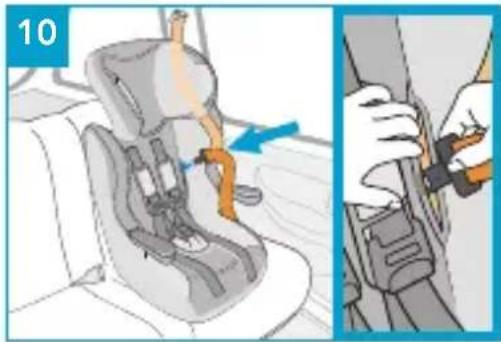
natural_image
Illustration of a car seatbelt switch with a hand adjusting the belt (no text or symbols present)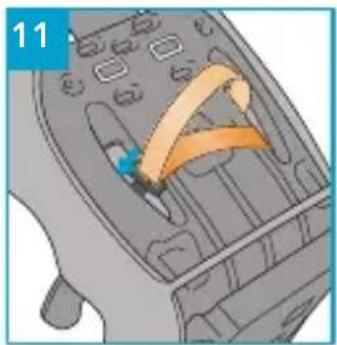
natural_image
Illustration of a car interior with orange bands and control buttons (no text or symbols)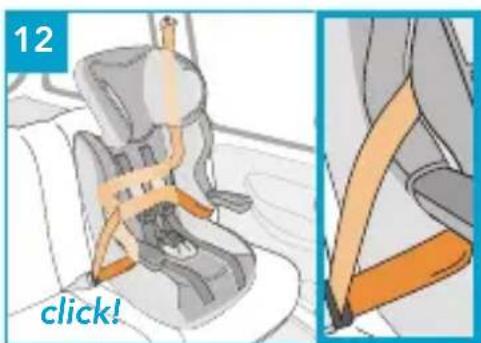
text_image
12 click!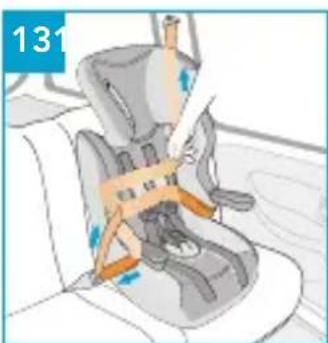
natural_image
Illustration of a car seatbelt with orange straps and blue buttons, no text or symbols present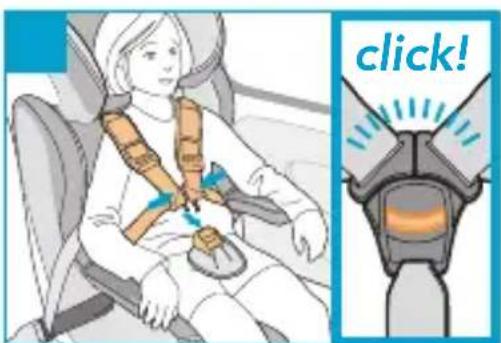
text_image
click!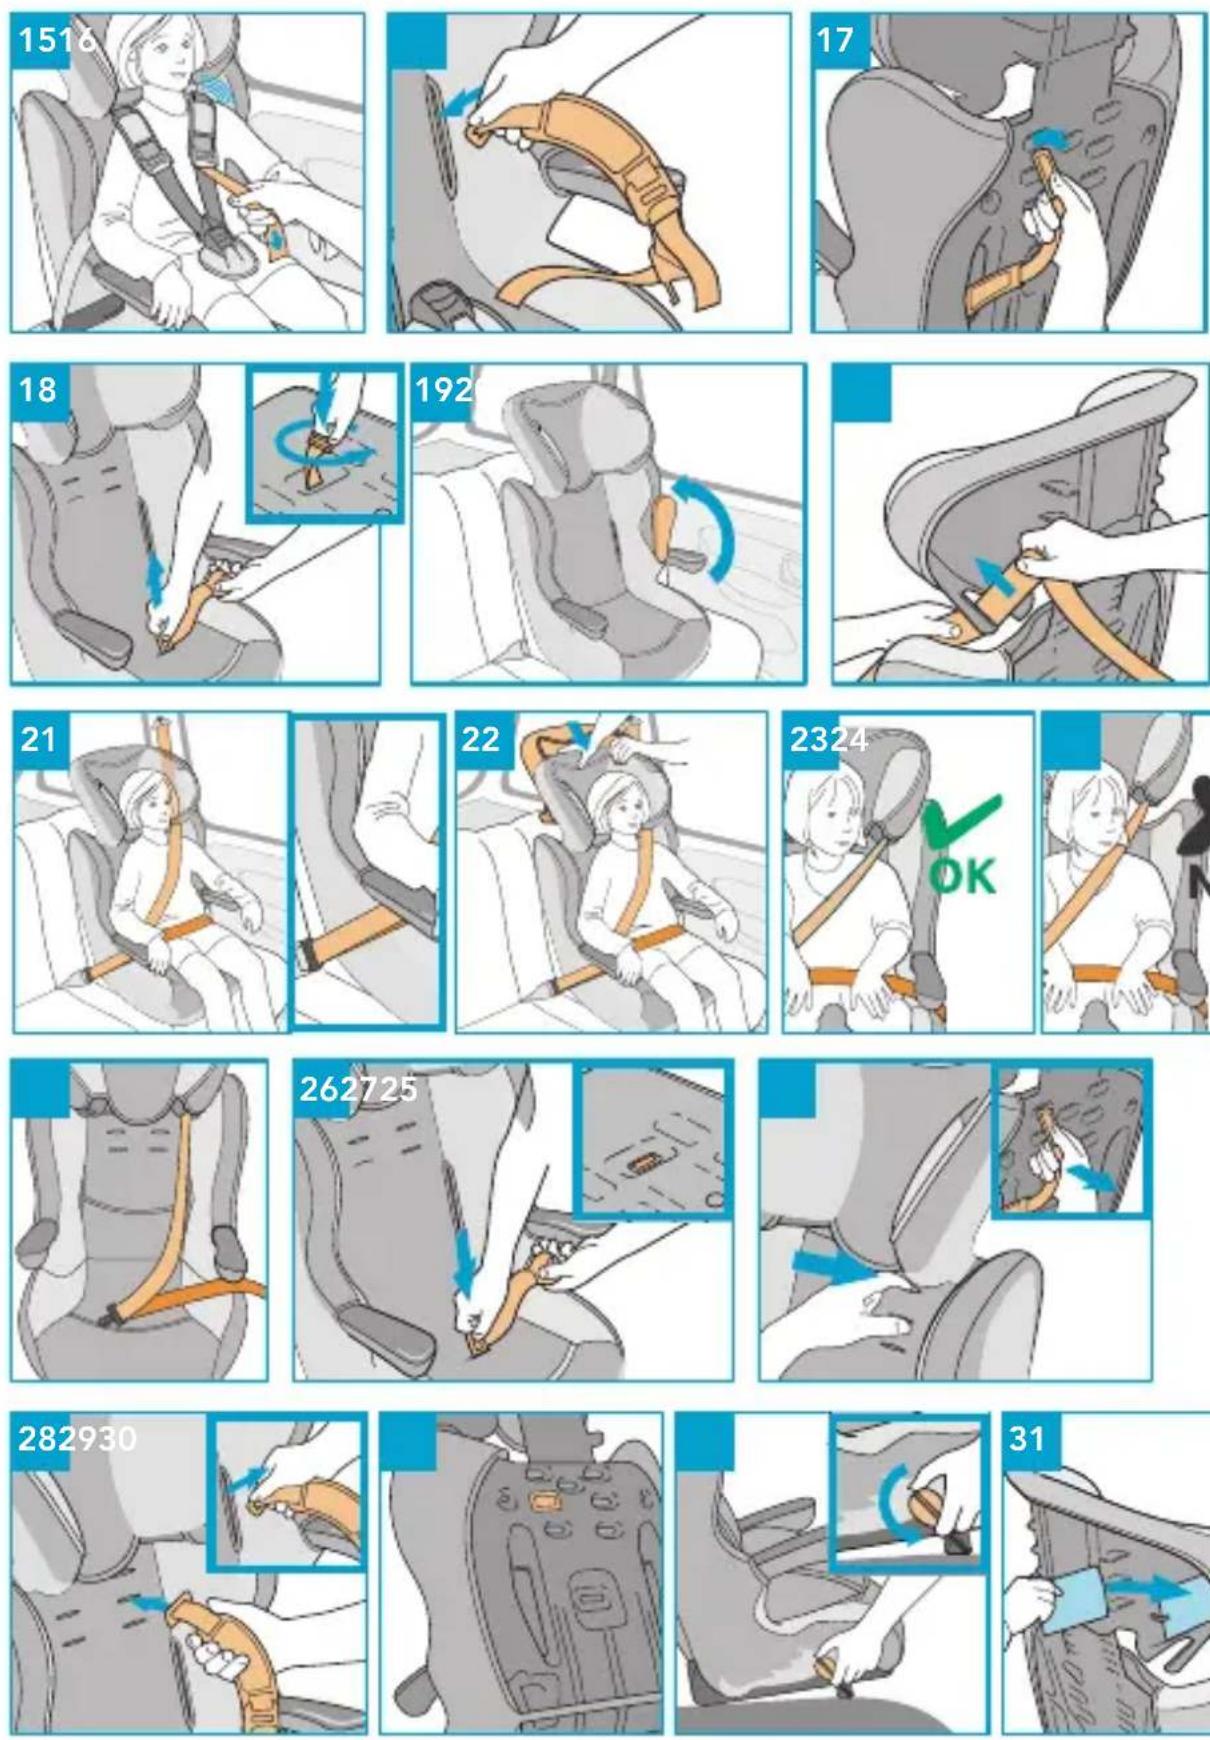
text_image
X NO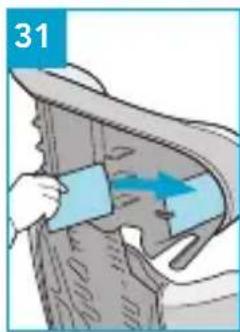

natural_image
Illustration of a stylized animal head in profile, showing limbs and body segments (no text or symbols)
text_image
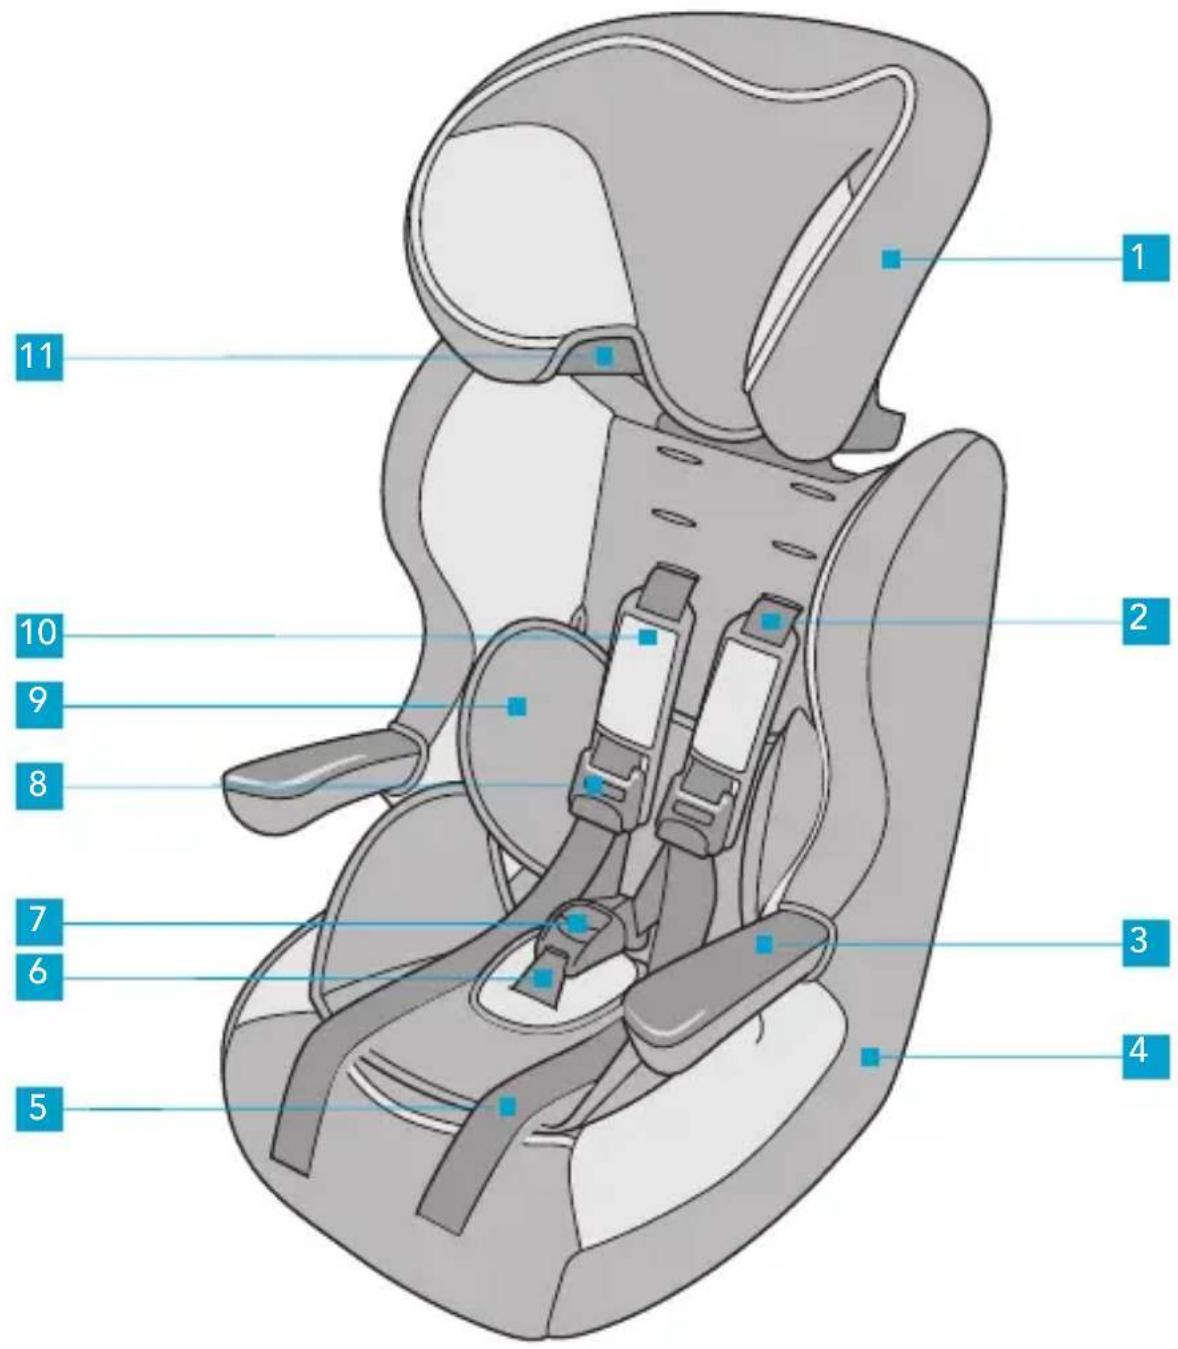
Diagram of a car comfort seat with numbered labels pointing to specific compartments or features.text_image
Diagram of a car seat with numbered labels pointing to specific compartments or features.Do not use spare parts or accessories not supplied or approved by the manufacturer, as they may make the product unsafe.
- Height-adjustable headrest
- Harness (x2)
- Liftable armrest (x2)
- Shell
- Adjustment belt (x2)
- Crotch strap
- Harness buckle
- Adjuster (x2)
- Reducer cushion (depending on the model)
- Padded protection (x2)
-
Chest belt guide (x2 - to be used without the harness)
-
This is a “Universal” child restraint device, approved according to Regulation No. 44, series 04 amendments. It is suitable for general use in vehicles and is compatible with most, but not all, passenger seats.
- Perfect compatibility is more easily achieved in cases where the vehicle manufacturer states in the manual that the vehicle requires a "Universal" child restraint device to be installed for the age group in question.
- This restraint device has been classified as 'Universal' according to stricter approval criteria than previous models that do not have this notice.
- Only suitable for use in vehicles equipped with 3-point static or retractor seat belts, approved according to regulation UN/ECE no. 16 or other equivalent standards.
-
If in doubt, contact the manufacturer of the child restraint device, or the retailer.
-
WARNING: Read the instructions carefully before use and store this manual so that you can consult it in the future. If these instructions are not followed, the safety of the child may be compromised.
- Only install the group 1-2-3/2-3 car seat on a forward-facing passenger seat equipped with a 3-point seat belt (1).
- The rigid elements and plastic parts of the child restraint device must be positioned and installed in such a way that, under normal conditions of use, they cannot get trapped under a movable passenger seat or in the vehicle door.
- Keep all the seat belts tight that are used to secure the restraint device to the vehicle and adjust the shoulder straps that are used to hold the child. In addition, the seat belts must not be twisted.
- Make sure that the sub-abdominal belts are as low as possible to maintain an optimal pelvis position.
- Replace the device when subjected to violent force in the event of an accident.
- It is dangerous to modify or customise the device with any additional elements without the consent of the competent authority, or not to carefully follow the installation instructions provided by the manufacturer of the child restraint device.
- Keep the car seat away from sunlight to prevent your child from getting burned.
-
Do not leave your child unattended in a child restraint device.
-
Check that luggage or other objects, which are potentially capable of causing bruises or injuries to the car seat occupant in the event of an impact, are firmly secured.
- Do not use the child restraint device without the cover.
- Do not replace the cover with one that is not recommended by the manufacturer, as it has a direct impact on the operation of the restraint device.
- If in doubt regarding the installation and the correct use of the seat, contact the manufacturer of the child restraint device.
- Install the child restraint system on passenger seats classified in the category "Universal" in the vehicle user manual.
- Do not use support contact points other than those described in the instructions and marked on the restraint system.
- Always prioritise installation on the rear passenger seats even when the highway code authorises an installation on the front passenger seat.
• Always check that the vehicle seat belt is fastened. - Always check that there are no food debris or other materials in the harness buckle or in the central adjuster.
- In winter, be careful to avoid placing your child in the car seat wearing clothes that are overly bulky.
- Do not use spare parts or accessories not supplied or approved by the manufacturer, as they may make the product unsafe.
Gr. 1, from 9 to 18 kg (from 9 months to 4 years of age approximately)
Before installing the car seat in the vehicle, check that the car seat shoulder straps are correctly adjusted to the child's height.
The straps can be adjusted to three different heights and must be passed through the slots closest to the child's shoulders.
If the child's shoulders are at a height between two slots, always use the highest position.
Make sure that the straps are not twisted and that they are correctly positioned on the child's shoulders.
To adjust the height of the shoulder straps, remove the upper end of one shoulder strap by rotating the metal stop device located on the back of the backrest (3), then pass the end of the shoulder strap through the slots in the backrest shell and the lining (4).
Reposition the end of the shoulder strap at the desired height using the same slots, both in the lining and in the shell (5), and fasten it to the back of the backrest again (6).
Check that the metal stop device is correctly positioned and that the end of the shoulder strap is not twisted. Repeat this process with the other strap.
To tighten the straps: pull the free end of the left and right adjustment chest strap; it is not necessary to press the buttons on the adjustment devices (7).
To loosen the straps: press the buttons on the adjustment devices located on the upper ends of the shoulder straps and at the same time pull the lower part of the shoulder straps (8). Press the red button on the shoulder strap buckle to open up the belt and release the child.
Place the car seat against the rear passenger seat (9).
Lower down the headrest as far as possible. Pull the passenger seat belt so that it is tight. Pass the two parts of the belt through the slots on the lining and the backrest shell (10), making sure that the lap belt part passes under the armrest of the car seat and that the diagonal part is in a vertical position between the backrest and the headrest, without going through the belt guide located at the bottom of the headrest.
Pass the passenger seat belt through the opposite slots from the back of the headrest to the inside of the seat (11).
Check that the lap part of the passenger belt passes under the armrest and that
the diagonal part passes over the armrest of the car seat (12).
Fasten the passenger seat belt, making sure it is not twisted (12).
Push the car seat firmly up against the passenger seat and tighten the seat belt as much as possible, pulling the lap part and the diagonal part in the direction of the winder (13).
Release the shoulder strap buckle by pressing the red button located in the centre of the buckle.
Place your child in the car seat.
The liftable armrests make access to the car seat easier and facilitate installation.
Bring together the ends of the shoulder straps and insert them into the buckle, until you hear a "click" (14).
Pull the adjustment belt of one shoulder strap until it is sufficiently tight against your child (15). Repeat this process with the adjustment belt of the second strap.
WARNING: the straps must be adjusted so that they fit snugly to the child's build, without being too tight.
WARNING: before travelling, always check that the armrests are lowered. It is essential that the shoulder straps are properly adjusted to protect your child as much as possible. The gap between the shoulder straps and the child must not be greater than the thickness of your finger.
Gr. 2-3, from 15 to 36 kg (from around 3 to 12 years of age approximately)
Before installing the car seat in the car, check that the car seat shoulder straps have been removed.
To remove the shoulder straps: if necessary, press the red button on the buckle to release the shoulder straps.
Remove the shoulder straps by following steps (3) and (4) for each upper end of the harness.
To store the shoulder straps in the car seat shell: hold one free end of the shoulder strap and pass it on the back of the backrest through the side openings of the cover and shell (16). Insert the metal ring, the harness stop device, into the slot on the back of the car seat's backrest towards the inner side and lock the ring of the locking device (17).
The metal stop device must be placed between the shell and the cover of the car seat.
Repeat this for the second end of the harness.
Check that the tips of the chest straps are placed behind the fabric, inside the slot of the shell.
Remove the crotch strap by rotating the metal stop device and passing it through the slots in the seat and lining (18).
This car seat is equipped with an adjustable headrest, designed to accommodate the child as they grow, in order to provide maximum lateral protection.
Lift up the adjustable headrest as high as possible.
Place the car seat against the rear passenger seat (19) and pass the diagonal part of the vehicle's 3-point seat belt through the guide on the headrest (20).
Place the child in the car seat, making sure that their back is properly in contact with the back of the car seat.
The liftable armrests make access to the car seat easier and facilitate installation.
Pull and fasten the car seat belt.
Pass the diagonal part of the vehicle's 3-point seat belt under the armrest on the opposite side of the headrest guide used as a diagonal belt loop; the lap part of the passenger seat belt must pass under both armrests (21). Lower the headrest and adjust it to the child's size (22).
The headrest must be positioned so as to surround the child's head properly for maximum lateral protection; the correct adjustment of the headrest ensures that the chest belt is placed in an optimal position on their body, providing maximum protection for your child when sitting on the car seat.
The headrest should be adjusted so that there is a two-finger gap between it and the child's shoulders (23) (24).
Tighten the passenger seat belt.
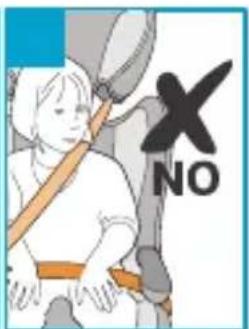
Check that the belt is correctly tightened, that it is not twisted and that it does not come into contact with the child's neck.
To remove your child from the car seat, release the passenger seat belt from the buckle on the side of the car seat. The chest belt will remain inserted in the headrest (25).
CAUTION: before travelling, always check that the armrests are lowered. Always secure the car seat with the passenger seat belt, even when the child is not inside it. In the event of a collision, an unsecured seat can become a dangerous object and injure the occupants of the vehicle.
RESTORING THE CAR SEAT TO ITS ORIGINAL CONFIGURATION
To restore the configuration with shoulder straps, follow the instructions below.
Reposition the crotch strap by inserting the strap with a metal ring into the slot and checking that the metal stop device is positioned in the lower part of the seat and correctly locked (26).
At the front of the backrest, between the cover and the shell, hold the metal stop device of one of the two upper ends of the shoulder straps, then rotate it. At the same time pull the end of the shoulder strap from the back of the backrest to remove it from the storage on the backrest (27).
From the front of the car seat, insert the end of the shoulder strap, with a metal ring, through the slot in the cover and the respective slot on the shell (28), locking the metal device in its housing on the back of the backrest. Use the correct slot for your child's height.
Check that the metal stop device at the end of the shoulder strap is correctly positioned and locked on the back of the backrest (29). Repeat this for the second end of the harness. The shoulder straps must be inserted into the slots aligned at the same height. Check that the harnesses are not twisted.
TILTING THE CAR SEAT
See figure (30)
STORING THE INSTRUCTIONS
See figure (31)
MAINTENANCE
- All fabric parts are removable. In the case of light stains, clean with a sponge moistened with soapy water or hand wash at 30 °C in soapy water.
- Do not use bleach, do not iron, do not machine wash, do not tumble dry.
• The colours may fade if washed at temperatures higher than those indicated.
• The plastic parts may be cleaned with water and soap. - Do not use harsh detergents (such as solvents).
FORMAL GUARANTEE
The contents of this document as stated below will come into effect as from 01.01.2005 and replace, on every account and in full, any previous message referring to the guarantee provided by Foppa Pedretti S.p.A.
FORMAL GUARANTEE
Foppa Pedretti S.p.A. the head office of which is located at n. 11 Via Volta, Grumello del Monte (Italy), guarantees directly to the Consumer that this brand new product is free of faults with regard to the materials, design and manufacture and that it complies with the characteristics as declared by the manufacturer.
This formal guarantee is valid in all Member Countries of the European Union and it neither excludes nor limits the Consumer's rights in accordance with mandatory measures provided for by the law with regard to the Retailer of the Product.
To take advantage of this formal guarantee, the Consumer must return the faulty product to the Retailer, presenting to the same the proof of purchase of the Product which must clearly show the Retailer's address, the date of purchase of the Product with the Retailer's stamp and signature and an indication of the Product itself or, alternatively, the receipt which must not have been altered and which must clearly show the same information as that referred to above.
The manufacturer's formal guarantee is valid for twelve (12) months from the date of purchase of the Product. During this period, Foppa Pedretti S.p.A. will repair or replace the faulty product, at its own discretion.
The formal guarantee is granted to the end buyer of the Product (Consumer) and it neither excludes nor limits the mandatory rights of the Consumer as provided for by the law and/or the rights that the Consumer may have with regard to the Dealer/Retailer of the Product.
EXCLUSIONS TO THE FORMAL GUARANTEE.
The formal guarantee is excluded in the case of damage caused to the Product for the following reasons: if the product is used in a way that does not comply with the information contained in the use and assembly instruction sheet, if the product is knocked or dropped, if the Product is exposed to humidity or extreme heat or environmental conditions, or to sudden changes in the same, corrosion, oxidization, unauthorized alterations or repairs to the Product, repairs using unauthorised spare parts, improper use, improper maintenance or failure to carry out the same, improper maintenance compared to the information given on the use and assembly instruction sheet, incorrect assembly, accidents, damage caused by food or drink, damage caused by chemical products, cases of force majeure.
In any case, Foppa Pedretti S.p.A. declines all responsibility for damage caused to persons or to property, other than the Product, when such damage is caused by a failure to comply with the instructions/advice/warnings contained in the manual or, alternatively, in the use and assembly instruction sheet provided with each Product for the owner/user. (Purely as an example, in the case of a cot: "Check your baby constantly. Make sure that the sheets and blankets do not cover the baby's head...").
Furthermore, Foppa Pedretti S.p.A. declines all responsibility for damage to persons and to property when the breakage of its products is due to a deterioration in the components of the Product that are subject to wear. All the components of the Product made of plastic are considered to be components subject to wear.