Action - Car seat Foppapedretti - Free user manual and instructions
Find the device manual for free Action Foppapedretti in PDF.
| Product type | Car seat group 0+ |
| Brand | Foppapedretti |
| Model | Action |
| Safety standard | ECE R44/04 |
| Weight category | Up to 13 kg (0-13 kg) |
| Installation orientation | Only rearward facing (back to the road) |
| Vehicle attachment | Vehicle 3-point safety belt |
| Restraint harness | 5-point harness with central buckle |
| Newborn insert | Included, for children under 9 kg |
| Headrest adjustment | Yes, adjustable height |
| Carrying handle | 3 positions: transport, installation, rocker |
| Sun canopy | Yes, adjustable |
| Use as rocker | Yes, with rocking motion locked |
| Cover maintenance | Machine washable at 30°C, delicate cycle |
| Buckle maintenance | Clean with lukewarm water and soap |
| Repairability | Original spare parts recommended |
| Warranty | 12 months conventional |
| Dimensions (approx.) | Not specified in the manual |
| Weight (approx.) | Not specified in the manual |
Frequently Asked Questions - Action Foppapedretti
User questions about Action Foppapedretti
0 question about this device. Answer the ones you know or ask your own.
Ask a new question about this device
Download the instructions for your Car seat in PDF format for free! Find your manual Action - Foppapedretti and take your electronic device back in hand. On this page are published all the documents necessary for the use of your device. Action by Foppapedretti.
USER MANUAL Action Foppapedretti
For children up to 13kg - Complies with ECE R44-04
READ THE INSTRUCTIONS CAREFULLY AND KEEP FOR FUTURE REFERENCE
FR. IMPORTANT!
LIRE ATTENTIVEMENT ET CONSERVER SOIGNEUSEMENT A PORTEE DE MAIN POUR UNE UTILISATION ULTERIEURE
DE. WICHTIG!
AUFMERKSAM LESEN UND FÜR ZUKUNFTIGE REFERENZEN AUFBEWAHREN
ES. IMPORTANTE!
LEER ATENTAMENTE Y CONSERVAR PARA FUTURAS REFERENCIAS
EL. ΔIAB'AΣTE ΠPΟΣΕKTΙΚΑ KAI KPATHΣTE AYTO TO ERXEIPIDIO ΓIA NA TO ΣΥΜΟΥΛEYEΣTE ΣTO MΕΛΛΟ
RU. BAXKHAR NHΦOPMALIЯ!
BHIMATEJIbHO IPOYTNTE N
COXPAHNTEДЛЯДАЛьHEIWEERO
ПОЛьЗOBAHЯ
AVVERTENZA PAG 05
Checks before use PAG 32
Components PAG 33
1.Approval PAG 34
- Installation in the vehicle PAG 35
2.1 with 3-point belt PAG 36
- Placing your child in the car seat PAG 37
3.1 Using the reducer PAG 37
3.2 Adjusting the handle PAG 38
3.3 Adjusting the headrest PAG 39
3.4 Loosening the straps PAG 39
3.5 Using the harness PAG 40
3.6 Tightening the harness PAG 41
3.7 Checking that the fastening is correct PAG 41
-
Installing the car seat in the vehicle PAG 42
-
Canopy PAG 45
-
Car seat maintenance and care PAG 46
FORMAL GUARANTEE PAG 50
WARNING
NOTICE
- This is an Universal child restraint. It is approved to Regulation No. 44, 04 series of amendments, for general use in vehicles and it will fit most, but not all, car seats.
- A correct fit is likely if the vehicle manufacturer has declared in the vehicle hand book that the vehicle is capable of accepting an Universal child restraint for this age group.
- This child restraint has been classified as Universal under more stringent conditions than those which applied to earlier designs which do not carry this notice.
- If in doubt, consult either the child restraint manufacturer or the retailer.
- Only suitable if the approved vehicles are fitted with 3 point safety belt, approved to UN/ECE Regulation No. 16 or other equivalent standards.
WARNING
IMPORTANT! Please read all instructions in this manual and in the vehicle owner's manual related to child safety seats carefully and understand them. Install and use the child safety seat as described in the instruction manual. Failure to do this could result in serious injury or death of your child. The instructions shall be retrained with the child restraint for the future use.
IMPORTANT! Because of potential medical issues inherent in low birth weight and premature infants, always have a trained professional doctor, or hospital staff member assess the suitability of the child restraint prior to leaving the hospital or using the child restraint.
DO NOT remove any labels on the child safety seat. Important information is contained on the labels.
DO NOT use a child safety seat with damaged or missing parts.
DO NOT use damaged or frayed harness straps or vehicle belt.
DO NOT modify or attempt to modify the child safety seat in any way.
DO NOT take apart or attempt to take apart this child safety seat except as instructed in this manual.
DO NOT use a child safety seat that has been in a crash. A crash can cause damage to the child safety seat that you cannot see.
DO NOT replace the child seat cover or harness with any other than the ones we recommend as these parts are integral to the child safety seat's performance.
DO NOT use a second-hand child seat or child seat whose history you do not know.
MAKE sure that the child safety seat does not become trapped by folding or
WARNING
moveable passenger seat or in the door of your car.
DO NOT USE in any configuration not shown in the instructions.
NEVER use this child safety seat with 2 point vehicle belts.
DO NOT use belt routing methods not shown in these instructions.
DO NOT allow children to play with or adjust the child safety seat.
Always check the tightness of the restraint and the harness before each use.
DO NOT use this child safety seat in a passenger seat with an active airbag unless the vehicle manufacturer confirms that it is safe.
This child restraint should be securely belted in the vehicle even when not in use. In a crash or sudden stop, an unsecured child safety seat may injure other occupants.
- Make sure to properly secure any loose objects, such as luggage or books, in your car as they may cause injuries in the event of an accident.
NEVER leave your child unattended in a car even for a short time.
NEVER take your child out of the child safety seat when the vehicle is moving.
NEVER use this child safety seat without the car seat cover.
HOT! Cover the child safety seat when left in direct sunlight. Parts of a child safety seat may become too hot for the child's skin. Always check surfaces before placing a child in the child seat.
DO NOT use any load bearing contact points other than those described in the instructions and marked in the child restraint.
The rigid items and plastic parts of a child restraint must be so located and installed that they are not liable, during everyday use of the vehicle to become trapped by a movable seat or in a door of the vehicle.
We recommended that any straps holding the restraint to the vehicle should be tight, that any straps restraining the child should be adjusted to the child's body, and that straps should not be twisted.
IMPORTANT! Please ensure that any lap strap is worn low down, so that the pelvis is firmly engaged.
NEVER use this child restraint with any other base except ones that the manufacturer permits.
ALWAYS make sure all vehicle belts and harness straps are not twisted before each use.
NEVER leave the child in the child seat when the harness straps are loose or undone.
DO NOT leave your child in this child restraint for an extended period of time.
ALWAYS install the child safety seat in a rear-facing position.
NEVER install the child safety seat forward-facing.
DO NOT use alternative routings not shown in these instructions.
WARNING
MAKE SURE all folding passenger seats are property latched.
ALL occupants of the vehicle should be correctly restrained. Unrestrained passengers may be thrown into other passengers and cause serious injury or death in a crash.
ALWAYS MAKE SURE the handle is properly locked in the upright carrying position before carrying a child in the child seat.
NEVER place the car seat or infant carrier near the edge of an elevated surface or on a soft such as a seat cushion or mattress. The car seat or infant carrier could fall off these surfaces and cause serious injury or death.
NEVER use the child safety seat with a shopping cart.
CHECKLIST BEFORE USE
Inspect:
- child restraint free of damage
Verify Child within Size Range:
weight between 0-13kg
Install Child Restraint Rearward-facing in Safe Location in Vehicle:
- vehicle seats that face front of vehicle only
- handle locked in specified position
- child facing rear of vehicle
- position with NO active airbag
- 3 point (shoulder/lap) belt used
- seat belt not twisted
- belt path followed
- tight against vehicle seat
Secure Child Properly in Child Restraint:
- correct shoulder strap height
- harness not twisted
- harness low across hips
- harness secure and tight
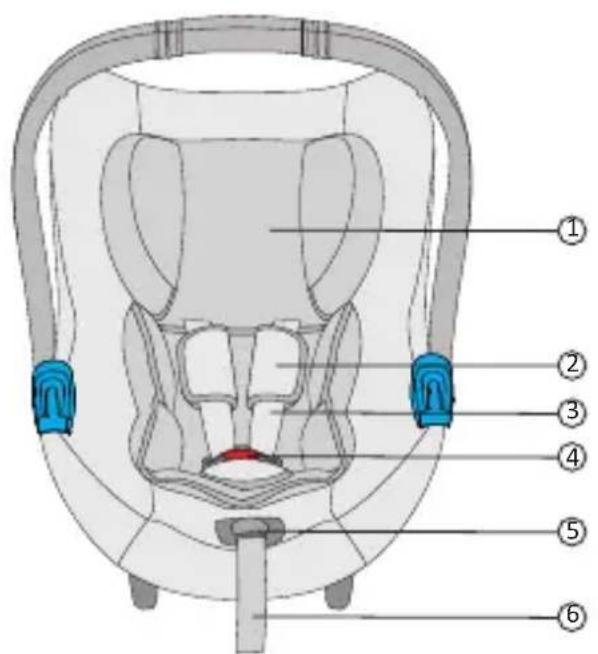
- Had support
- Shoulder pads
- Harness
- Buckle
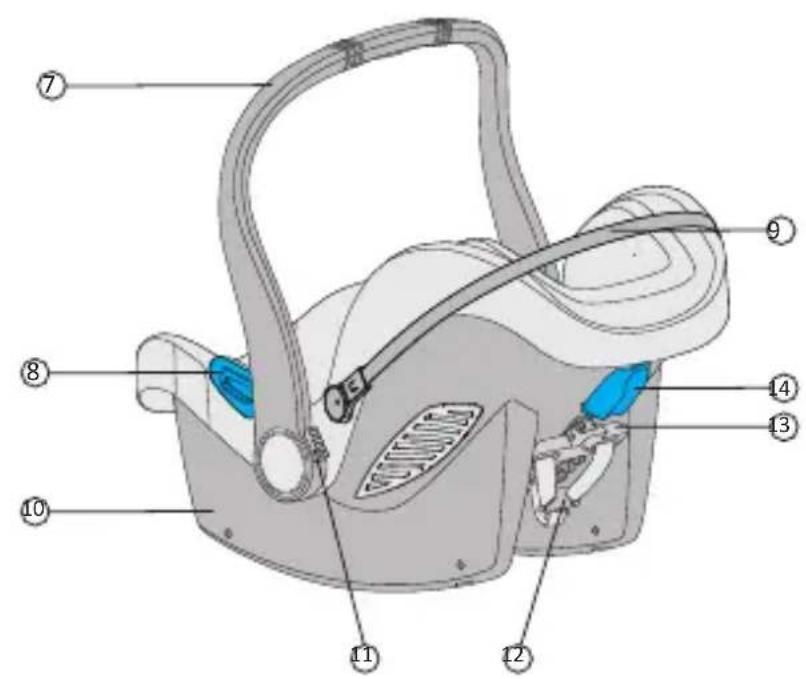
- Adjuster button
- Adjuster strap
- Handle
- Lap belt guide
- Frame structure of the canopy
- Shell
- Handle release button
- Splitter plate
- Headrest adjustment lever
- Shoulder belt guide
1. Certification

... as a safety car seat.
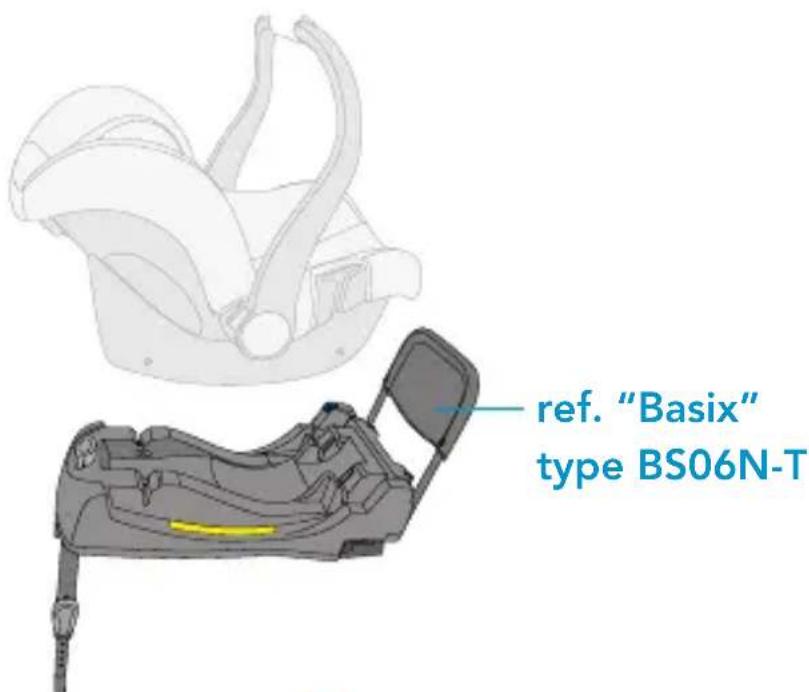
| Car seat Action | Complies with standard ECE R 44/04 | |
| Group Weight | ||
| Type BS06N | up to 13 kg0+ | |
This car seat has been designed, tested and approved according to the requirements of the European Regulation ECE R 44/04.
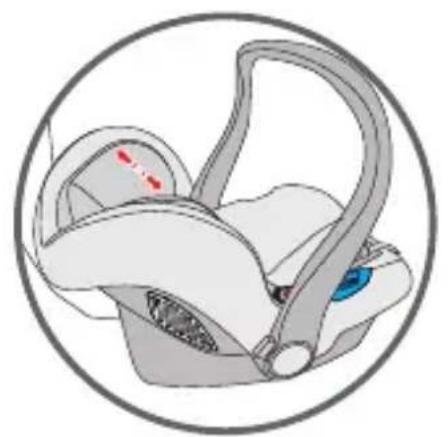
On the shell of the car seat there is a label that lists the approval number. Any changes made to the car seat will invalidate the approval.
Only the manufacturer is authorised to make changes to the car seat.
2. Use in the car
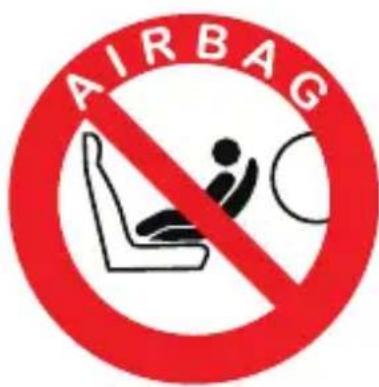
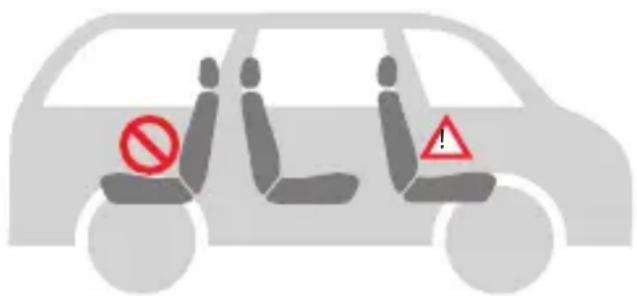
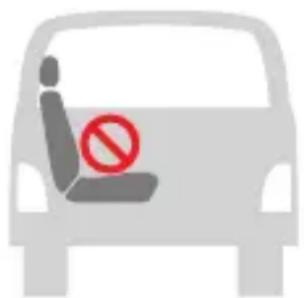
DO NOT USE THE CAR SEAT PLACED ON A PASSENGER SEAT Fitted WITH AN AIRBAG.
Danger! If the airbag explodes it may hit the seat, and cause serious injury to the child, if not death.
Follow the instructions in the vehicle owner's manual for the use of child seats.
NEVER use a 2-point seat belt to fix the child's car seat to the passenger seat.
Use only 3-point seat belts.
Comply with the regulations in force in your own country.
NEVER use a 2-point seat belt to fix this child's car seat to the passenger seat.
Only suitable for use in vehicles equipped with 3-point
static or retractor seat belts, approved according to regulation UN/ECE 16 or other equivalent standards.
Never use this car seat on a front passenger seat fitted with an active front airbag.
INSTALLATION IN THE VEHICLE
2.1 With 3-point car seat belt

You can install the car seat as follows:
| in the direction of travel no | |
| in the opposite direction to the direction of travel | yes |
| with a 2-point belt | no 1) |
| with a 3-point belt | yes 2) |
| on the front passenger seat | yes 3) |
| on the side rear seat | yes |
| on the central rear seat | no 4) |
1) The use of a 2-point belt increases the risk of injury to the child in
the event of an accident.
2) The seat belt must be approved to ECE R 16 or to other equivalent standards.
3) Do not use on a front passenger seat fitted with an active front airbag.
4) It may be used if the central seat of the vehicle is equipped with a 3-point belt.
THE CAR SEAT
3. Child protection
3.1 Protecting the child by using the reducer

To protect your child
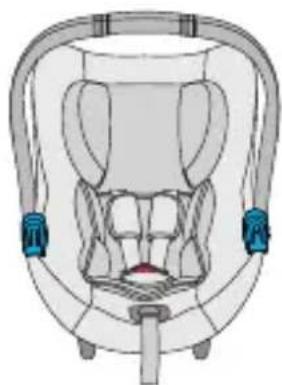
The reducer gives your child greater support during the first months.
The reducer is used to ensure greater comfort to young children.
WARNING! Use the car seat with the reducer supplied when the child weighs less than 9kg .
- Always secure the child with the belt when placed in the car seat
- Never leave the child unattended in the child seat when placed on high-up surfaces (such as tables, etc.).
- Make sure that the end of the belt does not get caught in moving parts (such as automatic doors, escalators, etc.).
- Warning! The plastic parts of the car seat can heat up in the sun, causing burns to the child. Protect the car seat from excessive heat, for example, by using a light covering.
- The car seat has only one installation position in the car, leaving the child always semi-reclined.
- Take regular breaks when travelling on long journeys. Your child can get tired very easily. Avoid leaving the child in the car seat for too long.
PLACING YOUR CHILD IN THE CAR SEAT
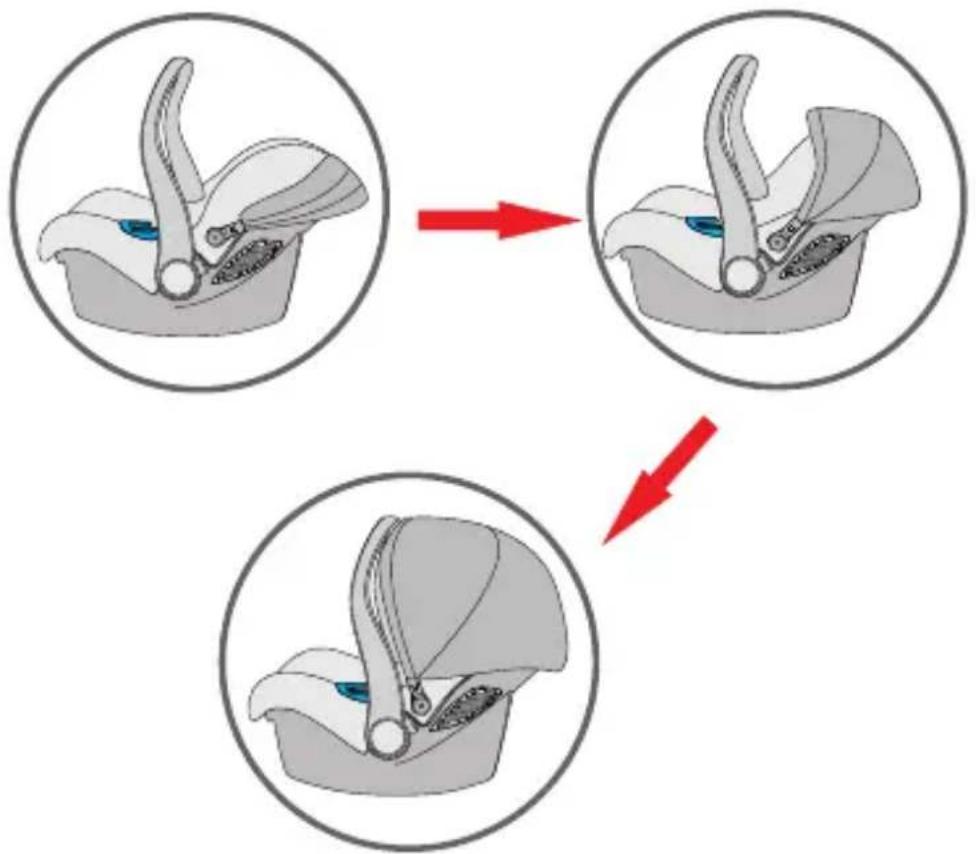
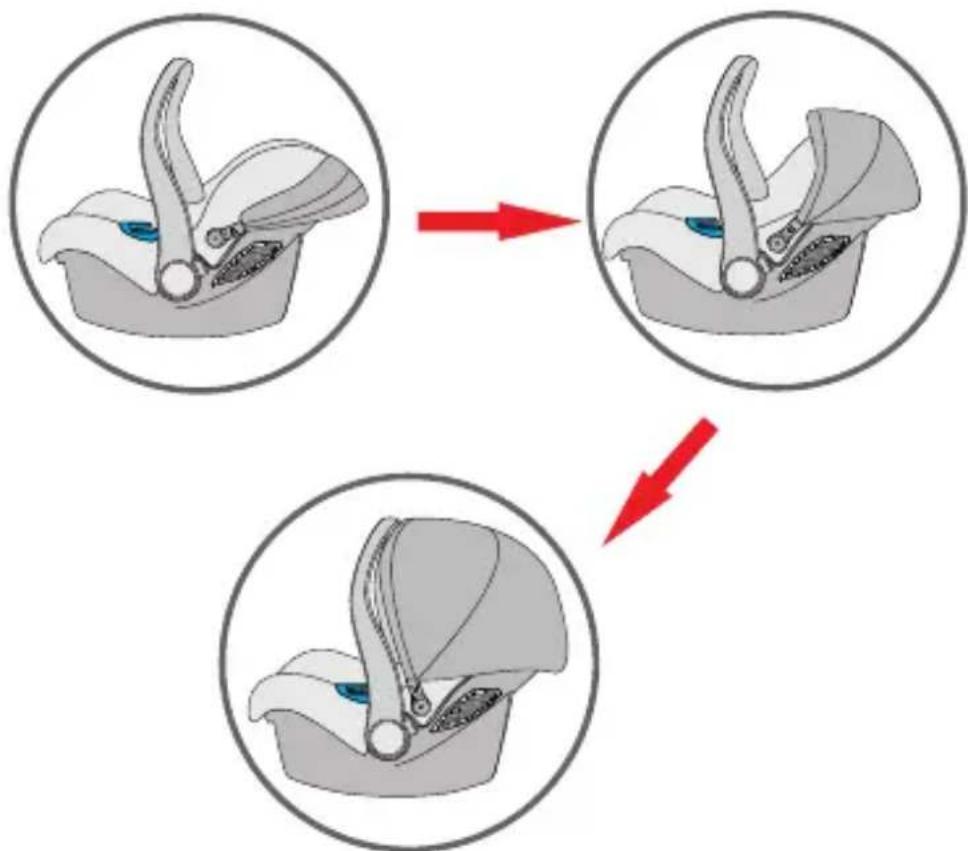
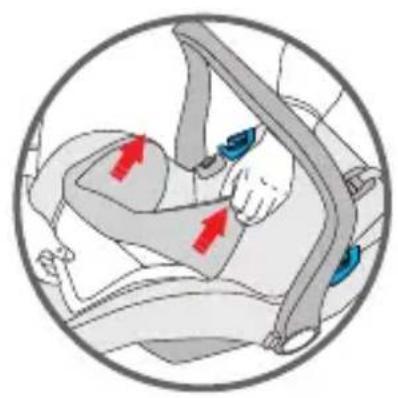
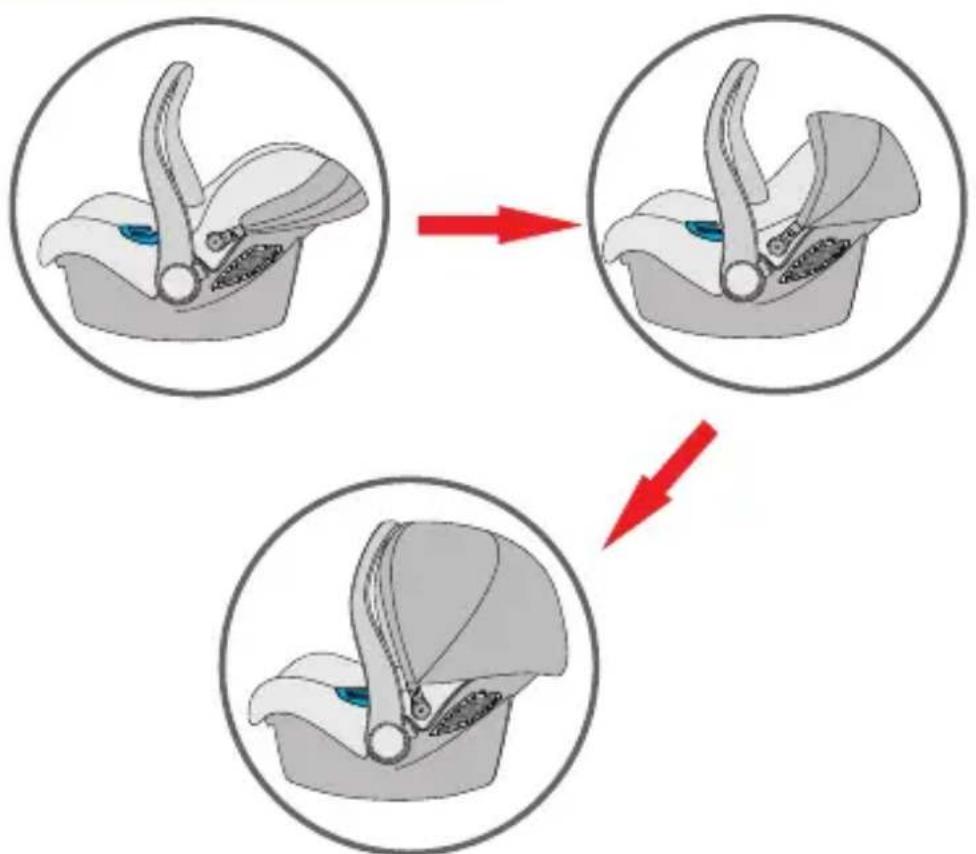
3.2 Adjusting the handle
The handle has 3 positions

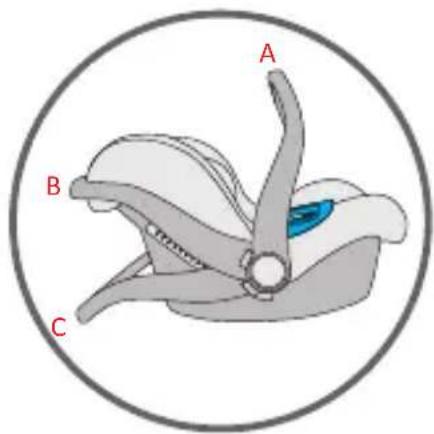
(A) For use in the car and for transport
(B) For placing your child in the seat
(C) For use as a bouncer with rocking movement locked
To adjust, squeeze handle release buttons on both sides, then rotate the handle, The handle will lock into position.
WARNING:
Always make sure the handle is securely locked in the upright carrying position before carrying.
You should hear a click when the handle button is engaged and handle is locked into the upright carrying position.
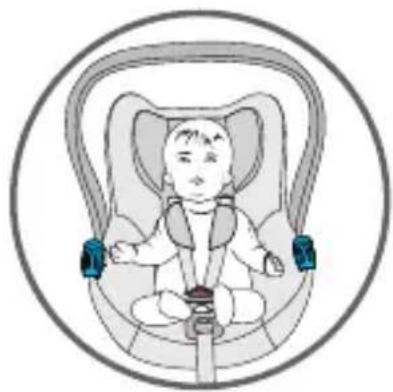
3.3 Adjusting the headrest
A properly-adjusted headrest ensures the optimal position for the child sitting in the car seat.
The headrest should be positioned so that the straps are at the same level or slightly above the child's shoulders.
To adjust the headrest for the child:
Slide the regulator until the shoulder belts are at the correct height. Lock the regulator in the new position.
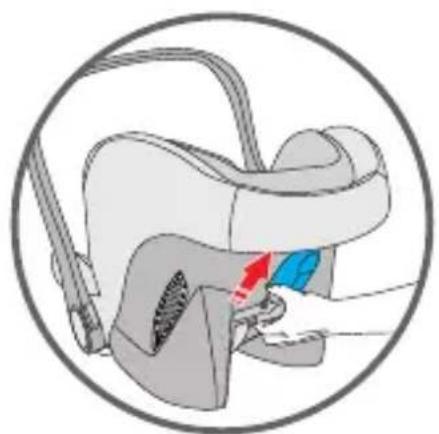
3.4 Loosening the straps
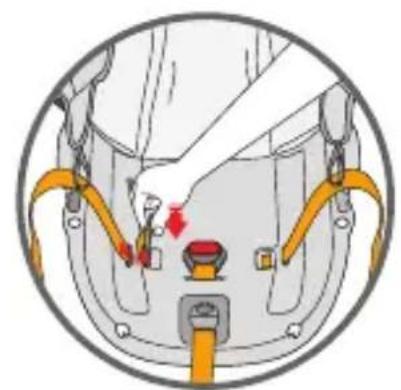
Press the adjuster button on the front center of the seat, and pull on both shoulder straps to loosen the harness.
PLACING YOUR CHILD IN THE CAR SEAT
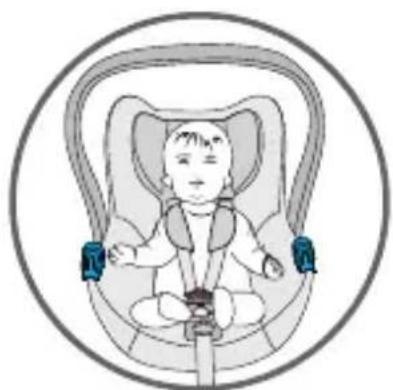
3.5 Securing the child with the harness

-
Loosen the straps
-
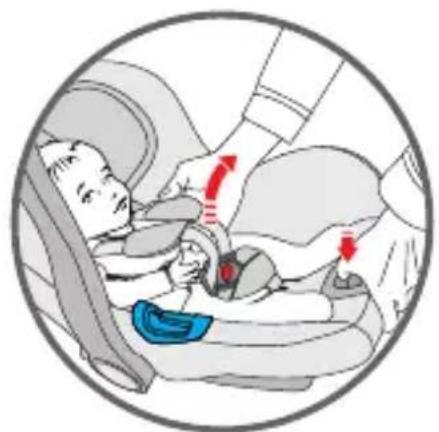
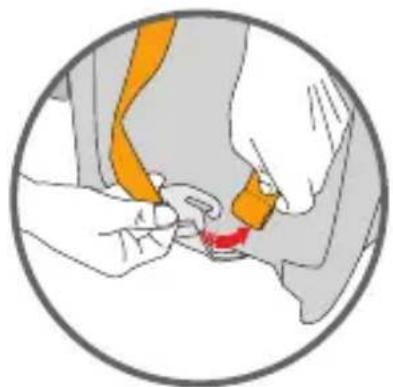
Press the red button on the buckle to release the shoulder straps and move them to the side.
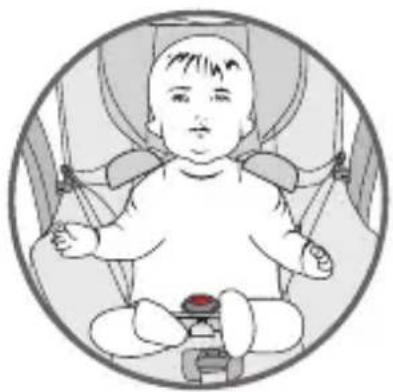
- Place child's bottom on the seat and the child's back flat against the back of the child restraint. This will increase the child's comfort and allow the harness to properly secure the child. Slide shoulder straps over the child's shoulders. Make sure that the straps are at the same height and positioned just above the child's shoulders.

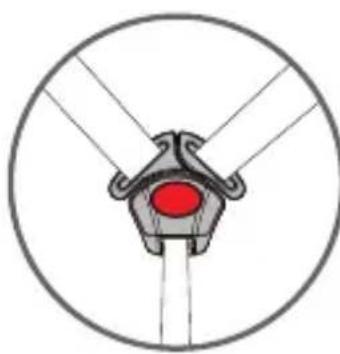
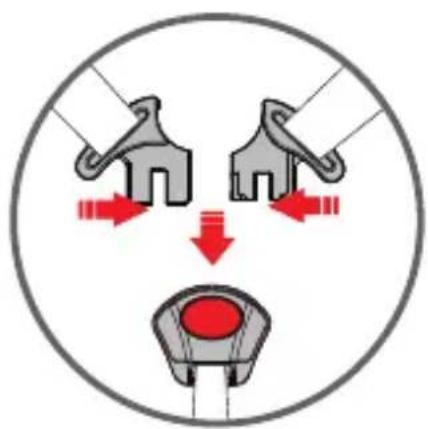
- Join together the two ends/ tabs of the straps to form a single connector.
Insert the connector into the central buckle until you hear a click.
Make sure that the straps are not twisted. Adjust the chest protectors to the centre of the child's shoulders.
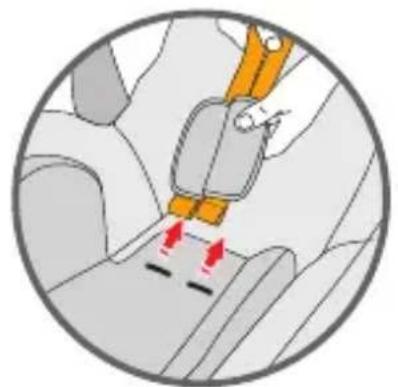
3.6 Tightening the harness
Pull the harness adjustment strap so as to tighten it properly against the body of the child. The harness is correctly tightened when the gap between the harness and the child is no greater than the thickness of your finger.
IMPORTANT! Pull the end of the adjuster strap outwards, not upwards or downwards.
During transport (especially when not in the car),
the adjuster strap must be placed in the belt compartment.
3.7 Ensuring that your child is properly secured with the harness
To ensure the safety of your child, check that ...
- The straps are adjusted correctly with the child's shoulders.
The straps are not twisted.
-
The tabs are properly engaged in the harness buckle
-
The straps are properly tightened, as the gap between the harness and the child must not be greater than the thickness of your finger.
INSTALLING THE CAR SEAT IN THE VEHICLE
4. Installing the car seat in the vehicle

Do not leave your child unattended in the car.
For the safety of all occupants of the vehicle
In the event of emergency braking or an accident, people without a seat belt and loose objects may cause injury to the other occupants of the vehicle. Always check that...
- the headrests on the vehicle seats are secured, and that the folding rear seat lock is correctly latched.
- all movable objects, such as luggage or books in the vehicle, are immobilised as they may cause injury in the event of an accident.
- the car seat is secured when placed in the vehicle, even if it is not transporting a child.
- everyone in the car is wearing seat belts.
4.1 Installing the car seat in the vehicle
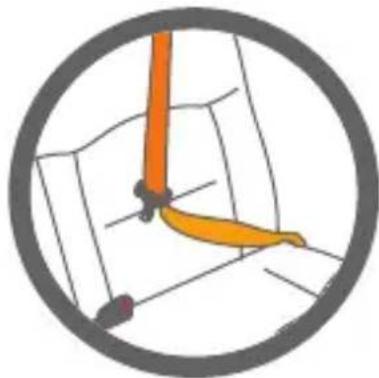
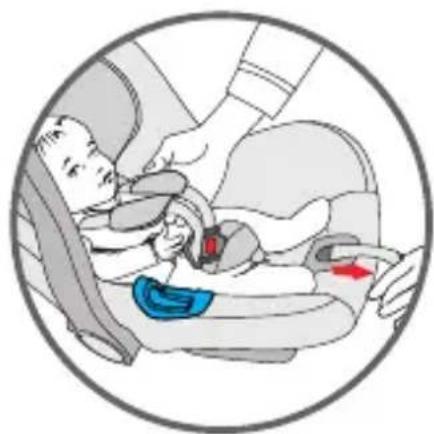
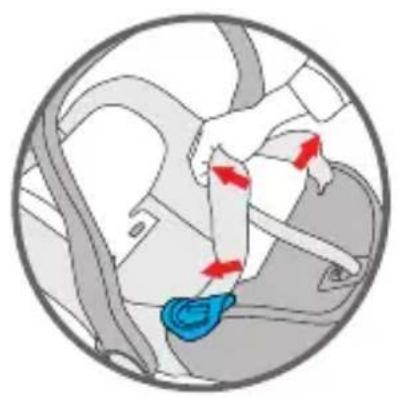
To secure the car seat in the vehicle with the 3-point seat belt, proceed as follows:
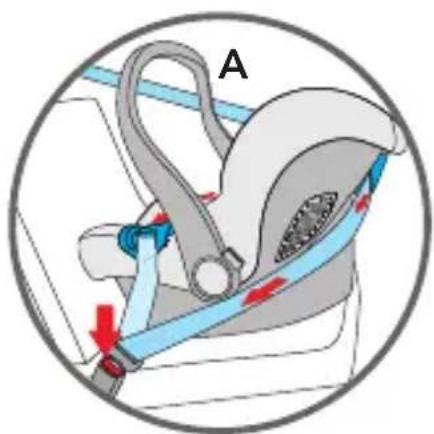
Place the child restraint rear-facing on the,vehicle seat and make sure the handles in specified position The child will face the rear of the vehicle.
Route the vehicle lap belt through both lap belt guides and buckle the seat belt.
Route the vehicle shoulder belt around the back of the child restraint and through the shoulder belt guide.
If vehicle shoulder belt is too short, please move vehicle seat belt height adjustment to the lowest possible height. If the vehicle belt is still too short, try another seating position.
Adjuster the child restraint to the proper recline to ensure maximum protection for the child. A tightly rolled towel under the front edge of the child restraint can be used to achieve the correct recline.
WARNING:
DO NOT route the vehicle belt using any other path when using the child seat. For assistant contact our Customer Service team.
DO NOT use 2 point vehicle belt to install this child seat.
ONLY install the child restraint rear-facing on forward-facing vehicle seats. Make sure the child is properly secured in the child restraint, and the child restraint is tightly installed in the vehicle.
INSTALLING THE CAR SEAT IN THE VEHICLE
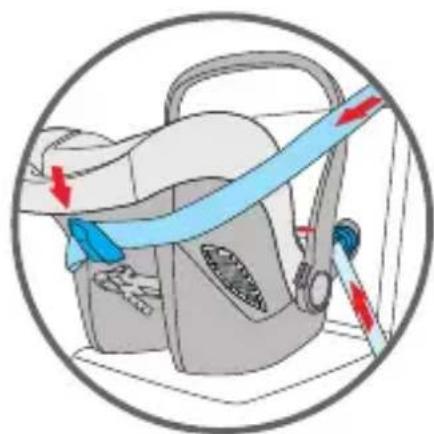
4.2 Check that the car seat has been installed correctly in the vehicle

To ensure the safety of your child, check that ...
- the car seat is installed so that the child is facing in the opposite direction to the direction of travel,
- the car seat is installed on the front passenger seat only if there is no AIRBAG or if this has been disabled,
- the car seat is secured with a 3-point seat belt only,
- the lap belt part passes through both the blue guides placed on the car seat,
- the diagonal part of the belt passes round the back through the blue support guide and the car seat,
- the vehicle seat belt is tight enough and not twisted or rolled up.


SUN CANOPY
5. Positioning the sun canopy
The sun canopy is easily adjustable.
It enables your child to rest peacefully and gives protection from the sun's rays.
OPTIONAL
6. Information for car seat care
To ensure effective protection of the car seat
- In the event of an accident with an impact speed of over 10km/h , the car seat may be damaged in a way that is not necessarily visible, in which case it is extremely important to replace it.
- Check the car seat regularly to ensure that there are NO damaged parts.
- Check that all the mechanical components are working correctly.
- To prevent the car seat from being damaged or broken, make sure that it does not get stuck between the doors or seat rails, etc.
- If the car seat is damaged (for example as a result of being dropped), have it checked by the manufacturer.
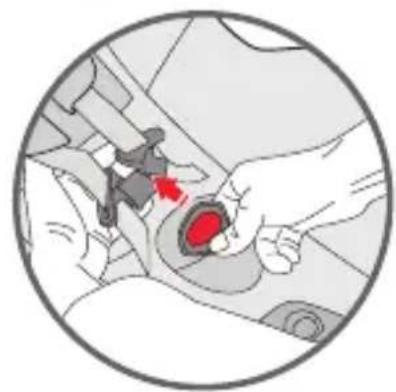
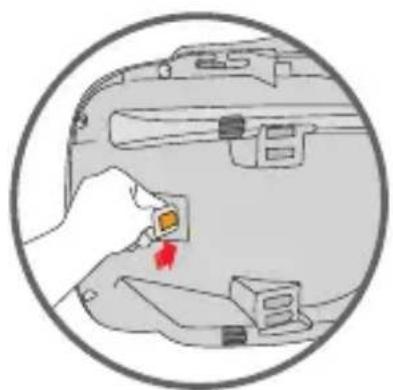
6.1 Maintenance of the harness buckle
The buckle needs to function correctly to ensure the safety of your child in the car seat. If the buckle fails to work, this is most likely due to an accumulation of dirt and dust.
Possible faults
The tabs on the buckle come out slowly after pressing the red release button.
The tabs do not attach together properly (they are released).
The tabs attach together without emitting the "click" sound.
The tabs do not fit together easily (you feel some resistance).
The buckle only opens with strong pressure.
Solution
Wash the buckle so that it starts to work properly again:
1. How to remove the harness buckle
Unclip the buckle (press the red release button).
Loosen the belts on the harness.
Locate the metal ring attached to the belt under the child restraint. Rotate the metal ring and remove it through the shell and the padding.
2. How to clean the harness buckle
Soak the buckle in warm water with washing-up liquid for at least an hour. Rinse and dry thoroughly.
3. How to replace the harness buckle
Insert the metal ring and the crotch strap through the padding and the shell. The metal ring, fastened to the belt, must come out from the shell. Pull the centre buckle to check that the crotch strap is correctly secured.
Fault
The tabs no longer fit into the appropriate slot in the buckle.
Solution
Unclip the buckle, pressing the red button.
6.2 Cleaning
When replacing the lining, only use the original FOPPAPEDRETTI ones, since the lining is an important part necessary to ensure the protection of your child.
The car seat must not be used without the lining.
The lining can be removed and washed with gentle detergent and in a cycle for delicate fabrics (30^) . Follow the washing instructions on the label of the lining. The colours of the lining may fade if washed at more than 30^ .
Do not spin or tumble dry (the fabric could be detached from the padding). The plastic parts must be cleaned with soapy water. Do not use harsh detergents (such as solvents).
The harness can be removed and washed with warm soapy water.
Warning! Never remove the tabs from the belts.
MAINTENANCE
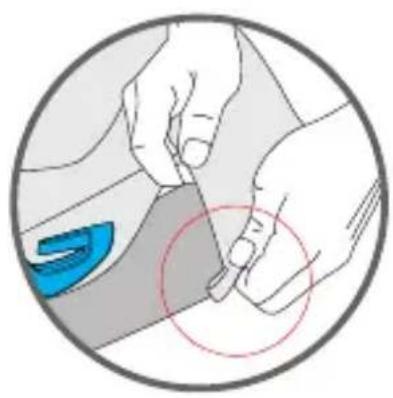
6.3 How to remove the harness

- Unclip the harness buckle (press the red button).
- Unclip the shoulder straps from the belt-tightening device, located on the rear of the backrest.
- Pull both belts through the shell and the lining and remove the chest protectors.
- Locate the metal ring attached to the belt under the child restraint. Rotate the metal ring and remove it through the shell and the padding.
HOW TO REMOVE THE LINING
6.4 How to remove the lining
Take off the harness and remove the headrest lining.
Take off the elastic parts from the hooks along the edge of the shell.
Unhook all the elastic parts from their fastenings to remove the lining from the car seat.
6.5 How to replace the lining
To put the car seat lining back on, attach the elastic parts to the hooks and fit the lining around the headrest.
FORMAL GUARANTEE
The contents of this document as stated below will come into effect as from 01.01.2005 and replace, on every account and in full, any previous message referring to the guarantee provided by Foppa Pedretti S.p.A.
FORMAL GUARANTEE
Foppa Pedretti S.p.A. the head office of which is located at n. 11 Via Volta, Grumello del Monte (Italy), guarantees directly to the Consumer that this brand new product is free of faults with regard to the materials, design and manufacture and that it complies with the characteristics as declared by the manufacturer.
This formal guarantee is valid in all Member Countries of the European Union and it neither excludes nor limits the Consumer's rights in accordance with mandatory measures provided for by the law with regard to the Retailer of the Product.
To take advantage of this formal guarantee, the Consumer must return the faulty product to the Retailer, presenting to the same the proof of purchase of the Product which must clearly show the Retailer's address, the date of purchase of the Product with the Retailer's stamp and signature and an indication of the Product itself or, alternatively, the receipt which must not have been altered and which must clearly show the same information as that referred to above.
The manufacturer's formal guarantee is valid for twelve (12) months from the date of purchase of the Product. During this period, Foppa Pedretti S.p.A. will repair or replace the faulty product, at its own discretion.
The formal guarantee is granted to the end buyer of the Product (Consumer) and it neither excludes nor limits the mandatory rights of the Consumer as provided for by the law and/or the rights that the Consumer may have with regard to the Dealer/Retailer of the Product.
EXCLUSIONS TO THE FORMAL GUARANTEE.
The formal guarantee is excluded in the case of damage caused to the Product for the following reasons: if the product is used in a way that does not comply with the information contained in the use and assembly instruction sheet, if the product is knocked or dropped, if the Product is exposed to humidity or extreme heat or environmental conditions, or to sudden changes in the same, corrosion, oxidization, unauthorized alterations or repairs to the Product, repairs using unauthorised spare parts, improper use, improper maintenance or failure to carry out the same, improper maintenance compared to the information given on the use and assembly instruction sheet, incorrect assembly, accidents, damage caused by food or drink, damage caused by chemical products, cases of force majeure.
In any case, Foppa Pedretti S.p.A. declines all responsibility for damage caused to persons or to property, other than the Product, when such damage is caused by a failure to comply with the instructions/advice/warnings cont a ined in the manua I or, alternatively, in the use and assembly instruction sheet provided with each Product for the owner/user. (Purely as an example, in the case of a cot : "Check your baby constantly. Make sure that the sheets and blankets do not cover the baby's head...").
Furthermore, Foppa Pedretti S.p.A. declines all responsibility for damage to persons and to property when the breakage of its products is due to a deterioration in the components of the Product that are subject to wear. All the components of the Product made of plastic are considered to be components subject to wear.
AVERTISSEMENT PAGE 52
EXCLUSIONS DE LA GARANTIE CONVENTIONNELLE.
ETHSH ANTHAIAKHE KOYKOYAA
5. Tontoetnon anvtnlaiknc koukoulaac
Havtnaiakn koukoula Topei va puOIOTeEkoLa.
Xpnoiuei otnv avetn Ekoupaon Tou Tpaiou kai otnv TpooTaia tou aTov nlaikn aktivooia.
ПноаIPETIKA

5. YctaHObKa KaHooHa dJa 3aunTbI OT CoHHca