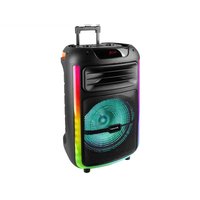
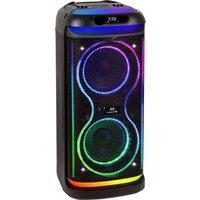
XF 900 CD - Speaker Trevi - Free user manual and instructions
Find the device manual for free XF 900 CD Trevi in PDF.
User questions about XF 900 CD Trevi
0 question about this device. Answer the ones you know or ask your own.
Ask a new question about this device
Download the instructions for your Speaker in PDF format for free! Find your manual XF 900 CD - Trevi and take your electronic device back in hand. On this page are published all the documents necessary for the use of your device. XF 900 CD by Trevi.
USER MANUAL XF 900 CD Trevi
PORTABLE AMPLIFIED SPEAKER with
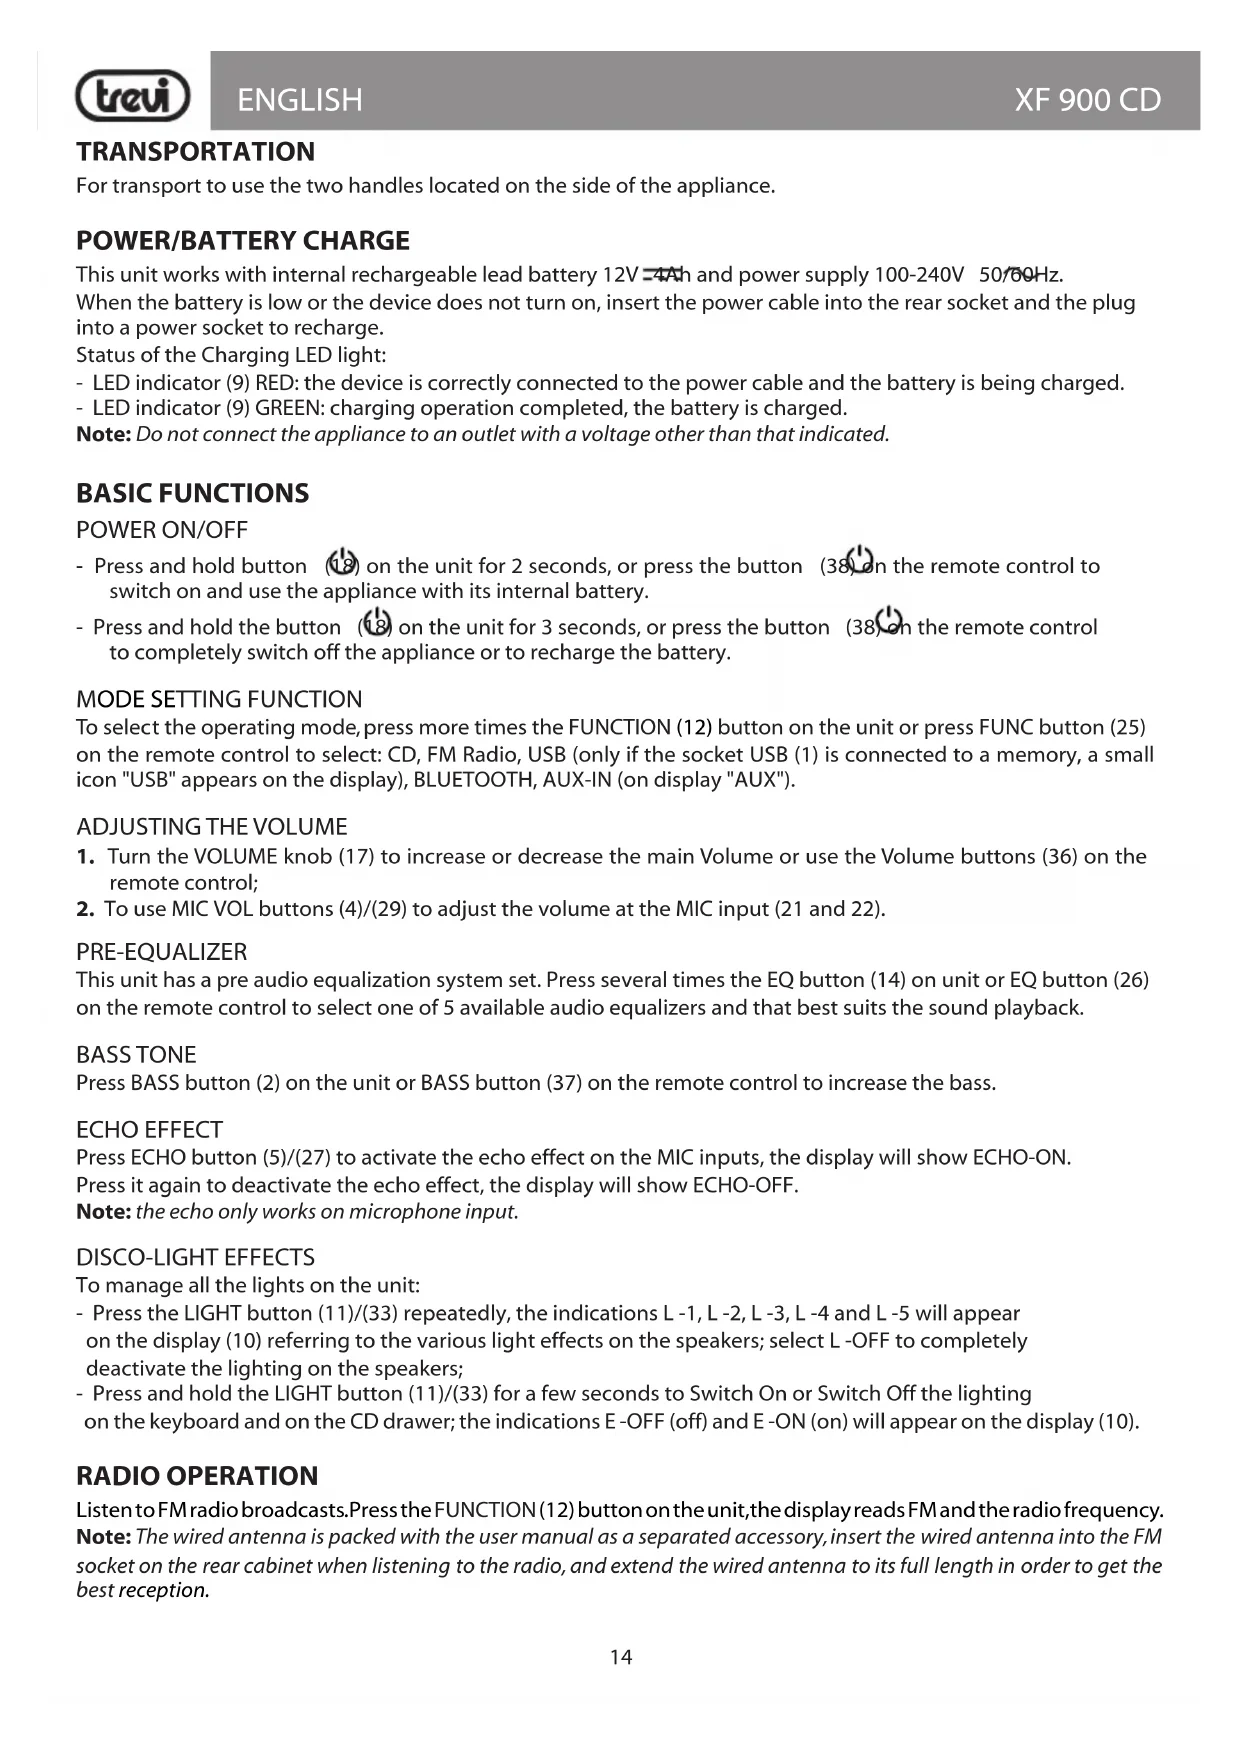
WIRES CONNECTIONS TO A UK THREE-PIN PLUG
The wires in this mains lead are coloured in accordance with the following wiring codes:
Blue: Neutral
Brown:......Live
The wires in this mains lead must be connected to the terminals in the plug as follows:
Blue wire:............N or Black
Brown wire: L or Red
Neither wire is to be connected to the earth (E or W) terminal of three-pin plug.
Should the fuse fail in the plug remove the plug form the wall socket and replace the fuse with a 3 Amp. ASTA approved BS 1362 fuse.
Dimensioni: 250x260x637mm
Peso: 8,32 Kg

CAUTION
This symbol on the back of the unit and in this manual indicate the presence on them of important instructions for safe use. Please read them carefully before using the appliance.

DANGEROUS VOLTAGE
This symbol on the back of the unit and in this manual indicates the presence in this equipment components operating at high voltage, do not open it to avoid the risk of electric shock.

WARNINGs ON THE LASER
This device is equipped with a laser beam reading system. Although the laser is of low power and with a safety device that prevents open door operation, scrupulously observe the following warnings:
Do not bring the eye to the laser lens with the device open, risk of retinal injury.
Do not attempt to disassemble or tamper with the laser unit, risk of radiation absorption.
To avoid possible hearing damage, limit the listening time to high volumes
NOTES ON USE
Listening at high volume for a long time may damage your hearing.
This is a precision electronic appliance; avoid using it in the following cases:
Near magnetic fields.
Near heat sources such as heaters and stoves.
- In very humid places such as bathrooms, swimming pools, etc...
In very dusty places.
In places subject to strong vibrations.
- Do not bring your ear close to the speaker during the setting and volume adjustment phases, and in particular to keep the volume to a minimum in the ignition phase.
- Position the appliance so that there is always enough space on its sides for the free circulation of air (at least 5 cm).
If liquids penetrate inside the appliance, immediately disconnect the plug from the socket and take the appliance to the nearest authorized TREVI service center.
- Before Switch On/Recharging the appliance, always check that the power and connection cables are installed correctly.
- The power cable must be connected to an outlet near the device and must be easily accessible.
- If you notice excessive heat on the device or on the power adapter, immediately disconnect the plug from the main power socket.
- Do not pull on the power cable.
- No naked flame sources, such as lighted candles, should be placed on the appliance.
- The appliance must not be exposed to dripping or splashing water and no objects filled with liquid, such as vases, must be placed on the appliance.
- Instruct children and people with little knowledge of the product to use it correctly.
- Keep this manual for future reference.
CARE AND MAINTENANCE
Use a slightly damp soft cloth for cleaning. Do not use solvents and abrasive substances.
IMPORTANT
This device is designed for non-professional home use. The good construction of this device guarantees its perfect functioning for a long time. If, however, a problem should arise, it is advisable to consult the nearest TREVI Authorized Service Center.
TREVI follows a policy of ongoing research and development. Therefore products may have different features from those described.
KEY DESCRIPTION
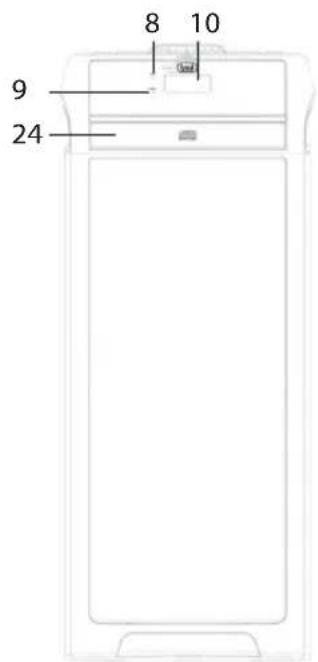
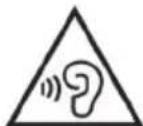
UNIT
- USB Socket
- BASS button, bass increase
- TUN-, previous track button
- MIC VOL, Microphone Volume Control
- Microphone ECHO
- OPEN/CLOSE CD Door button
7.PROG/P-MODE button - PAIR Led, Bluetooth pairing indicator
- CHARGE Led, Battery charge status indicator
- Display
- LIGHT button, disco light effects
- FUNCTION button, to select input signal source
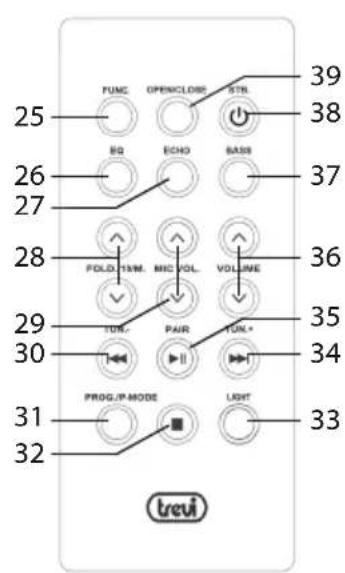
REMOTE CONTROL
- FUNC button, to select input signal source
- EQ button, preset EQ
- ECHO button
- FOLD/10/M button
- MIC VOL buttons, Microphone Volume Control
- TUN-, previous track button
31.PROG/P-MODE button -
top button
-
SCAN/ button
- EQ button, preset EQ
- /TUN+ , next track button
- 10/MEM/FOLD +/- buttons
- Main Volume control
- Power ON/OFF Switch
- top button
- USB socket for charging external devices
- MIC 2, Microphone Input
- MIC 1, Microphone Input
- AUX IN Input
-
CD Door
-
LIGHT button, disco light effects
- /TUN+ , next track button
- FAIR/SCAN button
- Volume buttons
- BASS button, bass increase
- ON/OFF button
- OPEN/CLOSE CD Door button
ACTIVATION AND REPLACEMENT REMOTE CONTROL'S BATTERY
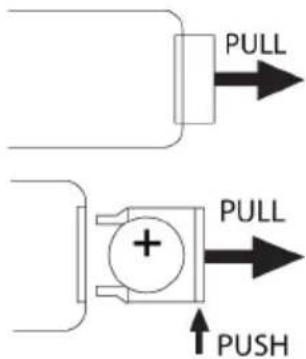
The remote control has a cell battery already installed. To activate the battery, remove the transparent tab at the bottom of the remote control. The remote control is now ready to use.
To Replace Battery:
- Remove the battery compartment cover as per the illustration on the left;
- Observe the correct polarity and install a 3V lithium battery (CR2025);
- Close the the battery compartment.
TRANSPORTATION
For transport to use the two handles located on the side of the appliance.
POWER/BATTERY CHARGE
This unit works with internal rechargeable lead battery 12V-4Ah and power supply 100-240V 50/60Hz.
When the battery is low or the device does not turn on, insert the power cable into the rear socket and the plug into a power socket to recharge.
Status of the Charging LED light:
-
LED indicator (9) RED: the device is correctly connected to the power cable and the battery is being charged.
-
LED indicator (9) GREEN: charging operation completed, the battery is charged.
Note: Do not connect the appliance to an outlet with a voltage other than that indicated.
BASIC FUNCTIONS
POWER ON/OFF
- Press and hold button (18) on the unit for 2 seconds, or press the button (38) on the remote control to switch on and use the appliance with its internal battery.
- Press and hold the button (18) on the unit for 3 seconds, or press the button (38) on the remote control to completely switch off the appliance or to recharge the battery.
MODE SETTING FUNCTION
To select the operating mode, press more times the FUNCTION (12) button on the unit or press FUNC button (25) on the remote control to select: CD, FM Radio, USB (only if the socket USB (1) is connected to a memory, a small icon "USB" appears on the display), BLUETOOTH, AUX-IN (on display "AUX").
ADJUSTING THE VOLUME
- Turn the VOLUME knob (17) to increase or decrease the main Volume or use the Volume buttons (36) on the remote control;
- To use MIC VOL buttons (4)/(29) to adjust the volume at the MIC input (21 and 22).
PRE-EQUALIZER
This unit has a pre audio equalization system set. Press several times the EQ button (14) on unit or EQ button (26) on the remote control to select one of 5 available audio equalizers and that best suits the sound playback.
BASS TONE
Press BASS button (2) on the unit or BASS button (37) on the remote control to increase the bass.
ECHO EFFECT
Press ECHO button (5)/(27) to activate the echo effect on the MIC inputs, the display will show ECHO-ON. Press it again to deactivate the echo effect, the display will show ECHO-OFF.
Note: the echo only works on microphone input.
DISCO-LIGHT EFFECTS
To manage all the lights on the unit:
- Press the LIGHT button (11)/(33) repeatedly, the indications L -1, L -2, L -3, L -4 and L -5 will appear on the display (10) referring to the various light effects on the speakers; select L-OFF to completely deactivate the lighting on the speakers;
- Press and hold the LIGHT button (11)/(33) for a few seconds to Switch On or Switch Off the lighting on the keyboard and on the CD drawer; the indications E-OFF (off) and E-ON (on) will appear on the display (10).
RADIO OPERATION
Listen to FM radio broadcasts. Press the FUNCTION (12) button on the unit, the display reads FM and the radio frequency.
Note: The wired antenna is packed with the user manual as a separated accessory, insert the wired antenna into the FM socket on the rear cabinet when listening to the radio, and extend the wired antenna to its full length in order to get the best reception.
TUNING TO A RADIO STATION
If you know the station frequency that you want to tune to directly:
- Tune to a station by press the /TUN+ (15) or /TUN- (3) button repeatedly. The station frequency is shown on the display.
AUTOMATIC TUNING STOP
- Press and hold the /TUN+ (15) or /TUN- (3) button to start tuning, tuning stop automatically when a station is received.
AUTO PRESET MEMORY/SCAN
To scan for stations within reception range and save them to preset memory automatically, press and hold the /SCAN/ (13) button. After the unit is finished scanning, the unit will automatically tune to preset number 1 (P01). To tune to a preset station:
- To tune to the next preset station, press the 10/MEM/FOLDER + (16) button;
- To tune to the previous preset, press the 10/MEM./FOLDER - (16) button.
Choose which stations to save in preset memory instead of scanning automatically.
- Use the /TUN + (15) or R / TUN - (3) button to tune to the station that you want to save as a preset (e.g., 93.1);
- Press the PROG./P-MODE (7) button. "P01" will flash on the display to indicate that you are saving the station as Preset Memory 01. (To change the preset memory number, press the 10/MEM/FOLDER + or 10/MEM/FOLDER - buttons (16));
- Press the PROG./P-MODE (7) button to finish saving the station (e.g., P01 is now set to 93.1);
- To save another station, repeat steps 1 to 3. You may save up to 30 FM stations.
Note:
FM reception depends very much on where the device is located.
- The proximity of TV sets, neon lamps or other household appliances can cause disturbances in the reception of radio programs, in this case remove the appliance.
- Switch on the appliance and select CD function;
- Open the CD compartment by pressing the OPEN/CLOSE button (6) on the unit or OPEN/CLOSE button (39) on the remote control and insert the disc with the written side facing up. Close the door carefully by pressing again the OPEN/CLOSE button (6) on the unit or OPEN/CLOSE button (39) on the remote control;
- After a few seconds the Display (10) shows the number of tracks (songs) present on the disc and playback will start automatically;
- Press /SCAN/ (13)/(35) button to activate the pause; the time indication will start flashing;
- Press /SCAN/ (13)/(35) button again to release the pause and start normal playback;
- Press the STOP button (19)/(32) to definitively stop playback;the display (10) will show the total tracks number.
JUMP TRACE AND QUICK SEARCH
- Pressing the button /TUN+ (15)/(34) while listening to it you go to the next track, while with key /TUN- (3)/(30) you go to the previous track;
- By holding the button /TUN + (15) / (34) or /TUN - (3) / (30) while listening, you quickly search for a particular musical passage;
- Release the button to return to normal playback;
- The LCD display (10) always shows which track you are listening to.
REPEAT
- In playback mode:
- Press PROG./P-MODE (7)/(31), the icon " " appears on the display to play the same track continuously.
- Press PROG./P-MODE (7)/(31),"DIR"indication appears on the display to continuously play all the tracks in the selected folder (only for MP3 CDs containing folders).
-
Press PROG./P-MODE (7)/(31),"AtL"indication appears on the display to continuously play all the tracks.
-
Press PROG./P-MODE (7)/(31), "RAN" indication appears on the display to randomly play all the tracks.
Press PROG./P-MODE (7)/(31),"INTRO" indication appears on the display to play the first 10sec. of each song.
PROGRAMMING
You can select the order in which the tracks are played.
- Press the button STOP (19)/(32) to stop playback;
- Press the PROG./P-MODE (7)/(31) button, the message "P01" appears on the display;
- Select the track you want to play first with the buttons /TUN + (15) / (34) or /TUN - (3) / (30) on the unit;
- Press PROG./P-MODE (7)/(31) button on unit to confirm;
- Repeat steps 3 and 4 to store and play the songs you want; for audio CDs a maximum of 20 tracks can be stored, while for MP3/USB CDs a maximum of 99 tracks can be stored;
- Press /SCAN/ (13)/(35) on the unit to start playback;
- Press two time the button TOP (19)/(32) to cancel programming.
ALBUM FUNCTION
Note: function valid only for MP3 CDs containing folders
- When listening to an Mp3 song and you want to change directory, press and hold the 10/FOLD +/- (16)/(28) button to move to the next/previous folders;
- Press the 10/FOLD + (16)/(28) button to move to the next 10th track. Press the 10/FOLD - (16)/(28) button to move to the previous 10th track.
BLUETOOTH FUNCTION
- Switch on the device and select the bluetooth function, the display will show "BLUETOOTH";
- In Bluetooth mode, the PAIR LED (8) will flashing and the system will automatically go into "Research" mode;
- Switch On the Bluetooth function on the external device to be paired and start the search for devices;
- Once the search is complete, select the "XF 900 CD" devices;
- Enter the password "0000" if requested;
- Press CAN/ (13) button on the unit or the button (35) on the remote control to start playback and use the TUN+ (15)/(34) or TUN-(3)/(30) buttons for track selection.
USB INPUT
- Switch On the appliance;
- Insert a USB memory in the socket (1) and select USB function; playback starts automatically;
- To pause playback, press /SCAN/ (13) button on the unit or press HAIR/SCAN (35) button on the remote control; the time indication on the display will begin to flash;
- To resume playback, press again the /SCAN/ (13) button on the unit or press PAIR/SCAN(35) button on the remote control;
- Press / TUN + (15) button on unit or button / TUN + (34) on the remote control, while listening to switch to the next track.
Press the TUN-(3) button on unit or TUN-(30) button on remote to go to the previous tracks;
Refer to the paragraph "MP3 CD player operation" for the repeat functions, track skip, etc...
Note:
- The player may not support some USB devices, this is due to the incompatibility of some processors.
- To avoid harmful interference, always connect USB devices directly to the unit, do not use extension cords.
- From the computer to format the USB memory in FAT.
USB CHARGE SOCKET
The USB CHARGE socket (20) can be used to charge external USB devices.
Note: this socket cannot be used to play audio files.
AUX-IN
- Switch on the unit and select the "AUX" function;
- Connect any unit equipped with audio output, through a cable 3.5mm jack to the AUX IN (23);
- Use the external device from their commands.
TROUBLESHOOTING
If a problem occurs, follow the steps in the table below.
If the problem still can't be solved, please contact your retailer.
| Problem Possible cause Solution | ||
| No sound when power is turned ON | 1. No input sound source comes2. Volume knob in the lowest position3. USB not plugged | 1. Input AUX signal2. Adjust volume3. Plug USB, play MP3 |
| Distorted sound 1. Vo | ume is too loud2. Audio file error | 1. Turn the volume down2. Check and change the audio file |
| No sound from the microphone | 1. Microphone socket may not be plugged properly.2. Microphone switch may not be on.3. Microphone volume is on lowest mode. | 1. Ensure the microphone is correctly plugged into the socket.2. Turn on the microphone3. Adjust the microphone volume as per users wish |
| No sound comes after inserting USB | 1. Incorrect file format2. USB may not be plugged properly | 1. File format should be MP32. Plug USB correctly |
| Unable to charge or the battery works only for short duration | 1. Connect with power cord to charge2. Battery not fully charged3. Battery life may have ended | 1. Check if power cord connected properly2. Extend charging time;normally it takes 5-6 hour to fully charge3. Replace old batteries with the same specification as the old batteries. |
| Speaker makes loud noises | 1. Microphone switched on but may too close to the speaker2. Microphone switched on but is not being used3. Microphone volume may be too loud4. Mobile phone is being used too close to the speaker5. Other wireless equipment may be placed very close to the speaker | 1. Keep the microphone 2 meters away from the speaker2. Turn off microphone if not in use.3. Adjust microphone volume to lower mode4. Keep mobile away from the speaker whilst a ending a call.5. Keep the speaker away from other wireless equipment |
INFORMATION NOTE ON THE REMOVAL BATTERY
Warning: Only high-qualified personnel should perform this operation!
BATTERY REMOVAL
The appliance should not be plugged to the mains socket when performing this operation!
- Remove the screws;
- Remove the battery;
- Connect a new one with same specification and capacity.
INFORMATION ON DISPOSAL BATTERY
Used batteries should not be disposed of with household waste or thrown into fire or water. Used batteries should be recycled or disposed of in separate waste collection centres.

Precautions for correct disposal of the product.
The symbol shown on the equipment indicates that waste must be disposed of in "separate collection" and so the product must not be disposed of together with urban waste.
The user must take the product to special "separate waste collection centres" provided by local government, or deliver it to the retailer against the purchase of a new product.
Separate collection of waste and subsequent treatment, recycling and disposal operations promotes the production of equipment with recycled materials and limits negative effects on the environment and on health caused by improper handling of waste.
Illegal disposal of the product leads to the enforcement of administrative penalties.
TECHNICAL SPECIFICATIONS
Power Supply: 100-240V~50/60Hz internal lead acid rechargeable battery 12V---4Ah
Power consumption: Max 39W
Power audio: Max 90W
Operating temperature: 5^ 35^
Frequency response: 45Hz - 18KHz
S/N ratio: 45dB
Impedance: 4Ω
FM frequency band: 87,5MHz - 108MHz
Bluetooth max power transmission:0,167dbm
Band transmission Bluetooth: 2,4GHz
Dimensions: 250x260x637mm
Weight: 8,32 kg
Dimensions: 250x260x637mm
Poids: 8,32 Kg
Grosse: 250x260x637mm
Gewicht: 8,32 Kg

VOLTAJE PELIGROSO
Dimensiones: 250x260x637mm
Peso: 8,32 Kg

TENSão PERIGOSA
Evite colocar o player:
Dimensoes: 250x260x637mm
Peso: 8,32 Kg
Simplified EU Declaration Of Conformity
Hereby TREVI S.p.a declares that equipment type "Portable amplified speaker" model XF 900 CD is in compliance with Directive 2014/53/EU.
The full text of the EU declaration of conformity is available at the following internet address:
https://www.trevi.it/dms/zidi/TREVI/DOCXF900CD.pdf


Trevi S.p.A.
Strada Consolare Rimini-San Marino, 62
47924 Rimini (Rn) Italia
Tel. 0541/756420
www.trevi.it
e-mail: info@trevi.it