XF 4500 DJ - Speaker Trevi - Free user manual and instructions
Find the device manual for free XF 4500 DJ Trevi in PDF.

| Product type | Amplified speaker |
| Brand | Trevi |
| Model | XF 4500 DJ |
| Power supply | 230 V ~ 50 Hz |
| Maximum consumption | 500 W |
| Maximum audio power | 500 W |
| Bluetooth - Peak transmission power | 1 mW |
| Bluetooth - Transmission band | 2.4 GHz |
| Dimensions (W × D × H) | 450 × 350 × 1270 mm |
| Weight | 28.4 kg |
| Main functions | Bluetooth, USB, SD card, LINE IN, microphone, equalizer, disco light effect, remote control |
| Inputs | MIC1/MIC2 (6.35 mm jack), LINE IN (3.5 mm jack), USB, SD |
| Equalizer | 6 presets via remote control + manual adjustment of frequencies 63 Hz, 1 kHz, 6 kHz, 12 kHz |
| Light effect | Integrated LED lights (Disco-Light) |
| Remote control | Yes, with AAA batteries (not included) |
| Cleaning | Soft, slightly damp cloth; avoid solvents and abrasives |
| Usage precautions | Do not expose to heat, moisture, dust, vibrations; leave a 5 cm space around for ventilation |
| Hearing protection | Limit listening time at high volume to avoid hearing damage |
| Intended use | Domestic (non-professional use) |
| Transport | Use the side handles; lock the front wheels |
Frequently Asked Questions - XF 4500 DJ Trevi
User questions about XF 4500 DJ Trevi
0 question about this device. Answer the ones you know or ask your own.
Ask a new question about this device
Download the instructions for your Speaker in PDF format for free! Find your manual XF 4500 DJ - Trevi and take your electronic device back in hand. On this page are published all the documents necessary for the use of your device. XF 4500 DJ by Trevi.
USER MANUAL XF 4500 DJ Trevi
Connection and Operation Manual
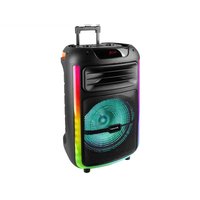
natural_image
Exterior view of a black multi-tiered speaker tower with blue-lit speaker emitting sound waves (no text or symbols visible)For additional information and updates of this product see www.trevi.it
WARNINGS

ATTENZIONE
RISCHIO DI SCOSSE ELET- TRICHE!
NON ESPORRE A PIOGGIA E UMIDITÀ

ATTENZIONE: NON APRITE L'APPARECCHIO. ALL'INTERNO NON VI SONO COMANDI MANIPOLABILI DALL'UTENTE NE PARTI DI RICAMBIO. PER TUTTE LE OPERAZIONI DI SERVIZIO RIVOLGERSI AD UN CENTRO DI ASSISTENZA AUTORIZZATO TREVI

ATTENTION
RISQUE DE DECHARGES ELEC- TRIQUES
NE PAS EXPOSER A LA PLUIE ET A L'HUMIDITE

ATTENTION: NE PAS OUVRIR L'APPAREIL, A L'INTERIEUR IL N'Y A PAS DE COMMANDES A MANIPULER PAR L'UTILISATEUR OU DE PIECES DE RECHANGE. POUR TOUTES LES OPERATIONS DE SERVICE IL FAUT S'ADRESSER A UN SERVICE D'ASSISTANCE AUTORISE TREVI.

ATENCION
PELIGRO DE CHOQUES ELECTRICOS
WARNING: DO NOT OPEN THE SET. NEITHER CONTROLS OR SPARE PARTS TO BE USED BY THE USER ARE TO BE FOUND INSIDE IT. APPLY TO AUTHORISED TREVI CENTERS FOR SERVICE OPERATIONS.

ACHTUNG
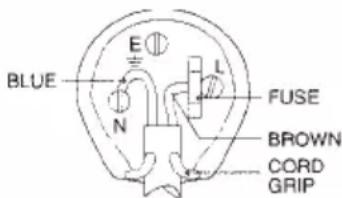
WIRES CONNECTIONS TO A UK THREE-PIN PLUG
The wires in this mains lead are coloured in accordance with the following wiring codes:
Blue: Neutral
Brown: Live
The wires in this mains lead must be connected to the terminals in the plug as follows:
Blue wire: N or Black
Brown wire: L or Red
Neither wire is to be connected to the earth (E or W) terminal of three-pin plug.
Should the fuse fail in the plug remove the plug form the wall socket and replace the fuse with a 3 Amp. ASTA approved BS 1362 fuse.
text_image
BLUE E N L FUSE BROWN CORD GRIPNOTE D'USO
This is a precision electronic appliance; avoid using it in the following cases:
- Listening to high volume for a long time could damage your hearing.
- Do not close the ear to the loudspeaker during step setting and volume adjustments, and in particular keep the volume down at the ignition.
- Near strong heat sources, such as central heating plants or stoves.
• In very humid places such as bathrooms, swimming pools, etc...
• In very dusty places.
• In places subject to strong vibrations. - Position the appliance in such a way that there is always enough room for free air circulation (at least 5 cm).
- Do not block the air inlets.
- If any liquid enters the appliance, unplug it immediately from the socket and take it to the nearest TREVI authorised service centre.
- Before switching on the appliance, always check that the power cable and the connection cable are properly installed.
- The apparatus shall not be exposed to dripping or splashing water. No objects filled with liquid, such as vases, should be placed on the unit.
- No naked flame sources, such as lighted candles, should be placed on.
- Keep this manual.
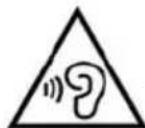
To avoid possible hearing damage, limit the listening time to high volumes.
CARE AND MAINTENANCE
Use a slightly damp soft cloth for cleaning. Do not use solvents and abrasive substances.
IMPORTANT
This device is designed for home use (not professional use). This appliance has been carefully built to ensure long-lasting perfect performance. However, should any inconvenience occur, please contact your local authorised TREVI Service Centre.
TREVI follows a policy of ongoing research and development. Therefore products may have different features from those described.
BACK PANEL
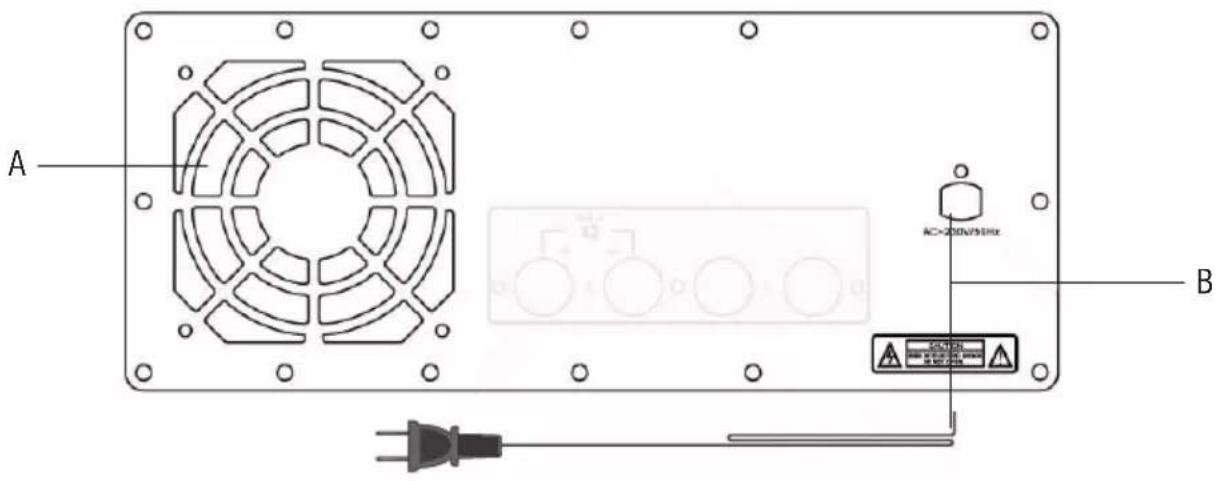
A. Cooling fan. B. Power cord.
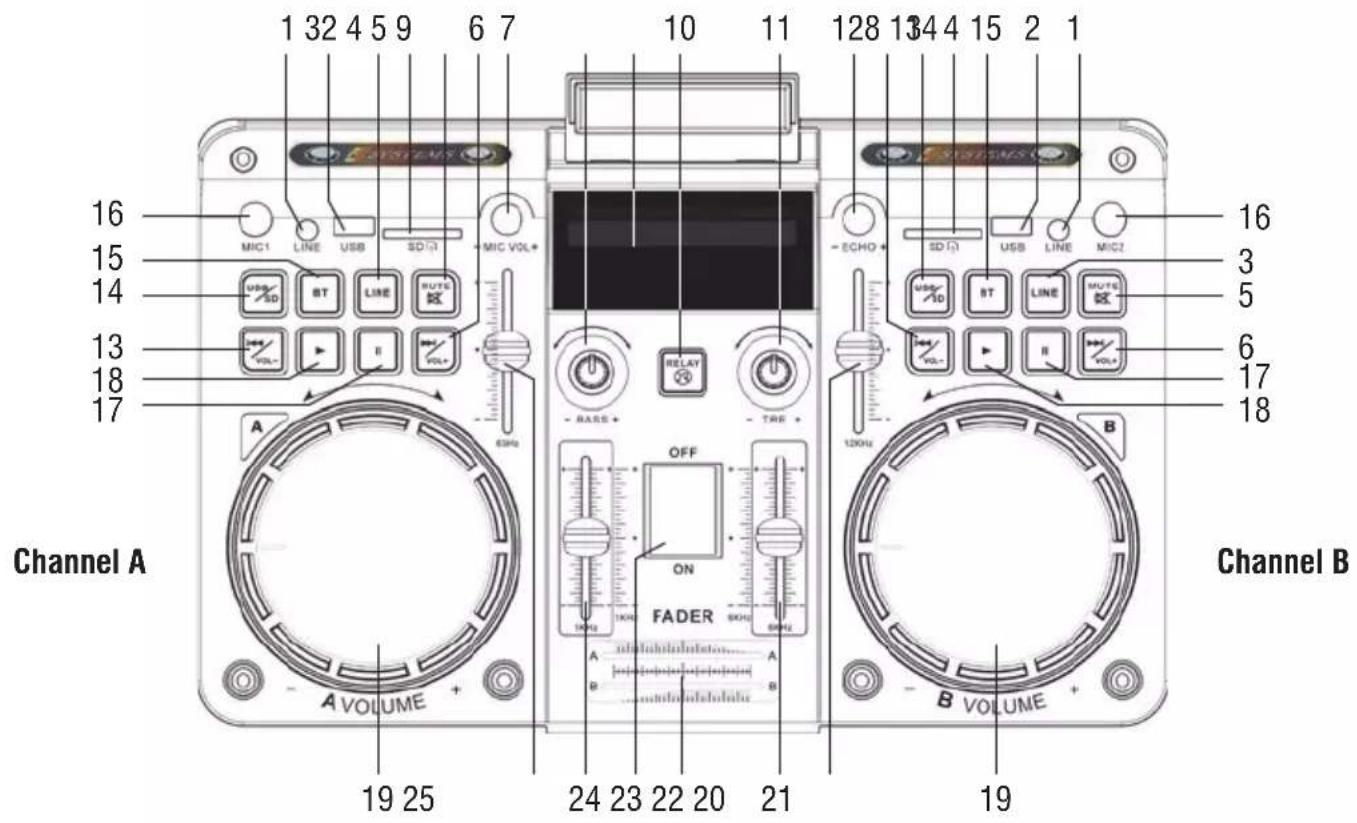
OVERVIEW OF THE MAIN UNIT
text_image
1 32 4 5 9 6 7 MIC1 LINE USB SD+ MIC VOL+ USB/SD BT LINE ROUTE VOL- E VOL- A VOLUME + Channel A 19 25 OFF ON FADER 10 11 128 134 4 15 2 1 - ECHO + SD+ USB LINE MIC2 USB/SD BT LINE ROUTE VOL- B VOLUME + Channel B 3 5 6 17 18 16 15 14 13 18 17 19- A/ B System LINE input slot.
- A/ B System USB input slot.
- A/ B System LINE input key.
- A/ B System SD Card input slot.
- A/ B System MUTE volume key.
- A/B System ▶ Vol + next key, long press for volume increase.
- Microphone Volume increase/ decrease.
- Bass increase/weakers.
- A System / B System LED Display.
- RELAY button, mute of whole unit.
- TREBLE increase/weakers.
- Microphone ECHO increase/ decrease.
-
A/ B System ◀◀/Vol- previous key, long press for volume decrease.
-
A/ B System USB/SD card input key.
- A/ B System BT input key.
- MIC 1/2 input slot.
- A/ B System II, pause key.
- A/ B System ▶, play key.
- A/ B System Volume control knob.
- Equalizer 12KHz frequency.
- Equalizer 6KHz frequency.
- A B System FADER.
- Power ON/OFF.
- Equalizer 1KHz frequency.
- Equalizer 63Hz frequency.
REMOTE CONTROL
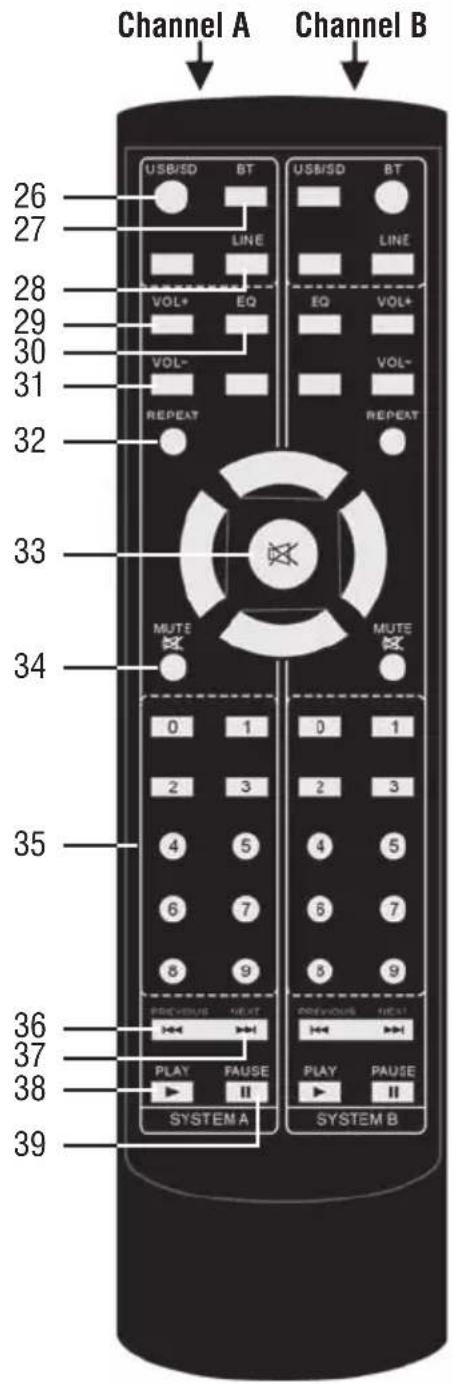
text_image
Channel A Channel B 26 27 LINE 28 VOL+ EQ 29 VOL- 30 31 REPEAT 32 33 MUTE 34 0 1 2 3 4 5 6 7 8 9 PREVIOUS NEXT PLAY FAUSE II SYSTEM A SYSTEM BThe commands described below for A channel are same for B channel:
- A System USB/SD card input button.
- A System BT input button.
- A System LINE input button.
- A System VOL +, volume increase.
- A System EQ button, equalizer.
- A System VOL -, volume decrease.
- A System REPEAT button.
- ✉ Mute button.
- A System MUTE volume ✗ button.
- A System, Numeric keyboard USB/SD card song select.
- A System ◀◀/ PREVIOUS song button.
- A System ▶/ NEXT song button.
- A System ▶, Play button.
- A System II, Pause button.
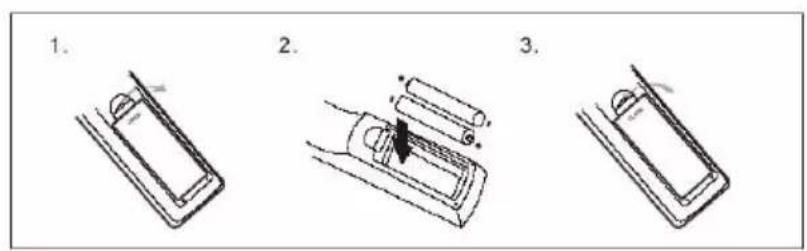
Installing the Batteries
- Remove the battery cover from the Remote Control;
- To put 2xAAA size batteries inside the compartment;
- The diagram inside the Battery Compartment shows the correct way to install the batteries.
text_image
1. 2. 3.TRANSPORTATION
For transport use the two handles placed laterally to the appliance or the two top handles; insert the brake on the front wheels once the speakers have been positioned.
POWER
This unit works with power supply 230V \~50Hz.
To activate the unit, insert the power cord plug into a power outlet. Do not connect the appliance to electrical outlets other than those indicated.
BASIC FUNCTIONS
POWER ON/OFF
- To switch on the appliance, press the main POWER ON/OFF switch (23) to the "ON" position;
- To switch off the appliance, press the main POWER ON/OFF switch (23) to the "OFF" position.
SELECTION A AND B CHANNEL
A and B channel have the same functions.
To activate A channel move the FADER balance control (22) to the left; to activate B channel move the FADER balance control (22) to the right; by acting on the balance it is possible to have a mixing of the two channels.
VOLUME CONTROL
Depending on the channel used, turn the corresponding VOLUME knob (19) on the unit, or use the (29) and (31) keys on the remote control.

Caution:
- The two settings add up, therefore, to have the maximum volume, both settings must be at most, while if the mumble of the VOLUME (19) is at minimum, increasing that of the remote control will not change.
PRESET EQ AND SETTING EQUALIZER
This set has a pre-set audio equalizer system, these are enabled in the Bluetooth, USB and SD Card functions:
- Press the EQ button (30) on the remote control several times to select one of the 6 audio equalizers available and that best suits the current sound reproduction.
For all functions is possible to regulate 4 frequency ranges (20, 21, 24, 25) present on the unit acting directly on certain frequencies, so as to always have the best equalization according to the music playback.
DISCO-LIGHT EFFECTS
The unit is equipped with LED lights (Disco-Light) on the speakers which create a luminous effect.
BLUETOOTH FUNCTION
FOR A AND B CHANNEL
- Switch on the unit and move the FADER balance control (22) to the channel to be used;
- Press the BT button (15) on the unit or the BT button (27) on the remote control and select the bluetooth function; the word "Blue" will appear on the display and the system will automatically enter pairing mode;
- Activate the Bluetooth functionality on the external device to be paired;
- Start the device search. At the end select the "XF 4500 DJ A" device if you are using A channel, or "XF 4500 DJ B" if you are using B channel;
- Enter the password "0000" if required;
- Start playback from the paired external device;
- Press the II button (17) on the unit or the II button (39) on the remote control to pause playback; press ▶ button (18) on the unit or ▶ button (38) on the remote control to resume normal playback;
- Use the ◀◀/Vol- (13), ▶▶/Vol+ (6) buttons on the unit, or the ◀◀(36), ▶▶(37) buttons on the remote control to select tracks.
PLAY ON USB INPUT
FOR A AND B CHANNEL
- Switch the appliance on and move the FADER balance control (22) to the channel to be used;
- Insert a USB memory in the corresponding inputs (2): for channel A and for channel B;
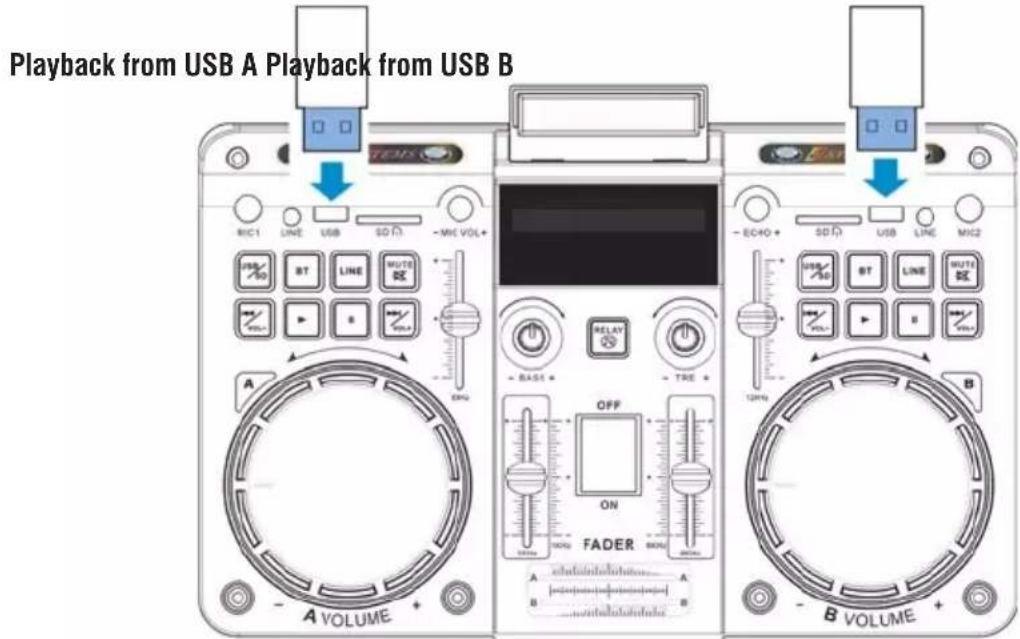
text_image
Playback from USB A Playback from USB B A VOLUME B VOLUME- Playback will start automatically; if it does not, press the ▶ button (18) on the unit or the ▶ button (38) on the remote control;
- Press II button (17) on the unit or II button (39) on the remote control to pause playback, press ▶ button (18) on the unit or ▶ button (38) on the remote control to resume normal reproduction;
- Use the ◀◀/Vol- (13), ▶◀/Vol+ (6) buttons on the unit, or the ◀◀(36), ▶◀(37) buttons on the remote control to select the tracks you want to play. You can also directly enter the track number to be played using the numeric keypad (35) on the remote control.
- Press the REPEAT (32) key on the remote control once, the display will show "ONE", to continuously reproduce the same track; press it a second time, the word "ALL" will appear on the display, to continuously play all the tracks in the folder or USB device.

Note:
• The player may not support some USB devices, this is due to the incompatibility of some processors.
- To avoid harmful interference, always connect USB devices directly to the unit, do not use extension cords.
• From the computer, format the USB memories in FAT (16 or 32).
PLAY ON SD CARD
FOR A AND B CHANNEL
Refer to the previous paragraph "Playback on USB inputs"; the commands and functions are the same as described above.
LINE-IN
FOR A AND B CHANNEL
- Connect any unit with audio output through the appropriate 3.5mm jack cable to the LINE IN (1) input of channel A or channel B;
- Switch the appliance on and move the FADER balance control (22) to the channel to be used;
- Press the LINE key (3) on the unit or the LINE key (28) on the remote control;
- Adjust the external device from your commands.
- Connect the supplied microphone with cable to the MIC1 or MIC2 socket (16);
- Turn on the microphone;
- Adjust the microphone input volume using the Volume control (7) on the unit and adjust the ECHO using the command (12).
TROUBLESHOOTING
If a problem occurs, follow the steps in the table below.
If the problem still can't be solved, please contact your retailer.
| Problem Possible cause Solution | ||
| No response from the unit P | Power cable disconnected or not connected properly | Disconnect and reconnect the AC power plug, then turn on the unit again |
| No sound when power is turned ON | 1. No input sound source comes2. Volume knob in the lowest position3. USB not plugged | 1. Input AUX signal2. Adjust volume3. Plug USB, play MP3 |
| Distorted sound 1. Volume | is too loud2. Audio file error | 1. Turn the volume down2. Check and change the audio file |
| No sound from the mi-crophone | 1. Microphone socket may not be plugged properly.2. Microphone switch may not be on.3. Microphone volume is on lowest mode. | 1. Ensure the microphone is correctly plugged into the socket.2. Turn on the microphone3. Adjust the microphone volume |
| No sound comes after inserting USB | 1. Incorrect file format2. USB may not be plugged properly | 1. File format should be MP32. Plug USB correctly |
| Remote control does not work | 1. The source has not been selected.2. The remote control is very far from the unit.3. The batteries have not been inserted correctly.4. Low batteries.5. The remote control receiver on the unit is covered or unable to receive the signal properly. | 1. Before you press any function button, first select the correct source with the remote control instead of the main unit.2. Reduce the distance between the remote control and the unit.3. Insert the batteries with their polarities (+/- signs) aligned as indicated.4. Replace the batteries.5. Aim the remote control directly at the sensor on the front of the main unit. |
| If Speaker makes loud noises | 1. Microphone switched on but may too close to the speaker2. Microphone switched on but is not being used3. Microphone volume may be too loud4. Mobile phone is being used too close to the speaker5. Other wireless equipment may be placed very close to the speaker | 1. Keep the microphone 2 meters away from the speaker2. Turn off microphone if not in use.3. Adjust microphone volume to lower mode4. Keep mobile away from the speaker whilst a ending a call.5. Keep the speaker away from other wireless equipment |

INFORMATION TO USERS
pursuant to Legislative Decree No. 49 of March 14, 2014
"Implementation of Directive 2012/19/EU on Waste Electrical and Electronic Equipment (WEEE)"
This wheeled bin symbol on the product indicates that at the end of its life must be collected separately from other waste. The user must, therefore, take the remote control integrates the essential components that got to its life to the appropriate differentiated collection centers for electronic and electro-technical waste, or return it to the dealer when purchasing a new appliance of equivalent type, in terms of one to one, or one to zero for equipment having longer side of less than 25 cm. Appropriate separate collection for the decommissioned equipment for recycling, processing and environmentally compatible disposal helps prevent negative impact on the environment and human health and promotes recycling of the materials making up the product. Illegal dumping of the product by the user entails the application of administrative sanctions stated in Legislative Decree n. Legislative Decree No. 49 of March 14, 2014.
TECHNICAL SPECIFICATIONS
Power Supply: 230V 50Hz \~
Power consumption: Max 500W
Output Audio power: 500W
Bluetooth peak transmission power: 1mW
Band transmission Bluetooth: 2,4GHz
Dimensions: 450x350x1270mm
Weight: 28,4 Kg
NOTES D'EMPLOI
Simplified EU Declaration Of Conformity
Hereby TREVI S.p.a declares that equipment type "High power amplified speaker" model XF 4500 DJ is in compliance with Directive 2014/53/EU. The full text of the EU declaration of conformity is available at the following internet address: https://www.trevi.it/dms/zidi/TREVI/DOCXF4500DJ.pdf

text_image
Grid of nine speech bubble icons with national flags, likely representing country or regional data.EN If you will not find your language on the instruction manual, please go on our website www.trevi.it to find it FR Si vous ne trouverez pas votre langue sur le mode d'emploi, veuillez vous visiter sur notre site Web www.trevi.it de le trouver DE Wenn Sie Ihre Sprache auf die Bedienungsanleitung nicht finden, gehen Sie bitte auf unsere Webseite www.trevi.it zu finden ES Si no encuentras tu idioma en el manual de instrucciones, por favor vaya a nuestra página web www.trevi.it se encuentra PT Se você não vai encontrar sua língua sobre o manual de instruções, por favor, vá em nosso site www.trevi.it para encontrá-lo

Trevi S.p.A.
Strada Consolare Rimini-San Marino, 62
47924 Rimini (Rn) Italia
Tel. 0541/756420 Fax 0541/756430 www.trevi.it


Made in CHINA
e-mail: info@trevi.it