
XF 650 KB - Speaker Trevi - Free user manual and instructions
Find the device manual for free XF 650 KB Trevi in PDF.

| Product Type | Portable Speaker |
| Brand | Trevi |
| Model | XF 650 KB |
| Dimensions | 250 x 262 x 565 mm |
| Weight | 6.6 kg |
| Power Supply | Lithium battery 7.4 V / 4000 mAh (rechargeable via Type-C 5V 2A) |
| Total Power | 100 W |
| FM Frequency Band | 87.5 - 108 MHz |
| Frequency Response | 60 Hz - 18 kHz |
| Signal-to-Noise Ratio | ≥70 dB |
| Sensitivity | 88±3 dB |
| Impedance | 4 Ω |
| Wireless Connectivity | Bluetooth 2.4 GHz (with TWS function) |
| Connectors | AUX 3.5 mm, USB, TF card, microphone inputs (x2) |
| Functions | FM Radio, Disco Light, recording, equalizer (5 modes), remote control |
| Estimated Battery Life | Several hours (depending on usage) |
| Maintenance | Soft, slightly damp cloth; avoid solvents |
| Safety | Avoid magnetic fields, heat, humidity, dust, vibrations; unplug if liquid enters |
| Spare Parts | Battery, remote control, AC adapter (not included) |
| Repairability | TREVI authorized service center |
| Usage | Domestic, non-professional |
| Box Contents | Speaker, remote control, Type-C cable, microphone |
Frequently Asked Questions - XF 650 KB Trevi
User questions about XF 650 KB Trevi
0 question about this device. Answer the ones you know or ask your own.
Ask a new question about this device
Download the instructions for your Speaker in PDF format for free! Find your manual XF 650 KB - Trevi and take your electronic device back in hand. On this page are published all the documents necessary for the use of your device. XF 650 KB by Trevi.
USER MANUAL XF 650 KB Trevi
natural_image
Black and white photo of a portable electronic device with two circular speakers and mesh grille (no visible text or symbols)* For additional information and updates of this product: www.trevi.it
Listening at high volumes for a long time may damage your hearing.
This appliance is a high precision electronic instrument, therefore avoid using it in the following cases:
• Near magnetic fields.
- Near heat sources such as heaters and stoves.
- In very humid places such as bathrooms, swimming pools, etc...
• In very dusty places.
• In places subject to strong vibrations.
- Do not bring your ear close to the speaker during the adjustment and volume adjustment phases, and in particular to keep the volume to a minimum in the ignition phase.
- Position the appliance so that there is always enough space on its sides for the free circulation of air (at least 5 cm).
- If liquids penetrate inside the appliance, immediately disconnect the plug from the socket and take the appliance to the nearest authorized TREVI service center.
- Always check before recharging the appliance, that the power and connection cables are installed correctly.
• No naked flame sources, such as lighted candles, should be placed on the appliance.
- The appliance must not be exposed to dripping or splashing water and no objects filled with liquid, such as vases, must be placed on the appliance.
- Before turning on the appliance, always check that the power cable and the connection cable are installed correctly.
- The power adapter must be connected to an outlet near the device and must be easily accessible.
- If you notice excessive heat on the device or on the power adapter, immediately disconnect the plug from the main power socket.
- Do not pull on the power cable.
- Keep this manual for future reference.
CARE AND MAINTENANCE
For cleaning, we recommend the use of a soft, slightly moistened cloth. Avoid solvents or abrasive substances.
WARNING FOR A CORRECT USE OF RECHARGEABLE BATTERY
- Recharge the battery in an ambient temperature between 5°C and 35°C.
- Don't recharge more than the suitable period to prevent the risk of overheating and burst.
- Recharging the battery over the suitable period or an extended period of inactivity may reduce battery duration.
-
Rechargeable battery is liable to wear and tear and its performance will reduce gradually.
-
To extend the duration of the battery use it when is completely charged up to the complete discharging, then recharge it fully before use it again. Recharge a battery not completely consumed, will result in reduced duration. In this case, repeat the full charging/discharging cycle many times.
- Avoid recharge the battery for the whole night.
IMPORTANT
This device is designed for non-professional home use. The good construction of this appliance guarantees perfect operation for a long time. However, should any inconvenience arise, it is advisable to consult the nearest TREVI Authorized Service Center.
TREVI pursues a policy of continuous research and development. Therefore the products may have different characteristics from those described.
DESCRIPTION
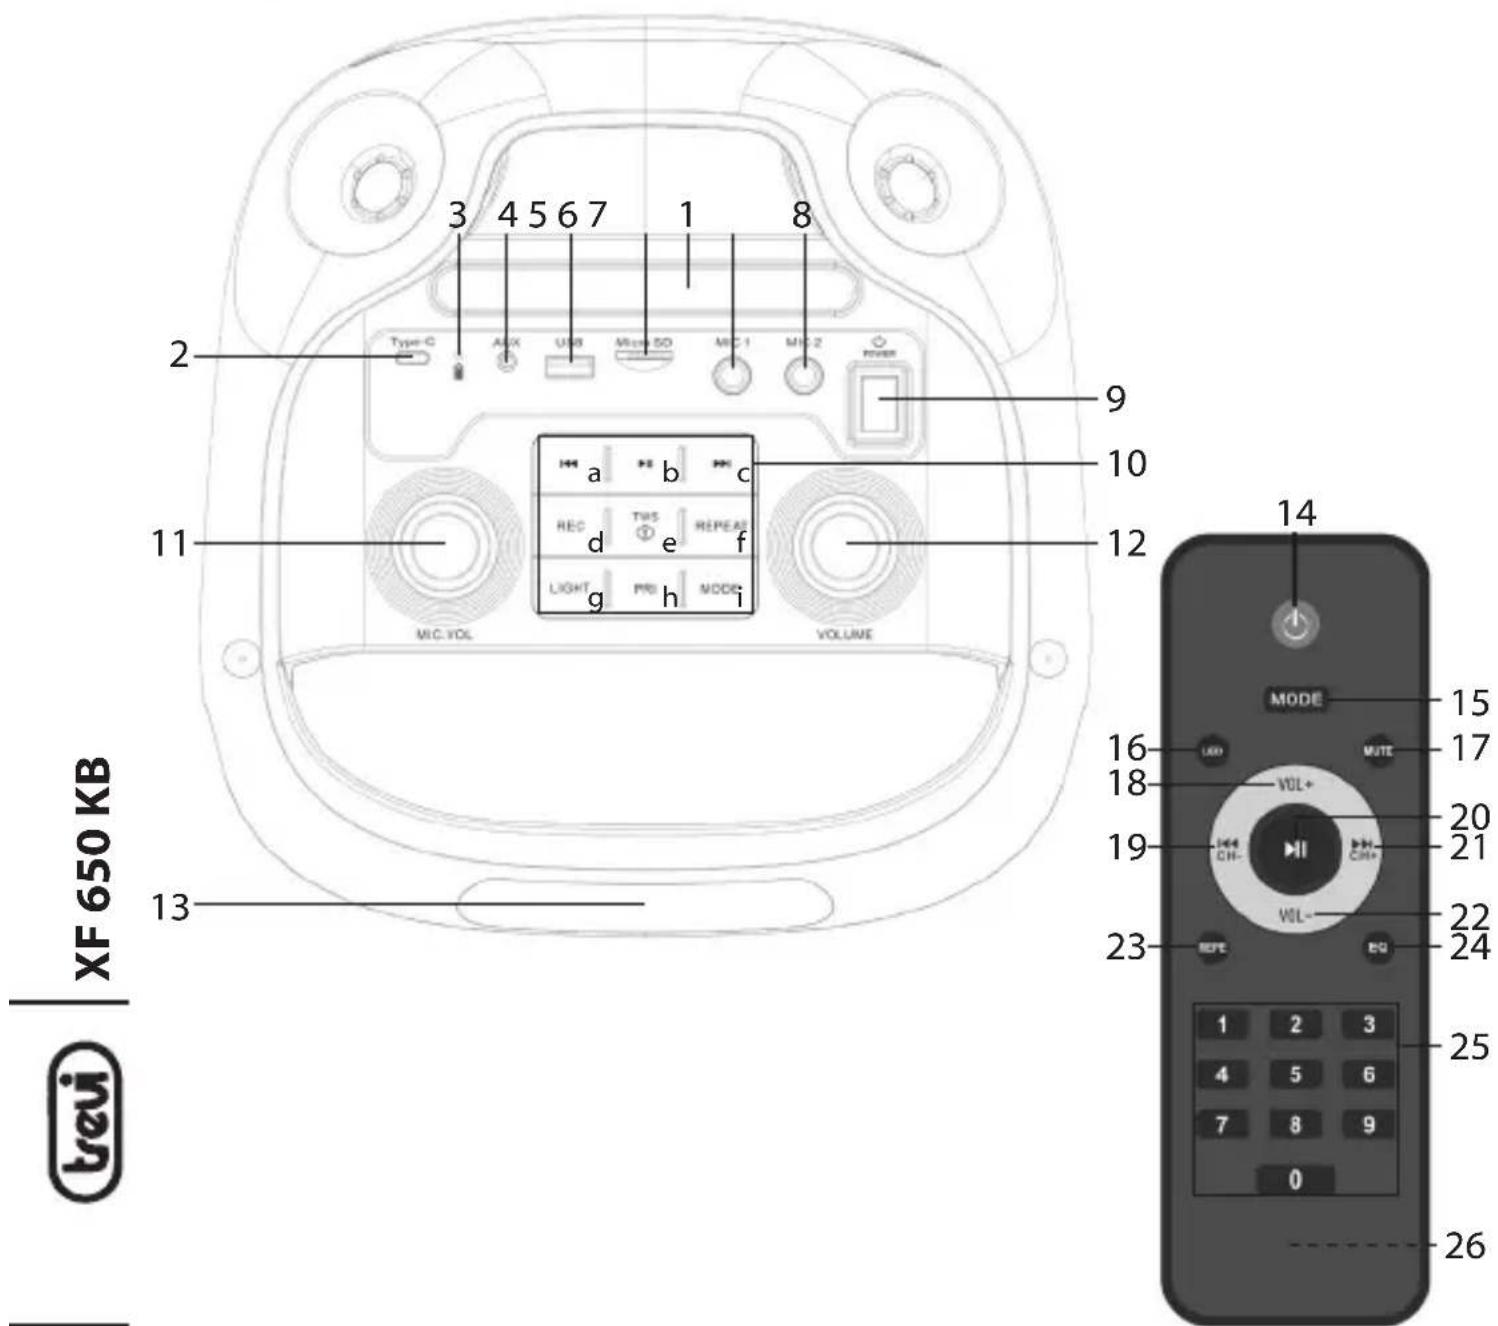
UNIT
- Smartphone/Tablet support
- Charging port 5V Type-C
- Charging Led indicator
- AUX input (3.5mm)
- USB input
- TF card slot
- Microphone1 input
- Microphone2 input
- Power ON/OFF switch
10a. 🏠 button, previous track
10b. button, Play/ Pause
REMOTE CONTROL
- ⏻ button, Stand-by/ ON switch
- MODE button
- LIGHT button, disco light effect
- MUTE button
- VOL+ button, to increase volume
- /CH button, previous track
10c. ▶ button, next track
10d. REC button
10e. TWS button, press for 3 sec. for TWS function
10f. REPAT BUTTON, repeat
10g. LIGHT button, disco light effect
10h. PRI button, microphone priority
10i. MODE button, change to the different mode
11. Microphone volume/Echo knob
12. Master volume/Tones knob
13. Display
- button, Play/Pause
- /CH+ button, next track
- VOL- button, to reduce volume
- REPE button, repeat
- EQ button, to set equalizer
- Numeric buttons
- Battery compartment
REMOTE CONTROL BATTERY REPLACEMENT
Caution: Batteries not included
- Open the battery compartment on the back of the remote control(26).
- Insert 2 batteries (size AAA) making sure to observe the polarity and guide marks inside the battery compartment.
- Close the battery compartment.
IMPORTANT
- Dispose of used batteries in accordance with the recycling regulations in your area.
- Danger of explosion if battery is incorrectly replaced.
- Replace only with the same or equivalent type.
- If the remote control is not used for a long time, the battery may leak and damage the remote control, replace it with a new one if this occurs.
- DO NOT short-circuit the batteries or throw them into water, general garbage or fire.
CHARGING THE BATTERY
- With the appliance off, connect the power supply cable to the charging port Type-C(2) on the device. Connect the cable to a 5V=2A power supply (not supplied) and the latter to a mains socket;
- The red LED indicator(3) will light up;
- Once charging is complete, the red LED indicator(3) will turn off.
With low battery, the last segment of the battery icon on the display will flash for a certain time, then the device will switch off automatically.
Note: For a good battery life, it is recommended to keep the device off during the charging.
Unless otherwise specified, the commands described below apply to both the unit and the remote control.
ON/ OFF
- Use the On/Off switch(9) to turn the appliance On and Off (position "I" On, position "O" Off).
- Press the button ⏻ (14) on the remote control to put the unit in stand-by mode; press it again to switch On the unit.
USE OF THE MICROPHONE
- Plug the supplied microphone into the MIC1(7) jack or MIC2(8) jack;
- Turn it on using the switch located on its body.
VOLUME/ MUTE/ TONE/ MIC VOLUME/ ECHO/ EQ ADJUSTMENT
- Turn the Master Volume knob(12) clockwise/counterclockwise to increase/decrease the volume of the unit. Press the button MUTE(17) on the remote control to mute the device, press it again to return to normal listening;
- Press and turn the Master Volume knob(12) to adjust the treble and bass tones;
- Turn the Microphone Volume knob(11) clockwise/counterclockwise to increase/decrease the microphone volume;
- Press and turn the Microphone Volume knob(11) to adjust the echo effect;
- Press the EQ(24) button on the remote control several times to choose the best audio dynamics from the preset ones: NOR, POP, ROCK, JAZZ, CLAS, CUT.
DISCO-LIGHT
Press the button LIGHT(10a) several times, to change the Disco-Light lighting effects, they will be distinguished on the display with: Led1, Led2, Led3, Led4, Led5, Led6, OFF. Select "OFF" to turn off the front Led lighting completely.
RADIO MODE
- Turn on the unit and press the button MODE(10i) on the unit several times until the frequency indication appears on the display;
- Press the (prob) button on the unit to activate automatic station search and storage (the radio starts an automatic search for radio stations and automatically saves them in memory). The number of stored stations depends on the radio signal in your area;
- Once scanning is complete, use the (10a) and (10c) buttons on the unit to move through the presets of saved stations.
Note:
- FM reception depends very much on where the device is located.
- The proximity of TV sets, neon lamps or other household appliances can cause disturbances in the reception of radio programs, in this case remove the appliance.
WIRELESS OPERATION
PAIRING TO DEVICES
- Place the speaker near the Wireless device to be paired and turn on the device;
- Select the Wireless function by pressing the button MODE(10i); "BLUE" will flash on the display;
- Follow the instructions of your external device to search for the speaker;
- Search for the speaker named "XF 650 KB" and enter PIN "0000" if prompted;
- After successful pairing, "BLUE" on the display will remain steady.
Note:
- The Wireless speaker only works with one connection at a time.
- The proximity of TV sets, neon lamps or other appliances can cause disturbances in reception, in this case move the appliance away.
CONTROLS AVAILABLE IN WIRELESS MODE
- Start sound playback from your device;
- Press the (10a) button once to go to the previous track, press the (10c) button once to go to the next track.
- Press the (10) button to pause; press it again to resume playback.
TWS CONNECTION
TWS technology allows the user to make a wireless connection between two speakers of the same model and compatible with the TWS function.
- Turn off Wireless on your phone or other device;
- Turn on both speakers and select "Wireless" mode on both;
- Press the TWS(10e) button on one of the speakers for 3 seconds, the word "BLUE" will appear flashing on the display. You will then hear a different beep to indicate that the two speakers have connected to each other;
- Activate Wireless on your phone or other device, search and pair the external device to the "XF 650 KB" speaker. After connection, you will be able to play music with the TWS stereo-speaker system.
Adjustments on the main speaker will be replicated simultaneously on the other speaker as well. For example, selecting the previous and next song, playing, and pausing.
Note:
- If the 2 speakers fail to pair, turn off both devices and repeat steps 1, 2 and 3.
- The TWS function only works between the same speakers or with other speakers using the same IC or solution.
TF CARD/USB
- Insert a Micro SD card into the slot(6) or a USB flash drive into the socket(5) and turn on the device;
- Playback will start automatically. Otherwise press the button MODE(10i) on the unit until USB or TF appears on the display;
- Press the (10a) button once to go to the previous track, press the (10c) button once to go to the next track;
- Press the (10b) button to pause, press it again to resume playback;
- Press and hold button (10a) or button (10c) to rewind or fast forward in listening to the song, release the button to return to normal listening;
- Using the REPAT(10f) button or the REPE(23) button on the remote control, you can activate the track repeat function (ONE=repeat single track, ALL=repeat all tracks present);
- Use the number buttons(25) on the remote control for direct selection of a track.
AUX INPUT MODE
- Connect any unit with audio output via appropriate 3.5mm Jack cable to the AUX(4) input;
- Press the button MODE(10i) on the unit several times until "AUX" appears on the display;
- Use the controls of the connected device to select and play the audio.
RECORD FUNCTION
It is possible to record only the speech of the microphone on the microSD/USB memory:
- Insert a micro SD memory or a USB memory in the respective inputs;
- Press and hold the REC(10d) key to start recording; the words CARD RECO or USB RECO appear on the display, followed by the recording start time;
- Press the REC(10d) button to stop recording and start listening to the recording you just made;
- Press the REC(10d) button to start listening to recordings on the microSD/USB memory.
Note: When recording from the microphone, it is plausible that there is some background noise on the recording.
TECHNICAL FEATURES
Total power: 100W
FM frequency band: 87,5MHz - 108MHz
Frequency response: 60Hz - 18KHz
S/N ratio: ....>70dB
Sensibility: 88±3dB
Impedance: 4Ω
Max Wireless transmission power: 0.8mW
Wireless transmission frequency: 2.4GHz
Power supply: 7.4V 4000mA lithium battery
Dimensions: 250(L) x 262(D) x 565(H) mm
Weight: 6,6kg
BATTERY REMOVAL AND DISPOSAL POLICY
Warning: the removal and disposal operation is reserved exclusively for specialized technical staff!
- Remove the screws securing the upper control panel;
- Lift up the top panel;
- Locate and remove the battery from its housing.
Whatever type of spent battery, it should not be thrown in the household waste, in the fire or in the water. Any type of spent battery should be recycled or disposed of at dedicated collection centers.
Precautions for correct disposal of the product.
The symbol shown on the equipment indicates that waste must be disposed of in “separate collection” and so the product must not be disposed of together with urban waste. The user must take the product to special “separate waste collection centres” provided by local government, or deliver it to the retailer against the purchase of a new product. Separate collection of waste and subsequent treatment, recycling and disposal operations promotes the production of equipment with recycled materials and limits negative effects on the environment and on health caused by improper handling of waste. Illegal disposal of the product leads to the enforcement of administrative penalties.
NOTES D'UTILISATION
VOLUME/ MUTE/ TONE/ MIC VOLUME/ ECHO/ EQ ADJUSTMENT
FONCTIONNEMENT WIRELESS
APPAIRAGE AUX APPAREILS
VOLUMEN/ MUTE/ TONE/ MIC VOLUME/ ECHO/ EQ ADJUSTMENT
https://www.trevi.it/dms/zidi/TREVI/DOCXF650KB.pdf
SIMPLIFIED EU DECLARATION OF CONFORMITY
Hereby TREVI Spa declares that the radio equipment type XF 650 KB is in compliance with directive 2014/53/EU.
The full text of the EU declaration of conformity is available at the following internet address
https://www.trevi.it/dms/zidi/TREVI/DOCXF650KB.pdf

natural_image
Grid of nine grayscale speech bubble icons with national flags, no text or symbols presentIf you will not find your language on the instruction manual, please go on our website www.trevi.it to find it

Trevi S.p.A.
Strada Consolare Rimini-San Marino, 62
47924 Rimini (RN) Italia
Tel. 0541/756420 | Fax 0541/756430 | www.trevi.it | e-mail: info@trevi.it


- CARE AND MAINTENANCE
- WARNING FOR A CORRECT USE OF RECHARGEABLE BATTERY
- IMPORTANT
- UNIT
- REMOTE CONTROL
- REMOTE CONTROL BATTERY REPLACEMENT
- CHARGING THE BATTERY
- ON/ OFF
- USE OF THE MICROPHONE
- VOLUME/ MUTE/ TONE/ MIC VOLUME/ ECHO/ EQ ADJUSTMENT
- DISCO-LIGHT
- RADIO MODE
- Note:
- WIRELESS OPERATION
- PAIRING TO DEVICES
- CONTROLS AVAILABLE IN WIRELESS MODE
- TWS CONNECTION
- TF CARD/USB
- AUX INPUT MODE
- RECORD FUNCTION
- TECHNICAL FEATURES
- BATTERY REMOVAL AND DISPOSAL POLICY
- Warning: the removal and disposal operation is reserved exclusively for specialized technical staff!
- Precautions for correct disposal of the product.
- NOTES D'UTILISATION
- FONCTIONNEMENT WIRELESS
- APPAIRAGE AUX APPAREILS
- VOLUMEN/ MUTE/ TONE/ MIC VOLUME/ ECHO/ EQ ADJUSTMENT
- SIMPLIFIED EU DECLARATION OF CONFORMITY
Brand : Trevi
Model : XF 650 KB
Category : Speaker