
AVX 590 BT - Loudspeaker Trevi - Free user manual and instructions
Find the device manual for free AVX 590 BT Trevi in PDF.

| Product type | Active 2.0 speaker with built-in amplifier |
| Brand | Trevi |
| Model | AVX 590 BT |
| Dimensions (H x W x D) | 162 x 272 x 240 mm |
| Weight | Approximately 4.5 kg (estimated) |
| Power supply | 230 V ~ 50 Hz, 68 W max |
| Maximum audio power | 60 W + 60 W |
| Frequency response | 50 Hz - 20 kHz |
| Signal-to-noise ratio | ≥ 72 dB |
| Harmonic distortion | 0.5% (1 kHz/1 W) |
| Speakers | 5-inch woofer, 0.75-inch tweeter |
| Wireless connectivity | Bluetooth 2.4 GHz, range approx. 10 m |
| Audio inputs | AUX IN 1 (3.5 mm jack), AUX IN 2 (3.5 mm jack), USB (MP3 player), Optical, Coaxial |
| Main functions | USB playback, Bluetooth, AUX, optical, coaxial; remote control; equalizer (Music, Movie, News, 3D); bass/treble adjustment |
| Controls | Rotary knob power/volume/input selection, infrared remote control |
| LED indicators | Red (standby), Blue (Bluetooth), Pink (USB), Green (AUX 1), Light green (AUX 2), White (Coaxial), Yellow (Optical) |
| Maintenance and cleaning | Slightly damp soft cloth; avoid solvents and abrasives |
| Safety | Do not expose to water; disconnect during storms; do not place objects filled with liquid on the device |
| Remote control batteries | 2 AAA batteries (not included) |
| Included accessories | Power cable, satellite speaker cable (presumed) |
| General information | Made in China; continuous production; features subject to change |
Frequently Asked Questions - AVX 590 BT Trevi
User questions about AVX 590 BT Trevi
0 question about this device. Answer the ones you know or ask your own.
Ask a new question about this device
Download the instructions for your Loudspeaker in PDF format for free! Find your manual AVX 590 BT - Trevi and take your electronic device back in hand. On this page are published all the documents necessary for the use of your device. AVX 590 BT by Trevi.
USER MANUAL AVX 590 BT Trevi
Connection and Operation Manual
HAUT-PARLEURS AMPLIFIÉS À HAUTE PUISSANCE AVEC BLUETOOTH®, USB/LECTEUR MP3, AUX-IN 1/AUX-IN 2, ENTREE OPTIQUE, ENTRÉE COAXIAL
WARNING: DO NOT OPEN THE SET. NEITHER CONTROLS OR SPARE PARTS TO BE USED BY THE USER ARE TO BE FOUND INSIDE IT. APPLY TO AUTHORISED TREVI CENTERS FOR SERVICE OPERATIONS.

ATTENTION
RISQUE DE DECHARGES ELEC- TRIQUES NE PAS EXPOSER A LA PLUIE ET A L'HUMIDITE

ATTENTION: NE PAS OUVRIR L'APPAREIL, A L'INTERIEUR IL N'Y A PAS DE COMMANDES A MANIPULER PAR L'UTILISATEUR OU DE PIECES DE RECHANGE. POUR TOUTES LES OPERATIONS DE SERVICE IL FAUT S'ADRESSER A UN SERVICE D'ASSISTANCE AUTORISE TREVI.
ACHTUNG
Distorsione: 0.5% (1K/1W)
Woofer: 5"
Tweeter: 0.75"
NOTES ON USE
This is a precision electronic appliance; avoid using it in the following cases:
- Place the device on a flat surface.
- Place the device so that its sides there is always enough space for air to circulate freely (at least 10 cm).
- Do not place anything on top of the unit.
• The apparatus shall not be exposed to dripping or splashing water. No objects filled with liquid, such as vases, should be placed on the unit.
• If liquids penetrate inside the device immediately disconnect the plug from the socket and take it to the nearest service center autorizato TREVI.
- No naked flame sources, such as lighted candles, should be placed on.
• Cables should be hidden and protected in order to avoid stumbling from someone and the consequent fall of the appliance.
- Keep the unit away from the following places: near magnetic fields;
near heat sources (radiators, stoves, direct sunlight, etc...);
near wetlands (bathrooms, swimming pools, etc...);
dusty areas; areas subject to strong vibration.
- Unplug the power cable during thunderstorms or long periods of inactivity.
- Instruct the proper use children and people with little knowledge of the product.
- Listen at high volume for a long time, can damage your hearing.
- Keep the following user manual.
CARE AND MAINTENANCE
Use a slightly damp soft cloth for cleaning. Do not use solvents and abrasive substances.
IMPORTANT
This appliance has been carefully built to ensure long-lasting perfect performance. However, should any inconvenience occur, please contact your local authorised TREVI Service Centre.
TREVI follows a policy of ongoing research and development. Therefore products may have different features from those described.
DESCRIPTION OF CONNECTORS/CONTROLS
- Bass Reflex
- Power knob/active input selection/adjustment Volume
- LED function indicator/Input
- USB input
- Digital Audio Optical input
- Digital Coaxial Audio input
- SPEAKER connector for satellite speaker
- Power switch ON/OFF
- 3.5 mm stereo AUDIO AUX IN 1 Jack input
- 3.5 mm stereo AUDIO AUX IN 2 Jack input
LED COLOURS DESCRIPTION
RED COLOR: Stand-by function
BLU COLOR: Bluetooth function
PINK COLOR: USB function
GREEN COLOR: AUX IN 1
LIGHT GREEN COLOR: AUX IN 2
WHITE COLOR: Digital Coaxial Audio
YELLOW COLOR: Digital Audio Optical
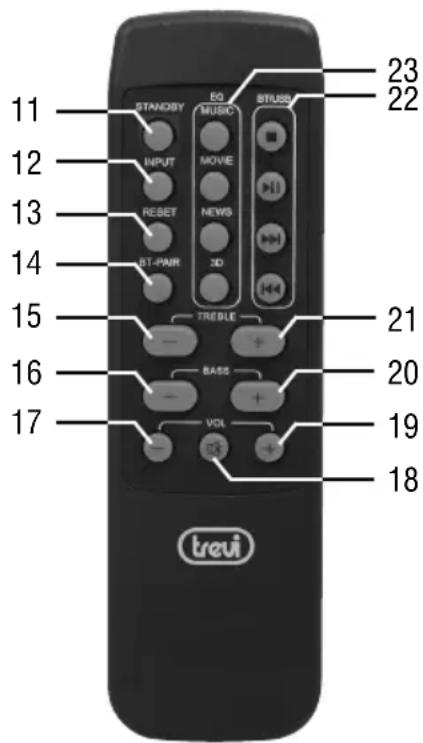
REMOTE CONTROL DESCRIPTION
- Power-on/Standby key
- INPUT key, active input selection
- RESET key, to reset treble and bass adjustments
- BT-PAIR key, coupling devices in Bluetooth function
- TREBLE-key, treble control
- BASS- key, bass control
- Volume down key
- MUTE key
- Volume up key
- BASS+ key, bass control
-
TREBLE+ key, treble control
-
BT/USB key, control buttons for playback source from USB/BT:
- ■ key, Stop Playing
- ▶ II key, to activate playback/pause
-▶▶ key, playback of the following track -
◀ key, playback of the previous track
-
EQ key, to activate different preset equalisations
-
MUSIC
- MOVIE
- NEWS
- 3D
REMOTE CONTROL BATTERY ACTIVATION AND REPLACEMENT
The remote control works with two type "AAA" batteries (not supplied) to be inserted in the battery compartment on the back.
When inserting the batteries, observe the polarity 'marks in the battery compartment.
INSTALLATION AND CONNECTION
Connect the satellite speaker cable jack (the one without controls) to the SPEAKER connector (7).
CONNECTING TO THE POWER SUPPLY
Fit the plug into an 230V \~ 50Hz socket. Do not plug the appliance to different power.
ON/OFF SWITCHING
- Press the main ON/OFF switch (8).
- Press the main ON/OFF switch again to switch the appliance off.
STANDBY
- With the ON/OFF switch (8) set to ON, press down on the knob (2) or press the Power-on/standby key (11) on the remote control to activate the appliance.
- Hold for a few seconds, the knob (2) or press the Power-on/standby key (11) again to switch the appliance back to standby mode.
VOLUME CONTROL AND MUTE FUNCTION
Volume can be adjusted unit, by unit, turning the knob (2) or by remote control using the volume control keys (volume up 19) (volume down 17). During the adjustment the LED indicator (3) will flash.
MUTE function: it is possible to activate the audio off function with the MUTE key (18); the indicator LED (3) flash to indicate activation of the function.
To switch the audio on, press the MUTE key (18) again.
TREBLE, BASS AND PRE-EQ CONTROL
Is possible to make an adjustment of the high and low tones during the playback:
- Treble: Press TREBLE + button (21) or TREBLE- (15) to make the adjustment.
- Bass: Press BASS + button (20) or BASS- (16) to make the adjustment.
- Status LED indications (3) when adjusting: pink flashing indicates adjustment in progress, pink fixed end adjustment layer.
Four different types of sound equalization with which to listen to the music tracks are also available:
- Press one of the four keys (23) corresponding to the pre-equalization to be activated.
Hold for a few seconds the RESET button (13) the set tone and equalization are reported to the initial value (default value).
Note: The unit may not support some USB devices, this is due to the incompatibility of some processors.
PLAYBACK
- Insert an USB device in the USB port (4).
- Switch On the appliance and press the knob (2) several times or press several times the INPUT key (12) until the indicator LED (3) will show the pink color.
- After a few seconds the player will automatically start playing the detected audio tracks (MP3).
- Press the ▶ II key (22) to pause the playback.
- To disable the pause press the ▶ II key (22) again.
- Status LED indications (3) during playback: Pink color indicates current playback, pink flashing indicates paused playback.
TRACK SKIP
- While listening, press the ▶ key (22) to move to the next track; press the ◀ key (22) to move to the previous track.
AUX-IN 1/AUX IN 2 INPUT
- Connect any type of appliance featuring an audio output to the AUX IN 1 input (9) or to the AUX IN 2 input (10) using a 3.5 mm jack plug cable.
- Switch ON the appliance and press the knob (2) several times or press several time the INPUT key (12) until the indicator LED (3) will show the Green color (AUX IN 1) or Light Green color (AUX IN 2).
- Control the external unit with its controls.
COAXIAL DIGITAL AUDIO INPUT
- TO Use a coaxial cable to connect the COAXIAL (5) input to the coaxial digital output of the TV or other source device.
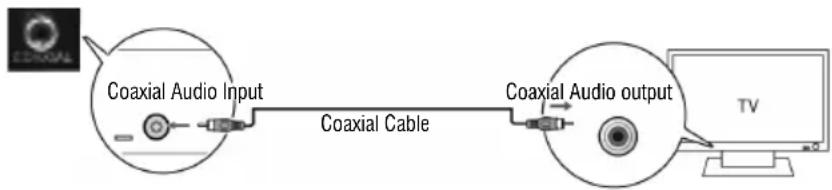
flowchart
graph LR
    A["Coaxial Audio Input"] --> B["Coaxial Cable"]
    B --> C["Coaxial Audio output"]
    C --> D["TV"]
- Switch on the device and repeatedly press the knob (2) or, press the INPUT button (12) on the remote until the LED (3) indicator will show White color.
- Adjust the volume by turning the knob (2), or by remote control using the volume keys (volume up 19) (decrease in volume 17).
OPTICAL DIGITAL AUDIO INPUT
- To use a digital optical cable to connect the OPTICAL input (5) to optical digital output of the TV or other source device. Note: Some TV or devices must enable the digital optical output.
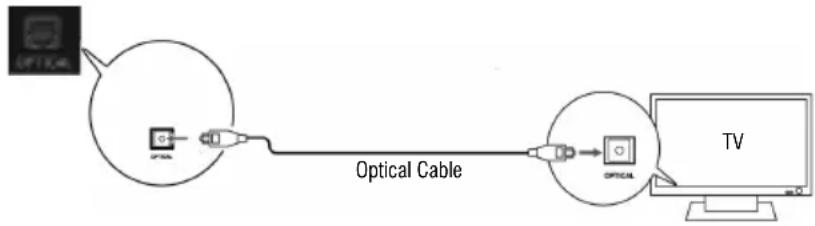
flowchart
graph LR
    A["Optical Cable"] --> B["Device"]
    B --> C["Optical Cable"]
    C --> D["TV"]
- Switch on the device and repeatedly press the knob (2) or, press the INPUT button (12) on the remote until the LED (3) indicator will show Yellow color.
- Adjust the volume by turning the knob (2), or by remote control using the volume keys (volume up 19) (decrease in volume 17). Nota: for playback from this input must be set on the source device the PCM digital audio.
BLUETOOTH FUNCTION
- Switch on the device and repeatedly press the knob (2) or, press the INPUT button (12) on the remote until the LED (3) indicator will show Blue color.
- After a beep sounds, the LED indicator (3) will start to flash rapidly searching for devices to be coupled.
- Start the Bluetooth feature on the device to be coupled and search the speaker called "AVX 590 BT" or "I200".
- After the connection the LED indicator (3) will remain Blue color.
- To use keys ▶ II, ▶, ◀, ■ (22) to manage the playback tracks, as for the use of the MP3 player.
- Status LED indications (3) during playback: Blue color indicates current playback or Pause, Blue flashing indicates MUTE function.

INFORMATION TO USERS
pursuant to Legislative Decree No. 49 of March 14, 2014
"Implementation of Directive 2012/19/EU on Waste Electrical and Electronic Equipment (WEEE)"
This wheeled bin symbol on the product indicates that at the end of its life must be collected separately from other waste. The user must, therefore, take the remote control integrates the essential components that got to its life to the appropriate differentiated collection centers for electronic and electro-technical waste, or return it to the dealer when purchasing a new appliance of equivalent type, in terms of one to one, or one to zero for equipment having longer side of less than 25 cm. Appropriate separate collection for the decommissioned equipment for recycling, processing and environmentally compatible disposal helps prevent negative impact on the environment and human health and promotes recycling of the materials making up the product. Illegal dumping of the product by the user entails the application of administrative sanctions stated in Legislative Decree n. Legislative Decree No. 49 of March 14, 2014.
TECHNICAL FEATURES
GENERAL FEATURES
Power supply: 230V \~ 50Hz
Maximum power: 68W
Bluetooth power transmission: 2,5mW
Bluetooth frequency transmission: 2,4GHz
Speakers size: 162x272x240mm
SPEAKERS
Maximum audio power: 60W + 60W
Frequency response: 50Hz - 20KHz
S/N Ration: ≥72dB
Distortion: 0.5% (1K/1W)
Woofer: 5"
Tweeter: 0.75"
NOTES D'EMPLOI
flowchart
graph LR
    A["Optical Cable"] --> B["Cable Optico"]
    B --> C["TV"]
Precautions for correct disposal of the product.
The symbol shown on the equipment indicates that waste must be disposed of in "separate collection" and so the product must not be disposed of together with urban waste. The user must take the product to special "separate waste collection centres" provided by local government, or deliver it to the retailer against the purchase of a new product. Separate collection of waste and subsequent treatment, recycling and disposal operations promotes the production of equipment with recycled materials and limits negative effects on the environment and on health caused by improper handling of waste. Illegal disposal of the product leads to the enforcement of administrative penalties.

SIMPLIFIED EU DECLARATION OF CONFORMITY
Hereby TREVI Spa declares that the radio equipment type AVX 590 BT is in compliance with directive 2014/53/EU.
The full text of the EU declaration of conformity is available at the following internet address www.trevi.it
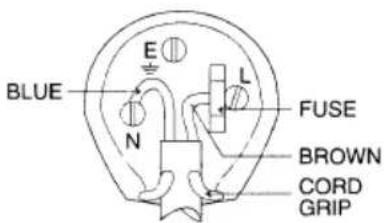
UK PLUG ONLY
WIRES CONNECTIONS TO A UK THREE-PIN PLUG
The wires in this mains lead are coloured in accordance with the following wiring codes:
Blue: Neutral
Brown: Live
The wires in this mains lead must be connected to the terminals in the plug as follows:
Blue wire: N or Black
Brown wire: L or Red
Neither wire is to be connected to the earth (E or
W) terminal of three-pin plug.
Should the fuse fail in the plug remove the plug form the wall socket and replace the fuse with a 3
Amp. ASTA approved BS 1362 fuse.

- NOTES ON USE
- CARE AND MAINTENANCE
- IMPORTANT
- DESCRIPTION OF CONNECTORS/CONTROLS
- LED COLOURS DESCRIPTION
- REMOTE CONTROL DESCRIPTION
- REMOTE CONTROL BATTERY ACTIVATION AND REPLACEMENT
- INSTALLATION AND CONNECTION
- CONNECTING TO THE POWER SUPPLY
- ON/OFF SWITCHING
- STANDBY
- VOLUME CONTROL AND MUTE FUNCTION
- TREBLE, BASS AND PRE-EQ CONTROL
- PLAYBACK
- TRACK SKIP
- AUX-IN 1/AUX IN 2 INPUT
- COAXIAL DIGITAL AUDIO INPUT
- OPTICAL DIGITAL AUDIO INPUT
- BLUETOOTH FUNCTION
- INFORMATION TO USERS
- TECHNICAL FEATURES
- GENERAL FEATURES
- SPEAKERS
- NOTES D'EMPLOI
- Precautions for correct disposal of the product.
- SIMPLIFIED EU DECLARATION OF CONFORMITY
- UK PLUG ONLY
- WIRES CONNECTIONS TO A UK THREE-PIN PLUG
Brand : Trevi
Model : AVX 590 BT
Category : Loudspeaker